
Updated Making Triggered Memes with Filmora Video Editor
Making Triggered Memes with Filmora Video Editor
How to Make a Triggered Meme?

Ollie Mattison
Mar 27, 2024• Proven solutions
It is no secret that we all lose our cool from time. It’s only natural, after all, the world can be a frustrating place. We’re all enraged by different things, some of us can’t stand pineapple on pizza while others explode when being pranked. What we often don’t realize is that being triggered in front of a camera makes us perfect meme material. Even though the majority of memes are still images, some of the most memorable memes ever created were GIFs or short videos.
Making the triggered meme is easy when you know how, so in this article, we are going to show you how to make your next potentially viral meme, in just a few easy steps.
Filmora offers an easy to use video editor named Filmora Video Editor to make video and gif memes, and an online free meme maker named Filmora FREE Online Meme Maker which allows you to create images, videos and gifs memes for free. The video tutorial below will show you how to make a triggered video meme with Filmora. Download it and try it by yourself now.


The Things You Need to Make a Triggered Meme
Preparation is key to almost every important thing in life, including making a triggered meme featuring your bestie. Before you can capitalize on that amazing footage of triggered people you first have to make sure you have everything you need to generate a meme. Okay, let’s get started with the essentials to making a fun and effective meme.
1. A Triggered Template
You have virtually unlimited resources at your disposal, as this meme template can be easily found through a quick Google search. There is even an Android app called Triggered Meme Maker , that lets you do what its name suggests, make triggered memes. Making your own template in Microsoft Paint (we will show you how to make it in this article later) or any other photo editing software is also an option if you want to select the color of the background, rather than work with what you can find online.
2. A Video Editing Software
Memes are short videos that rarely last longer than 30 seconds, which is why you don’t need a powerful video editing suite like Final Cut Pro or Adobe Premiere Pro to make a good meme. A software like Wondershare Filmora that is easy to use and yet packed with cool visual effects and useful tools is a better choice if you just want to have a little fun with a video you recorded.
3. The Sound for the Triggered Meme
This ingredient of a good meme is easy to forget, but music or any other type of sound can make your meme funnier. In most cases, you’ll want to keep at least a portion of the original audio, but adding sound effects at different points of the meme can have a comical effect. The Filmora’s Music Library can serve as your endless source of royalty free music and sounds .
Making a Triggered Meme Template in Microsoft Paint
Creating a meme template is an easy task that can be handled from the Microsoft Paint in a couple of minutes. When you launch the software, click on the Fill with color icon located in the Tools section of the Paint’s ribbon. Activating this option enables you to change the color of the background with a single click. Proceed to select the color of the background from the color palette located on the far right side of the ribbon. We recommend choosing shades of green because the background is going to be used for the Chroma Key effect. You can click on the Edit Colors icon if you want to find a perfect color tone for the background. Right-click anywhere on the canvas to change its color.
Now you just need to add the text to your template. Select the Text option in the Tools menu and then proceed to select the font or the size of your text in the Font menu. Make sure that the Opaque feature is enabled in the Background menu in order to change the color of the textbox background. Adjusting the Color 1 option in the Color Menu will enable you to choose the text color, while the Color 2 option lets you pick the color of the background. Type triggered in the textbox, and center the text by clicking on the TAB button on your keyboard a few times. Now you have everything you need to start creating your own triggered meme.
How to Make a Triggered Meme?
Once you’ve successfully created a triggered template you can move on to the next step of the meme making process.
1. Adding Media to a Project
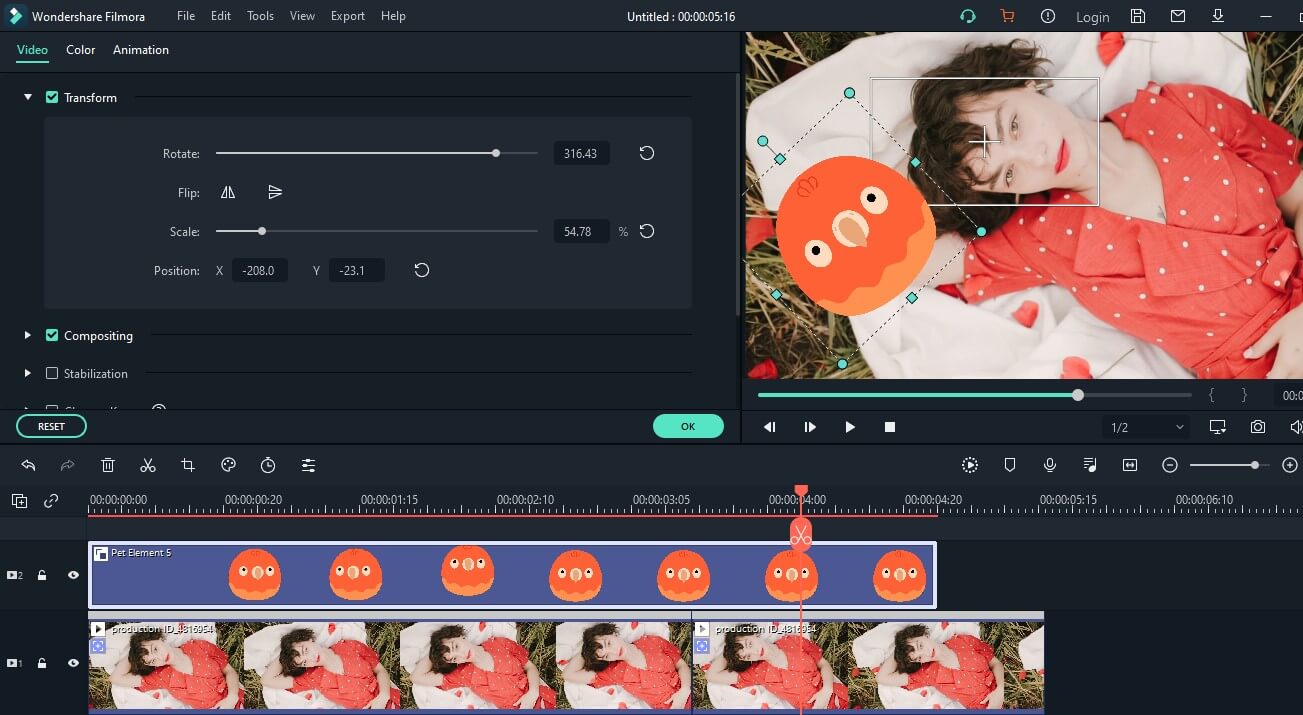
Open Filmora in the Full Feature Mode and import all the files you’re going to need during the process of making a meme. The files you import to your project will be stored in the Media Panel. Add the video to the timeline by dropping it over the video track. You can then remove the unwanted parts of the clip or add a still frame to the end of the video to prolong the triggered effect of the meme. Still frames in Filmora can be created by clicking on the Snapshot icon, that is located below the Preview Panel.
2. Using the Green Screen Effect
Place the triggered template to the Picture-in-Picture track and try to position it at the exact place in the video where the person gets triggered. Click on the Green Screen icon located in the toolbar to gain access to the PIP Edit window. The Chroma Key (Green Screen) option will be selected by default, so you just have to check the ‘Make parts of the clip transparent’ box. The green background of the template will become transparent and you’ll be able to see parts of your video, with the triggered text displayed below it.
3. Enhancing Colors and Applying Effects
In order to highlight just how much a person in the video got triggered, you can change the vibrance and saturation in a portion of a video clip by clicking on the Edit icon in the toolbar. In addition, other software’s color correction tools like brightness, tint or contrast can also be used to highlight the triggered moment.
After you adjust the color values, you can click on the Effects icon if you want to add motion blur or camera shake effects. Click on the Shake option in the Effects panel to start browsing through different effects and click on the plus icon to add the effect to the clip you selected. The Distortion category in the Effects panel features a number of blur effects you can use to make the video more entertaining. You can adjust the properties of all the effects you add to your meme and control how much of the effect is applied to the video.
4. Adding Music and Text Overlays to Your Meme
Increasing the number of visual elements in the video can help you create a funnier meme. A single word can change the meaning of a meme so if you want to add additional comment besides noting that the person got triggered you can click on the Text icon and select the text overlay you like. Click on the plus icon that is displayed over the effect to add it to a video clip. A textbox will appear over the video in the Preview window and you can drag it around the screen to reposition it or rotate it. Enable the No Animation option if you want the text to just appear and disappear from the screen.
Sounds can add to the comical effect of a meme. Carefully select what type of music or sound you want to use for a meme since it can improve the quality of your meme. Simply drag the audio file you imported into Filmora and place it on the audio track and adjust its duration to match the duration of the video. If you don’t have your own music you can try some of the tracks featured in the software’s music library.
4. Exporting the Triggered Meme from Filmora
When your meme is ready to hit the social media, you can click on the Export button. In the Export window, you can choose any of the available file formats, but the formats best suited for memes are either MP4 or GIF. Click on the Settings icon in the Output Description menu to change the frame rate, resolution or the quality of the video. Wondershare Filmora lets you export videos directly to your YouTube channel or your Facebook account, so you don’t have to waste time on posting the meme after the export process is completed.
The software also offers the option to save a meme you created to your hard drive if you don’t want to post a meme on social media right away. You just have to click on the Export button after adjusting the output settings and wait for the file to be exported.
Conclusion
The precious memories of your friends being enraged by the silliest things can be turned into hilarious memes effortlessly. A video editing software like Wondershare Filmora gives you all the tools you’ll need to quickly generate a triggered meme, so you can focus on having fun with your friends. What’s your favorite method of making memes?
Ollie Mattison
Ollie Mattison is a writer and a lover of all things video.
Follow @Ollie Mattison
Ollie Mattison
Mar 27, 2024• Proven solutions
It is no secret that we all lose our cool from time. It’s only natural, after all, the world can be a frustrating place. We’re all enraged by different things, some of us can’t stand pineapple on pizza while others explode when being pranked. What we often don’t realize is that being triggered in front of a camera makes us perfect meme material. Even though the majority of memes are still images, some of the most memorable memes ever created were GIFs or short videos.
Making the triggered meme is easy when you know how, so in this article, we are going to show you how to make your next potentially viral meme, in just a few easy steps.
Filmora offers an easy to use video editor named Filmora Video Editor to make video and gif memes, and an online free meme maker named Filmora FREE Online Meme Maker which allows you to create images, videos and gifs memes for free. The video tutorial below will show you how to make a triggered video meme with Filmora. Download it and try it by yourself now.
The Things You Need to Make a Triggered Meme
Preparation is key to almost every important thing in life, including making a triggered meme featuring your bestie. Before you can capitalize on that amazing footage of triggered people you first have to make sure you have everything you need to generate a meme. Okay, let’s get started with the essentials to making a fun and effective meme.
1. A Triggered Template
You have virtually unlimited resources at your disposal, as this meme template can be easily found through a quick Google search. There is even an Android app called Triggered Meme Maker , that lets you do what its name suggests, make triggered memes. Making your own template in Microsoft Paint (we will show you how to make it in this article later) or any other photo editing software is also an option if you want to select the color of the background, rather than work with what you can find online.
2. A Video Editing Software
Memes are short videos that rarely last longer than 30 seconds, which is why you don’t need a powerful video editing suite like Final Cut Pro or Adobe Premiere Pro to make a good meme. A software like Wondershare Filmora that is easy to use and yet packed with cool visual effects and useful tools is a better choice if you just want to have a little fun with a video you recorded.
3. The Sound for the Triggered Meme
This ingredient of a good meme is easy to forget, but music or any other type of sound can make your meme funnier. In most cases, you’ll want to keep at least a portion of the original audio, but adding sound effects at different points of the meme can have a comical effect. The Filmora’s Music Library can serve as your endless source of royalty free music and sounds .
Making a Triggered Meme Template in Microsoft Paint
Creating a meme template is an easy task that can be handled from the Microsoft Paint in a couple of minutes. When you launch the software, click on the Fill with color icon located in the Tools section of the Paint’s ribbon. Activating this option enables you to change the color of the background with a single click. Proceed to select the color of the background from the color palette located on the far right side of the ribbon. We recommend choosing shades of green because the background is going to be used for the Chroma Key effect. You can click on the Edit Colors icon if you want to find a perfect color tone for the background. Right-click anywhere on the canvas to change its color.
Now you just need to add the text to your template. Select the Text option in the Tools menu and then proceed to select the font or the size of your text in the Font menu. Make sure that the Opaque feature is enabled in the Background menu in order to change the color of the textbox background. Adjusting the Color 1 option in the Color Menu will enable you to choose the text color, while the Color 2 option lets you pick the color of the background. Type triggered in the textbox, and center the text by clicking on the TAB button on your keyboard a few times. Now you have everything you need to start creating your own triggered meme.
How to Make a Triggered Meme?
Once you’ve successfully created a triggered template you can move on to the next step of the meme making process.
1. Adding Media to a Project
Open Filmora in the Full Feature Mode and import all the files you’re going to need during the process of making a meme. The files you import to your project will be stored in the Media Panel. Add the video to the timeline by dropping it over the video track. You can then remove the unwanted parts of the clip or add a still frame to the end of the video to prolong the triggered effect of the meme. Still frames in Filmora can be created by clicking on the Snapshot icon, that is located below the Preview Panel.
2. Using the Green Screen Effect
Place the triggered template to the Picture-in-Picture track and try to position it at the exact place in the video where the person gets triggered. Click on the Green Screen icon located in the toolbar to gain access to the PIP Edit window. The Chroma Key (Green Screen) option will be selected by default, so you just have to check the ‘Make parts of the clip transparent’ box. The green background of the template will become transparent and you’ll be able to see parts of your video, with the triggered text displayed below it.
3. Enhancing Colors and Applying Effects
In order to highlight just how much a person in the video got triggered, you can change the vibrance and saturation in a portion of a video clip by clicking on the Edit icon in the toolbar. In addition, other software’s color correction tools like brightness, tint or contrast can also be used to highlight the triggered moment.
After you adjust the color values, you can click on the Effects icon if you want to add motion blur or camera shake effects. Click on the Shake option in the Effects panel to start browsing through different effects and click on the plus icon to add the effect to the clip you selected. The Distortion category in the Effects panel features a number of blur effects you can use to make the video more entertaining. You can adjust the properties of all the effects you add to your meme and control how much of the effect is applied to the video.
4. Adding Music and Text Overlays to Your Meme
Increasing the number of visual elements in the video can help you create a funnier meme. A single word can change the meaning of a meme so if you want to add additional comment besides noting that the person got triggered you can click on the Text icon and select the text overlay you like. Click on the plus icon that is displayed over the effect to add it to a video clip. A textbox will appear over the video in the Preview window and you can drag it around the screen to reposition it or rotate it. Enable the No Animation option if you want the text to just appear and disappear from the screen.
Sounds can add to the comical effect of a meme. Carefully select what type of music or sound you want to use for a meme since it can improve the quality of your meme. Simply drag the audio file you imported into Filmora and place it on the audio track and adjust its duration to match the duration of the video. If you don’t have your own music you can try some of the tracks featured in the software’s music library.
4. Exporting the Triggered Meme from Filmora
When your meme is ready to hit the social media, you can click on the Export button. In the Export window, you can choose any of the available file formats, but the formats best suited for memes are either MP4 or GIF. Click on the Settings icon in the Output Description menu to change the frame rate, resolution or the quality of the video. Wondershare Filmora lets you export videos directly to your YouTube channel or your Facebook account, so you don’t have to waste time on posting the meme after the export process is completed.
The software also offers the option to save a meme you created to your hard drive if you don’t want to post a meme on social media right away. You just have to click on the Export button after adjusting the output settings and wait for the file to be exported.
Conclusion
The precious memories of your friends being enraged by the silliest things can be turned into hilarious memes effortlessly. A video editing software like Wondershare Filmora gives you all the tools you’ll need to quickly generate a triggered meme, so you can focus on having fun with your friends. What’s your favorite method of making memes?
Ollie Mattison
Ollie Mattison is a writer and a lover of all things video.
Follow @Ollie Mattison

Distracted Boyfriend Meme Generator
Distracted Boyfriend Meme Generator
Ollie Mattison
Mar 27, 2024• Proven solutions
The Distracted Boyfriend meme is the embodiment of the awkward situation we find ourselves in when we want something other than what we already have. The original image was taken by Antonio Guillem and posted on iStock with a caption “Disloyal man with his girlfriend looking at another girl”. By early 2017, a few years after it was posted on iStock, the picture surfaced on social media, and it became a viral meme in a few short months. One of the first Distracted Boyfriend memes that featured a joke about staring at the sun during a solar eclipse was posted on Reddit and within 24 hours it gained 31.200 points.
The meme has since become synonymous with being unfaithful to girlfriends, ideologies, scientific evidence, photo cameras or virtually anything else. Despite its popularity, it is still difficult to make a good Distracted Boyfriend meme, so let’s have a look at some of the best versions of the meme that emerged on social networks.
The Distracted Girlfriend meme became popular soon after the Distracted Boyfriend meme went viral. The photo belongs to the same series of images posted to iStock by Antonio Guillem.

Copy the image
The facial expression of the girl in the photo makes it perfect meme material because she looks as if she’s just about to risk it all and do what she wants. Both Boyfriend and Girlfriend versions of this meme contain text over each of the characters in the picture. If you have a similar dilemma you can make your own version effortlessly. Here’s how.
How to Make a Distracted Boyfriend Meme?
Online meme generators often watermark the content you create or require you to sign in before you can make a meme, which is why we recommend using Filmora Online Meme Maker . The platform lets you generate memes for free, and it offers all the tools you’ll need to quickly make a watermark-free Distracted Boyfriend meme.
1. Uploading the Image
You can click the “Copy the image” link below and the image link will be copied automatically.

Copy the image
Enter the URL into the box. Click on the Upload button and wait for the new page to load, so you can start making adjustments to the picture.
If you saved the photo to your computer, you can click on the +icon once you arrive at the meme maker’s homepage and navigate to its destination on your hard drive.

2. Adding Text to Memes
The textual part of the Distracted Boyfriend meme is always incorporated into the photo, so make sure that the Text Inside option is selected and proceed to insert the text into the text boxes. Click on the Add Text Box button to add a third text box to the meme, and drag the text boxes displayed on the screen to their best positions.

The Text Options menu lets you pick a font or change the color and the size of the text. It also offers the standard text alignment features, so you can easily rearrange the text.
3. Downloading the Meme
Click on the Create button once you finish customizing the text and wait for the new page to load.

Conclusion
Click on the download button to save the meme you created or use some of the file sharing options to post the meme on social media platforms if you are accessing the Online Meme Maker from a mobile device.
The Distracted Boyfriend is one of the most popular memes in the last couple of years that has made us all laugh because we all understand how it feels to be tempted by the things we don’t have. Do you like generating the Distracted Boyfriend or Distracted Girlfriend memes? Leave a comment below and share your experiences with us.
Ollie Mattison
Ollie Mattison is a writer and a lover of all things video.
Follow @Ollie Mattison
Ollie Mattison
Mar 27, 2024• Proven solutions
The Distracted Boyfriend meme is the embodiment of the awkward situation we find ourselves in when we want something other than what we already have. The original image was taken by Antonio Guillem and posted on iStock with a caption “Disloyal man with his girlfriend looking at another girl”. By early 2017, a few years after it was posted on iStock, the picture surfaced on social media, and it became a viral meme in a few short months. One of the first Distracted Boyfriend memes that featured a joke about staring at the sun during a solar eclipse was posted on Reddit and within 24 hours it gained 31.200 points.
The meme has since become synonymous with being unfaithful to girlfriends, ideologies, scientific evidence, photo cameras or virtually anything else. Despite its popularity, it is still difficult to make a good Distracted Boyfriend meme, so let’s have a look at some of the best versions of the meme that emerged on social networks.
The Distracted Girlfriend meme became popular soon after the Distracted Boyfriend meme went viral. The photo belongs to the same series of images posted to iStock by Antonio Guillem.
Copy the image
The facial expression of the girl in the photo makes it perfect meme material because she looks as if she’s just about to risk it all and do what she wants. Both Boyfriend and Girlfriend versions of this meme contain text over each of the characters in the picture. If you have a similar dilemma you can make your own version effortlessly. Here’s how.
How to Make a Distracted Boyfriend Meme?
Online meme generators often watermark the content you create or require you to sign in before you can make a meme, which is why we recommend using Filmora Online Meme Maker . The platform lets you generate memes for free, and it offers all the tools you’ll need to quickly make a watermark-free Distracted Boyfriend meme.
1. Uploading the Image
You can click the “Copy the image” link below and the image link will be copied automatically.
Copy the image
Enter the URL into the box. Click on the Upload button and wait for the new page to load, so you can start making adjustments to the picture.
If you saved the photo to your computer, you can click on the +icon once you arrive at the meme maker’s homepage and navigate to its destination on your hard drive.
2. Adding Text to Memes
The textual part of the Distracted Boyfriend meme is always incorporated into the photo, so make sure that the Text Inside option is selected and proceed to insert the text into the text boxes. Click on the Add Text Box button to add a third text box to the meme, and drag the text boxes displayed on the screen to their best positions.
The Text Options menu lets you pick a font or change the color and the size of the text. It also offers the standard text alignment features, so you can easily rearrange the text.
3. Downloading the Meme
Click on the Create button once you finish customizing the text and wait for the new page to load.
Conclusion
Click on the download button to save the meme you created or use some of the file sharing options to post the meme on social media platforms if you are accessing the Online Meme Maker from a mobile device.
The Distracted Boyfriend is one of the most popular memes in the last couple of years that has made us all laugh because we all understand how it feels to be tempted by the things we don’t have. Do you like generating the Distracted Boyfriend or Distracted Girlfriend memes? Leave a comment below and share your experiences with us.
Ollie Mattison
Ollie Mattison is a writer and a lover of all things video.
Follow @Ollie Mattison
How to Make a FLV Photo Slideshow with Music
How to Make a FLV Photo Slideshow

Shanoon Cox
Mar 27, 2024• Proven solutions
FLV slideshow is a suitable way to share photos and videos online due to its small size and reasonable quality. Wondershare DVD Slideshow Builder brings more convenience to instantly make a slideshow with music , photos and lets you create FLV videos, as well as other video formats. You can create a FLV slideshow in easy steps as below.
Easy Guide to Make FLV Slideshow with Music

1 Import Photos & Video and Music for FLV Slideshow
Install and launch the slideshow maker, go to Organize tab and import your photos, videos and music files. Transitions between adjacent slides will be used. But you can change them by following step 2.
2 Apply Transition and Motion Effect
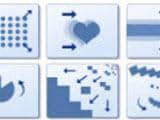
This slideshow maker includes more than 100 transition effects for slides switch. Before applying, double-click transition thumbnail to preview in player on the right. You could also randomize transitions or apply one transition to all slides in FLV slideshow.
3 Save Photo Slideshow to FLV Video
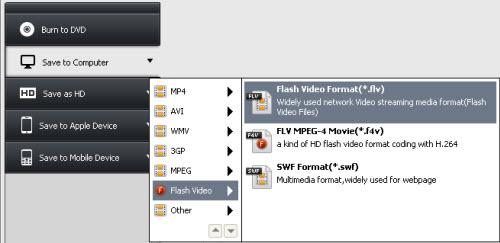
Select Flash Video format as the output and make advanced settings by clicking Settings button. Finally, click Burn and wail a while, you get your FLV video to sharing on YouTube, Facebook, MySpace, Mobile Phone. Alternatively, play FLV video on computer via stand-alone FLV player.
FLV Slideshow Tips
For more detailed settings of FLV slideshow, click Settings button and specify various options, like encoder, resolution, frame rate, bit rate and audio settings.
To play FLV slideshow on Nokia mobile phone, you should set encode type to Nokia FLV series (*.flv). Once created, upload flv to Nokia phone or online and view FLV slideshow using FLV player or web browser plugin.
You could also upload FLV slideshow to YouTube to share with more people. FLV videos are perfectly supported by YouTube.
More: Convert All Popular Formats to FLV
Wondershare DVD Slideshow Builder Deluxe supports all popular video formats. Therefore, you can import videos that need to change format, and save it in another format. It’s not only a DVD slideshow maker, but only powerful FLV converter. For detailed supported input formats, check video format references.
More: Convert FLV to MP4, AVI, MOV, MPEG or Burn FLV to DVD
You could also import FLV to DVD Slideshow Builder Deluxe and save it as MP4, AVI, MOV and 3GP, or even burn FLV video to DVD with beautiful DVD menus. For detailed supported output formats, check video format references. Here, I recommended to save FLV to MP4 for its comprehensive support on various devices, such as iPhone, iPod, Apple TV, Gphone, Nokia phone, LG phone, PSP, Palm, Zune, etc.
About FLV Video (Flash Video)
Flash Video (*.FLV) is a container file format used to deliver video over the internet using Adobe Flash Player versions 6-10 (developed by Macromedia). Flash Video content may also be embedded within SWF files. FLV videos are widely used by international companies, including YouTube, Google Video, Yahoo! Video, metacafe, Reuters.com, and many other news providers. Flash Video could be watched on most operating systems, via the Adobe Flash Player and web browser plugin, or desired third-party FLV Players.
Shanoon Cox
Shanoon Cox is a writer and a lover of all things video.
Follow @Shanoon Cox
Shanoon Cox
Mar 27, 2024• Proven solutions
FLV slideshow is a suitable way to share photos and videos online due to its small size and reasonable quality. Wondershare DVD Slideshow Builder brings more convenience to instantly make a slideshow with music , photos and lets you create FLV videos, as well as other video formats. You can create a FLV slideshow in easy steps as below.
Easy Guide to Make FLV Slideshow with Music
1 Import Photos & Video and Music for FLV Slideshow
Install and launch the slideshow maker, go to Organize tab and import your photos, videos and music files. Transitions between adjacent slides will be used. But you can change them by following step 2.
2 Apply Transition and Motion Effect
This slideshow maker includes more than 100 transition effects for slides switch. Before applying, double-click transition thumbnail to preview in player on the right. You could also randomize transitions or apply one transition to all slides in FLV slideshow.
3 Save Photo Slideshow to FLV Video
Select Flash Video format as the output and make advanced settings by clicking Settings button. Finally, click Burn and wail a while, you get your FLV video to sharing on YouTube, Facebook, MySpace, Mobile Phone. Alternatively, play FLV video on computer via stand-alone FLV player.
FLV Slideshow Tips
For more detailed settings of FLV slideshow, click Settings button and specify various options, like encoder, resolution, frame rate, bit rate and audio settings.
To play FLV slideshow on Nokia mobile phone, you should set encode type to Nokia FLV series (*.flv). Once created, upload flv to Nokia phone or online and view FLV slideshow using FLV player or web browser plugin.
You could also upload FLV slideshow to YouTube to share with more people. FLV videos are perfectly supported by YouTube.
More: Convert All Popular Formats to FLV
Wondershare DVD Slideshow Builder Deluxe supports all popular video formats. Therefore, you can import videos that need to change format, and save it in another format. It’s not only a DVD slideshow maker, but only powerful FLV converter. For detailed supported input formats, check video format references.
More: Convert FLV to MP4, AVI, MOV, MPEG or Burn FLV to DVD
You could also import FLV to DVD Slideshow Builder Deluxe and save it as MP4, AVI, MOV and 3GP, or even burn FLV video to DVD with beautiful DVD menus. For detailed supported output formats, check video format references. Here, I recommended to save FLV to MP4 for its comprehensive support on various devices, such as iPhone, iPod, Apple TV, Gphone, Nokia phone, LG phone, PSP, Palm, Zune, etc.
About FLV Video (Flash Video)
Flash Video (*.FLV) is a container file format used to deliver video over the internet using Adobe Flash Player versions 6-10 (developed by Macromedia). Flash Video content may also be embedded within SWF files. FLV videos are widely used by international companies, including YouTube, Google Video, Yahoo! Video, metacafe, Reuters.com, and many other news providers. Flash Video could be watched on most operating systems, via the Adobe Flash Player and web browser plugin, or desired third-party FLV Players.
Shanoon Cox
Shanoon Cox is a writer and a lover of all things video.
Follow @Shanoon Cox
How to Add Stickers to WhatsApp-The Ultimate Guide
How to Add Stickers to WhatsApp-The Ultimate Guide
Shanoon Cox
Mar 27, 2024• Proven solutions
Whatsapp has recently added the stickers feature, and people are going crazy about adding stickers to WhatsApp. But the question is how to add stickers to Whatsapp? To help with that, we will walk you through a detailed guide on how to add stickers to Whatsapp and bring a dash of fun to boring texts.
Now, if you don’t know how to add stickers to WhatsApp and use stickers on Whatsapp, we have you covered.
- Part 1: How to Create Stickers for WhatsApp
- Part 2: How to Add Stickers to WhatsApp
- Part 3: How to Send Stickers on WhatsApp
- Part 4: Bonus Tip—Add Sticker to Your Video with Wondershare Filmora
Part 1: How to Create Stickers for WhatsApp
Whatsapp stickers are now a significant part of our daily conversations. Because let’s face it, life would be boring without them. Perhaps it’s time to up your game by learning how to add stickers to Whatsapp
Even though Whatsapp has a vast library of stickers available, creating a unique sticker is more fun. And the latest apps have made it incredibly easy to create customized stickers. So all you need to do now is learn how to use stickers in Whatsapp
Sticker Make for Whatsapp is one such app. It is free and requires no registrations. Download the app from Google Store and start creating hilarious stickers to surprise your friends.
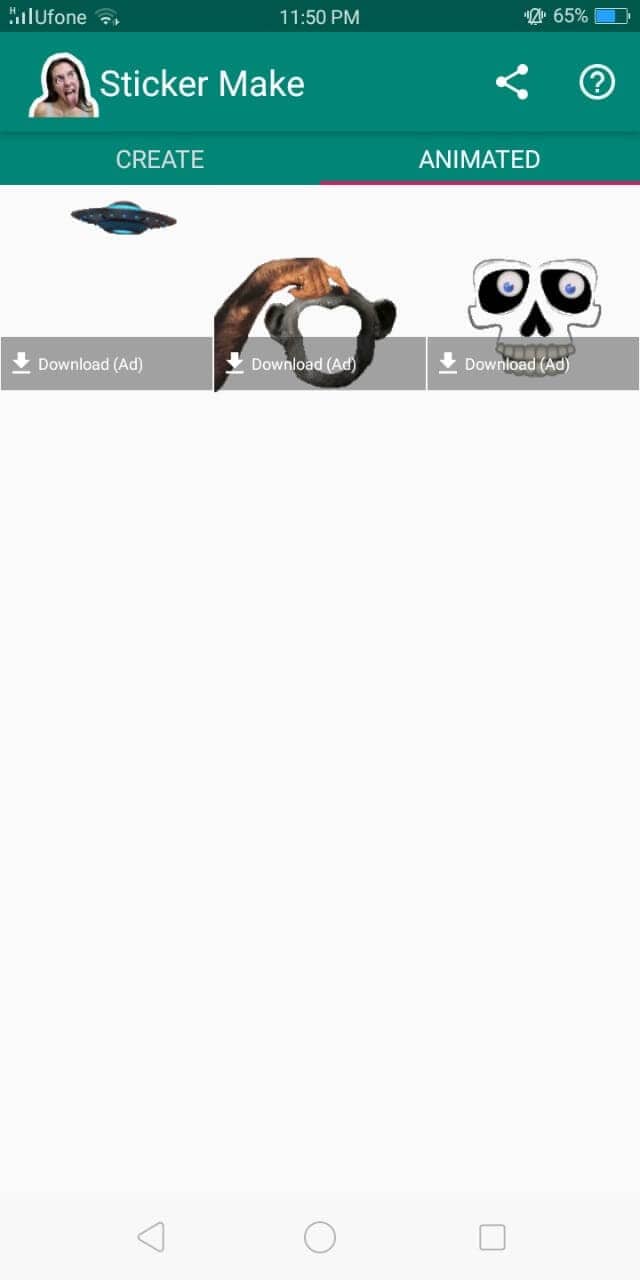
1. Download Sticker Make and launch it. On the homepage, you will be presented with two options. Click Create to make a sticker from scratch using your own image or click on Animated to insert your picture in a sticker template.
2. Choose any image from your gallery. Crop it to the size and shape you wish to include. Use the Freehand tool or click Automatically to let the app crop a face itself.
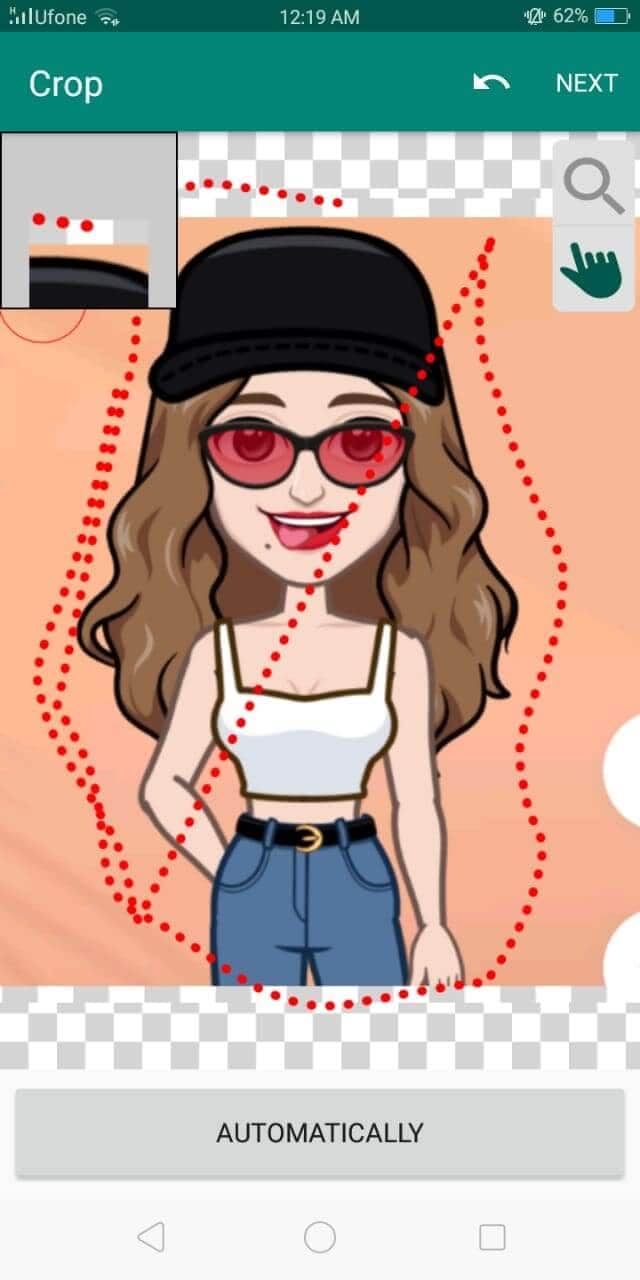
3. Click Next and now erase the background or make careful cropping.
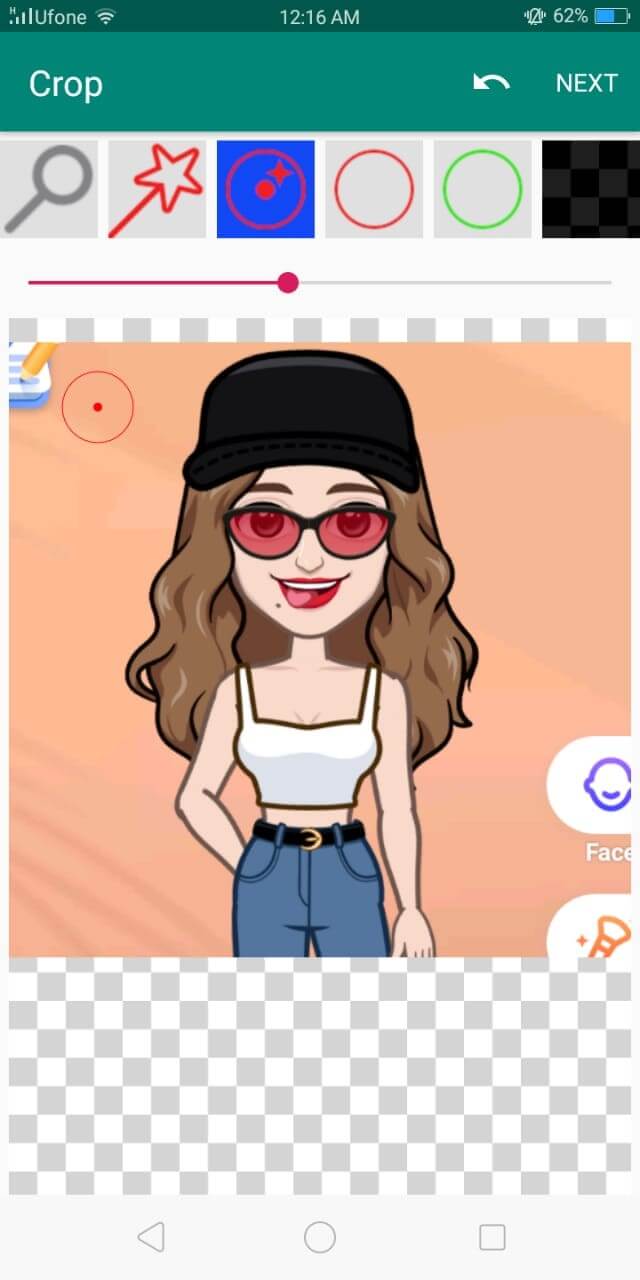
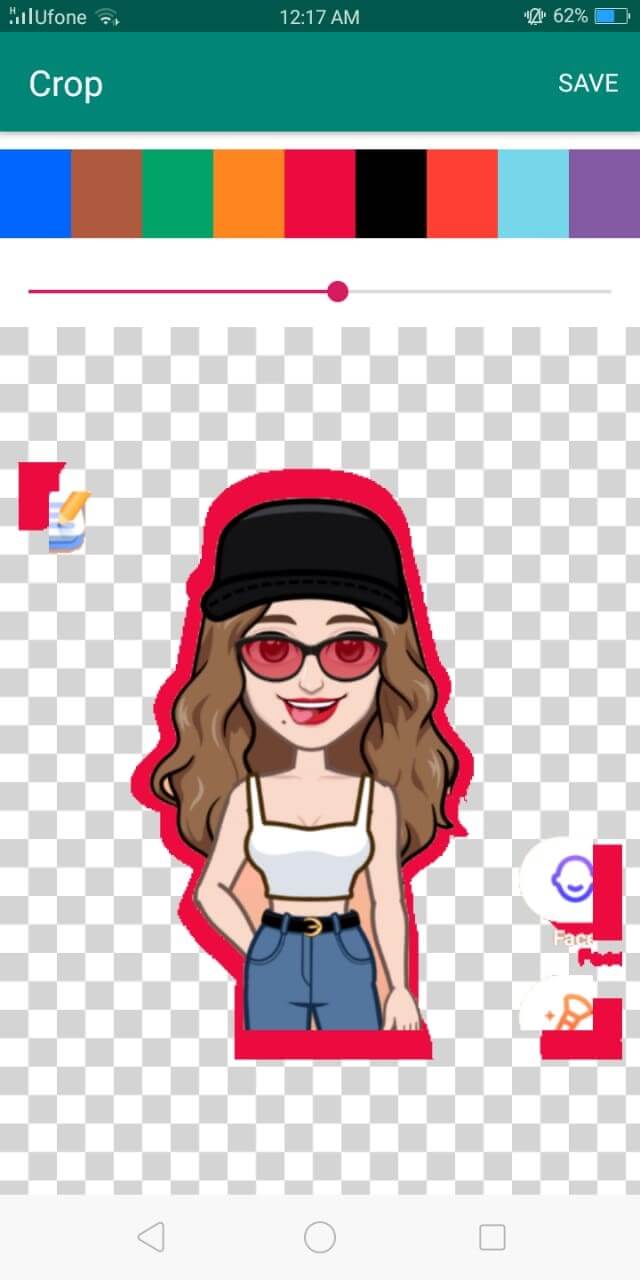
4. You can even outline your sticker and adjust its width and color.
5. You can even add texts and change fonts.

6. Click on the square in the bottom panel to choose from a list of cool backgrounds for your sticker.
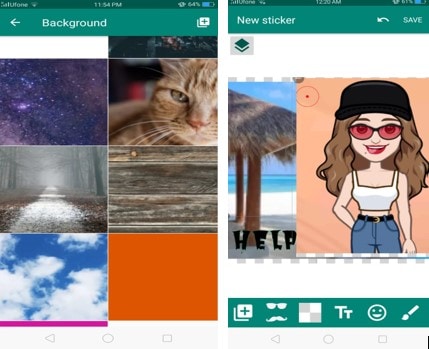
7. Choose to add themed emojis or decorate using a variety of images in the library of Sticker Make. Once you are done, click Save, enter pack name, and click Ok.
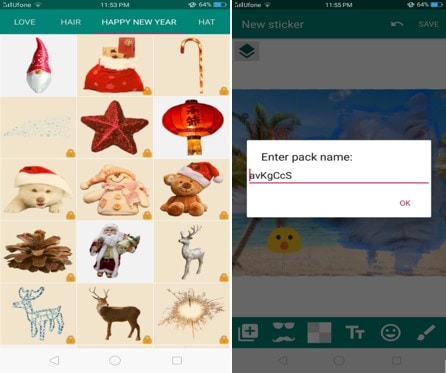
(P.S Make sure that the stickers are precisely 512x512 pixels and no more than 100kb)
Part 2: How to Add Stickers to WhatsApp
Now, you must be wondering how to add stickers to Whatsapp. Let me ease your worry. In this part, I will walk you through a step-by-step guide on how to use stickers in Whatsapp and a few additional features too.
You can save the stickers you receive from other people-
- Click on the sticker you receive
- Tap Add to favorites

If you wish you get more exciting stickers to better express yourself-
- Open Whatsapp chat, either individual or group chat.
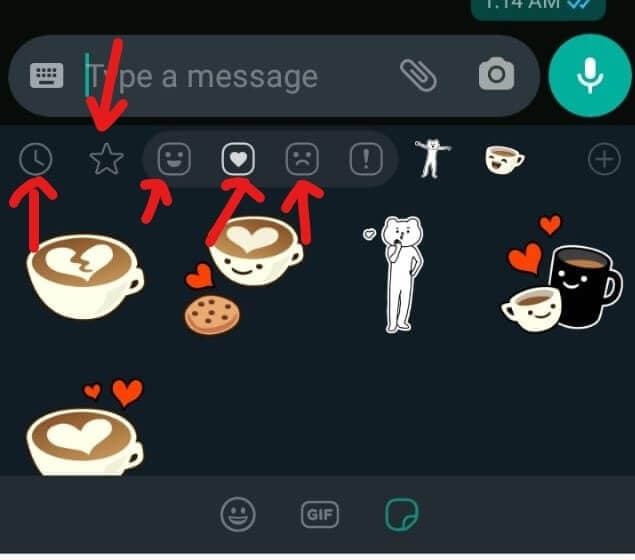
- Click on the emoji and then click the sticker beside GIF (the square shape)
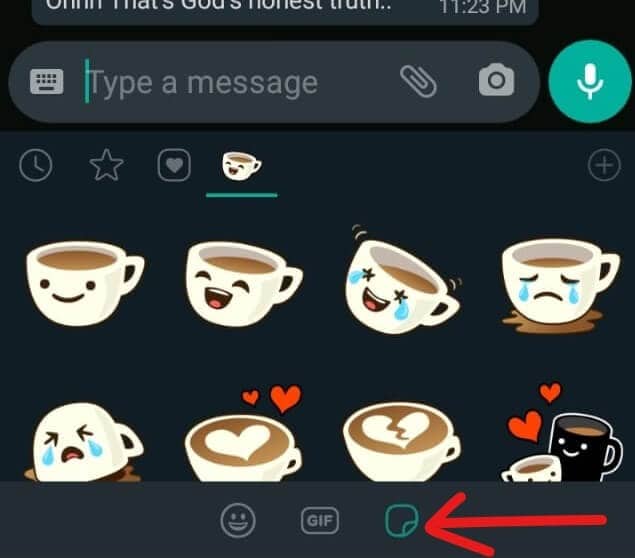
- Tap on the + sign on the upper right corner of your keyboard.
- Here you choose to download any number of sticker packs or click Get More Stickers from Google Play.
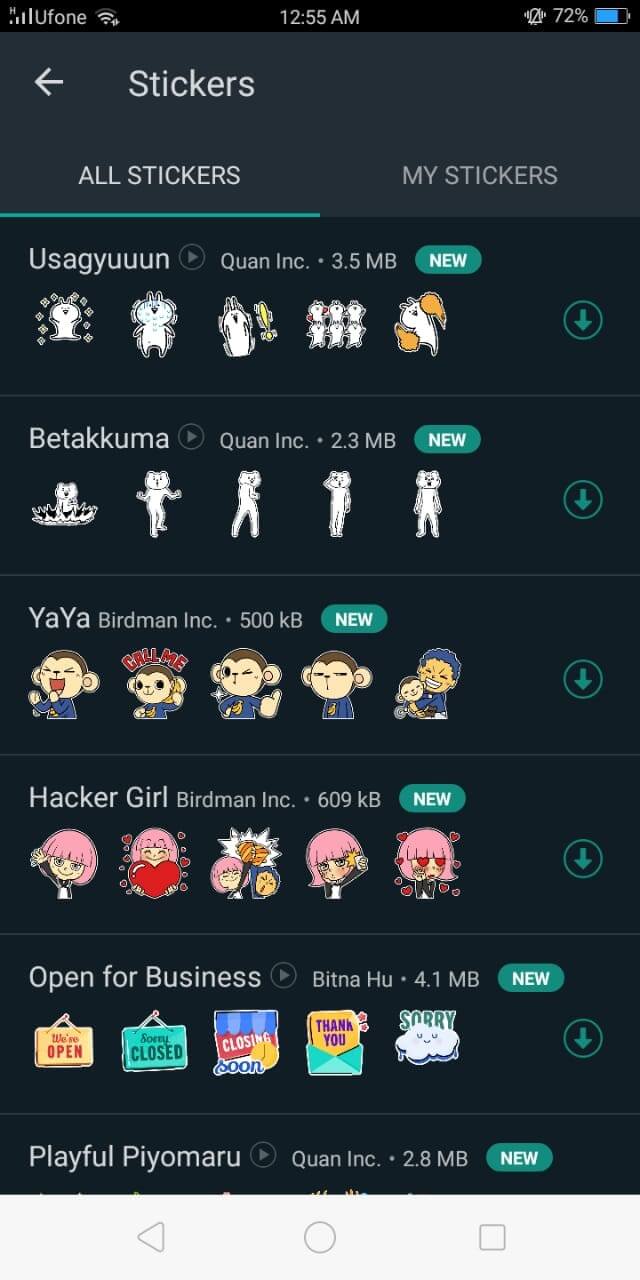
- Tap the download sign beside the sticker pack to start downloading.
- Once the download is complete, it will be displayed among the other stickers in your list.
Other features:
- Clock sign- This sign has all the stickers you recently used
- Star sign- It contains your favorite stickers
- Heart- In this, there are several categories. Whatsapp automatically arranges all your stickers in these categories as happy, sad, romantic, etc.
Part 3: How to Send Stickers on WhatsApp
So far, you have learned to create a custom sticker and then how to use Whatsapp stickers. All credit goes to the apps that made this task cakewalk (and some credit goes to your creativity too). Now that the worst is over, you have come to the final and best part of our article.
In 3 quick steps, you will be able to learn how to add stickers to Whatsapp and surprise your friends with hilarious stickers.
1.Open individual or group chat.
2.Click on the emoji and then tap the stickers on the bottom panel.
3.Choose the sticker that best fits your mood and intention from the various categories. Click it and voila! Sent!
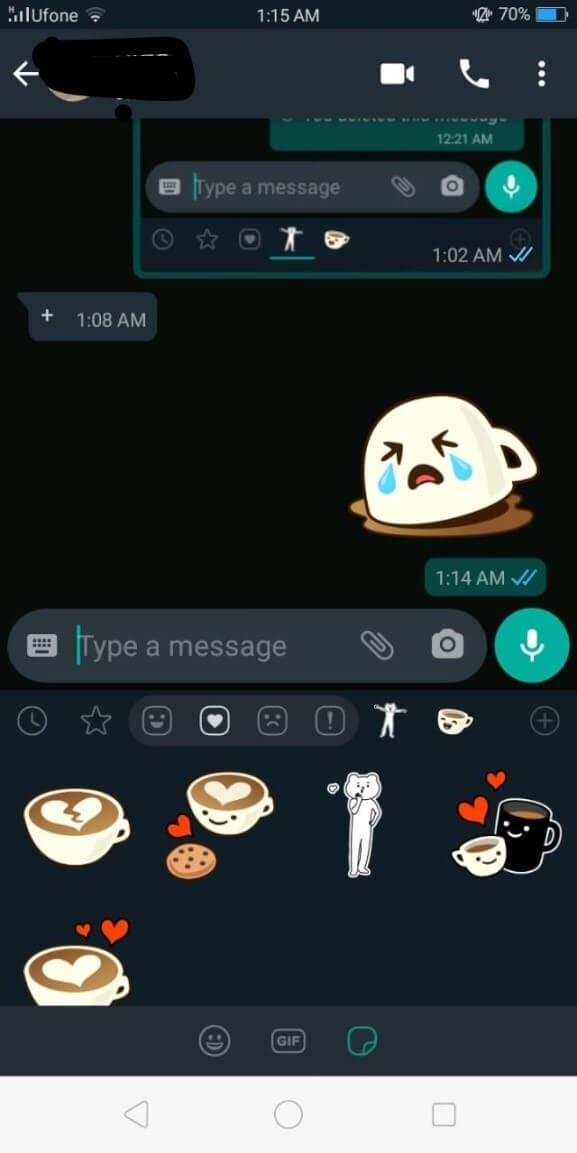
Easy peasy, right?
Bonus Tip—Add Sticker to Your Video with Wondershare Filmora
Although videos themselves are gripping enough, the addition of a customized sticker exclusive to you will be a cherry on top. Wondershare Filmora, with its user-friendly interface, is here just for that. You can now not only add your customized stickers to your video, but multiple effects can also be applied to enhance the video. Filmora is specially designed to offer professional editing tools to beginners. It has an in-built library of special effects and filters to help you create a stunningly cinematic video. Apply motion tracking, keyframe animations, or color match your videos. Add catchy captions or aesthetic filters to create a cool cinematic video
Let’s get right to it:
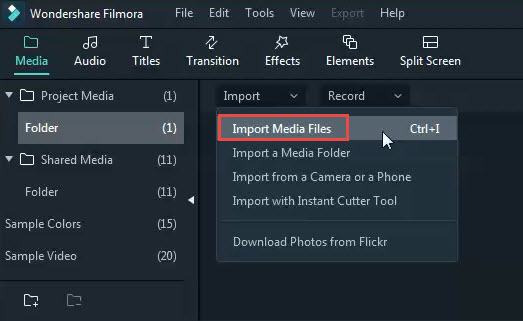
1.Download and install Filmora. Launch it. And click on Import-Import Media Files.
2. Then import your sticker into Filmora and drag and drop it to the video track or choose a sticker from the Elements (Note that both must be added to the video track).
3. Double-click on the sticker in the timeline to adjust the additional parameters. In Video, you can adjust the size or rotation of the sticker. Tap Color to adjust the tint, temperature, or saturation of the sticker. You can also add 3D motion to the sticker in the Motion.
4. And in the viewer panel, click on the sticker and drag it to adjust the size or change the location.
5. Click Export and save it to your computer in the desired resolution.

Ready to Create and Add Stickers?
Stickers have been around long enough to become boringly ordinary. So, to keep the fun side of texting alive, you can now master how to use stickers on Whatsapp after creating your own personalized stickers.
You can start being creative with Sticker Make for Whatsapp. And if you didn’t know how to add stickers in Whatsapp, by now, you must have mastered it (hopefully).
Last but not least, to stand out in a crowd, you need to bring to light something others can’t. Inserting custom-made stickers in your videos might do the trick. Decorate your videos with Wondershare Filmora and create impressive masterpieces. Take note from this ultimate guide on how to add stickers to Whatsapp and transform your texting experience.
Let the fun begin!
Shanoon Cox
Shanoon Cox is a writer and a lover of all things video.
Follow @Shanoon Cox
Shanoon Cox
Mar 27, 2024• Proven solutions
Whatsapp has recently added the stickers feature, and people are going crazy about adding stickers to WhatsApp. But the question is how to add stickers to Whatsapp? To help with that, we will walk you through a detailed guide on how to add stickers to Whatsapp and bring a dash of fun to boring texts.
Now, if you don’t know how to add stickers to WhatsApp and use stickers on Whatsapp, we have you covered.
- Part 1: How to Create Stickers for WhatsApp
- Part 2: How to Add Stickers to WhatsApp
- Part 3: How to Send Stickers on WhatsApp
- Part 4: Bonus Tip—Add Sticker to Your Video with Wondershare Filmora
Part 1: How to Create Stickers for WhatsApp
Whatsapp stickers are now a significant part of our daily conversations. Because let’s face it, life would be boring without them. Perhaps it’s time to up your game by learning how to add stickers to Whatsapp
Even though Whatsapp has a vast library of stickers available, creating a unique sticker is more fun. And the latest apps have made it incredibly easy to create customized stickers. So all you need to do now is learn how to use stickers in Whatsapp
Sticker Make for Whatsapp is one such app. It is free and requires no registrations. Download the app from Google Store and start creating hilarious stickers to surprise your friends.
1. Download Sticker Make and launch it. On the homepage, you will be presented with two options. Click Create to make a sticker from scratch using your own image or click on Animated to insert your picture in a sticker template.
2. Choose any image from your gallery. Crop it to the size and shape you wish to include. Use the Freehand tool or click Automatically to let the app crop a face itself.
3. Click Next and now erase the background or make careful cropping.
4. You can even outline your sticker and adjust its width and color.
5. You can even add texts and change fonts.
6. Click on the square in the bottom panel to choose from a list of cool backgrounds for your sticker.
7. Choose to add themed emojis or decorate using a variety of images in the library of Sticker Make. Once you are done, click Save, enter pack name, and click Ok.
(P.S Make sure that the stickers are precisely 512x512 pixels and no more than 100kb)
Part 2: How to Add Stickers to WhatsApp
Now, you must be wondering how to add stickers to Whatsapp. Let me ease your worry. In this part, I will walk you through a step-by-step guide on how to use stickers in Whatsapp and a few additional features too.
You can save the stickers you receive from other people-
- Click on the sticker you receive
- Tap Add to favorites
If you wish you get more exciting stickers to better express yourself-
- Open Whatsapp chat, either individual or group chat.
- Click on the emoji and then click the sticker beside GIF (the square shape)
- Tap on the + sign on the upper right corner of your keyboard.
- Here you choose to download any number of sticker packs or click Get More Stickers from Google Play.
- Tap the download sign beside the sticker pack to start downloading.
- Once the download is complete, it will be displayed among the other stickers in your list.
Other features:
- Clock sign- This sign has all the stickers you recently used
- Star sign- It contains your favorite stickers
- Heart- In this, there are several categories. Whatsapp automatically arranges all your stickers in these categories as happy, sad, romantic, etc.
Part 3: How to Send Stickers on WhatsApp
So far, you have learned to create a custom sticker and then how to use Whatsapp stickers. All credit goes to the apps that made this task cakewalk (and some credit goes to your creativity too). Now that the worst is over, you have come to the final and best part of our article.
In 3 quick steps, you will be able to learn how to add stickers to Whatsapp and surprise your friends with hilarious stickers.
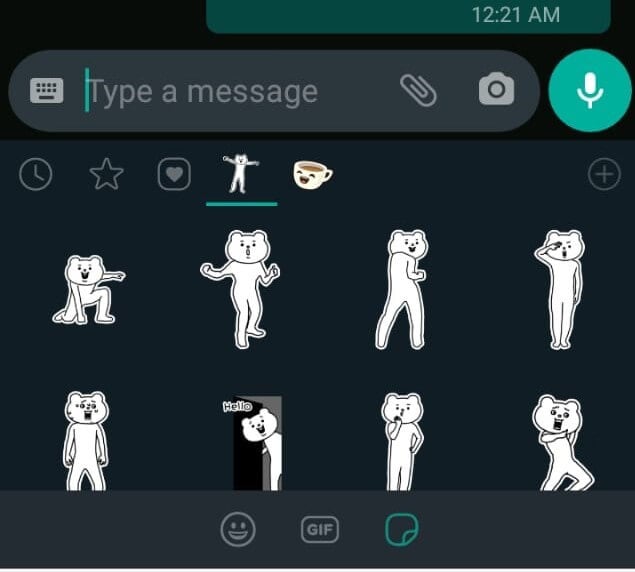
1.Open individual or group chat.
2.Click on the emoji and then tap the stickers on the bottom panel.
3.Choose the sticker that best fits your mood and intention from the various categories. Click it and voila! Sent!
Easy peasy, right?
Bonus Tip—Add Sticker to Your Video with Wondershare Filmora
Although videos themselves are gripping enough, the addition of a customized sticker exclusive to you will be a cherry on top. Wondershare Filmora, with its user-friendly interface, is here just for that. You can now not only add your customized stickers to your video, but multiple effects can also be applied to enhance the video. Filmora is specially designed to offer professional editing tools to beginners. It has an in-built library of special effects and filters to help you create a stunningly cinematic video. Apply motion tracking, keyframe animations, or color match your videos. Add catchy captions or aesthetic filters to create a cool cinematic video
Let’s get right to it:
1.Download and install Filmora. Launch it. And click on Import-Import Media Files.
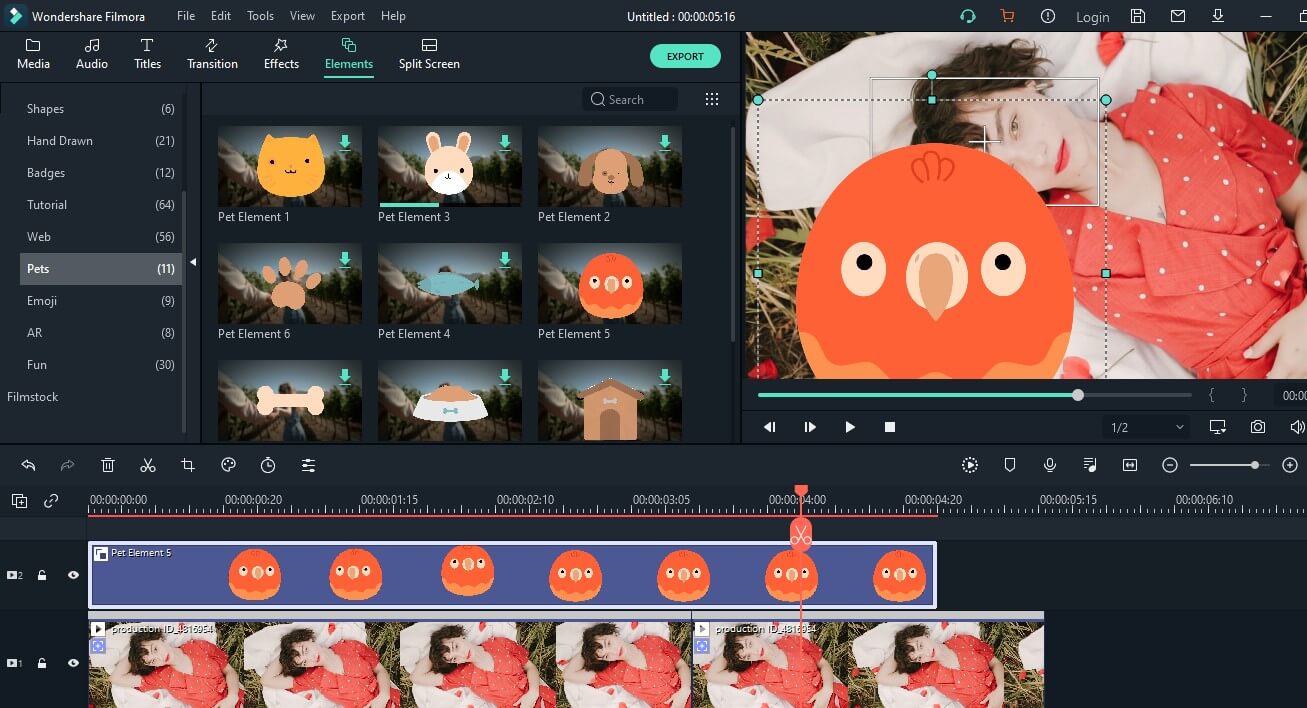
2. Then import your sticker into Filmora and drag and drop it to the video track or choose a sticker from the Elements (Note that both must be added to the video track).
3. Double-click on the sticker in the timeline to adjust the additional parameters. In Video, you can adjust the size or rotation of the sticker. Tap Color to adjust the tint, temperature, or saturation of the sticker. You can also add 3D motion to the sticker in the Motion.
4. And in the viewer panel, click on the sticker and drag it to adjust the size or change the location.
5. Click Export and save it to your computer in the desired resolution.
Ready to Create and Add Stickers?
Stickers have been around long enough to become boringly ordinary. So, to keep the fun side of texting alive, you can now master how to use stickers on Whatsapp after creating your own personalized stickers.
You can start being creative with Sticker Make for Whatsapp. And if you didn’t know how to add stickers in Whatsapp, by now, you must have mastered it (hopefully).
Last but not least, to stand out in a crowd, you need to bring to light something others can’t. Inserting custom-made stickers in your videos might do the trick. Decorate your videos with Wondershare Filmora and create impressive masterpieces. Take note from this ultimate guide on how to add stickers to Whatsapp and transform your texting experience.
Let the fun begin!
Shanoon Cox
Shanoon Cox is a writer and a lover of all things video.
Follow @Shanoon Cox
Shanoon Cox
Mar 27, 2024• Proven solutions
Whatsapp has recently added the stickers feature, and people are going crazy about adding stickers to WhatsApp. But the question is how to add stickers to Whatsapp? To help with that, we will walk you through a detailed guide on how to add stickers to Whatsapp and bring a dash of fun to boring texts.
Now, if you don’t know how to add stickers to WhatsApp and use stickers on Whatsapp, we have you covered.
- Part 1: How to Create Stickers for WhatsApp
- Part 2: How to Add Stickers to WhatsApp
- Part 3: How to Send Stickers on WhatsApp
- Part 4: Bonus Tip—Add Sticker to Your Video with Wondershare Filmora
Part 1: How to Create Stickers for WhatsApp
Whatsapp stickers are now a significant part of our daily conversations. Because let’s face it, life would be boring without them. Perhaps it’s time to up your game by learning how to add stickers to Whatsapp
Even though Whatsapp has a vast library of stickers available, creating a unique sticker is more fun. And the latest apps have made it incredibly easy to create customized stickers. So all you need to do now is learn how to use stickers in Whatsapp
Sticker Make for Whatsapp is one such app. It is free and requires no registrations. Download the app from Google Store and start creating hilarious stickers to surprise your friends.
1. Download Sticker Make and launch it. On the homepage, you will be presented with two options. Click Create to make a sticker from scratch using your own image or click on Animated to insert your picture in a sticker template.
2. Choose any image from your gallery. Crop it to the size and shape you wish to include. Use the Freehand tool or click Automatically to let the app crop a face itself.
3. Click Next and now erase the background or make careful cropping.
4. You can even outline your sticker and adjust its width and color.
5. You can even add texts and change fonts.
6. Click on the square in the bottom panel to choose from a list of cool backgrounds for your sticker.
7. Choose to add themed emojis or decorate using a variety of images in the library of Sticker Make. Once you are done, click Save, enter pack name, and click Ok.
(P.S Make sure that the stickers are precisely 512x512 pixels and no more than 100kb)
Part 2: How to Add Stickers to WhatsApp
Now, you must be wondering how to add stickers to Whatsapp. Let me ease your worry. In this part, I will walk you through a step-by-step guide on how to use stickers in Whatsapp and a few additional features too.
You can save the stickers you receive from other people-
- Click on the sticker you receive
- Tap Add to favorites
If you wish you get more exciting stickers to better express yourself-
- Open Whatsapp chat, either individual or group chat.
- Click on the emoji and then click the sticker beside GIF (the square shape)
- Tap on the + sign on the upper right corner of your keyboard.
- Here you choose to download any number of sticker packs or click Get More Stickers from Google Play.
- Tap the download sign beside the sticker pack to start downloading.
- Once the download is complete, it will be displayed among the other stickers in your list.
Other features:
- Clock sign- This sign has all the stickers you recently used
- Star sign- It contains your favorite stickers
- Heart- In this, there are several categories. Whatsapp automatically arranges all your stickers in these categories as happy, sad, romantic, etc.
Part 3: How to Send Stickers on WhatsApp
So far, you have learned to create a custom sticker and then how to use Whatsapp stickers. All credit goes to the apps that made this task cakewalk (and some credit goes to your creativity too). Now that the worst is over, you have come to the final and best part of our article.
In 3 quick steps, you will be able to learn how to add stickers to Whatsapp and surprise your friends with hilarious stickers.
1.Open individual or group chat.
2.Click on the emoji and then tap the stickers on the bottom panel.
3.Choose the sticker that best fits your mood and intention from the various categories. Click it and voila! Sent!
Easy peasy, right?
Bonus Tip—Add Sticker to Your Video with Wondershare Filmora
Although videos themselves are gripping enough, the addition of a customized sticker exclusive to you will be a cherry on top. Wondershare Filmora, with its user-friendly interface, is here just for that. You can now not only add your customized stickers to your video, but multiple effects can also be applied to enhance the video. Filmora is specially designed to offer professional editing tools to beginners. It has an in-built library of special effects and filters to help you create a stunningly cinematic video. Apply motion tracking, keyframe animations, or color match your videos. Add catchy captions or aesthetic filters to create a cool cinematic video
Let’s get right to it:
1.Download and install Filmora. Launch it. And click on Import-Import Media Files.
2. Then import your sticker into Filmora and drag and drop it to the video track or choose a sticker from the Elements (Note that both must be added to the video track).
3. Double-click on the sticker in the timeline to adjust the additional parameters. In Video, you can adjust the size or rotation of the sticker. Tap Color to adjust the tint, temperature, or saturation of the sticker. You can also add 3D motion to the sticker in the Motion.
4. And in the viewer panel, click on the sticker and drag it to adjust the size or change the location.
5. Click Export and save it to your computer in the desired resolution.
Ready to Create and Add Stickers?
Stickers have been around long enough to become boringly ordinary. So, to keep the fun side of texting alive, you can now master how to use stickers on Whatsapp after creating your own personalized stickers.
You can start being creative with Sticker Make for Whatsapp. And if you didn’t know how to add stickers in Whatsapp, by now, you must have mastered it (hopefully).
Last but not least, to stand out in a crowd, you need to bring to light something others can’t. Inserting custom-made stickers in your videos might do the trick. Decorate your videos with Wondershare Filmora and create impressive masterpieces. Take note from this ultimate guide on how to add stickers to Whatsapp and transform your texting experience.
Let the fun begin!
Shanoon Cox
Shanoon Cox is a writer and a lover of all things video.
Follow @Shanoon Cox
20 Wonderful Stop Motion Ideas for Beginners and Kids - Filmora
20 Wonderful Stop Motion Ideas for Beginners and Kids
Shanoon Cox
Mar 27, 2024• Proven solutions
Stop motion is the most adoring animated presentation of the social media era on digital presence. You can express conceptual-based ideas and thoughtful messages in a storytelling frame. We will discuss and get an overview of the stop motion ideas of kids and stop motion ideas for beginners in this article.
Let’s dive into the subject line!
Stop motion animation could be a great idea while presenting a story that will take a short duration but carry a significant meaning. The meaning even you can portray easily with the animated objects, characters, figures, and the movement.
Here, the movement of the illustrated figures and characters is vital because the camera uses in stop motion repeatedly getting on or off. Many frames are created to portray the story you want to present to your audience during the on and off.
- Part 1: What are the Important Elements When Producing a Good Stop Motion Animation?
- Part 2: 20 Best Stop Animation Ideas for Kids and Beginners
Part 1: What are the Important Elements When Producing a Good Stop Motion Animation?
While you are dealing with the digital creative aspect, you need to have a subject line, plan, execution components, camera and knowledge about running the camera to show its movements. In short, these are the major elements you need to have grip before starting any stop motion animation.
The significant elements are:
- A thoughtful subject line: why people watch you stop motion animation, ask the question to yourself and decide a good subject line. If you want to show a story by moving a few objects, characters, and figures, the subject line must have a solid message you want to convey. Otherwise, you will never get your target audience.
- Proper planning: It is an old proverb that creativity is the messy thing in the world. But people will not watch it messy on the screen. How you present the complete story, what kinds of cameras and angles you need to use to get what you want, the background settings, any music you can add or not are part of the planning.
- Cameras and angles: A firm stand tripod, a stationary camera, and lots of careful movement of your object are important elements in stop motion animation. The lights and the angles of your camera decide the result of your efforts. Do not bump your camera during the shoot, or you may lose everything and begin from scratch, which is not a good idea at all. Lights and the shadow angle are even important in stop motion animation creation.
There are movements and shoot arrangements, like a few more major elements you must consider while planning to stop motion animation from escalating your creative aspect.
To create stop motion animation, beginners and kids require different objects. Among them, few things are common like cameras, tripods, lights etc. In the case of kids, you can start practicing at home with available items like a big table to keep objects on them. But for beginners, can start from a small studio with various angle lights and camera arrangements.
However, even for the beginner, the home could be the best option instead of a studio.
Part 2: 20 Best Stop Animation Ideas for Kids and Beginners
We will see the 20 best stop animation ideas for kids and beginners for the next few paragraphs. We will divide the section into two segments: easy stop motion ideas for beginners and amazing stop motion ideas for kids. As kids are small and tender, we mention them in the first column and then beginners.
1.Everyday Play Items
For Kids
Kids love to play with toys. But every day playing with the same toys brings boredom. Being a responsible parent, you must eradicate their boredom to teach him/them how to make stop motion with their daily playing toys. Place the toys over a table, fix the angle and place your mobile phone camera and start slow-moving and on and off the camera. It’s fun for kids to create something different that can go online.
For Beginners
Take a basket, collect a few items from your daily use like pin, comb, paperweight, vegetable cutter, knife, stationery items on the table. You can adjust your home lights and set your mobile camera or DSLR on the tripod. Create something based on your thought process with the objects, start on or off the camera and make a little move to create the animation over the video.
The process is quite basic yet useful to know the camera angles, the lights, and shadow collaboration to create the magic.
2.Lego stop motion
Lego is the legendary name in stop motion animation. The brick-style square figures or brickfilms your kid can create to lego stop motion. The creativity is unlimited, and your kid can express any story using lego animation.
Windows 10 with the latest version supports Lego animation. Your kid must know how to operate the Lego creation under your guidance.
For beginners: The best stop animation tries for the beginners, the Lego. You can create numerous characters, stories, and the message you want to convey through your animation creation. Lego is the best for beginners. You will get opportunities to experiment with the shadow and lights technique, animation movement tricks, and, if possible, voiceover gives you the perfect stop motion animation.
3.Claymation
For Kids
You will get clay toys in every household and every kid’s wardrobe. Every kid can prepare a figure out of those colorful clay bumps stored in their collection. If you hold the camera at an apt angle, place any clay figures and start camera roll on and off, a beautiful clip you can make.
For Beginners
You can make clay figures without hands or legs and make moves. Use a tripod and place it in front of those clay figures, put the lights on and start rolling the camera. The clays can depict a story without much of your efforts and involvement. The plus point of the claymation is you can use the same clay and make hundreds of stop motions and show the magic over the camera.
4.Whiteboard stop motion for kids
If your kids are good at sketching or drawing, or painting, a whiteboard becomes a great idea to make stop motion. The shape and size of the whiteboard give you enough space to draw a story and show it to your audience.
For beginners: A small sketch by a marker on the whiteboard, use the white space, place the camera on the tripod and start to roll on. The major plus point to using a whiteboard is the spacious object and the sketch you draw over the board. You can easily brief the subject line, using figures, characters and make a super stop motion to feed your creativity.
5.Sticky Notes stop motion for kids
You can create a sticky notes game or figures if you want to use the sticky notes board. Once you get the idea, you will never feel bored playing with sticky notes and create stop motion. But for the kids, it’s high-level creativity that needs attention and support from your elders.
For beginners: The notes can be a great idea to draw a story or the game we used to play in our childhood. You can add voiceover or the music at the time of final editing. The movement of the notes with the rhythm and music create a perfect stop motion for your beginning journey.
6.Paper-cut out stop motion idea for kids
The paper-cut-out stop motion is an interesting animation that easily grabs the watchers’ attention. You can prepare figures and characters by cutting papers or directly cutting figures from magazines, newspapers, and books and creating stop motion animation.
For the beginners: It could be really fun to cut the figures from books, magazines, newspapers and make the story and give the animation form. Here it would help if you held the camera from the top of the object to avoid the shadow. The playful manner of shadow and light is a very important thing in paper-cut-out stop motion. The camera position would decide how beautiful your stop motion creation will be. Perfect practice for beginners at home.
7.Floor motion or chalkboard motion for kids
The school classroom becomes our best play area if teachers are not around. Black or green boards become the best drawing space with white and colorful chalk. The same stance we can apply on the floor. You can draw figures and move on the floor and shoot. As a kid, you can take the help from your elder and create the motion of your choice.
For the beginners: For the beginners, the floor motion suits you best as you can use the space and set the camera and lights. You can draw the images and figures on the floor, place the camera as per the angle and start on and off. It is also a tricky stop motion idea for beginners to try at home to set the hands-on.
8.Boing Claymation or Replacement for kids
Boing claymation intrigues laughter if you can add good sound effects. Though kids prefer the replacement stop motion, it is a funny animation if you manage to create. Lots of creativity and lesser arrangements are required to make this category stop motion animation.
For the Beginners: If you try your hands to make some funny animation based on objects available at home, Boing claymation is the best option to start working on it. The objects you set need to move from one place to another and shoot at from a distance.
9.Human and shadow stop motion for kids
The most engaging stop motion ever is when you can use the human body and the shadow reflection to create the animation. Play with your friends on the playground, experiment with the shadow, and shoot it. Later add sound effects to create a stop motion animation to give surprise to your elder brother. How cool!
For beginners: You can start with your friends and create magic with shadow reflection and start your camera roll on it. You can do figure-centric stop motion or objective-related stop motion if you know how to utilize the sun rays, half of the job you have done so far.
10.Timelapse stop motion for kids
This category stop motion idea is to get concrete formation if you know how to set your device camera to click or shoot every time interval. The time setting is called timelapse, and it captures the movement of the object or formation of the object and captures the transformation or change. Being a kid, it’s great creativity to set the camera and capture those moments to create timelapse.
For beginners: In the professional world, several ad agencies take the help of time-lapse to show the transformation and the slow changes of the object they select. The transformation depicts a story that could frame on a device. The shoot will be on the time interval to frame the entire change.
11.Fruit stop motion ideas for kids
Kids do not prefer to have fruits after breakfast. To understand how important fruits are in our daily diet, you can create fruit stop motion animation. Fruits have different shapes and sizes. You can select anyone and can make stop motion. Place them on the table, shoot them from different angles, add titles in the final editing. Your stop motion animation is ready.
For beginners: To get into the kids’ world, you can start with the food and fruit is a great choice. Create a catchy subject line and make a message story with the fruits. As a beginner, it would be a challenge to get fit into the kids’ world. Give it a try!
12.Matchstick stop motion for kids
You can make something creative out of matchsticks and shoot them following a sequence and make a story. It’s a good idea to personify them and shoot them from different angles. As a kid, you can enjoy making them unified and create a story.
For beginners: Arrange matchstick and make a story out of those sticks is a great idea to begin your journey. You only need to craft a story based on the sticks, settings, camera, and lights. You can use the floor as well to decorate the story.
13.Paper animation for kids
Kids have lots of craftwork in school. You can utilize the extracurricular activities by making stop motion with paper and drawing over it. The idea is amazing, and your friends may feel jealous to watch your creativity.
For the beginners: Beginners can use anything on paper and create a stop motion of their choice. With paper, you can create a stop motion of the beautiful memory book or memory sequence that reminds you of a happy time with your family members.
14.Easy breakfast preparing stop motion for kids
Kids, when preparing something in the kitchen, can shoot the entire process and then set them in the following sequence. It’s the wisest decision to Make a stop motion to frame your creativity. You can even share or show it to your elders and friends and give them a surprise.
For beginners: Beginners can make the stop motion by shooting their cooking recipes. Sometimes you try something on the gas oven. Shoot your efforts, make a sequence and get the frame of stop motion. The creativity you can share on social media platforms.
15.Stop motion for Maths and Arts
School curriculum is a great idea to show your creative aspects. You can combine maths and arts and create any topic you want. Hand-made drawings, colors, a whiteboard, and a camera, you are all set to begin your project.
For beginners: Paper Cutting and making any object could be a great artistic creation. You can elevate your thinking process by arranging things and making a stop motion animation.
16.Stop motion with toys for kids
Check your wardrobe and get all the toys out from there. Set them as a story and roll on the camera. You can make your own toy story.
For the beginners: Remember what you made out in your college project? You can make Eskimo living and create stop motion. You can add your creativity and knowledge about their living style to make the animation more attractive and eye-catching.
![]()
A cross-platform for making videos anywhere for all creators
* Secure Download
Why your video editing isn’t good enough? How about some creative inspo?
- 100M+ Users
- 5M+ Stock Media for Use
- 4M+ Social Media Followers
- 150+ Countries and Regions

17.Drawing stop motion for kids
You can draw a picture, make a story out of it, place the camera, fix the light and shadow, and start shooting it. You can give a surprise to your drawing teacher as well by making the stop motion from your drawing book.
For beginners: Halloween stop motion is quite popular among beginners. It would be a great idea to give your friends an incredible and scary gift this Halloween. Cut the paper, draw the pictures, fix them as per the sequence of your story and make a stop motion. Don’t forget to shoot in a shadow, fewer lights needed to create the horror effects. You can add cold music to make it more horrific.
18.Halloween stop motion for kids
You can create a Halloween stop motion by making a craft. Using pumpkin, different pops to support your story and start to roll the camera. If it is a scary idea, use lights and then shoot.
For beginners: You can make course ads or promotions in the stop motion format. Content writing and the prospect in the industry you can show through the stop motion, asking your friend, or if possible, you stand in front of the camera and shoot it. It’s a good idea to promote education as well among the kids.
19.Christmas tree-making ideas for kids
You can make your Christmas a memorable one by making the Christmas tree stop motion. Decorate the tree and shoot them following a sequence and camera angle. Give a festive look to your Christmas tree and create a memorable stop motion this Christmas.
For beginners: As a beginner, you can try at the corner of the home, decorate the tree with lights, colorful papers, leaves, balls, stars and give an amazing look. The natural lights give different looks and feel to the animation in the corner, easily attracting viewers. You can add music to give a completely festive look.
20.Birthday card stop motion for kids
A birthday celebration is a great festival for any age kid. To make the celebration memorable, you can create a birthday card stop motion animation. You can add music to make it attractive and a joyful experience for you or your friend.
For beginners: College fest is a great opportunity to show your skill. You can create new ideas and form a stop motion to exhibit the idea and concept to your fellow friends and faculty members. Give your hands a try to make the fest an animated day.
Final Thought
You can give a shape to any idea if you know how to organize the stop motion systematically. Portray a beautiful story, arrange the stuff you need to express your ideas and concepts, and start shooting it. You can spread your work digitally by posting on various social media platforms.
Shanoon Cox
Shanoon Cox is a writer and a lover of all things video.
Follow @Shanoon Cox
Shanoon Cox
Mar 27, 2024• Proven solutions
Stop motion is the most adoring animated presentation of the social media era on digital presence. You can express conceptual-based ideas and thoughtful messages in a storytelling frame. We will discuss and get an overview of the stop motion ideas of kids and stop motion ideas for beginners in this article.
Let’s dive into the subject line!
Stop motion animation could be a great idea while presenting a story that will take a short duration but carry a significant meaning. The meaning even you can portray easily with the animated objects, characters, figures, and the movement.
Here, the movement of the illustrated figures and characters is vital because the camera uses in stop motion repeatedly getting on or off. Many frames are created to portray the story you want to present to your audience during the on and off.
- Part 1: What are the Important Elements When Producing a Good Stop Motion Animation?
- Part 2: 20 Best Stop Animation Ideas for Kids and Beginners
Part 1: What are the Important Elements When Producing a Good Stop Motion Animation?
While you are dealing with the digital creative aspect, you need to have a subject line, plan, execution components, camera and knowledge about running the camera to show its movements. In short, these are the major elements you need to have grip before starting any stop motion animation.
The significant elements are:
- A thoughtful subject line: why people watch you stop motion animation, ask the question to yourself and decide a good subject line. If you want to show a story by moving a few objects, characters, and figures, the subject line must have a solid message you want to convey. Otherwise, you will never get your target audience.
- Proper planning: It is an old proverb that creativity is the messy thing in the world. But people will not watch it messy on the screen. How you present the complete story, what kinds of cameras and angles you need to use to get what you want, the background settings, any music you can add or not are part of the planning.
- Cameras and angles: A firm stand tripod, a stationary camera, and lots of careful movement of your object are important elements in stop motion animation. The lights and the angles of your camera decide the result of your efforts. Do not bump your camera during the shoot, or you may lose everything and begin from scratch, which is not a good idea at all. Lights and the shadow angle are even important in stop motion animation creation.
There are movements and shoot arrangements, like a few more major elements you must consider while planning to stop motion animation from escalating your creative aspect.
To create stop motion animation, beginners and kids require different objects. Among them, few things are common like cameras, tripods, lights etc. In the case of kids, you can start practicing at home with available items like a big table to keep objects on them. But for beginners, can start from a small studio with various angle lights and camera arrangements.
However, even for the beginner, the home could be the best option instead of a studio.
Part 2: 20 Best Stop Animation Ideas for Kids and Beginners
We will see the 20 best stop animation ideas for kids and beginners for the next few paragraphs. We will divide the section into two segments: easy stop motion ideas for beginners and amazing stop motion ideas for kids. As kids are small and tender, we mention them in the first column and then beginners.
1.Everyday Play Items
For Kids
Kids love to play with toys. But every day playing with the same toys brings boredom. Being a responsible parent, you must eradicate their boredom to teach him/them how to make stop motion with their daily playing toys. Place the toys over a table, fix the angle and place your mobile phone camera and start slow-moving and on and off the camera. It’s fun for kids to create something different that can go online.
For Beginners
Take a basket, collect a few items from your daily use like pin, comb, paperweight, vegetable cutter, knife, stationery items on the table. You can adjust your home lights and set your mobile camera or DSLR on the tripod. Create something based on your thought process with the objects, start on or off the camera and make a little move to create the animation over the video.
The process is quite basic yet useful to know the camera angles, the lights, and shadow collaboration to create the magic.
2.Lego stop motion
Lego is the legendary name in stop motion animation. The brick-style square figures or brickfilms your kid can create to lego stop motion. The creativity is unlimited, and your kid can express any story using lego animation.
Windows 10 with the latest version supports Lego animation. Your kid must know how to operate the Lego creation under your guidance.
For beginners: The best stop animation tries for the beginners, the Lego. You can create numerous characters, stories, and the message you want to convey through your animation creation. Lego is the best for beginners. You will get opportunities to experiment with the shadow and lights technique, animation movement tricks, and, if possible, voiceover gives you the perfect stop motion animation.
3.Claymation
For Kids
You will get clay toys in every household and every kid’s wardrobe. Every kid can prepare a figure out of those colorful clay bumps stored in their collection. If you hold the camera at an apt angle, place any clay figures and start camera roll on and off, a beautiful clip you can make.
For Beginners
You can make clay figures without hands or legs and make moves. Use a tripod and place it in front of those clay figures, put the lights on and start rolling the camera. The clays can depict a story without much of your efforts and involvement. The plus point of the claymation is you can use the same clay and make hundreds of stop motions and show the magic over the camera.
4.Whiteboard stop motion for kids
If your kids are good at sketching or drawing, or painting, a whiteboard becomes a great idea to make stop motion. The shape and size of the whiteboard give you enough space to draw a story and show it to your audience.
For beginners: A small sketch by a marker on the whiteboard, use the white space, place the camera on the tripod and start to roll on. The major plus point to using a whiteboard is the spacious object and the sketch you draw over the board. You can easily brief the subject line, using figures, characters and make a super stop motion to feed your creativity.
5.Sticky Notes stop motion for kids
You can create a sticky notes game or figures if you want to use the sticky notes board. Once you get the idea, you will never feel bored playing with sticky notes and create stop motion. But for the kids, it’s high-level creativity that needs attention and support from your elders.
For beginners: The notes can be a great idea to draw a story or the game we used to play in our childhood. You can add voiceover or the music at the time of final editing. The movement of the notes with the rhythm and music create a perfect stop motion for your beginning journey.
6.Paper-cut out stop motion idea for kids
The paper-cut-out stop motion is an interesting animation that easily grabs the watchers’ attention. You can prepare figures and characters by cutting papers or directly cutting figures from magazines, newspapers, and books and creating stop motion animation.
For the beginners: It could be really fun to cut the figures from books, magazines, newspapers and make the story and give the animation form. Here it would help if you held the camera from the top of the object to avoid the shadow. The playful manner of shadow and light is a very important thing in paper-cut-out stop motion. The camera position would decide how beautiful your stop motion creation will be. Perfect practice for beginners at home.
7.Floor motion or chalkboard motion for kids
The school classroom becomes our best play area if teachers are not around. Black or green boards become the best drawing space with white and colorful chalk. The same stance we can apply on the floor. You can draw figures and move on the floor and shoot. As a kid, you can take the help from your elder and create the motion of your choice.
For the beginners: For the beginners, the floor motion suits you best as you can use the space and set the camera and lights. You can draw the images and figures on the floor, place the camera as per the angle and start on and off. It is also a tricky stop motion idea for beginners to try at home to set the hands-on.
8.Boing Claymation or Replacement for kids
Boing claymation intrigues laughter if you can add good sound effects. Though kids prefer the replacement stop motion, it is a funny animation if you manage to create. Lots of creativity and lesser arrangements are required to make this category stop motion animation.
For the Beginners: If you try your hands to make some funny animation based on objects available at home, Boing claymation is the best option to start working on it. The objects you set need to move from one place to another and shoot at from a distance.
9.Human and shadow stop motion for kids
The most engaging stop motion ever is when you can use the human body and the shadow reflection to create the animation. Play with your friends on the playground, experiment with the shadow, and shoot it. Later add sound effects to create a stop motion animation to give surprise to your elder brother. How cool!
For beginners: You can start with your friends and create magic with shadow reflection and start your camera roll on it. You can do figure-centric stop motion or objective-related stop motion if you know how to utilize the sun rays, half of the job you have done so far.
10.Timelapse stop motion for kids
This category stop motion idea is to get concrete formation if you know how to set your device camera to click or shoot every time interval. The time setting is called timelapse, and it captures the movement of the object or formation of the object and captures the transformation or change. Being a kid, it’s great creativity to set the camera and capture those moments to create timelapse.
For beginners: In the professional world, several ad agencies take the help of time-lapse to show the transformation and the slow changes of the object they select. The transformation depicts a story that could frame on a device. The shoot will be on the time interval to frame the entire change.
11.Fruit stop motion ideas for kids
Kids do not prefer to have fruits after breakfast. To understand how important fruits are in our daily diet, you can create fruit stop motion animation. Fruits have different shapes and sizes. You can select anyone and can make stop motion. Place them on the table, shoot them from different angles, add titles in the final editing. Your stop motion animation is ready.
For beginners: To get into the kids’ world, you can start with the food and fruit is a great choice. Create a catchy subject line and make a message story with the fruits. As a beginner, it would be a challenge to get fit into the kids’ world. Give it a try!
12.Matchstick stop motion for kids
You can make something creative out of matchsticks and shoot them following a sequence and make a story. It’s a good idea to personify them and shoot them from different angles. As a kid, you can enjoy making them unified and create a story.
For beginners: Arrange matchstick and make a story out of those sticks is a great idea to begin your journey. You only need to craft a story based on the sticks, settings, camera, and lights. You can use the floor as well to decorate the story.
13.Paper animation for kids
Kids have lots of craftwork in school. You can utilize the extracurricular activities by making stop motion with paper and drawing over it. The idea is amazing, and your friends may feel jealous to watch your creativity.
For the beginners: Beginners can use anything on paper and create a stop motion of their choice. With paper, you can create a stop motion of the beautiful memory book or memory sequence that reminds you of a happy time with your family members.
14.Easy breakfast preparing stop motion for kids
Kids, when preparing something in the kitchen, can shoot the entire process and then set them in the following sequence. It’s the wisest decision to Make a stop motion to frame your creativity. You can even share or show it to your elders and friends and give them a surprise.
For beginners: Beginners can make the stop motion by shooting their cooking recipes. Sometimes you try something on the gas oven. Shoot your efforts, make a sequence and get the frame of stop motion. The creativity you can share on social media platforms.
15.Stop motion for Maths and Arts
School curriculum is a great idea to show your creative aspects. You can combine maths and arts and create any topic you want. Hand-made drawings, colors, a whiteboard, and a camera, you are all set to begin your project.
For beginners: Paper Cutting and making any object could be a great artistic creation. You can elevate your thinking process by arranging things and making a stop motion animation.
16.Stop motion with toys for kids
Check your wardrobe and get all the toys out from there. Set them as a story and roll on the camera. You can make your own toy story.
For the beginners: Remember what you made out in your college project? You can make Eskimo living and create stop motion. You can add your creativity and knowledge about their living style to make the animation more attractive and eye-catching.
![]()
A cross-platform for making videos anywhere for all creators
* Secure Download
Why your video editing isn’t good enough? How about some creative inspo?
- 100M+ Users
- 5M+ Stock Media for Use
- 4M+ Social Media Followers
- 150+ Countries and Regions
17.Drawing stop motion for kids
You can draw a picture, make a story out of it, place the camera, fix the light and shadow, and start shooting it. You can give a surprise to your drawing teacher as well by making the stop motion from your drawing book.
For beginners: Halloween stop motion is quite popular among beginners. It would be a great idea to give your friends an incredible and scary gift this Halloween. Cut the paper, draw the pictures, fix them as per the sequence of your story and make a stop motion. Don’t forget to shoot in a shadow, fewer lights needed to create the horror effects. You can add cold music to make it more horrific.
18.Halloween stop motion for kids
You can create a Halloween stop motion by making a craft. Using pumpkin, different pops to support your story and start to roll the camera. If it is a scary idea, use lights and then shoot.
For beginners: You can make course ads or promotions in the stop motion format. Content writing and the prospect in the industry you can show through the stop motion, asking your friend, or if possible, you stand in front of the camera and shoot it. It’s a good idea to promote education as well among the kids.
19.Christmas tree-making ideas for kids
You can make your Christmas a memorable one by making the Christmas tree stop motion. Decorate the tree and shoot them following a sequence and camera angle. Give a festive look to your Christmas tree and create a memorable stop motion this Christmas.
For beginners: As a beginner, you can try at the corner of the home, decorate the tree with lights, colorful papers, leaves, balls, stars and give an amazing look. The natural lights give different looks and feel to the animation in the corner, easily attracting viewers. You can add music to give a completely festive look.
20.Birthday card stop motion for kids
A birthday celebration is a great festival for any age kid. To make the celebration memorable, you can create a birthday card stop motion animation. You can add music to make it attractive and a joyful experience for you or your friend.
For beginners: College fest is a great opportunity to show your skill. You can create new ideas and form a stop motion to exhibit the idea and concept to your fellow friends and faculty members. Give your hands a try to make the fest an animated day.
Final Thought
You can give a shape to any idea if you know how to organize the stop motion systematically. Portray a beautiful story, arrange the stuff you need to express your ideas and concepts, and start shooting it. You can spread your work digitally by posting on various social media platforms.
Shanoon Cox
Shanoon Cox is a writer and a lover of all things video.
Follow @Shanoon Cox
How to Make an Emoji of Yourself on Mobile ? [Emoji Yourself]
How to Make an Emoji of Yourself on Android and iPhone [Emoji Yourself]
Shanoon Cox
Mar 27, 2024• Proven solutions
The introduction of stickers and emojis have transformed the texting experience—no more boring texts. Just make an emoji of yourself in every mood and instantly express yourself in a better and funnier way.
Whether you own an iPhone or an Android device, you can easily emoji yourself that exactly mimics your appearance and reaction. It’s time to up your chatting game and make exciting emojis.
In this article, we will show you how to amaze your friends by teaching you to make an emoji of yourself in no time.
Part 1: Make an Emoji of Yourself on iPhone
iPhone has now introduced a fun feature that lets you make an emoji of yourself, the exact mirror image of you, just smaller and animated.
Here’s how you can make an emoji of yourself in 2 easy ways:
Method 1-By the iPhone Message app
iPhone has now introduced an in-built feature to let you make an emoji of yourself without having to download any other apps. However, you can only make an emoji of yourself in iOS 13 or later.
For the lucky lot of you, let me walk you through how to make an emoji of yourself in a few simple steps:
1.Open your iMessages. Go to a previous chat or tap the New Message Make sure your Appstore icon is toggled on to display the app tray. Hit the Animoji icon, represented by the monkey. Swipe to find the + plus sign for New Memoji to emoji yourself.

2.Now you can make an emoji of yourself by adding even the smallest details. Start by selecting your skin color. You can even add freckles or adjust your skin color’s warmth or paleness with a slider.

3.Hairstyle-Select the style that mimics the real you or goes for your dream hair-do.

4.Head Shape-Select the age group from kids, adults, old, and your face cut by choosing the chin that best fits you.

5.Nose & Lips- After selecting your eye color, shape, and brows, choose a nose shape and a lipstick color and intensity.

6.Eyewear/Headwear-Add glasses, adjust tint shade, color, and choose a hat, cap, or turban as you like. Finally, click Done to save the emoji.

Method 2-Using the Avatoon app
If you want to make an emoji of yourself that is more fun and personalized, from your dress to your pose, Avatoon is your way to go. With more than 500 customizable options, Avatoon lets you make an emoji of yourself meticulously, allowing you add avid details that pave the way for a hilariously amazing texting experience
1.Install and launch Avatoon app.
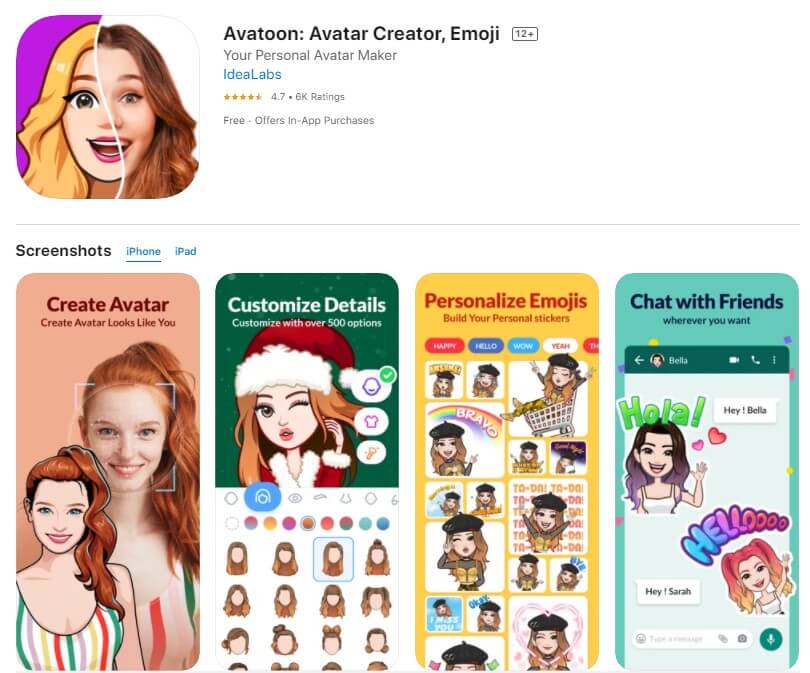
2.Now, choose the face shape that best matches your features and also select your face color. Add freckles(if you have any).

3.Next up is the hairstyle. There is a range of hairstyles from straight to wavy. Pick one you like best. You can choose the eye shape, color, brow, nose, lips, and finally, add some funky or formal eyewear to complete the look. Press Save.
4.After you make an emoji of yourself, you can further fine-tune it by adding detailed features and accessories using coins. Choose a stylish dress for your avatar from the Clothes tab or add a fun background.
5.Click on Photoboothto fit your emoji in a themed photo for an event or celebration.
6.Click on Poses and select your pose and share directly to any social media platform or save to phone.
Part 2: Make an Emoji of Yourself on Android
Now you can make an emoji of yourself even on an Android phone with the Mirror emoji app. Take your texting experience to the next level. Quickly make an emoji of yourself and wow your friends and family with the cute mini version of yourself.
1.Install and launch Mirror. Now, to make an emoji of yourself for your current look, take a selfie or click the gallery icon to choose an existing image to emoji yourself.

2.Click the left one to make an original avatar or the right one if you wish to make an emoji of yourself as an anime. Click Next.

3.Now, customize your emoji. Add a hairstyle, choose your glasses, cap, headphones, turban, scarf, or even devil horns.

4.Customize your dress color to your liking. Then, click Next.

5.Once you make an emoji of yourself, Mirror will display a range of fun stickers for instant sharing.

6.Click on any sticker, choose a mood using the emojis displayed and click to share or save to the device.

7.In the Sticker backstab, choose a themed sticker set and click Add to WhatsApp.

Conclusion-Ready to Emoji Yourself?
With texts being taken over by stickers and emojis, it’s high time for you to enter the league. Make an emoji of yourself in different moods and add funny backgrounds to express yourself fully and hilariously.
Use the in-built iPhone feature or a powerful app to make an emoji of yourself stand out from the crowd of mainstream messages. And take inspiration from our guide to surprise your friends with an emoji that looks exactly like you, just a bit smaller.
Here, we recommend Wondershare Filmora , due to its AR camera feature, which makes taking selfies more interesting. This AR camera function includes animoji and memoji avatars for a fun and excellent video.
Go on and make an emoji of yourself. Show your friends how awesome and unique you are with a beautifully personalized emoji.
Good luck
Shanoon Cox
Shanoon Cox is a writer and a lover of all things video.
Follow @Shanoon Cox
Shanoon Cox
Mar 27, 2024• Proven solutions
The introduction of stickers and emojis have transformed the texting experience—no more boring texts. Just make an emoji of yourself in every mood and instantly express yourself in a better and funnier way.
Whether you own an iPhone or an Android device, you can easily emoji yourself that exactly mimics your appearance and reaction. It’s time to up your chatting game and make exciting emojis.
In this article, we will show you how to amaze your friends by teaching you to make an emoji of yourself in no time.
Part 1: Make an Emoji of Yourself on iPhone
iPhone has now introduced a fun feature that lets you make an emoji of yourself, the exact mirror image of you, just smaller and animated.
Here’s how you can make an emoji of yourself in 2 easy ways:
Method 1-By the iPhone Message app
iPhone has now introduced an in-built feature to let you make an emoji of yourself without having to download any other apps. However, you can only make an emoji of yourself in iOS 13 or later.
For the lucky lot of you, let me walk you through how to make an emoji of yourself in a few simple steps:
1.Open your iMessages. Go to a previous chat or tap the New Message Make sure your Appstore icon is toggled on to display the app tray. Hit the Animoji icon, represented by the monkey. Swipe to find the + plus sign for New Memoji to emoji yourself.
2.Now you can make an emoji of yourself by adding even the smallest details. Start by selecting your skin color. You can even add freckles or adjust your skin color’s warmth or paleness with a slider.
3.Hairstyle-Select the style that mimics the real you or goes for your dream hair-do.
4.Head Shape-Select the age group from kids, adults, old, and your face cut by choosing the chin that best fits you.
5.Nose & Lips- After selecting your eye color, shape, and brows, choose a nose shape and a lipstick color and intensity.
6.Eyewear/Headwear-Add glasses, adjust tint shade, color, and choose a hat, cap, or turban as you like. Finally, click Done to save the emoji.
Method 2-Using the Avatoon app
If you want to make an emoji of yourself that is more fun and personalized, from your dress to your pose, Avatoon is your way to go. With more than 500 customizable options, Avatoon lets you make an emoji of yourself meticulously, allowing you add avid details that pave the way for a hilariously amazing texting experience
1.Install and launch Avatoon app.
2.Now, choose the face shape that best matches your features and also select your face color. Add freckles(if you have any).
3.Next up is the hairstyle. There is a range of hairstyles from straight to wavy. Pick one you like best. You can choose the eye shape, color, brow, nose, lips, and finally, add some funky or formal eyewear to complete the look. Press Save.
4.After you make an emoji of yourself, you can further fine-tune it by adding detailed features and accessories using coins. Choose a stylish dress for your avatar from the Clothes tab or add a fun background.
5.Click on Photoboothto fit your emoji in a themed photo for an event or celebration.
6.Click on Poses and select your pose and share directly to any social media platform or save to phone.
Part 2: Make an Emoji of Yourself on Android
Now you can make an emoji of yourself even on an Android phone with the Mirror emoji app. Take your texting experience to the next level. Quickly make an emoji of yourself and wow your friends and family with the cute mini version of yourself.
1.Install and launch Mirror. Now, to make an emoji of yourself for your current look, take a selfie or click the gallery icon to choose an existing image to emoji yourself.
2.Click the left one to make an original avatar or the right one if you wish to make an emoji of yourself as an anime. Click Next.
3.Now, customize your emoji. Add a hairstyle, choose your glasses, cap, headphones, turban, scarf, or even devil horns.
4.Customize your dress color to your liking. Then, click Next.
5.Once you make an emoji of yourself, Mirror will display a range of fun stickers for instant sharing.
6.Click on any sticker, choose a mood using the emojis displayed and click to share or save to the device.
7.In the Sticker backstab, choose a themed sticker set and click Add to WhatsApp.
Conclusion-Ready to Emoji Yourself?
With texts being taken over by stickers and emojis, it’s high time for you to enter the league. Make an emoji of yourself in different moods and add funny backgrounds to express yourself fully and hilariously.
Use the in-built iPhone feature or a powerful app to make an emoji of yourself stand out from the crowd of mainstream messages. And take inspiration from our guide to surprise your friends with an emoji that looks exactly like you, just a bit smaller.
Here, we recommend Wondershare Filmora , due to its AR camera feature, which makes taking selfies more interesting. This AR camera function includes animoji and memoji avatars for a fun and excellent video.
Go on and make an emoji of yourself. Show your friends how awesome and unique you are with a beautifully personalized emoji.
Good luck
Shanoon Cox
Shanoon Cox is a writer and a lover of all things video.
Follow @Shanoon Cox
Add Emojis to Videos on YouTube/Facebook/Snapchat [2023 Guide]
Add Emojis to Videos on YouTube/Facebook/Snapchat [Step by Step Guide]

Liza Brown
Mar 27, 2024• Proven solutions
Emojis are a great way to express one’s emotion more vividly through a depiction rather than a plain conventional text. By the passage of time, the trend of using emoji on social media domain has drastically increased around the world. Since emoji are ubiquitous and its influence on culture is increasingly huge, using emoji has now become a trend.
A plain conventional text or video may not emphasize the meaning behind the phrase, but adding emoji to it is like adding a soul to the intentions behind the message. It helps outshine the theme and make a video more appealing at the same time.
So, with all this being known, let’s take a tour to a complete guide to how to accessorize a video on multiple social media domains and make it far more attractive and meaningful.
Best Tool to Help You Add Emojis to Videos in Few Clicks
Gamers, YouTubers and all other Mac and PC users who’d like to add a smiley or any other emoji to a video should try processing their footage with the Filmora video editor.
Performing basic video editing tasks like cutting or trimming the footage, choosing a soundtrack for a video or adding an emoji to a single shot or an entire sequence can all be completed in just a couple of clicks.
Filmora is free to download. Import your videos after you launch the software, you then can add any animated emojis into wherever you want. Have a try now! Emojis inside are so Cute
How to Add Emojis to YouTube Videos?
You can now add emojis to any of the YouTube videos using an online free tool called Kapwing.
Below are the basic steps about how to add emojis to YouTube videos anywhere using Kapwing.
Step 1: Open free tool Meme Maker and tap on “get started”.
Step 2: Copy the link of the targeted YouTube video and paste the URL of your YouTube video.
Step 3: One of the ways to insert emoji using Kapwing is to directly upload an emoji having a transparent background. In the toolbar, click on “upload” and paste its URL there. The image will be placed onto the targeted video as an overlay by importing it. Another way to add emoji is to click “add text” where you will have options to insert emojis.
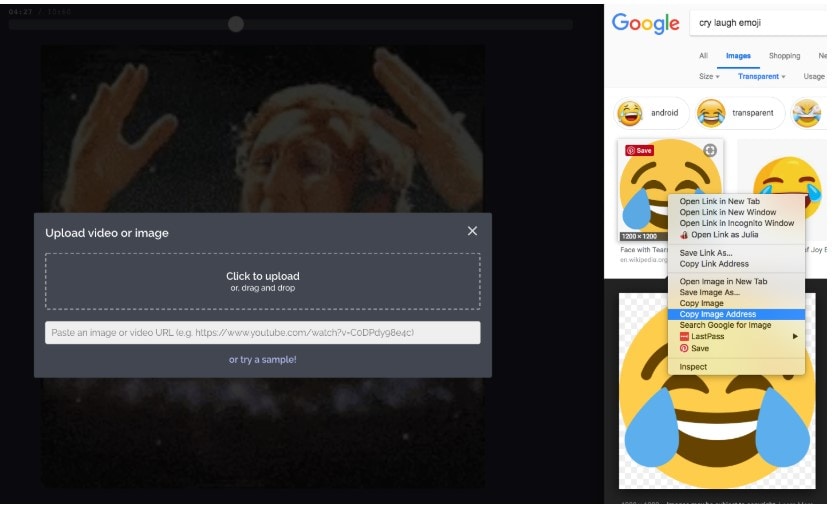
Step 4: You can now play around with editing options in Kapwing to adjust accordingly.
How to Use Emojis on YouTube?
YouTube provides you an option to insert emoji on your YouTube account description, tag and titles with great ease with the use of YouTube certified plugin, Tube Buddy.
Step 1: Install this plugin on chrome browser.
Step 2: Open “info and settings” option in your YouTube targeted video.
Step 3: Tap on description box, tags or title where an emoji icon will be shown. Tap on the emoji icon to display a list of emojis. You can also search for an emoji in the search bar.
How to Add Emojis in Snapchat Videos?
Step 1: Install Snapchat if you don’t already have it. Then run Snapchat.
Step 2: Record a video by keeping your fingers on the record button.
Step 3: Choose and tap an emoji of your choice to add in your video. Hold your fingers on emoji to place to the desired frame/clip of your recorded video.
Step 4: The emoji can be resized by dragging or pinching it in. You can add more than one emoji.
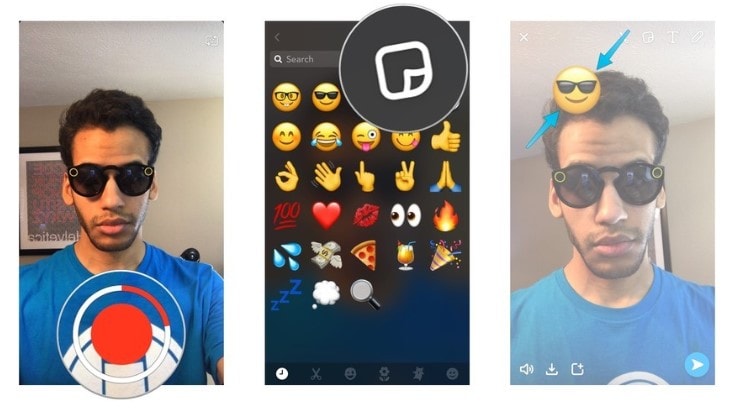
Image from iMore
How to Add Emojis to Facebook?
If you are wondering about how to add emojis to Facebook videos then, unfortunately, Facebook only offers “go live” option on Facebook where an emoji cannot be inserted. But you can insert emoji to Facebook status, comment or in your messenger conversation easily by following the step below for status:
Step 1: Click “what’s on your mind” to add new status on Facebook.
Step 2: At the bottom right side of the status box is an emoji icon. Click on it. This will open a list of emojis that you can choose as many as you want
Step 3: Click on the emoji icon back again to close the list when you are done. Click on post to share the post on your wall.
How to Add Emojis to Videos on iMovie?
Step 1: Search for the desired emoji on the internet with transparent background. Go to iMovie and select a clip of your video where you want to insert an emoji.
Step 2: Go to the “Import” option into the toolbar above, select your desired emoji from the list. This emoji will be added to the iMovie library.
Step 3: Click on that emoji. This overlays that emoji onto that video clip. You can scale the emoji up and down and drag it anywhere on the video.
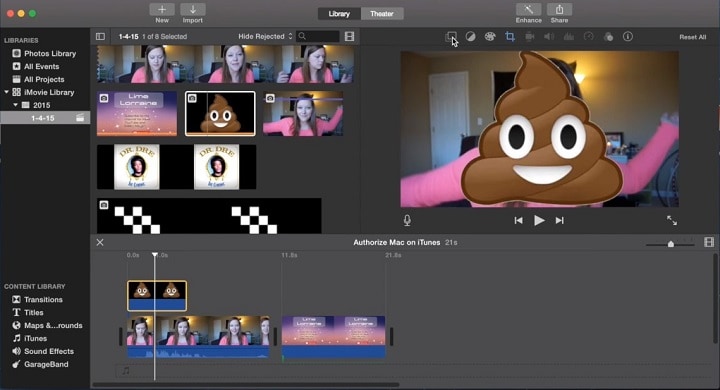
Image from YouSubtitles
How to Add Emojis to Videos Online?
Blurbiz, is an online application for editing YouTube, Instagram, Facebook and Snapchat videos. Just follow the steps below, then you can add emojis you want.
Step 1: Create and name the project in Blurbiz.
Step 2: Upload either your video, sticker or gif whichever you want an emoji to be placed in.
Step 3: Hover over the video and click on the “edit” button.
Step 4: Tap on “upload” at the top left side of the pane. Upload emoji with .png extension from your desktop.
Step 5: Drag and drop to overlay the emoji onto your video. Resize and position an emoji accordingly.
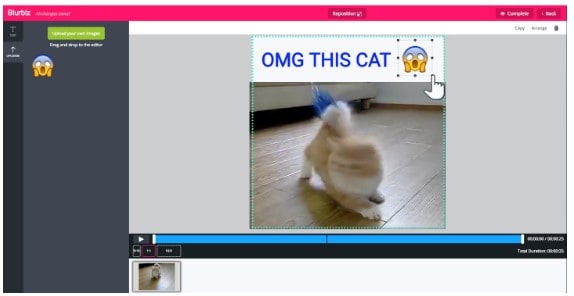
Step 6: Tap on “complete” at the top right corner when you are done. You can download an mp4 format video.
How to Add Emojis to Videos Android?
WeVideo , is an app to create and edit videos to the next level and provide one with ample special effects to add on to your videos.
Alongside using basic editing features like cutting, trimming or arranging video clips, you can amplify your editing game by adding emoji to your videos. Moreover, you can export your projects in high quality and share them on either Vimeo, YouTube or Dropbox.

Conclusion
Be it any video on any social media platform or your local device, with this thorough guide, you must be able to accessorize your video and take it to another level of emotional expression and message details in your video by using fun emojis.
Liza Brown
Liza Brown is a writer and a lover of all things video.
Follow @Liza Brown
Liza Brown
Mar 27, 2024• Proven solutions
Emojis are a great way to express one’s emotion more vividly through a depiction rather than a plain conventional text. By the passage of time, the trend of using emoji on social media domain has drastically increased around the world. Since emoji are ubiquitous and its influence on culture is increasingly huge, using emoji has now become a trend.
A plain conventional text or video may not emphasize the meaning behind the phrase, but adding emoji to it is like adding a soul to the intentions behind the message. It helps outshine the theme and make a video more appealing at the same time.
So, with all this being known, let’s take a tour to a complete guide to how to accessorize a video on multiple social media domains and make it far more attractive and meaningful.
Best Tool to Help You Add Emojis to Videos in Few Clicks
Gamers, YouTubers and all other Mac and PC users who’d like to add a smiley or any other emoji to a video should try processing their footage with the Filmora video editor.
Performing basic video editing tasks like cutting or trimming the footage, choosing a soundtrack for a video or adding an emoji to a single shot or an entire sequence can all be completed in just a couple of clicks.
Filmora is free to download. Import your videos after you launch the software, you then can add any animated emojis into wherever you want. Have a try now! Emojis inside are so Cute
How to Add Emojis to YouTube Videos?
You can now add emojis to any of the YouTube videos using an online free tool called Kapwing.
Below are the basic steps about how to add emojis to YouTube videos anywhere using Kapwing.
Step 1: Open free tool Meme Maker and tap on “get started”.
Step 2: Copy the link of the targeted YouTube video and paste the URL of your YouTube video.
Step 3: One of the ways to insert emoji using Kapwing is to directly upload an emoji having a transparent background. In the toolbar, click on “upload” and paste its URL there. The image will be placed onto the targeted video as an overlay by importing it. Another way to add emoji is to click “add text” where you will have options to insert emojis.
Step 4: You can now play around with editing options in Kapwing to adjust accordingly.
How to Use Emojis on YouTube?
YouTube provides you an option to insert emoji on your YouTube account description, tag and titles with great ease with the use of YouTube certified plugin, Tube Buddy.
Step 1: Install this plugin on chrome browser.
Step 2: Open “info and settings” option in your YouTube targeted video.
Step 3: Tap on description box, tags or title where an emoji icon will be shown. Tap on the emoji icon to display a list of emojis. You can also search for an emoji in the search bar.
How to Add Emojis in Snapchat Videos?
Step 1: Install Snapchat if you don’t already have it. Then run Snapchat.
Step 2: Record a video by keeping your fingers on the record button.
Step 3: Choose and tap an emoji of your choice to add in your video. Hold your fingers on emoji to place to the desired frame/clip of your recorded video.
Step 4: The emoji can be resized by dragging or pinching it in. You can add more than one emoji.
Image from iMore
How to Add Emojis to Facebook?
If you are wondering about how to add emojis to Facebook videos then, unfortunately, Facebook only offers “go live” option on Facebook where an emoji cannot be inserted. But you can insert emoji to Facebook status, comment or in your messenger conversation easily by following the step below for status:
Step 1: Click “what’s on your mind” to add new status on Facebook.
Step 2: At the bottom right side of the status box is an emoji icon. Click on it. This will open a list of emojis that you can choose as many as you want
Step 3: Click on the emoji icon back again to close the list when you are done. Click on post to share the post on your wall.
How to Add Emojis to Videos on iMovie?
Step 1: Search for the desired emoji on the internet with transparent background. Go to iMovie and select a clip of your video where you want to insert an emoji.
Step 2: Go to the “Import” option into the toolbar above, select your desired emoji from the list. This emoji will be added to the iMovie library.
Step 3: Click on that emoji. This overlays that emoji onto that video clip. You can scale the emoji up and down and drag it anywhere on the video.
Image from YouSubtitles
How to Add Emojis to Videos Online?
Blurbiz, is an online application for editing YouTube, Instagram, Facebook and Snapchat videos. Just follow the steps below, then you can add emojis you want.
Step 1: Create and name the project in Blurbiz.
Step 2: Upload either your video, sticker or gif whichever you want an emoji to be placed in.
Step 3: Hover over the video and click on the “edit” button.
Step 4: Tap on “upload” at the top left side of the pane. Upload emoji with .png extension from your desktop.
Step 5: Drag and drop to overlay the emoji onto your video. Resize and position an emoji accordingly.
Step 6: Tap on “complete” at the top right corner when you are done. You can download an mp4 format video.
How to Add Emojis to Videos Android?
WeVideo , is an app to create and edit videos to the next level and provide one with ample special effects to add on to your videos.
Alongside using basic editing features like cutting, trimming or arranging video clips, you can amplify your editing game by adding emoji to your videos. Moreover, you can export your projects in high quality and share them on either Vimeo, YouTube or Dropbox.
Conclusion
Be it any video on any social media platform or your local device, with this thorough guide, you must be able to accessorize your video and take it to another level of emotional expression and message details in your video by using fun emojis.
Liza Brown
Liza Brown is a writer and a lover of all things video.
Follow @Liza Brown
Also read:
- [New] Fusing iPhones' Audio and Visuals Together for 2024
- [Updated] 2024 Approved Building Harmonious Forms Crafting Circles and Spheres
- How to Bypass Android Lock Screen Using Emergency Call On Oppo Find X6?
- In 2024, How to Track Vivo Y56 5G Location without Installing Software? | Dr.fone
- In 2024, How to Unlock iCloud lock from your Apple iPhone 12 Pro and iPad?
- In 2024, Seamless Classic Play on iOS with Select PS2 Emulators
- New 2024 Approved How to Make a Memorable Honeymoon Video
- New FREE 10 Websites to Watch Cartoon Online in HD for 2024
- The Power Play Enhancing Your Page's Popularity Ranking
- Unveiling Mastery The Ultimate Animoji Guide for iPhone X
- Updated 2024 Approved Add Emojis to Videos on YouTube/Facebook/Snapchat Step by Step Guide
- Updated 2024 Approved How to Make a Video Meme with 4 Best Meme Video Makers
- Updated What Is Emoji?
- Title: Updated Making Triggered Memes with Filmora Video Editor
- Author: Jan
- Created at : 2024-09-25 16:52:00
- Updated at : 2024-09-30 18:01:57
- Link: https://meme-emoji.techidaily.com/updated-making-triggered-memes-with-filmora-video-editor/
- License: This work is licensed under CC BY-NC-SA 4.0.