
:max_bytes(150000):strip_icc():format(webp)/asian-woman-talking-into-microphone-722208887-5b2a989730371300373a0447.jpg)
Updated In 2024, How to Make a Photo Collage Using iPhoto?
How to Make a Photo Collage Using iPhoto?
How to Make a Photo Collage on Mac/iPhone Using iPhoto?

Shanoon Cox
Mar 27, 2024• Proven solutions
iPhoto is a photo library familiar to iOS users. It can help you easily organize, store and sort images, and even make a slide show to help you enjoy photos. This is why, even though Apple no longer develops iPhoto, some people use it.
Update: On April 8, 2015, Apple has launched a new Photos app on OS X Yosemite, which means Apple has stopped developing iPhoto. However, if you like iPhoto, you can still use it.
The following will introduce how to use the iPhoto collage maker on Mac or iPhone. At the end of this article, iPhoto alternative software will serve as your reference.
Part 1: How to Make a Photo Collage in iPhoto?
Here are the quick steps to create a photo collage with iPhoto.
Step 1: Launch iPhoto and click “Events” in the side menu.
Step 2: Hold “Shift” and click each photo you want to include in your photo collage.
Step 3: Click the “+” button in the lower-left corner and select Card in the pop-up window.
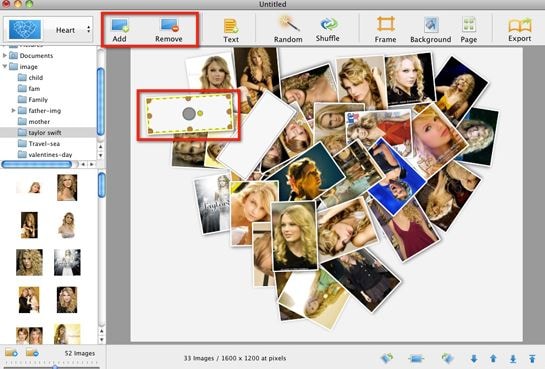
Step 4: Choose “Picture Collage”, which should be under the Any Occasion section if you are using the iPhoto 11.
Step 5: You’ll notice that all the templates are sorted based on the occasion.
Step 6: Drag photos to the template and pick a background, orientation and design.
Step 7: Click the Buy button on the lower right-hand corner of the collage editor, or go to the Share menu and email it to yourself or family members.
But before you make a photo collage using iPhoto, here are some important things for you to know:
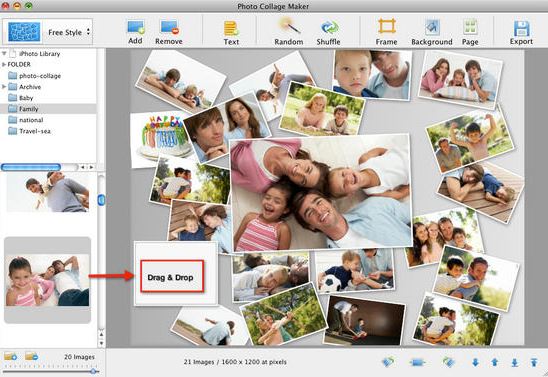
- Technically, iPhoto can’t make fancy photo collages like other Photo collages makers on Mac. So don’t expect too much of it. iPhoto only creates greeting cards with a simple collage layout.
- The templates iPhoto offers are quite limited and ordinary that you might feel a little disappointed.
- iPhoto offers no share options to save photo collages to desktop or to post on Facebook, which is a basic feature of picture collage editor.
Part 2: What Replaces iPhoto on Mac/iPhone?
Since iPhoto’s functions are not sufficient, we will introduce some alternative collage makers that you may be interested in.
Alternative to Make a Short Video, Slideshow, or Photo Collage: Wondershare Filmora
If there are too many photos to save or share with friends and family, you can use these images to make short videos to better collage and share. Filmora can do this for you, through which you can easily crop, add effects, split the screen, and merge photos. In order to make the “photo video” lively and exciting, you can also add music, audio, animation, title, music, etc. to it.


Alternative to Organize, Store, and Sort Images: iCloud
Migrating your photos to iCloud is a wise choice. iCloud is the best photo storage for iOS or Mac users. You don’t need to download other apps or software. Just allow iCloud to back up the photo’s library in the settings.
The best thing is that you can view iCloud photos anytime and anywhere after logging in to your iCloud account. You can also automatically share photos with others by opening “Shared Album”. However, if there are too many photos, a paid subscription may be required to upgrade the storage space.
Conclusion
Above are the steps to make a photo collage using iPhoto on Mac/iPhone. We also list alternative methods to meet the different needs of the Photo library. So, if this isn’t quite what you’re looking for, you can also use some online photo collage service instead. If you want to have more fun editing photo stories, welcome to download Filmora and make more memorable and interesting videos.
Shanoon Cox
Shanoon Cox is a writer and a lover of all things video.
Follow @Shanoon Cox
Shanoon Cox
Mar 27, 2024• Proven solutions
iPhoto is a photo library familiar to iOS users. It can help you easily organize, store and sort images, and even make a slide show to help you enjoy photos. This is why, even though Apple no longer develops iPhoto, some people use it.
Update: On April 8, 2015, Apple has launched a new Photos app on OS X Yosemite, which means Apple has stopped developing iPhoto. However, if you like iPhoto, you can still use it.
The following will introduce how to use the iPhoto collage maker on Mac or iPhone. At the end of this article, iPhoto alternative software will serve as your reference.
Part 1: How to Make a Photo Collage in iPhoto?
Here are the quick steps to create a photo collage with iPhoto.
Step 1: Launch iPhoto and click “Events” in the side menu.
Step 2: Hold “Shift” and click each photo you want to include in your photo collage.
Step 3: Click the “+” button in the lower-left corner and select Card in the pop-up window.
Step 4: Choose “Picture Collage”, which should be under the Any Occasion section if you are using the iPhoto 11.
Step 5: You’ll notice that all the templates are sorted based on the occasion.
Step 6: Drag photos to the template and pick a background, orientation and design.
Step 7: Click the Buy button on the lower right-hand corner of the collage editor, or go to the Share menu and email it to yourself or family members.
But before you make a photo collage using iPhoto, here are some important things for you to know:
- Technically, iPhoto can’t make fancy photo collages like other Photo collages makers on Mac. So don’t expect too much of it. iPhoto only creates greeting cards with a simple collage layout.
- The templates iPhoto offers are quite limited and ordinary that you might feel a little disappointed.
- iPhoto offers no share options to save photo collages to desktop or to post on Facebook, which is a basic feature of picture collage editor.
Part 2: What Replaces iPhoto on Mac/iPhone?
Since iPhoto’s functions are not sufficient, we will introduce some alternative collage makers that you may be interested in.
Alternative to Make a Short Video, Slideshow, or Photo Collage: Wondershare Filmora
If there are too many photos to save or share with friends and family, you can use these images to make short videos to better collage and share. Filmora can do this for you, through which you can easily crop, add effects, split the screen, and merge photos. In order to make the “photo video” lively and exciting, you can also add music, audio, animation, title, music, etc. to it.
Alternative to Organize, Store, and Sort Images: iCloud
Migrating your photos to iCloud is a wise choice. iCloud is the best photo storage for iOS or Mac users. You don’t need to download other apps or software. Just allow iCloud to back up the photo’s library in the settings.
The best thing is that you can view iCloud photos anytime and anywhere after logging in to your iCloud account. You can also automatically share photos with others by opening “Shared Album”. However, if there are too many photos, a paid subscription may be required to upgrade the storage space.
Conclusion
Above are the steps to make a photo collage using iPhoto on Mac/iPhone. We also list alternative methods to meet the different needs of the Photo library. So, if this isn’t quite what you’re looking for, you can also use some online photo collage service instead. If you want to have more fun editing photo stories, welcome to download Filmora and make more memorable and interesting videos.
Shanoon Cox
Shanoon Cox is a writer and a lover of all things video.
Follow @Shanoon Cox
Generating the Nut Button Meme
Generating the Nut Button Meme

Ollie Mattison
Mar 27, 2024• Proven solutions
Generating the Nut Button Meme
The Nut Button meme started out as an immature joke, with a word ‘Nut’ written across a blue button, and for a number of years, this meme was used mostly for bad sex jokes. However, the meme has evolved through the years and meme makers from around the world use it to make social media, gaming and countless other types of jokes.
Commonly, the Nut Button meme suggests that a person, in many cases the creator of the meme, likes doing something in certain types of situations, like listening to crappy music when they feel down or taking revenge on their enemies when they have the opportunity. Generating this type of meme doesn’t require too much effort as it often contains one word. Some versions of this meme include the motive that prompts the hand in the meme to push the button, but using this element of the meme is optional.
A Few Good Examples of the Nut Button Meme
Taking the first concept that comes to your mind won’t necessarily make this meme as effective as you’d like it to be, so you have to think carefully which button the hand is going to hit.
Hitting the Divorce button can be a painful process in real life, but it can also be an endless source of fun if the reason why the hand hits it is so ridiculous that it could never be an actual reason for a divorce.
This meme can also be used to make fun of world leaders and their bad decisions or pop-culture figures that often do ill-advised things.

The elements of the Nut meme are always the same, although their topics can vary because the hand and the blue button are irreplaceable parts of this meme.
Generating the Nut Button Meme
We suggest using Filmora Online Meme Maker to generate your meme because this online tool lets you create memes without watermarks for free. What’s more, you don’t even have to sign up in order to make a meme from images, GIFs or videos.
Step 1 – Uploading the Meme Template
You can click the “Copy the image” link below and the image link will be copied automatically.
![]()
Copy the image
After arriving at Filmora Online Meme Maker ‘s home page, you’ll be asked to upload the image. Paste the image’s URL into the Enter a URL box. After uploading a picture from your computer, you’ll be asked if you would like to crop, flip or rotate it. Click on the OK button to confirm the changes you’ve made and proceed to the next step of the process.

Step 2 – Adding Text to the Image
When a new page loads you will get access to all tools Filmora Online Meme Maker offers. Make sure that the Text Inside option is selected, since on nearly all examples of this meme the text is positioned within the image.

Insert the text into the text boxes, and reposition it on the picture so it is placed between the blue button and hand. You can add as many text boxes as you want to the picture, but Nut Button memes commonly include just one or two lines of text.

The color of the text, size, and font can all be changed in the Text Options menu, so before hitting the Create button you can experiment with these tools in order to generate a better meme.
Step 3 – Saving the Meme
Finally, click on the download button, and when a new page loads and you’re ready to share your new Nut Button meme on social media.

The Filmora Online Meme Maker is mobile friendly, which means that you can use this platform to make memes from your Smartphone.
Conclusion
The Nut Button meme can be used in a wide array of different contexts, and it is up to you which one you’re going to use. You can mock stereotypical answers to questions, world leaders or make a joke at your own expense. Whichever topic you choose, the Filmora Online Meme Maker will help you express your creativity fully. What is your favorite Nut Button meme? Leave a comment below and let us know.
Ollie Mattison
Ollie Mattison is a writer and a lover of all things video.
Follow @Ollie Mattison
Ollie Mattison
Mar 27, 2024• Proven solutions
Generating the Nut Button Meme
The Nut Button meme started out as an immature joke, with a word ‘Nut’ written across a blue button, and for a number of years, this meme was used mostly for bad sex jokes. However, the meme has evolved through the years and meme makers from around the world use it to make social media, gaming and countless other types of jokes.
Commonly, the Nut Button meme suggests that a person, in many cases the creator of the meme, likes doing something in certain types of situations, like listening to crappy music when they feel down or taking revenge on their enemies when they have the opportunity. Generating this type of meme doesn’t require too much effort as it often contains one word. Some versions of this meme include the motive that prompts the hand in the meme to push the button, but using this element of the meme is optional.
A Few Good Examples of the Nut Button Meme
Taking the first concept that comes to your mind won’t necessarily make this meme as effective as you’d like it to be, so you have to think carefully which button the hand is going to hit.
Hitting the Divorce button can be a painful process in real life, but it can also be an endless source of fun if the reason why the hand hits it is so ridiculous that it could never be an actual reason for a divorce.
This meme can also be used to make fun of world leaders and their bad decisions or pop-culture figures that often do ill-advised things.
The elements of the Nut meme are always the same, although their topics can vary because the hand and the blue button are irreplaceable parts of this meme.
Generating the Nut Button Meme
We suggest using Filmora Online Meme Maker to generate your meme because this online tool lets you create memes without watermarks for free. What’s more, you don’t even have to sign up in order to make a meme from images, GIFs or videos.
Step 1 – Uploading the Meme Template
You can click the “Copy the image” link below and the image link will be copied automatically.
![]()
Copy the image
After arriving at Filmora Online Meme Maker ‘s home page, you’ll be asked to upload the image. Paste the image’s URL into the Enter a URL box. After uploading a picture from your computer, you’ll be asked if you would like to crop, flip or rotate it. Click on the OK button to confirm the changes you’ve made and proceed to the next step of the process.
Step 2 – Adding Text to the Image
When a new page loads you will get access to all tools Filmora Online Meme Maker offers. Make sure that the Text Inside option is selected, since on nearly all examples of this meme the text is positioned within the image.
Insert the text into the text boxes, and reposition it on the picture so it is placed between the blue button and hand. You can add as many text boxes as you want to the picture, but Nut Button memes commonly include just one or two lines of text.
The color of the text, size, and font can all be changed in the Text Options menu, so before hitting the Create button you can experiment with these tools in order to generate a better meme.
Step 3 – Saving the Meme
Finally, click on the download button, and when a new page loads and you’re ready to share your new Nut Button meme on social media.
The Filmora Online Meme Maker is mobile friendly, which means that you can use this platform to make memes from your Smartphone.
Conclusion
The Nut Button meme can be used in a wide array of different contexts, and it is up to you which one you’re going to use. You can mock stereotypical answers to questions, world leaders or make a joke at your own expense. Whichever topic you choose, the Filmora Online Meme Maker will help you express your creativity fully. What is your favorite Nut Button meme? Leave a comment below and let us know.
Ollie Mattison
Ollie Mattison is a writer and a lover of all things video.
Follow @Ollie Mattison
How to Make Memes on iPhone and Android
How to Make Memes on iPhone and Android
Ollie Mattison
Mar 27, 2024• Proven solutions
With growing demand on the internet, memes are spreading like wildfire. In case you want to promote your brand using various types of relatable memes that would drive more traffic for your website, then there is good news for you. It doesn’t matter, whether you own an Android or iOS device. We will help you out in learning how to make memes on iPhone/Android in this article. Keep reading!
- Part1: How to make memes on iPhone with Meme Generator
- Part2: How to make memes on Android with Memedroid
- Part3: Recommended - Making memes with Filmora meme maker online
Part 1: How to make memes on iPhone with Meme Generator
While planning to create memes on your iPhone, you might find Meme Generator as the most suitable tool. It helps you create hilarious memes and allows you to share on social media platforms like Twitter, Facebook, Messenger, Instagram, Dropbox, E-mail, Snapchat etc. you get 500 plus memes with example captions under different categories.
You can customize memes using your own photos and adding text, alter size and color of text using 10 different fonts. You can crop the image, move it, add border to it, filter/search memes, and scroll through each meme category. There are no watermark or auto upload of memes to protect your privacy. Here is the detailed guide –
Step 1: Install Meme Generator from App Store on your iPhone and launch the app.
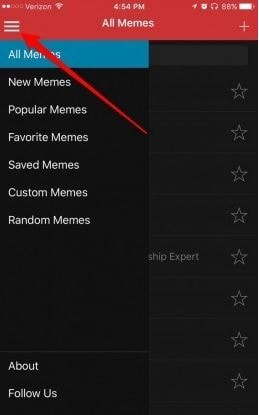
Step 2: Tap on the 3 horizontal lines on the top-left corner to browse memes. If you know the name, then search a meme and click on it.
Step 3: Use the example text or hit the ‘Text’ bar to add or edit your caption. Press the icons over the top-right corner for customizing your meme photo and caption options.

Step 4: Tap on the ‘Save’ or ‘Share’ button, once you are done editing the meme. You can find the meme on your ‘Photos’ app.
Part 2: How to make memes on Android with Memedroid
If you are wondering how to make memes on Android, then take the Memedroid app into consideration. You can create photos and GIF memes, jokes, avatars, graphics etc. with this app. There are numerous memes uploaded everyday on the app and you get the chance to let people vote for your meme too.
You get to use popular templates such as evil toddler, attached girlfriend, surprised koala with hilarious designs. The best rated memes are in the top gallery and you get the main gallery with latest funny memes too. You can design and save your memes and share them or download, it’s up to you. It supports a wide variety of languages such as English, French, Spanish, Italian, Portuguese etc.
Here are the steps for how to make memes on Android –
Step 1: Download and install the app on your mobile and launch it. Click on ‘Meme Factory’ to pick the background image and then you can swipe to explore the other features too. Alternatively, you can add your own photos if Meme factory was not of your choice. Hit ‘Upload Zone’ instead of ‘Meme Factory’ and register for a free account. On the ‘Upload’ screen, tap the ‘Select An Image’ button to pick a photo within 330MB size

Step 2: After selecting the background image, add captions at the top and bottom of the image. The ‘SAVE’ button can be found on the top-right, tap that to save. Likewise, for sharing the meme, hit the ‘SHARE’ button located at the bottom of the screen.
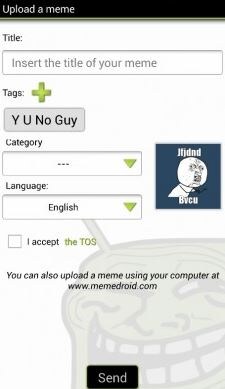
Step 3: Add tags and accept the ‘Terms of Service’ followed by ‘Send’ button. Wait a while, to get you meme ready for your audience.
Part 3: Recommended - Making memes with Filmora meme maker online
In order to make memes on iPhone/Android, you need a mobile device. But, what if you have a computer on which you need to create a meme? Well, Filmora meme maker is the apt choice for you. You don’t need to download apps or software on your Pc. It is the ultimate online solution.
Brief steps to introduce making memes. You can create image, GIF, and video memes adding nice fonts. It processes video/GIF/image memes rapidly than the competitors. Adding texts, fonts and altering font colors is so easy with it.
Here is the detailed guide to make memes on Android –
Step 1: Visit the official Filmora website and look for Filmora online meme maker. Import videos by dragging and dropping to the Filmora interface. You can even add online links to videos in order to upload them.

Step 2: After selecting the video/photo/GIF move to the meme editor page and customize your video meme using tools from the left pane. Include text, change fonts and then you can preview the changes.

Step 3: Tap on the ‘CREATE’ button to apply the changes, when you are satisfied. Press the ‘DOWNLOAD’ button and then share your meme on social media sites.

Conclusion
Coming towards the end of the article, we have discovered that Filmora creates brilliant memes and that too, in no time. No lengthy or annoying processes, nor you need apps that eat up your phone memory. Life is blissfully funny with meme making on Filmora.
Ollie Mattison
Ollie Mattison is a writer and a lover of all things video.
Follow @Ollie Mattison
Ollie Mattison
Mar 27, 2024• Proven solutions
With growing demand on the internet, memes are spreading like wildfire. In case you want to promote your brand using various types of relatable memes that would drive more traffic for your website, then there is good news for you. It doesn’t matter, whether you own an Android or iOS device. We will help you out in learning how to make memes on iPhone/Android in this article. Keep reading!
- Part1: How to make memes on iPhone with Meme Generator
- Part2: How to make memes on Android with Memedroid
- Part3: Recommended - Making memes with Filmora meme maker online
Part 1: How to make memes on iPhone with Meme Generator
While planning to create memes on your iPhone, you might find Meme Generator as the most suitable tool. It helps you create hilarious memes and allows you to share on social media platforms like Twitter, Facebook, Messenger, Instagram, Dropbox, E-mail, Snapchat etc. you get 500 plus memes with example captions under different categories.
You can customize memes using your own photos and adding text, alter size and color of text using 10 different fonts. You can crop the image, move it, add border to it, filter/search memes, and scroll through each meme category. There are no watermark or auto upload of memes to protect your privacy. Here is the detailed guide –
Step 1: Install Meme Generator from App Store on your iPhone and launch the app.
Step 2: Tap on the 3 horizontal lines on the top-left corner to browse memes. If you know the name, then search a meme and click on it.
Step 3: Use the example text or hit the ‘Text’ bar to add or edit your caption. Press the icons over the top-right corner for customizing your meme photo and caption options.
Step 4: Tap on the ‘Save’ or ‘Share’ button, once you are done editing the meme. You can find the meme on your ‘Photos’ app.
Part 2: How to make memes on Android with Memedroid
If you are wondering how to make memes on Android, then take the Memedroid app into consideration. You can create photos and GIF memes, jokes, avatars, graphics etc. with this app. There are numerous memes uploaded everyday on the app and you get the chance to let people vote for your meme too.
You get to use popular templates such as evil toddler, attached girlfriend, surprised koala with hilarious designs. The best rated memes are in the top gallery and you get the main gallery with latest funny memes too. You can design and save your memes and share them or download, it’s up to you. It supports a wide variety of languages such as English, French, Spanish, Italian, Portuguese etc.
Here are the steps for how to make memes on Android –
Step 1: Download and install the app on your mobile and launch it. Click on ‘Meme Factory’ to pick the background image and then you can swipe to explore the other features too. Alternatively, you can add your own photos if Meme factory was not of your choice. Hit ‘Upload Zone’ instead of ‘Meme Factory’ and register for a free account. On the ‘Upload’ screen, tap the ‘Select An Image’ button to pick a photo within 330MB size
Step 2: After selecting the background image, add captions at the top and bottom of the image. The ‘SAVE’ button can be found on the top-right, tap that to save. Likewise, for sharing the meme, hit the ‘SHARE’ button located at the bottom of the screen.
Step 3: Add tags and accept the ‘Terms of Service’ followed by ‘Send’ button. Wait a while, to get you meme ready for your audience.
Part 3: Recommended - Making memes with Filmora meme maker online
In order to make memes on iPhone/Android, you need a mobile device. But, what if you have a computer on which you need to create a meme? Well, Filmora meme maker is the apt choice for you. You don’t need to download apps or software on your Pc. It is the ultimate online solution.
Brief steps to introduce making memes. You can create image, GIF, and video memes adding nice fonts. It processes video/GIF/image memes rapidly than the competitors. Adding texts, fonts and altering font colors is so easy with it.
Here is the detailed guide to make memes on Android –
Step 1: Visit the official Filmora website and look for Filmora online meme maker. Import videos by dragging and dropping to the Filmora interface. You can even add online links to videos in order to upload them.
Step 2: After selecting the video/photo/GIF move to the meme editor page and customize your video meme using tools from the left pane. Include text, change fonts and then you can preview the changes.
Step 3: Tap on the ‘CREATE’ button to apply the changes, when you are satisfied. Press the ‘DOWNLOAD’ button and then share your meme on social media sites.
Conclusion
Coming towards the end of the article, we have discovered that Filmora creates brilliant memes and that too, in no time. No lengthy or annoying processes, nor you need apps that eat up your phone memory. Life is blissfully funny with meme making on Filmora.
Ollie Mattison
Ollie Mattison is a writer and a lover of all things video.
Follow @Ollie Mattison
How to Make an Adorable Video for Your Baby’s First Year
How to Make an Adorable Video for Your Baby’s First Year
Ollie Mattison
Mar 27, 2024• Proven solutions
Your baby grows up very fast and being able to see him grow is maybe one of the most interesting and exciting moments in your life. Documenting the first year is amazing and it will surely offer you an extraordinary value so try to do that the best way you can. Imagine how touched your child would be when he/she, at the age of 18, watch something like this:
How to make the baby’s first year video
Filming tips
Shooting a good baby’s first year video can take a little bit of preparation and it will surely offer you an extraordinary experience in the long run. It will also help offer you an incredible value to begin with which is always impressive.
Stabilize the camera - The first thing you need to do is to stabilize the camera. Using a tripod can be the best option here so take your time and results will be great for sure. Of course, placing the camera on your counter will also help, so try to keep that in mind as it can indeed be a very good option to begin with.
Lighting - You will also have to play with the proper lighting setup. A good light will help you get much better results and even though it can take some time to get the best experience, it really is a truly amazing option that you do not want to miss.
Focus - Of course, focus on the baby. Yes, focus but don’t zoom in and out all the time. Find a good pattern that will help keep the baby steady and do all in your power to get the best results. Granted, it will take some time to get good results but don’t rush it otherwise the experience will not be as good as you would expect.
Audio - Moreover, audio should be your focus here as well. Take the time and do something good here, a good audio will always pay off very well so get a good audio setup if you want to obtain a stellar experience.
Props - Also, we recommend you to use props. These can really make a good video and they will even add in some much needed fun to your setup. Try to find the best possible props and add them in your video. Some good prop examples would be a stuffed animal, a toy, maybe even the family pet. All of these are great and well worth your time.
Editing tips
Once you finished capturing the movie, you will have to go to editing. This is where you have to use a good video editing tool that will help provide a good baby’s first year video in the end. With that in mind, Wondershare Filmora can be the tool of choice as it offers you all the features you need in order to create a good baby video.
=“” style=”width: 100%; height: 278.438px;”;
Download Mac Version ](https://tools.techidaily.com/wondershare/filmora/download/ )
Adjust saturation - You should try to use the app in order to adjust the saturation as this can lead to some very bad results if you’re not careful. Find the proper saturation levels and opt for them right away.
Trim, cut, or split - If needed, split, cut or even trim the video. There will be times when you will need the reversing effect as well. All of these effects are accessible via the Wondershare Filmora video app.
Advanced editing - Plus, you will also need to apply a green screen effect as this will help you place your baby in a variety of funny locations, be it a funny MV or a Hollywood movie. The app can also help you clone the baby with PIP effects and you can also use it to add filters, overlays or text.
Wondershare Filmora will offer you an extraordinary set of tools and it will bring in front a very good value right from the start. The interface of the app is user friendly and you will have no problem using it as you see fit. Also, you can create the baby’s first year video on both Mac and Windows as the app supports both platforms. It also delivers immediate support for camcorders and smartphones so you can use any device you want for video capture. With its help you can share videos to DVD or YouTube too if you so desire. Don’t hesitate and access this great tool as fast as possible to get a good outcome!
Ollie Mattison
Ollie Mattison is a writer and a lover of all things video.
Follow @Ollie Mattison
Ollie Mattison
Mar 27, 2024• Proven solutions
Your baby grows up very fast and being able to see him grow is maybe one of the most interesting and exciting moments in your life. Documenting the first year is amazing and it will surely offer you an extraordinary value so try to do that the best way you can. Imagine how touched your child would be when he/she, at the age of 18, watch something like this:
How to make the baby’s first year video
Filming tips
Shooting a good baby’s first year video can take a little bit of preparation and it will surely offer you an extraordinary experience in the long run. It will also help offer you an incredible value to begin with which is always impressive.
Stabilize the camera - The first thing you need to do is to stabilize the camera. Using a tripod can be the best option here so take your time and results will be great for sure. Of course, placing the camera on your counter will also help, so try to keep that in mind as it can indeed be a very good option to begin with.
Lighting - You will also have to play with the proper lighting setup. A good light will help you get much better results and even though it can take some time to get the best experience, it really is a truly amazing option that you do not want to miss.
Focus - Of course, focus on the baby. Yes, focus but don’t zoom in and out all the time. Find a good pattern that will help keep the baby steady and do all in your power to get the best results. Granted, it will take some time to get good results but don’t rush it otherwise the experience will not be as good as you would expect.
Audio - Moreover, audio should be your focus here as well. Take the time and do something good here, a good audio will always pay off very well so get a good audio setup if you want to obtain a stellar experience.
Props - Also, we recommend you to use props. These can really make a good video and they will even add in some much needed fun to your setup. Try to find the best possible props and add them in your video. Some good prop examples would be a stuffed animal, a toy, maybe even the family pet. All of these are great and well worth your time.
Editing tips
Once you finished capturing the movie, you will have to go to editing. This is where you have to use a good video editing tool that will help provide a good baby’s first year video in the end. With that in mind, Wondershare Filmora can be the tool of choice as it offers you all the features you need in order to create a good baby video.
=“” style=”width: 100%; height: 278.438px;”;
Download Mac Version ](https://tools.techidaily.com/wondershare/filmora/download/ )
Adjust saturation - You should try to use the app in order to adjust the saturation as this can lead to some very bad results if you’re not careful. Find the proper saturation levels and opt for them right away.
Trim, cut, or split - If needed, split, cut or even trim the video. There will be times when you will need the reversing effect as well. All of these effects are accessible via the Wondershare Filmora video app.
Advanced editing - Plus, you will also need to apply a green screen effect as this will help you place your baby in a variety of funny locations, be it a funny MV or a Hollywood movie. The app can also help you clone the baby with PIP effects and you can also use it to add filters, overlays or text.
Wondershare Filmora will offer you an extraordinary set of tools and it will bring in front a very good value right from the start. The interface of the app is user friendly and you will have no problem using it as you see fit. Also, you can create the baby’s first year video on both Mac and Windows as the app supports both platforms. It also delivers immediate support for camcorders and smartphones so you can use any device you want for video capture. With its help you can share videos to DVD or YouTube too if you so desire. Don’t hesitate and access this great tool as fast as possible to get a good outcome!
Ollie Mattison
Ollie Mattison is a writer and a lover of all things video.
Follow @Ollie Mattison
How to Use Emojis on Windows 10 and Windows 11?
If you ever wondered how to use emojis on Windows, or since when the emojis are around and what is their significance, you will find all your answers here. Because Windows 10 offers a great range of emojis that help you express your feelings and reactions in fewer words, they have recently gained a decent level of popularity, mostly amongst youngsters and millennials.
With that said, in the following sections, you will learn how to use emojis on Windows 10 using both keyboard shortcuts and touch keyboard, how to get emojis on Windows 10 to make your text or conversation look more versatile, and what new has been added to the latest operating system released by Microsoft, i.e., Windows 11.
In this article
01 Part 1: The History of Emojis in Windows
02 Part 2: How to Use Emojis with Keyboard Shortcuts
03 Part 3: How to Use Emojis on Windows PC with Touch Keyboard
04 Part 4: What’s New in Emojis in Windows 11
05 Part 5: How to Get More Emojis in Windows 11
Part 1: The History of Emojis in Windows
Although emojis are present in some form or the other since the mid-‘90s, they were not quite popular back then. With the evolution of smartphones, these iconic characters got attention from the then-teenagers. Seeing this, in 2012, Microsoft introduced the first-ever set of black-and-white emojis with the release of Windows 8, and after some time, the company also added the same to Windows 7 that was rolled out along with the updates for the OS.
With the release of Windows 10 in 2015, a wide range of full-fledged colored emojis was introduced and received a large number of positive reactions from the users. As of today, emojis have become an integral part of everyone’s day-to-day text conversation, be it on Skype, WhatsApp, Facebook, or any other such platform.
Part 2: How to Use Emojis with Keyboard Shortcuts
A keyboard shortcut is a combination of two or more keys that are pressed simultaneously to trigger a pre-assigned event or action. A good example of a keyboard shortcut is ‘Ctrl + S’ which, when pressed, saves the document you’re working on.
While learning the process of how to use emoji in Windows 10, it is equally imperative to memorize the shortcut keys to insert those icons without taking your hands off the keyboard. This not only saves your time, but it also prevents you from going through the lengthy process of opening the emojis keyboard, navigating through all the available icons to choose the one you’re looking for, and then clicking it to insert in the document or conversation.
Nevertheless, it would be a good idea to learn how to launch the emojis keyboard, and the process is simple. All you need to do is:
- Make sure that your keyboard cursor is in an app that can accept text inputs. A text editor like MS Word or WordPad could be a good example
- Press the Windows + ; (semicolon) or Windows + . (period) keys together to open the emojis keyboard

Once the keyboard is open, you can click any of the available emojis to insert it in your conversion or text content.
As for the shortcuts, depending on the type of expression you want to convey, there could be thousands of them. Some of the commonly used emojis and their universal shortcut keys for both Windows 10 and Windows 11 include:
: (colon) + ) (right brace) will create a smiley face
: (colon) + ( (left brace) will create a sad face
: (colon) + ; (semicolon) will create a wink face
…and so on. You can conduct a quick online search to get the entire list of keyboard shortcuts and the emojis that they will create. For your convenience, a link from the Microsoft official website is given below:
Part 3: How to Use Emojis on Windows PC with Touch Keyboard
If you have Microsoft Surface or any other device that has Windows 10 or Windows 11 installed on it, and can accept inputs via touch keyboard, you can enable the feature in the operating system, and then use the touch keyboard to add emojis to your conversion or content. You can follow the instructions given below to enable touch keyboard, and then learn how to use emojis on Windows 11 or Windows 10 via touch:
- Right-click anywhere on the taskbar (Windows 11 is used here for demonstration), and then click Taskbar settings

- From the right area of the Settings window that opens next, scroll down to the Taskbar corner icons section, and then turn on the Touch keyboard switch

- Launch an app that can accept text inputs, e.g., a text editor, chatting app, etc. Click or tap the Touch keyboard icon from the notification area that is present at the bottom-right corner of the screen.

- Click or tap the Emojis icon from the upper-left corner of the touch keyboard that opens up, and then touch your preferred emoji to add it to your text or conversation.

Part 4: What’s New in Emojis in Windows 11
In addition to learning how to use emojis on Windows 10, it is also important to know what’s new with them or the emojis panel in Windows 11, the latest operating system released by Microsoft this year, i.e., 2021.
In Windows 11, although you can launch the emojis keyboard using the same shortcuts, i.e., ‘Windows + .’ or ‘Windows + ;’ keys as mentioned earlier, the emojis keyboard itself has four sections, namely:
- Emojis – Contains various emojis and smileys
- GIF – Gives you access to various animated GIFs from Tenor
- Kamojis – Lets you add the ASCII characters for emojis, e.g., :-) or :-(
- Symbols – To add important symbols to your text, e.g., ©, ®, etc.
In addition to this, the 2D Clippy emoji has also been introduced with Windows 11, and can be located by launching the emojis keyboard, and typing ‘Clippy’.
Part 5: How to Get More Emojis in Windows 11
If the built-in emoji library doesn’t contain your favorite expressions, you can always get several more by following the instructions given below:
- Launch your favorite web browser on Windows 11, and then go to http://www.iemoji.com/
- Click an emoji from the available options or copy one from your favorite portal, and paste it in the Paste Emoji here field

- Review the emoji in the MESSAGE PREVIEW field, and click Create from the Options section to generate the emoji that can be sent as a message or image

- Alternatively, click Copy from the Options section itself, and then go to the text editor or any other portal you want to use the emoji in, and press Ctrl + V to paste and insert the emoji in your conversation or text without any hassle.

Conclusion
While the emojis were introduced to Windows as late as 2012, Windows 11 has a wide range of these virtual objects or faces for various occasions and to convey different expressions respectively. Furthermore, Windows 11 also gives you access to Tenor’s GIFs, and ASCII characters with particular combinations to represent the emojis, as it was done back in the days of button-operated cellphones.
Also, if the built-in emoji keyboard doesn’t have your favorite expressions and smileys, you can always generate your custom ones by going to http://www.iemoji.com/ , and using the options that the website offers. All in all, it’s easy to learn how to use emojis on Windows as long as you have access to the correct tutorial that explains the process in an easy manner.
02 Part 2: How to Use Emojis with Keyboard Shortcuts
03 Part 3: How to Use Emojis on Windows PC with Touch Keyboard
04 Part 4: What’s New in Emojis in Windows 11
05 Part 5: How to Get More Emojis in Windows 11
Part 1: The History of Emojis in Windows
Although emojis are present in some form or the other since the mid-‘90s, they were not quite popular back then. With the evolution of smartphones, these iconic characters got attention from the then-teenagers. Seeing this, in 2012, Microsoft introduced the first-ever set of black-and-white emojis with the release of Windows 8, and after some time, the company also added the same to Windows 7 that was rolled out along with the updates for the OS.
With the release of Windows 10 in 2015, a wide range of full-fledged colored emojis was introduced and received a large number of positive reactions from the users. As of today, emojis have become an integral part of everyone’s day-to-day text conversation, be it on Skype, WhatsApp, Facebook, or any other such platform.
Part 2: How to Use Emojis with Keyboard Shortcuts
A keyboard shortcut is a combination of two or more keys that are pressed simultaneously to trigger a pre-assigned event or action. A good example of a keyboard shortcut is ‘Ctrl + S’ which, when pressed, saves the document you’re working on.
While learning the process of how to use emoji in Windows 10, it is equally imperative to memorize the shortcut keys to insert those icons without taking your hands off the keyboard. This not only saves your time, but it also prevents you from going through the lengthy process of opening the emojis keyboard, navigating through all the available icons to choose the one you’re looking for, and then clicking it to insert in the document or conversation.
Nevertheless, it would be a good idea to learn how to launch the emojis keyboard, and the process is simple. All you need to do is:
- Make sure that your keyboard cursor is in an app that can accept text inputs. A text editor like MS Word or WordPad could be a good example
- Press the Windows + ; (semicolon) or Windows + . (period) keys together to open the emojis keyboard
Once the keyboard is open, you can click any of the available emojis to insert it in your conversion or text content.
As for the shortcuts, depending on the type of expression you want to convey, there could be thousands of them. Some of the commonly used emojis and their universal shortcut keys for both Windows 10 and Windows 11 include:
: (colon) + ) (right brace) will create a smiley face
: (colon) + ( (left brace) will create a sad face
: (colon) + ; (semicolon) will create a wink face
…and so on. You can conduct a quick online search to get the entire list of keyboard shortcuts and the emojis that they will create. For your convenience, a link from the Microsoft official website is given below:
Part 3: How to Use Emojis on Windows PC with Touch Keyboard
If you have Microsoft Surface or any other device that has Windows 10 or Windows 11 installed on it, and can accept inputs via touch keyboard, you can enable the feature in the operating system, and then use the touch keyboard to add emojis to your conversion or content. You can follow the instructions given below to enable touch keyboard, and then learn how to use emojis on Windows 11 or Windows 10 via touch:
- Right-click anywhere on the taskbar (Windows 11 is used here for demonstration), and then click Taskbar settings
- From the right area of the Settings window that opens next, scroll down to the Taskbar corner icons section, and then turn on the Touch keyboard switch
- Launch an app that can accept text inputs, e.g., a text editor, chatting app, etc. Click or tap the Touch keyboard icon from the notification area that is present at the bottom-right corner of the screen.
- Click or tap the Emojis icon from the upper-left corner of the touch keyboard that opens up, and then touch your preferred emoji to add it to your text or conversation.
Part 4: What’s New in Emojis in Windows 11
In addition to learning how to use emojis on Windows 10, it is also important to know what’s new with them or the emojis panel in Windows 11, the latest operating system released by Microsoft this year, i.e., 2021.
In Windows 11, although you can launch the emojis keyboard using the same shortcuts, i.e., ‘Windows + .’ or ‘Windows + ;’ keys as mentioned earlier, the emojis keyboard itself has four sections, namely:
- Emojis – Contains various emojis and smileys
- GIF – Gives you access to various animated GIFs from Tenor
- Kamojis – Lets you add the ASCII characters for emojis, e.g., :-) or :-(
- Symbols – To add important symbols to your text, e.g., ©, ®, etc.
In addition to this, the 2D Clippy emoji has also been introduced with Windows 11, and can be located by launching the emojis keyboard, and typing ‘Clippy’.
Part 5: How to Get More Emojis in Windows 11
If the built-in emoji library doesn’t contain your favorite expressions, you can always get several more by following the instructions given below:
- Launch your favorite web browser on Windows 11, and then go to http://www.iemoji.com/
- Click an emoji from the available options or copy one from your favorite portal, and paste it in the Paste Emoji here field
- Review the emoji in the MESSAGE PREVIEW field, and click Create from the Options section to generate the emoji that can be sent as a message or image
- Alternatively, click Copy from the Options section itself, and then go to the text editor or any other portal you want to use the emoji in, and press Ctrl + V to paste and insert the emoji in your conversation or text without any hassle.
Conclusion
While the emojis were introduced to Windows as late as 2012, Windows 11 has a wide range of these virtual objects or faces for various occasions and to convey different expressions respectively. Furthermore, Windows 11 also gives you access to Tenor’s GIFs, and ASCII characters with particular combinations to represent the emojis, as it was done back in the days of button-operated cellphones.
Also, if the built-in emoji keyboard doesn’t have your favorite expressions and smileys, you can always generate your custom ones by going to http://www.iemoji.com/ , and using the options that the website offers. All in all, it’s easy to learn how to use emojis on Windows as long as you have access to the correct tutorial that explains the process in an easy manner.
10 Popular Cartoon Characters That Should Top Your List
10 Popular Cartoon Characters That Should Top Your List
Shanoon Cox
Mar 27, 2024• Proven solutions
Childhood is a book with different chapters filled with joy, fun, school, chocolates, and our favorite cartoon characters. The most fantasizing thing for a child is the popular cartoon characters which they see as a tutor who teaches them to become honest, humble and most importantly they show us how to overcome problems in our life. All the famous cartoon characters are still famous among millennials who used to watch them in their childhood. In this article, we are going to dive back into childhood again and you will be amazed to see those characters again in front of your eyes.
Get ready for something mesmerizing today!
Part 1: 10 Popular Cartoon Characters of All Time
Everyone has a role model in their life and this is is a no brainer as we always have a superhero from the cartoon world whom we follow and wanna be like them. Let’s talk about some famous cartoon characters that everyone in this world is aware of.
- 1. Bugs Bunny
- 2. Scooby-Doo
- 3. SpongeBob SquarePants
- 4. Daffy Duck
- 5. Tom Cat
- 6. Mickey Mouse
- 7. Jerry Mouse
- 8. Snoopy
- 9. Winnie-the-Pooh
- 10. Donald Duck
1. Bugs Bunny
Bugs bunny is a famous cartoon character that was created in back 1930s by Leon Schlesinger and its one of the best and popular cartoon characters of all time. Bugs bunny is associated with Looney Tunes and Merrie Melodie’s animated stories. Bugs bunny is known for his insouciant and flippant personality because bugs bunny was always happy and he was also known as Happy Rabbit. The message bugs bunny sent to the world was to be happy in all situations in life.
2. Scooby-Doo
Scooby-Doo is a famous cartoon character that was created back in 1969 and this character is associated with Hanna-Barbera, an American animation company. The character is famous for its curiosity about solving supernatural mysteries and making people laugh with his crazy styles. Scooby-Doo is a natural detective and has made people fantasize about solving mysteries more easily. Scooby is so famous today that people who are in their mid-30s still watch it with their kids because of the unique character it plays.
3. SpongeBob SquarePants
SpongeBob SquarePants was created back in 1999 by Stephen Hillenburg, a marine science educator. SpongeBob SquarePants made its debut on Nickelodeon in 1999. The show becomes a superhit and SpongeBob was the next superstar with the most successful character at that time. This cartoon character is famous for his friendship with his aquatic friends and the energetic and optimistic nature of SpongeBob made inspired everyone to be hopeful in any situation.
4. Daffy Duck
Daffy Duck is a famous cartoon character that was produced in the late 1930s by Warner Bros. The cartoon is associated with cartoon series like Merrie Melodies and Looney Tunes. The cartoon character was famous for the way he would hope around in the water and yell, Woo-hoo! Woo-hoo!. Daffy Duck has always entertained people with his quirky ways of jumping into the water and making people laugh out. The message from this character was very clear and entertaining
5. Tom Cat
Tom Cat needs no introduction as it’s the furious and popular cartoon character of all time. It was created by Joseph Barbera and William Hanna in 1940. Tom is associated with the Tom & Jerry cartoon series and it made people laugh with silly fights and chasing all over the series. Tom was very annoyed by Jerry and he wanted to make a meal of Jerry as that used to make people laugh. However, the deep message Tom has given to the viewers was that whenever Jerry was in serious trouble apart from their silly fights, Tom used to save Jerry and would ignore him sarcastically. So, the message was to spread the love even if you are irritated with a person.
6. Mickey Mouse
Walt Disney created a mouse in 1928 and that was named Mickey Mouse. The cartoon character is still famous among kids and adults as a childhood memory. Mickey is famous for his nice character and stubborn attitude. Mickey and his girlfriend Minnie Mouse with his pet dog Pluto were seen with Donald Duck and Goofy. Mickey always inspired people to stay honest and loving to friends and loved ones and people who like Mickey follow the same.
7. Jerry Mouse
Jerry Mouse is one of the most notorious and crazy characters of the Tom & Jerry cartoon series. He was very much liked by people and the way he used to irritate Tom in the cartoon series was amazing. If you want to learn different ways of annoying a friend then you better take classes from Jerry as he has the craziest ways of teasing a friend without getting caught.
8. Snoopy
Ah! Snoopy, the cute dog was created by Charles M. Schulz in 1950 for a comic strip. Snoopy was the most iconic and recognizable character and was very famous for the character. Snoopy was famous for his sleep as he used to sleep all day long and he used to find different ways to live an easier life. The message it sent to the people was very clear to become easy on life as whatever the time is today, it will ultimately pass.
9. Winnie-the-Pooh
Winnie-the-Pooh was a cartoon character featured in 1928 in A.A Milne’s House at Pooh Corner. Pooh was a yellow furred bear who loved honey and lived in a forest surrounded by hundred-acre wood. He lived there with his friends who were a donkey, pig, own, rabbit and birds. Winnie was always an adventurous character and helped his friends in every situation. People liked the way Winnie used to do things and roam around the forest with his friends.
10. Donald Duck
Donald Duck is a cartoon character created by Walt Disney in 1934 with yellow legs and feet. Donald Duck wears a typical sailor shirt and a cap to look like a gentleman in every way. Donald Duck first appeared in The Wise Little Hen in 1934 and become one of the most popular characters with its style and anger-related issues. Though Donald Duck was very strict it inspired people to be gentle and easy with being tough.
Conclusion
In this article, you learned about the popular cartoon characters that made your childhood awesome. Also, the brief given in this guide about the famous cartoon characters is amazing and you can get all the information about the cartoon characters without checking different information about them. Given that cartoons are fun to watch but we have also introduced to Filmora where you can create your cartoon video by using the features and tools on the timeline. If you find this guide helpful then don’t forget to tell us about your favorite cartoon character and why do you like them.
Shanoon Cox
Shanoon Cox is a writer and a lover of all things video.
Follow @Shanoon Cox
Shanoon Cox
Mar 27, 2024• Proven solutions
Childhood is a book with different chapters filled with joy, fun, school, chocolates, and our favorite cartoon characters. The most fantasizing thing for a child is the popular cartoon characters which they see as a tutor who teaches them to become honest, humble and most importantly they show us how to overcome problems in our life. All the famous cartoon characters are still famous among millennials who used to watch them in their childhood. In this article, we are going to dive back into childhood again and you will be amazed to see those characters again in front of your eyes.
Get ready for something mesmerizing today!
Part 1: 10 Popular Cartoon Characters of All Time
Everyone has a role model in their life and this is is a no brainer as we always have a superhero from the cartoon world whom we follow and wanna be like them. Let’s talk about some famous cartoon characters that everyone in this world is aware of.
- 1. Bugs Bunny
- 2. Scooby-Doo
- 3. SpongeBob SquarePants
- 4. Daffy Duck
- 5. Tom Cat
- 6. Mickey Mouse
- 7. Jerry Mouse
- 8. Snoopy
- 9. Winnie-the-Pooh
- 10. Donald Duck
1. Bugs Bunny
Bugs bunny is a famous cartoon character that was created in back 1930s by Leon Schlesinger and its one of the best and popular cartoon characters of all time. Bugs bunny is associated with Looney Tunes and Merrie Melodie’s animated stories. Bugs bunny is known for his insouciant and flippant personality because bugs bunny was always happy and he was also known as Happy Rabbit. The message bugs bunny sent to the world was to be happy in all situations in life.
2. Scooby-Doo
Scooby-Doo is a famous cartoon character that was created back in 1969 and this character is associated with Hanna-Barbera, an American animation company. The character is famous for its curiosity about solving supernatural mysteries and making people laugh with his crazy styles. Scooby-Doo is a natural detective and has made people fantasize about solving mysteries more easily. Scooby is so famous today that people who are in their mid-30s still watch it with their kids because of the unique character it plays.
3. SpongeBob SquarePants
SpongeBob SquarePants was created back in 1999 by Stephen Hillenburg, a marine science educator. SpongeBob SquarePants made its debut on Nickelodeon in 1999. The show becomes a superhit and SpongeBob was the next superstar with the most successful character at that time. This cartoon character is famous for his friendship with his aquatic friends and the energetic and optimistic nature of SpongeBob made inspired everyone to be hopeful in any situation.
4. Daffy Duck
Daffy Duck is a famous cartoon character that was produced in the late 1930s by Warner Bros. The cartoon is associated with cartoon series like Merrie Melodies and Looney Tunes. The cartoon character was famous for the way he would hope around in the water and yell, Woo-hoo! Woo-hoo!. Daffy Duck has always entertained people with his quirky ways of jumping into the water and making people laugh out. The message from this character was very clear and entertaining
5. Tom Cat
Tom Cat needs no introduction as it’s the furious and popular cartoon character of all time. It was created by Joseph Barbera and William Hanna in 1940. Tom is associated with the Tom & Jerry cartoon series and it made people laugh with silly fights and chasing all over the series. Tom was very annoyed by Jerry and he wanted to make a meal of Jerry as that used to make people laugh. However, the deep message Tom has given to the viewers was that whenever Jerry was in serious trouble apart from their silly fights, Tom used to save Jerry and would ignore him sarcastically. So, the message was to spread the love even if you are irritated with a person.
6. Mickey Mouse
Walt Disney created a mouse in 1928 and that was named Mickey Mouse. The cartoon character is still famous among kids and adults as a childhood memory. Mickey is famous for his nice character and stubborn attitude. Mickey and his girlfriend Minnie Mouse with his pet dog Pluto were seen with Donald Duck and Goofy. Mickey always inspired people to stay honest and loving to friends and loved ones and people who like Mickey follow the same.
7. Jerry Mouse
Jerry Mouse is one of the most notorious and crazy characters of the Tom & Jerry cartoon series. He was very much liked by people and the way he used to irritate Tom in the cartoon series was amazing. If you want to learn different ways of annoying a friend then you better take classes from Jerry as he has the craziest ways of teasing a friend without getting caught.
8. Snoopy
Ah! Snoopy, the cute dog was created by Charles M. Schulz in 1950 for a comic strip. Snoopy was the most iconic and recognizable character and was very famous for the character. Snoopy was famous for his sleep as he used to sleep all day long and he used to find different ways to live an easier life. The message it sent to the people was very clear to become easy on life as whatever the time is today, it will ultimately pass.
9. Winnie-the-Pooh
Winnie-the-Pooh was a cartoon character featured in 1928 in A.A Milne’s House at Pooh Corner. Pooh was a yellow furred bear who loved honey and lived in a forest surrounded by hundred-acre wood. He lived there with his friends who were a donkey, pig, own, rabbit and birds. Winnie was always an adventurous character and helped his friends in every situation. People liked the way Winnie used to do things and roam around the forest with his friends.
10. Donald Duck
Donald Duck is a cartoon character created by Walt Disney in 1934 with yellow legs and feet. Donald Duck wears a typical sailor shirt and a cap to look like a gentleman in every way. Donald Duck first appeared in The Wise Little Hen in 1934 and become one of the most popular characters with its style and anger-related issues. Though Donald Duck was very strict it inspired people to be gentle and easy with being tough.
Conclusion
In this article, you learned about the popular cartoon characters that made your childhood awesome. Also, the brief given in this guide about the famous cartoon characters is amazing and you can get all the information about the cartoon characters without checking different information about them. Given that cartoons are fun to watch but we have also introduced to Filmora where you can create your cartoon video by using the features and tools on the timeline. If you find this guide helpful then don’t forget to tell us about your favorite cartoon character and why do you like them.
Shanoon Cox
Shanoon Cox is a writer and a lover of all things video.
Follow @Shanoon Cox
Best Photo Slideshow Maker: How to Make a Photo Slideshow [2023 Update]
Best Photo Slideshow Maker: How to Make a Photo Slideshow
Shanoon Cox
Mar 27, 2024• Proven solutions
Have you ever taken so many photos for your family, friends and special events? One fun-filled way of sharing them is to make a photo slideshow. That helps back up the memories in your life. What’s more, it can all be done in just a few simple clicks if you use slideshow maker like DVD Slideshow Builder Deluxe . With this programs, you can easily weave photos and video into work of art to amaze anyone. Here let’s see how to easily and creatively make a photo slideshow and burn to DVD with these all-in-one slideshow tools.
Download and run DVD slideshow builder , then follow the steps below to see how to make a photo slideshow.

Ways for Photo Slidehow making
Step 1. Add photo or video files to the photo slideshow maker
After running the photo slideshow maker, you’ll start from the “Organize” tab. On the interface, there are two Add Files buttons any of which you can click to add your photos and videos. Then just drag and drop photos or videos to arrange their order on storyboard. If you want to edit the photos, click “Edit” to add effects, crop photos, repair red-eye or add caption.
Tip: To have a large viewe of all the files, click the “Expand” button on top right corner of storyboard.

Step 2. Customize the slideshow like background music and transitions
When importing your files, more than 100 transition effects will be randomly and automatically applied between every two photo or video. However, you can change them anytime in the “Personalize” tab. Just drag and drop a transition from the list to the thumbnail between two slides. You can also add effects, motion or intro/credit as you like.
Adding music can greatly enhance the vibe of your photo slideshow. To achieve this, click “Music” on the storyboard. This photo slideshow maker enables you to add several different pieces of music according to your needs. If you want to add your own voice, just click “Voice Over” to record and then add it to the slideshow.

Step 3 Create photo slideshow and burn to DVD

Go to the “Create” tab and click the “Preview” button to make sure the photo slideshow is good enough. Go back to Personalize tab to change if necessary. When you are happy with the result, choose the options on the left to export photo slideshow to DVD, PC, portable devices, etc. You can also directly upload slideshow to Youtube and send message to Facebook and Twitter friends.

Now sit back and relax, it’ll only take a while to get your photo slideshow for sharing anywhere.
Shanoon Cox
Shanoon Cox is a writer and a lover of all things video.
Follow @Shanoon Cox
Shanoon Cox
Mar 27, 2024• Proven solutions
Have you ever taken so many photos for your family, friends and special events? One fun-filled way of sharing them is to make a photo slideshow. That helps back up the memories in your life. What’s more, it can all be done in just a few simple clicks if you use slideshow maker like DVD Slideshow Builder Deluxe . With this programs, you can easily weave photos and video into work of art to amaze anyone. Here let’s see how to easily and creatively make a photo slideshow and burn to DVD with these all-in-one slideshow tools.
Download and run DVD slideshow builder , then follow the steps below to see how to make a photo slideshow.
Ways for Photo Slidehow making
Step 1. Add photo or video files to the photo slideshow maker
After running the photo slideshow maker, you’ll start from the “Organize” tab. On the interface, there are two Add Files buttons any of which you can click to add your photos and videos. Then just drag and drop photos or videos to arrange their order on storyboard. If you want to edit the photos, click “Edit” to add effects, crop photos, repair red-eye or add caption.
Tip: To have a large viewe of all the files, click the “Expand” button on top right corner of storyboard.
Step 2. Customize the slideshow like background music and transitions
When importing your files, more than 100 transition effects will be randomly and automatically applied between every two photo or video. However, you can change them anytime in the “Personalize” tab. Just drag and drop a transition from the list to the thumbnail between two slides. You can also add effects, motion or intro/credit as you like.
Adding music can greatly enhance the vibe of your photo slideshow. To achieve this, click “Music” on the storyboard. This photo slideshow maker enables you to add several different pieces of music according to your needs. If you want to add your own voice, just click “Voice Over” to record and then add it to the slideshow.
Step 3 Create photo slideshow and burn to DVD
Go to the “Create” tab and click the “Preview” button to make sure the photo slideshow is good enough. Go back to Personalize tab to change if necessary. When you are happy with the result, choose the options on the left to export photo slideshow to DVD, PC, portable devices, etc. You can also directly upload slideshow to Youtube and send message to Facebook and Twitter friends.
Now sit back and relax, it’ll only take a while to get your photo slideshow for sharing anywhere.
Shanoon Cox
Shanoon Cox is a writer and a lover of all things video.
Follow @Shanoon Cox
Also read:
- Updated In 2024, Best 10 Free Manga Sites to Read Online
- New In 2024, Best Photo Slideshow Maker How to Make a Photo Slideshow 2023 Update
- New How to Record Your Memorable Honeymoon Video for 2024
- Updated Top 10 Storyboarding Software
- New Making Triggered Memes with Filmora Video Editor
- Updated How to Make a Funny Meme on MacBook for 2024
- How to Make a iMovie Photo Slideshow with Music for 2024
- New In 2024, 8 Best Meme Maker App to Create Memes with Your Own Picture
- New How to Add Bitmoji to Keyboard, In 2024
- New Top 10 Free Emoji Websites to Download Emojis Online
- 25 Cute Memes to Make You Feel Better
- How to Make a Video for Your Babys First Year
- New 2024 Approved Top 12 Best Meme Makers Online for FREE
- Updated How to Add and Custom Slack Emoji-Wondershare Filmora
- How to Add Bitmoji to Keyboard? Complete Guide for 2024
- New 2024 Approved 10 Popular Cartoon Characters That Should Top Your List 2023 Updated
- Updated 2024 Approved 20 Wonderful Stop Motion Ideas for Beginners and Kids - Filmora
- New 2024 Approved 10 Best Meme Makers Online (Free to Use)
- Updated 2024 Approved Top 12 Best Meme Makers Online for FREE
- Updated 2024 Approved How to Record and Edit an Animoji or Memoji Karaoke Music Video?
- Updated 2024 Approved How to Make a Photo Collage Using iPhoto?
- Updated Best Emoji Removers to Remove Emojis From Pictures for 2024
- Best iOS and Android Apps You Can Use to Create Animoji and Memoji Videos for 2024
- Updated How to Use Emojis on Windows for 2024
- In 2024, Top 10 Best Free Manga Sites to Read Online
- The Essential Guide to Emoji, Memoji, Animoji, and Bitmoji for 2024
- Updated How to Make a Slideshow with Music
- In 2024, How to Reset a Locked ZTE Axon 40 Lite Phone
- In 2024, Recommended Best Applications for Mirroring Your Xiaomi Civi 3 Screen | Dr.fone
- In 2024, Tutorial to Change Motorola G24 Power IMEI without Root A Comprehensive Guide
- Top 9 Apple iPhone XR Monitoring Apps for Parental Controls | Dr.fone
- Best 3 Honor Magic 6 Emulator for Mac to Run Your Wanted Android Apps | Dr.fone
- Unlock Your Oppo Find X7 Ultra Phone with Ease The 3 Best Lock Screen Removal Tools
- In 2024, Complete Guide For iPhone 12 mini Lock Screen
- How to Recover Deleted Photos from Android Gallery App on Xiaomi Redmi K70E
- In 2024, Easy Ways to Manage Your OnePlus Nord CE 3 5G Location Settings | Dr.fone
- In 2024, How to use Snapchat Location Spoofer to Protect Your Privacy On Motorola Moto G13? | Dr.fone
- 4 Things You Must Know About iPhone XS Max Activation Lock
- 4 Feasible Ways to Fake Location on Facebook For your Tecno Camon 20 Premier 5G | Dr.fone
- In 2024, 9 Best Phone Monitoring Apps for Apple iPhone 15 Pro | Dr.fone
- Recover Apple iPhone 8 Data From iOS iCloud | Dr.fone
- In 2024, 5 Ways to Move Contacts From HTC U23 to iPhone (13/14/15) | Dr.fone
- New In 2024, Easy Guide How To Make Talking Head Videos
- FRP Hijacker by Hagard Download and Bypass your Vivo Y78+ FRP Locks
- What Is a SIM Network Unlock PIN? Get Your Samsung Galaxy F04 Phone Network-Ready
- Fixes for Apps Keep Crashing on Vivo V30 Pro | Dr.fone
- How to Transfer Data After Switching From Infinix Smart 8 Pro to Latest Samsung | Dr.fone
- In 2024, How To Remove Flashlight From Apple iPhone SE (2022) Lock Screen
- How to Perform Hard Reset on Huawei Nova Y71? | Dr.fone
- Hard Reset Honor 90 Lite in 3 Efficient Ways | Dr.fone
- Title: Updated In 2024, How to Make a Photo Collage Using iPhoto?
- Author: Jan
- Created at : 2024-05-19 02:31:23
- Updated at : 2024-05-20 02:31:23
- Link: https://meme-emoji.techidaily.com/updated-in-2024-how-to-make-a-photo-collage-using-iphoto/
- License: This work is licensed under CC BY-NC-SA 4.0.
