
Updated In 2024, How to Add Bitmoji to Keyboard?
How to Add Bitmoji to Keyboard?
Emojis have made it so much better for people to express themselves. Let’s say someone compliments you on a chat app; you can use a smiley emoji to tell that you are happy. At the same time, an angry emoji lets you express that you are angry.
Apart from the generic emojis that you can find in your chat applications, Bitmoji enables you to customize your character and share it with people you chat with. Bitmoji is fun, but do you know how to add it to a keyboard? If you don’t, don’t worry, this post will help you understand how to do that.
In this article
02 How to Add and Use Bitmoji to iPhone Keyboard?
03 How to Get the Bitmoji Keyboard on Android?
04 How to Install and Use Bitmoji on Windows and Mac?
Part 1: What is Bitmoji?
If you are new to Bitmoji, you may wonder what it is? Bitmoji is essentially your own personal emoji. You can create a cartoon version of yourself and share it with people to make the conversation fun. So, what one does is create an avatar of themselves and give it all kinds of expressions.
Then, you can create comics using your Bitmoji, use it to express yourself while having a chat, and even use it as a reaction. Anyone who is done using the same old emojis has started using Bitmoji because it’s a lot more fun.
Now, let’s learn how to create your very own Bitmoji.
Step 1: First, go to the App Store or Play store and download the Bitmoji application.
Step 2: Once downloaded, launch the app and start making an avatar or your Bitmoji.
Step 3: Pick a skin color, hair color, chin, nose, hairstyle, jawline, and more.

Once your Bitmoji is created, you are all set to use the Bitmoji as stickers. Moreover, the app lets you dress your Bitmoji as you want as well. Let it have different expressions and postures because that’s how it’s going to be fun! After your Bitmoji is added, the next thing to do is enable Bitmoji on the keyboard of the device you are using.
Part 2: How to Add and Use Bitmoji to iPhone Keyboard?
Since you have learned how to create a Bimoji, it’s time to learn the steps to use it on your iPhone keyboard. Unfortunately, just by downloading the app, it won’t reflect on the keyboard directly. Instead, you will have to follow a few steps to add Bitmoji to the keyboard. Here’s what you need to do.
Step 1: Launch your iPhone and click on the Settings option.
Step 2: Now, go to the General option and click on the Keyboard option.

Step 3: When the Keyboard page opens, click on the option that says Keyboards and then click on Add New Keyboard.
Step 4: You will see the Third Party Keyboards option. There, you need to click on Bitmoji.
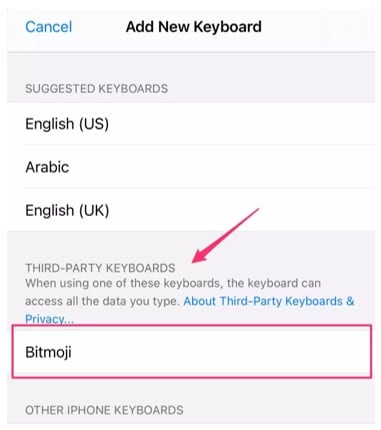
Step 5: Now, toggle the option that says Allow Full Access. Once you do that, you will see a small pop-up. Click on the Allow option.
And that’s it. Bitmoji will be added to the iPhone keyboard. Open any messaging app and click on the globe and hold it for a few seconds. When you see Bitmoji, click on that, and you will be able to use Bitmoji stickers.
Part 3: How to Get the Bitmoji Keyboard on Android?
Bitmoji is available for Android users as well. Before you begin to use it, go through the first part again and download the app. Then create your Bitmoji, as explained earlier. You can send Bitmojis directly from the app itself, but if you plan to use Bitmoji regularly, getting the Bitmoji keyboard makes sense. So, once you are done, follow the following steps to get the Bitmoji keyboard on Android.
Step 1: Launch the Bitmoji app. Click on the Keyboard option that you see at the bottom of the Bitmoji app screen.
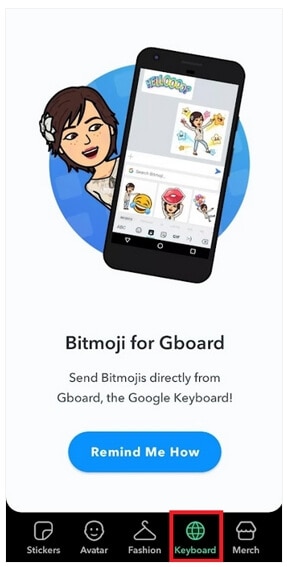
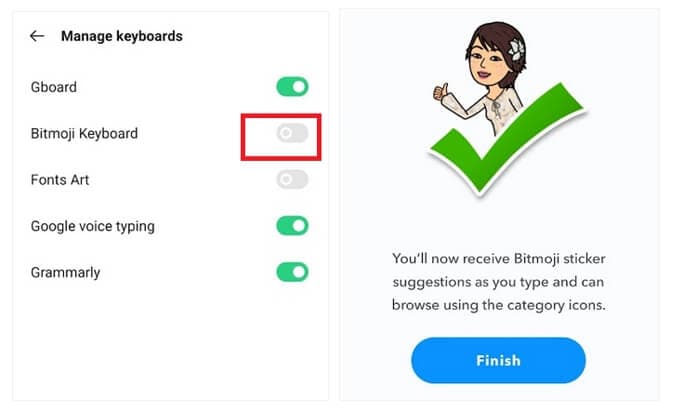
Step 2: Install Bitmoji keyboard and give permission to your phone to use Bitmoji keyboard. Bitmoji will notify you when the Bitmoji keyboard gets activated.
You are all done. Now, use the Bitmoji keyboard to chat with your family members and friends and make everything fun and exciting.
Part 4: How to Install and Use Bitmoji on Windows and Mac?
If you want to use Bitmoji on Windows and Mac, you will have to use the Google Chrome browser. If you already have the Google Chrome browser, carry on with the steps explained below; otherwise, get the browser before starting.
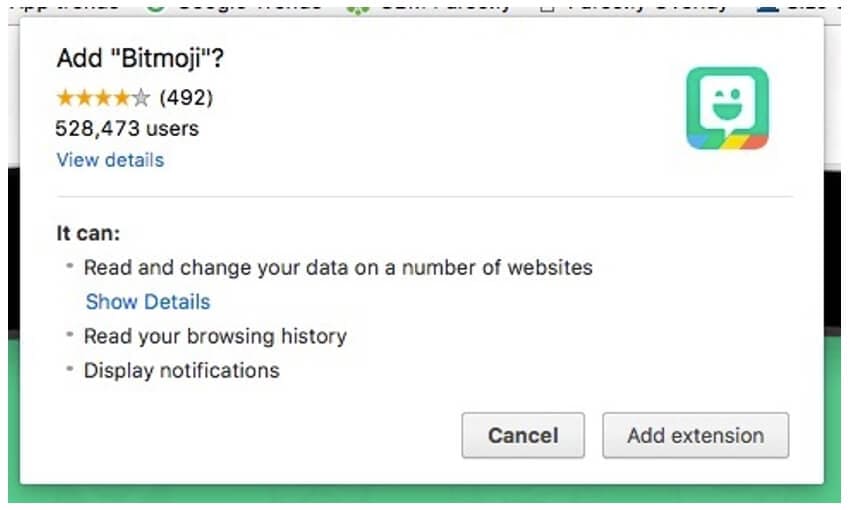
Step 1: Go to Chrome Extension and install Bitmoji for Chrome Extension.
Step 2: You will have to sign in to Bitmoji. If you want to add Bitmoji to Gmail, click on add Bitmoji to Gmail.
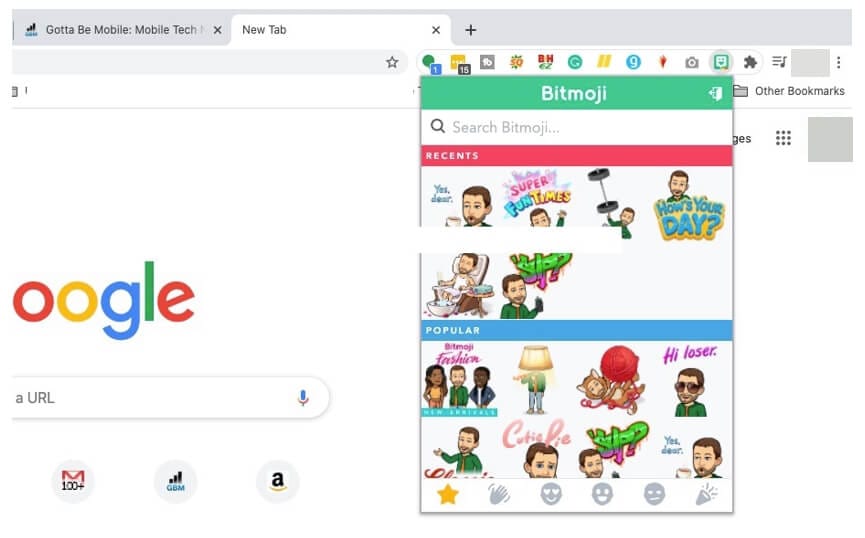
After you are done following the three easy steps, you will see Bitmoji is installed. To start using it, move the cursor to the upper corner of the browser and click on the Bitmoji icon. Next, you will see the Bitmojis. Choose any Bitmoji, copy it, and paste it on Gmail or instant messaging applications.
Part 5: Where can You Use Bitmoji?
Bitmojis can be used on different platforms. All you need to do is enable Bitmoji keyboard on your iPhone or Android phone or Windows and Mac computers and use it on various social media platforms. For example, use Snapchat to send Bitmojis for different types of occasions.
If you are an iPhone user, you can share fun Bitmojis through iMessage. On a computer, you can use these Bitmojis on Facebook or other instant messaging platforms. You can drag and drop the Bitmoji sticker or copy it to share it with your friends.
If you are a working professional and want to lighten the mood of your Slack workspace, use Bitmojis to make your coworkers feel relaxed. Plus, this can be a great way to make someone feel pumped up. Like that, there are many other platforms to use Bitmojis!
Related: Best Free Apps to Get Emojis on iPhone and Android
Conclusion
So, there you go. We have finally reached the end of this guide. We hope you have found this post interesting and will face no hassle using the Bitmoji keyboard on different devices. Get the Bitmoji app if you haven’t downloaded it yet and make your conversations fun and enjoyable!
02 How to Add and Use Bitmoji to iPhone Keyboard?
03 How to Get the Bitmoji Keyboard on Android?
04 How to Install and Use Bitmoji on Windows and Mac?
Part 1: What is Bitmoji?
If you are new to Bitmoji, you may wonder what it is? Bitmoji is essentially your own personal emoji. You can create a cartoon version of yourself and share it with people to make the conversation fun. So, what one does is create an avatar of themselves and give it all kinds of expressions.
Then, you can create comics using your Bitmoji, use it to express yourself while having a chat, and even use it as a reaction. Anyone who is done using the same old emojis has started using Bitmoji because it’s a lot more fun.
Now, let’s learn how to create your very own Bitmoji.
Step 1: First, go to the App Store or Play store and download the Bitmoji application.
Step 2: Once downloaded, launch the app and start making an avatar or your Bitmoji.
Step 3: Pick a skin color, hair color, chin, nose, hairstyle, jawline, and more.
Once your Bitmoji is created, you are all set to use the Bitmoji as stickers. Moreover, the app lets you dress your Bitmoji as you want as well. Let it have different expressions and postures because that’s how it’s going to be fun! After your Bitmoji is added, the next thing to do is enable Bitmoji on the keyboard of the device you are using.
Part 2: How to Add and Use Bitmoji to iPhone Keyboard?
Since you have learned how to create a Bimoji, it’s time to learn the steps to use it on your iPhone keyboard. Unfortunately, just by downloading the app, it won’t reflect on the keyboard directly. Instead, you will have to follow a few steps to add Bitmoji to the keyboard. Here’s what you need to do.
Step 1: Launch your iPhone and click on the Settings option.
Step 2: Now, go to the General option and click on the Keyboard option.
Step 3: When the Keyboard page opens, click on the option that says Keyboards and then click on Add New Keyboard.
Step 4: You will see the Third Party Keyboards option. There, you need to click on Bitmoji.
Step 5: Now, toggle the option that says Allow Full Access. Once you do that, you will see a small pop-up. Click on the Allow option.
And that’s it. Bitmoji will be added to the iPhone keyboard. Open any messaging app and click on the globe and hold it for a few seconds. When you see Bitmoji, click on that, and you will be able to use Bitmoji stickers.
Part 3: How to Get the Bitmoji Keyboard on Android?
Bitmoji is available for Android users as well. Before you begin to use it, go through the first part again and download the app. Then create your Bitmoji, as explained earlier. You can send Bitmojis directly from the app itself, but if you plan to use Bitmoji regularly, getting the Bitmoji keyboard makes sense. So, once you are done, follow the following steps to get the Bitmoji keyboard on Android.
Step 1: Launch the Bitmoji app. Click on the Keyboard option that you see at the bottom of the Bitmoji app screen.
Step 2: Install Bitmoji keyboard and give permission to your phone to use Bitmoji keyboard. Bitmoji will notify you when the Bitmoji keyboard gets activated.
You are all done. Now, use the Bitmoji keyboard to chat with your family members and friends and make everything fun and exciting.
Part 4: How to Install and Use Bitmoji on Windows and Mac?
If you want to use Bitmoji on Windows and Mac, you will have to use the Google Chrome browser. If you already have the Google Chrome browser, carry on with the steps explained below; otherwise, get the browser before starting.
Step 1: Go to Chrome Extension and install Bitmoji for Chrome Extension.
Step 2: You will have to sign in to Bitmoji. If you want to add Bitmoji to Gmail, click on add Bitmoji to Gmail.
After you are done following the three easy steps, you will see Bitmoji is installed. To start using it, move the cursor to the upper corner of the browser and click on the Bitmoji icon. Next, you will see the Bitmojis. Choose any Bitmoji, copy it, and paste it on Gmail or instant messaging applications.
Part 5: Where can You Use Bitmoji?
Bitmojis can be used on different platforms. All you need to do is enable Bitmoji keyboard on your iPhone or Android phone or Windows and Mac computers and use it on various social media platforms. For example, use Snapchat to send Bitmojis for different types of occasions.
If you are an iPhone user, you can share fun Bitmojis through iMessage. On a computer, you can use these Bitmojis on Facebook or other instant messaging platforms. You can drag and drop the Bitmoji sticker or copy it to share it with your friends.
If you are a working professional and want to lighten the mood of your Slack workspace, use Bitmojis to make your coworkers feel relaxed. Plus, this can be a great way to make someone feel pumped up. Like that, there are many other platforms to use Bitmojis!
Related: Best Free Apps to Get Emojis on iPhone and Android
Conclusion
So, there you go. We have finally reached the end of this guide. We hope you have found this post interesting and will face no hassle using the Bitmoji keyboard on different devices. Get the Bitmoji app if you haven’t downloaded it yet and make your conversations fun and enjoyable!
02 How to Add and Use Bitmoji to iPhone Keyboard?
03 How to Get the Bitmoji Keyboard on Android?
04 How to Install and Use Bitmoji on Windows and Mac?
Part 1: What is Bitmoji?
If you are new to Bitmoji, you may wonder what it is? Bitmoji is essentially your own personal emoji. You can create a cartoon version of yourself and share it with people to make the conversation fun. So, what one does is create an avatar of themselves and give it all kinds of expressions.
Then, you can create comics using your Bitmoji, use it to express yourself while having a chat, and even use it as a reaction. Anyone who is done using the same old emojis has started using Bitmoji because it’s a lot more fun.
Now, let’s learn how to create your very own Bitmoji.
Step 1: First, go to the App Store or Play store and download the Bitmoji application.
Step 2: Once downloaded, launch the app and start making an avatar or your Bitmoji.
Step 3: Pick a skin color, hair color, chin, nose, hairstyle, jawline, and more.
Once your Bitmoji is created, you are all set to use the Bitmoji as stickers. Moreover, the app lets you dress your Bitmoji as you want as well. Let it have different expressions and postures because that’s how it’s going to be fun! After your Bitmoji is added, the next thing to do is enable Bitmoji on the keyboard of the device you are using.
Part 2: How to Add and Use Bitmoji to iPhone Keyboard?
Since you have learned how to create a Bimoji, it’s time to learn the steps to use it on your iPhone keyboard. Unfortunately, just by downloading the app, it won’t reflect on the keyboard directly. Instead, you will have to follow a few steps to add Bitmoji to the keyboard. Here’s what you need to do.
Step 1: Launch your iPhone and click on the Settings option.
Step 2: Now, go to the General option and click on the Keyboard option.
Step 3: When the Keyboard page opens, click on the option that says Keyboards and then click on Add New Keyboard.
Step 4: You will see the Third Party Keyboards option. There, you need to click on Bitmoji.
Step 5: Now, toggle the option that says Allow Full Access. Once you do that, you will see a small pop-up. Click on the Allow option.
And that’s it. Bitmoji will be added to the iPhone keyboard. Open any messaging app and click on the globe and hold it for a few seconds. When you see Bitmoji, click on that, and you will be able to use Bitmoji stickers.

Part 3: How to Get the Bitmoji Keyboard on Android?
Bitmoji is available for Android users as well. Before you begin to use it, go through the first part again and download the app. Then create your Bitmoji, as explained earlier. You can send Bitmojis directly from the app itself, but if you plan to use Bitmoji regularly, getting the Bitmoji keyboard makes sense. So, once you are done, follow the following steps to get the Bitmoji keyboard on Android.
Step 1: Launch the Bitmoji app. Click on the Keyboard option that you see at the bottom of the Bitmoji app screen.
Step 2: Install Bitmoji keyboard and give permission to your phone to use Bitmoji keyboard. Bitmoji will notify you when the Bitmoji keyboard gets activated.
You are all done. Now, use the Bitmoji keyboard to chat with your family members and friends and make everything fun and exciting.
Part 4: How to Install and Use Bitmoji on Windows and Mac?
If you want to use Bitmoji on Windows and Mac, you will have to use the Google Chrome browser. If you already have the Google Chrome browser, carry on with the steps explained below; otherwise, get the browser before starting.
Step 1: Go to Chrome Extension and install Bitmoji for Chrome Extension.
Step 2: You will have to sign in to Bitmoji. If you want to add Bitmoji to Gmail, click on add Bitmoji to Gmail.
After you are done following the three easy steps, you will see Bitmoji is installed. To start using it, move the cursor to the upper corner of the browser and click on the Bitmoji icon. Next, you will see the Bitmojis. Choose any Bitmoji, copy it, and paste it on Gmail or instant messaging applications.
Part 5: Where can You Use Bitmoji?
Bitmojis can be used on different platforms. All you need to do is enable Bitmoji keyboard on your iPhone or Android phone or Windows and Mac computers and use it on various social media platforms. For example, use Snapchat to send Bitmojis for different types of occasions.
If you are an iPhone user, you can share fun Bitmojis through iMessage. On a computer, you can use these Bitmojis on Facebook or other instant messaging platforms. You can drag and drop the Bitmoji sticker or copy it to share it with your friends.
If you are a working professional and want to lighten the mood of your Slack workspace, use Bitmojis to make your coworkers feel relaxed. Plus, this can be a great way to make someone feel pumped up. Like that, there are many other platforms to use Bitmojis!
Related: Best Free Apps to Get Emojis on iPhone and Android
Conclusion
So, there you go. We have finally reached the end of this guide. We hope you have found this post interesting and will face no hassle using the Bitmoji keyboard on different devices. Get the Bitmoji app if you haven’t downloaded it yet and make your conversations fun and enjoyable!
Best Emoji Removers to Remove Emojis From Pictures [Online/PC/Mobile]
Thanks to technology, editing photos have become easy. You can crop and rotate a photo, add filters, and even add emojis. While removing emojis is easy while you are editing an image and have not saved your work, but what if you have and want to get rid of the emojis you added to the picture? How to go about that?
So, if you want to remove an emoji from a picture and the picture is already saved, don’t worry; this post will help you learn about the top ways to remove it. Keep reading!
Related: How to Remove Unwanted Objects from Photo
In this article
01 Best Emoji Removers Online to Remove Emojis from Pictures
02 Best Emoji Removers on Windows/Mac Computer
03 Best Emoji Remover Apps on iPhone and Android
Part 1: Best Emoji Removers Online to Remove Emojis from Pictures
1. Inpaint
So, the first online emoji remover that you can try is Inpaint. This is a simple to use tool and will remove unwanted objects, such as emojis, from a picture by intelligently filling it with textures that match the surrounding image data.
The image formats Inpaint accepts are JPG, WebP, and PNG. Just remember to use only the recommended image formats, and you can start using them right away. You don’t need to log in or sign up to start using it.
Features
- An online tool that removes unwanted objects quickly.
- You don’t need to sign up or log in.
- It accepts JPG, PNG, and WebP formats.
- 4.2MP is the maximum image resolution.
Website: https://theinpaint.com/
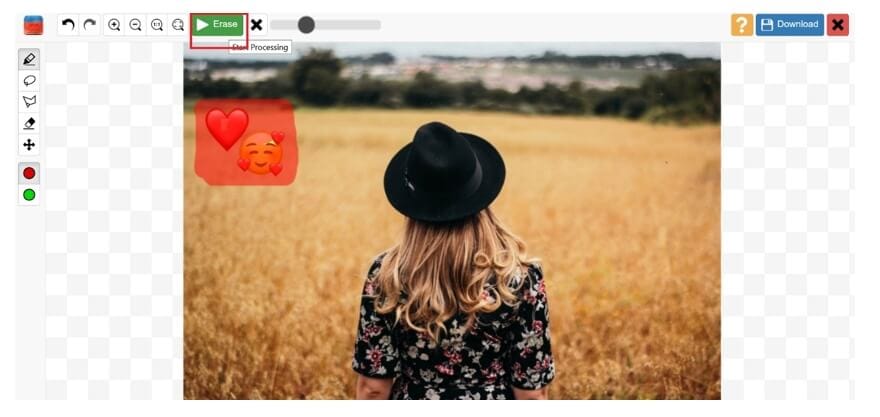
2. Pixlr
The next popular online tool is Pixlr. Pixlr is a popular photo editing tool that allows you to fix your pictures as well. You can use the tool online either using your computer web browser or mobile.
Whatever works for you. It doesn’t only let you remove emojis but erase background as well. But since you want to remove emojis, you will have to add the image and click on the retouch button from the toolbar. Then, you need to click on the image multiple times so that its surroundings overlap the emojis.
Features
- Pixlr can be used on both mobile and web browsers.
- Multiple photo editing tools are available.
- Removes emojis by blending them with the surroundings.
- Using Pixlr is easy and convenient.
Website: https://pixlr.com/
3. Fotor

Fotor is a professional photo editing tool, which lets you clone an emoji with a part of the image. The online tool asks you to sign up using your Google account to save your work. So, if you want to know how to remove emoji from a photo, you can use the clone feature.
Once you upload an image with emojis, move your cursor to the tool section in the left menu bar. Scroll down, and you will see the Clone option. Touch one part of the image that you want to use instead of the emoji. The first dot will be the area you want to clone and place the second dot on the emoji. And all done.
Website: https://www.fotor.com/
Features
- You can clone the emoji to remove it.
- A professional tool with lots of editing features.
- One needs to sign up or log in before using Fotor.
- The tool retains the original picture quality.
Related: Best Online Photo Editors
Part 2: Best Emoji Removers on Windows/Mac Computer
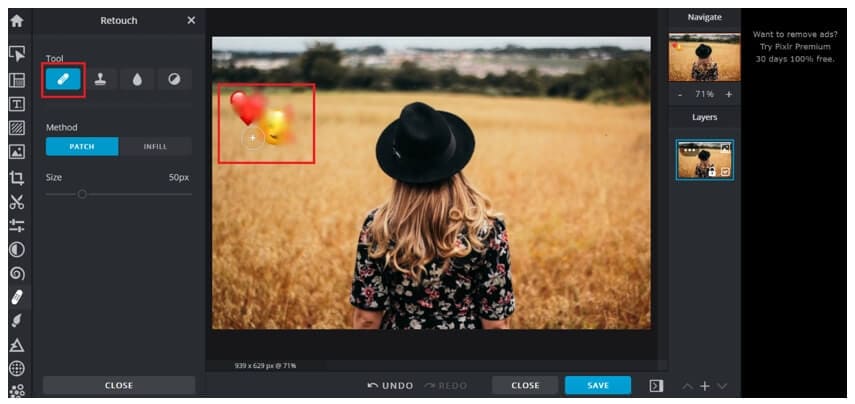
1. Adobe Photoshop
Adobe Photoshop is arguably one of the best photo editing tools that only allows you to enhance a photo but fix issues, such as removing emojis, unwanted objects, and so on. Adobe Photoshop is a professional tool and might not be the best for those new to it, but if you have used Adobe Photoshop earlier, you can use the Lasso Tool or the Marqueel Tool, which you will find on the left toolbar to remove emojis and unwanted items. Once done, save the image, and yes, the original picture quality will be retained.
Key Features
- A professional photo editing tool.
- It has multiple photo editing features and lets you remove emojis.
- You can draw on the emoji with a pen or pencil.
- It autosaves your work.
2. Wondershare Fotophire
Wondershare Fotophire is a fantastic photo editing tool that works magically on all kinds of images. Whether your photo is loaded with multiple emojis, you can remove them easily using Fotophire. If you are thinking about how to remove emojis from pictures using Fotophire, it’s pretty easy.
You need to clone any part of the image, and the tool will automatically use its algorithm to fill the emoji with its surroundings so that the filled area looks natural and blends well with the rest of the photo. Fotophire is a good option for both beginners and pros.
Key Features
- It removes all kinds of unwanted objects from an image, including emojis.
- Using Fotophire is easy and convenient.
- A good tool for both pros and beginners.
- Background doesn’t get impacted, and the original image quality remains intact.
3. GIMP
GIMP is a free and open-source photo editor, which allows you to remove emojis from a photo. It is available for Windows, macOS, GNU/Linux, and other operating systems. GIMP has been designed for everyone who would want their picture to look better.
If you wish to manipulate a high-quality image, you don’t have to worry about that because it accepts bigger-size photos as well. GIMP lets you clone an area and use that part on the emoji. You can also adjust the opacity of the cloned item depending on your requirements.
Key Features
- It lets you clone the surrounding area to hide an emoji.
- Accepts all the top image formats.
- It doesn’t pixelate the image after editing it.
- A free tool to use with lots of photo editing features.
4. Jihosoft Photo Eraser
Jihosoft Photo Eraser is a good photo editor tool that removes emojis or unwanted objects from an image by analyzing the surroundings. Once done, it will fill the selected emojis with the intelligently-generated textures. If you no longer want the emojis to be there is an image, Jihosoft Photo Eraser will be an ideal tool to use. The tool’s primary purpose is to remove unwanted items from an image, which is why it is an excellent software to go for.
Key Features
- It removes unwanted objects, such as emojis, from a photo.
- It allows the cloning of things to replace emojis.
- Using Jihosoft Photo Eraser is easy.
- The photo quality remains intact.
Part 3: Best Emoji Remover Apps on iPhone and Android
1. Snapseed
Snapseed is a photo editing app that is available for both iPhone and Android users. It has a masking feature, which lets you mask any object in a photo, including an emoji. Snapseed is a good tool to get rid of unwanted items from any image.
It has around 29 photo editing tools, which will help a user to enhance the photo quality. Using it is very easy because all the tools are readily available on the main screen. You just need to select the right tool and get started with the work.
Key Features
- It helps in removing emojis and unwanted objects from a photo.
- It works on both RAW and JPG files.
- It has multiple photo editing tools.
- Using Snapseed is easy.
2. AirBrush
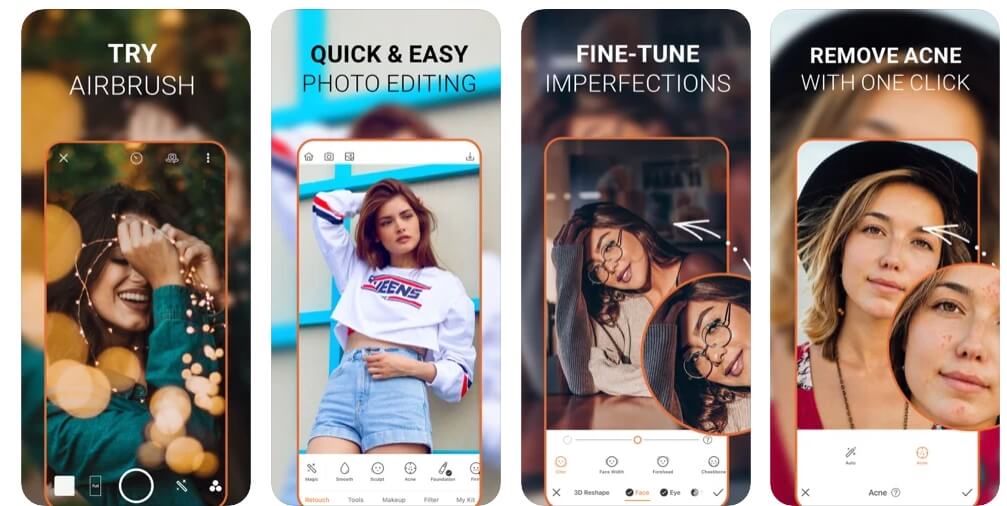
AirBrush is a leading photo editing tool for iPhone users and has a high rating of 4.9. The tool makes editing an image effortlessly. If you don’t want the emojis to ruin your photo, use AirBrush to deal with it quickly. Moreover, it lets you edit your photos further, for example, remove blemishes, make the image look smooth and glowing, add filters to give it a magical touch, and so much more! The tool has quite a lot of features that you will like.
Key Features
- It removes emojis and unwanted objects from an image.
- Using AirBrush is easy.
- It removes emojis quickly.
- It has many photo editing tools.
3. TouchRetouch
If you are looking for a professional photo editing tool that will let you do much more than just remove emojis, you should try TouchRetouch. You can use it to remove unwanted items, such as emojis, lines, blemishes, imperfections, and more.
It has a rating of 4.8, which is great looking at the kind of photo editing features TouchRetouch offers. No matter what objects you want to get rid of in your photo, TouchRetouch can let you do that easily.
Key Features
- It removes all kinds of unwanted objects quickly.
- It provides you with a single-flick line removal function.
- TouchRetouch is easy to use.
- It offers easy to understand tutorials.
FAQ About Removing Emojis from Pictures
How Do I Remove an Emoji from a Hidden Face?
It depends on the kind of tool you have picked. Typically, the tool will let you select the emoji and mask it with its surroundings to blend in well. So, let’s say you are on a dating site and you can’t see how the person looks like because they have hidden their face with an emoji.
In such a case, even if you use an emoji remover tool, it won’t show the actual face, instead replace it with the surrounding. Emoji removal tools are for personal use only.
Conclusion
So, now you know about the easy ways to remove emojis from pictures. Try any of the tools and remove unwanted objects and emojis from any photo you want. The tools that we have listed here are trusted by many and are easy to use.
02 Best Emoji Removers on Windows/Mac Computer
03 Best Emoji Remover Apps on iPhone and Android
Part 1: Best Emoji Removers Online to Remove Emojis from Pictures
1. Inpaint
So, the first online emoji remover that you can try is Inpaint. This is a simple to use tool and will remove unwanted objects, such as emojis, from a picture by intelligently filling it with textures that match the surrounding image data.
The image formats Inpaint accepts are JPG, WebP, and PNG. Just remember to use only the recommended image formats, and you can start using them right away. You don’t need to log in or sign up to start using it.
Features
- An online tool that removes unwanted objects quickly.
- You don’t need to sign up or log in.
- It accepts JPG, PNG, and WebP formats.
- 4.2MP is the maximum image resolution.
Website: https://theinpaint.com/
2. Pixlr
The next popular online tool is Pixlr. Pixlr is a popular photo editing tool that allows you to fix your pictures as well. You can use the tool online either using your computer web browser or mobile.
Whatever works for you. It doesn’t only let you remove emojis but erase background as well. But since you want to remove emojis, you will have to add the image and click on the retouch button from the toolbar. Then, you need to click on the image multiple times so that its surroundings overlap the emojis.
Features
- Pixlr can be used on both mobile and web browsers.
- Multiple photo editing tools are available.
- Removes emojis by blending them with the surroundings.
- Using Pixlr is easy and convenient.
Website: https://pixlr.com/
3. Fotor
Fotor is a professional photo editing tool, which lets you clone an emoji with a part of the image. The online tool asks you to sign up using your Google account to save your work. So, if you want to know how to remove emoji from a photo, you can use the clone feature.
Once you upload an image with emojis, move your cursor to the tool section in the left menu bar. Scroll down, and you will see the Clone option. Touch one part of the image that you want to use instead of the emoji. The first dot will be the area you want to clone and place the second dot on the emoji. And all done.
Website: https://www.fotor.com/
Features
- You can clone the emoji to remove it.
- A professional tool with lots of editing features.
- One needs to sign up or log in before using Fotor.
- The tool retains the original picture quality.
Related: Best Online Photo Editors
Part 2: Best Emoji Removers on Windows/Mac Computer
1. Adobe Photoshop
Adobe Photoshop is arguably one of the best photo editing tools that only allows you to enhance a photo but fix issues, such as removing emojis, unwanted objects, and so on. Adobe Photoshop is a professional tool and might not be the best for those new to it, but if you have used Adobe Photoshop earlier, you can use the Lasso Tool or the Marqueel Tool, which you will find on the left toolbar to remove emojis and unwanted items. Once done, save the image, and yes, the original picture quality will be retained.
Key Features
- A professional photo editing tool.
- It has multiple photo editing features and lets you remove emojis.
- You can draw on the emoji with a pen or pencil.
- It autosaves your work.
2. Wondershare Fotophire
Wondershare Fotophire is a fantastic photo editing tool that works magically on all kinds of images. Whether your photo is loaded with multiple emojis, you can remove them easily using Fotophire. If you are thinking about how to remove emojis from pictures using Fotophire, it’s pretty easy.
You need to clone any part of the image, and the tool will automatically use its algorithm to fill the emoji with its surroundings so that the filled area looks natural and blends well with the rest of the photo. Fotophire is a good option for both beginners and pros.
Key Features
- It removes all kinds of unwanted objects from an image, including emojis.
- Using Fotophire is easy and convenient.
- A good tool for both pros and beginners.
- Background doesn’t get impacted, and the original image quality remains intact.
3. GIMP
GIMP is a free and open-source photo editor, which allows you to remove emojis from a photo. It is available for Windows, macOS, GNU/Linux, and other operating systems. GIMP has been designed for everyone who would want their picture to look better.
If you wish to manipulate a high-quality image, you don’t have to worry about that because it accepts bigger-size photos as well. GIMP lets you clone an area and use that part on the emoji. You can also adjust the opacity of the cloned item depending on your requirements.
Key Features
- It lets you clone the surrounding area to hide an emoji.
- Accepts all the top image formats.
- It doesn’t pixelate the image after editing it.
- A free tool to use with lots of photo editing features.
4. Jihosoft Photo Eraser
Jihosoft Photo Eraser is a good photo editor tool that removes emojis or unwanted objects from an image by analyzing the surroundings. Once done, it will fill the selected emojis with the intelligently-generated textures. If you no longer want the emojis to be there is an image, Jihosoft Photo Eraser will be an ideal tool to use. The tool’s primary purpose is to remove unwanted items from an image, which is why it is an excellent software to go for.
Key Features
- It removes unwanted objects, such as emojis, from a photo.
- It allows the cloning of things to replace emojis.
- Using Jihosoft Photo Eraser is easy.
- The photo quality remains intact.
Part 3: Best Emoji Remover Apps on iPhone and Android
1. Snapseed
Snapseed is a photo editing app that is available for both iPhone and Android users. It has a masking feature, which lets you mask any object in a photo, including an emoji. Snapseed is a good tool to get rid of unwanted items from any image.
It has around 29 photo editing tools, which will help a user to enhance the photo quality. Using it is very easy because all the tools are readily available on the main screen. You just need to select the right tool and get started with the work.
Key Features
- It helps in removing emojis and unwanted objects from a photo.
- It works on both RAW and JPG files.
- It has multiple photo editing tools.
- Using Snapseed is easy.
2. AirBrush
AirBrush is a leading photo editing tool for iPhone users and has a high rating of 4.9. The tool makes editing an image effortlessly. If you don’t want the emojis to ruin your photo, use AirBrush to deal with it quickly. Moreover, it lets you edit your photos further, for example, remove blemishes, make the image look smooth and glowing, add filters to give it a magical touch, and so much more! The tool has quite a lot of features that you will like.
Key Features
- It removes emojis and unwanted objects from an image.
- Using AirBrush is easy.
- It removes emojis quickly.
- It has many photo editing tools.
3. TouchRetouch
If you are looking for a professional photo editing tool that will let you do much more than just remove emojis, you should try TouchRetouch. You can use it to remove unwanted items, such as emojis, lines, blemishes, imperfections, and more.
It has a rating of 4.8, which is great looking at the kind of photo editing features TouchRetouch offers. No matter what objects you want to get rid of in your photo, TouchRetouch can let you do that easily.
Key Features
- It removes all kinds of unwanted objects quickly.
- It provides you with a single-flick line removal function.
- TouchRetouch is easy to use.
- It offers easy to understand tutorials.
FAQ About Removing Emojis from Pictures
How Do I Remove an Emoji from a Hidden Face?
It depends on the kind of tool you have picked. Typically, the tool will let you select the emoji and mask it with its surroundings to blend in well. So, let’s say you are on a dating site and you can’t see how the person looks like because they have hidden their face with an emoji.
In such a case, even if you use an emoji remover tool, it won’t show the actual face, instead replace it with the surrounding. Emoji removal tools are for personal use only.
Conclusion
So, now you know about the easy ways to remove emojis from pictures. Try any of the tools and remove unwanted objects and emojis from any photo you want. The tools that we have listed here are trusted by many and are easy to use.
Top 5 Best Websites to Add Emojis to Photo Online
Are you in love with those funny emojis you see in messenger apps and want to add them to your images too? Guess what? You can add emojis to photos online conveniently through a few websites. Emojis enhance how a picture looks instantly.
People can use an emoji on a friend’s image to make them look funny or hide their face with a smiley emoji. Why upload boring and the same kind of photos all the time when emojis can add the much-needed magical touch? So, if you want to add emoji to photos online, look no further and learn about the best websites that allow you do that easily.
In this article
01 Top 5 Websites to Add Emojis to Photo Online
02 How to Add Emojis to Photo on Wondershare Filmora
Part 1: Top 5 Websites to Add Emojis to Photo Online
#1: Kapwing

One of the best websites is Kapwing, which lets you add emojis to any photo you want. Kapwing is an easy-to-use online tool, which means you will not have to download any tool. But to start using it, you will have to sign up. You can do that by using your Google ID. When it comes to the number of emojis it has, it boasts more than 250 different emojis. It lets you add custom emojis; let’s say you have a pack of custom emojis with you that you want to use; you can do that effortlessly.
Key Features
- It’s an online tool and free to use.
- You need to sign up to save your work.
- It has more than 250 emojis to choose from.
- Kapwing is easy to use.
Steps to Follow to Use Kapwing
Step 1: Visit the official website of Kapwing. You will see the Start Editing option; please click on that.
Step 2: You will see the workspace with an option that says “click to upload.” Click on it.
Step 3: Now, upload a photo that you want to add the emoji too. The image will be uploaded.
Step 4: To add an emoji, look towards the left menu, and you will see the Add Media option. Click on that.
Step 5: You will see the upload, projects, and emojis options. Click on the emojis option.
Step 6: Emojis will appear. Click on one, and it will be uploaded to the main photo. You can drag, shrink, zoom, or rotate the emoji used. You can add as many emojis you want.
Related: How to make a slo-mo video on Kapwing
#2: Image Online.Co

The next good online tool that you can try is Image Online.Co. It’s a pretty basic tool that lets you upload a photo and add an emoji the right way. It has more than 100 emojis, which is not a lot. But features all the popular emojis that will suit all kinds of images. And it allows you to add your custom emojis, which is why people prefer to use Image Online.Co. Using it is very easy, and the interface of the online tool is easy to understand.
Key Features
- It is a 100% free online tool that won’t ask you to sign up or log in.
- The tool has 100+ emojis to choose from.
- The interface is easy to understand.
- The tool is easy to use.
Steps to Follow to Use Image Online.Co
Step 1: Visit https://emoji.imageonline.co/ , which is their official website.
Step 2: Click on the Select Photo option, else directly drop an image from your local folder.
Step 3: If you want, you can add a custom emoji that you already have.
Step 4: Add an emoji from the right menu and rotate or zoom in or zoom out.
#3: Canva

Canva is arguably one of the best ways to make your photos look better. This tool has tons of features, and the best part is that you can customize a picture with an emoji using one of their templates. It has 250+ emojis and lets you add your customized emoji. And to start using Canva, you will have to sign up.
Key Features
- Canva has more than 250 emojis.
- It lets you edit your photos to enhance their quality.
- One-month free trial.
- You can choose from different templates.
Steps to Follow to Use Canva
Step 1: First, visit https://www.canva.com/ and sign up using your Facebook account or Gmail.
Step 2: Choose the kind of work you would like to do, and you will be taken to the photo editing page.
Step 3: Upload an image and click on the more option.
Step 4: Click on the emoji option and choose an emoji to add to the image. To save, click on the download option.
Related: How to Animate Pictures in Canva
#4: PiZap

PiZap is a photo editing tool that lets you add emojis too. To start using, you will have to log in or sign up. You can use your Facebook, Twitter, or Google account to sign up. It provides you with various graphics, fonts, and other photo editing features to make the image look better than before. The basic tool comes for free and has 232 emojis currently.
Key Features
- The basic tool comes for free.
- There are numerous emojis to choose from.
- The image quality doesn’t lose its original quality.
- Using the tool is easy, and the interface is intuitive.
Steps to Follow to Use PiZap
Step 1: Visit www.pizap.com and click on the try for free option.
Step 2: Click on the edit photo option, and upload an image.
Step 3: From the left-side toolbar, click on the Graphics option. Scroll a bit, and you will see the emoji section.
Step 4: Click on any of the emojis you like to add to the photo. You can adjust the emojis as you want.
#5: Pixelied
![]()
The last website that we have is Pixelied. The free tool will let you edit your image and add emojis, which will be enough if you don’t want many features. Using the tool is easy, and the emojis Pixelied has are great. They are different than general emojis and look better! Plus, the tool provides 300+ fantastic emojis.
Key Features
- The tool has an excellent collection of emojis.
- Adding emojis is extremely easy.
- It is free to use and doesn’t require any photo editing experience.
- The tool also offers various photo editing features.
How to Use Pixelied?
Step 1: Visit pixelied.com and click on the Upload Your Image option.
Step 2: On the left, you will find tons of icons. Use the search bar and type emojis.
Step 3: Browse through the emojis and click on one that you like. You can use multiple emojis, too, if you want. To save, click on the download option.
Part 2: How to Add Emojis to Photo on Wondershare Filmora
Filmora video editor provides tons of emojis that you can add for free, so you can add them to photos directly. What’s more, you can also upload your own emoji and use it in Filmora. All you need to do is download the tool on your Windows or Mac computer and start using it to add an emoji. There are two ways to go about it:
Use Emojis from Elements

Step 1: Launch Wondershare Filmora and click on create a new project.
Step 2: Click on the Elements option on the top and use the search bar to search for emojis.
Step 3: Click on any of the emojis that you like and adjust them.
Step 4: To save the photo with emojis, just click the camera icon to take a screenshot .
The video below shows the animated emojis that you can try in Filmora, take a look and have fun.
For Win 7 or later (64-bit)
For macOS 10.12 or later
Upload Your Own Emoji
Step 1: Launch Wondershare Filmora and add both the emoji and photo.
Step 2: Drag both of them into the timeline.
Step 3: Use the viewer panel to adjust the size of the emoji.

For Win 7 or later (64-bit)
For macOS 10.12 or later
Besides adding emojis to photos or videos, you can also add stickers to videos in Filmora to have fun.
Conclusion
And that’s how you can add an emoji to a photo online easily. You can try all five websites to add emojis to your photos, and if you want, you can download Wondershare Filmora to further edit the image. So, try these tools and make your photo look fun and fantastic!
02 How to Add Emojis to Photo on Wondershare Filmora
Part 1: Top 5 Websites to Add Emojis to Photo Online
#1: Kapwing
One of the best websites is Kapwing, which lets you add emojis to any photo you want. Kapwing is an easy-to-use online tool, which means you will not have to download any tool. But to start using it, you will have to sign up. You can do that by using your Google ID. When it comes to the number of emojis it has, it boasts more than 250 different emojis. It lets you add custom emojis; let’s say you have a pack of custom emojis with you that you want to use; you can do that effortlessly.
Key Features
- It’s an online tool and free to use.
- You need to sign up to save your work.
- It has more than 250 emojis to choose from.
- Kapwing is easy to use.
Steps to Follow to Use Kapwing
Step 1: Visit the official website of Kapwing. You will see the Start Editing option; please click on that.
Step 2: You will see the workspace with an option that says “click to upload.” Click on it.
Step 3: Now, upload a photo that you want to add the emoji too. The image will be uploaded.
Step 4: To add an emoji, look towards the left menu, and you will see the Add Media option. Click on that.
Step 5: You will see the upload, projects, and emojis options. Click on the emojis option.
Step 6: Emojis will appear. Click on one, and it will be uploaded to the main photo. You can drag, shrink, zoom, or rotate the emoji used. You can add as many emojis you want.
Related: How to make a slo-mo video on Kapwing
#2: Image Online.Co
The next good online tool that you can try is Image Online.Co. It’s a pretty basic tool that lets you upload a photo and add an emoji the right way. It has more than 100 emojis, which is not a lot. But features all the popular emojis that will suit all kinds of images. And it allows you to add your custom emojis, which is why people prefer to use Image Online.Co. Using it is very easy, and the interface of the online tool is easy to understand.
Key Features
- It is a 100% free online tool that won’t ask you to sign up or log in.
- The tool has 100+ emojis to choose from.
- The interface is easy to understand.
- The tool is easy to use.
Steps to Follow to Use Image Online.Co
Step 1: Visit https://emoji.imageonline.co/ , which is their official website.
Step 2: Click on the Select Photo option, else directly drop an image from your local folder.
Step 3: If you want, you can add a custom emoji that you already have.
Step 4: Add an emoji from the right menu and rotate or zoom in or zoom out.
#3: Canva
Canva is arguably one of the best ways to make your photos look better. This tool has tons of features, and the best part is that you can customize a picture with an emoji using one of their templates. It has 250+ emojis and lets you add your customized emoji. And to start using Canva, you will have to sign up.
Key Features
- Canva has more than 250 emojis.
- It lets you edit your photos to enhance their quality.
- One-month free trial.
- You can choose from different templates.
Steps to Follow to Use Canva
Step 1: First, visit https://www.canva.com/ and sign up using your Facebook account or Gmail.
Step 2: Choose the kind of work you would like to do, and you will be taken to the photo editing page.
Step 3: Upload an image and click on the more option.
Step 4: Click on the emoji option and choose an emoji to add to the image. To save, click on the download option.
Related: How to Animate Pictures in Canva
#4: PiZap
PiZap is a photo editing tool that lets you add emojis too. To start using, you will have to log in or sign up. You can use your Facebook, Twitter, or Google account to sign up. It provides you with various graphics, fonts, and other photo editing features to make the image look better than before. The basic tool comes for free and has 232 emojis currently.
Key Features
- The basic tool comes for free.
- There are numerous emojis to choose from.
- The image quality doesn’t lose its original quality.
- Using the tool is easy, and the interface is intuitive.
Steps to Follow to Use PiZap
Step 1: Visit www.pizap.com and click on the try for free option.
Step 2: Click on the edit photo option, and upload an image.
Step 3: From the left-side toolbar, click on the Graphics option. Scroll a bit, and you will see the emoji section.
Step 4: Click on any of the emojis you like to add to the photo. You can adjust the emojis as you want.
#5: Pixelied
![]()
The last website that we have is Pixelied. The free tool will let you edit your image and add emojis, which will be enough if you don’t want many features. Using the tool is easy, and the emojis Pixelied has are great. They are different than general emojis and look better! Plus, the tool provides 300+ fantastic emojis.
Key Features
- The tool has an excellent collection of emojis.
- Adding emojis is extremely easy.
- It is free to use and doesn’t require any photo editing experience.
- The tool also offers various photo editing features.
How to Use Pixelied?
Step 1: Visit pixelied.com and click on the Upload Your Image option.
Step 2: On the left, you will find tons of icons. Use the search bar and type emojis.
Step 3: Browse through the emojis and click on one that you like. You can use multiple emojis, too, if you want. To save, click on the download option.
Part 2: How to Add Emojis to Photo on Wondershare Filmora
Filmora video editor provides tons of emojis that you can add for free, so you can add them to photos directly. What’s more, you can also upload your own emoji and use it in Filmora. All you need to do is download the tool on your Windows or Mac computer and start using it to add an emoji. There are two ways to go about it:
Use Emojis from Elements
Step 1: Launch Wondershare Filmora and click on create a new project.
Step 2: Click on the Elements option on the top and use the search bar to search for emojis.
Step 3: Click on any of the emojis that you like and adjust them.
Step 4: To save the photo with emojis, just click the camera icon to take a screenshot .
The video below shows the animated emojis that you can try in Filmora, take a look and have fun.
For Win 7 or later (64-bit)
For macOS 10.12 or later
Upload Your Own Emoji
Step 1: Launch Wondershare Filmora and add both the emoji and photo.
Step 2: Drag both of them into the timeline.
Step 3: Use the viewer panel to adjust the size of the emoji.
For Win 7 or later (64-bit)
For macOS 10.12 or later
Besides adding emojis to photos or videos, you can also add stickers to videos in Filmora to have fun.
Conclusion
And that’s how you can add an emoji to a photo online easily. You can try all five websites to add emojis to your photos, and if you want, you can download Wondershare Filmora to further edit the image. So, try these tools and make your photo look fun and fantastic!
How to Burn Photos to DVD with Transitions and Music
How to Burn Photos to DVD with Transitions and Music

Shanoon Cox
Mar 27, 2024• Proven solutions
Photos are precious memories not only for you but also for your family members. As time goes on, the photos might fade out and be unable to retrieve. To avoid this, burn photos to DVD will be a great idea to preserve family memories eternally.
This article will show you how to burn photos to DVD Slideshow with transition, titles and music quickly and easily by using Wondershare DVD Slideshow Builder Deluxe . It also provides some tips on how to burn photos to DVD.
Part 1: How to Burn Photos to DVD with Transition, Titles and Music
Wondershare DVD Slideshow Builder Deluxe can help you quickly create and burn photos to DVD. Download the free trial version this photo DVD maker first.

Step 1. Add Photo or Video Files
In Organize tab, simply click the “Add Files” button to open the browse window, find your files and import them into the program, you can drag and drop photos or videos to organize them on storyboard. Click the Expand button to get a larger viewer.

Step 2. Customize Photo Slideshow Transitions
Generally speaking, transition effects will be automatically inserted between every two photos/videos when you import the photos. But you can customize them by clicking the Personalize tab, then drag and drop a transition from the list to the thumbnail between two slides.
You are also able to add background music here: click the Music button and choose a music file from your computer.

Step 3. Choose DVD Menu
Now switch to Create tab to author a DVD menu from template and burn to DVD disc quickly:
- On the right hand side of the screen, double click on desired menu template to apply a DVD menu template.
- Click the Edit button under the preview windows to customize your DVD menu or right click on menu for more options.
- You can also make a professional DVD menu using dynamic DVD menu templates.
BTW, if you don’t want a DVD menu, just check the “Disable DVD Menu” option.

Step 4. Burn Photos to DVD Disc
Now click the Preview button beneath the preview window to make sure the photo DVD slideshow is exactly what you want. Go back to Personalize tab to change if necessary. After that, click “Burn” button to start burning your DVD slideshow to DVD.
You can also output photo slideshow to watch on Youtube, Mobile Phone, iPhone, PSP, etc. through options on the left. Below are the instructions to burn DVD for watch on TV:

- Insert a blank DVD disc, and do the following.
- Click “Burn to DVD”. Then specify the number of DVD copies. You can also choose to generate ISO Image files or DVD Folders.
- Make sure the PAL or NTSC TV Standard settings is right. If you don’t know which standard is used in your country, click the “Help” button. The wrong TV standard would cause playback incompatibility problem.
- Then click “Start” to burn DVD slideshow. If you have checked Create DVD Folder and/or Create DVD Image File options, the corresponding files will also be created to the specified folder.
Now sit back and relax, when burning complete, insert the created DVD disc into your DVD player to watch photo DVD slideshow on TV.
Learn more: User Guide of DVD Slideshow Builder Deluxe
Part 2: More Photo to DVD Tips
More about NTSC/PAL TV Standard
Nowadays, there are three video formats around the world. But each one is incompatible with others. For instance, NTSC is used in North America, Canada and Japan; while most of other regions PAL/SECAM. To apply TV Standard in DVD Slideshow Builder Deluxe , go to “Create“ -> Option tab and locate TV Standard option to select NTSC or PAL. If you are not sure which one to choose, please click “Help” button, select your country, then click “OK” , the program will choose the right TV standard for you.
Burn Photos to DVD/CD as Data Disc
If you only want to burn photo to DVD for backup and further use, you only need a burning photo to DVD software like ImgBurn (Free) or Nero (commercial). These software helps you burn all digital media files to DVD, of course you can burn photos to DVD for backup purpose. Notice that some photo DVD maker allows you burn slideshow as well as the original photos. This way, you turn photos to DVD slideshow with transition, and at the same time, backup photos to DVD for other uses.
Scan Photos to DVD - Digitize Photos
If you use traditional camera and have got loads of photos in album, you can scan photos to computer so that convert photo to digital format. Afterwards, you can get more from these digital photos, like backup photos to DVD, send to others as DVD gift, make a photo DVD show to play on TV, etc. All these could be done with your favorite photo DVD maker software. Now see how to transform your printed photos to digital first:
Select a good photo scanner -> Prepare your photos to scan -> Start photo scanning -> Adjust scanned photos
Scanning printed photos to computer is not an easy job. It needs patience and some tips and tricks. As you may know, some companies provide photo scanning service. For the Step 4, you can also adjust digital photos in your selected photo DVD maker. Anyway, you need to get your digital photos ready before you burn photos to DVD with transitions and music.
Shanoon Cox
Shanoon Cox is a writer and a lover of all things video.
Follow @Shanoon Cox
Shanoon Cox
Mar 27, 2024• Proven solutions
Photos are precious memories not only for you but also for your family members. As time goes on, the photos might fade out and be unable to retrieve. To avoid this, burn photos to DVD will be a great idea to preserve family memories eternally.
This article will show you how to burn photos to DVD Slideshow with transition, titles and music quickly and easily by using Wondershare DVD Slideshow Builder Deluxe . It also provides some tips on how to burn photos to DVD.
Part 1: How to Burn Photos to DVD with Transition, Titles and Music
Wondershare DVD Slideshow Builder Deluxe can help you quickly create and burn photos to DVD. Download the free trial version this photo DVD maker first.
Step 1. Add Photo or Video Files
In Organize tab, simply click the “Add Files” button to open the browse window, find your files and import them into the program, you can drag and drop photos or videos to organize them on storyboard. Click the Expand button to get a larger viewer.
Step 2. Customize Photo Slideshow Transitions
Generally speaking, transition effects will be automatically inserted between every two photos/videos when you import the photos. But you can customize them by clicking the Personalize tab, then drag and drop a transition from the list to the thumbnail between two slides.
You are also able to add background music here: click the Music button and choose a music file from your computer.
Step 3. Choose DVD Menu
Now switch to Create tab to author a DVD menu from template and burn to DVD disc quickly:
- On the right hand side of the screen, double click on desired menu template to apply a DVD menu template.
- Click the Edit button under the preview windows to customize your DVD menu or right click on menu for more options.
- You can also make a professional DVD menu using dynamic DVD menu templates.
BTW, if you don’t want a DVD menu, just check the “Disable DVD Menu” option.
Step 4. Burn Photos to DVD Disc
Now click the Preview button beneath the preview window to make sure the photo DVD slideshow is exactly what you want. Go back to Personalize tab to change if necessary. After that, click “Burn” button to start burning your DVD slideshow to DVD.
You can also output photo slideshow to watch on Youtube, Mobile Phone, iPhone, PSP, etc. through options on the left. Below are the instructions to burn DVD for watch on TV:
- Insert a blank DVD disc, and do the following.
- Click “Burn to DVD”. Then specify the number of DVD copies. You can also choose to generate ISO Image files or DVD Folders.
- Make sure the PAL or NTSC TV Standard settings is right. If you don’t know which standard is used in your country, click the “Help” button. The wrong TV standard would cause playback incompatibility problem.
- Then click “Start” to burn DVD slideshow. If you have checked Create DVD Folder and/or Create DVD Image File options, the corresponding files will also be created to the specified folder.
Now sit back and relax, when burning complete, insert the created DVD disc into your DVD player to watch photo DVD slideshow on TV.
Learn more: User Guide of DVD Slideshow Builder Deluxe
Part 2: More Photo to DVD Tips
More about NTSC/PAL TV Standard
Nowadays, there are three video formats around the world. But each one is incompatible with others. For instance, NTSC is used in North America, Canada and Japan; while most of other regions PAL/SECAM. To apply TV Standard in DVD Slideshow Builder Deluxe , go to “Create“ -> Option tab and locate TV Standard option to select NTSC or PAL. If you are not sure which one to choose, please click “Help” button, select your country, then click “OK” , the program will choose the right TV standard for you.
Burn Photos to DVD/CD as Data Disc
If you only want to burn photo to DVD for backup and further use, you only need a burning photo to DVD software like ImgBurn (Free) or Nero (commercial). These software helps you burn all digital media files to DVD, of course you can burn photos to DVD for backup purpose. Notice that some photo DVD maker allows you burn slideshow as well as the original photos. This way, you turn photos to DVD slideshow with transition, and at the same time, backup photos to DVD for other uses.
Scan Photos to DVD - Digitize Photos
If you use traditional camera and have got loads of photos in album, you can scan photos to computer so that convert photo to digital format. Afterwards, you can get more from these digital photos, like backup photos to DVD, send to others as DVD gift, make a photo DVD show to play on TV, etc. All these could be done with your favorite photo DVD maker software. Now see how to transform your printed photos to digital first:
Select a good photo scanner -> Prepare your photos to scan -> Start photo scanning -> Adjust scanned photos
Scanning printed photos to computer is not an easy job. It needs patience and some tips and tricks. As you may know, some companies provide photo scanning service. For the Step 4, you can also adjust digital photos in your selected photo DVD maker. Anyway, you need to get your digital photos ready before you burn photos to DVD with transitions and music.
Shanoon Cox
Shanoon Cox is a writer and a lover of all things video.
Follow @Shanoon Cox
How to Make a Triggered Meme?
How to Make a Triggered Meme?

Ollie Mattison
Mar 27, 2024• Proven solutions
It is no secret that we all lose our cool from time. It’s only natural, after all, the world can be a frustrating place. We’re all enraged by different things, some of us can’t stand pineapple on pizza while others explode when being pranked. What we often don’t realize is that being triggered in front of a camera makes us perfect meme material. Even though the majority of memes are still images, some of the most memorable memes ever created were GIFs or short videos.
Making the triggered meme is easy when you know how, so in this article, we are going to show you how to make your next potentially viral meme, in just a few easy steps.
Filmora offers an easy to use video editor named Filmora Video Editor to make video and gif memes, and an online free meme maker named Filmora FREE Online Meme Maker which allows you to create images, videos and gifs memes for free. The video tutorial below will show you how to make a triggered video meme with Filmora. Download it and try it by yourself now.


The Things You Need to Make a Triggered Meme
Preparation is key to almost every important thing in life, including making a triggered meme featuring your bestie. Before you can capitalize on that amazing footage of triggered people you first have to make sure you have everything you need to generate a meme. Okay, let’s get started with the essentials to making a fun and effective meme.
1. A Triggered Template
You have virtually unlimited resources at your disposal, as this meme template can be easily found through a quick Google search. There is even an Android app called Triggered Meme Maker , that lets you do what its name suggests, make triggered memes. Making your own template in Microsoft Paint (we will show you how to make it in this article later) or any other photo editing software is also an option if you want to select the color of the background, rather than work with what you can find online.
2. A Video Editing Software
Memes are short videos that rarely last longer than 30 seconds, which is why you don’t need a powerful video editing suite like Final Cut Pro or Adobe Premiere Pro to make a good meme. A software like Wondershare Filmora that is easy to use and yet packed with cool visual effects and useful tools is a better choice if you just want to have a little fun with a video you recorded.
3. The Sound for the Triggered Meme
This ingredient of a good meme is easy to forget, but music or any other type of sound can make your meme funnier. In most cases, you’ll want to keep at least a portion of the original audio, but adding sound effects at different points of the meme can have a comical effect. The Filmora’s Music Library can serve as your endless source of royalty free music and sounds .
Making a Triggered Meme Template in Microsoft Paint
Creating a meme template is an easy task that can be handled from the Microsoft Paint in a couple of minutes. When you launch the software, click on the Fill with color icon located in the Tools section of the Paint’s ribbon. Activating this option enables you to change the color of the background with a single click. Proceed to select the color of the background from the color palette located on the far right side of the ribbon. We recommend choosing shades of green because the background is going to be used for the Chroma Key effect. You can click on the Edit Colors icon if you want to find a perfect color tone for the background. Right-click anywhere on the canvas to change its color.
Now you just need to add the text to your template. Select the Text option in the Tools menu and then proceed to select the font or the size of your text in the Font menu. Make sure that the Opaque feature is enabled in the Background menu in order to change the color of the textbox background. Adjusting the Color 1 option in the Color Menu will enable you to choose the text color, while the Color 2 option lets you pick the color of the background. Type triggered in the textbox, and center the text by clicking on the TAB button on your keyboard a few times. Now you have everything you need to start creating your own triggered meme.
How to Make a Triggered Meme?
Once you’ve successfully created a triggered template you can move on to the next step of the meme making process.
1. Adding Media to a Project
Open Filmora in the Full Feature Mode and import all the files you’re going to need during the process of making a meme. The files you import to your project will be stored in the Media Panel. Add the video to the timeline by dropping it over the video track. You can then remove the unwanted parts of the clip or add a still frame to the end of the video to prolong the triggered effect of the meme. Still frames in Filmora can be created by clicking on the Snapshot icon, that is located below the Preview Panel.
2. Using the Green Screen Effect
Place the triggered template to the Picture-in-Picture track and try to position it at the exact place in the video where the person gets triggered. Click on the Green Screen icon located in the toolbar to gain access to the PIP Edit window. The Chroma Key (Green Screen) option will be selected by default, so you just have to check the ‘Make parts of the clip transparent’ box. The green background of the template will become transparent and you’ll be able to see parts of your video, with the triggered text displayed below it.
3. Enhancing Colors and Applying Effects
In order to highlight just how much a person in the video got triggered, you can change the vibrance and saturation in a portion of a video clip by clicking on the Edit icon in the toolbar. In addition, other software’s color correction tools like brightness, tint or contrast can also be used to highlight the triggered moment.
After you adjust the color values, you can click on the Effects icon if you want to add motion blur or camera shake effects. Click on the Shake option in the Effects panel to start browsing through different effects and click on the plus icon to add the effect to the clip you selected. The Distortion category in the Effects panel features a number of blur effects you can use to make the video more entertaining. You can adjust the properties of all the effects you add to your meme and control how much of the effect is applied to the video.
4. Adding Music and Text Overlays to Your Meme
Increasing the number of visual elements in the video can help you create a funnier meme. A single word can change the meaning of a meme so if you want to add additional comment besides noting that the person got triggered you can click on the Text icon and select the text overlay you like. Click on the plus icon that is displayed over the effect to add it to a video clip. A textbox will appear over the video in the Preview window and you can drag it around the screen to reposition it or rotate it. Enable the No Animation option if you want the text to just appear and disappear from the screen.
Sounds can add to the comical effect of a meme. Carefully select what type of music or sound you want to use for a meme since it can improve the quality of your meme. Simply drag the audio file you imported into Filmora and place it on the audio track and adjust its duration to match the duration of the video. If you don’t have your own music you can try some of the tracks featured in the software’s music library.
4. Exporting the Triggered Meme from Filmora
When your meme is ready to hit the social media, you can click on the Export button. In the Export window, you can choose any of the available file formats, but the formats best suited for memes are either MP4 or GIF. Click on the Settings icon in the Output Description menu to change the frame rate, resolution or the quality of the video. Wondershare Filmora lets you export videos directly to your YouTube channel or your Facebook account, so you don’t have to waste time on posting the meme after the export process is completed.
The software also offers the option to save a meme you created to your hard drive if you don’t want to post a meme on social media right away. You just have to click on the Export button after adjusting the output settings and wait for the file to be exported.
Conclusion
The precious memories of your friends being enraged by the silliest things can be turned into hilarious memes effortlessly. A video editing software like Wondershare Filmora gives you all the tools you’ll need to quickly generate a triggered meme, so you can focus on having fun with your friends. What’s your favorite method of making memes?
Ollie Mattison
Ollie Mattison is a writer and a lover of all things video.
Follow @Ollie Mattison
Ollie Mattison
Mar 27, 2024• Proven solutions
It is no secret that we all lose our cool from time. It’s only natural, after all, the world can be a frustrating place. We’re all enraged by different things, some of us can’t stand pineapple on pizza while others explode when being pranked. What we often don’t realize is that being triggered in front of a camera makes us perfect meme material. Even though the majority of memes are still images, some of the most memorable memes ever created were GIFs or short videos.
Making the triggered meme is easy when you know how, so in this article, we are going to show you how to make your next potentially viral meme, in just a few easy steps.
Filmora offers an easy to use video editor named Filmora Video Editor to make video and gif memes, and an online free meme maker named Filmora FREE Online Meme Maker which allows you to create images, videos and gifs memes for free. The video tutorial below will show you how to make a triggered video meme with Filmora. Download it and try it by yourself now.
The Things You Need to Make a Triggered Meme
Preparation is key to almost every important thing in life, including making a triggered meme featuring your bestie. Before you can capitalize on that amazing footage of triggered people you first have to make sure you have everything you need to generate a meme. Okay, let’s get started with the essentials to making a fun and effective meme.
1. A Triggered Template
You have virtually unlimited resources at your disposal, as this meme template can be easily found through a quick Google search. There is even an Android app called Triggered Meme Maker , that lets you do what its name suggests, make triggered memes. Making your own template in Microsoft Paint (we will show you how to make it in this article later) or any other photo editing software is also an option if you want to select the color of the background, rather than work with what you can find online.
2. A Video Editing Software
Memes are short videos that rarely last longer than 30 seconds, which is why you don’t need a powerful video editing suite like Final Cut Pro or Adobe Premiere Pro to make a good meme. A software like Wondershare Filmora that is easy to use and yet packed with cool visual effects and useful tools is a better choice if you just want to have a little fun with a video you recorded.
3. The Sound for the Triggered Meme
This ingredient of a good meme is easy to forget, but music or any other type of sound can make your meme funnier. In most cases, you’ll want to keep at least a portion of the original audio, but adding sound effects at different points of the meme can have a comical effect. The Filmora’s Music Library can serve as your endless source of royalty free music and sounds .
Making a Triggered Meme Template in Microsoft Paint
Creating a meme template is an easy task that can be handled from the Microsoft Paint in a couple of minutes. When you launch the software, click on the Fill with color icon located in the Tools section of the Paint’s ribbon. Activating this option enables you to change the color of the background with a single click. Proceed to select the color of the background from the color palette located on the far right side of the ribbon. We recommend choosing shades of green because the background is going to be used for the Chroma Key effect. You can click on the Edit Colors icon if you want to find a perfect color tone for the background. Right-click anywhere on the canvas to change its color.
Now you just need to add the text to your template. Select the Text option in the Tools menu and then proceed to select the font or the size of your text in the Font menu. Make sure that the Opaque feature is enabled in the Background menu in order to change the color of the textbox background. Adjusting the Color 1 option in the Color Menu will enable you to choose the text color, while the Color 2 option lets you pick the color of the background. Type triggered in the textbox, and center the text by clicking on the TAB button on your keyboard a few times. Now you have everything you need to start creating your own triggered meme.
How to Make a Triggered Meme?
Once you’ve successfully created a triggered template you can move on to the next step of the meme making process.
1. Adding Media to a Project
Open Filmora in the Full Feature Mode and import all the files you’re going to need during the process of making a meme. The files you import to your project will be stored in the Media Panel. Add the video to the timeline by dropping it over the video track. You can then remove the unwanted parts of the clip or add a still frame to the end of the video to prolong the triggered effect of the meme. Still frames in Filmora can be created by clicking on the Snapshot icon, that is located below the Preview Panel.
2. Using the Green Screen Effect
Place the triggered template to the Picture-in-Picture track and try to position it at the exact place in the video where the person gets triggered. Click on the Green Screen icon located in the toolbar to gain access to the PIP Edit window. The Chroma Key (Green Screen) option will be selected by default, so you just have to check the ‘Make parts of the clip transparent’ box. The green background of the template will become transparent and you’ll be able to see parts of your video, with the triggered text displayed below it.
3. Enhancing Colors and Applying Effects
In order to highlight just how much a person in the video got triggered, you can change the vibrance and saturation in a portion of a video clip by clicking on the Edit icon in the toolbar. In addition, other software’s color correction tools like brightness, tint or contrast can also be used to highlight the triggered moment.
After you adjust the color values, you can click on the Effects icon if you want to add motion blur or camera shake effects. Click on the Shake option in the Effects panel to start browsing through different effects and click on the plus icon to add the effect to the clip you selected. The Distortion category in the Effects panel features a number of blur effects you can use to make the video more entertaining. You can adjust the properties of all the effects you add to your meme and control how much of the effect is applied to the video.
4. Adding Music and Text Overlays to Your Meme
Increasing the number of visual elements in the video can help you create a funnier meme. A single word can change the meaning of a meme so if you want to add additional comment besides noting that the person got triggered you can click on the Text icon and select the text overlay you like. Click on the plus icon that is displayed over the effect to add it to a video clip. A textbox will appear over the video in the Preview window and you can drag it around the screen to reposition it or rotate it. Enable the No Animation option if you want the text to just appear and disappear from the screen.
Sounds can add to the comical effect of a meme. Carefully select what type of music or sound you want to use for a meme since it can improve the quality of your meme. Simply drag the audio file you imported into Filmora and place it on the audio track and adjust its duration to match the duration of the video. If you don’t have your own music you can try some of the tracks featured in the software’s music library.
4. Exporting the Triggered Meme from Filmora
When your meme is ready to hit the social media, you can click on the Export button. In the Export window, you can choose any of the available file formats, but the formats best suited for memes are either MP4 or GIF. Click on the Settings icon in the Output Description menu to change the frame rate, resolution or the quality of the video. Wondershare Filmora lets you export videos directly to your YouTube channel or your Facebook account, so you don’t have to waste time on posting the meme after the export process is completed.
The software also offers the option to save a meme you created to your hard drive if you don’t want to post a meme on social media right away. You just have to click on the Export button after adjusting the output settings and wait for the file to be exported.
Conclusion
The precious memories of your friends being enraged by the silliest things can be turned into hilarious memes effortlessly. A video editing software like Wondershare Filmora gives you all the tools you’ll need to quickly generate a triggered meme, so you can focus on having fun with your friends. What’s your favorite method of making memes?
Ollie Mattison
Ollie Mattison is a writer and a lover of all things video.
Follow @Ollie Mattison
The Essential Guide to Emoji, Memoji, Animoji, and Bitmoji
The Essential Guide to Emoji, Memoji, Animoji, and Bitmoji
Shanoon Cox
Mar 27, 2024• Proven solutions
Did you know there are 3,304 emojis as of now? Why do we even need emojis? Well, Emojis and emoticons have a long history within digital communication, internet culture, and digital content. Nowadays, emoticons have evolved into different animated versions like emoji, Bitmoji, Animoji, and Memoji. All these types of emoticons have become an important communication tool in the contemporary online world – especially on social media apps like Facebook, Instagram, and Snapchat. If you are confused between emojis, Bitmojis, Animoji, and Memoji, read this guide to understand better!
Here is an introduction to emoji, bitmoji, Animoji, and memoji.
1.What Is Emoji?
Anybody with a smartphone should know what an emoji is. Open up your keypad, and the ideograms and smileys present there are called emojis.
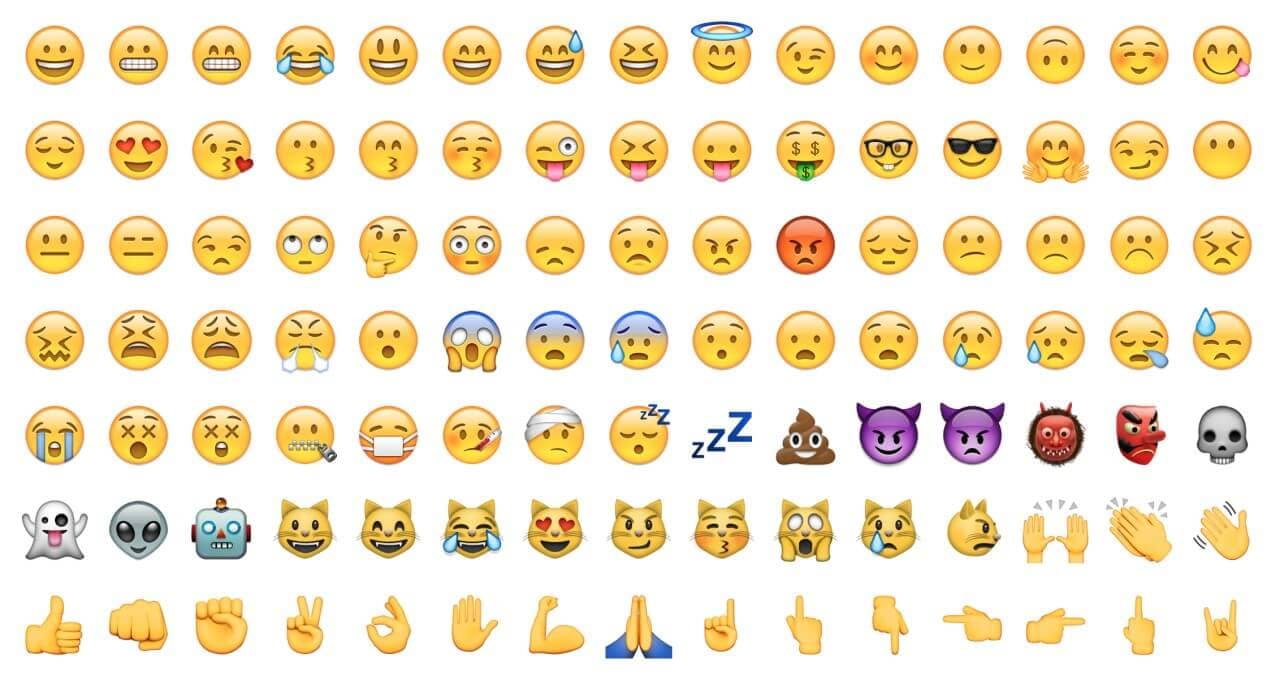
We can say that emojis are an advanced form of emoticons, but instead of typographic expressions, they are in the form of pictures. In simple words, an emoji is a small digital icon or image that expresses your emotions or ideas.
Emojis are widely used in our day-to-day communications through electronic messages and web pages. The emojis on our mobile phones exist in various genres, including facial expressions, places, food items, types of weather, animals, and other everyday objects.
Over the years, the emoji lexicon has constantly evolved to become all-inclusive as emojis are for everyone. Nowadays, emojis can be used across cultures, across screens, and across time. Whether you are white or black, Muslim or Christian, or gay or transgender, there is an emoji representing you and your culture!
2.What is Animoji?
Animojis are popular on iOS devices. Apple devices include an animated emoji feature that is called Animoji. Animoji is a 3D animated emoji that responds to your facial expressions. You can create and emojis on your phone using the front camera face ID system.

Animoji is created with the facial ID software allowing the screen to record and register your facial expressions and movements. The animojis recognize and copy your facial movements like pouting, lowering eyebrow, or rolling the eyeball.
Thus, Animoji is a customized or personalized animated emoji. Animojis have a range of expressions, and they also mimic to match the audio. The current full set of Animoji includes alien, bore, bear, cat, cow, dog, chicken, fox, dragon, rabbit, and many more!
Furthermore, Animojis can be shared as a video (with sound) via different messaging apps like WhatsApp and Facebook Messenger.
3.What is Memoji?
Animojis evolve into Memojis. In simple words, Memojis are personalized Animojis. Such Animojis are 3D animated emojis that look exactly like you or an animated version of you.

Memoji was first introduced by Apple, where the iPhone face ID camera system creates your avatar copying your facial expressions in real-time recording. Some high-end Android devices have also introduced the Memoji feature like the Samsung AR emoji.
The best thing about memojis is that you can completely customize them to suit you. From changing the shape of the head to brows, and hair color to eye color, you can make your Memoji look like you as much as possible.
Like other emojis, Memojis can also be shared on different popular messaging apps like WhatsApp, Facebook, and Instagram.
4.What is Bitmoji?
If you are an avid Snapchat user, then you must know what a Bitmoji is. Bitmojis are like Memojis, but they belong to the Bitmoji app owned by Bitstrips.

Bitstrips is a company that makes personalized emojis and cartoon avatars. Snapchat acquired Bitstrips in 2007 and later on introduced it as a feature in the Snapchat app. Over the years, Snapchat released new versions, and now it supports Bitmojis. Thus, all Snapchat users can create their own personal emojis using the Bitmoji app.
Bitmojis are customizable to a great extent allowing you to create your own cartoon version. You can also choose from a massive library of different moods and expressions, featuring your avatar.
You can also share your little cartoon versions of Bitmojis on different social media accounts. Moreover, you can put them into any chat message or even status update!
Conclusion
If it weren’t for emojis, the online messaging world would be so boring! Emojis add a touch of fun and emotion to everything. Therefore, the majority of us today use emojis to express our emotions through digital communication.
Thus, emojis have become the language of the digital era and social media apps. So, whether you use Emojis, Animojis, Memojis, or Bitmojis, they will lighten the mood and make any conversation fun!
Shanoon Cox
Shanoon Cox is a writer and a lover of all things video.
Follow @Shanoon Cox
Shanoon Cox
Mar 27, 2024• Proven solutions
Did you know there are 3,304 emojis as of now? Why do we even need emojis? Well, Emojis and emoticons have a long history within digital communication, internet culture, and digital content. Nowadays, emoticons have evolved into different animated versions like emoji, Bitmoji, Animoji, and Memoji. All these types of emoticons have become an important communication tool in the contemporary online world – especially on social media apps like Facebook, Instagram, and Snapchat. If you are confused between emojis, Bitmojis, Animoji, and Memoji, read this guide to understand better!
Here is an introduction to emoji, bitmoji, Animoji, and memoji.
1.What Is Emoji?
Anybody with a smartphone should know what an emoji is. Open up your keypad, and the ideograms and smileys present there are called emojis.
We can say that emojis are an advanced form of emoticons, but instead of typographic expressions, they are in the form of pictures. In simple words, an emoji is a small digital icon or image that expresses your emotions or ideas.
Emojis are widely used in our day-to-day communications through electronic messages and web pages. The emojis on our mobile phones exist in various genres, including facial expressions, places, food items, types of weather, animals, and other everyday objects.
Over the years, the emoji lexicon has constantly evolved to become all-inclusive as emojis are for everyone. Nowadays, emojis can be used across cultures, across screens, and across time. Whether you are white or black, Muslim or Christian, or gay or transgender, there is an emoji representing you and your culture!
2.What is Animoji?
Animojis are popular on iOS devices. Apple devices include an animated emoji feature that is called Animoji. Animoji is a 3D animated emoji that responds to your facial expressions. You can create and emojis on your phone using the front camera face ID system.
Animoji is created with the facial ID software allowing the screen to record and register your facial expressions and movements. The animojis recognize and copy your facial movements like pouting, lowering eyebrow, or rolling the eyeball.
Thus, Animoji is a customized or personalized animated emoji. Animojis have a range of expressions, and they also mimic to match the audio. The current full set of Animoji includes alien, bore, bear, cat, cow, dog, chicken, fox, dragon, rabbit, and many more!
Furthermore, Animojis can be shared as a video (with sound) via different messaging apps like WhatsApp and Facebook Messenger.
3.What is Memoji?
Animojis evolve into Memojis. In simple words, Memojis are personalized Animojis. Such Animojis are 3D animated emojis that look exactly like you or an animated version of you.
Memoji was first introduced by Apple, where the iPhone face ID camera system creates your avatar copying your facial expressions in real-time recording. Some high-end Android devices have also introduced the Memoji feature like the Samsung AR emoji.
The best thing about memojis is that you can completely customize them to suit you. From changing the shape of the head to brows, and hair color to eye color, you can make your Memoji look like you as much as possible.
Like other emojis, Memojis can also be shared on different popular messaging apps like WhatsApp, Facebook, and Instagram.
4.What is Bitmoji?
If you are an avid Snapchat user, then you must know what a Bitmoji is. Bitmojis are like Memojis, but they belong to the Bitmoji app owned by Bitstrips.
Bitstrips is a company that makes personalized emojis and cartoon avatars. Snapchat acquired Bitstrips in 2007 and later on introduced it as a feature in the Snapchat app. Over the years, Snapchat released new versions, and now it supports Bitmojis. Thus, all Snapchat users can create their own personal emojis using the Bitmoji app.
Bitmojis are customizable to a great extent allowing you to create your own cartoon version. You can also choose from a massive library of different moods and expressions, featuring your avatar.
You can also share your little cartoon versions of Bitmojis on different social media accounts. Moreover, you can put them into any chat message or even status update!
Conclusion
If it weren’t for emojis, the online messaging world would be so boring! Emojis add a touch of fun and emotion to everything. Therefore, the majority of us today use emojis to express our emotions through digital communication.
Thus, emojis have become the language of the digital era and social media apps. So, whether you use Emojis, Animojis, Memojis, or Bitmojis, they will lighten the mood and make any conversation fun!
Shanoon Cox
Shanoon Cox is a writer and a lover of all things video.
Follow @Shanoon Cox
How to Make a Photo Collage on Mac/iPhone Using iPhoto?
How to Make a Photo Collage on Mac/iPhone Using iPhoto?
Shanoon Cox
Mar 27, 2024• Proven solutions
iPhoto is a photo library familiar to iOS users. It can help you easily organize, store and sort images, and even make a slide show to help you enjoy photos. This is why, even though Apple no longer develops iPhoto, some people use it.
Update: On April 8, 2015, Apple has launched a new Photos app on OS X Yosemite, which means Apple has stopped developing iPhoto. However, if you like iPhoto, you can still use it.
The following will introduce how to use the iPhoto collage maker on Mac or iPhone. At the end of this article, iPhoto alternative software will serve as your reference.
Part 1: How to Make a Photo Collage in iPhoto?
Here are the quick steps to create a photo collage with iPhoto.
Step 1: Launch iPhoto and click “Events” in the side menu.
Step 2: Hold “Shift” and click each photo you want to include in your photo collage.
Step 3: Click the “+” button in the lower-left corner and select Card in the pop-up window.
Step 4: Choose “Picture Collage”, which should be under the Any Occasion section if you are using the iPhoto 11.
Step 5: You’ll notice that all the templates are sorted based on the occasion.
Step 6: Drag photos to the template and pick a background, orientation and design.
Step 7: Click the Buy button on the lower right-hand corner of the collage editor, or go to the Share menu and email it to yourself or family members.
But before you make a photo collage using iPhoto, here are some important things for you to know:
- Technically, iPhoto can’t make fancy photo collages like other Photo collages makers on Mac. So don’t expect too much of it. iPhoto only creates greeting cards with a simple collage layout.
- The templates iPhoto offers are quite limited and ordinary that you might feel a little disappointed.
- iPhoto offers no share options to save photo collages to desktop or to post on Facebook, which is a basic feature of picture collage editor.
Part 2: What Replaces iPhoto on Mac/iPhone?
Since iPhoto’s functions are not sufficient, we will introduce some alternative collage makers that you may be interested in.
Alternative to Make a Short Video, Slideshow, or Photo Collage: Wondershare Filmora
If there are too many photos to save or share with friends and family, you can use these images to make short videos to better collage and share. Filmora can do this for you, through which you can easily crop, add effects, split the screen, and merge photos. In order to make the “photo video” lively and exciting, you can also add music, audio, animation, title, music, etc. to it.
Alternative to Organize, Store, and Sort Images: iCloud
Migrating your photos to iCloud is a wise choice. iCloud is the best photo storage for iOS or Mac users. You don’t need to download other apps or software. Just allow iCloud to back up the photo’s library in the settings.
The best thing is that you can view iCloud photos anytime and anywhere after logging in to your iCloud account. You can also automatically share photos with others by opening “Shared Album”. However, if there are too many photos, a paid subscription may be required to upgrade the storage space.
Conclusion
Above are the steps to make a photo collage using iPhoto on Mac/iPhone. We also list alternative methods to meet the different needs of the Photo library. So, if this isn’t quite what you’re looking for, you can also use some online photo collage service instead. If you want to have more fun editing photo stories, welcome to download Filmora and make more memorable and interesting videos.
Shanoon Cox
Shanoon Cox is a writer and a lover of all things video.
Follow @Shanoon Cox
Shanoon Cox
Mar 27, 2024• Proven solutions
iPhoto is a photo library familiar to iOS users. It can help you easily organize, store and sort images, and even make a slide show to help you enjoy photos. This is why, even though Apple no longer develops iPhoto, some people use it.
Update: On April 8, 2015, Apple has launched a new Photos app on OS X Yosemite, which means Apple has stopped developing iPhoto. However, if you like iPhoto, you can still use it.
The following will introduce how to use the iPhoto collage maker on Mac or iPhone. At the end of this article, iPhoto alternative software will serve as your reference.
Part 1: How to Make a Photo Collage in iPhoto?
Here are the quick steps to create a photo collage with iPhoto.
Step 1: Launch iPhoto and click “Events” in the side menu.
Step 2: Hold “Shift” and click each photo you want to include in your photo collage.
Step 3: Click the “+” button in the lower-left corner and select Card in the pop-up window.
Step 4: Choose “Picture Collage”, which should be under the Any Occasion section if you are using the iPhoto 11.
Step 5: You’ll notice that all the templates are sorted based on the occasion.
Step 6: Drag photos to the template and pick a background, orientation and design.
Step 7: Click the Buy button on the lower right-hand corner of the collage editor, or go to the Share menu and email it to yourself or family members.
But before you make a photo collage using iPhoto, here are some important things for you to know:
- Technically, iPhoto can’t make fancy photo collages like other Photo collages makers on Mac. So don’t expect too much of it. iPhoto only creates greeting cards with a simple collage layout.
- The templates iPhoto offers are quite limited and ordinary that you might feel a little disappointed.
- iPhoto offers no share options to save photo collages to desktop or to post on Facebook, which is a basic feature of picture collage editor.
Part 2: What Replaces iPhoto on Mac/iPhone?
Since iPhoto’s functions are not sufficient, we will introduce some alternative collage makers that you may be interested in.
Alternative to Make a Short Video, Slideshow, or Photo Collage: Wondershare Filmora
If there are too many photos to save or share with friends and family, you can use these images to make short videos to better collage and share. Filmora can do this for you, through which you can easily crop, add effects, split the screen, and merge photos. In order to make the “photo video” lively and exciting, you can also add music, audio, animation, title, music, etc. to it.
Alternative to Organize, Store, and Sort Images: iCloud
Migrating your photos to iCloud is a wise choice. iCloud is the best photo storage for iOS or Mac users. You don’t need to download other apps or software. Just allow iCloud to back up the photo’s library in the settings.
The best thing is that you can view iCloud photos anytime and anywhere after logging in to your iCloud account. You can also automatically share photos with others by opening “Shared Album”. However, if there are too many photos, a paid subscription may be required to upgrade the storage space.
Conclusion
Above are the steps to make a photo collage using iPhoto on Mac/iPhone. We also list alternative methods to meet the different needs of the Photo library. So, if this isn’t quite what you’re looking for, you can also use some online photo collage service instead. If you want to have more fun editing photo stories, welcome to download Filmora and make more memorable and interesting videos.
Shanoon Cox
Shanoon Cox is a writer and a lover of all things video.
Follow @Shanoon Cox
Also read:
- [New] In 2024, Best Practices in Digital Image Creation for YouTube
- [Updated] In 2024, How to Share Facebook Videos to WhatsApp?
- 2024 Approved An All-Inclusive Examination of InShot's Video Edits
- Elite 8 Minimalist Android Simulations, Home Devices
- How To Get the Latest NVMe Driver Software for Windows Systems
- How to Make a Video for Your Babys First Year
- In 2024, Gameplay Reel How-To Reviewed
- Legjobb Ingyenes VIDEÓSZERKESZTŐ Softverek Window 7-Re Szükségesek 2024-Ban
- New How to Add Stickers to WhatsApp-The Ultimate Guide for 2024
- New In 2024, How to Make Memes with White Background Step by Step
- Step-by-Step Guide: Organizing Data by Hue in MS Excel
- Updated In 2024, 7 Free Apps to Get Emojis on Android and iPhone
- Title: Updated In 2024, How to Add Bitmoji to Keyboard?
- Author: Jan
- Created at : 2024-09-24 20:07:32
- Updated at : 2024-09-30 17:33:04
- Link: https://meme-emoji.techidaily.com/updated-in-2024-how-to-add-bitmoji-to-keyboard/
- License: This work is licensed under CC BY-NC-SA 4.0.