
Updated In 2024, Best Photo Slideshow Maker How to Make a Photo Slideshow 2023 Update
Best Photo Slideshow Maker: How to Make a Photo Slideshow [2023 Update]
Best Photo Slideshow Maker: How to Make a Photo Slideshow

Shanoon Cox
Mar 27, 2024• Proven solutions
Have you ever taken so many photos for your family, friends and special events? One fun-filled way of sharing them is to make a photo slideshow. That helps back up the memories in your life. What’s more, it can all be done in just a few simple clicks if you use slideshow maker like DVD Slideshow Builder Deluxe . With this programs, you can easily weave photos and video into work of art to amaze anyone. Here let’s see how to easily and creatively make a photo slideshow and burn to DVD with these all-in-one slideshow tools.
Download and run DVD slideshow builder , then follow the steps below to see how to make a photo slideshow.

Ways for Photo Slidehow making
Step 1. Add photo or video files to the photo slideshow maker
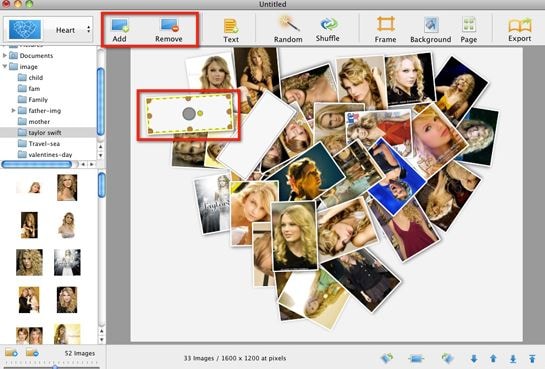
After running the photo slideshow maker, you’ll start from the “Organize” tab. On the interface, there are two Add Files buttons any of which you can click to add your photos and videos. Then just drag and drop photos or videos to arrange their order on storyboard. If you want to edit the photos, click “Edit” to add effects, crop photos, repair red-eye or add caption.
Tip: To have a large viewe of all the files, click the “Expand” button on top right corner of storyboard.

Step 2. Customize the slideshow like background music and transitions
When importing your files, more than 100 transition effects will be randomly and automatically applied between every two photo or video. However, you can change them anytime in the “Personalize” tab. Just drag and drop a transition from the list to the thumbnail between two slides. You can also add effects, motion or intro/credit as you like.
Adding music can greatly enhance the vibe of your photo slideshow. To achieve this, click “Music” on the storyboard. This photo slideshow maker enables you to add several different pieces of music according to your needs. If you want to add your own voice, just click “Voice Over” to record and then add it to the slideshow.

Step 3 Create photo slideshow and burn to DVD

Go to the “Create” tab and click the “Preview” button to make sure the photo slideshow is good enough. Go back to Personalize tab to change if necessary. When you are happy with the result, choose the options on the left to export photo slideshow to DVD, PC, portable devices, etc. You can also directly upload slideshow to Youtube and send message to Facebook and Twitter friends.

Now sit back and relax, it’ll only take a while to get your photo slideshow for sharing anywhere.
Shanoon Cox
Shanoon Cox is a writer and a lover of all things video.
Follow @Shanoon Cox
Shanoon Cox
Mar 27, 2024• Proven solutions
Have you ever taken so many photos for your family, friends and special events? One fun-filled way of sharing them is to make a photo slideshow. That helps back up the memories in your life. What’s more, it can all be done in just a few simple clicks if you use slideshow maker like DVD Slideshow Builder Deluxe . With this programs, you can easily weave photos and video into work of art to amaze anyone. Here let’s see how to easily and creatively make a photo slideshow and burn to DVD with these all-in-one slideshow tools.
Download and run DVD slideshow builder , then follow the steps below to see how to make a photo slideshow.
Ways for Photo Slidehow making
Step 1. Add photo or video files to the photo slideshow maker
After running the photo slideshow maker, you’ll start from the “Organize” tab. On the interface, there are two Add Files buttons any of which you can click to add your photos and videos. Then just drag and drop photos or videos to arrange their order on storyboard. If you want to edit the photos, click “Edit” to add effects, crop photos, repair red-eye or add caption.
Tip: To have a large viewe of all the files, click the “Expand” button on top right corner of storyboard.
Step 2. Customize the slideshow like background music and transitions
When importing your files, more than 100 transition effects will be randomly and automatically applied between every two photo or video. However, you can change them anytime in the “Personalize” tab. Just drag and drop a transition from the list to the thumbnail between two slides. You can also add effects, motion or intro/credit as you like.
Adding music can greatly enhance the vibe of your photo slideshow. To achieve this, click “Music” on the storyboard. This photo slideshow maker enables you to add several different pieces of music according to your needs. If you want to add your own voice, just click “Voice Over” to record and then add it to the slideshow.
Step 3 Create photo slideshow and burn to DVD
Go to the “Create” tab and click the “Preview” button to make sure the photo slideshow is good enough. Go back to Personalize tab to change if necessary. When you are happy with the result, choose the options on the left to export photo slideshow to DVD, PC, portable devices, etc. You can also directly upload slideshow to Youtube and send message to Facebook and Twitter friends.
Now sit back and relax, it’ll only take a while to get your photo slideshow for sharing anywhere.
Shanoon Cox
Shanoon Cox is a writer and a lover of all things video.
Follow @Shanoon Cox
How to Make a Photo Collage Using iPhoto?
How to Make a Photo Collage on Mac/iPhone Using iPhoto?
Shanoon Cox
Mar 27, 2024• Proven solutions
iPhoto is a photo library familiar to iOS users. It can help you easily organize, store and sort images, and even make a slide show to help you enjoy photos. This is why, even though Apple no longer develops iPhoto, some people use it.
Update: On April 8, 2015, Apple has launched a new Photos app on OS X Yosemite, which means Apple has stopped developing iPhoto. However, if you like iPhoto, you can still use it.
The following will introduce how to use the iPhoto collage maker on Mac or iPhone. At the end of this article, iPhoto alternative software will serve as your reference.
Part 1: How to Make a Photo Collage in iPhoto?
Here are the quick steps to create a photo collage with iPhoto.
Step 1: Launch iPhoto and click “Events” in the side menu.
Step 2: Hold “Shift” and click each photo you want to include in your photo collage.
Step 3: Click the “+” button in the lower-left corner and select Card in the pop-up window.
Step 4: Choose “Picture Collage”, which should be under the Any Occasion section if you are using the iPhoto 11.
Step 5: You’ll notice that all the templates are sorted based on the occasion.
Step 6: Drag photos to the template and pick a background, orientation and design.
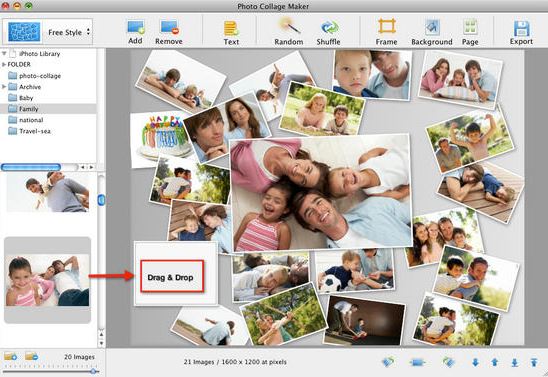
Step 7: Click the Buy button on the lower right-hand corner of the collage editor, or go to the Share menu and email it to yourself or family members.
But before you make a photo collage using iPhoto, here are some important things for you to know:
- Technically, iPhoto can’t make fancy photo collages like other Photo collages makers on Mac. So don’t expect too much of it. iPhoto only creates greeting cards with a simple collage layout.
- The templates iPhoto offers are quite limited and ordinary that you might feel a little disappointed.
- iPhoto offers no share options to save photo collages to desktop or to post on Facebook, which is a basic feature of picture collage editor.
Part 2: What Replaces iPhoto on Mac/iPhone?
Since iPhoto’s functions are not sufficient, we will introduce some alternative collage makers that you may be interested in.
Alternative to Make a Short Video, Slideshow, or Photo Collage: Wondershare Filmora
If there are too many photos to save or share with friends and family, you can use these images to make short videos to better collage and share. Filmora can do this for you, through which you can easily crop, add effects, split the screen, and merge photos. In order to make the “photo video” lively and exciting, you can also add music, audio, animation, title, music, etc. to it.


Alternative to Organize, Store, and Sort Images: iCloud
Migrating your photos to iCloud is a wise choice. iCloud is the best photo storage for iOS or Mac users. You don’t need to download other apps or software. Just allow iCloud to back up the photo’s library in the settings.
The best thing is that you can view iCloud photos anytime and anywhere after logging in to your iCloud account. You can also automatically share photos with others by opening “Shared Album”. However, if there are too many photos, a paid subscription may be required to upgrade the storage space.
Conclusion
Above are the steps to make a photo collage using iPhoto on Mac/iPhone. We also list alternative methods to meet the different needs of the Photo library. So, if this isn’t quite what you’re looking for, you can also use some online photo collage service instead. If you want to have more fun editing photo stories, welcome to download Filmora and make more memorable and interesting videos.
Shanoon Cox
Shanoon Cox is a writer and a lover of all things video.
Follow @Shanoon Cox
Shanoon Cox
Mar 27, 2024• Proven solutions
iPhoto is a photo library familiar to iOS users. It can help you easily organize, store and sort images, and even make a slide show to help you enjoy photos. This is why, even though Apple no longer develops iPhoto, some people use it.
Update: On April 8, 2015, Apple has launched a new Photos app on OS X Yosemite, which means Apple has stopped developing iPhoto. However, if you like iPhoto, you can still use it.
The following will introduce how to use the iPhoto collage maker on Mac or iPhone. At the end of this article, iPhoto alternative software will serve as your reference.
Part 1: How to Make a Photo Collage in iPhoto?
Here are the quick steps to create a photo collage with iPhoto.
Step 1: Launch iPhoto and click “Events” in the side menu.
Step 2: Hold “Shift” and click each photo you want to include in your photo collage.
Step 3: Click the “+” button in the lower-left corner and select Card in the pop-up window.
Step 4: Choose “Picture Collage”, which should be under the Any Occasion section if you are using the iPhoto 11.
Step 5: You’ll notice that all the templates are sorted based on the occasion.
Step 6: Drag photos to the template and pick a background, orientation and design.
Step 7: Click the Buy button on the lower right-hand corner of the collage editor, or go to the Share menu and email it to yourself or family members.
But before you make a photo collage using iPhoto, here are some important things for you to know:
- Technically, iPhoto can’t make fancy photo collages like other Photo collages makers on Mac. So don’t expect too much of it. iPhoto only creates greeting cards with a simple collage layout.
- The templates iPhoto offers are quite limited and ordinary that you might feel a little disappointed.
- iPhoto offers no share options to save photo collages to desktop or to post on Facebook, which is a basic feature of picture collage editor.
Part 2: What Replaces iPhoto on Mac/iPhone?
Since iPhoto’s functions are not sufficient, we will introduce some alternative collage makers that you may be interested in.
Alternative to Make a Short Video, Slideshow, or Photo Collage: Wondershare Filmora
If there are too many photos to save or share with friends and family, you can use these images to make short videos to better collage and share. Filmora can do this for you, through which you can easily crop, add effects, split the screen, and merge photos. In order to make the “photo video” lively and exciting, you can also add music, audio, animation, title, music, etc. to it.
Alternative to Organize, Store, and Sort Images: iCloud
Migrating your photos to iCloud is a wise choice. iCloud is the best photo storage for iOS or Mac users. You don’t need to download other apps or software. Just allow iCloud to back up the photo’s library in the settings.
The best thing is that you can view iCloud photos anytime and anywhere after logging in to your iCloud account. You can also automatically share photos with others by opening “Shared Album”. However, if there are too many photos, a paid subscription may be required to upgrade the storage space.
Conclusion
Above are the steps to make a photo collage using iPhoto on Mac/iPhone. We also list alternative methods to meet the different needs of the Photo library. So, if this isn’t quite what you’re looking for, you can also use some online photo collage service instead. If you want to have more fun editing photo stories, welcome to download Filmora and make more memorable and interesting videos.
Shanoon Cox
Shanoon Cox is a writer and a lover of all things video.
Follow @Shanoon Cox
Add Emojis to Videos on YouTube/Facebook/Snapchat [2023 Guide]
Add Emojis to Videos on YouTube/Facebook/Snapchat [Step by Step Guide]

Liza Brown
Mar 27, 2024• Proven solutions
Emojis are a great way to express one’s emotion more vividly through a depiction rather than a plain conventional text. By the passage of time, the trend of using emoji on social media domain has drastically increased around the world. Since emoji are ubiquitous and its influence on culture is increasingly huge, using emoji has now become a trend.
A plain conventional text or video may not emphasize the meaning behind the phrase, but adding emoji to it is like adding a soul to the intentions behind the message. It helps outshine the theme and make a video more appealing at the same time.
So, with all this being known, let’s take a tour to a complete guide to how to accessorize a video on multiple social media domains and make it far more attractive and meaningful.
Best Tool to Help You Add Emojis to Videos in Few Clicks
Gamers, YouTubers and all other Mac and PC users who’d like to add a smiley or any other emoji to a video should try processing their footage with the Filmora video editor.
Performing basic video editing tasks like cutting or trimming the footage, choosing a soundtrack for a video or adding an emoji to a single shot or an entire sequence can all be completed in just a couple of clicks.
Filmora is free to download. Import your videos after you launch the software, you then can add any animated emojis into wherever you want. Have a try now! Emojis inside are so Cute
How to Add Emojis to YouTube Videos?
You can now add emojis to any of the YouTube videos using an online free tool called Kapwing.
Below are the basic steps about how to add emojis to YouTube videos anywhere using Kapwing.
Step 1: Open free tool Meme Maker and tap on “get started”.
Step 2: Copy the link of the targeted YouTube video and paste the URL of your YouTube video.
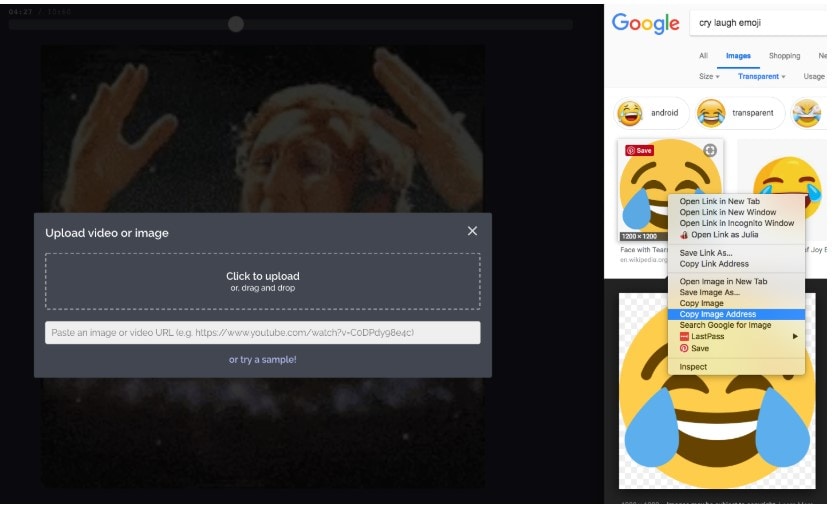
Step 3: One of the ways to insert emoji using Kapwing is to directly upload an emoji having a transparent background. In the toolbar, click on “upload” and paste its URL there. The image will be placed onto the targeted video as an overlay by importing it. Another way to add emoji is to click “add text” where you will have options to insert emojis.
Step 4: You can now play around with editing options in Kapwing to adjust accordingly.
How to Use Emojis on YouTube?
YouTube provides you an option to insert emoji on your YouTube account description, tag and titles with great ease with the use of YouTube certified plugin, Tube Buddy.
Step 1: Install this plugin on chrome browser.
Step 2: Open “info and settings” option in your YouTube targeted video.
Step 3: Tap on description box, tags or title where an emoji icon will be shown. Tap on the emoji icon to display a list of emojis. You can also search for an emoji in the search bar.
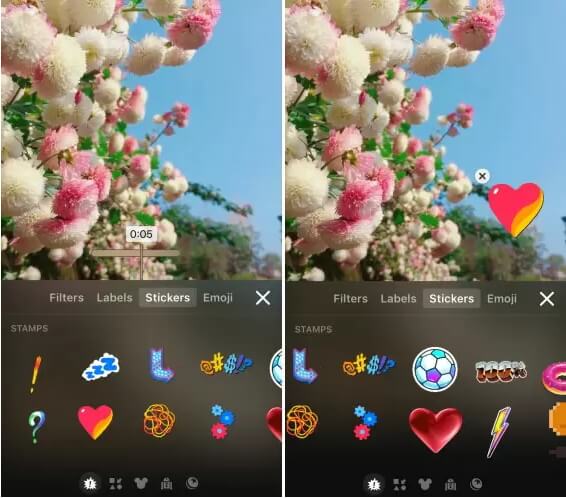
How to Add Emojis in Snapchat Videos?
Step 1: Install Snapchat if you don’t already have it. Then run Snapchat.
Step 2: Record a video by keeping your fingers on the record button.
Step 3: Choose and tap an emoji of your choice to add in your video. Hold your fingers on emoji to place to the desired frame/clip of your recorded video.
Step 4: The emoji can be resized by dragging or pinching it in. You can add more than one emoji.
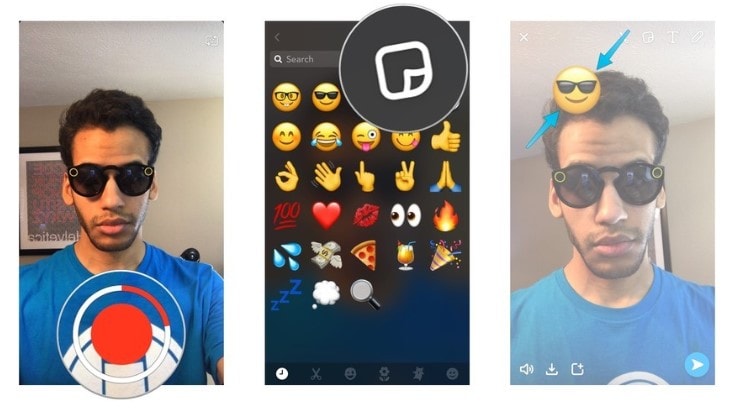
Image from iMore
How to Add Emojis to Facebook?
If you are wondering about how to add emojis to Facebook videos then, unfortunately, Facebook only offers “go live” option on Facebook where an emoji cannot be inserted. But you can insert emoji to Facebook status, comment or in your messenger conversation easily by following the step below for status:
Step 1: Click “what’s on your mind” to add new status on Facebook.
Step 2: At the bottom right side of the status box is an emoji icon. Click on it. This will open a list of emojis that you can choose as many as you want
Step 3: Click on the emoji icon back again to close the list when you are done. Click on post to share the post on your wall.
How to Add Emojis to Videos on iMovie?
Step 1: Search for the desired emoji on the internet with transparent background. Go to iMovie and select a clip of your video where you want to insert an emoji.
Step 2: Go to the “Import” option into the toolbar above, select your desired emoji from the list. This emoji will be added to the iMovie library.
Step 3: Click on that emoji. This overlays that emoji onto that video clip. You can scale the emoji up and down and drag it anywhere on the video.
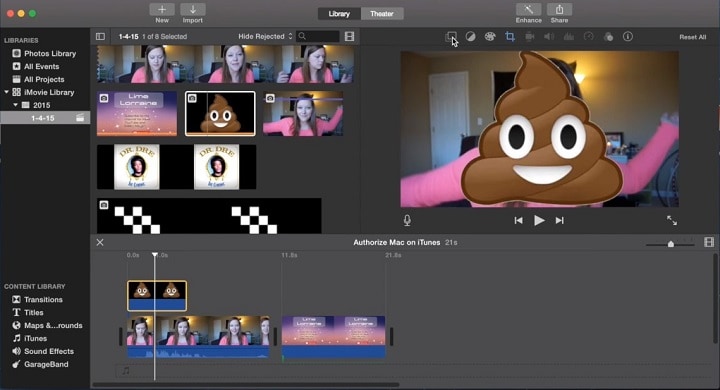
Image from YouSubtitles
How to Add Emojis to Videos Online?
Blurbiz, is an online application for editing YouTube, Instagram, Facebook and Snapchat videos. Just follow the steps below, then you can add emojis you want.
Step 1: Create and name the project in Blurbiz.
Step 2: Upload either your video, sticker or gif whichever you want an emoji to be placed in.
Step 3: Hover over the video and click on the “edit” button.
Step 4: Tap on “upload” at the top left side of the pane. Upload emoji with .png extension from your desktop.
Step 5: Drag and drop to overlay the emoji onto your video. Resize and position an emoji accordingly.
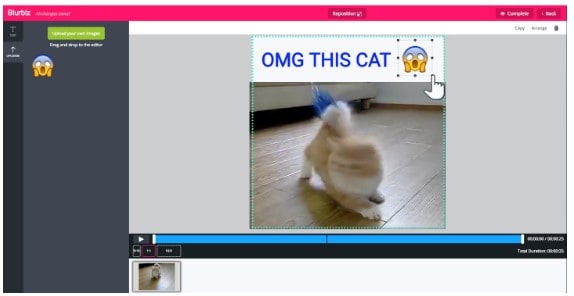
Step 6: Tap on “complete” at the top right corner when you are done. You can download an mp4 format video.
How to Add Emojis to Videos Android?
WeVideo , is an app to create and edit videos to the next level and provide one with ample special effects to add on to your videos.
Alongside using basic editing features like cutting, trimming or arranging video clips, you can amplify your editing game by adding emoji to your videos. Moreover, you can export your projects in high quality and share them on either Vimeo, YouTube or Dropbox.

Conclusion
Be it any video on any social media platform or your local device, with this thorough guide, you must be able to accessorize your video and take it to another level of emotional expression and message details in your video by using fun emojis.
Liza Brown
Liza Brown is a writer and a lover of all things video.
Follow @Liza Brown
Liza Brown
Mar 27, 2024• Proven solutions
Emojis are a great way to express one’s emotion more vividly through a depiction rather than a plain conventional text. By the passage of time, the trend of using emoji on social media domain has drastically increased around the world. Since emoji are ubiquitous and its influence on culture is increasingly huge, using emoji has now become a trend.
A plain conventional text or video may not emphasize the meaning behind the phrase, but adding emoji to it is like adding a soul to the intentions behind the message. It helps outshine the theme and make a video more appealing at the same time.
So, with all this being known, let’s take a tour to a complete guide to how to accessorize a video on multiple social media domains and make it far more attractive and meaningful.
Best Tool to Help You Add Emojis to Videos in Few Clicks
Gamers, YouTubers and all other Mac and PC users who’d like to add a smiley or any other emoji to a video should try processing their footage with the Filmora video editor.
Performing basic video editing tasks like cutting or trimming the footage, choosing a soundtrack for a video or adding an emoji to a single shot or an entire sequence can all be completed in just a couple of clicks.
Filmora is free to download. Import your videos after you launch the software, you then can add any animated emojis into wherever you want. Have a try now! Emojis inside are so Cute
How to Add Emojis to YouTube Videos?
You can now add emojis to any of the YouTube videos using an online free tool called Kapwing.
Below are the basic steps about how to add emojis to YouTube videos anywhere using Kapwing.
Step 1: Open free tool Meme Maker and tap on “get started”.
Step 2: Copy the link of the targeted YouTube video and paste the URL of your YouTube video.
Step 3: One of the ways to insert emoji using Kapwing is to directly upload an emoji having a transparent background. In the toolbar, click on “upload” and paste its URL there. The image will be placed onto the targeted video as an overlay by importing it. Another way to add emoji is to click “add text” where you will have options to insert emojis.
Step 4: You can now play around with editing options in Kapwing to adjust accordingly.
How to Use Emojis on YouTube?
YouTube provides you an option to insert emoji on your YouTube account description, tag and titles with great ease with the use of YouTube certified plugin, Tube Buddy.
Step 1: Install this plugin on chrome browser.
Step 2: Open “info and settings” option in your YouTube targeted video.
Step 3: Tap on description box, tags or title where an emoji icon will be shown. Tap on the emoji icon to display a list of emojis. You can also search for an emoji in the search bar.
How to Add Emojis in Snapchat Videos?
Step 1: Install Snapchat if you don’t already have it. Then run Snapchat.
Step 2: Record a video by keeping your fingers on the record button.
Step 3: Choose and tap an emoji of your choice to add in your video. Hold your fingers on emoji to place to the desired frame/clip of your recorded video.
Step 4: The emoji can be resized by dragging or pinching it in. You can add more than one emoji.
Image from iMore
How to Add Emojis to Facebook?
If you are wondering about how to add emojis to Facebook videos then, unfortunately, Facebook only offers “go live” option on Facebook where an emoji cannot be inserted. But you can insert emoji to Facebook status, comment or in your messenger conversation easily by following the step below for status:
Step 1: Click “what’s on your mind” to add new status on Facebook.
Step 2: At the bottom right side of the status box is an emoji icon. Click on it. This will open a list of emojis that you can choose as many as you want
Step 3: Click on the emoji icon back again to close the list when you are done. Click on post to share the post on your wall.
How to Add Emojis to Videos on iMovie?
Step 1: Search for the desired emoji on the internet with transparent background. Go to iMovie and select a clip of your video where you want to insert an emoji.
Step 2: Go to the “Import” option into the toolbar above, select your desired emoji from the list. This emoji will be added to the iMovie library.
Step 3: Click on that emoji. This overlays that emoji onto that video clip. You can scale the emoji up and down and drag it anywhere on the video.
Image from YouSubtitles
How to Add Emojis to Videos Online?
Blurbiz, is an online application for editing YouTube, Instagram, Facebook and Snapchat videos. Just follow the steps below, then you can add emojis you want.
Step 1: Create and name the project in Blurbiz.
Step 2: Upload either your video, sticker or gif whichever you want an emoji to be placed in.
Step 3: Hover over the video and click on the “edit” button.
Step 4: Tap on “upload” at the top left side of the pane. Upload emoji with .png extension from your desktop.
Step 5: Drag and drop to overlay the emoji onto your video. Resize and position an emoji accordingly.
Step 6: Tap on “complete” at the top right corner when you are done. You can download an mp4 format video.
How to Add Emojis to Videos Android?
WeVideo , is an app to create and edit videos to the next level and provide one with ample special effects to add on to your videos.
Alongside using basic editing features like cutting, trimming or arranging video clips, you can amplify your editing game by adding emoji to your videos. Moreover, you can export your projects in high quality and share them on either Vimeo, YouTube or Dropbox.
Conclusion
Be it any video on any social media platform or your local device, with this thorough guide, you must be able to accessorize your video and take it to another level of emotional expression and message details in your video by using fun emojis.
Liza Brown
Liza Brown is a writer and a lover of all things video.
Follow @Liza Brown
How to Add Emojis to Videos: The Ultimate Guide
How to Add Emojis to Videos: The Ultimate Guide
Liza Brown
Mar 27, 2024• Proven solutions
The way we communicate has changed so much in the first two decades of the 21st century. In the late 1990s, when emojis were first introduced to the global market nobody could have guessed just how popular they are going to become. An emoji is an ideogram that is commonly used in electronic messages, but there are countless creative ways to incorporate them in the visual content you’re sharing to your Facebook account or your YouTube channel. Read on if you would like to find out how to add an emoji to a video you’re editing on a Mac, PC, iPhone or an Android device.
- Part 1: Add Animated Emojis to Videos in Flimora [3 Ways]
- Part 2: Add Animated Emojis & Stickers to Videos in iPhone for FREE
- Part 3: Add Animated Emojis to Videos in Android
- Part 4: Add Animated Emojis & Stickers to Videos Online
How to Add Animated Emojis to Videos in Flimora? [Windows & Mac][
Gamers, YouTubers and all other Mac and PC users who’d like to add a smiley or any other emoji to a video should try processing their footage with the Filmora video editor . Performing basic video editing tasks like cutting or trimming the footage, choosing a soundtrack for a video or adding an emoji to a single shot or an entire sequence can all be completed in just a couple of clicks. Here’s how you can add an emoji to a video clip in Filmora.
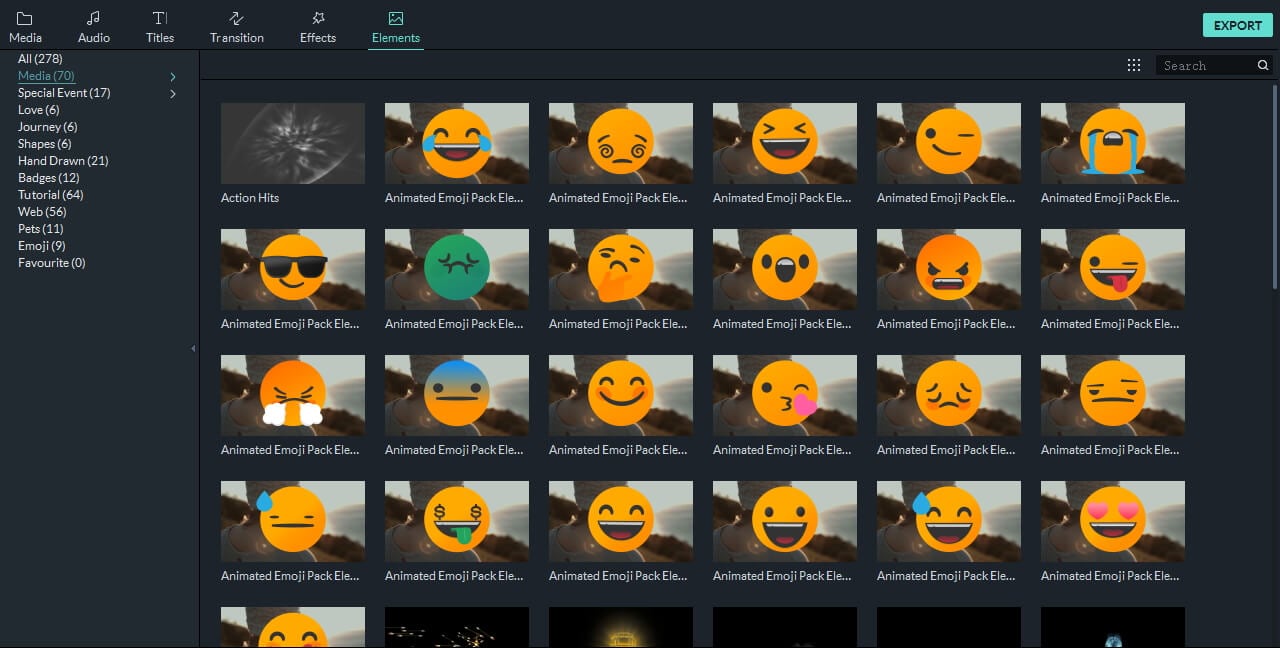
1. Use the Filmora’s Built-in Animated Emoji Library
Create a new project
Launch Filmora and then select the New Project option from the app’s welcome window. Afterward, you can set the project’s aspect ratio, frame rate and resolution from the Project Settings tab that can be accessed from the File drop-down menu. When done, you should proceed to import a video clip to which you want to add an emoji.
Place the Footage onto the Timeline
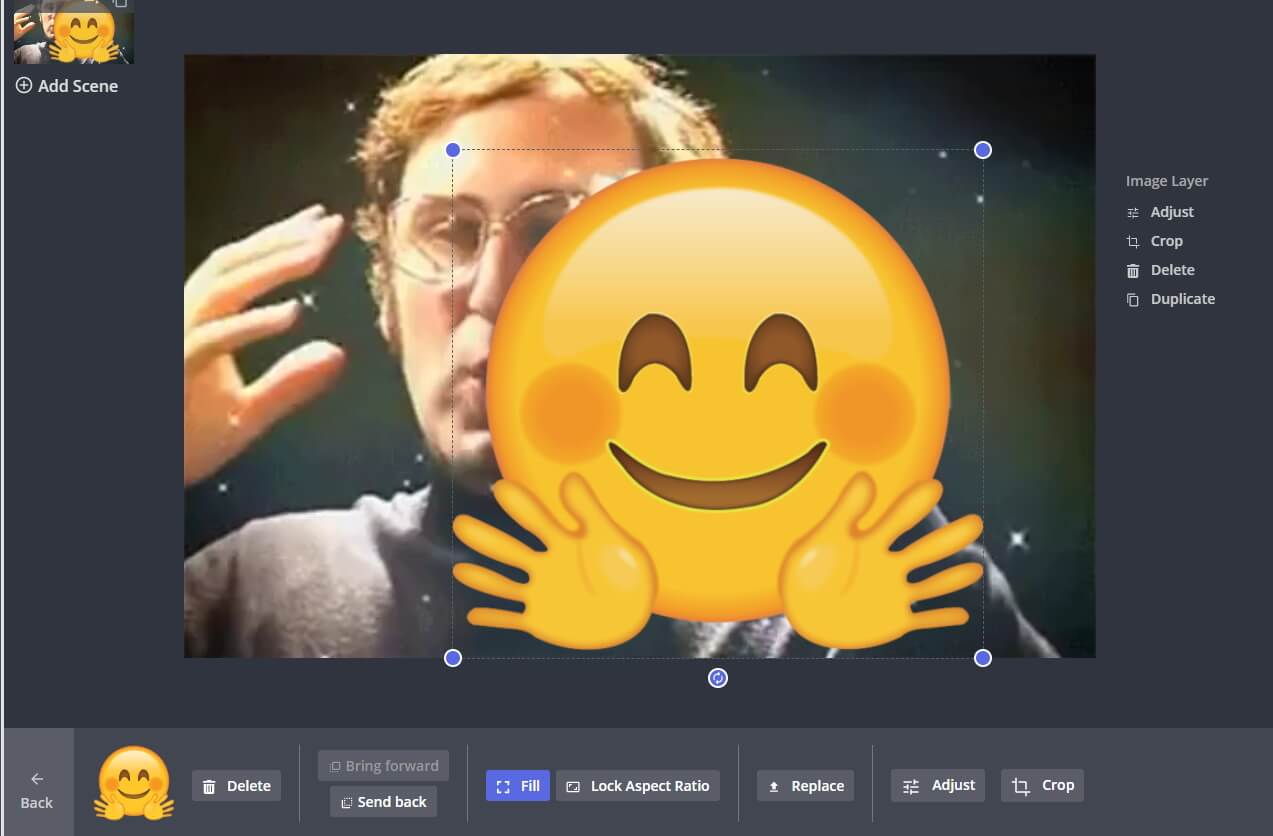
The media files you import into your projects in Filmora are located in the software’s Media Tab, and you can just drag them from the Media Tab and drop them onto a video track on the timeline. Remove all parts of the video clip you don’t want to use and head over to the Elements Tab that is located in the upper left corner of the screen.
Choose an Emoji
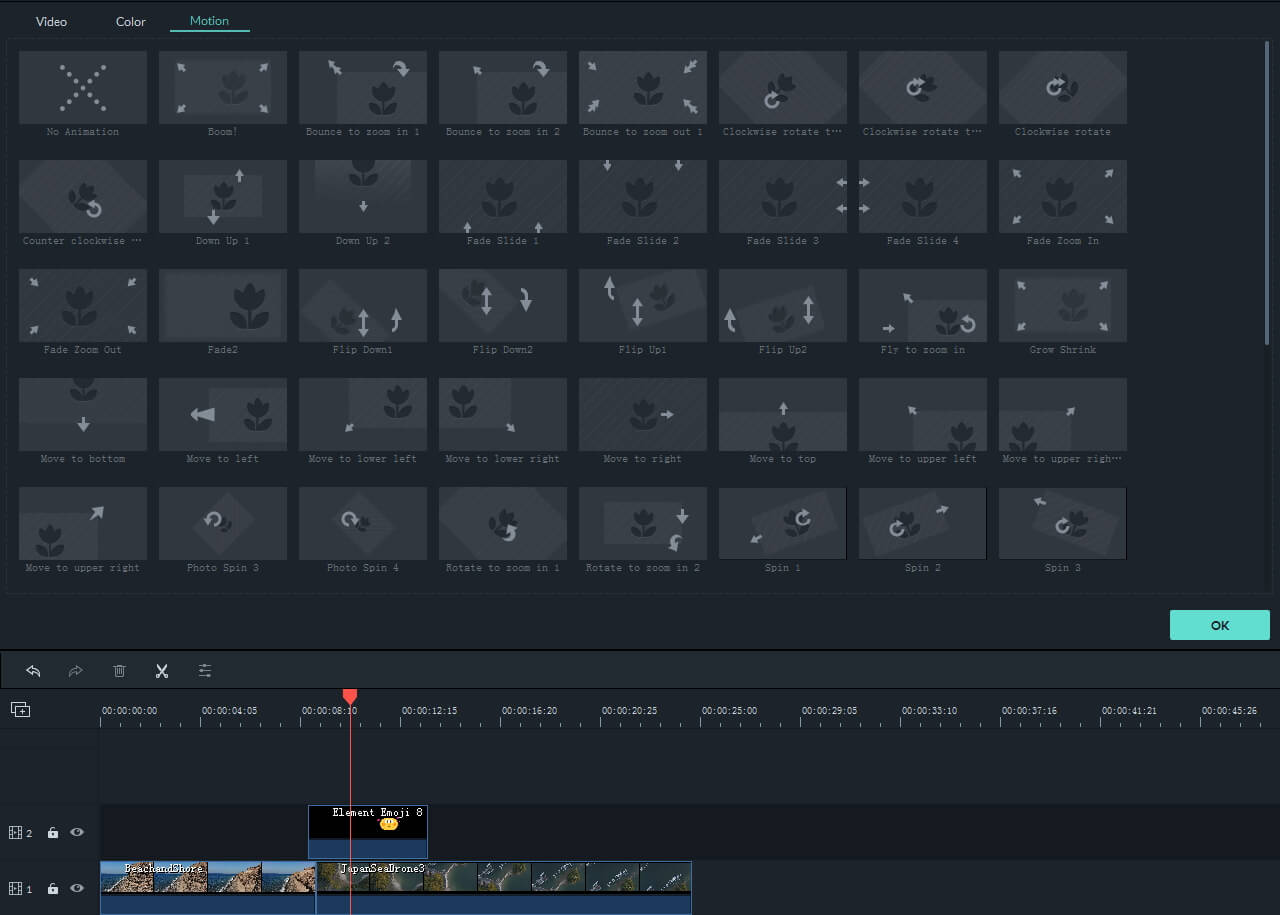
The Elements Tab contains different categories such as Shapes, Badges or Pets. Click on the Emoji category to start browsing through Filmora’s collection of emojis and simply drag and drop the emoji you like above the video clip to which you’d like to add it. You can then adjust its duration, position on the screen or size. Optionally, you can double-click on the emoji to access the Motion tab that enables you to choose between different motion effects.
Export the Project
Preview the results by hitting the space button on your keyboard or clicking on the Play button that is located below the app’s preview window. In case you don’t want to make any more edits to the footage, you should click on the Export button and choose if you want to export your project to a hard drive on your computer or to your YouTube or Vimeo channel. Select the output file format, click on the Export and wait for the rendering process to be completed.
With Filmora video editor, you can also add animated texts and titles to video, or apply various elements such as hand drawn, badges and elements for tutorial. Click to learn more details about how to edit videos in Filmora .
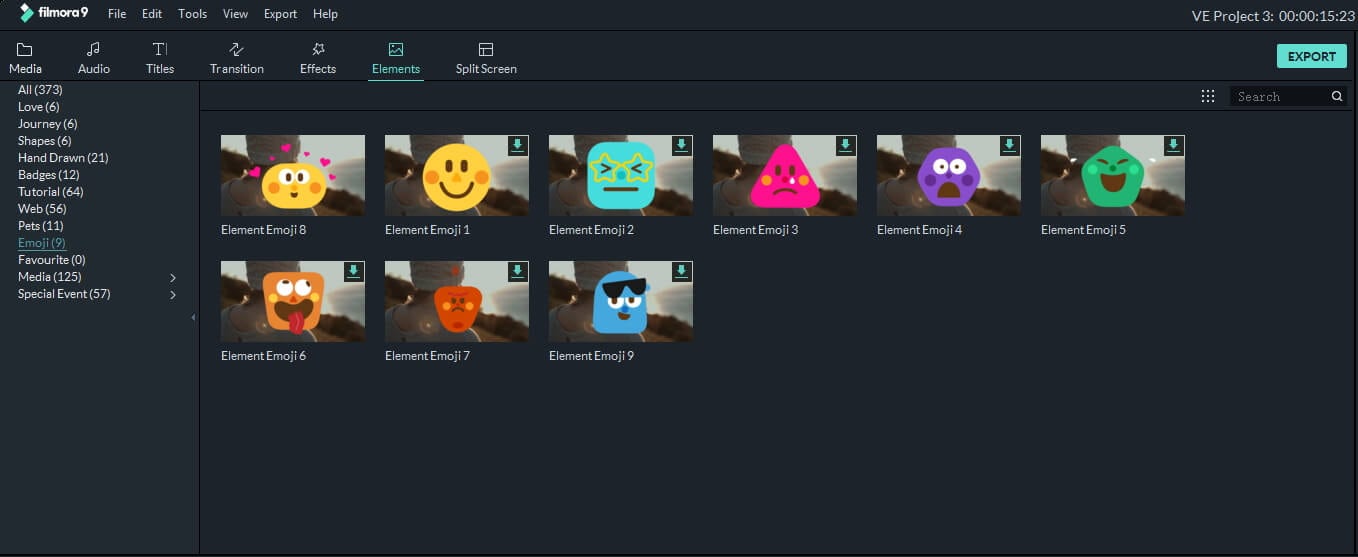
2. Download Additional Animated Emojis from Filmostocks for Free
There are only nine emojis available in the Filmora’s built-in Emojis category, but you can easily broaden the range of emoji genres you have the access to by downloading the Animated Emoji Pack from Filmstock effects store . You don’t have to spend any additional money on this pack that contains 24 different emojis, but you must create an account on Filmstock before you can download the Animated Emoji Pack to your computer. The process of adding the emojis from this pack to videos is the same as the process of adding one of the emojis from the built-in Emojis category. Filmstock is so much more than an endless source of emojis for your videos since it offers a variety of visual and audio stock footage and visual effects. Even if you are using Adobe After Effects, you can also download and use some visual effects templates for AE.
3. Bonus: Animate Sticker and Emojis Your Download from Internet with Filmora
Instead of adding pre-animated ideograms to your videos, you can simply download a still image of a sticker or an emoji and animate it with Filmora. However, you should search for emojis that have a transparent background in order to blend it quicker with the source footage. Once you find a smiley or any other emoji you’d like to add to a video you should save it on your hard drive and import it into a project in Filmora.
You should then place the emoji at the exact spot on the timeline where you want it to appear in the final cut of the video. Double-click on the still image file and proceed to adjust its size or position from the Transform menu or choose a motion effect from the Motion tab. When done, commence the rendering process by clicking on the Export button. You can check our step guide about How to add picture to video to get more clues about that.
How to Add Emojis and Stickers to Videos on an iPhone
Waiting to edit the high-resolution videos you recorded with your iPhone on a computer is not always an option, because in certain situations you just want to polish a video you recorded and post it on social media as fast as you can. The Apple’s Clip app that can be downloaded for free from the AppStore seems to be a perfect solution for all iPhone users who want to add emojis to their videos before sharing them on Facebook, Instagram or any other popular social media networks.
The Clip app offers a rich selection of stickers and emojis that can be accessed by tapping on the icon that looks like a star within a circle. There are more than 30 emojis available, but you can also use the iPhone’s emoji keyboard to add emojis to videos in the Clip app. All of the app’s stickers and emojis are fully customizable, which means that you can change their size, screen position or insert text effortlessly. Once the video editing process is completed you can store a video on Dropbox or share it via AirDrop.
Best App for Adding Stickers and Emojis on Android Devices
The WeVideo app for Android devices is equipped with all video editing tools you are going to need to produce a visually impressive video. In case you decide to purchase and install WeVideo on your phone, you will be able to cut, trim or arrange video clips as you see fit. The app also features a collection of emojis that can be added easily to all videos you decide to edit with it. The best part is that you can export all of your projects in 4K Ultra HD resolution and publish them to YouTube, Vimeo or Dropbox from the app so you don’t have to spend extra time on waiting for the file to be uploaded to the social media platform on which you want to share the video.
Using Kapwing Meme Maker to Add Stickers and Emojis Online
Web-based video editing platforms like Kapwing have been growing in popularity recently because they enable social media content creators to produce social media videos in a brief period of time. The Kapwing Meme Maker tool doesn’t feature any built-in stickers or emojis, so you must either upload a still image with a transparent ground to the platform or use its Text tool to add emojis to a video. Moreover, you won’t be able to animate the emojis you add to video clips with the Kapwing Meme Maker tool since the Kapwing platform doesn’t offer any animation tools. Despite this Kapwing is still one of the best online video editing platforms you can use to add emojis and stickers to videos.
A Few Tips to Help you Incorporate Emojis in Your Videos
Which emoji you are going to add to a video depends on factors that range from the topic of the video to the audience you are trying to reach. So, if you can’t find the emoji that fits perfectly to your video you should head over to emojipedia or any other website that lets you download thousands of emojis for free. You should keep in mind that emojis can have different meanings in different cultures, which is the reason why you must make sure that the emoji you’re adding to your video isn’t inappropriate or offensive in the context in which you’re using it. It is also worth noting that the emojis you download from the Internet should have a transparent background and that they should be saved in the PNG file format.
You may also like: Add Emojis to Videos on YouTube/Facebook/Snapchat [Step by Step Guide] >>
Conclusion
A single image overlay like an emoji can make your video more dynamic and more entertaining to watch, but you must discover creative and innovative ways to incorporate these visual elements into the story your video is telling. Each video editing app we presented in this article enables you to add emojis to videos in just a few easy steps, so you should choose the video editor that you feel most comfortable using. Do you add emojis to your videos often? Leave a comment below and share your favorite emojis with us.
Liza Brown
Liza Brown is a writer and a lover of all things video.
Follow @Liza Brown
Liza Brown
Mar 27, 2024• Proven solutions
The way we communicate has changed so much in the first two decades of the 21st century. In the late 1990s, when emojis were first introduced to the global market nobody could have guessed just how popular they are going to become. An emoji is an ideogram that is commonly used in electronic messages, but there are countless creative ways to incorporate them in the visual content you’re sharing to your Facebook account or your YouTube channel. Read on if you would like to find out how to add an emoji to a video you’re editing on a Mac, PC, iPhone or an Android device.
- Part 1: Add Animated Emojis to Videos in Flimora [3 Ways]
- Part 2: Add Animated Emojis & Stickers to Videos in iPhone for FREE
- Part 3: Add Animated Emojis to Videos in Android
- Part 4: Add Animated Emojis & Stickers to Videos Online
How to Add Animated Emojis to Videos in Flimora? [Windows & Mac][
Gamers, YouTubers and all other Mac and PC users who’d like to add a smiley or any other emoji to a video should try processing their footage with the Filmora video editor . Performing basic video editing tasks like cutting or trimming the footage, choosing a soundtrack for a video or adding an emoji to a single shot or an entire sequence can all be completed in just a couple of clicks. Here’s how you can add an emoji to a video clip in Filmora.
1. Use the Filmora’s Built-in Animated Emoji Library
Create a new project
Launch Filmora and then select the New Project option from the app’s welcome window. Afterward, you can set the project’s aspect ratio, frame rate and resolution from the Project Settings tab that can be accessed from the File drop-down menu. When done, you should proceed to import a video clip to which you want to add an emoji.
Place the Footage onto the Timeline
The media files you import into your projects in Filmora are located in the software’s Media Tab, and you can just drag them from the Media Tab and drop them onto a video track on the timeline. Remove all parts of the video clip you don’t want to use and head over to the Elements Tab that is located in the upper left corner of the screen.
Choose an Emoji
The Elements Tab contains different categories such as Shapes, Badges or Pets. Click on the Emoji category to start browsing through Filmora’s collection of emojis and simply drag and drop the emoji you like above the video clip to which you’d like to add it. You can then adjust its duration, position on the screen or size. Optionally, you can double-click on the emoji to access the Motion tab that enables you to choose between different motion effects.
Export the Project
Preview the results by hitting the space button on your keyboard or clicking on the Play button that is located below the app’s preview window. In case you don’t want to make any more edits to the footage, you should click on the Export button and choose if you want to export your project to a hard drive on your computer or to your YouTube or Vimeo channel. Select the output file format, click on the Export and wait for the rendering process to be completed.
With Filmora video editor, you can also add animated texts and titles to video, or apply various elements such as hand drawn, badges and elements for tutorial. Click to learn more details about how to edit videos in Filmora .
2. Download Additional Animated Emojis from Filmostocks for Free
There are only nine emojis available in the Filmora’s built-in Emojis category, but you can easily broaden the range of emoji genres you have the access to by downloading the Animated Emoji Pack from Filmstock effects store . You don’t have to spend any additional money on this pack that contains 24 different emojis, but you must create an account on Filmstock before you can download the Animated Emoji Pack to your computer. The process of adding the emojis from this pack to videos is the same as the process of adding one of the emojis from the built-in Emojis category. Filmstock is so much more than an endless source of emojis for your videos since it offers a variety of visual and audio stock footage and visual effects. Even if you are using Adobe After Effects, you can also download and use some visual effects templates for AE.
3. Bonus: Animate Sticker and Emojis Your Download from Internet with Filmora
Instead of adding pre-animated ideograms to your videos, you can simply download a still image of a sticker or an emoji and animate it with Filmora. However, you should search for emojis that have a transparent background in order to blend it quicker with the source footage. Once you find a smiley or any other emoji you’d like to add to a video you should save it on your hard drive and import it into a project in Filmora.
You should then place the emoji at the exact spot on the timeline where you want it to appear in the final cut of the video. Double-click on the still image file and proceed to adjust its size or position from the Transform menu or choose a motion effect from the Motion tab. When done, commence the rendering process by clicking on the Export button. You can check our step guide about How to add picture to video to get more clues about that.
How to Add Emojis and Stickers to Videos on an iPhone
Waiting to edit the high-resolution videos you recorded with your iPhone on a computer is not always an option, because in certain situations you just want to polish a video you recorded and post it on social media as fast as you can. The Apple’s Clip app that can be downloaded for free from the AppStore seems to be a perfect solution for all iPhone users who want to add emojis to their videos before sharing them on Facebook, Instagram or any other popular social media networks.
The Clip app offers a rich selection of stickers and emojis that can be accessed by tapping on the icon that looks like a star within a circle. There are more than 30 emojis available, but you can also use the iPhone’s emoji keyboard to add emojis to videos in the Clip app. All of the app’s stickers and emojis are fully customizable, which means that you can change their size, screen position or insert text effortlessly. Once the video editing process is completed you can store a video on Dropbox or share it via AirDrop.
Best App for Adding Stickers and Emojis on Android Devices
The WeVideo app for Android devices is equipped with all video editing tools you are going to need to produce a visually impressive video. In case you decide to purchase and install WeVideo on your phone, you will be able to cut, trim or arrange video clips as you see fit. The app also features a collection of emojis that can be added easily to all videos you decide to edit with it. The best part is that you can export all of your projects in 4K Ultra HD resolution and publish them to YouTube, Vimeo or Dropbox from the app so you don’t have to spend extra time on waiting for the file to be uploaded to the social media platform on which you want to share the video.
Using Kapwing Meme Maker to Add Stickers and Emojis Online
Web-based video editing platforms like Kapwing have been growing in popularity recently because they enable social media content creators to produce social media videos in a brief period of time. The Kapwing Meme Maker tool doesn’t feature any built-in stickers or emojis, so you must either upload a still image with a transparent ground to the platform or use its Text tool to add emojis to a video. Moreover, you won’t be able to animate the emojis you add to video clips with the Kapwing Meme Maker tool since the Kapwing platform doesn’t offer any animation tools. Despite this Kapwing is still one of the best online video editing platforms you can use to add emojis and stickers to videos.
A Few Tips to Help you Incorporate Emojis in Your Videos
Which emoji you are going to add to a video depends on factors that range from the topic of the video to the audience you are trying to reach. So, if you can’t find the emoji that fits perfectly to your video you should head over to emojipedia or any other website that lets you download thousands of emojis for free. You should keep in mind that emojis can have different meanings in different cultures, which is the reason why you must make sure that the emoji you’re adding to your video isn’t inappropriate or offensive in the context in which you’re using it. It is also worth noting that the emojis you download from the Internet should have a transparent background and that they should be saved in the PNG file format.
You may also like: Add Emojis to Videos on YouTube/Facebook/Snapchat [Step by Step Guide] >>
Conclusion
A single image overlay like an emoji can make your video more dynamic and more entertaining to watch, but you must discover creative and innovative ways to incorporate these visual elements into the story your video is telling. Each video editing app we presented in this article enables you to add emojis to videos in just a few easy steps, so you should choose the video editor that you feel most comfortable using. Do you add emojis to your videos often? Leave a comment below and share your favorite emojis with us.
Liza Brown
Liza Brown is a writer and a lover of all things video.
Follow @Liza Brown
What Is Emoji and What Does It Mean?
What Is Emoji?
Shanoon Cox
Mar 27, 2024• Proven solutions
If you ever wondered what is emoji, and how the term relates (or unrelates) to its elder sibling emoticon, you are at the right place. In the following sections, you will learn some quite interesting facts about the two, what different types of emojis are available, and what do they mean.
Because understanding the meaning of emojis is more important as compared to knowing what is an emoji itself, here you will get all the related details, relevant answers, and some best practice tips.
Part 1: What Is an Emoji?
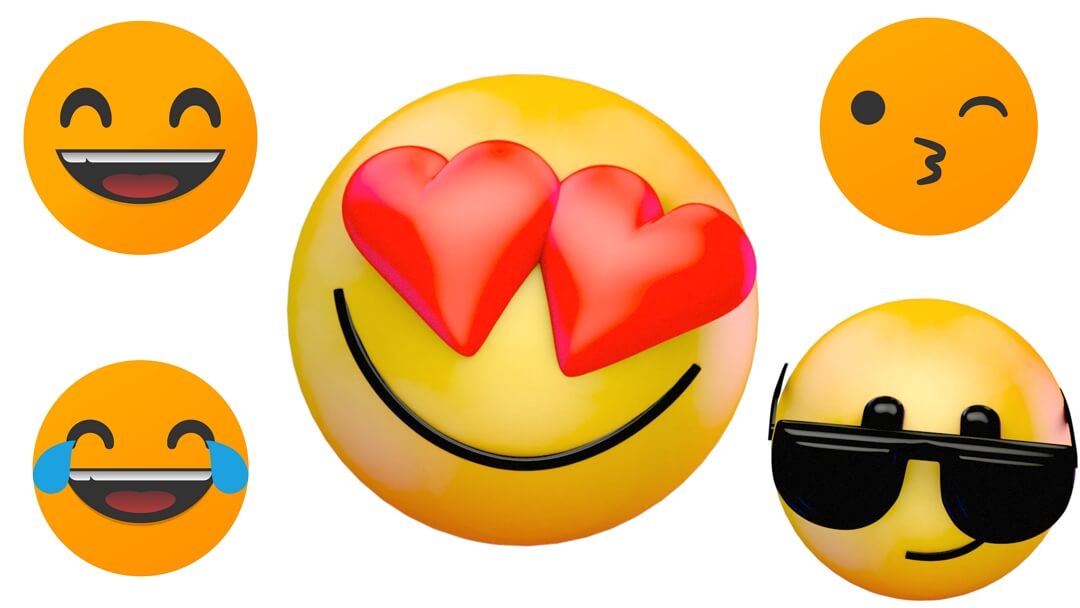
In a nutshell, an emoji is a graphical image that reflects a certain facial expression. Emojis are created using a drawing tool, and are incorporated into a unique 16-bit Unicode in order to make them compatible with operating systems of the most common devices and platforms like iOS, Android, macOS, and Windows.
In addition to being merely a picture, emojis are also animated to exaggerate the message senders’ emotions. You can find a couple of decent examples of such animations while using Skype messenger.
The reason behind emojis being more popular than the emoticons used earlier is the close resemblance of the former to the real-like expressions that they reflect when sent to a recipient. Therefore, it would be safe to say that a single emoji could be worth several sentences while texting if used correctly.
Part 2: What are the Differences Between Emojis and Emoticons?
As explained earlier, the emojis are graphical and sometimes animated Unicode illustrations that can be included in the text messages as objects.
On the other hand, the emoticons are formed using the ASCII characters, and no specific coding is required at the users’ side to create them. Simply put, an emoticon can be easily added to a text message or even to an email merely by using a combination of letters on the keyboard.
For instance, to create an emoticon of a smiley face, all you need to do is, type a colon sign along with a closing brace. (E.g. Typing a : and ) without space will become a smiling face, a : and ( will form a sad face, and so on).
To be clearer, emojis can be considered an advanced, better, and evolved version of emoticons. While the latter can be formed using simple characters like letters and symbols, the former is inserted as an object in the text messages.
Part 3: Where to Find the Meaning of Emojis?
Once you have understood what emoji is, it is now time to learn what the emojis mean. This part is imperative to ensure you don’t send a wrong emotional expression to your friends or family members, and get into some awkward situation after that.
Below is a list of some useful online websites and dictionaries that can help you find correct emojis along with their meanings to make your text conversation more meaningful and interesting:
1. Emojipedia
Emojipedia is an online library that holds several emojis. All the emojis that the portal has are placed in their corresponding categories.
Another section on the landing page of the website contains some of the most popular emojis, i.e. those that are mostly used by the texters during their conversions. Furthermore, the name of the emoji is present right next to it, and the entire part is hyperlinked which when clicked, takes you to a new page that has all the details about the object including its meaning, alternate names, and a button to copy the emoji to the clip board. The copied element can then be pasted in the text input field of a compatible messenger such as Facebook.
2. EMOJI DICTIONARY
https://www.dictionary.com/e/emoji/
EMOJI DICTIONARY is another online portal that contains almost all the commonly used emojis. The upper section of the page is dedicated to ‘Featured Terms’ with a slider that has all the featured emojis. The next segment lists all the categories other than emojis.
The bottom area of the landing page has all the emojis along with their names and/or the supported devices. All the names in the section are hyperlinked that open a new page when clicked, and show all the details such as examples, usage, and origin related to that particular emoji.
3. Emoji Dictionary
https://emojidictionary.emojifoundation.com/
This one is unique in its own way as in along with listing the most popular emojis and their names and definitions, it also allows you to include your own information in case you know something other than what is already present.
In addition to displaying the top emojis right on the landing page, the portal also has a category list where each segment holds its corresponding objects. This helps in locating your favorite elements easily and quickly. Furthermore, when you click an emoji, a new page opens up with all its definition from different aspects such as nouns, verbs, etc., along with a ‘Copy’ button that lets you copy the image to the clipboard, and use it on a compatible messaging app.
4. EmojiMeanings
https://www.emojimeanings.net/
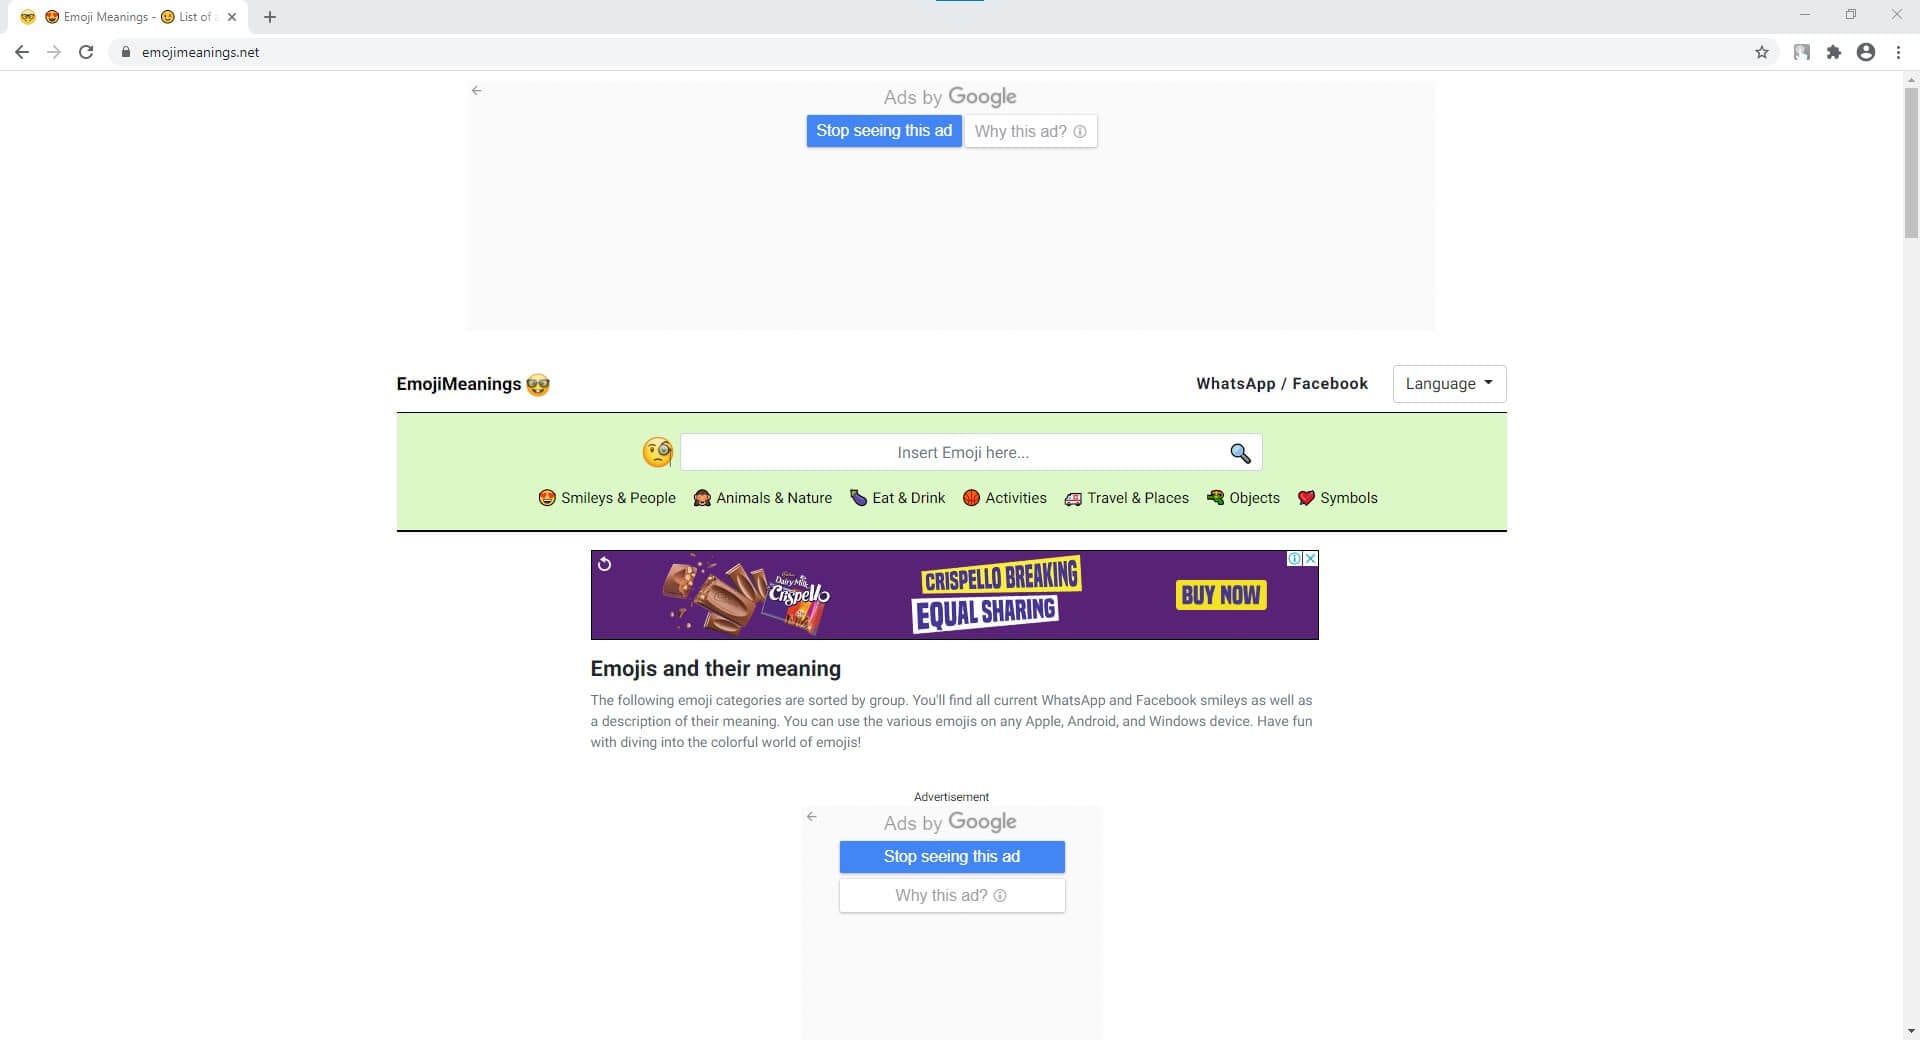
The landing page of EmojiMeanings is populated with all the categories where each holds several relevant emojis, thus making it easier for the users to find and learn their meaning. The home page also has complete information about what emojis are, how they are different from emoticons, and what does the term ‘smiley’ actually mean.
When you click a category, a new page opens up with three major columns titled as ‘Emoji’, ‘Meaning’, and ‘Unicode’ that show an emoji itself, explain what it means, and what Unicode is used to form it respectively. All the emojis on EmojiMeanings are usually compatible with WhatsApp and Facebook.
5. HotEmoji
https://hotemoji.com/emoji-meanings.html
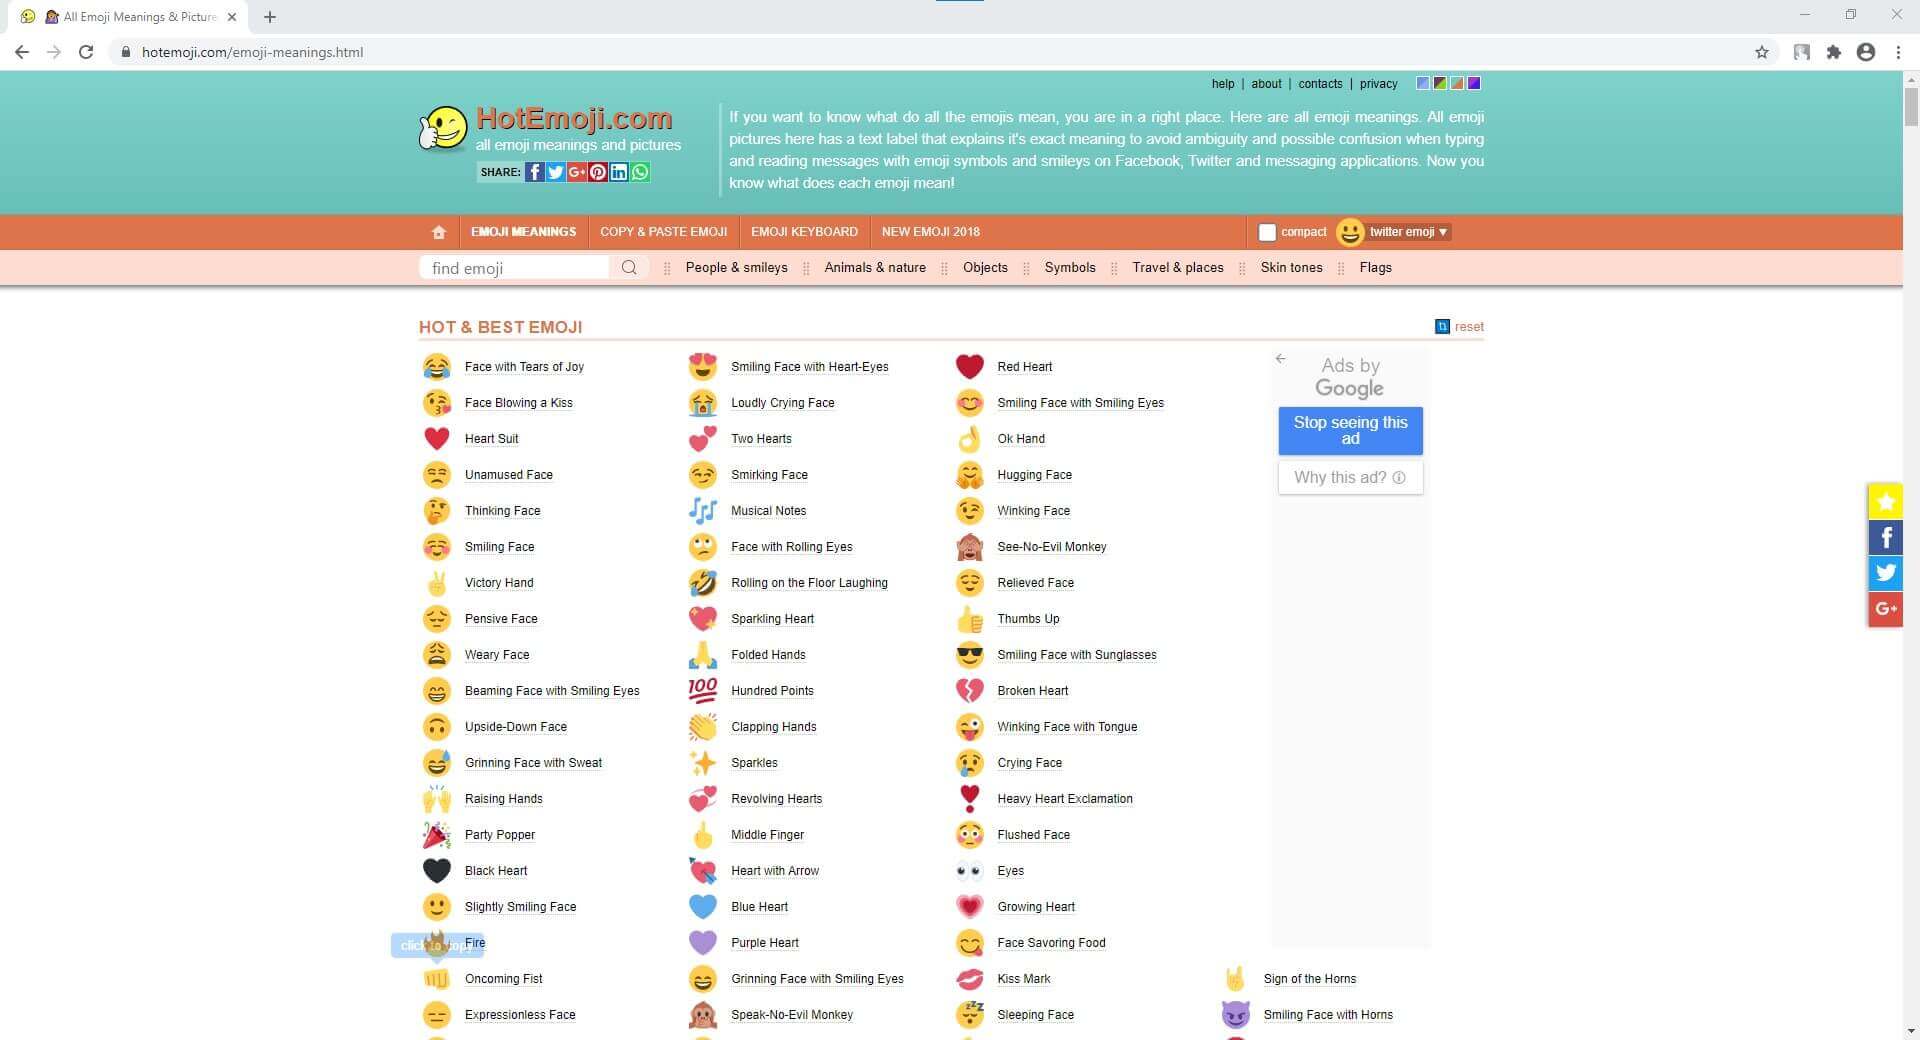
HotEmoji is yet another online portal that lists almost all the emojis along with their meanings. Each entry is hyperlinked which when clicked opens a new web page dedicated to that particular emoji where all the details about it are mentioned.
The new page also has a ‘Copy’ button that can be used to copy the object to the clipboard, and then the element can be pasted onto any compatible messenger during a text conversation.
Part 4: How to Find Emoji on Any Device?
While locating and inserting emojis on any messaging app on your smartphone is fairly simple as the messenger already has an icon that opens the entire emoji library when tapped, things are a bit tricky while using a Mac or Windows PC. Therefore, the following points explain how to find and use emojis on the computer running any of these operating systems:
How to Find Emojis on Windows 8 and Windows 10
On Windows 8 or Windows 10 computers, click the ‘Keyboard’ icon that is present in the ‘Notification area’ at the bottom-right corner of the screen, i.e. right side of the taskbar. When the list of emojis appears, you can click your favorite one and use it in the messenger.
How to Find Emojis on macOS
While using a Mac computer, you can open the app you want to add an emoji to, and then press the ctrl + cmd + spacebar keys on the keyboard.
Part 5: Most Common Emoji Categories
Some of the most commonly used categories that you must know after understanding what is an emoji include:
- Smileys & People – Holds the images of faces reflecting facial expressions and the vector images/animations of some popular people
- Animals & Nature – Contains the images/animations of animals and other natural elements such as trees, rocks, mountains, etc.
- Food & Drink – This category has vector images of beautifully decorated and well-aligned wine glasses, soft drink cans, pizza slices, etc.
- Activity – Has the emojis that reflect certain actions such as dance stances, walking, running, etc.
- Travel & Places – Is equipped with vectors of transportation mediums and locations such as trains, buses, buildings, banks, etc.
- Objects – Is populated with miscellaneous objects like a pair of shoes, suits, clocks, socks, etc.
- Symbols – This one consists of different types of symbols such as an equal to sign, stop sign, delta symbol, and many more
- Flags – This category contains flags of almost all the countries of the world. These emojis are mostly used to illustrate your current or destination location for reference
Part 6: Tips of Using Emojis
It is always a good idea to use emojis every now and then. However, using too many of them in your conversation might make the entire text look overly populated, and your communication partner may lose interest in you. Therefore, understanding when and how to use emojis is as important as it is to know what the emoji means.
Add Emojis to Video with Filmora
If you want to add animated emojis to video and share on social media, then Filmora is a good choice. Besides the built-in free animated emojis under Effects tab, you will also find some free or paid animated emojis or stickers on the effects store Filmstock. Download the free trial version of Filmora and create videos with fun.
Shanoon Cox
Shanoon Cox is a writer and a lover of all things video.
Follow @Shanoon Cox
Shanoon Cox
Mar 27, 2024• Proven solutions
If you ever wondered what is emoji, and how the term relates (or unrelates) to its elder sibling emoticon, you are at the right place. In the following sections, you will learn some quite interesting facts about the two, what different types of emojis are available, and what do they mean.
Because understanding the meaning of emojis is more important as compared to knowing what is an emoji itself, here you will get all the related details, relevant answers, and some best practice tips.
Part 1: What Is an Emoji?
In a nutshell, an emoji is a graphical image that reflects a certain facial expression. Emojis are created using a drawing tool, and are incorporated into a unique 16-bit Unicode in order to make them compatible with operating systems of the most common devices and platforms like iOS, Android, macOS, and Windows.
In addition to being merely a picture, emojis are also animated to exaggerate the message senders’ emotions. You can find a couple of decent examples of such animations while using Skype messenger.
The reason behind emojis being more popular than the emoticons used earlier is the close resemblance of the former to the real-like expressions that they reflect when sent to a recipient. Therefore, it would be safe to say that a single emoji could be worth several sentences while texting if used correctly.
Part 2: What are the Differences Between Emojis and Emoticons?
As explained earlier, the emojis are graphical and sometimes animated Unicode illustrations that can be included in the text messages as objects.
On the other hand, the emoticons are formed using the ASCII characters, and no specific coding is required at the users’ side to create them. Simply put, an emoticon can be easily added to a text message or even to an email merely by using a combination of letters on the keyboard.
For instance, to create an emoticon of a smiley face, all you need to do is, type a colon sign along with a closing brace. (E.g. Typing a : and ) without space will become a smiling face, a : and ( will form a sad face, and so on).
To be clearer, emojis can be considered an advanced, better, and evolved version of emoticons. While the latter can be formed using simple characters like letters and symbols, the former is inserted as an object in the text messages.
Part 3: Where to Find the Meaning of Emojis?
Once you have understood what emoji is, it is now time to learn what the emojis mean. This part is imperative to ensure you don’t send a wrong emotional expression to your friends or family members, and get into some awkward situation after that.
Below is a list of some useful online websites and dictionaries that can help you find correct emojis along with their meanings to make your text conversation more meaningful and interesting:
1. Emojipedia
Emojipedia is an online library that holds several emojis. All the emojis that the portal has are placed in their corresponding categories.
Another section on the landing page of the website contains some of the most popular emojis, i.e. those that are mostly used by the texters during their conversions. Furthermore, the name of the emoji is present right next to it, and the entire part is hyperlinked which when clicked, takes you to a new page that has all the details about the object including its meaning, alternate names, and a button to copy the emoji to the clip board. The copied element can then be pasted in the text input field of a compatible messenger such as Facebook.
2. EMOJI DICTIONARY
https://www.dictionary.com/e/emoji/
EMOJI DICTIONARY is another online portal that contains almost all the commonly used emojis. The upper section of the page is dedicated to ‘Featured Terms’ with a slider that has all the featured emojis. The next segment lists all the categories other than emojis.
The bottom area of the landing page has all the emojis along with their names and/or the supported devices. All the names in the section are hyperlinked that open a new page when clicked, and show all the details such as examples, usage, and origin related to that particular emoji.
3. Emoji Dictionary
https://emojidictionary.emojifoundation.com/
This one is unique in its own way as in along with listing the most popular emojis and their names and definitions, it also allows you to include your own information in case you know something other than what is already present.
In addition to displaying the top emojis right on the landing page, the portal also has a category list where each segment holds its corresponding objects. This helps in locating your favorite elements easily and quickly. Furthermore, when you click an emoji, a new page opens up with all its definition from different aspects such as nouns, verbs, etc., along with a ‘Copy’ button that lets you copy the image to the clipboard, and use it on a compatible messaging app.
4. EmojiMeanings
https://www.emojimeanings.net/
The landing page of EmojiMeanings is populated with all the categories where each holds several relevant emojis, thus making it easier for the users to find and learn their meaning. The home page also has complete information about what emojis are, how they are different from emoticons, and what does the term ‘smiley’ actually mean.
When you click a category, a new page opens up with three major columns titled as ‘Emoji’, ‘Meaning’, and ‘Unicode’ that show an emoji itself, explain what it means, and what Unicode is used to form it respectively. All the emojis on EmojiMeanings are usually compatible with WhatsApp and Facebook.
5. HotEmoji
https://hotemoji.com/emoji-meanings.html
HotEmoji is yet another online portal that lists almost all the emojis along with their meanings. Each entry is hyperlinked which when clicked opens a new web page dedicated to that particular emoji where all the details about it are mentioned.
The new page also has a ‘Copy’ button that can be used to copy the object to the clipboard, and then the element can be pasted onto any compatible messenger during a text conversation.
Part 4: How to Find Emoji on Any Device?
While locating and inserting emojis on any messaging app on your smartphone is fairly simple as the messenger already has an icon that opens the entire emoji library when tapped, things are a bit tricky while using a Mac or Windows PC. Therefore, the following points explain how to find and use emojis on the computer running any of these operating systems:
How to Find Emojis on Windows 8 and Windows 10
On Windows 8 or Windows 10 computers, click the ‘Keyboard’ icon that is present in the ‘Notification area’ at the bottom-right corner of the screen, i.e. right side of the taskbar. When the list of emojis appears, you can click your favorite one and use it in the messenger.
How to Find Emojis on macOS
While using a Mac computer, you can open the app you want to add an emoji to, and then press the ctrl + cmd + spacebar keys on the keyboard.
Part 5: Most Common Emoji Categories
Some of the most commonly used categories that you must know after understanding what is an emoji include:
- Smileys & People – Holds the images of faces reflecting facial expressions and the vector images/animations of some popular people
- Animals & Nature – Contains the images/animations of animals and other natural elements such as trees, rocks, mountains, etc.
- Food & Drink – This category has vector images of beautifully decorated and well-aligned wine glasses, soft drink cans, pizza slices, etc.
- Activity – Has the emojis that reflect certain actions such as dance stances, walking, running, etc.
- Travel & Places – Is equipped with vectors of transportation mediums and locations such as trains, buses, buildings, banks, etc.
- Objects – Is populated with miscellaneous objects like a pair of shoes, suits, clocks, socks, etc.
- Symbols – This one consists of different types of symbols such as an equal to sign, stop sign, delta symbol, and many more
- Flags – This category contains flags of almost all the countries of the world. These emojis are mostly used to illustrate your current or destination location for reference
Part 6: Tips of Using Emojis
It is always a good idea to use emojis every now and then. However, using too many of them in your conversation might make the entire text look overly populated, and your communication partner may lose interest in you. Therefore, understanding when and how to use emojis is as important as it is to know what the emoji means.
Add Emojis to Video with Filmora
If you want to add animated emojis to video and share on social media, then Filmora is a good choice. Besides the built-in free animated emojis under Effects tab, you will also find some free or paid animated emojis or stickers on the effects store Filmstock. Download the free trial version of Filmora and create videos with fun.
Shanoon Cox
Shanoon Cox is a writer and a lover of all things video.
Follow @Shanoon Cox
How to Make an Adorable Video for Your Baby’s First Year
How to Make an Adorable Video for Your Baby’s First Year

Ollie Mattison
Mar 27, 2024• Proven solutions
Your baby grows up very fast and being able to see him grow is maybe one of the most interesting and exciting moments in your life. Documenting the first year is amazing and it will surely offer you an extraordinary value so try to do that the best way you can. Imagine how touched your child would be when he/she, at the age of 18, watch something like this:
How to make the baby’s first year video
Filming tips
Shooting a good baby’s first year video can take a little bit of preparation and it will surely offer you an extraordinary experience in the long run. It will also help offer you an incredible value to begin with which is always impressive.
Stabilize the camera - The first thing you need to do is to stabilize the camera. Using a tripod can be the best option here so take your time and results will be great for sure. Of course, placing the camera on your counter will also help, so try to keep that in mind as it can indeed be a very good option to begin with.
Lighting - You will also have to play with the proper lighting setup. A good light will help you get much better results and even though it can take some time to get the best experience, it really is a truly amazing option that you do not want to miss.
Focus - Of course, focus on the baby. Yes, focus but don’t zoom in and out all the time. Find a good pattern that will help keep the baby steady and do all in your power to get the best results. Granted, it will take some time to get good results but don’t rush it otherwise the experience will not be as good as you would expect.
Audio - Moreover, audio should be your focus here as well. Take the time and do something good here, a good audio will always pay off very well so get a good audio setup if you want to obtain a stellar experience.
Props - Also, we recommend you to use props. These can really make a good video and they will even add in some much needed fun to your setup. Try to find the best possible props and add them in your video. Some good prop examples would be a stuffed animal, a toy, maybe even the family pet. All of these are great and well worth your time.
Editing tips
Once you finished capturing the movie, you will have to go to editing. This is where you have to use a good video editing tool that will help provide a good baby’s first year video in the end. With that in mind, Wondershare Filmora can be the tool of choice as it offers you all the features you need in order to create a good baby video.
=“” style=”width: 100%; height: 278.438px;”;
Download Mac Version ](https://tools.techidaily.com/wondershare/filmora/download/ )
Adjust saturation - You should try to use the app in order to adjust the saturation as this can lead to some very bad results if you’re not careful. Find the proper saturation levels and opt for them right away.
Trim, cut, or split - If needed, split, cut or even trim the video. There will be times when you will need the reversing effect as well. All of these effects are accessible via the Wondershare Filmora video app.
Advanced editing - Plus, you will also need to apply a green screen effect as this will help you place your baby in a variety of funny locations, be it a funny MV or a Hollywood movie. The app can also help you clone the baby with PIP effects and you can also use it to add filters, overlays or text.
Wondershare Filmora will offer you an extraordinary set of tools and it will bring in front a very good value right from the start. The interface of the app is user friendly and you will have no problem using it as you see fit. Also, you can create the baby’s first year video on both Mac and Windows as the app supports both platforms. It also delivers immediate support for camcorders and smartphones so you can use any device you want for video capture. With its help you can share videos to DVD or YouTube too if you so desire. Don’t hesitate and access this great tool as fast as possible to get a good outcome!
Ollie Mattison
Ollie Mattison is a writer and a lover of all things video.
Follow @Ollie Mattison
Ollie Mattison
Mar 27, 2024• Proven solutions
Your baby grows up very fast and being able to see him grow is maybe one of the most interesting and exciting moments in your life. Documenting the first year is amazing and it will surely offer you an extraordinary value so try to do that the best way you can. Imagine how touched your child would be when he/she, at the age of 18, watch something like this:
How to make the baby’s first year video
Filming tips
Shooting a good baby’s first year video can take a little bit of preparation and it will surely offer you an extraordinary experience in the long run. It will also help offer you an incredible value to begin with which is always impressive.
Stabilize the camera - The first thing you need to do is to stabilize the camera. Using a tripod can be the best option here so take your time and results will be great for sure. Of course, placing the camera on your counter will also help, so try to keep that in mind as it can indeed be a very good option to begin with.
Lighting - You will also have to play with the proper lighting setup. A good light will help you get much better results and even though it can take some time to get the best experience, it really is a truly amazing option that you do not want to miss.
Focus - Of course, focus on the baby. Yes, focus but don’t zoom in and out all the time. Find a good pattern that will help keep the baby steady and do all in your power to get the best results. Granted, it will take some time to get good results but don’t rush it otherwise the experience will not be as good as you would expect.
Audio - Moreover, audio should be your focus here as well. Take the time and do something good here, a good audio will always pay off very well so get a good audio setup if you want to obtain a stellar experience.
Props - Also, we recommend you to use props. These can really make a good video and they will even add in some much needed fun to your setup. Try to find the best possible props and add them in your video. Some good prop examples would be a stuffed animal, a toy, maybe even the family pet. All of these are great and well worth your time.
Editing tips
Once you finished capturing the movie, you will have to go to editing. This is where you have to use a good video editing tool that will help provide a good baby’s first year video in the end. With that in mind, Wondershare Filmora can be the tool of choice as it offers you all the features you need in order to create a good baby video.
=“” style=”width: 100%; height: 278.438px;”;
Download Mac Version ](https://tools.techidaily.com/wondershare/filmora/download/ )
Adjust saturation - You should try to use the app in order to adjust the saturation as this can lead to some very bad results if you’re not careful. Find the proper saturation levels and opt for them right away.
Trim, cut, or split - If needed, split, cut or even trim the video. There will be times when you will need the reversing effect as well. All of these effects are accessible via the Wondershare Filmora video app.
Advanced editing - Plus, you will also need to apply a green screen effect as this will help you place your baby in a variety of funny locations, be it a funny MV or a Hollywood movie. The app can also help you clone the baby with PIP effects and you can also use it to add filters, overlays or text.
Wondershare Filmora will offer you an extraordinary set of tools and it will bring in front a very good value right from the start. The interface of the app is user friendly and you will have no problem using it as you see fit. Also, you can create the baby’s first year video on both Mac and Windows as the app supports both platforms. It also delivers immediate support for camcorders and smartphones so you can use any device you want for video capture. With its help you can share videos to DVD or YouTube too if you so desire. Don’t hesitate and access this great tool as fast as possible to get a good outcome!
Ollie Mattison
Ollie Mattison is a writer and a lover of all things video.
Follow @Ollie Mattison
Making Triggered Memes with Filmora Video Editor
How to Make a Triggered Meme?
Ollie Mattison
Mar 27, 2024• Proven solutions
It is no secret that we all lose our cool from time. It’s only natural, after all, the world can be a frustrating place. We’re all enraged by different things, some of us can’t stand pineapple on pizza while others explode when being pranked. What we often don’t realize is that being triggered in front of a camera makes us perfect meme material. Even though the majority of memes are still images, some of the most memorable memes ever created were GIFs or short videos.
Making the triggered meme is easy when you know how, so in this article, we are going to show you how to make your next potentially viral meme, in just a few easy steps.
Filmora offers an easy to use video editor named Filmora Video Editor to make video and gif memes, and an online free meme maker named Filmora FREE Online Meme Maker which allows you to create images, videos and gifs memes for free. The video tutorial below will show you how to make a triggered video meme with Filmora. Download it and try it by yourself now.
The Things You Need to Make a Triggered Meme
Preparation is key to almost every important thing in life, including making a triggered meme featuring your bestie. Before you can capitalize on that amazing footage of triggered people you first have to make sure you have everything you need to generate a meme. Okay, let’s get started with the essentials to making a fun and effective meme.
1. A Triggered Template
You have virtually unlimited resources at your disposal, as this meme template can be easily found through a quick Google search. There is even an Android app called Triggered Meme Maker , that lets you do what its name suggests, make triggered memes. Making your own template in Microsoft Paint (we will show you how to make it in this article later) or any other photo editing software is also an option if you want to select the color of the background, rather than work with what you can find online.
2. A Video Editing Software
Memes are short videos that rarely last longer than 30 seconds, which is why you don’t need a powerful video editing suite like Final Cut Pro or Adobe Premiere Pro to make a good meme. A software like Wondershare Filmora that is easy to use and yet packed with cool visual effects and useful tools is a better choice if you just want to have a little fun with a video you recorded.
3. The Sound for the Triggered Meme
This ingredient of a good meme is easy to forget, but music or any other type of sound can make your meme funnier. In most cases, you’ll want to keep at least a portion of the original audio, but adding sound effects at different points of the meme can have a comical effect. The Filmora’s Music Library can serve as your endless source of royalty free music and sounds .
Making a Triggered Meme Template in Microsoft Paint
Creating a meme template is an easy task that can be handled from the Microsoft Paint in a couple of minutes. When you launch the software, click on the Fill with color icon located in the Tools section of the Paint’s ribbon. Activating this option enables you to change the color of the background with a single click. Proceed to select the color of the background from the color palette located on the far right side of the ribbon. We recommend choosing shades of green because the background is going to be used for the Chroma Key effect. You can click on the Edit Colors icon if you want to find a perfect color tone for the background. Right-click anywhere on the canvas to change its color.
Now you just need to add the text to your template. Select the Text option in the Tools menu and then proceed to select the font or the size of your text in the Font menu. Make sure that the Opaque feature is enabled in the Background menu in order to change the color of the textbox background. Adjusting the Color 1 option in the Color Menu will enable you to choose the text color, while the Color 2 option lets you pick the color of the background. Type triggered in the textbox, and center the text by clicking on the TAB button on your keyboard a few times. Now you have everything you need to start creating your own triggered meme.
How to Make a Triggered Meme?
Once you’ve successfully created a triggered template you can move on to the next step of the meme making process.
1. Adding Media to a Project
Open Filmora in the Full Feature Mode and import all the files you’re going to need during the process of making a meme. The files you import to your project will be stored in the Media Panel. Add the video to the timeline by dropping it over the video track. You can then remove the unwanted parts of the clip or add a still frame to the end of the video to prolong the triggered effect of the meme. Still frames in Filmora can be created by clicking on the Snapshot icon, that is located below the Preview Panel.
2. Using the Green Screen Effect
Place the triggered template to the Picture-in-Picture track and try to position it at the exact place in the video where the person gets triggered. Click on the Green Screen icon located in the toolbar to gain access to the PIP Edit window. The Chroma Key (Green Screen) option will be selected by default, so you just have to check the ‘Make parts of the clip transparent’ box. The green background of the template will become transparent and you’ll be able to see parts of your video, with the triggered text displayed below it.
3. Enhancing Colors and Applying Effects
In order to highlight just how much a person in the video got triggered, you can change the vibrance and saturation in a portion of a video clip by clicking on the Edit icon in the toolbar. In addition, other software’s color correction tools like brightness, tint or contrast can also be used to highlight the triggered moment.
After you adjust the color values, you can click on the Effects icon if you want to add motion blur or camera shake effects. Click on the Shake option in the Effects panel to start browsing through different effects and click on the plus icon to add the effect to the clip you selected. The Distortion category in the Effects panel features a number of blur effects you can use to make the video more entertaining. You can adjust the properties of all the effects you add to your meme and control how much of the effect is applied to the video.
4. Adding Music and Text Overlays to Your Meme
Increasing the number of visual elements in the video can help you create a funnier meme. A single word can change the meaning of a meme so if you want to add additional comment besides noting that the person got triggered you can click on the Text icon and select the text overlay you like. Click on the plus icon that is displayed over the effect to add it to a video clip. A textbox will appear over the video in the Preview window and you can drag it around the screen to reposition it or rotate it. Enable the No Animation option if you want the text to just appear and disappear from the screen.
Sounds can add to the comical effect of a meme. Carefully select what type of music or sound you want to use for a meme since it can improve the quality of your meme. Simply drag the audio file you imported into Filmora and place it on the audio track and adjust its duration to match the duration of the video. If you don’t have your own music you can try some of the tracks featured in the software’s music library.
4. Exporting the Triggered Meme from Filmora
When your meme is ready to hit the social media, you can click on the Export button. In the Export window, you can choose any of the available file formats, but the formats best suited for memes are either MP4 or GIF. Click on the Settings icon in the Output Description menu to change the frame rate, resolution or the quality of the video. Wondershare Filmora lets you export videos directly to your YouTube channel or your Facebook account, so you don’t have to waste time on posting the meme after the export process is completed.
The software also offers the option to save a meme you created to your hard drive if you don’t want to post a meme on social media right away. You just have to click on the Export button after adjusting the output settings and wait for the file to be exported.
Conclusion
The precious memories of your friends being enraged by the silliest things can be turned into hilarious memes effortlessly. A video editing software like Wondershare Filmora gives you all the tools you’ll need to quickly generate a triggered meme, so you can focus on having fun with your friends. What’s your favorite method of making memes?
Ollie Mattison
Ollie Mattison is a writer and a lover of all things video.
Follow @Ollie Mattison
Ollie Mattison
Mar 27, 2024• Proven solutions
It is no secret that we all lose our cool from time. It’s only natural, after all, the world can be a frustrating place. We’re all enraged by different things, some of us can’t stand pineapple on pizza while others explode when being pranked. What we often don’t realize is that being triggered in front of a camera makes us perfect meme material. Even though the majority of memes are still images, some of the most memorable memes ever created were GIFs or short videos.
Making the triggered meme is easy when you know how, so in this article, we are going to show you how to make your next potentially viral meme, in just a few easy steps.
Filmora offers an easy to use video editor named Filmora Video Editor to make video and gif memes, and an online free meme maker named Filmora FREE Online Meme Maker which allows you to create images, videos and gifs memes for free. The video tutorial below will show you how to make a triggered video meme with Filmora. Download it and try it by yourself now.
The Things You Need to Make a Triggered Meme
Preparation is key to almost every important thing in life, including making a triggered meme featuring your bestie. Before you can capitalize on that amazing footage of triggered people you first have to make sure you have everything you need to generate a meme. Okay, let’s get started with the essentials to making a fun and effective meme.
1. A Triggered Template
You have virtually unlimited resources at your disposal, as this meme template can be easily found through a quick Google search. There is even an Android app called Triggered Meme Maker , that lets you do what its name suggests, make triggered memes. Making your own template in Microsoft Paint (we will show you how to make it in this article later) or any other photo editing software is also an option if you want to select the color of the background, rather than work with what you can find online.
2. A Video Editing Software
Memes are short videos that rarely last longer than 30 seconds, which is why you don’t need a powerful video editing suite like Final Cut Pro or Adobe Premiere Pro to make a good meme. A software like Wondershare Filmora that is easy to use and yet packed with cool visual effects and useful tools is a better choice if you just want to have a little fun with a video you recorded.
3. The Sound for the Triggered Meme
This ingredient of a good meme is easy to forget, but music or any other type of sound can make your meme funnier. In most cases, you’ll want to keep at least a portion of the original audio, but adding sound effects at different points of the meme can have a comical effect. The Filmora’s Music Library can serve as your endless source of royalty free music and sounds .
Making a Triggered Meme Template in Microsoft Paint
Creating a meme template is an easy task that can be handled from the Microsoft Paint in a couple of minutes. When you launch the software, click on the Fill with color icon located in the Tools section of the Paint’s ribbon. Activating this option enables you to change the color of the background with a single click. Proceed to select the color of the background from the color palette located on the far right side of the ribbon. We recommend choosing shades of green because the background is going to be used for the Chroma Key effect. You can click on the Edit Colors icon if you want to find a perfect color tone for the background. Right-click anywhere on the canvas to change its color.
Now you just need to add the text to your template. Select the Text option in the Tools menu and then proceed to select the font or the size of your text in the Font menu. Make sure that the Opaque feature is enabled in the Background menu in order to change the color of the textbox background. Adjusting the Color 1 option in the Color Menu will enable you to choose the text color, while the Color 2 option lets you pick the color of the background. Type triggered in the textbox, and center the text by clicking on the TAB button on your keyboard a few times. Now you have everything you need to start creating your own triggered meme.
How to Make a Triggered Meme?
Once you’ve successfully created a triggered template you can move on to the next step of the meme making process.
1. Adding Media to a Project
Open Filmora in the Full Feature Mode and import all the files you’re going to need during the process of making a meme. The files you import to your project will be stored in the Media Panel. Add the video to the timeline by dropping it over the video track. You can then remove the unwanted parts of the clip or add a still frame to the end of the video to prolong the triggered effect of the meme. Still frames in Filmora can be created by clicking on the Snapshot icon, that is located below the Preview Panel.
2. Using the Green Screen Effect
Place the triggered template to the Picture-in-Picture track and try to position it at the exact place in the video where the person gets triggered. Click on the Green Screen icon located in the toolbar to gain access to the PIP Edit window. The Chroma Key (Green Screen) option will be selected by default, so you just have to check the ‘Make parts of the clip transparent’ box. The green background of the template will become transparent and you’ll be able to see parts of your video, with the triggered text displayed below it.
3. Enhancing Colors and Applying Effects
In order to highlight just how much a person in the video got triggered, you can change the vibrance and saturation in a portion of a video clip by clicking on the Edit icon in the toolbar. In addition, other software’s color correction tools like brightness, tint or contrast can also be used to highlight the triggered moment.
After you adjust the color values, you can click on the Effects icon if you want to add motion blur or camera shake effects. Click on the Shake option in the Effects panel to start browsing through different effects and click on the plus icon to add the effect to the clip you selected. The Distortion category in the Effects panel features a number of blur effects you can use to make the video more entertaining. You can adjust the properties of all the effects you add to your meme and control how much of the effect is applied to the video.
4. Adding Music and Text Overlays to Your Meme
Increasing the number of visual elements in the video can help you create a funnier meme. A single word can change the meaning of a meme so if you want to add additional comment besides noting that the person got triggered you can click on the Text icon and select the text overlay you like. Click on the plus icon that is displayed over the effect to add it to a video clip. A textbox will appear over the video in the Preview window and you can drag it around the screen to reposition it or rotate it. Enable the No Animation option if you want the text to just appear and disappear from the screen.
Sounds can add to the comical effect of a meme. Carefully select what type of music or sound you want to use for a meme since it can improve the quality of your meme. Simply drag the audio file you imported into Filmora and place it on the audio track and adjust its duration to match the duration of the video. If you don’t have your own music you can try some of the tracks featured in the software’s music library.
4. Exporting the Triggered Meme from Filmora
When your meme is ready to hit the social media, you can click on the Export button. In the Export window, you can choose any of the available file formats, but the formats best suited for memes are either MP4 or GIF. Click on the Settings icon in the Output Description menu to change the frame rate, resolution or the quality of the video. Wondershare Filmora lets you export videos directly to your YouTube channel or your Facebook account, so you don’t have to waste time on posting the meme after the export process is completed.
The software also offers the option to save a meme you created to your hard drive if you don’t want to post a meme on social media right away. You just have to click on the Export button after adjusting the output settings and wait for the file to be exported.
Conclusion
The precious memories of your friends being enraged by the silliest things can be turned into hilarious memes effortlessly. A video editing software like Wondershare Filmora gives you all the tools you’ll need to quickly generate a triggered meme, so you can focus on having fun with your friends. What’s your favorite method of making memes?
Ollie Mattison
Ollie Mattison is a writer and a lover of all things video.
Follow @Ollie Mattison
Also read:
- [New] Address WebView Compatibility for FB Streaming for 2024
- [Updated] EchoGuard Audio Deterrent Sticker for 2024
- 2024 Approved 10 Most Popular Minion Memes that Moms Are Crazy About
- 2024 Approved How to Make Memes on iPhone and Android
- How to Make a Triggered Meme for 2024
- In 2024, Can I use iTools gpx file to catch the rare Pokemon On Apple iPhone 6 Plus | Dr.fone
- In 2024, How to Change/Add Location Filters on Snapchat For your Xiaomi Redmi Note 12 Pro+ 5G | Dr.fone
- Mastering Control over Apple Music's Autoplay Feature
- New 2024 Approved How to Use Emojis on Windows
- Tom's Tech Corner: Dive Into Latest Gadgets and Hardware Reviews
- Title: Updated In 2024, Best Photo Slideshow Maker How to Make a Photo Slideshow 2023 Update
- Author: Jan
- Created at : 2025-02-17 17:20:08
- Updated at : 2025-02-19 18:23:51
- Link: https://meme-emoji.techidaily.com/updated-in-2024-best-photo-slideshow-maker-how-to-make-a-photo-slideshow-2023-update/
- License: This work is licensed under CC BY-NC-SA 4.0.