
Updated How to Make a Wonderful Video Slideshow with Your Travel Photos
How to Make a Wonderful Video Slideshow with Your Travel Photos
How to Make Video Slideshow with Your Travel Photos

Ollie Mattison
Mar 27, 2024• Proven solutions
We all love traveling and for a good reason. It allows us to relax, it removes the pressure from our life and it just makes the entire experience a lot better. But if you are a fan of taking picture while travelling, why not try to create a video slideshow with your images? This is one of the best and most original ways you can use it in order to share your travels with others. It works magically and it manages to bring in front some of those unique moments. However, you do need to have the proper tools when you want to create such a slideshow, but that’s great as we are here to help you with that.
How can you create a travel slideshow with travel photos
Things you need to know before creating it
Before you create the travel slideshow you have to keep in mind a few things. If you don’t then the results will not be as good as you expect. You have to be committed to the idea of having the best results and as long as you do that the outcome will be very well worth it.
You need to try and consider your audience because based on that the slideshow will have a specific format. You also need to think about telling a story as that will make it a lot more interesting other than just having a bunch of images aligned together in a non-meaningful manner.


Wondershare Filmora – The best tool to create a video slideshow with your travel photos
But one has to wonder, what tool should you use to create such a travel slideshow? Wondershare Filmora is the application of choice in this regard because it does help offer a huge variety of amazing features that all add up in order to deliver great value!
- Wondershare Filmora is great for beginners as it makes editing a breeze thanks to the stellar interface
- It also integrates transitions as well as filters and effects. It provides you with a refined set of tools that help maintain a good focus on results.
- It helps you add sound effects and a variety of music types to help you with the story.
- You can burn the result to DVD or you can share it on social media and YouTube/Vimeo among others right from within the app.
How can you create video slideshows with Wondershare Filmora?
Creating a unique slideshow video with this tool is actually very easy and it does provide you with a huge amount of value should you choose to use it. Here are several things you need to consider when making a travel slideshow video. First, choose the right music for the travel slideshow; second, adjust the duration of the photos; third, transitions and effects.
Here are the steps you need to focus on when creating a travel slideshow video with Wondershare Filmora:
Filmstock Stock Media Library ](https://filmstock.wondershare.com/creative-theme-tourism?spm=rs.filmora%5Fweb&source%5Fchannel=seo%5Farticle )
Step 1: Download and install Wondershare Filmora, then open it.
Add all the travel photos into the applications. You can add in multiple folders in order to make sorting the images a lot easier.
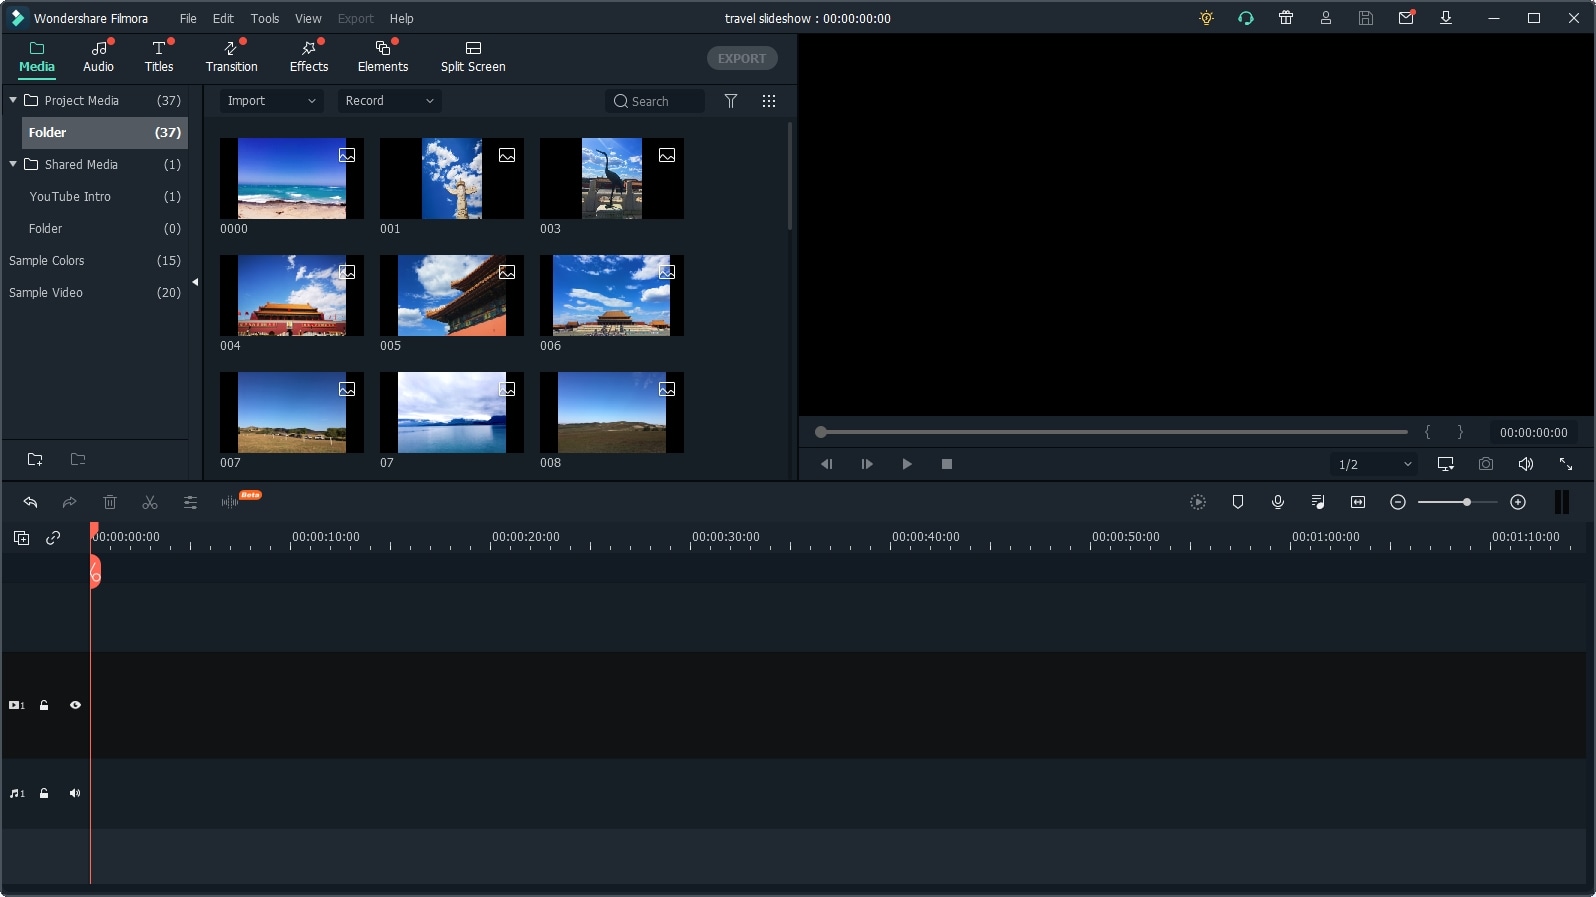
Next, set up the photo duration to the desired length, so that you don’t need to adjust the photo duration one by one.

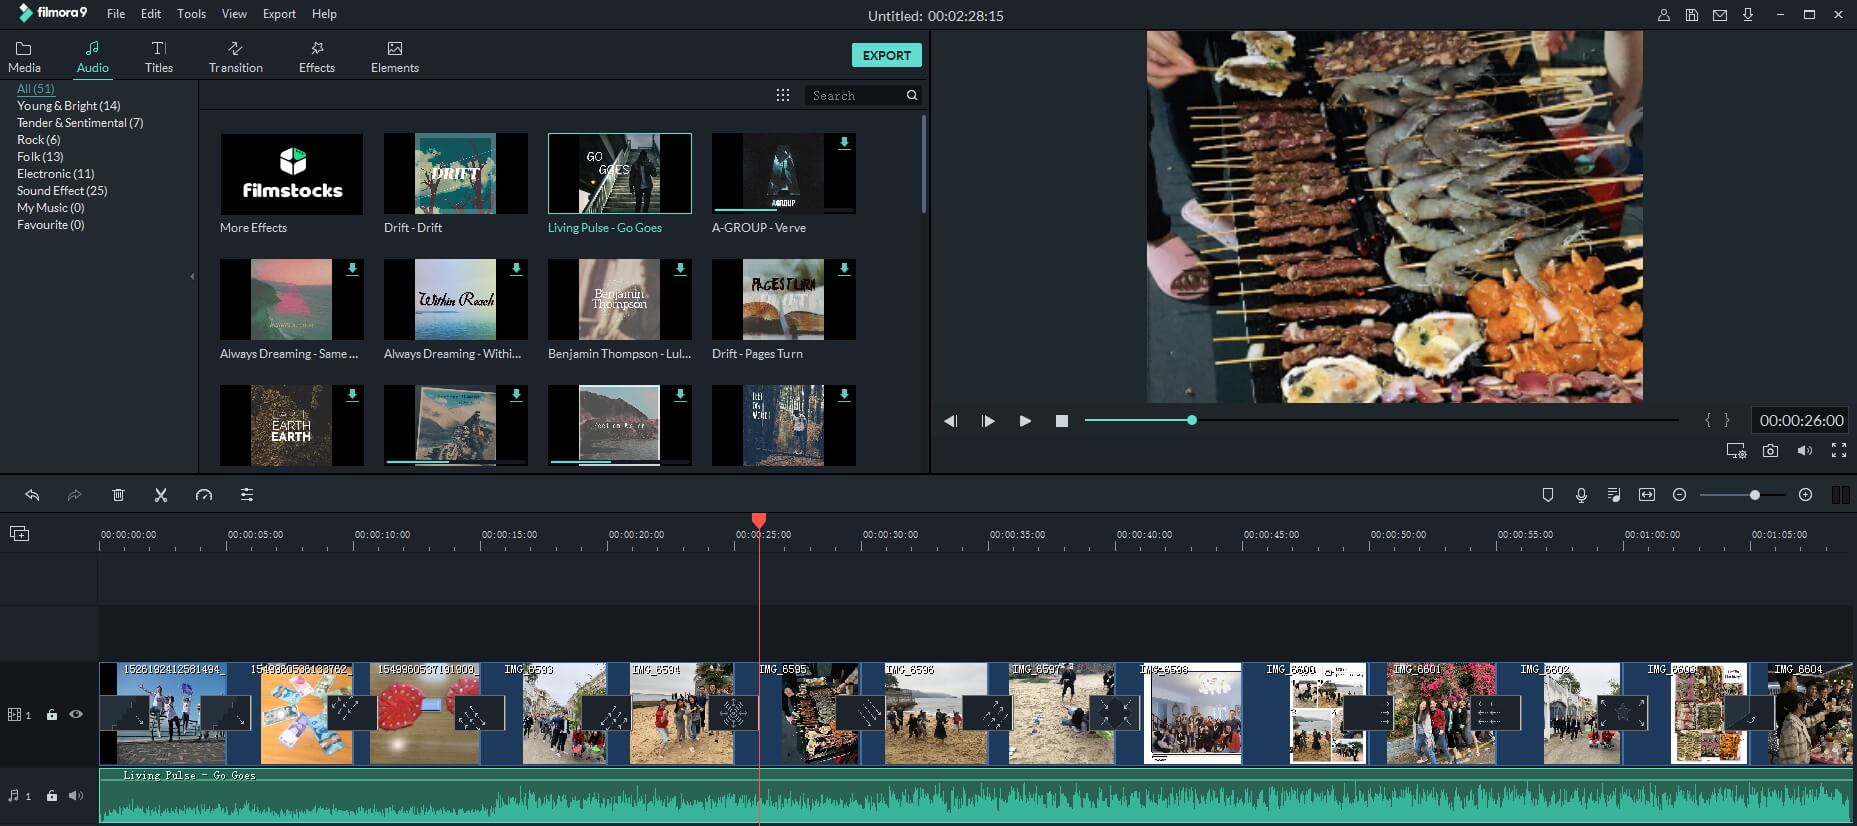
Step 2: Now, it’s time to determine and add music in the background. Add some sounds and royalty-free music in Wondershare Filmora and then use the media library to help you give more of an impact to the entire experience.

If you want to sync the photo to the background music, you can use the Beat Detection tool in Filmora and mark the highlights accordingly.
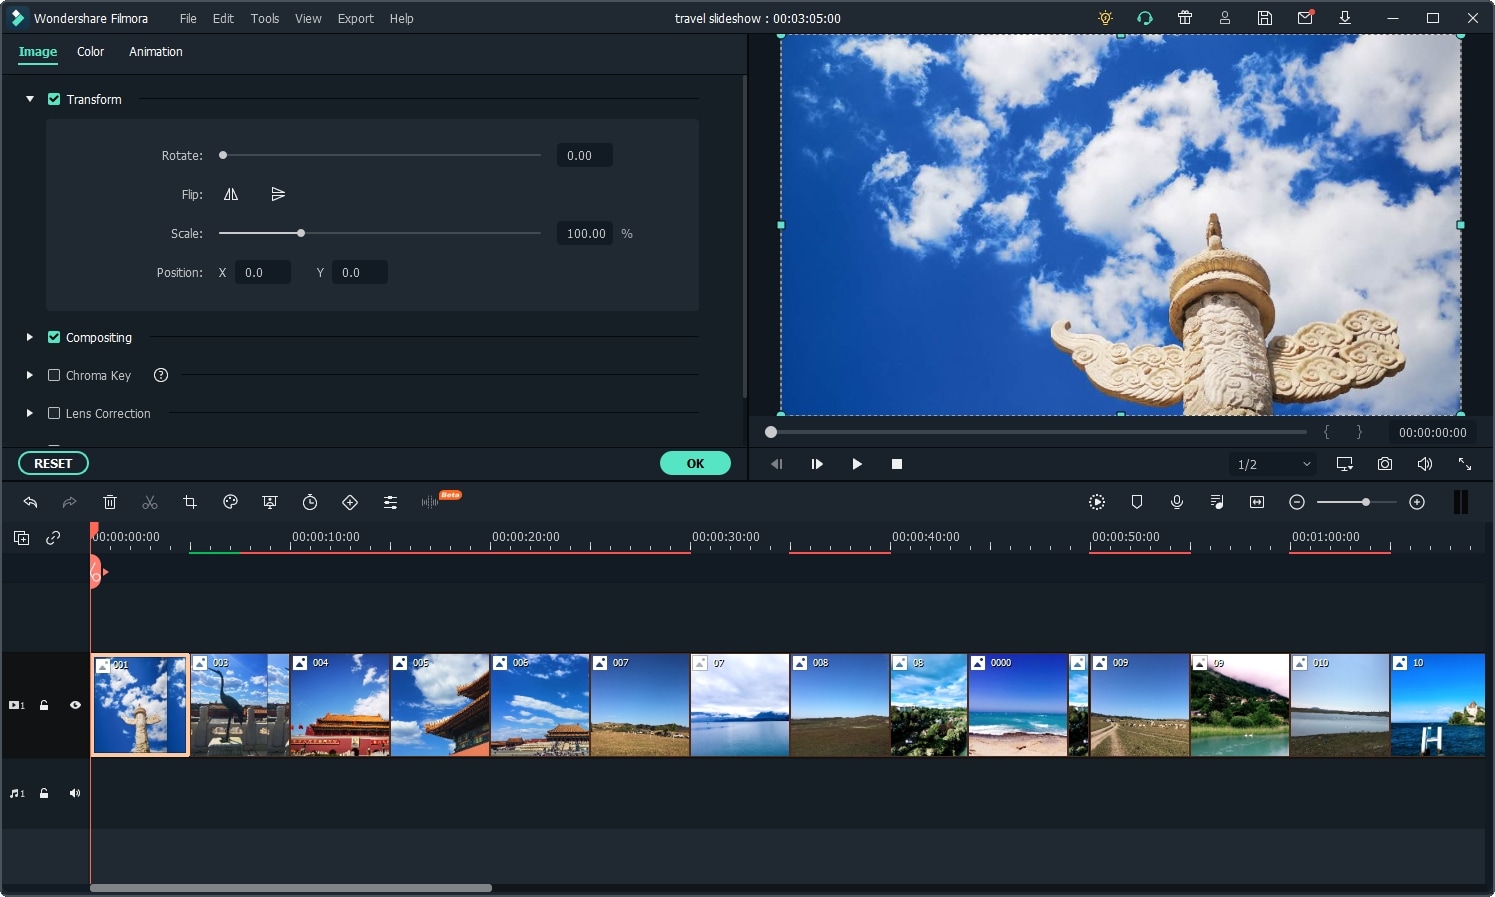
Step 3: Once you did that, you will have to drag and then drop the images directly to the timeline. Here is where you can change things like saturation, hue, brightness, contrast and other features.
You can also rotate the images and crop them if you see fit. If some of the travel photos have different aspect ratios, you can select Crop to Fit so all the photos will be in the same aspect ratio without blackbar.
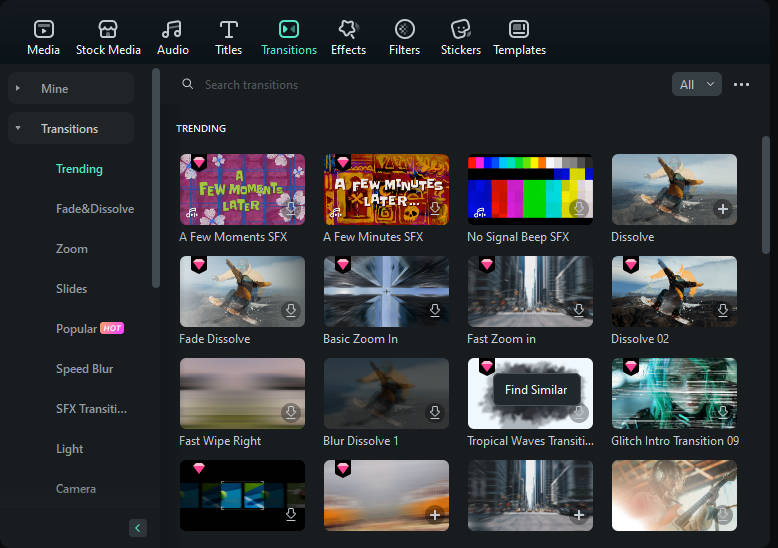
Step 4: At this point, you do need to try and add transitions between each of the images.
When you are done with that, you have to select the filters and overlays that will help you make your travel slideshow look better. This is an important step and you do want to spend a good amount of time with it.
Step 5: Lastly, you will have to export the slideshow as you see fit, but you also have the option to share it on YouTube if you so desire.

Conclusion
Wondershare Filmora is a very good application for those that want a unique, fun travel slideshow. It allows you to get all the tools and high-quality features that you need in order to take the experience to the next level. We recommend you to check it out right away as it’s well worth the investment!
Download Mac Version ](https://tools.techidaily.com/wondershare/filmora/download/ )
Ollie Mattison
Ollie Mattison is a writer and a lover of all things video.
Follow @Ollie Mattison
Ollie Mattison
Mar 27, 2024• Proven solutions
We all love traveling and for a good reason. It allows us to relax, it removes the pressure from our life and it just makes the entire experience a lot better. But if you are a fan of taking picture while travelling, why not try to create a video slideshow with your images? This is one of the best and most original ways you can use it in order to share your travels with others. It works magically and it manages to bring in front some of those unique moments. However, you do need to have the proper tools when you want to create such a slideshow, but that’s great as we are here to help you with that.
How can you create a travel slideshow with travel photos
Things you need to know before creating it
Before you create the travel slideshow you have to keep in mind a few things. If you don’t then the results will not be as good as you expect. You have to be committed to the idea of having the best results and as long as you do that the outcome will be very well worth it.
You need to try and consider your audience because based on that the slideshow will have a specific format. You also need to think about telling a story as that will make it a lot more interesting other than just having a bunch of images aligned together in a non-meaningful manner.
Wondershare Filmora – The best tool to create a video slideshow with your travel photos
But one has to wonder, what tool should you use to create such a travel slideshow? Wondershare Filmora is the application of choice in this regard because it does help offer a huge variety of amazing features that all add up in order to deliver great value!
- Wondershare Filmora is great for beginners as it makes editing a breeze thanks to the stellar interface
- It also integrates transitions as well as filters and effects. It provides you with a refined set of tools that help maintain a good focus on results.
- It helps you add sound effects and a variety of music types to help you with the story.
- You can burn the result to DVD or you can share it on social media and YouTube/Vimeo among others right from within the app.
How can you create video slideshows with Wondershare Filmora?
Creating a unique slideshow video with this tool is actually very easy and it does provide you with a huge amount of value should you choose to use it. Here are several things you need to consider when making a travel slideshow video. First, choose the right music for the travel slideshow; second, adjust the duration of the photos; third, transitions and effects.
Here are the steps you need to focus on when creating a travel slideshow video with Wondershare Filmora:
Filmstock Stock Media Library ](https://filmstock.wondershare.com/creative-theme-tourism?spm=rs.filmora%5Fweb&source%5Fchannel=seo%5Farticle )
Step 1: Download and install Wondershare Filmora, then open it.
Add all the travel photos into the applications. You can add in multiple folders in order to make sorting the images a lot easier.
Next, set up the photo duration to the desired length, so that you don’t need to adjust the photo duration one by one.
Step 2: Now, it’s time to determine and add music in the background. Add some sounds and royalty-free music in Wondershare Filmora and then use the media library to help you give more of an impact to the entire experience.
If you want to sync the photo to the background music, you can use the Beat Detection tool in Filmora and mark the highlights accordingly.
Step 3: Once you did that, you will have to drag and then drop the images directly to the timeline. Here is where you can change things like saturation, hue, brightness, contrast and other features.
You can also rotate the images and crop them if you see fit. If some of the travel photos have different aspect ratios, you can select Crop to Fit so all the photos will be in the same aspect ratio without blackbar.
Step 4: At this point, you do need to try and add transitions between each of the images.
When you are done with that, you have to select the filters and overlays that will help you make your travel slideshow look better. This is an important step and you do want to spend a good amount of time with it.
Step 5: Lastly, you will have to export the slideshow as you see fit, but you also have the option to share it on YouTube if you so desire.
Conclusion
Wondershare Filmora is a very good application for those that want a unique, fun travel slideshow. It allows you to get all the tools and high-quality features that you need in order to take the experience to the next level. We recommend you to check it out right away as it’s well worth the investment!
Download Mac Version ](https://tools.techidaily.com/wondershare/filmora/download/ )
Ollie Mattison
Ollie Mattison is a writer and a lover of all things video.
Follow @Ollie Mattison
How to Make a Slideshow with Music
How to Make a Slideshow with Music

Shanoon Cox
Mar 27, 2024• Proven solutions
Nowadays, we tend to store our experiences of important occasions in photos and videos since cameras and camcorders are popular. To better preserve these sweet memories, make a slideshow with music, photos and videos is a good idea. It’s not as difficult as you think since all you need are: a good slideshow maker, photos and videos you want to show, music to go along with your slideshow. Here is a tutorial about how to make a slideshow with music with Wondershare Filmora video editor and Wondershare DVD Slideshow Builder .
Read more: 20 Best Slideshow Songs for Different Occasions [Royalty-Free]
How to create slideshow with music in Filmora?
Note: The video tutorial about how to make slideshow in minutes is created with the previous version of Filmora video editor. Most of the steps are similar and creating a music slideshow with the latest Filmora is very easy. As we said before, all you need is your photos and music tracks, then follow the steps below to start.
Step 1. Download Filmora and Run it
Click the Free Download button above to download and install Wondershare Filmora on your computer and then launch it.
In case you want to change the default aspect ratio setting in the splash screen, you can choose 9:16 for portrait mode, 1:1 for Instagram slideshow and more. And then click New Project to create a project to continue.
Step 2. Import Photos and Music
After that, you need to import all your photo and music media to the Media Library and then drag and drop them to the timeline directly. Filmora allows you to change the order the photos in the timeline, and the photo duration as well.
You can also rotate photos and crop them manually to fit your project.
Note: If you find some black bar on your photos in preview, it is recommended to change Photo Placement to Crop and Zoom under Preference before drag-n-drop to timeline.
Step 3. Add Transitions

There are hundreds of transitions available in Filmora which you should totally have a try. You can apply a specific transition between each selected photo, or apply random transitions to selected photos.
Filmora features more than 30 transitions especially for Slideshow, such as cross merge, cross split, swap and sweep clockwise. Of course, you can also use some 3D transition, ripple and dissolve, or speed blur transitions.
You can also adjust the transition duration accordingly.
To make your photos slideshow looks better, it is highly recommended to apply filters and overlays effects.
Step 4. Add background music
You can choose background music or sound effect from the inbuilt audio library in Filmora or drag and drop the music track file from computer to the timeline directly. Filmora features the voiceover recording tool which helps you to record your own voice easily.
Step 5. Export and Save
Finally, it’s time to save and export the music slideshow as you see fit. You have several options, you can save it on the computer in different formats, or you can share it to YouTube or Vimeo directly, or you can burn it to DVD.
Why choose Filmora to create music slideshow?
- Filmora supports most of popular image formats such as .jpg, .png, .bmp, .gif, .tif, and .tiff.
- Filmora allows you to crop, pan & zoom the slideshow manually or automatically by applying Pan & Zoom Photo Placement.
- Filmora has inbuilt music track and sound effect library, and stunning transitions, effects and elements presets.
- Filmora allows you to record your own voiceover and apply fade in and fade out effects.
- Besides creating photo slideshow, you can use it to create videos for both your YouTube marketing, daily sharing and business.
How to make a slideshow with DVD Slideshow Builder

Tips for Make a Slideshow with Music
1. Install slideshow software and import photos and videos
Install the software and import your digital photos to the storyboard by clicking ‘“Add Files” (there is no quantity limitation of photos). You can also add videos from computer or camera.
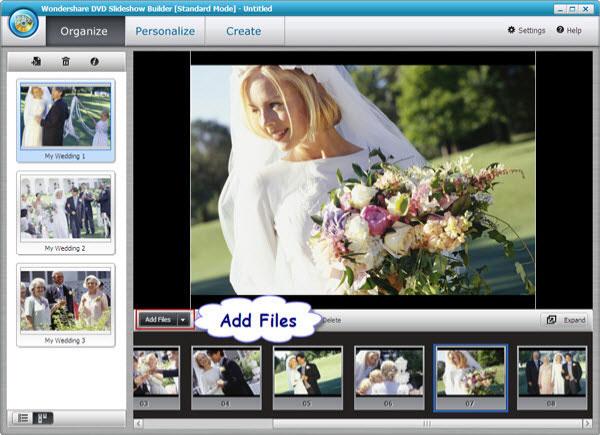
2. Add music to your photo slideshow
Go to the “Personalize” tab. Click “Music” toolbar to add background music or just drag the music to the background track. In the timeline, you can drag the slider to make the music best suit the photos and videos. If you need to edit the music, double click the clip and in the pop up window, trim music and adjust music volume as you like.
Tip: If you want to synchronize background music with the slideshow, click “Settings” (it’s on the right upper corner) and choose “Slideshow” tab, then tick the checkbox under the “Synchronize“. At last, click “OK” button.
3 .Select movie styles and add decorations
There are also 480+ free styles and transition effects that can be used for your picture slideshow with music in this tab. Choose your favorite styles and drag it on the photos. You can also add decoration text, clipart and effects on your digital photos. To make add more fun, you can also add intro movie and credit movie to your picture slideshow with music by clicking the “Intro/Credit” build-in button.

4 . Preview and save your slideshow with music
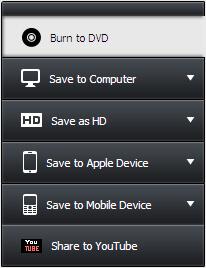
Go to “Publish” tab, you can preview the photo video by click the preview button first. Then publish it to the format you want. If you want to watch your photo slideshow with music to iPod or iPhone, you’d better publish it to MP4 format. This slideshow software also enables you to share your slideshow directly to YouTube by filling in the necessary information. Besides, you can burn DVD slideshow with music by clicking the “Burn to DVD” button and putting a DVD disc in your computer.
We shared two ways of making slideshow with music, whether you are using Filmora or DVD slideshow maker, leave a comment below and let me know your choice.
Shanoon Cox
Shanoon Cox is a writer and a lover of all things video.
Follow @Shanoon Cox
Shanoon Cox
Mar 27, 2024• Proven solutions
Nowadays, we tend to store our experiences of important occasions in photos and videos since cameras and camcorders are popular. To better preserve these sweet memories, make a slideshow with music, photos and videos is a good idea. It’s not as difficult as you think since all you need are: a good slideshow maker, photos and videos you want to show, music to go along with your slideshow. Here is a tutorial about how to make a slideshow with music with Wondershare Filmora video editor and Wondershare DVD Slideshow Builder .
Read more: 20 Best Slideshow Songs for Different Occasions [Royalty-Free]
How to create slideshow with music in Filmora?
Note: The video tutorial about how to make slideshow in minutes is created with the previous version of Filmora video editor. Most of the steps are similar and creating a music slideshow with the latest Filmora is very easy. As we said before, all you need is your photos and music tracks, then follow the steps below to start.
Step 1. Download Filmora and Run it
Click the Free Download button above to download and install Wondershare Filmora on your computer and then launch it.
In case you want to change the default aspect ratio setting in the splash screen, you can choose 9:16 for portrait mode, 1:1 for Instagram slideshow and more. And then click New Project to create a project to continue.
Step 2. Import Photos and Music
After that, you need to import all your photo and music media to the Media Library and then drag and drop them to the timeline directly. Filmora allows you to change the order the photos in the timeline, and the photo duration as well.
You can also rotate photos and crop them manually to fit your project.
Note: If you find some black bar on your photos in preview, it is recommended to change Photo Placement to Crop and Zoom under Preference before drag-n-drop to timeline.
Step 3. Add Transitions
There are hundreds of transitions available in Filmora which you should totally have a try. You can apply a specific transition between each selected photo, or apply random transitions to selected photos.
Filmora features more than 30 transitions especially for Slideshow, such as cross merge, cross split, swap and sweep clockwise. Of course, you can also use some 3D transition, ripple and dissolve, or speed blur transitions.
You can also adjust the transition duration accordingly.
To make your photos slideshow looks better, it is highly recommended to apply filters and overlays effects.
Step 4. Add background music
You can choose background music or sound effect from the inbuilt audio library in Filmora or drag and drop the music track file from computer to the timeline directly. Filmora features the voiceover recording tool which helps you to record your own voice easily.
Step 5. Export and Save
Finally, it’s time to save and export the music slideshow as you see fit. You have several options, you can save it on the computer in different formats, or you can share it to YouTube or Vimeo directly, or you can burn it to DVD.
Why choose Filmora to create music slideshow?
- Filmora supports most of popular image formats such as .jpg, .png, .bmp, .gif, .tif, and .tiff.
- Filmora allows you to crop, pan & zoom the slideshow manually or automatically by applying Pan & Zoom Photo Placement.
- Filmora has inbuilt music track and sound effect library, and stunning transitions, effects and elements presets.
- Filmora allows you to record your own voiceover and apply fade in and fade out effects.
- Besides creating photo slideshow, you can use it to create videos for both your YouTube marketing, daily sharing and business.
How to make a slideshow with DVD Slideshow Builder
Tips for Make a Slideshow with Music
1. Install slideshow software and import photos and videos
Install the software and import your digital photos to the storyboard by clicking ‘“Add Files” (there is no quantity limitation of photos). You can also add videos from computer or camera.
2. Add music to your photo slideshow
Go to the “Personalize” tab. Click “Music” toolbar to add background music or just drag the music to the background track. In the timeline, you can drag the slider to make the music best suit the photos and videos. If you need to edit the music, double click the clip and in the pop up window, trim music and adjust music volume as you like.
Tip: If you want to synchronize background music with the slideshow, click “Settings” (it’s on the right upper corner) and choose “Slideshow” tab, then tick the checkbox under the “Synchronize“. At last, click “OK” button.
3 .Select movie styles and add decorations
There are also 480+ free styles and transition effects that can be used for your picture slideshow with music in this tab. Choose your favorite styles and drag it on the photos. You can also add decoration text, clipart and effects on your digital photos. To make add more fun, you can also add intro movie and credit movie to your picture slideshow with music by clicking the “Intro/Credit” build-in button.
4 . Preview and save your slideshow with music
Go to “Publish” tab, you can preview the photo video by click the preview button first. Then publish it to the format you want. If you want to watch your photo slideshow with music to iPod or iPhone, you’d better publish it to MP4 format. This slideshow software also enables you to share your slideshow directly to YouTube by filling in the necessary information. Besides, you can burn DVD slideshow with music by clicking the “Burn to DVD” button and putting a DVD disc in your computer.
We shared two ways of making slideshow with music, whether you are using Filmora or DVD slideshow maker, leave a comment below and let me know your choice.
Shanoon Cox
Shanoon Cox is a writer and a lover of all things video.
Follow @Shanoon Cox
Shanoon Cox
Mar 27, 2024• Proven solutions
Nowadays, we tend to store our experiences of important occasions in photos and videos since cameras and camcorders are popular. To better preserve these sweet memories, make a slideshow with music, photos and videos is a good idea. It’s not as difficult as you think since all you need are: a good slideshow maker, photos and videos you want to show, music to go along with your slideshow. Here is a tutorial about how to make a slideshow with music with Wondershare Filmora video editor and Wondershare DVD Slideshow Builder .
Read more: 20 Best Slideshow Songs for Different Occasions [Royalty-Free]
How to create slideshow with music in Filmora?
Note: The video tutorial about how to make slideshow in minutes is created with the previous version of Filmora video editor. Most of the steps are similar and creating a music slideshow with the latest Filmora is very easy. As we said before, all you need is your photos and music tracks, then follow the steps below to start.
Step 1. Download Filmora and Run it
Click the Free Download button above to download and install Wondershare Filmora on your computer and then launch it.
In case you want to change the default aspect ratio setting in the splash screen, you can choose 9:16 for portrait mode, 1:1 for Instagram slideshow and more. And then click New Project to create a project to continue.
Step 2. Import Photos and Music
After that, you need to import all your photo and music media to the Media Library and then drag and drop them to the timeline directly. Filmora allows you to change the order the photos in the timeline, and the photo duration as well.
You can also rotate photos and crop them manually to fit your project.
Note: If you find some black bar on your photos in preview, it is recommended to change Photo Placement to Crop and Zoom under Preference before drag-n-drop to timeline.
Step 3. Add Transitions
There are hundreds of transitions available in Filmora which you should totally have a try. You can apply a specific transition between each selected photo, or apply random transitions to selected photos.
Filmora features more than 30 transitions especially for Slideshow, such as cross merge, cross split, swap and sweep clockwise. Of course, you can also use some 3D transition, ripple and dissolve, or speed blur transitions.
You can also adjust the transition duration accordingly.
To make your photos slideshow looks better, it is highly recommended to apply filters and overlays effects.
Step 4. Add background music
You can choose background music or sound effect from the inbuilt audio library in Filmora or drag and drop the music track file from computer to the timeline directly. Filmora features the voiceover recording tool which helps you to record your own voice easily.
Step 5. Export and Save
Finally, it’s time to save and export the music slideshow as you see fit. You have several options, you can save it on the computer in different formats, or you can share it to YouTube or Vimeo directly, or you can burn it to DVD.
Why choose Filmora to create music slideshow?
- Filmora supports most of popular image formats such as .jpg, .png, .bmp, .gif, .tif, and .tiff.
- Filmora allows you to crop, pan & zoom the slideshow manually or automatically by applying Pan & Zoom Photo Placement.
- Filmora has inbuilt music track and sound effect library, and stunning transitions, effects and elements presets.
- Filmora allows you to record your own voiceover and apply fade in and fade out effects.
- Besides creating photo slideshow, you can use it to create videos for both your YouTube marketing, daily sharing and business.
How to make a slideshow with DVD Slideshow Builder

Tips for Make a Slideshow with Music
1. Install slideshow software and import photos and videos
Install the software and import your digital photos to the storyboard by clicking ‘“Add Files” (there is no quantity limitation of photos). You can also add videos from computer or camera.
2. Add music to your photo slideshow
Go to the “Personalize” tab. Click “Music” toolbar to add background music or just drag the music to the background track. In the timeline, you can drag the slider to make the music best suit the photos and videos. If you need to edit the music, double click the clip and in the pop up window, trim music and adjust music volume as you like.
Tip: If you want to synchronize background music with the slideshow, click “Settings” (it’s on the right upper corner) and choose “Slideshow” tab, then tick the checkbox under the “Synchronize“. At last, click “OK” button.
3 .Select movie styles and add decorations
There are also 480+ free styles and transition effects that can be used for your picture slideshow with music in this tab. Choose your favorite styles and drag it on the photos. You can also add decoration text, clipart and effects on your digital photos. To make add more fun, you can also add intro movie and credit movie to your picture slideshow with music by clicking the “Intro/Credit” build-in button.
4 . Preview and save your slideshow with music
Go to “Publish” tab, you can preview the photo video by click the preview button first. Then publish it to the format you want. If you want to watch your photo slideshow with music to iPod or iPhone, you’d better publish it to MP4 format. This slideshow software also enables you to share your slideshow directly to YouTube by filling in the necessary information. Besides, you can burn DVD slideshow with music by clicking the “Burn to DVD” button and putting a DVD disc in your computer.
We shared two ways of making slideshow with music, whether you are using Filmora or DVD slideshow maker, leave a comment below and let me know your choice.
Shanoon Cox
Shanoon Cox is a writer and a lover of all things video.
Follow @Shanoon Cox
Best Emoji Removers to Remove Emojis From Pictures
Thanks to technology, editing photos have become easy. You can crop and rotate a photo, add filters, and even add emojis. While removing emojis is easy while you are editing an image and have not saved your work, but what if you have and want to get rid of the emojis you added to the picture? How to go about that?
So, if you want to remove an emoji from a picture and the picture is already saved, don’t worry; this post will help you learn about the top ways to remove it. Keep reading!
Related: How to Remove Unwanted Objects from Photo
In this article
01 Best Emoji Removers Online to Remove Emojis from Pictures
02 Best Emoji Removers on Windows/Mac Computer
03 Best Emoji Remover Apps on iPhone and Android
Part 1: Best Emoji Removers Online to Remove Emojis from Pictures
1. Inpaint
So, the first online emoji remover that you can try is Inpaint. This is a simple to use tool and will remove unwanted objects, such as emojis, from a picture by intelligently filling it with textures that match the surrounding image data.
The image formats Inpaint accepts are JPG, WebP, and PNG. Just remember to use only the recommended image formats, and you can start using them right away. You don’t need to log in or sign up to start using it.
Features
- An online tool that removes unwanted objects quickly.
- You don’t need to sign up or log in.
- It accepts JPG, PNG, and WebP formats.
- 4.2MP is the maximum image resolution.
Website: https://theinpaint.com/
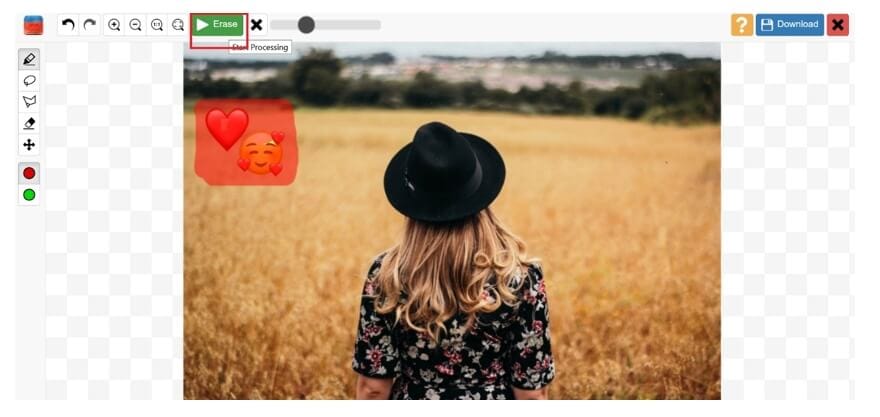
2. Pixlr
The next popular online tool is Pixlr. Pixlr is a popular photo editing tool that allows you to fix your pictures as well. You can use the tool online either using your computer web browser or mobile.
Whatever works for you. It doesn’t only let you remove emojis but erase background as well. But since you want to remove emojis, you will have to add the image and click on the retouch button from the toolbar. Then, you need to click on the image multiple times so that its surroundings overlap the emojis.
Features
- Pixlr can be used on both mobile and web browsers.
- Multiple photo editing tools are available.
- Removes emojis by blending them with the surroundings.
- Using Pixlr is easy and convenient.
Website: https://pixlr.com/
3. Fotor

Fotor is a professional photo editing tool, which lets you clone an emoji with a part of the image. The online tool asks you to sign up using your Google account to save your work. So, if you want to know how to remove emoji from a photo, you can use the clone feature.
Once you upload an image with emojis, move your cursor to the tool section in the left menu bar. Scroll down, and you will see the Clone option. Touch one part of the image that you want to use instead of the emoji. The first dot will be the area you want to clone and place the second dot on the emoji. And all done.
Website: https://www.fotor.com/
Features
- You can clone the emoji to remove it.
- A professional tool with lots of editing features.
- One needs to sign up or log in before using Fotor.
- The tool retains the original picture quality.
Related: Best Online Photo Editors
Part 2: Best Emoji Removers on Windows/Mac Computer
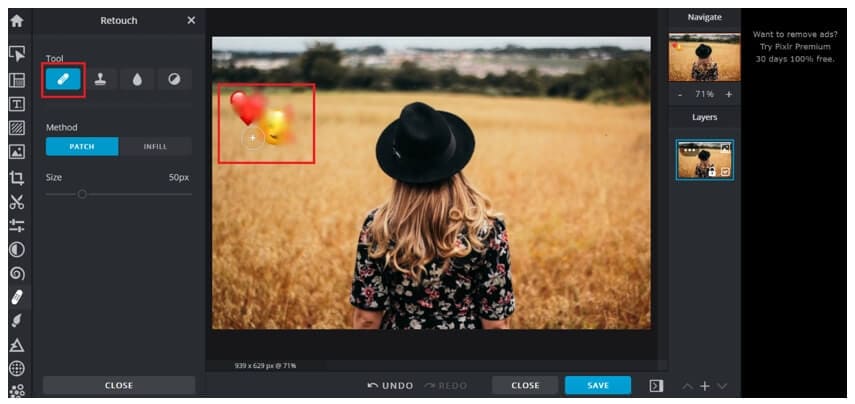
1. Adobe Photoshop
Adobe Photoshop is arguably one of the best photo editing tools that only allows you to enhance a photo but fix issues, such as removing emojis, unwanted objects, and so on. Adobe Photoshop is a professional tool and might not be the best for those new to it, but if you have used Adobe Photoshop earlier, you can use the Lasso Tool or the Marqueel Tool, which you will find on the left toolbar to remove emojis and unwanted items. Once done, save the image, and yes, the original picture quality will be retained.
Key Features
- A professional photo editing tool.
- It has multiple photo editing features and lets you remove emojis.
- You can draw on the emoji with a pen or pencil.
- It autosaves your work.
2. Wondershare Fotophire
Wondershare Fotophire is a fantastic photo editing tool that works magically on all kinds of images. Whether your photo is loaded with multiple emojis, you can remove them easily using Fotophire. If you are thinking about how to remove emojis from pictures using Fotophire, it’s pretty easy.
You need to clone any part of the image, and the tool will automatically use its algorithm to fill the emoji with its surroundings so that the filled area looks natural and blends well with the rest of the photo. Fotophire is a good option for both beginners and pros.
Key Features
- It removes all kinds of unwanted objects from an image, including emojis.
- Using Fotophire is easy and convenient.
- A good tool for both pros and beginners.
- Background doesn’t get impacted, and the original image quality remains intact.
3. GIMP
GIMP is a free and open-source photo editor, which allows you to remove emojis from a photo. It is available for Windows, macOS, GNU/Linux, and other operating systems. GIMP has been designed for everyone who would want their picture to look better.
If you wish to manipulate a high-quality image, you don’t have to worry about that because it accepts bigger-size photos as well. GIMP lets you clone an area and use that part on the emoji. You can also adjust the opacity of the cloned item depending on your requirements.
Key Features
- It lets you clone the surrounding area to hide an emoji.
- Accepts all the top image formats.
- It doesn’t pixelate the image after editing it.
- A free tool to use with lots of photo editing features.
4. Jihosoft Photo Eraser
Jihosoft Photo Eraser is a good photo editor tool that removes emojis or unwanted objects from an image by analyzing the surroundings. Once done, it will fill the selected emojis with the intelligently-generated textures. If you no longer want the emojis to be there is an image, Jihosoft Photo Eraser will be an ideal tool to use. The tool’s primary purpose is to remove unwanted items from an image, which is why it is an excellent software to go for.
Key Features
- It removes unwanted objects, such as emojis, from a photo.
- It allows the cloning of things to replace emojis.
- Using Jihosoft Photo Eraser is easy.
- The photo quality remains intact.
Part 3: Best Emoji Remover Apps on iPhone and Android
1. Snapseed
Snapseed is a photo editing app that is available for both iPhone and Android users. It has a masking feature, which lets you mask any object in a photo, including an emoji. Snapseed is a good tool to get rid of unwanted items from any image.
It has around 29 photo editing tools, which will help a user to enhance the photo quality. Using it is very easy because all the tools are readily available on the main screen. You just need to select the right tool and get started with the work.
Key Features
- It helps in removing emojis and unwanted objects from a photo.
- It works on both RAW and JPG files.
- It has multiple photo editing tools.
- Using Snapseed is easy.
2. AirBrush
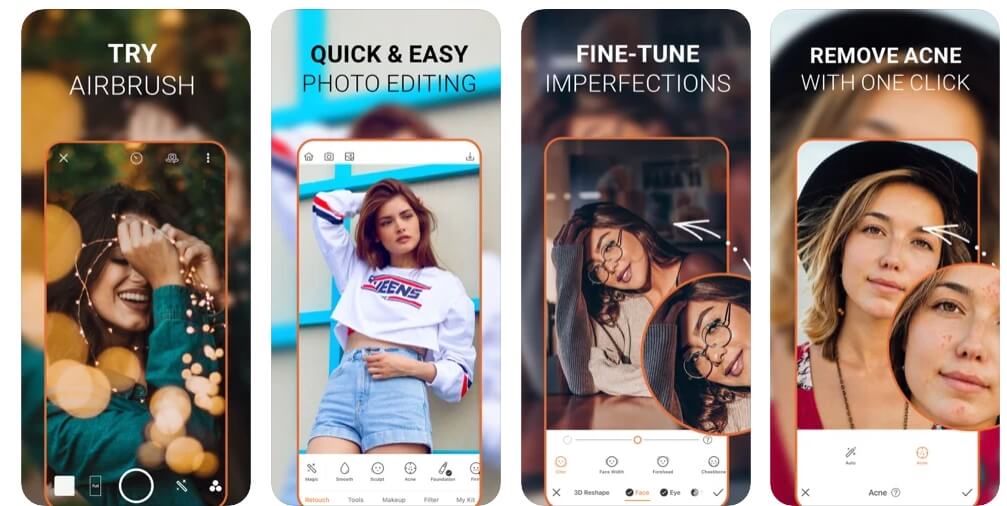
AirBrush is a leading photo editing tool for iPhone users and has a high rating of 4.9. The tool makes editing an image effortlessly. If you don’t want the emojis to ruin your photo, use AirBrush to deal with it quickly. Moreover, it lets you edit your photos further, for example, remove blemishes, make the image look smooth and glowing, add filters to give it a magical touch, and so much more! The tool has quite a lot of features that you will like.
Key Features
- It removes emojis and unwanted objects from an image.
- Using AirBrush is easy.
- It removes emojis quickly.
- It has many photo editing tools.
3. TouchRetouch
If you are looking for a professional photo editing tool that will let you do much more than just remove emojis, you should try TouchRetouch. You can use it to remove unwanted items, such as emojis, lines, blemishes, imperfections, and more.
It has a rating of 4.8, which is great looking at the kind of photo editing features TouchRetouch offers. No matter what objects you want to get rid of in your photo, TouchRetouch can let you do that easily.
Key Features
- It removes all kinds of unwanted objects quickly.
- It provides you with a single-flick line removal function.
- TouchRetouch is easy to use.
- It offers easy to understand tutorials.
FAQ About Removing Emojis from Pictures
How Do I Remove an Emoji from a Hidden Face?
It depends on the kind of tool you have picked. Typically, the tool will let you select the emoji and mask it with its surroundings to blend in well. So, let’s say you are on a dating site and you can’t see how the person looks like because they have hidden their face with an emoji.
In such a case, even if you use an emoji remover tool, it won’t show the actual face, instead replace it with the surrounding. Emoji removal tools are for personal use only.
Conclusion
So, now you know about the easy ways to remove emojis from pictures. Try any of the tools and remove unwanted objects and emojis from any photo you want. The tools that we have listed here are trusted by many and are easy to use.
02 Best Emoji Removers on Windows/Mac Computer
03 Best Emoji Remover Apps on iPhone and Android
Part 1: Best Emoji Removers Online to Remove Emojis from Pictures
1. Inpaint
So, the first online emoji remover that you can try is Inpaint. This is a simple to use tool and will remove unwanted objects, such as emojis, from a picture by intelligently filling it with textures that match the surrounding image data.
The image formats Inpaint accepts are JPG, WebP, and PNG. Just remember to use only the recommended image formats, and you can start using them right away. You don’t need to log in or sign up to start using it.
Features
- An online tool that removes unwanted objects quickly.
- You don’t need to sign up or log in.
- It accepts JPG, PNG, and WebP formats.
- 4.2MP is the maximum image resolution.
Website: https://theinpaint.com/
2. Pixlr
The next popular online tool is Pixlr. Pixlr is a popular photo editing tool that allows you to fix your pictures as well. You can use the tool online either using your computer web browser or mobile.
Whatever works for you. It doesn’t only let you remove emojis but erase background as well. But since you want to remove emojis, you will have to add the image and click on the retouch button from the toolbar. Then, you need to click on the image multiple times so that its surroundings overlap the emojis.
Features
- Pixlr can be used on both mobile and web browsers.
- Multiple photo editing tools are available.
- Removes emojis by blending them with the surroundings.
- Using Pixlr is easy and convenient.
Website: https://pixlr.com/
3. Fotor
Fotor is a professional photo editing tool, which lets you clone an emoji with a part of the image. The online tool asks you to sign up using your Google account to save your work. So, if you want to know how to remove emoji from a photo, you can use the clone feature.
Once you upload an image with emojis, move your cursor to the tool section in the left menu bar. Scroll down, and you will see the Clone option. Touch one part of the image that you want to use instead of the emoji. The first dot will be the area you want to clone and place the second dot on the emoji. And all done.
Website: https://www.fotor.com/
Features
- You can clone the emoji to remove it.
- A professional tool with lots of editing features.
- One needs to sign up or log in before using Fotor.
- The tool retains the original picture quality.
Related: Best Online Photo Editors
Part 2: Best Emoji Removers on Windows/Mac Computer
1. Adobe Photoshop
Adobe Photoshop is arguably one of the best photo editing tools that only allows you to enhance a photo but fix issues, such as removing emojis, unwanted objects, and so on. Adobe Photoshop is a professional tool and might not be the best for those new to it, but if you have used Adobe Photoshop earlier, you can use the Lasso Tool or the Marqueel Tool, which you will find on the left toolbar to remove emojis and unwanted items. Once done, save the image, and yes, the original picture quality will be retained.
Key Features
- A professional photo editing tool.
- It has multiple photo editing features and lets you remove emojis.
- You can draw on the emoji with a pen or pencil.
- It autosaves your work.
2. Wondershare Fotophire
Wondershare Fotophire is a fantastic photo editing tool that works magically on all kinds of images. Whether your photo is loaded with multiple emojis, you can remove them easily using Fotophire. If you are thinking about how to remove emojis from pictures using Fotophire, it’s pretty easy.
You need to clone any part of the image, and the tool will automatically use its algorithm to fill the emoji with its surroundings so that the filled area looks natural and blends well with the rest of the photo. Fotophire is a good option for both beginners and pros.
Key Features
- It removes all kinds of unwanted objects from an image, including emojis.
- Using Fotophire is easy and convenient.
- A good tool for both pros and beginners.
- Background doesn’t get impacted, and the original image quality remains intact.
3. GIMP
GIMP is a free and open-source photo editor, which allows you to remove emojis from a photo. It is available for Windows, macOS, GNU/Linux, and other operating systems. GIMP has been designed for everyone who would want their picture to look better.
If you wish to manipulate a high-quality image, you don’t have to worry about that because it accepts bigger-size photos as well. GIMP lets you clone an area and use that part on the emoji. You can also adjust the opacity of the cloned item depending on your requirements.
Key Features
- It lets you clone the surrounding area to hide an emoji.
- Accepts all the top image formats.
- It doesn’t pixelate the image after editing it.
- A free tool to use with lots of photo editing features.
4. Jihosoft Photo Eraser
Jihosoft Photo Eraser is a good photo editor tool that removes emojis or unwanted objects from an image by analyzing the surroundings. Once done, it will fill the selected emojis with the intelligently-generated textures. If you no longer want the emojis to be there is an image, Jihosoft Photo Eraser will be an ideal tool to use. The tool’s primary purpose is to remove unwanted items from an image, which is why it is an excellent software to go for.
Key Features
- It removes unwanted objects, such as emojis, from a photo.
- It allows the cloning of things to replace emojis.
- Using Jihosoft Photo Eraser is easy.
- The photo quality remains intact.
Part 3: Best Emoji Remover Apps on iPhone and Android
1. Snapseed
Snapseed is a photo editing app that is available for both iPhone and Android users. It has a masking feature, which lets you mask any object in a photo, including an emoji. Snapseed is a good tool to get rid of unwanted items from any image.
It has around 29 photo editing tools, which will help a user to enhance the photo quality. Using it is very easy because all the tools are readily available on the main screen. You just need to select the right tool and get started with the work.
Key Features
- It helps in removing emojis and unwanted objects from a photo.
- It works on both RAW and JPG files.
- It has multiple photo editing tools.
- Using Snapseed is easy.
2. AirBrush
AirBrush is a leading photo editing tool for iPhone users and has a high rating of 4.9. The tool makes editing an image effortlessly. If you don’t want the emojis to ruin your photo, use AirBrush to deal with it quickly. Moreover, it lets you edit your photos further, for example, remove blemishes, make the image look smooth and glowing, add filters to give it a magical touch, and so much more! The tool has quite a lot of features that you will like.
Key Features
- It removes emojis and unwanted objects from an image.
- Using AirBrush is easy.
- It removes emojis quickly.
- It has many photo editing tools.
3. TouchRetouch
If you are looking for a professional photo editing tool that will let you do much more than just remove emojis, you should try TouchRetouch. You can use it to remove unwanted items, such as emojis, lines, blemishes, imperfections, and more.
It has a rating of 4.8, which is great looking at the kind of photo editing features TouchRetouch offers. No matter what objects you want to get rid of in your photo, TouchRetouch can let you do that easily.
Key Features
- It removes all kinds of unwanted objects quickly.
- It provides you with a single-flick line removal function.
- TouchRetouch is easy to use.
- It offers easy to understand tutorials.
FAQ About Removing Emojis from Pictures
How Do I Remove an Emoji from a Hidden Face?
It depends on the kind of tool you have picked. Typically, the tool will let you select the emoji and mask it with its surroundings to blend in well. So, let’s say you are on a dating site and you can’t see how the person looks like because they have hidden their face with an emoji.
In such a case, even if you use an emoji remover tool, it won’t show the actual face, instead replace it with the surrounding. Emoji removal tools are for personal use only.
Conclusion
So, now you know about the easy ways to remove emojis from pictures. Try any of the tools and remove unwanted objects and emojis from any photo you want. The tools that we have listed here are trusted by many and are easy to use.
10 Trending Memes Right Now (Include Image/ GIF/Video)
10 Trending Memes In 2024 Right Now (Include Image/ GIF/Video)
Ollie Mattison
Mar 27, 2024• Proven solutions
With several popular memes doing rounds on the Internet this year, 2019 can be said the “best memes year”. The memes are the latest things that speak louder than any other words. You get just 140 characters on Twitter which might not be enough for what you wish to post but, a powerful meme with a strong caption can do what any simple words cannot do. This is what each of the people is doing today.
When the meme is just released and hot like fire, each one of you wishes to use it. Below are by far the 10 best memes that you would definitely like to check out. Let’s laugh and have fun, forgetting all the stress of life.
Part 1: 10 Best Memes In 2024
1. Steven Crowder’s “Change My Mind” Campus Sign
The conservative podcaster Steven Crowder tweeted an image on 16th February 2018 which went on to become one of the funniest memes of 2018. It had Crowder’s photograph behind a table poster that read “Male Privilege is a myth / Change My Mind”. The image had a backdrop of the Texas Christian University and he tweeted it with a caption, “Hello @TCU. Come one come all. #ChangeMyMind.”
The image was tweeted as part of Crowder’s YouTube and podcast promotions where various viewpoints of Crowder are opposed by the people and they convince him of these issues. This post garnered around 6400 likes and 900 retweets in just 4 days.

2. Gru’s Plan
When Despicable Me was released on July 9, 2010, Gru, the protagonist in the film shows a presentation of stealing a moon and notice a drawing of himself where he is sitting on the toilet in between the pages of the presentation.
The memes of this comic show a startling presentation with a 3rd page, where the panel of Gru looks back at the board in complete bewilderment. FieldMarshalSixDans, a Redditor used screencaps from the film and posted a four-panel version meme which was re-posted. It reaped about 250 comments and above 18000 votes in 1 day.

3. American Chopper Argument
In the year 2009, the YouTube channel Shemrock Nursery Rhymes created a meme of the nursery rhymes Johny Johny Yes Papa. This rhyme is a popular one featured under animated amateur music video. It shows a small boy who tries to steal sugar and confronted by his father for not taking permission.
In July 2009, Shemrock YouTube channel created best memes for this video by using the clips of Johny Johny and used the audio of another nursery rhymes Twinkle Twinkle which collected over 2.9 million views in the first 6 years of its posting.
4. Who Killed Hannibal?
It is a skit from the Eric Andre Show, also known as Eric Andre Shooting Hannibal Buress where Eric Andre, the host of the show can be seen shooting a gun multiple times and asking on camera Who Killed Hannibal?
It was actually a joke during the Season 2, episode 6 of The Eric Andre Show. It turned out to be the best memes of this year when the famous dialogue “Who Killed Hannibal” was replaced by “Why would X do this?” in a variety of expressive template.

5. Walmart Yodel Boy
The Walmart Yodel Boy is a video that was filmed in a Walmart on 24th March 2018. It was the video of the 12-year-old child artist, Mason Ramsay singing “Lovesick Blues”. He is better known for Hank Williams impressions. This video from the concert was uploaded from a YouTube account named ViralHog. This song started being remixed with several other captions and went viral in no time and is considered one of the best memes of this year.

6. Is this a pigeon?
A shot from the anime series “The Brave Fighter of Sun Fighbird” had a scene in episode 3 of season 1 where professor Hiroshi Amano creates a human android, Yutaro Katori. While explaining mother Nature, Yutaro Katori thinks a butterfly to be a pigeon. One of the best memes is created when the reaction of this scene with the quote is used widely to show a confused expression on Tumblr.

7. LeBron James’s NBA Finals Reaction
This is a video during the NBA finals when J.R.Smith, a player from Cleveland Cavaliers kept dribbling in the last 5 important seconds of the game against the Golden State Warriors and the time ran out. This is when Smith’s teammate Lebron James showed his utter disappointment and pointed out his mistake by stretching out his arms.
The reaction from James became the best memes of this year. As soon as the game was over, Lebron James’ reaction with caption started doing rounds on the Twitter that emoted disappointment and frustration. It garnered 29000 likes and 8800 retweets.
8. Tired Spongebob
Tired Spongebob is the lead character of the Spongebob Squarepants which used to air in the year 1999 and was from Episode 1. It is a still image of Spongebob where it appears to be out of breath and naked. Twitter has made this image popular by using it for showing exhaustion.

9. Tide Pods
Tide Pods is one of the best memes that shows how tide pods are compared to bleach drinking in the memes. When Procter Gamble launched its new product tide pods laundary detergent in 2012 it appeared like some flavored fruit snack due to its packaging.
Unfortunately, the attractive packaging of these laundry detergent capsules led to children consuming it and increasing calls to the poison control center. So, the Tide Pod eating memes are used to mock and compare it with the poisonous food and drinks in the online circuit.
10. Green M&M Bambi Copypasta
While a Tumblr post comment and response the Green M&M Bambi Copypasta was used and went on to be amongst the top 10 best memes of the year so far. Here the person role-plays the character of the Green M&M and demands a game named Bambi from the Gamestop on Play Station 2.
The aggressive character and dominating tone of the post have stirred several variations. The Green M&M role plays in the similar demanding tone of the character started doing the rounds on the online platform since then.
Or you may want to make a trending meme, like red glowing eye, please read this article: How to create a red glowing eyes effect in videos?
Part 2: Recommended Tool to Make Memes
The newest addition in the Filmora family is the Filmora Online Meme Maker that lets you create funny and best memes completely free. It is being widely used by all the meme lovers and is packed with some of the best features. GIF, image and video memes are all supported to make.
From adding texts with the use of both internal and external sources to adjusting size and color, the Filmora Online Meme Maker comes with an intuitive interface, several video effects, and a range of editing tools. It is easy to use and an amazing tool for creating the best meme. It also lets you import video from YouTube and Vimeo and there are no watermarks even when used free. Try it now!
Ollie Mattison
Ollie Mattison is a writer and a lover of all things video.
Follow @Ollie Mattison
Ollie Mattison
Mar 27, 2024• Proven solutions
With several popular memes doing rounds on the Internet this year, 2019 can be said the “best memes year”. The memes are the latest things that speak louder than any other words. You get just 140 characters on Twitter which might not be enough for what you wish to post but, a powerful meme with a strong caption can do what any simple words cannot do. This is what each of the people is doing today.
When the meme is just released and hot like fire, each one of you wishes to use it. Below are by far the 10 best memes that you would definitely like to check out. Let’s laugh and have fun, forgetting all the stress of life.
Part 1: 10 Best Memes In 2024
1. Steven Crowder’s “Change My Mind” Campus Sign
The conservative podcaster Steven Crowder tweeted an image on 16th February 2018 which went on to become one of the funniest memes of 2018. It had Crowder’s photograph behind a table poster that read “Male Privilege is a myth / Change My Mind”. The image had a backdrop of the Texas Christian University and he tweeted it with a caption, “Hello @TCU. Come one come all. #ChangeMyMind.”
The image was tweeted as part of Crowder’s YouTube and podcast promotions where various viewpoints of Crowder are opposed by the people and they convince him of these issues. This post garnered around 6400 likes and 900 retweets in just 4 days.
2. Gru’s Plan
When Despicable Me was released on July 9, 2010, Gru, the protagonist in the film shows a presentation of stealing a moon and notice a drawing of himself where he is sitting on the toilet in between the pages of the presentation.
The memes of this comic show a startling presentation with a 3rd page, where the panel of Gru looks back at the board in complete bewilderment. FieldMarshalSixDans, a Redditor used screencaps from the film and posted a four-panel version meme which was re-posted. It reaped about 250 comments and above 18000 votes in 1 day.
3. American Chopper Argument
In the year 2009, the YouTube channel Shemrock Nursery Rhymes created a meme of the nursery rhymes Johny Johny Yes Papa. This rhyme is a popular one featured under animated amateur music video. It shows a small boy who tries to steal sugar and confronted by his father for not taking permission.
In July 2009, Shemrock YouTube channel created best memes for this video by using the clips of Johny Johny and used the audio of another nursery rhymes Twinkle Twinkle which collected over 2.9 million views in the first 6 years of its posting.
4. Who Killed Hannibal?
It is a skit from the Eric Andre Show, also known as Eric Andre Shooting Hannibal Buress where Eric Andre, the host of the show can be seen shooting a gun multiple times and asking on camera Who Killed Hannibal?
It was actually a joke during the Season 2, episode 6 of The Eric Andre Show. It turned out to be the best memes of this year when the famous dialogue “Who Killed Hannibal” was replaced by “Why would X do this?” in a variety of expressive template.
5. Walmart Yodel Boy
The Walmart Yodel Boy is a video that was filmed in a Walmart on 24th March 2018. It was the video of the 12-year-old child artist, Mason Ramsay singing “Lovesick Blues”. He is better known for Hank Williams impressions. This video from the concert was uploaded from a YouTube account named ViralHog. This song started being remixed with several other captions and went viral in no time and is considered one of the best memes of this year.
6. Is this a pigeon?
A shot from the anime series “The Brave Fighter of Sun Fighbird” had a scene in episode 3 of season 1 where professor Hiroshi Amano creates a human android, Yutaro Katori. While explaining mother Nature, Yutaro Katori thinks a butterfly to be a pigeon. One of the best memes is created when the reaction of this scene with the quote is used widely to show a confused expression on Tumblr.
7. LeBron James’s NBA Finals Reaction
This is a video during the NBA finals when J.R.Smith, a player from Cleveland Cavaliers kept dribbling in the last 5 important seconds of the game against the Golden State Warriors and the time ran out. This is when Smith’s teammate Lebron James showed his utter disappointment and pointed out his mistake by stretching out his arms.
The reaction from James became the best memes of this year. As soon as the game was over, Lebron James’ reaction with caption started doing rounds on the Twitter that emoted disappointment and frustration. It garnered 29000 likes and 8800 retweets.
8. Tired Spongebob
Tired Spongebob is the lead character of the Spongebob Squarepants which used to air in the year 1999 and was from Episode 1. It is a still image of Spongebob where it appears to be out of breath and naked. Twitter has made this image popular by using it for showing exhaustion.
9. Tide Pods
Tide Pods is one of the best memes that shows how tide pods are compared to bleach drinking in the memes. When Procter Gamble launched its new product tide pods laundary detergent in 2012 it appeared like some flavored fruit snack due to its packaging.
Unfortunately, the attractive packaging of these laundry detergent capsules led to children consuming it and increasing calls to the poison control center. So, the Tide Pod eating memes are used to mock and compare it with the poisonous food and drinks in the online circuit.
10. Green M&M Bambi Copypasta
While a Tumblr post comment and response the Green M&M Bambi Copypasta was used and went on to be amongst the top 10 best memes of the year so far. Here the person role-plays the character of the Green M&M and demands a game named Bambi from the Gamestop on Play Station 2.
The aggressive character and dominating tone of the post have stirred several variations. The Green M&M role plays in the similar demanding tone of the character started doing the rounds on the online platform since then.
Or you may want to make a trending meme, like red glowing eye, please read this article: How to create a red glowing eyes effect in videos?
Part 2: Recommended Tool to Make Memes
The newest addition in the Filmora family is the Filmora Online Meme Maker that lets you create funny and best memes completely free. It is being widely used by all the meme lovers and is packed with some of the best features. GIF, image and video memes are all supported to make.
From adding texts with the use of both internal and external sources to adjusting size and color, the Filmora Online Meme Maker comes with an intuitive interface, several video effects, and a range of editing tools. It is easy to use and an amazing tool for creating the best meme. It also lets you import video from YouTube and Vimeo and there are no watermarks even when used free. Try it now!
Ollie Mattison
Ollie Mattison is a writer and a lover of all things video.
Follow @Ollie Mattison
Top 5 Best Websites to Add Emojis to Photo Online
Are you in love with those funny emojis you see in messenger apps and want to add them to your images too? Guess what? You can add emojis to photos online conveniently through a few websites. Emojis enhance how a picture looks instantly.
People can use an emoji on a friend’s image to make them look funny or hide their face with a smiley emoji. Why upload boring and the same kind of photos all the time when emojis can add the much-needed magical touch? So, if you want to add emoji to photos online, look no further and learn about the best websites that allow you do that easily.
In this article
01 Top 5 Websites to Add Emojis to Photo Online
02 How to Add Emojis to Photo on Wondershare Filmora
Part 1: Top 5 Websites to Add Emojis to Photo Online
#1: Kapwing

One of the best websites is Kapwing, which lets you add emojis to any photo you want. Kapwing is an easy-to-use online tool, which means you will not have to download any tool. But to start using it, you will have to sign up. You can do that by using your Google ID. When it comes to the number of emojis it has, it boasts more than 250 different emojis. It lets you add custom emojis; let’s say you have a pack of custom emojis with you that you want to use; you can do that effortlessly.
Key Features
- It’s an online tool and free to use.
- You need to sign up to save your work.
- It has more than 250 emojis to choose from.
- Kapwing is easy to use.
Steps to Follow to Use Kapwing
Step 1: Visit the official website of Kapwing. You will see the Start Editing option; please click on that.
Step 2: You will see the workspace with an option that says “click to upload.” Click on it.
Step 3: Now, upload a photo that you want to add the emoji too. The image will be uploaded.
Step 4: To add an emoji, look towards the left menu, and you will see the Add Media option. Click on that.
Step 5: You will see the upload, projects, and emojis options. Click on the emojis option.
Step 6: Emojis will appear. Click on one, and it will be uploaded to the main photo. You can drag, shrink, zoom, or rotate the emoji used. You can add as many emojis you want.
Related: How to make a slo-mo video on Kapwing
#2: Image Online.Co

The next good online tool that you can try is Image Online.Co. It’s a pretty basic tool that lets you upload a photo and add an emoji the right way. It has more than 100 emojis, which is not a lot. But features all the popular emojis that will suit all kinds of images. And it allows you to add your custom emojis, which is why people prefer to use Image Online.Co. Using it is very easy, and the interface of the online tool is easy to understand.
Key Features
- It is a 100% free online tool that won’t ask you to sign up or log in.
- The tool has 100+ emojis to choose from.
- The interface is easy to understand.
- The tool is easy to use.
Steps to Follow to Use Image Online.Co
Step 1: Visit https://emoji.imageonline.co/ , which is their official website.
Step 2: Click on the Select Photo option, else directly drop an image from your local folder.
Step 3: If you want, you can add a custom emoji that you already have.
Step 4: Add an emoji from the right menu and rotate or zoom in or zoom out.
#3: Canva

Canva is arguably one of the best ways to make your photos look better. This tool has tons of features, and the best part is that you can customize a picture with an emoji using one of their templates. It has 250+ emojis and lets you add your customized emoji. And to start using Canva, you will have to sign up.
Key Features
- Canva has more than 250 emojis.
- It lets you edit your photos to enhance their quality.
- One-month free trial.
- You can choose from different templates.
Steps to Follow to Use Canva
Step 1: First, visit https://www.canva.com/ and sign up using your Facebook account or Gmail.
Step 2: Choose the kind of work you would like to do, and you will be taken to the photo editing page.
Step 3: Upload an image and click on the more option.
Step 4: Click on the emoji option and choose an emoji to add to the image. To save, click on the download option.
Related: How to Animate Pictures in Canva
#4: PiZap

PiZap is a photo editing tool that lets you add emojis too. To start using, you will have to log in or sign up. You can use your Facebook, Twitter, or Google account to sign up. It provides you with various graphics, fonts, and other photo editing features to make the image look better than before. The basic tool comes for free and has 232 emojis currently.
Key Features
- The basic tool comes for free.
- There are numerous emojis to choose from.
- The image quality doesn’t lose its original quality.
- Using the tool is easy, and the interface is intuitive.
Steps to Follow to Use PiZap
Step 1: Visit www.pizap.com and click on the try for free option.
Step 2: Click on the edit photo option, and upload an image.
Step 3: From the left-side toolbar, click on the Graphics option. Scroll a bit, and you will see the emoji section.
Step 4: Click on any of the emojis you like to add to the photo. You can adjust the emojis as you want.
#5: Pixelied
![]()
The last website that we have is Pixelied. The free tool will let you edit your image and add emojis, which will be enough if you don’t want many features. Using the tool is easy, and the emojis Pixelied has are great. They are different than general emojis and look better! Plus, the tool provides 300+ fantastic emojis.
Key Features
- The tool has an excellent collection of emojis.
- Adding emojis is extremely easy.
- It is free to use and doesn’t require any photo editing experience.
- The tool also offers various photo editing features.
How to Use Pixelied?
Step 1: Visit pixelied.com and click on the Upload Your Image option.
Step 2: On the left, you will find tons of icons. Use the search bar and type emojis.
Step 3: Browse through the emojis and click on one that you like. You can use multiple emojis, too, if you want. To save, click on the download option.
Part 2: How to Add Emojis to Photo on Wondershare Filmora
Filmora video editor provides tons of emojis that you can add for free, so you can add them to photos directly. What’s more, you can also upload your own emoji and use it in Filmora. All you need to do is download the tool on your Windows or Mac computer and start using it to add an emoji. There are two ways to go about it:
Use Emojis from Elements

Step 1: Launch Wondershare Filmora and click on create a new project.
Step 2: Click on the Elements option on the top and use the search bar to search for emojis.
Step 3: Click on any of the emojis that you like and adjust them.
Step 4: To save the photo with emojis, just click the camera icon to take a screenshot .
The video below shows the animated emojis that you can try in Filmora, take a look and have fun.
For Win 7 or later (64-bit)
For macOS 10.12 or later
Upload Your Own Emoji
Step 1: Launch Wondershare Filmora and add both the emoji and photo.
Step 2: Drag both of them into the timeline.
Step 3: Use the viewer panel to adjust the size of the emoji.

For Win 7 or later (64-bit)
For macOS 10.12 or later
Besides adding emojis to photos or videos, you can also add stickers to videos in Filmora to have fun.
Conclusion
And that’s how you can add an emoji to a photo online easily. You can try all five websites to add emojis to your photos, and if you want, you can download Wondershare Filmora to further edit the image. So, try these tools and make your photo look fun and fantastic!
02 How to Add Emojis to Photo on Wondershare Filmora
Part 1: Top 5 Websites to Add Emojis to Photo Online
#1: Kapwing
One of the best websites is Kapwing, which lets you add emojis to any photo you want. Kapwing is an easy-to-use online tool, which means you will not have to download any tool. But to start using it, you will have to sign up. You can do that by using your Google ID. When it comes to the number of emojis it has, it boasts more than 250 different emojis. It lets you add custom emojis; let’s say you have a pack of custom emojis with you that you want to use; you can do that effortlessly.
Key Features
- It’s an online tool and free to use.
- You need to sign up to save your work.
- It has more than 250 emojis to choose from.
- Kapwing is easy to use.
Steps to Follow to Use Kapwing
Step 1: Visit the official website of Kapwing. You will see the Start Editing option; please click on that.
Step 2: You will see the workspace with an option that says “click to upload.” Click on it.
Step 3: Now, upload a photo that you want to add the emoji too. The image will be uploaded.
Step 4: To add an emoji, look towards the left menu, and you will see the Add Media option. Click on that.
Step 5: You will see the upload, projects, and emojis options. Click on the emojis option.
Step 6: Emojis will appear. Click on one, and it will be uploaded to the main photo. You can drag, shrink, zoom, or rotate the emoji used. You can add as many emojis you want.
Related: How to make a slo-mo video on Kapwing
#2: Image Online.Co
The next good online tool that you can try is Image Online.Co. It’s a pretty basic tool that lets you upload a photo and add an emoji the right way. It has more than 100 emojis, which is not a lot. But features all the popular emojis that will suit all kinds of images. And it allows you to add your custom emojis, which is why people prefer to use Image Online.Co. Using it is very easy, and the interface of the online tool is easy to understand.
Key Features
- It is a 100% free online tool that won’t ask you to sign up or log in.
- The tool has 100+ emojis to choose from.
- The interface is easy to understand.
- The tool is easy to use.
Steps to Follow to Use Image Online.Co
Step 1: Visit https://emoji.imageonline.co/ , which is their official website.
Step 2: Click on the Select Photo option, else directly drop an image from your local folder.
Step 3: If you want, you can add a custom emoji that you already have.
Step 4: Add an emoji from the right menu and rotate or zoom in or zoom out.
#3: Canva
Canva is arguably one of the best ways to make your photos look better. This tool has tons of features, and the best part is that you can customize a picture with an emoji using one of their templates. It has 250+ emojis and lets you add your customized emoji. And to start using Canva, you will have to sign up.
Key Features
- Canva has more than 250 emojis.
- It lets you edit your photos to enhance their quality.
- One-month free trial.
- You can choose from different templates.
Steps to Follow to Use Canva
Step 1: First, visit https://www.canva.com/ and sign up using your Facebook account or Gmail.
Step 2: Choose the kind of work you would like to do, and you will be taken to the photo editing page.
Step 3: Upload an image and click on the more option.
Step 4: Click on the emoji option and choose an emoji to add to the image. To save, click on the download option.
Related: How to Animate Pictures in Canva
#4: PiZap
PiZap is a photo editing tool that lets you add emojis too. To start using, you will have to log in or sign up. You can use your Facebook, Twitter, or Google account to sign up. It provides you with various graphics, fonts, and other photo editing features to make the image look better than before. The basic tool comes for free and has 232 emojis currently.
Key Features
- The basic tool comes for free.
- There are numerous emojis to choose from.
- The image quality doesn’t lose its original quality.
- Using the tool is easy, and the interface is intuitive.
Steps to Follow to Use PiZap
Step 1: Visit www.pizap.com and click on the try for free option.
Step 2: Click on the edit photo option, and upload an image.
Step 3: From the left-side toolbar, click on the Graphics option. Scroll a bit, and you will see the emoji section.
Step 4: Click on any of the emojis you like to add to the photo. You can adjust the emojis as you want.
#5: Pixelied
![]()
The last website that we have is Pixelied. The free tool will let you edit your image and add emojis, which will be enough if you don’t want many features. Using the tool is easy, and the emojis Pixelied has are great. They are different than general emojis and look better! Plus, the tool provides 300+ fantastic emojis.
Key Features
- The tool has an excellent collection of emojis.
- Adding emojis is extremely easy.
- It is free to use and doesn’t require any photo editing experience.
- The tool also offers various photo editing features.
How to Use Pixelied?
Step 1: Visit pixelied.com and click on the Upload Your Image option.
Step 2: On the left, you will find tons of icons. Use the search bar and type emojis.
Step 3: Browse through the emojis and click on one that you like. You can use multiple emojis, too, if you want. To save, click on the download option.
Part 2: How to Add Emojis to Photo on Wondershare Filmora
Filmora video editor provides tons of emojis that you can add for free, so you can add them to photos directly. What’s more, you can also upload your own emoji and use it in Filmora. All you need to do is download the tool on your Windows or Mac computer and start using it to add an emoji. There are two ways to go about it:
Use Emojis from Elements
Step 1: Launch Wondershare Filmora and click on create a new project.
Step 2: Click on the Elements option on the top and use the search bar to search for emojis.
Step 3: Click on any of the emojis that you like and adjust them.
Step 4: To save the photo with emojis, just click the camera icon to take a screenshot .
The video below shows the animated emojis that you can try in Filmora, take a look and have fun.
For Win 7 or later (64-bit)
For macOS 10.12 or later
Upload Your Own Emoji
Step 1: Launch Wondershare Filmora and add both the emoji and photo.
Step 2: Drag both of them into the timeline.
Step 3: Use the viewer panel to adjust the size of the emoji.
For Win 7 or later (64-bit)
For macOS 10.12 or later
Besides adding emojis to photos or videos, you can also add stickers to videos in Filmora to have fun.
Conclusion
And that’s how you can add an emoji to a photo online easily. You can try all five websites to add emojis to your photos, and if you want, you can download Wondershare Filmora to further edit the image. So, try these tools and make your photo look fun and fantastic!
Best Photo Slideshow Maker: How to Make a Photo Slideshow
Best Photo Slideshow Maker: How to Make a Photo Slideshow
Shanoon Cox
Mar 27, 2024• Proven solutions
Have you ever taken so many photos for your family, friends and special events? One fun-filled way of sharing them is to make a photo slideshow. That helps back up the memories in your life. What’s more, it can all be done in just a few simple clicks if you use slideshow maker like DVD Slideshow Builder Deluxe . With this programs, you can easily weave photos and video into work of art to amaze anyone. Here let’s see how to easily and creatively make a photo slideshow and burn to DVD with these all-in-one slideshow tools.
Download and run DVD slideshow builder , then follow the steps below to see how to make a photo slideshow.
Ways for Photo Slidehow making
Step 1. Add photo or video files to the photo slideshow maker
After running the photo slideshow maker, you’ll start from the “Organize” tab. On the interface, there are two Add Files buttons any of which you can click to add your photos and videos. Then just drag and drop photos or videos to arrange their order on storyboard. If you want to edit the photos, click “Edit” to add effects, crop photos, repair red-eye or add caption.
Tip: To have a large viewe of all the files, click the “Expand” button on top right corner of storyboard.

Step 2. Customize the slideshow like background music and transitions
When importing your files, more than 100 transition effects will be randomly and automatically applied between every two photo or video. However, you can change them anytime in the “Personalize” tab. Just drag and drop a transition from the list to the thumbnail between two slides. You can also add effects, motion or intro/credit as you like.
Adding music can greatly enhance the vibe of your photo slideshow. To achieve this, click “Music” on the storyboard. This photo slideshow maker enables you to add several different pieces of music according to your needs. If you want to add your own voice, just click “Voice Over” to record and then add it to the slideshow.

Step 3 Create photo slideshow and burn to DVD

Go to the “Create” tab and click the “Preview” button to make sure the photo slideshow is good enough. Go back to Personalize tab to change if necessary. When you are happy with the result, choose the options on the left to export photo slideshow to DVD, PC, portable devices, etc. You can also directly upload slideshow to Youtube and send message to Facebook and Twitter friends.

Now sit back and relax, it’ll only take a while to get your photo slideshow for sharing anywhere.
Shanoon Cox
Shanoon Cox is a writer and a lover of all things video.
Follow @Shanoon Cox
Shanoon Cox
Mar 27, 2024• Proven solutions
Have you ever taken so many photos for your family, friends and special events? One fun-filled way of sharing them is to make a photo slideshow. That helps back up the memories in your life. What’s more, it can all be done in just a few simple clicks if you use slideshow maker like DVD Slideshow Builder Deluxe . With this programs, you can easily weave photos and video into work of art to amaze anyone. Here let’s see how to easily and creatively make a photo slideshow and burn to DVD with these all-in-one slideshow tools.
Download and run DVD slideshow builder , then follow the steps below to see how to make a photo slideshow.
Ways for Photo Slidehow making
Step 1. Add photo or video files to the photo slideshow maker
After running the photo slideshow maker, you’ll start from the “Organize” tab. On the interface, there are two Add Files buttons any of which you can click to add your photos and videos. Then just drag and drop photos or videos to arrange their order on storyboard. If you want to edit the photos, click “Edit” to add effects, crop photos, repair red-eye or add caption.
Tip: To have a large viewe of all the files, click the “Expand” button on top right corner of storyboard.
Step 2. Customize the slideshow like background music and transitions
When importing your files, more than 100 transition effects will be randomly and automatically applied between every two photo or video. However, you can change them anytime in the “Personalize” tab. Just drag and drop a transition from the list to the thumbnail between two slides. You can also add effects, motion or intro/credit as you like.
Adding music can greatly enhance the vibe of your photo slideshow. To achieve this, click “Music” on the storyboard. This photo slideshow maker enables you to add several different pieces of music according to your needs. If you want to add your own voice, just click “Voice Over” to record and then add it to the slideshow.
Step 3 Create photo slideshow and burn to DVD
Go to the “Create” tab and click the “Preview” button to make sure the photo slideshow is good enough. Go back to Personalize tab to change if necessary. When you are happy with the result, choose the options on the left to export photo slideshow to DVD, PC, portable devices, etc. You can also directly upload slideshow to Youtube and send message to Facebook and Twitter friends.
Now sit back and relax, it’ll only take a while to get your photo slideshow for sharing anywhere.
Shanoon Cox
Shanoon Cox is a writer and a lover of all things video.
Follow @Shanoon Cox
Add Emojis to Videos on YouTube/Facebook/Snapchat [Step by Step Guide]
Add Emojis to Videos on YouTube/Facebook/Snapchat [Step by Step Guide]

Liza Brown
Mar 27, 2024• Proven solutions
Emojis are a great way to express one’s emotion more vividly through a depiction rather than a plain conventional text. By the passage of time, the trend of using emoji on social media domain has drastically increased around the world. Since emoji are ubiquitous and its influence on culture is increasingly huge, using emoji has now become a trend.
A plain conventional text or video may not emphasize the meaning behind the phrase, but adding emoji to it is like adding a soul to the intentions behind the message. It helps outshine the theme and make a video more appealing at the same time.
So, with all this being known, let’s take a tour to a complete guide to how to accessorize a video on multiple social media domains and make it far more attractive and meaningful.
Best Tool to Help You Add Emojis to Videos in Few Clicks
Gamers, YouTubers and all other Mac and PC users who’d like to add a smiley or any other emoji to a video should try processing their footage with the Filmora video editor.
Performing basic video editing tasks like cutting or trimming the footage, choosing a soundtrack for a video or adding an emoji to a single shot or an entire sequence can all be completed in just a couple of clicks.
Filmora is free to download. Import your videos after you launch the software, you then can add any animated emojis into wherever you want. Have a try now! Emojis inside are so Cute!
How to Add Emojis to YouTube Videos?
You can now add emojis to any of the YouTube videos using an online free tool called Kapwing.
Below are the basic steps about how to add emojis to YouTube videos anywhere using Kapwing.
Step 1: Open free tool Meme Maker and tap on “get started”.
Step 2: Copy the link of the targeted YouTube video and paste the URL of your YouTube video.
Step 3: One of the ways to insert emoji using Kapwing is to directly upload an emoji having a transparent background. In the toolbar, click on “upload” and paste its URL there. The image will be placed onto the targeted video as an overlay by importing it. Another way to add emoji is to click “add text” where you will have options to insert emojis.
Step 4: You can now play around with editing options in Kapwing to adjust accordingly.
How to Use Emojis on YouTube?
YouTube provides you an option to insert emoji on your YouTube account description, tag and titles with great ease with the use of YouTube certified plugin, Tube Buddy.
Step 1: Install this plugin on chrome browser.
Step 2: Open “info and settings” option in your YouTube targeted video.
Step 3: Tap on description box, tags or title where an emoji icon will be shown. Tap on the emoji icon to display a list of emojis. You can also search for an emoji in the search bar.
How to Add Emojis in Snapchat Videos?
Step 1: Install Snapchat if you don’t already have it. Then run Snapchat.
Step 2: Record a video by keeping your fingers on the record button.
Step 3: Choose and tap an emoji of your choice to add in your video. Hold your fingers on emoji to place to the desired frame/clip of your recorded video.
Step 4: The emoji can be resized by dragging or pinching it in. You can add more than one emoji.
Image from iMore
How to Add Emojis to Facebook?
If you are wondering about how to add emojis to Facebook videos then, unfortunately, Facebook only offers “go live” option on Facebook where an emoji cannot be inserted. But you can insert emoji to Facebook status, comment or in your messenger conversation easily by following the step below for status:
Step 1: Click “what’s on your mind” to add new status on Facebook.
Step 2: At the bottom right side of the status box is an emoji icon. Click on it. This will open a list of emojis that you can choose as many as you want
Step 3: Click on the emoji icon back again to close the list when you are done. Click on post to share the post on your wall.
How to Add Emojis to Videos on iMovie?
Step 1: Search for the desired emoji on the internet with transparent background. Go to iMovie and select a clip of your video where you want to insert an emoji.
Step 2: Go to the “Import” option into the toolbar above, select your desired emoji from the list. This emoji will be added to the iMovie library.
Step 3: Click on that emoji. This overlays that emoji onto that video clip. You can scale the emoji up and down and drag it anywhere on the video.
Image from YouSubtitles
How to Add Emojis to Videos Online?
Blurbiz, is an online application for editing YouTube, Instagram, Facebook and Snapchat videos. Just follow the steps below, then you can add emojis you want.
Step 1: Create and name the project in Blurbiz.
Step 2: Upload either your video, sticker or gif whichever you want an emoji to be placed in.
Step 3: Hover over the video and click on the “edit” button.
Step 4: Tap on “upload” at the top left side of the pane. Upload emoji with .png extension from your desktop.
Step 5: Drag and drop to overlay the emoji onto your video. Resize and position an emoji accordingly.
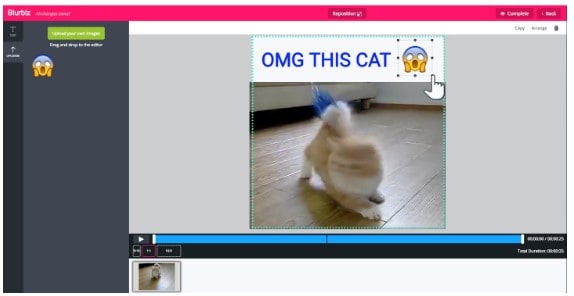
Step 6: Tap on “complete” at the top right corner when you are done. You can download an mp4 format video.
How to Add Emojis to Videos Android?
WeVideo , is an app to create and edit videos to the next level and provide one with ample special effects to add on to your videos.
Alongside using basic editing features like cutting, trimming or arranging video clips, you can amplify your editing game by adding emoji to your videos. Moreover, you can export your projects in high quality and share them on either Vimeo, YouTube or Dropbox.

Conclusion
Be it any video on any social media platform or your local device, with this thorough guide, you must be able to accessorize your video and take it to another level of emotional expression and message details in your video by using fun emojis.
Liza Brown
Liza Brown is a writer and a lover of all things video.
Follow @Liza Brown
Liza Brown
Mar 27, 2024• Proven solutions
Emojis are a great way to express one’s emotion more vividly through a depiction rather than a plain conventional text. By the passage of time, the trend of using emoji on social media domain has drastically increased around the world. Since emoji are ubiquitous and its influence on culture is increasingly huge, using emoji has now become a trend.
A plain conventional text or video may not emphasize the meaning behind the phrase, but adding emoji to it is like adding a soul to the intentions behind the message. It helps outshine the theme and make a video more appealing at the same time.
So, with all this being known, let’s take a tour to a complete guide to how to accessorize a video on multiple social media domains and make it far more attractive and meaningful.
Best Tool to Help You Add Emojis to Videos in Few Clicks
Gamers, YouTubers and all other Mac and PC users who’d like to add a smiley or any other emoji to a video should try processing their footage with the Filmora video editor.
Performing basic video editing tasks like cutting or trimming the footage, choosing a soundtrack for a video or adding an emoji to a single shot or an entire sequence can all be completed in just a couple of clicks.
Filmora is free to download. Import your videos after you launch the software, you then can add any animated emojis into wherever you want. Have a try now! Emojis inside are so Cute!
How to Add Emojis to YouTube Videos?
You can now add emojis to any of the YouTube videos using an online free tool called Kapwing.
Below are the basic steps about how to add emojis to YouTube videos anywhere using Kapwing.
Step 1: Open free tool Meme Maker and tap on “get started”.
Step 2: Copy the link of the targeted YouTube video and paste the URL of your YouTube video.
Step 3: One of the ways to insert emoji using Kapwing is to directly upload an emoji having a transparent background. In the toolbar, click on “upload” and paste its URL there. The image will be placed onto the targeted video as an overlay by importing it. Another way to add emoji is to click “add text” where you will have options to insert emojis.
Step 4: You can now play around with editing options in Kapwing to adjust accordingly.
How to Use Emojis on YouTube?
YouTube provides you an option to insert emoji on your YouTube account description, tag and titles with great ease with the use of YouTube certified plugin, Tube Buddy.
Step 1: Install this plugin on chrome browser.
Step 2: Open “info and settings” option in your YouTube targeted video.
Step 3: Tap on description box, tags or title where an emoji icon will be shown. Tap on the emoji icon to display a list of emojis. You can also search for an emoji in the search bar.
How to Add Emojis in Snapchat Videos?
Step 1: Install Snapchat if you don’t already have it. Then run Snapchat.
Step 2: Record a video by keeping your fingers on the record button.
Step 3: Choose and tap an emoji of your choice to add in your video. Hold your fingers on emoji to place to the desired frame/clip of your recorded video.
Step 4: The emoji can be resized by dragging or pinching it in. You can add more than one emoji.
Image from iMore
How to Add Emojis to Facebook?
If you are wondering about how to add emojis to Facebook videos then, unfortunately, Facebook only offers “go live” option on Facebook where an emoji cannot be inserted. But you can insert emoji to Facebook status, comment or in your messenger conversation easily by following the step below for status:
Step 1: Click “what’s on your mind” to add new status on Facebook.
Step 2: At the bottom right side of the status box is an emoji icon. Click on it. This will open a list of emojis that you can choose as many as you want
Step 3: Click on the emoji icon back again to close the list when you are done. Click on post to share the post on your wall.
How to Add Emojis to Videos on iMovie?
Step 1: Search for the desired emoji on the internet with transparent background. Go to iMovie and select a clip of your video where you want to insert an emoji.
Step 2: Go to the “Import” option into the toolbar above, select your desired emoji from the list. This emoji will be added to the iMovie library.
Step 3: Click on that emoji. This overlays that emoji onto that video clip. You can scale the emoji up and down and drag it anywhere on the video.
Image from YouSubtitles
How to Add Emojis to Videos Online?
Blurbiz, is an online application for editing YouTube, Instagram, Facebook and Snapchat videos. Just follow the steps below, then you can add emojis you want.
Step 1: Create and name the project in Blurbiz.
Step 2: Upload either your video, sticker or gif whichever you want an emoji to be placed in.
Step 3: Hover over the video and click on the “edit” button.
Step 4: Tap on “upload” at the top left side of the pane. Upload emoji with .png extension from your desktop.
Step 5: Drag and drop to overlay the emoji onto your video. Resize and position an emoji accordingly.
Step 6: Tap on “complete” at the top right corner when you are done. You can download an mp4 format video.
How to Add Emojis to Videos Android?
WeVideo , is an app to create and edit videos to the next level and provide one with ample special effects to add on to your videos.
Alongside using basic editing features like cutting, trimming or arranging video clips, you can amplify your editing game by adding emoji to your videos. Moreover, you can export your projects in high quality and share them on either Vimeo, YouTube or Dropbox.
Conclusion
Be it any video on any social media platform or your local device, with this thorough guide, you must be able to accessorize your video and take it to another level of emotional expression and message details in your video by using fun emojis.
Liza Brown
Liza Brown is a writer and a lover of all things video.
Follow @Liza Brown
Also read:
- [New] Best Video Equipment for Documenting Dynamic Musical Performances
- [New] In 2024, How Does Vidma Stack Up as a Screen Recorder?
- [Updated] In 2024, Audio Conversion Made Simple YouTube to MP3, Mac Edition
- [Updated] Unveiling the Secrets of Self-Playing FB Videos for 2024
- 2024 Approved Best iOS and Android Apps You Can Use to Create Animoji and Memoji Videos
- 2024 Approved Is This a Pigeon Meme Generator
- Digital Deliberation for Better Treatment Outcomes
- How to Burn Photos to DVD with Transitions and Music for 2024
- In 2024, How to Remove a Previously Synced Google Account from Your OnePlus Ace 2V
- In 2024, Ways to trade pokemon go from far away On Motorola G24 Power? | Dr.fone
- Innovative Techniques to Make a Mark with Your GoPro Studio Edits
- New 2024 Approved Top 10 Free Emoji Websites to Download Emojis Online
- New How to Make an Emoji of Yourself on Mobile ? Emoji Yourself for 2024
- New In 2024, 10 Popular Cartoon Characters That Should Top Your List
- New In 2024, How to Add Emojis To Discord
- New What Is Emoji?
- The Ultimate List Watching NBA in Real-Time
- Title: Updated How to Make a Wonderful Video Slideshow with Your Travel Photos
- Author: Jan
- Created at : 2024-09-25 17:46:24
- Updated at : 2024-09-30 16:59:01
- Link: https://meme-emoji.techidaily.com/updated-how-to-make-a-wonderful-video-slideshow-with-your-travel-photos/
- License: This work is licensed under CC BY-NC-SA 4.0.