
Updated How to Add Bitmoji to Keyboard, In 2024
How to Add Bitmoji to Keyboard?
Emojis have made it so much better for people to express themselves. Let’s say someone compliments you on a chat app; you can use a smiley emoji to tell that you are happy. At the same time, an angry emoji lets you express that you are angry.
Apart from the generic emojis that you can find in your chat applications, Bitmoji enables you to customize your character and share it with people you chat with. Bitmoji is fun, but do you know how to add it to a keyboard? If you don’t, don’t worry, this post will help you understand how to do that.
In this article
02 How to Add and Use Bitmoji to iPhone Keyboard?
03 How to Get the Bitmoji Keyboard on Android?
04 How to Install and Use Bitmoji on Windows and Mac?
Part 1: What is Bitmoji?
If you are new to Bitmoji, you may wonder what it is? Bitmoji is essentially your own personal emoji. You can create a cartoon version of yourself and share it with people to make the conversation fun. So, what one does is create an avatar of themselves and give it all kinds of expressions.
Then, you can create comics using your Bitmoji, use it to express yourself while having a chat, and even use it as a reaction. Anyone who is done using the same old emojis has started using Bitmoji because it’s a lot more fun.
Now, let’s learn how to create your very own Bitmoji.
Step 1: First, go to the App Store or Play store and download the Bitmoji application.
Step 2: Once downloaded, launch the app and start making an avatar or your Bitmoji.
Step 3: Pick a skin color, hair color, chin, nose, hairstyle, jawline, and more.

Once your Bitmoji is created, you are all set to use the Bitmoji as stickers. Moreover, the app lets you dress your Bitmoji as you want as well. Let it have different expressions and postures because that’s how it’s going to be fun! After your Bitmoji is added, the next thing to do is enable Bitmoji on the keyboard of the device you are using.
Part 2: How to Add and Use Bitmoji to iPhone Keyboard?
Since you have learned how to create a Bimoji, it’s time to learn the steps to use it on your iPhone keyboard. Unfortunately, just by downloading the app, it won’t reflect on the keyboard directly. Instead, you will have to follow a few steps to add Bitmoji to the keyboard. Here’s what you need to do.
Step 1: Launch your iPhone and click on the Settings option.
Step 2: Now, go to the General option and click on the Keyboard option.

Step 3: When the Keyboard page opens, click on the option that says Keyboards and then click on Add New Keyboard.
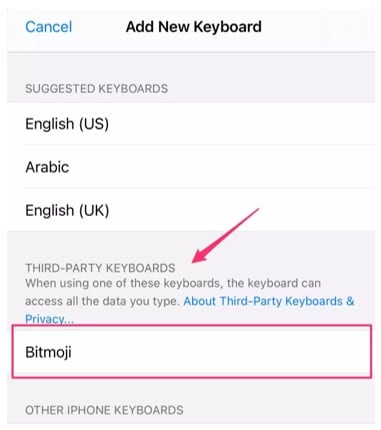
Step 4: You will see the Third Party Keyboards option. There, you need to click on Bitmoji.
Step 5: Now, toggle the option that says Allow Full Access. Once you do that, you will see a small pop-up. Click on the Allow option.
And that’s it. Bitmoji will be added to the iPhone keyboard. Open any messaging app and click on the globe and hold it for a few seconds. When you see Bitmoji, click on that, and you will be able to use Bitmoji stickers.
Part 3: How to Get the Bitmoji Keyboard on Android?
Bitmoji is available for Android users as well. Before you begin to use it, go through the first part again and download the app. Then create your Bitmoji, as explained earlier. You can send Bitmojis directly from the app itself, but if you plan to use Bitmoji regularly, getting the Bitmoji keyboard makes sense. So, once you are done, follow the following steps to get the Bitmoji keyboard on Android.
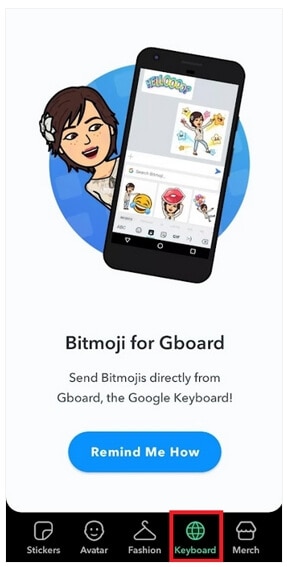
Step 1: Launch the Bitmoji app. Click on the Keyboard option that you see at the bottom of the Bitmoji app screen.
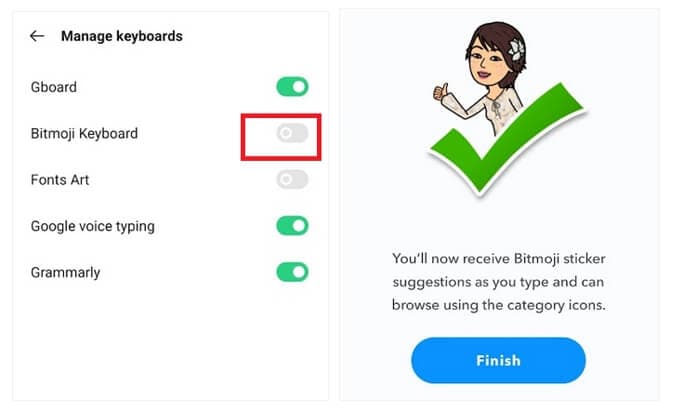
Step 2: Install Bitmoji keyboard and give permission to your phone to use Bitmoji keyboard. Bitmoji will notify you when the Bitmoji keyboard gets activated.
You are all done. Now, use the Bitmoji keyboard to chat with your family members and friends and make everything fun and exciting.
Part 4: How to Install and Use Bitmoji on Windows and Mac?
If you want to use Bitmoji on Windows and Mac, you will have to use the Google Chrome browser. If you already have the Google Chrome browser, carry on with the steps explained below; otherwise, get the browser before starting.
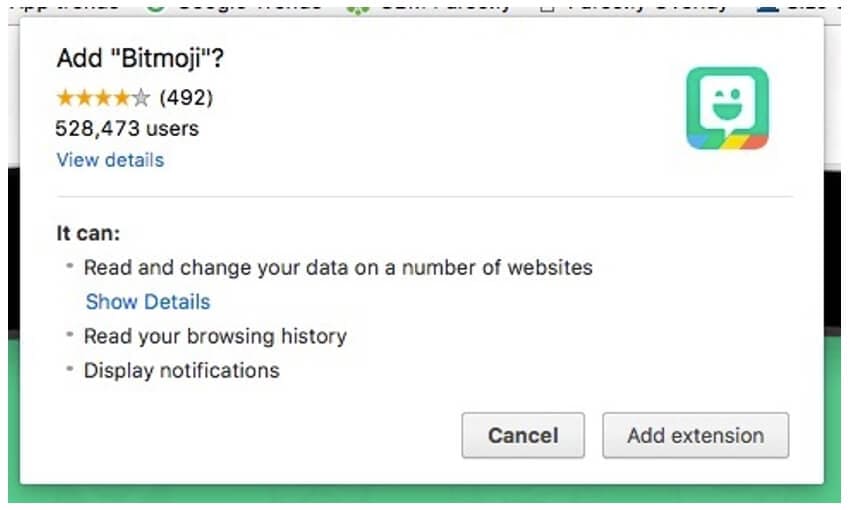
Step 1: Go to Chrome Extension and install Bitmoji for Chrome Extension.
Step 2: You will have to sign in to Bitmoji. If you want to add Bitmoji to Gmail, click on add Bitmoji to Gmail.
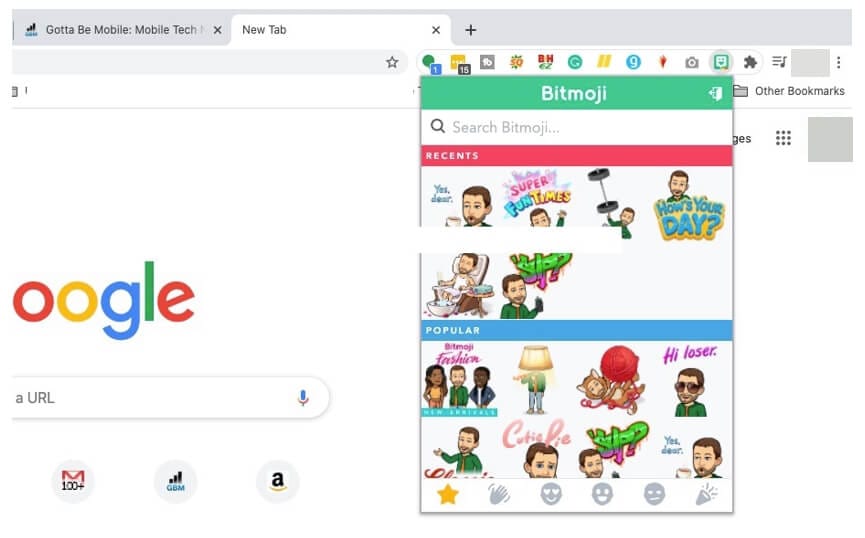
After you are done following the three easy steps, you will see Bitmoji is installed. To start using it, move the cursor to the upper corner of the browser and click on the Bitmoji icon. Next, you will see the Bitmojis. Choose any Bitmoji, copy it, and paste it on Gmail or instant messaging applications.

Part 5: Where can You Use Bitmoji?
Bitmojis can be used on different platforms. All you need to do is enable Bitmoji keyboard on your iPhone or Android phone or Windows and Mac computers and use it on various social media platforms. For example, use Snapchat to send Bitmojis for different types of occasions.
If you are an iPhone user, you can share fun Bitmojis through iMessage. On a computer, you can use these Bitmojis on Facebook or other instant messaging platforms. You can drag and drop the Bitmoji sticker or copy it to share it with your friends.
If you are a working professional and want to lighten the mood of your Slack workspace, use Bitmojis to make your coworkers feel relaxed. Plus, this can be a great way to make someone feel pumped up. Like that, there are many other platforms to use Bitmojis!
Related: Best Free Apps to Get Emojis on iPhone and Android
Conclusion
So, there you go. We have finally reached the end of this guide. We hope you have found this post interesting and will face no hassle using the Bitmoji keyboard on different devices. Get the Bitmoji app if you haven’t downloaded it yet and make your conversations fun and enjoyable!
02 How to Add and Use Bitmoji to iPhone Keyboard?
03 How to Get the Bitmoji Keyboard on Android?
04 How to Install and Use Bitmoji on Windows and Mac?
Part 1: What is Bitmoji?
If you are new to Bitmoji, you may wonder what it is? Bitmoji is essentially your own personal emoji. You can create a cartoon version of yourself and share it with people to make the conversation fun. So, what one does is create an avatar of themselves and give it all kinds of expressions.
Then, you can create comics using your Bitmoji, use it to express yourself while having a chat, and even use it as a reaction. Anyone who is done using the same old emojis has started using Bitmoji because it’s a lot more fun.
Now, let’s learn how to create your very own Bitmoji.
Step 1: First, go to the App Store or Play store and download the Bitmoji application.
Step 2: Once downloaded, launch the app and start making an avatar or your Bitmoji.
Step 3: Pick a skin color, hair color, chin, nose, hairstyle, jawline, and more.
Once your Bitmoji is created, you are all set to use the Bitmoji as stickers. Moreover, the app lets you dress your Bitmoji as you want as well. Let it have different expressions and postures because that’s how it’s going to be fun! After your Bitmoji is added, the next thing to do is enable Bitmoji on the keyboard of the device you are using.
Part 2: How to Add and Use Bitmoji to iPhone Keyboard?
Since you have learned how to create a Bimoji, it’s time to learn the steps to use it on your iPhone keyboard. Unfortunately, just by downloading the app, it won’t reflect on the keyboard directly. Instead, you will have to follow a few steps to add Bitmoji to the keyboard. Here’s what you need to do.
Step 1: Launch your iPhone and click on the Settings option.
Step 2: Now, go to the General option and click on the Keyboard option.
Step 3: When the Keyboard page opens, click on the option that says Keyboards and then click on Add New Keyboard.
Step 4: You will see the Third Party Keyboards option. There, you need to click on Bitmoji.
Step 5: Now, toggle the option that says Allow Full Access. Once you do that, you will see a small pop-up. Click on the Allow option.
And that’s it. Bitmoji will be added to the iPhone keyboard. Open any messaging app and click on the globe and hold it for a few seconds. When you see Bitmoji, click on that, and you will be able to use Bitmoji stickers.
Part 3: How to Get the Bitmoji Keyboard on Android?
Bitmoji is available for Android users as well. Before you begin to use it, go through the first part again and download the app. Then create your Bitmoji, as explained earlier. You can send Bitmojis directly from the app itself, but if you plan to use Bitmoji regularly, getting the Bitmoji keyboard makes sense. So, once you are done, follow the following steps to get the Bitmoji keyboard on Android.
Step 1: Launch the Bitmoji app. Click on the Keyboard option that you see at the bottom of the Bitmoji app screen.
Step 2: Install Bitmoji keyboard and give permission to your phone to use Bitmoji keyboard. Bitmoji will notify you when the Bitmoji keyboard gets activated.
You are all done. Now, use the Bitmoji keyboard to chat with your family members and friends and make everything fun and exciting.
Part 4: How to Install and Use Bitmoji on Windows and Mac?
If you want to use Bitmoji on Windows and Mac, you will have to use the Google Chrome browser. If you already have the Google Chrome browser, carry on with the steps explained below; otherwise, get the browser before starting.
Step 1: Go to Chrome Extension and install Bitmoji for Chrome Extension.
Step 2: You will have to sign in to Bitmoji. If you want to add Bitmoji to Gmail, click on add Bitmoji to Gmail.
After you are done following the three easy steps, you will see Bitmoji is installed. To start using it, move the cursor to the upper corner of the browser and click on the Bitmoji icon. Next, you will see the Bitmojis. Choose any Bitmoji, copy it, and paste it on Gmail or instant messaging applications.
Part 5: Where can You Use Bitmoji?
Bitmojis can be used on different platforms. All you need to do is enable Bitmoji keyboard on your iPhone or Android phone or Windows and Mac computers and use it on various social media platforms. For example, use Snapchat to send Bitmojis for different types of occasions.
If you are an iPhone user, you can share fun Bitmojis through iMessage. On a computer, you can use these Bitmojis on Facebook or other instant messaging platforms. You can drag and drop the Bitmoji sticker or copy it to share it with your friends.
If you are a working professional and want to lighten the mood of your Slack workspace, use Bitmojis to make your coworkers feel relaxed. Plus, this can be a great way to make someone feel pumped up. Like that, there are many other platforms to use Bitmojis!
Related: Best Free Apps to Get Emojis on iPhone and Android
Conclusion
So, there you go. We have finally reached the end of this guide. We hope you have found this post interesting and will face no hassle using the Bitmoji keyboard on different devices. Get the Bitmoji app if you haven’t downloaded it yet and make your conversations fun and enjoyable!
Generating the Nut Button Meme
Generating the Nut Button Meme

Ollie Mattison
Mar 27, 2024• Proven solutions
Generating the Nut Button Meme
The Nut Button meme started out as an immature joke, with a word ‘Nut’ written across a blue button, and for a number of years, this meme was used mostly for bad sex jokes. However, the meme has evolved through the years and meme makers from around the world use it to make social media, gaming and countless other types of jokes.
Commonly, the Nut Button meme suggests that a person, in many cases the creator of the meme, likes doing something in certain types of situations, like listening to crappy music when they feel down or taking revenge on their enemies when they have the opportunity. Generating this type of meme doesn’t require too much effort as it often contains one word. Some versions of this meme include the motive that prompts the hand in the meme to push the button, but using this element of the meme is optional.
A Few Good Examples of the Nut Button Meme
Taking the first concept that comes to your mind won’t necessarily make this meme as effective as you’d like it to be, so you have to think carefully which button the hand is going to hit.
Hitting the Divorce button can be a painful process in real life, but it can also be an endless source of fun if the reason why the hand hits it is so ridiculous that it could never be an actual reason for a divorce.
This meme can also be used to make fun of world leaders and their bad decisions or pop-culture figures that often do ill-advised things.

The elements of the Nut meme are always the same, although their topics can vary because the hand and the blue button are irreplaceable parts of this meme.
Generating the Nut Button Meme
We suggest using Filmora Online Meme Maker to generate your meme because this online tool lets you create memes without watermarks for free. What’s more, you don’t even have to sign up in order to make a meme from images, GIFs or videos.
Step 1 – Uploading the Meme Template
You can click the “Copy the image” link below and the image link will be copied automatically.
![]()
Copy the image
After arriving at Filmora Online Meme Maker ‘s home page, you’ll be asked to upload the image. Paste the image’s URL into the Enter a URL box. After uploading a picture from your computer, you’ll be asked if you would like to crop, flip or rotate it. Click on the OK button to confirm the changes you’ve made and proceed to the next step of the process.

Step 2 – Adding Text to the Image
When a new page loads you will get access to all tools Filmora Online Meme Maker offers. Make sure that the Text Inside option is selected, since on nearly all examples of this meme the text is positioned within the image.

Insert the text into the text boxes, and reposition it on the picture so it is placed between the blue button and hand. You can add as many text boxes as you want to the picture, but Nut Button memes commonly include just one or two lines of text.

The color of the text, size, and font can all be changed in the Text Options menu, so before hitting the Create button you can experiment with these tools in order to generate a better meme.
Step 3 – Saving the Meme
Finally, click on the download button, and when a new page loads and you’re ready to share your new Nut Button meme on social media.

The Filmora Online Meme Maker is mobile friendly, which means that you can use this platform to make memes from your Smartphone.
Conclusion
The Nut Button meme can be used in a wide array of different contexts, and it is up to you which one you’re going to use. You can mock stereotypical answers to questions, world leaders or make a joke at your own expense. Whichever topic you choose, the Filmora Online Meme Maker will help you express your creativity fully. What is your favorite Nut Button meme? Leave a comment below and let us know.
Ollie Mattison
Ollie Mattison is a writer and a lover of all things video.
Follow @Ollie Mattison
Ollie Mattison
Mar 27, 2024• Proven solutions
Generating the Nut Button Meme
The Nut Button meme started out as an immature joke, with a word ‘Nut’ written across a blue button, and for a number of years, this meme was used mostly for bad sex jokes. However, the meme has evolved through the years and meme makers from around the world use it to make social media, gaming and countless other types of jokes.
Commonly, the Nut Button meme suggests that a person, in many cases the creator of the meme, likes doing something in certain types of situations, like listening to crappy music when they feel down or taking revenge on their enemies when they have the opportunity. Generating this type of meme doesn’t require too much effort as it often contains one word. Some versions of this meme include the motive that prompts the hand in the meme to push the button, but using this element of the meme is optional.
A Few Good Examples of the Nut Button Meme
Taking the first concept that comes to your mind won’t necessarily make this meme as effective as you’d like it to be, so you have to think carefully which button the hand is going to hit.
Hitting the Divorce button can be a painful process in real life, but it can also be an endless source of fun if the reason why the hand hits it is so ridiculous that it could never be an actual reason for a divorce.
This meme can also be used to make fun of world leaders and their bad decisions or pop-culture figures that often do ill-advised things.
The elements of the Nut meme are always the same, although their topics can vary because the hand and the blue button are irreplaceable parts of this meme.
Generating the Nut Button Meme
We suggest using Filmora Online Meme Maker to generate your meme because this online tool lets you create memes without watermarks for free. What’s more, you don’t even have to sign up in order to make a meme from images, GIFs or videos.
Step 1 – Uploading the Meme Template
You can click the “Copy the image” link below and the image link will be copied automatically.
![]()
Copy the image
After arriving at Filmora Online Meme Maker ‘s home page, you’ll be asked to upload the image. Paste the image’s URL into the Enter a URL box. After uploading a picture from your computer, you’ll be asked if you would like to crop, flip or rotate it. Click on the OK button to confirm the changes you’ve made and proceed to the next step of the process.
Step 2 – Adding Text to the Image
When a new page loads you will get access to all tools Filmora Online Meme Maker offers. Make sure that the Text Inside option is selected, since on nearly all examples of this meme the text is positioned within the image.
Insert the text into the text boxes, and reposition it on the picture so it is placed between the blue button and hand. You can add as many text boxes as you want to the picture, but Nut Button memes commonly include just one or two lines of text.
The color of the text, size, and font can all be changed in the Text Options menu, so before hitting the Create button you can experiment with these tools in order to generate a better meme.
Step 3 – Saving the Meme
Finally, click on the download button, and when a new page loads and you’re ready to share your new Nut Button meme on social media.
The Filmora Online Meme Maker is mobile friendly, which means that you can use this platform to make memes from your Smartphone.
Conclusion
The Nut Button meme can be used in a wide array of different contexts, and it is up to you which one you’re going to use. You can mock stereotypical answers to questions, world leaders or make a joke at your own expense. Whichever topic you choose, the Filmora Online Meme Maker will help you express your creativity fully. What is your favorite Nut Button meme? Leave a comment below and let us know.
Ollie Mattison
Ollie Mattison is a writer and a lover of all things video.
Follow @Ollie Mattison
How to Add Stickers to WhatsApp-The Ultimate Guide
How to Add Stickers to WhatsApp-The Ultimate Guide

Shanoon Cox
Mar 27, 2024• Proven solutions
Whatsapp has recently added the stickers feature, and people are going crazy about adding stickers to WhatsApp. But the question is how to add stickers to Whatsapp? To help with that, we will walk you through a detailed guide on how to add stickers to Whatsapp and bring a dash of fun to boring texts.
Now, if you don’t know how to add stickers to WhatsApp and use stickers on Whatsapp, we have you covered.
- Part 1: How to Create Stickers for WhatsApp
- Part 2: How to Add Stickers to WhatsApp
- Part 3: How to Send Stickers on WhatsApp
- Part 4: Bonus Tip—Add Sticker to Your Video with Wondershare Filmora
Part 1: How to Create Stickers for WhatsApp
Whatsapp stickers are now a significant part of our daily conversations. Because let’s face it, life would be boring without them. Perhaps it’s time to up your game by learning how to add stickers to Whatsapp
Even though Whatsapp has a vast library of stickers available, creating a unique sticker is more fun. And the latest apps have made it incredibly easy to create customized stickers. So all you need to do now is learn how to use stickers in Whatsapp
Sticker Make for Whatsapp is one such app. It is free and requires no registrations. Download the app from Google Store and start creating hilarious stickers to surprise your friends.
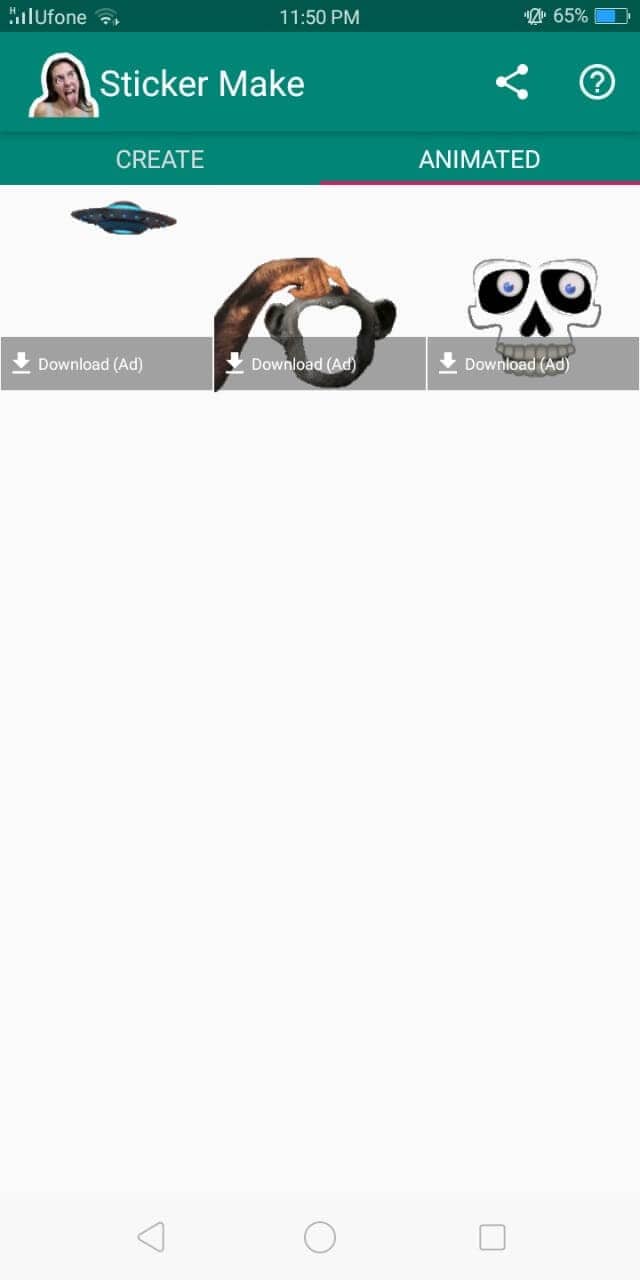
1. Download Sticker Make and launch it. On the homepage, you will be presented with two options. Click Create to make a sticker from scratch using your own image or click on Animated to insert your picture in a sticker template.
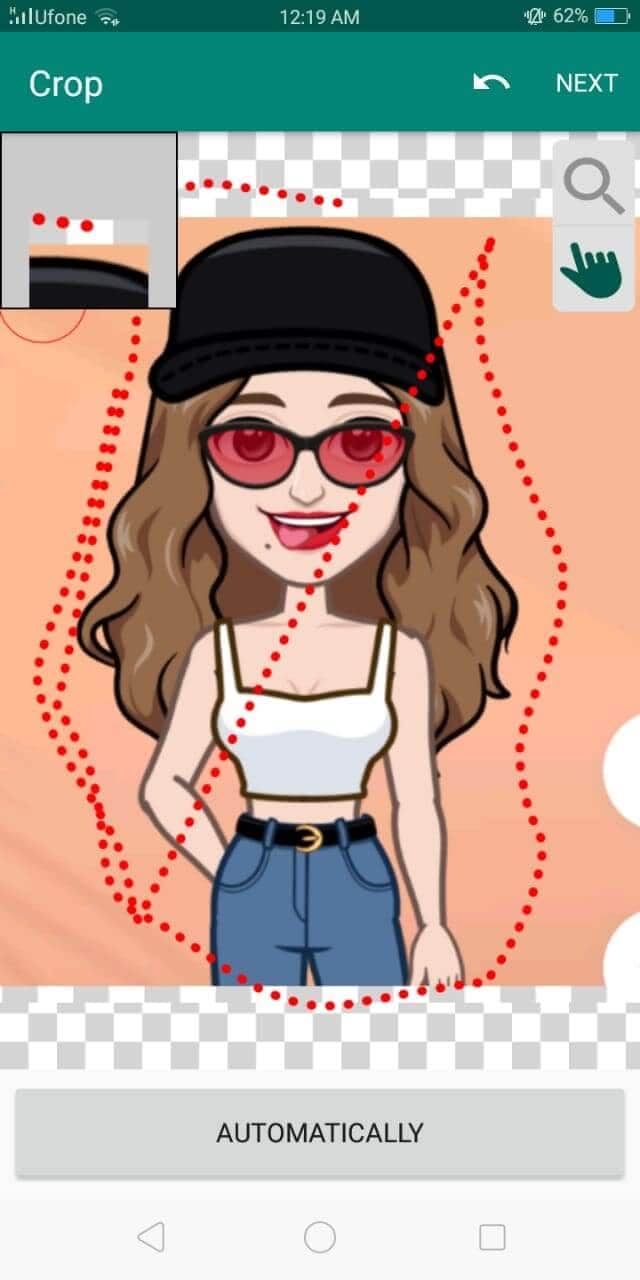
2. Choose any image from your gallery. Crop it to the size and shape you wish to include. Use the Freehand tool or click Automatically to let the app crop a face itself.
3. Click Next and now erase the background or make careful cropping.
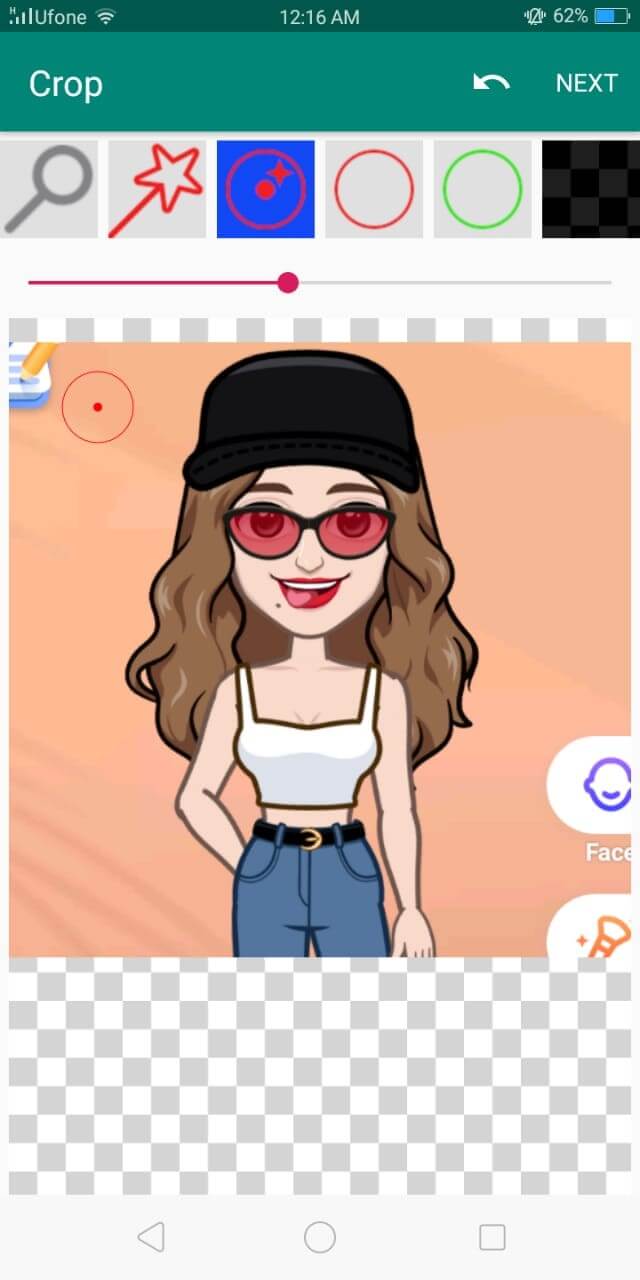
4. You can even outline your sticker and adjust its width and color.
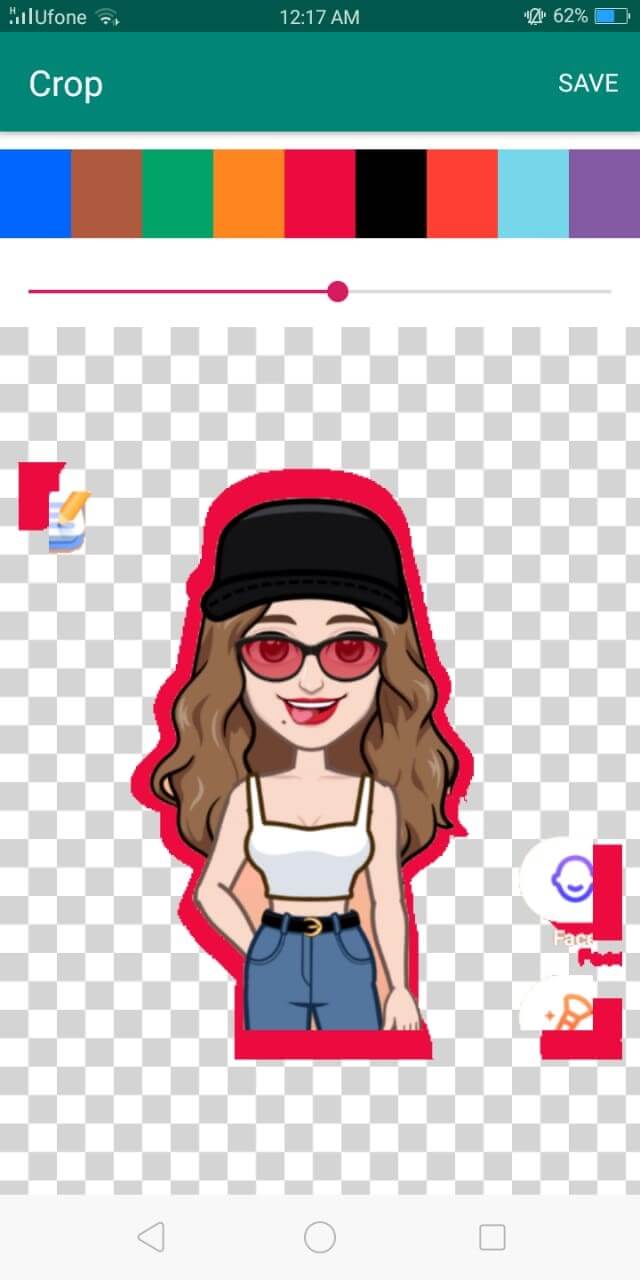
5. You can even add texts and change fonts.

6. Click on the square in the bottom panel to choose from a list of cool backgrounds for your sticker.
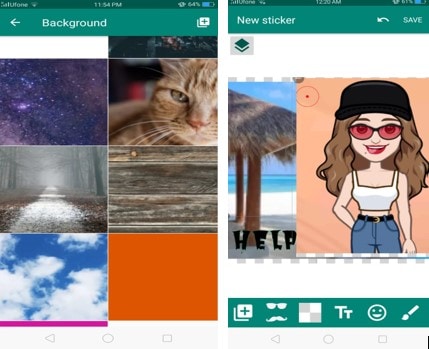
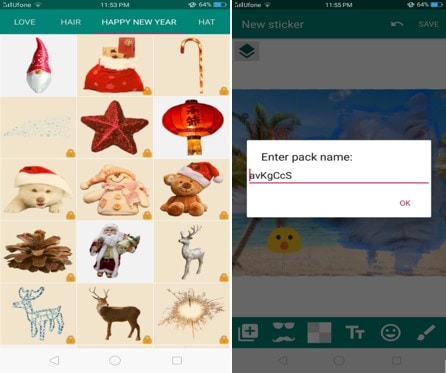
7. Choose to add themed emojis or decorate using a variety of images in the library of Sticker Make. Once you are done, click Save, enter pack name, and click Ok.
(P.S Make sure that the stickers are precisely 512x512 pixels and no more than 100kb)
Part 2: How to Add Stickers to WhatsApp
Now, you must be wondering how to add stickers to Whatsapp. Let me ease your worry. In this part, I will walk you through a step-by-step guide on how to use stickers in Whatsapp and a few additional features too.
You can save the stickers you receive from other people-
- Click on the sticker you receive
- Tap Add to favorites

If you wish you get more exciting stickers to better express yourself-
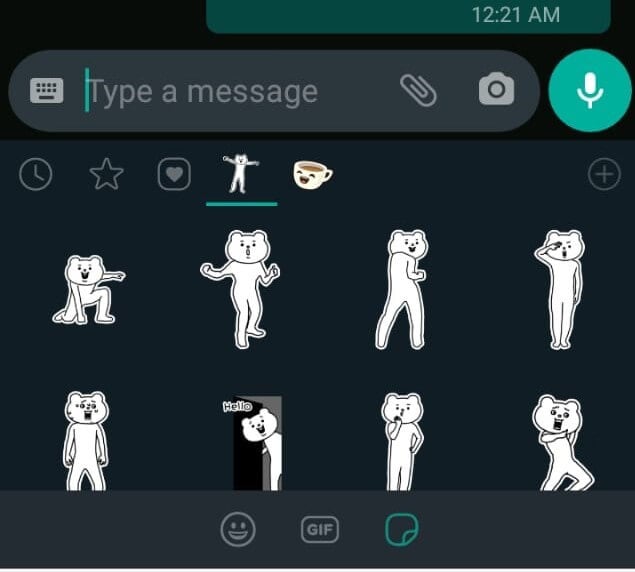
- Open Whatsapp chat, either individual or group chat.
- Click on the emoji and then click the sticker beside GIF (the square shape)
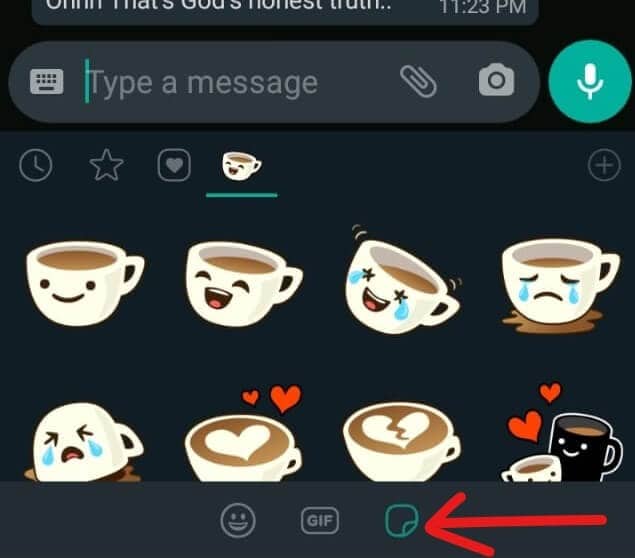
- Tap on the + sign on the upper right corner of your keyboard.
- Here you choose to download any number of sticker packs or click Get More Stickers from Google Play.
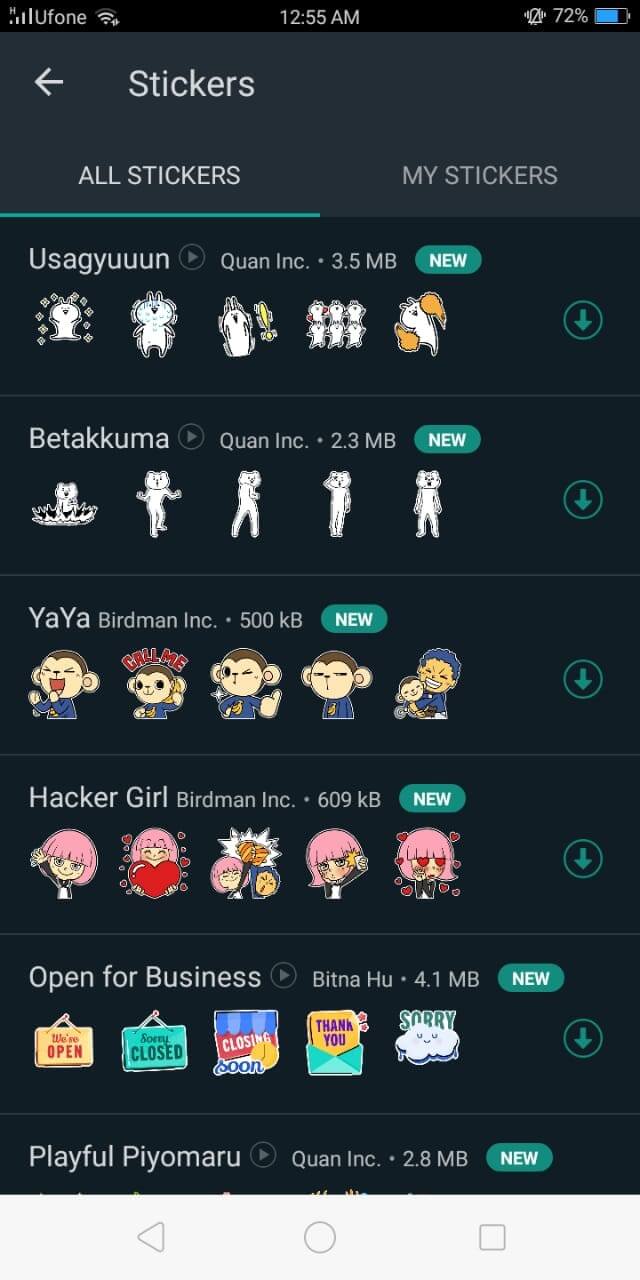
- Tap the download sign beside the sticker pack to start downloading.
- Once the download is complete, it will be displayed among the other stickers in your list.
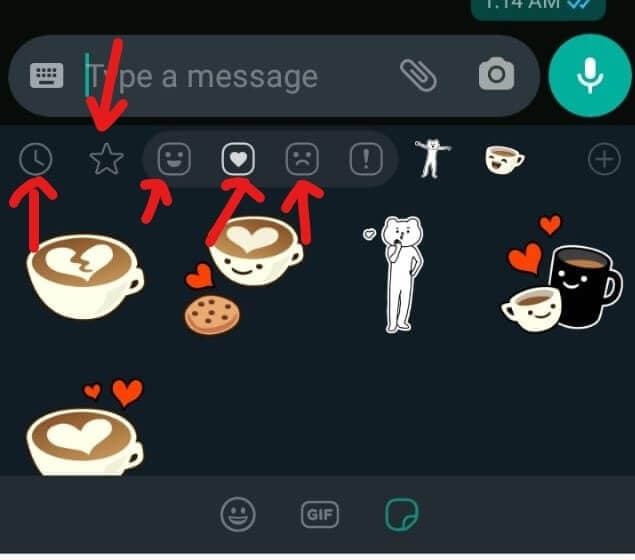
Other features:
- Clock sign- This sign has all the stickers you recently used
- Star sign- It contains your favorite stickers
- Heart- In this, there are several categories. Whatsapp automatically arranges all your stickers in these categories as happy, sad, romantic, etc.
Part 3: How to Send Stickers on WhatsApp
So far, you have learned to create a custom sticker and then how to use Whatsapp stickers. All credit goes to the apps that made this task cakewalk (and some credit goes to your creativity too). Now that the worst is over, you have come to the final and best part of our article.
In 3 quick steps, you will be able to learn how to add stickers to Whatsapp and surprise your friends with hilarious stickers.
1.Open individual or group chat.
2.Click on the emoji and then tap the stickers on the bottom panel.
3.Choose the sticker that best fits your mood and intention from the various categories. Click it and voila! Sent!
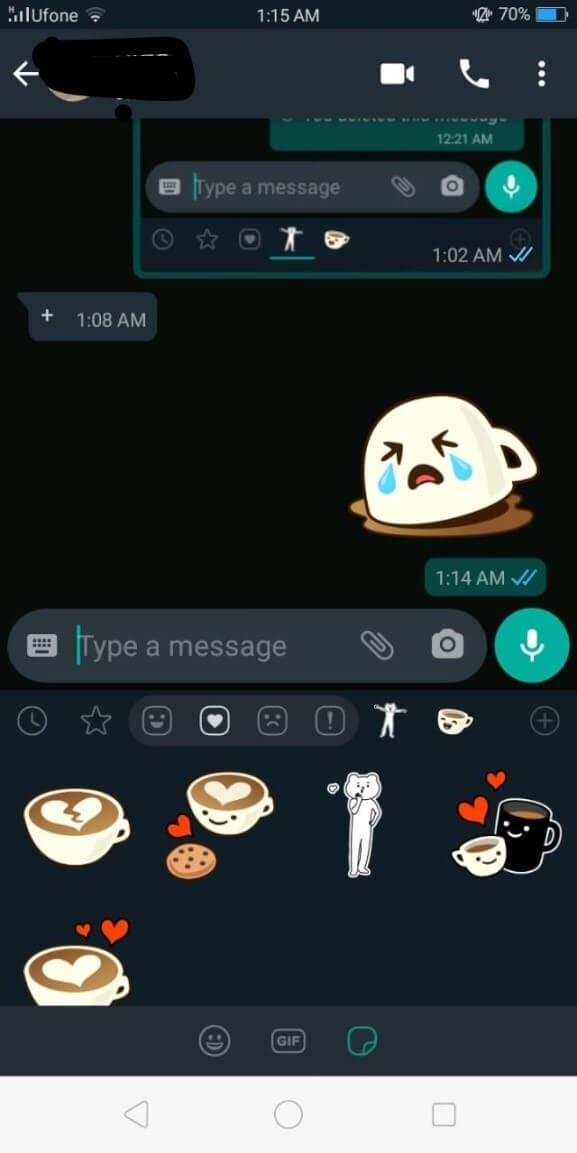
Easy peasy, right?
Bonus Tip—Add Sticker to Your Video with Wondershare Filmora
Although videos themselves are gripping enough, the addition of a customized sticker exclusive to you will be a cherry on top. Wondershare Filmora, with its user-friendly interface, is here just for that. You can now not only add your customized stickers to your video, but multiple effects can also be applied to enhance the video. Filmora is specially designed to offer professional editing tools to beginners. It has an in-built library of special effects and filters to help you create a stunningly cinematic video. Apply motion tracking, keyframe animations, or color match your videos. Add catchy captions or aesthetic filters to create a cool cinematic video


Let’s get right to it:
1.Download and install Filmora. Launch it. And click on Import-Import Media Files.
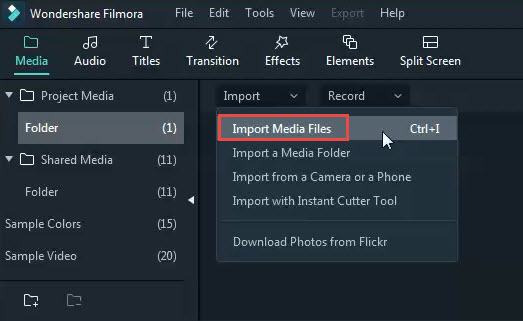
2. Then import your sticker into Filmora and drag and drop it to the video track or choose a sticker from the Elements (Note that both must be added to the video track).
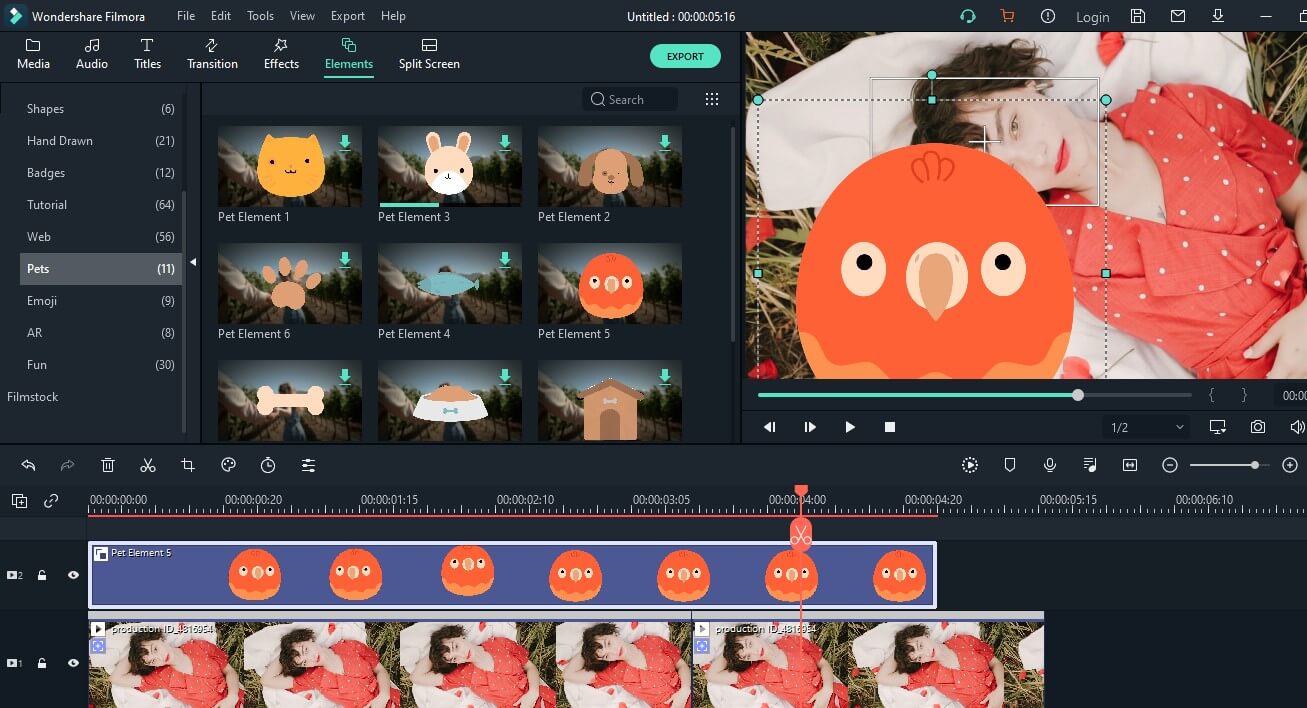
3. Double-click on the sticker in the timeline to adjust the additional parameters. In Video, you can adjust the size or rotation of the sticker. Tap Color to adjust the tint, temperature, or saturation of the sticker. You can also add 3D motion to the sticker in the Motion.
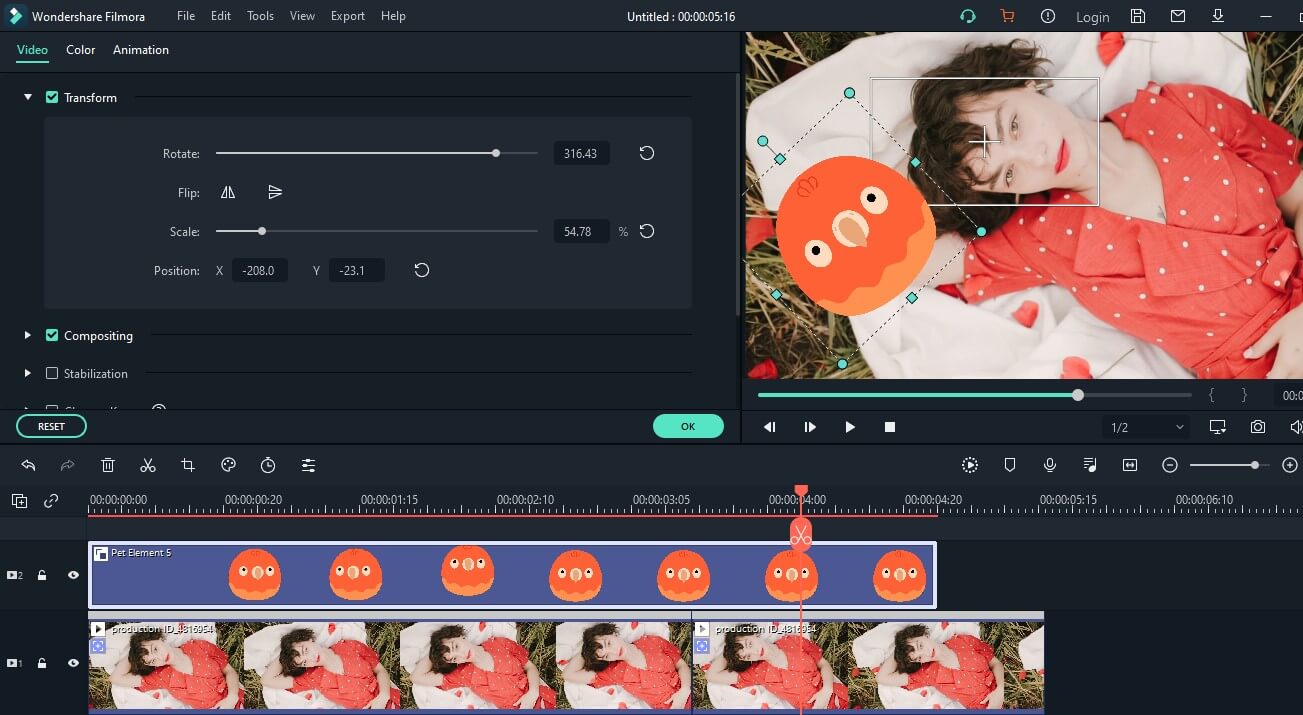
4. And in the viewer panel, click on the sticker and drag it to adjust the size or change the location.
5. Click Export and save it to your computer in the desired resolution.

Ready to Create and Add Stickers?
Stickers have been around long enough to become boringly ordinary. So, to keep the fun side of texting alive, you can now master how to use stickers on Whatsapp after creating your own personalized stickers.
You can start being creative with Sticker Make for Whatsapp. And if you didn’t know how to add stickers in Whatsapp, by now, you must have mastered it (hopefully).
Last but not least, to stand out in a crowd, you need to bring to light something others can’t. Inserting custom-made stickers in your videos might do the trick. Decorate your videos with Wondershare Filmora and create impressive masterpieces. Take note from this ultimate guide on how to add stickers to Whatsapp and transform your texting experience.
Let the fun begin!
Shanoon Cox
Shanoon Cox is a writer and a lover of all things video.
Follow @Shanoon Cox
Shanoon Cox
Mar 27, 2024• Proven solutions
Whatsapp has recently added the stickers feature, and people are going crazy about adding stickers to WhatsApp. But the question is how to add stickers to Whatsapp? To help with that, we will walk you through a detailed guide on how to add stickers to Whatsapp and bring a dash of fun to boring texts.
Now, if you don’t know how to add stickers to WhatsApp and use stickers on Whatsapp, we have you covered.
- Part 1: How to Create Stickers for WhatsApp
- Part 2: How to Add Stickers to WhatsApp
- Part 3: How to Send Stickers on WhatsApp
- Part 4: Bonus Tip—Add Sticker to Your Video with Wondershare Filmora
Part 1: How to Create Stickers for WhatsApp
Whatsapp stickers are now a significant part of our daily conversations. Because let’s face it, life would be boring without them. Perhaps it’s time to up your game by learning how to add stickers to Whatsapp
Even though Whatsapp has a vast library of stickers available, creating a unique sticker is more fun. And the latest apps have made it incredibly easy to create customized stickers. So all you need to do now is learn how to use stickers in Whatsapp
Sticker Make for Whatsapp is one such app. It is free and requires no registrations. Download the app from Google Store and start creating hilarious stickers to surprise your friends.
1. Download Sticker Make and launch it. On the homepage, you will be presented with two options. Click Create to make a sticker from scratch using your own image or click on Animated to insert your picture in a sticker template.
2. Choose any image from your gallery. Crop it to the size and shape you wish to include. Use the Freehand tool or click Automatically to let the app crop a face itself.
3. Click Next and now erase the background or make careful cropping.
4. You can even outline your sticker and adjust its width and color.
5. You can even add texts and change fonts.
6. Click on the square in the bottom panel to choose from a list of cool backgrounds for your sticker.
7. Choose to add themed emojis or decorate using a variety of images in the library of Sticker Make. Once you are done, click Save, enter pack name, and click Ok.
(P.S Make sure that the stickers are precisely 512x512 pixels and no more than 100kb)
Part 2: How to Add Stickers to WhatsApp
Now, you must be wondering how to add stickers to Whatsapp. Let me ease your worry. In this part, I will walk you through a step-by-step guide on how to use stickers in Whatsapp and a few additional features too.
You can save the stickers you receive from other people-
- Click on the sticker you receive
- Tap Add to favorites
If you wish you get more exciting stickers to better express yourself-
- Open Whatsapp chat, either individual or group chat.
- Click on the emoji and then click the sticker beside GIF (the square shape)
- Tap on the + sign on the upper right corner of your keyboard.
- Here you choose to download any number of sticker packs or click Get More Stickers from Google Play.
- Tap the download sign beside the sticker pack to start downloading.
- Once the download is complete, it will be displayed among the other stickers in your list.
Other features:
- Clock sign- This sign has all the stickers you recently used
- Star sign- It contains your favorite stickers
- Heart- In this, there are several categories. Whatsapp automatically arranges all your stickers in these categories as happy, sad, romantic, etc.
Part 3: How to Send Stickers on WhatsApp
So far, you have learned to create a custom sticker and then how to use Whatsapp stickers. All credit goes to the apps that made this task cakewalk (and some credit goes to your creativity too). Now that the worst is over, you have come to the final and best part of our article.
In 3 quick steps, you will be able to learn how to add stickers to Whatsapp and surprise your friends with hilarious stickers.
1.Open individual or group chat.
2.Click on the emoji and then tap the stickers on the bottom panel.
3.Choose the sticker that best fits your mood and intention from the various categories. Click it and voila! Sent!
Easy peasy, right?
Bonus Tip—Add Sticker to Your Video with Wondershare Filmora
Although videos themselves are gripping enough, the addition of a customized sticker exclusive to you will be a cherry on top. Wondershare Filmora, with its user-friendly interface, is here just for that. You can now not only add your customized stickers to your video, but multiple effects can also be applied to enhance the video. Filmora is specially designed to offer professional editing tools to beginners. It has an in-built library of special effects and filters to help you create a stunningly cinematic video. Apply motion tracking, keyframe animations, or color match your videos. Add catchy captions or aesthetic filters to create a cool cinematic video
Let’s get right to it:
1.Download and install Filmora. Launch it. And click on Import-Import Media Files.
2. Then import your sticker into Filmora and drag and drop it to the video track or choose a sticker from the Elements (Note that both must be added to the video track).
3. Double-click on the sticker in the timeline to adjust the additional parameters. In Video, you can adjust the size or rotation of the sticker. Tap Color to adjust the tint, temperature, or saturation of the sticker. You can also add 3D motion to the sticker in the Motion.
4. And in the viewer panel, click on the sticker and drag it to adjust the size or change the location.
5. Click Export and save it to your computer in the desired resolution.
Ready to Create and Add Stickers?
Stickers have been around long enough to become boringly ordinary. So, to keep the fun side of texting alive, you can now master how to use stickers on Whatsapp after creating your own personalized stickers.
You can start being creative with Sticker Make for Whatsapp. And if you didn’t know how to add stickers in Whatsapp, by now, you must have mastered it (hopefully).
Last but not least, to stand out in a crowd, you need to bring to light something others can’t. Inserting custom-made stickers in your videos might do the trick. Decorate your videos with Wondershare Filmora and create impressive masterpieces. Take note from this ultimate guide on how to add stickers to Whatsapp and transform your texting experience.
Let the fun begin!
Shanoon Cox
Shanoon Cox is a writer and a lover of all things video.
Follow @Shanoon Cox
10 Trending Memes Right Now (Include Image/ GIF/Video)
10 Trending Memes In 2024 Right Now (Include Image/ GIF/Video)
Ollie Mattison
Mar 27, 2024• Proven solutions
With several popular memes doing rounds on the Internet this year, 2019 can be said the “best memes year”. The memes are the latest things that speak louder than any other words. You get just 140 characters on Twitter which might not be enough for what you wish to post but, a powerful meme with a strong caption can do what any simple words cannot do. This is what each of the people is doing today.
When the meme is just released and hot like fire, each one of you wishes to use it. Below are by far the 10 best memes that you would definitely like to check out. Let’s laugh and have fun, forgetting all the stress of life.
Part 1: 10 Best Memes In 2024
1. Steven Crowder’s “Change My Mind” Campus Sign
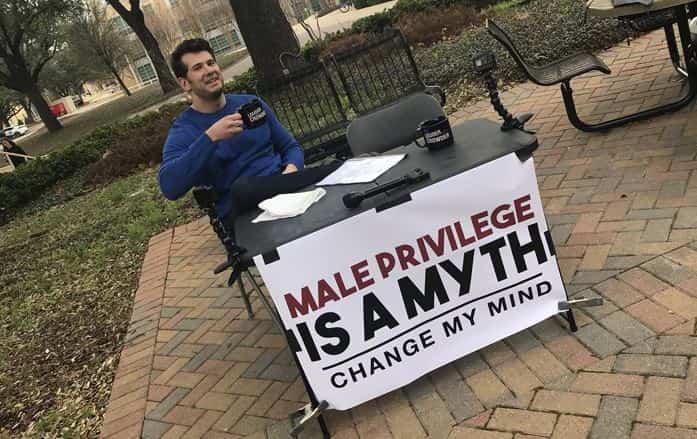
The conservative podcaster Steven Crowder tweeted an image on 16th February 2018 which went on to become one of the funniest memes of 2018. It had Crowder’s photograph behind a table poster that read “Male Privilege is a myth / Change My Mind”. The image had a backdrop of the Texas Christian University and he tweeted it with a caption, “Hello @TCU. Come one come all. #ChangeMyMind.”
The image was tweeted as part of Crowder’s YouTube and podcast promotions where various viewpoints of Crowder are opposed by the people and they convince him of these issues. This post garnered around 6400 likes and 900 retweets in just 4 days.
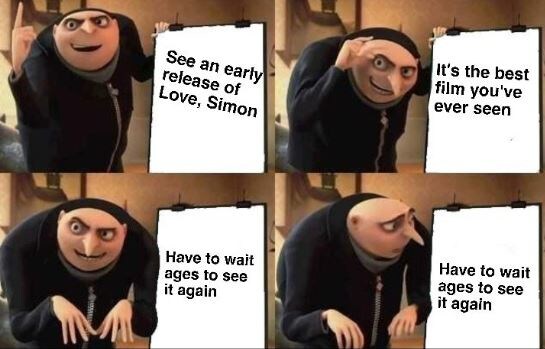
2. Gru’s Plan
When Despicable Me was released on July 9, 2010, Gru, the protagonist in the film shows a presentation of stealing a moon and notice a drawing of himself where he is sitting on the toilet in between the pages of the presentation.
The memes of this comic show a startling presentation with a 3rd page, where the panel of Gru looks back at the board in complete bewilderment. FieldMarshalSixDans, a Redditor used screencaps from the film and posted a four-panel version meme which was re-posted. It reaped about 250 comments and above 18000 votes in 1 day.
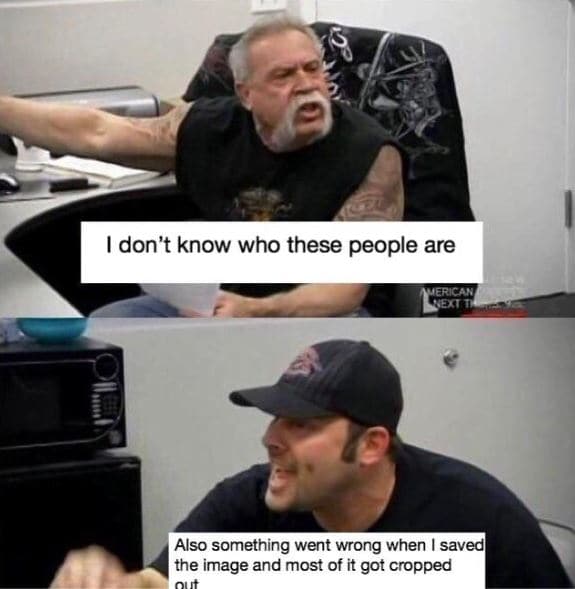
3. American Chopper Argument
In the year 2009, the YouTube channel Shemrock Nursery Rhymes created a meme of the nursery rhymes Johny Johny Yes Papa. This rhyme is a popular one featured under animated amateur music video. It shows a small boy who tries to steal sugar and confronted by his father for not taking permission.
In July 2009, Shemrock YouTube channel created best memes for this video by using the clips of Johny Johny and used the audio of another nursery rhymes Twinkle Twinkle which collected over 2.9 million views in the first 6 years of its posting.
4. Who Killed Hannibal?
It is a skit from the Eric Andre Show, also known as Eric Andre Shooting Hannibal Buress where Eric Andre, the host of the show can be seen shooting a gun multiple times and asking on camera Who Killed Hannibal?
It was actually a joke during the Season 2, episode 6 of The Eric Andre Show. It turned out to be the best memes of this year when the famous dialogue “Who Killed Hannibal” was replaced by “Why would X do this?” in a variety of expressive template.

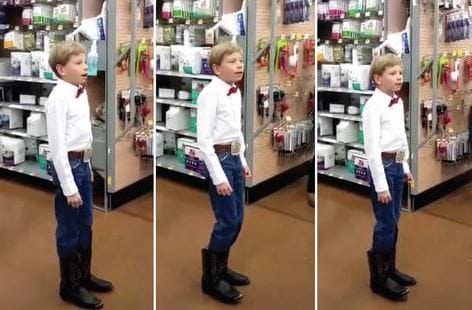
5. Walmart Yodel Boy
The Walmart Yodel Boy is a video that was filmed in a Walmart on 24th March 2018. It was the video of the 12-year-old child artist, Mason Ramsay singing “Lovesick Blues”. He is better known for Hank Williams impressions. This video from the concert was uploaded from a YouTube account named ViralHog. This song started being remixed with several other captions and went viral in no time and is considered one of the best memes of this year.
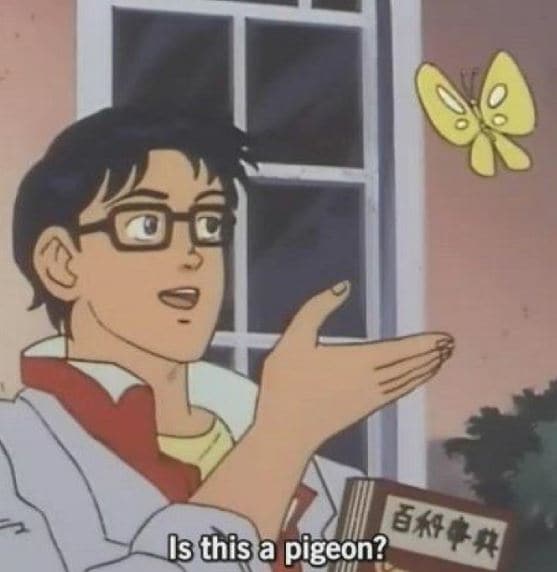
6. Is this a pigeon?
A shot from the anime series “The Brave Fighter of Sun Fighbird” had a scene in episode 3 of season 1 where professor Hiroshi Amano creates a human android, Yutaro Katori. While explaining mother Nature, Yutaro Katori thinks a butterfly to be a pigeon. One of the best memes is created when the reaction of this scene with the quote is used widely to show a confused expression on Tumblr.
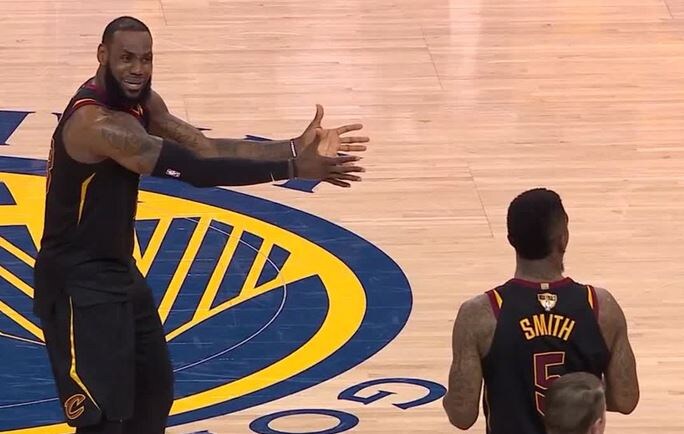
7. LeBron James’s NBA Finals Reaction
This is a video during the NBA finals when J.R.Smith, a player from Cleveland Cavaliers kept dribbling in the last 5 important seconds of the game against the Golden State Warriors and the time ran out. This is when Smith’s teammate Lebron James showed his utter disappointment and pointed out his mistake by stretching out his arms.
The reaction from James became the best memes of this year. As soon as the game was over, Lebron James’ reaction with caption started doing rounds on the Twitter that emoted disappointment and frustration. It garnered 29000 likes and 8800 retweets.
8. Tired Spongebob
Tired Spongebob is the lead character of the Spongebob Squarepants which used to air in the year 1999 and was from Episode 1. It is a still image of Spongebob where it appears to be out of breath and naked. Twitter has made this image popular by using it for showing exhaustion.

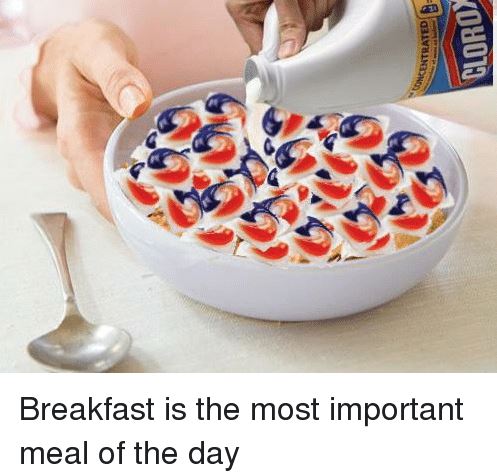
9. Tide Pods
Tide Pods is one of the best memes that shows how tide pods are compared to bleach drinking in the memes. When Procter Gamble launched its new product tide pods laundary detergent in 2012 it appeared like some flavored fruit snack due to its packaging.
Unfortunately, the attractive packaging of these laundry detergent capsules led to children consuming it and increasing calls to the poison control center. So, the Tide Pod eating memes are used to mock and compare it with the poisonous food and drinks in the online circuit.
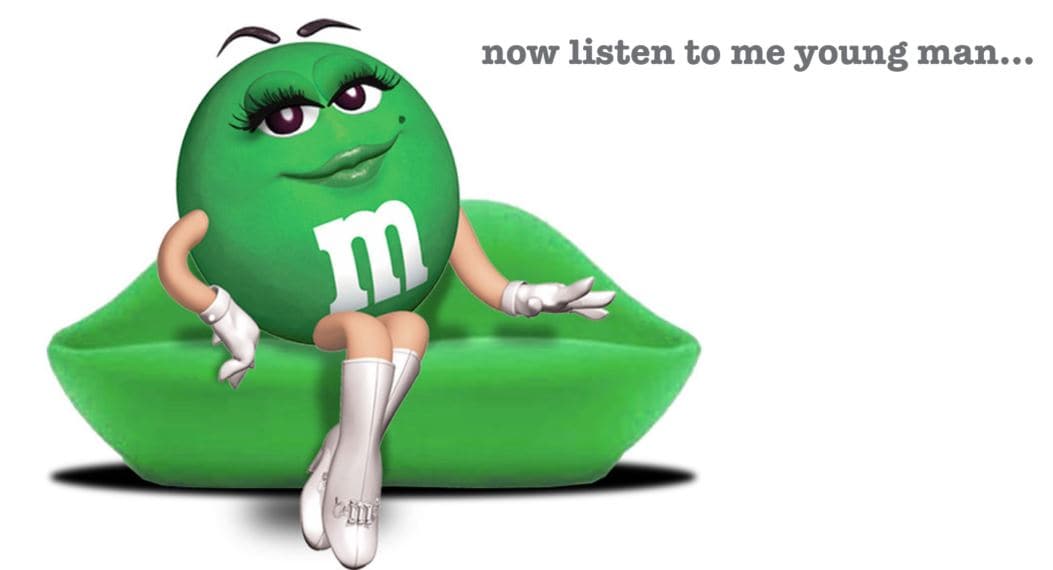
10. Green M&M Bambi Copypasta
While a Tumblr post comment and response the Green M&M Bambi Copypasta was used and went on to be amongst the top 10 best memes of the year so far. Here the person role-plays the character of the Green M&M and demands a game named Bambi from the Gamestop on Play Station 2.
The aggressive character and dominating tone of the post have stirred several variations. The Green M&M role plays in the similar demanding tone of the character started doing the rounds on the online platform since then.
Or you may want to make a trending meme, like red glowing eye, please read this article: How to create a red glowing eyes effect in videos?
Part 2: Recommended Tool to Make Memes
The newest addition in the Filmora family is the Filmora Online Meme Maker that lets you create funny and best memes completely free. It is being widely used by all the meme lovers and is packed with some of the best features. GIF, image and video memes are all supported to make.
From adding texts with the use of both internal and external sources to adjusting size and color, the Filmora Online Meme Maker comes with an intuitive interface, several video effects, and a range of editing tools. It is easy to use and an amazing tool for creating the best meme. It also lets you import video from YouTube and Vimeo and there are no watermarks even when used free. Try it now!
Ollie Mattison
Ollie Mattison is a writer and a lover of all things video.
Follow @Ollie Mattison
Ollie Mattison
Mar 27, 2024• Proven solutions
With several popular memes doing rounds on the Internet this year, 2019 can be said the “best memes year”. The memes are the latest things that speak louder than any other words. You get just 140 characters on Twitter which might not be enough for what you wish to post but, a powerful meme with a strong caption can do what any simple words cannot do. This is what each of the people is doing today.
When the meme is just released and hot like fire, each one of you wishes to use it. Below are by far the 10 best memes that you would definitely like to check out. Let’s laugh and have fun, forgetting all the stress of life.
Part 1: 10 Best Memes In 2024
1. Steven Crowder’s “Change My Mind” Campus Sign
The conservative podcaster Steven Crowder tweeted an image on 16th February 2018 which went on to become one of the funniest memes of 2018. It had Crowder’s photograph behind a table poster that read “Male Privilege is a myth / Change My Mind”. The image had a backdrop of the Texas Christian University and he tweeted it with a caption, “Hello @TCU. Come one come all. #ChangeMyMind.”
The image was tweeted as part of Crowder’s YouTube and podcast promotions where various viewpoints of Crowder are opposed by the people and they convince him of these issues. This post garnered around 6400 likes and 900 retweets in just 4 days.
2. Gru’s Plan
When Despicable Me was released on July 9, 2010, Gru, the protagonist in the film shows a presentation of stealing a moon and notice a drawing of himself where he is sitting on the toilet in between the pages of the presentation.
The memes of this comic show a startling presentation with a 3rd page, where the panel of Gru looks back at the board in complete bewilderment. FieldMarshalSixDans, a Redditor used screencaps from the film and posted a four-panel version meme which was re-posted. It reaped about 250 comments and above 18000 votes in 1 day.
3. American Chopper Argument
In the year 2009, the YouTube channel Shemrock Nursery Rhymes created a meme of the nursery rhymes Johny Johny Yes Papa. This rhyme is a popular one featured under animated amateur music video. It shows a small boy who tries to steal sugar and confronted by his father for not taking permission.
In July 2009, Shemrock YouTube channel created best memes for this video by using the clips of Johny Johny and used the audio of another nursery rhymes Twinkle Twinkle which collected over 2.9 million views in the first 6 years of its posting.
4. Who Killed Hannibal?
It is a skit from the Eric Andre Show, also known as Eric Andre Shooting Hannibal Buress where Eric Andre, the host of the show can be seen shooting a gun multiple times and asking on camera Who Killed Hannibal?
It was actually a joke during the Season 2, episode 6 of The Eric Andre Show. It turned out to be the best memes of this year when the famous dialogue “Who Killed Hannibal” was replaced by “Why would X do this?” in a variety of expressive template.
5. Walmart Yodel Boy
The Walmart Yodel Boy is a video that was filmed in a Walmart on 24th March 2018. It was the video of the 12-year-old child artist, Mason Ramsay singing “Lovesick Blues”. He is better known for Hank Williams impressions. This video from the concert was uploaded from a YouTube account named ViralHog. This song started being remixed with several other captions and went viral in no time and is considered one of the best memes of this year.
6. Is this a pigeon?
A shot from the anime series “The Brave Fighter of Sun Fighbird” had a scene in episode 3 of season 1 where professor Hiroshi Amano creates a human android, Yutaro Katori. While explaining mother Nature, Yutaro Katori thinks a butterfly to be a pigeon. One of the best memes is created when the reaction of this scene with the quote is used widely to show a confused expression on Tumblr.
7. LeBron James’s NBA Finals Reaction
This is a video during the NBA finals when J.R.Smith, a player from Cleveland Cavaliers kept dribbling in the last 5 important seconds of the game against the Golden State Warriors and the time ran out. This is when Smith’s teammate Lebron James showed his utter disappointment and pointed out his mistake by stretching out his arms.
The reaction from James became the best memes of this year. As soon as the game was over, Lebron James’ reaction with caption started doing rounds on the Twitter that emoted disappointment and frustration. It garnered 29000 likes and 8800 retweets.
8. Tired Spongebob
Tired Spongebob is the lead character of the Spongebob Squarepants which used to air in the year 1999 and was from Episode 1. It is a still image of Spongebob where it appears to be out of breath and naked. Twitter has made this image popular by using it for showing exhaustion.
9. Tide Pods
Tide Pods is one of the best memes that shows how tide pods are compared to bleach drinking in the memes. When Procter Gamble launched its new product tide pods laundary detergent in 2012 it appeared like some flavored fruit snack due to its packaging.
Unfortunately, the attractive packaging of these laundry detergent capsules led to children consuming it and increasing calls to the poison control center. So, the Tide Pod eating memes are used to mock and compare it with the poisonous food and drinks in the online circuit.
10. Green M&M Bambi Copypasta
While a Tumblr post comment and response the Green M&M Bambi Copypasta was used and went on to be amongst the top 10 best memes of the year so far. Here the person role-plays the character of the Green M&M and demands a game named Bambi from the Gamestop on Play Station 2.
The aggressive character and dominating tone of the post have stirred several variations. The Green M&M role plays in the similar demanding tone of the character started doing the rounds on the online platform since then.
Or you may want to make a trending meme, like red glowing eye, please read this article: How to create a red glowing eyes effect in videos?
Part 2: Recommended Tool to Make Memes
The newest addition in the Filmora family is the Filmora Online Meme Maker that lets you create funny and best memes completely free. It is being widely used by all the meme lovers and is packed with some of the best features. GIF, image and video memes are all supported to make.
From adding texts with the use of both internal and external sources to adjusting size and color, the Filmora Online Meme Maker comes with an intuitive interface, several video effects, and a range of editing tools. It is easy to use and an amazing tool for creating the best meme. It also lets you import video from YouTube and Vimeo and there are no watermarks even when used free. Try it now!
Ollie Mattison
Ollie Mattison is a writer and a lover of all things video.
Follow @Ollie Mattison
How to Make a Memorable Honeymoon Video
How to Make a Memorable Honeymoon Video
Ollie Mattison
Mar 27, 2024• Proven solutions
The honeymoon is maybe one of the most important times in our life. It’s unique, refined and filled with emotion which is why you should always try to consider exploring all the opportunities that this has to offer. But if you go on a honeymoon, you do want to have a video that you can cherish forever, don’t you? If you do, here are example of fancy honey moon video and some of the best ideas that you can use to create the best, most immersive and memorable honeymoon video.
Tips on creating a memorable honeymoon video
Choosing the right camera
There are many affordable 1080p or 4k cameras that you can use and all of them come with various features and prices. Obviously, you should try and focus on finding the right one that suits your needs. Take your time and study the prices and features then select the one you want based on your budget and expertise.
Get lots of photos
Another great tip is that you need to get as many photos as you can. No matter where you choose to go, there are tons of scenes, people, monuments and landmarks that you can choose to photograph. Take your time and try to capture as many of them as you possibly can. Granted, it will take a little bit of time but it will offer you the insight and fun you need in order to have a great slideshow in the end.
Organize a story from your photos
Once you have the photos, you should try to organize a story from the images. The best honeymoon movies are the ones that include a story so think about that and you will have quite a bit of fun as you immerse yourself into this experience, that’s for sure.
Add songs and overlays
You should try and consider adding songs and overlays because this will make the movie more fun and immersive. Once you complete it, you will need to share it with friends and family!
Edit your honeymoon video with Wondershare Filmora
Why choose Wondershare Filmora
If you are not good at video editing, or if you are a beginner and bothered by the complex steps of some professional video editor, Wondershare Filmora is here to save you. This is the best movie creation tool that helps you create you honeymoon movies from images all while delivering the entire set of tools you need to get a one of a kind and fun experience. If you always wanted an incredible and unique, refined movie creation experience then this is the app to use.
=“” style=”width: 100%; height: 278.438px;”;
Download Mac Version ](https://tools.techidaily.com/wondershare/filmora/download/ )
Wondershare Filmora is very easy to use but it also manages to offer a lot of power. This is great for people that want to access basic editing features such as splitting, reverse, rotate and crop but which might also want some advanced features as well. You are bound to enjoy the entire experience for sure and the outcome will be very well worth it.
Aside from that, Wondershare Filmora also allows you to access a fresh interface that makes editing such a video a breeze. You can even add a variety of overlays and filters which do add up to offer you a very refined, exciting and refreshing experience at all times. It’s all about having the right focus and attention to detail but rest assured that the outcome will be well worth it. Once you have the movie, you can share it on Vimeo, YouTube and Facebook with a single click. The app also allows you to burn it to DVD if you so desire.
How to edit the honeymoon video with Wondershare Filmora
All you have to do is to go through the next steps:
Step 1: Import your honeymoon photos and videos
Gather all the videos and images that you have from your honeymoon then paste them inside the app.

Step 2: Tone your videos with editing tools
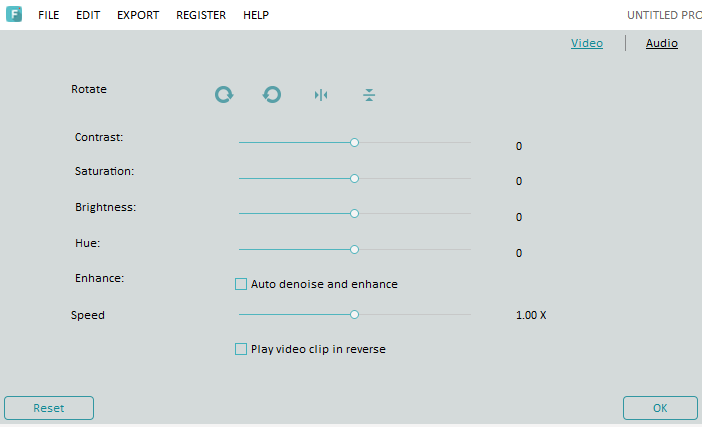
Add in video tones with features like reverse, trim, rotate, overlays, transitions, text and so on. This will help you refine the movie and offer it the unique experience you always wanted.
Step 3: Add music from Filmora library
Once you have that, add the music from the integrated royalty free library to ignite your love story.
Step 4: Save and share you video

Complete the video by saving it and then you can feel free to share it with friends.
Wondershare Filmora is the best solution for those that want a refined and fun honeymoon video. All you have to do is to try it out and rest assured that you are bound to love the results!
Download Mac Version ](https://tools.techidaily.com/wondershare/filmora/download/ )
Ollie Mattison
Ollie Mattison is a writer and a lover of all things video.
Follow @Ollie Mattison
Ollie Mattison
Mar 27, 2024• Proven solutions
The honeymoon is maybe one of the most important times in our life. It’s unique, refined and filled with emotion which is why you should always try to consider exploring all the opportunities that this has to offer. But if you go on a honeymoon, you do want to have a video that you can cherish forever, don’t you? If you do, here are example of fancy honey moon video and some of the best ideas that you can use to create the best, most immersive and memorable honeymoon video.
Tips on creating a memorable honeymoon video
Choosing the right camera
There are many affordable 1080p or 4k cameras that you can use and all of them come with various features and prices. Obviously, you should try and focus on finding the right one that suits your needs. Take your time and study the prices and features then select the one you want based on your budget and expertise.
Get lots of photos
Another great tip is that you need to get as many photos as you can. No matter where you choose to go, there are tons of scenes, people, monuments and landmarks that you can choose to photograph. Take your time and try to capture as many of them as you possibly can. Granted, it will take a little bit of time but it will offer you the insight and fun you need in order to have a great slideshow in the end.
Organize a story from your photos
Once you have the photos, you should try to organize a story from the images. The best honeymoon movies are the ones that include a story so think about that and you will have quite a bit of fun as you immerse yourself into this experience, that’s for sure.
Add songs and overlays
You should try and consider adding songs and overlays because this will make the movie more fun and immersive. Once you complete it, you will need to share it with friends and family!
Edit your honeymoon video with Wondershare Filmora
Why choose Wondershare Filmora
If you are not good at video editing, or if you are a beginner and bothered by the complex steps of some professional video editor, Wondershare Filmora is here to save you. This is the best movie creation tool that helps you create you honeymoon movies from images all while delivering the entire set of tools you need to get a one of a kind and fun experience. If you always wanted an incredible and unique, refined movie creation experience then this is the app to use.
=“” style=”width: 100%; height: 278.438px;”;
Download Mac Version ](https://tools.techidaily.com/wondershare/filmora/download/ )
Wondershare Filmora is very easy to use but it also manages to offer a lot of power. This is great for people that want to access basic editing features such as splitting, reverse, rotate and crop but which might also want some advanced features as well. You are bound to enjoy the entire experience for sure and the outcome will be very well worth it.
Aside from that, Wondershare Filmora also allows you to access a fresh interface that makes editing such a video a breeze. You can even add a variety of overlays and filters which do add up to offer you a very refined, exciting and refreshing experience at all times. It’s all about having the right focus and attention to detail but rest assured that the outcome will be well worth it. Once you have the movie, you can share it on Vimeo, YouTube and Facebook with a single click. The app also allows you to burn it to DVD if you so desire.
How to edit the honeymoon video with Wondershare Filmora
All you have to do is to go through the next steps:
Step 1: Import your honeymoon photos and videos
Gather all the videos and images that you have from your honeymoon then paste them inside the app.
Step 2: Tone your videos with editing tools
Add in video tones with features like reverse, trim, rotate, overlays, transitions, text and so on. This will help you refine the movie and offer it the unique experience you always wanted.
Step 3: Add music from Filmora library
Once you have that, add the music from the integrated royalty free library to ignite your love story.
Step 4: Save and share you video
Complete the video by saving it and then you can feel free to share it with friends.
Wondershare Filmora is the best solution for those that want a refined and fun honeymoon video. All you have to do is to try it out and rest assured that you are bound to love the results!
Download Mac Version ](https://tools.techidaily.com/wondershare/filmora/download/ )
Ollie Mattison
Ollie Mattison is a writer and a lover of all things video.
Follow @Ollie Mattison
Top 5 Best Websites to Add Emojis to Photo Online
Are you in love with those funny emojis you see in messenger apps and want to add them to your images too? Guess what? You can add emojis to photos online conveniently through a few websites. Emojis enhance how a picture looks instantly.
People can use an emoji on a friend’s image to make them look funny or hide their face with a smiley emoji. Why upload boring and the same kind of photos all the time when emojis can add the much-needed magical touch? So, if you want to add emoji to photos online, look no further and learn about the best websites that allow you do that easily.
In this article
01 Top 5 Websites to Add Emojis to Photo Online
02 How to Add Emojis to Photo on Wondershare Filmora
Part 1: Top 5 Websites to Add Emojis to Photo Online
#1: Kapwing

One of the best websites is Kapwing, which lets you add emojis to any photo you want. Kapwing is an easy-to-use online tool, which means you will not have to download any tool. But to start using it, you will have to sign up. You can do that by using your Google ID. When it comes to the number of emojis it has, it boasts more than 250 different emojis. It lets you add custom emojis; let’s say you have a pack of custom emojis with you that you want to use; you can do that effortlessly.
Key Features
- It’s an online tool and free to use.
- You need to sign up to save your work.
- It has more than 250 emojis to choose from.
- Kapwing is easy to use.
Steps to Follow to Use Kapwing
Step 1: Visit the official website of Kapwing. You will see the Start Editing option; please click on that.
Step 2: You will see the workspace with an option that says “click to upload.” Click on it.
Step 3: Now, upload a photo that you want to add the emoji too. The image will be uploaded.
Step 4: To add an emoji, look towards the left menu, and you will see the Add Media option. Click on that.
Step 5: You will see the upload, projects, and emojis options. Click on the emojis option.
Step 6: Emojis will appear. Click on one, and it will be uploaded to the main photo. You can drag, shrink, zoom, or rotate the emoji used. You can add as many emojis you want.
Related: How to make a slo-mo video on Kapwing
#2: Image Online.Co

The next good online tool that you can try is Image Online.Co. It’s a pretty basic tool that lets you upload a photo and add an emoji the right way. It has more than 100 emojis, which is not a lot. But features all the popular emojis that will suit all kinds of images. And it allows you to add your custom emojis, which is why people prefer to use Image Online.Co. Using it is very easy, and the interface of the online tool is easy to understand.
Key Features
- It is a 100% free online tool that won’t ask you to sign up or log in.
- The tool has 100+ emojis to choose from.
- The interface is easy to understand.
- The tool is easy to use.
Steps to Follow to Use Image Online.Co
Step 1: Visit https://emoji.imageonline.co/ , which is their official website.
Step 2: Click on the Select Photo option, else directly drop an image from your local folder.
Step 3: If you want, you can add a custom emoji that you already have.
Step 4: Add an emoji from the right menu and rotate or zoom in or zoom out.
#3: Canva

Canva is arguably one of the best ways to make your photos look better. This tool has tons of features, and the best part is that you can customize a picture with an emoji using one of their templates. It has 250+ emojis and lets you add your customized emoji. And to start using Canva, you will have to sign up.
Key Features
- Canva has more than 250 emojis.
- It lets you edit your photos to enhance their quality.
- One-month free trial.
- You can choose from different templates.
Steps to Follow to Use Canva
Step 1: First, visit https://www.canva.com/ and sign up using your Facebook account or Gmail.
Step 2: Choose the kind of work you would like to do, and you will be taken to the photo editing page.
Step 3: Upload an image and click on the more option.
Step 4: Click on the emoji option and choose an emoji to add to the image. To save, click on the download option.
Related: How to Animate Pictures in Canva
#4: PiZap

PiZap is a photo editing tool that lets you add emojis too. To start using, you will have to log in or sign up. You can use your Facebook, Twitter, or Google account to sign up. It provides you with various graphics, fonts, and other photo editing features to make the image look better than before. The basic tool comes for free and has 232 emojis currently.
Key Features
- The basic tool comes for free.
- There are numerous emojis to choose from.
- The image quality doesn’t lose its original quality.
- Using the tool is easy, and the interface is intuitive.
Steps to Follow to Use PiZap
Step 1: Visit www.pizap.com and click on the try for free option.
Step 2: Click on the edit photo option, and upload an image.
Step 3: From the left-side toolbar, click on the Graphics option. Scroll a bit, and you will see the emoji section.
Step 4: Click on any of the emojis you like to add to the photo. You can adjust the emojis as you want.
#5: Pixelied
![]()
The last website that we have is Pixelied. The free tool will let you edit your image and add emojis, which will be enough if you don’t want many features. Using the tool is easy, and the emojis Pixelied has are great. They are different than general emojis and look better! Plus, the tool provides 300+ fantastic emojis.
Key Features
- The tool has an excellent collection of emojis.
- Adding emojis is extremely easy.
- It is free to use and doesn’t require any photo editing experience.
- The tool also offers various photo editing features.
How to Use Pixelied?
Step 1: Visit pixelied.com and click on the Upload Your Image option.
Step 2: On the left, you will find tons of icons. Use the search bar and type emojis.
Step 3: Browse through the emojis and click on one that you like. You can use multiple emojis, too, if you want. To save, click on the download option.
Part 2: How to Add Emojis to Photo on Wondershare Filmora
Filmora video editor provides tons of emojis that you can add for free, so you can add them to photos directly. What’s more, you can also upload your own emoji and use it in Filmora. All you need to do is download the tool on your Windows or Mac computer and start using it to add an emoji. There are two ways to go about it:
Use Emojis from Elements

Step 1: Launch Wondershare Filmora and click on create a new project.
Step 2: Click on the Elements option on the top and use the search bar to search for emojis.
Step 3: Click on any of the emojis that you like and adjust them.
Step 4: To save the photo with emojis, just click the camera icon to take a screenshot .
The video below shows the animated emojis that you can try in Filmora, take a look and have fun.
For Win 7 or later (64-bit)
For macOS 10.12 or later
Upload Your Own Emoji
Step 1: Launch Wondershare Filmora and add both the emoji and photo.
Step 2: Drag both of them into the timeline.
Step 3: Use the viewer panel to adjust the size of the emoji.

For Win 7 or later (64-bit)
For macOS 10.12 or later
Besides adding emojis to photos or videos, you can also add stickers to videos in Filmora to have fun.
Conclusion
And that’s how you can add an emoji to a photo online easily. You can try all five websites to add emojis to your photos, and if you want, you can download Wondershare Filmora to further edit the image. So, try these tools and make your photo look fun and fantastic!
02 How to Add Emojis to Photo on Wondershare Filmora
Part 1: Top 5 Websites to Add Emojis to Photo Online
#1: Kapwing
One of the best websites is Kapwing, which lets you add emojis to any photo you want. Kapwing is an easy-to-use online tool, which means you will not have to download any tool. But to start using it, you will have to sign up. You can do that by using your Google ID. When it comes to the number of emojis it has, it boasts more than 250 different emojis. It lets you add custom emojis; let’s say you have a pack of custom emojis with you that you want to use; you can do that effortlessly.
Key Features
- It’s an online tool and free to use.
- You need to sign up to save your work.
- It has more than 250 emojis to choose from.
- Kapwing is easy to use.
Steps to Follow to Use Kapwing
Step 1: Visit the official website of Kapwing. You will see the Start Editing option; please click on that.
Step 2: You will see the workspace with an option that says “click to upload.” Click on it.
Step 3: Now, upload a photo that you want to add the emoji too. The image will be uploaded.
Step 4: To add an emoji, look towards the left menu, and you will see the Add Media option. Click on that.
Step 5: You will see the upload, projects, and emojis options. Click on the emojis option.
Step 6: Emojis will appear. Click on one, and it will be uploaded to the main photo. You can drag, shrink, zoom, or rotate the emoji used. You can add as many emojis you want.
Related: How to make a slo-mo video on Kapwing
#2: Image Online.Co
The next good online tool that you can try is Image Online.Co. It’s a pretty basic tool that lets you upload a photo and add an emoji the right way. It has more than 100 emojis, which is not a lot. But features all the popular emojis that will suit all kinds of images. And it allows you to add your custom emojis, which is why people prefer to use Image Online.Co. Using it is very easy, and the interface of the online tool is easy to understand.
Key Features
- It is a 100% free online tool that won’t ask you to sign up or log in.
- The tool has 100+ emojis to choose from.
- The interface is easy to understand.
- The tool is easy to use.
Steps to Follow to Use Image Online.Co
Step 1: Visit https://emoji.imageonline.co/ , which is their official website.
Step 2: Click on the Select Photo option, else directly drop an image from your local folder.
Step 3: If you want, you can add a custom emoji that you already have.
Step 4: Add an emoji from the right menu and rotate or zoom in or zoom out.
#3: Canva
Canva is arguably one of the best ways to make your photos look better. This tool has tons of features, and the best part is that you can customize a picture with an emoji using one of their templates. It has 250+ emojis and lets you add your customized emoji. And to start using Canva, you will have to sign up.
Key Features
- Canva has more than 250 emojis.
- It lets you edit your photos to enhance their quality.
- One-month free trial.
- You can choose from different templates.
Steps to Follow to Use Canva
Step 1: First, visit https://www.canva.com/ and sign up using your Facebook account or Gmail.
Step 2: Choose the kind of work you would like to do, and you will be taken to the photo editing page.
Step 3: Upload an image and click on the more option.
Step 4: Click on the emoji option and choose an emoji to add to the image. To save, click on the download option.
Related: How to Animate Pictures in Canva
#4: PiZap
PiZap is a photo editing tool that lets you add emojis too. To start using, you will have to log in or sign up. You can use your Facebook, Twitter, or Google account to sign up. It provides you with various graphics, fonts, and other photo editing features to make the image look better than before. The basic tool comes for free and has 232 emojis currently.
Key Features
- The basic tool comes for free.
- There are numerous emojis to choose from.
- The image quality doesn’t lose its original quality.
- Using the tool is easy, and the interface is intuitive.
Steps to Follow to Use PiZap
Step 1: Visit www.pizap.com and click on the try for free option.
Step 2: Click on the edit photo option, and upload an image.
Step 3: From the left-side toolbar, click on the Graphics option. Scroll a bit, and you will see the emoji section.
Step 4: Click on any of the emojis you like to add to the photo. You can adjust the emojis as you want.
#5: Pixelied
![]()
The last website that we have is Pixelied. The free tool will let you edit your image and add emojis, which will be enough if you don’t want many features. Using the tool is easy, and the emojis Pixelied has are great. They are different than general emojis and look better! Plus, the tool provides 300+ fantastic emojis.
Key Features
- The tool has an excellent collection of emojis.
- Adding emojis is extremely easy.
- It is free to use and doesn’t require any photo editing experience.
- The tool also offers various photo editing features.
How to Use Pixelied?
Step 1: Visit pixelied.com and click on the Upload Your Image option.
Step 2: On the left, you will find tons of icons. Use the search bar and type emojis.
Step 3: Browse through the emojis and click on one that you like. You can use multiple emojis, too, if you want. To save, click on the download option.
Part 2: How to Add Emojis to Photo on Wondershare Filmora
Filmora video editor provides tons of emojis that you can add for free, so you can add them to photos directly. What’s more, you can also upload your own emoji and use it in Filmora. All you need to do is download the tool on your Windows or Mac computer and start using it to add an emoji. There are two ways to go about it:
Use Emojis from Elements
Step 1: Launch Wondershare Filmora and click on create a new project.
Step 2: Click on the Elements option on the top and use the search bar to search for emojis.
Step 3: Click on any of the emojis that you like and adjust them.
Step 4: To save the photo with emojis, just click the camera icon to take a screenshot .
The video below shows the animated emojis that you can try in Filmora, take a look and have fun.
For Win 7 or later (64-bit)
For macOS 10.12 or later
Upload Your Own Emoji
Step 1: Launch Wondershare Filmora and add both the emoji and photo.
Step 2: Drag both of them into the timeline.
Step 3: Use the viewer panel to adjust the size of the emoji.
For Win 7 or later (64-bit)
For macOS 10.12 or later
Besides adding emojis to photos or videos, you can also add stickers to videos in Filmora to have fun.
Conclusion
And that’s how you can add an emoji to a photo online easily. You can try all five websites to add emojis to your photos, and if you want, you can download Wondershare Filmora to further edit the image. So, try these tools and make your photo look fun and fantastic!
Also read:
- How to Make an Emoji of Yourself on Mobile ? Emoji Yourself for 2024
- How to Successfully Charge Your Electric Vehicle (EV) From the Comfort of Your Own Residence
- How to Teach English as a Second Language
- In 2024, From Basics to Brilliance Fullscreen Proficiency in Premiere
- In 2024, The Blueprint for Channel Empowerment via Studio Mastery
- Innovative Approaches to IPTV Video Logging for 2024
- New In 2024, How to Add Bitmoji to Keyboard? Complete Guide
- Updated 10 Most Popular Minion Memes that Moms Are Crazy About
- Updated 2024 Approved 10 Popular Cartoon Characters That Should Top Your List
- Updated 2024 Approved 8 Best Meme Maker App to Create Memes with Your Own Picture
- Updated 25 Cute Memes to Make You Feel Better for 2024
- Why Choose the ChatGPT Desktop Application Over the Standard Web Interface?
- World Words Ranking: Longest to Shortest
- Title: Updated How to Add Bitmoji to Keyboard, In 2024
- Author: Jan
- Created at : 2024-09-23 19:37:46
- Updated at : 2024-09-30 20:35:03
- Link: https://meme-emoji.techidaily.com/updated-how-to-add-bitmoji-to-keyboard-in-2024/
- License: This work is licensed under CC BY-NC-SA 4.0.