
Updated 2024 Approved How to Add Bitmoji to Keyboard? Complete Guide
How to Add Bitmoji to Keyboard? Complete Guide][Emojis
Apart from the generic emojis that you can find in your chat applications, Bitmoji enables you to customize your character and share it with people you chat with. Bitmoji is fun, but do you know how to add it to a keyboard? If you don’t, don’t worry, this post will help you understand how to do that.
In this article
02 How to Add and Use Bitmoji to iPhone Keyboard?
03 How to Get the Bitmoji Keyboard on Android?
04 How to Install and Use Bitmoji on Windows and Mac?
Part 1: What is Bitmoji?
If you are new to Bitmoji, you may wonder what it is? Bitmoji is essentially your own personal emoji. You can create a cartoon version of yourself and share it with people to make the conversation fun. So, what one does is create an avatar of themselves and give it all kinds of expressions.
Then, you can create comics using your Bitmoji, use it to express yourself while having a chat, and even use it as a reaction. Anyone who is done using the same old emojis has started using Bitmoji because it’s a lot more fun.
Now, let’s learn how to create your very own Bitmoji.
Step 1: First, go to the App Store or Play store and download the Bitmoji application.
Step 2: Once downloaded, launch the app and start making an avatar or your Bitmoji.
Step 3: Pick a skin color, hair color, chin, nose, hairstyle, jawline, and more.

Once your Bitmoji is created, you are all set to use the Bitmoji as stickers. Moreover, the app lets you dress your Bitmoji as you want as well. Let it have different expressions and postures because that’s how it’s going to be fun! After your Bitmoji is added, the next thing to do is enable Bitmoji on the keyboard of the device you are using.
Part 2: How to Add and Use Bitmoji to iPhone Keyboard?
Since you have learned how to create a Bimoji, it’s time to learn the steps to use it on your iPhone keyboard. Unfortunately, just by downloading the app, it won’t reflect on the keyboard directly. Instead, you will have to follow a few steps to add Bitmoji to the keyboard. Here’s what you need to do.
Step 1: Launch your iPhone and click on the Settings option.
Step 2: Now, go to the General option and click on the Keyboard option.

Step 3: When the Keyboard page opens, click on the option that says Keyboards and then click on Add New Keyboard.
Step 4: You will see the Third Party Keyboards option. There, you need to click on Bitmoji.
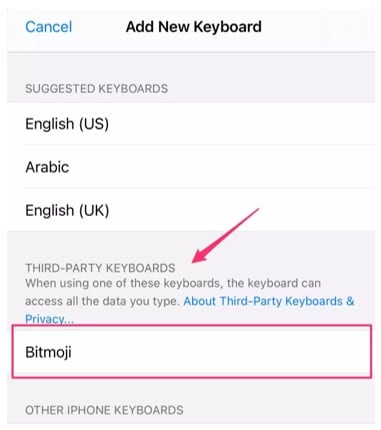
Step 5: Now, toggle the option that says Allow Full Access. Once you do that, you will see a small pop-up. Click on the Allow option.
And that’s it. Bitmoji will be added to the iPhone keyboard. Open any messaging app and click on the globe and hold it for a few seconds. When you see Bitmoji, click on that, and you will be able to use Bitmoji stickers.
Part 3: How to Get the Bitmoji Keyboard on Android?
Bitmoji is available for Android users as well. Before you begin to use it, go through the first part again and download the app. Then create your Bitmoji, as explained earlier. You can send Bitmojis directly from the app itself, but if you plan to use Bitmoji regularly, getting the Bitmoji keyboard makes sense. So, once you are done, follow the following steps to get the Bitmoji keyboard on Android.
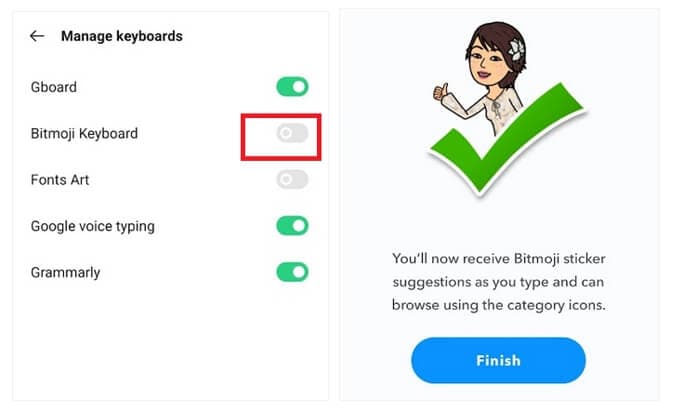
Step 1: Launch the Bitmoji app. Click on the Keyboard option that you see at the bottom of the Bitmoji app screen.
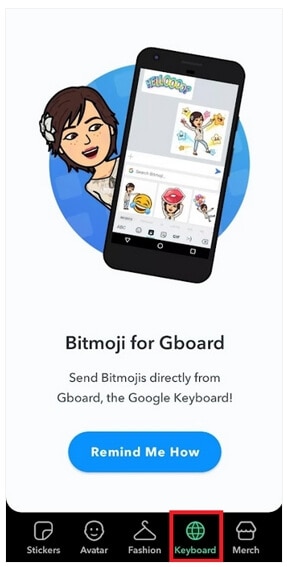
Step 2: Install Bitmoji keyboard and give permission to your phone to use Bitmoji keyboard. Bitmoji will notify you when the Bitmoji keyboard gets activated.
You are all done. Now, use the Bitmoji keyboard to chat with your family members and friends and make everything fun and exciting.
Part 4: How to Install and Use Bitmoji on Windows and Mac?
If you want to use Bitmoji on Windows and Mac, you will have to use the Google Chrome browser. If you already have the Google Chrome browser, carry on with the steps explained below; otherwise, get the browser before starting.
Step 1: Go to Chrome Extension and install Bitmoji for Chrome Extension.
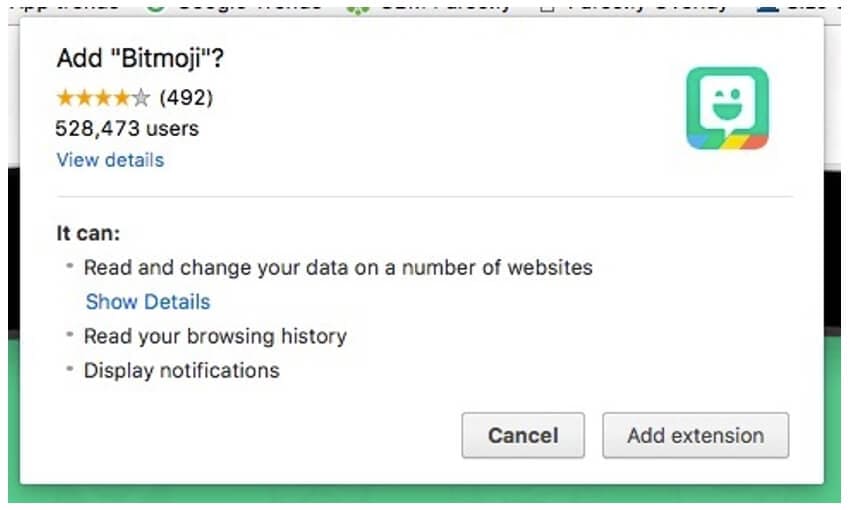
Step 2: You will have to sign in to Bitmoji. If you want to add Bitmoji to Gmail, click on add Bitmoji to Gmail.
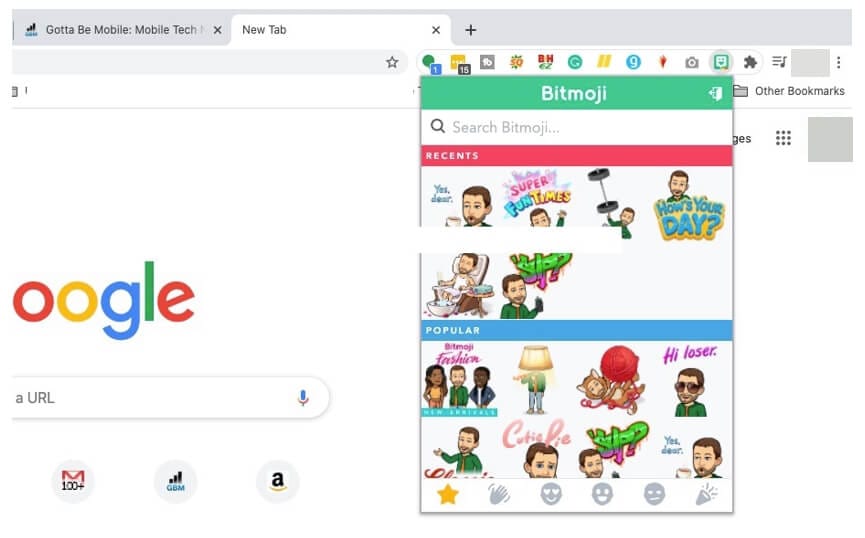
After you are done following the three easy steps, you will see Bitmoji is installed. To start using it, move the cursor to the upper corner of the browser and click on the Bitmoji icon. Next, you will see the Bitmojis. Choose any Bitmoji, copy it, and paste it on Gmail or instant messaging applications.
Part 5: Where can You Use Bitmoji?
Bitmojis can be used on different platforms. All you need to do is enable Bitmoji keyboard on your iPhone or Android phone or Windows and Mac computers and use it on various social media platforms. For example, use Snapchat to send Bitmojis for different types of occasions.
If you are an iPhone user, you can share fun Bitmojis through iMessage. On a computer, you can use these Bitmojis on Facebook or other instant messaging platforms. You can drag and drop the Bitmoji sticker or copy it to share it with your friends.
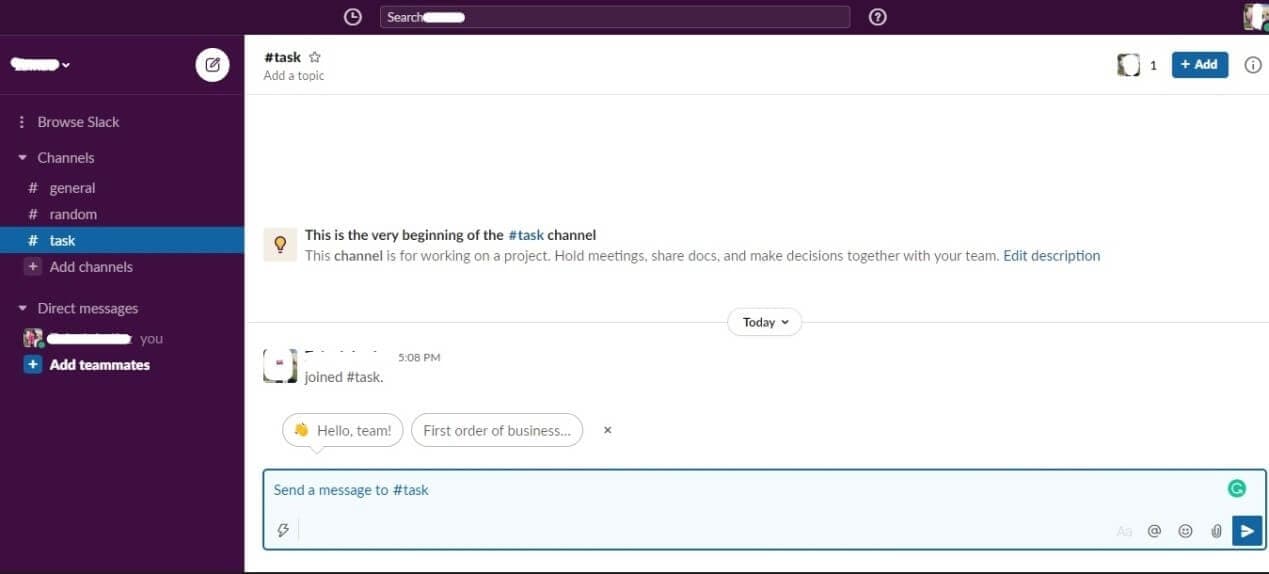
If you are a working professional and want to lighten the mood of your Slack workspace, use Bitmojis to make your coworkers feel relaxed. Plus, this can be a great way to make someone feel pumped up. Like that, there are many other platforms to use Bitmojis!
Related: Best Free Apps to Get Emojis on iPhone and Android
Conclusion
So, there you go. We have finally reached the end of this guide. We hope you have found this post interesting and will face no hassle using the Bitmoji keyboard on different devices. Get the Bitmoji app if you haven’t downloaded it yet and make your conversations fun and enjoyable!
02 How to Add and Use Bitmoji to iPhone Keyboard?
03 How to Get the Bitmoji Keyboard on Android?
04 How to Install and Use Bitmoji on Windows and Mac?
Part 1: What is Bitmoji?
If you are new to Bitmoji, you may wonder what it is? Bitmoji is essentially your own personal emoji. You can create a cartoon version of yourself and share it with people to make the conversation fun. So, what one does is create an avatar of themselves and give it all kinds of expressions.
Then, you can create comics using your Bitmoji, use it to express yourself while having a chat, and even use it as a reaction. Anyone who is done using the same old emojis has started using Bitmoji because it’s a lot more fun.
Now, let’s learn how to create your very own Bitmoji.
Step 1: First, go to the App Store or Play store and download the Bitmoji application.
Step 2: Once downloaded, launch the app and start making an avatar or your Bitmoji.
Step 3: Pick a skin color, hair color, chin, nose, hairstyle, jawline, and more.
Once your Bitmoji is created, you are all set to use the Bitmoji as stickers. Moreover, the app lets you dress your Bitmoji as you want as well. Let it have different expressions and postures because that’s how it’s going to be fun! After your Bitmoji is added, the next thing to do is enable Bitmoji on the keyboard of the device you are using.
Part 2: How to Add and Use Bitmoji to iPhone Keyboard?
Since you have learned how to create a Bimoji, it’s time to learn the steps to use it on your iPhone keyboard. Unfortunately, just by downloading the app, it won’t reflect on the keyboard directly. Instead, you will have to follow a few steps to add Bitmoji to the keyboard. Here’s what you need to do.
Step 1: Launch your iPhone and click on the Settings option.
Step 2: Now, go to the General option and click on the Keyboard option.
Step 3: When the Keyboard page opens, click on the option that says Keyboards and then click on Add New Keyboard.
Step 4: You will see the Third Party Keyboards option. There, you need to click on Bitmoji.
Step 5: Now, toggle the option that says Allow Full Access. Once you do that, you will see a small pop-up. Click on the Allow option.
And that’s it. Bitmoji will be added to the iPhone keyboard. Open any messaging app and click on the globe and hold it for a few seconds. When you see Bitmoji, click on that, and you will be able to use Bitmoji stickers.
Part 3: How to Get the Bitmoji Keyboard on Android?
Bitmoji is available for Android users as well. Before you begin to use it, go through the first part again and download the app. Then create your Bitmoji, as explained earlier. You can send Bitmojis directly from the app itself, but if you plan to use Bitmoji regularly, getting the Bitmoji keyboard makes sense. So, once you are done, follow the following steps to get the Bitmoji keyboard on Android.
Step 1: Launch the Bitmoji app. Click on the Keyboard option that you see at the bottom of the Bitmoji app screen.
Step 2: Install Bitmoji keyboard and give permission to your phone to use Bitmoji keyboard. Bitmoji will notify you when the Bitmoji keyboard gets activated.
You are all done. Now, use the Bitmoji keyboard to chat with your family members and friends and make everything fun and exciting.
Part 4: How to Install and Use Bitmoji on Windows and Mac?
If you want to use Bitmoji on Windows and Mac, you will have to use the Google Chrome browser. If you already have the Google Chrome browser, carry on with the steps explained below; otherwise, get the browser before starting.
Step 1: Go to Chrome Extension and install Bitmoji for Chrome Extension.
Step 2: You will have to sign in to Bitmoji. If you want to add Bitmoji to Gmail, click on add Bitmoji to Gmail.
After you are done following the three easy steps, you will see Bitmoji is installed. To start using it, move the cursor to the upper corner of the browser and click on the Bitmoji icon. Next, you will see the Bitmojis. Choose any Bitmoji, copy it, and paste it on Gmail or instant messaging applications.
Part 5: Where can You Use Bitmoji?
Bitmojis can be used on different platforms. All you need to do is enable Bitmoji keyboard on your iPhone or Android phone or Windows and Mac computers and use it on various social media platforms. For example, use Snapchat to send Bitmojis for different types of occasions.
If you are an iPhone user, you can share fun Bitmojis through iMessage. On a computer, you can use these Bitmojis on Facebook or other instant messaging platforms. You can drag and drop the Bitmoji sticker or copy it to share it with your friends.
If you are a working professional and want to lighten the mood of your Slack workspace, use Bitmojis to make your coworkers feel relaxed. Plus, this can be a great way to make someone feel pumped up. Like that, there are many other platforms to use Bitmojis!
Related: Best Free Apps to Get Emojis on iPhone and Android
Conclusion
So, there you go. We have finally reached the end of this guide. We hope you have found this post interesting and will face no hassle using the Bitmoji keyboard on different devices. Get the Bitmoji app if you haven’t downloaded it yet and make your conversations fun and enjoyable!
How to Add and Custom Slack Emoji-Wondershare Filmora
How to Add and Custom Slack Emoji-Wondershare Filmora

Shanoon Cox
Mar 27, 2024• Proven solutions
A Slack emoji is just like the emojis you usually use on Whatsapp, Messenger, or other chatting platforms. There is a wide range of emojis you can use to express yourself better or lighten the working environment.
Plus, the option to create a custom Slack emoji makes it more interesting. You can use it to create a new and unique Slack emoji to personalize your chatting experience. Why write long texts when you can just add Slack emoji to say it all?
Let me show you the ropes on how to create a custom Slack emoji and make your chatting experience more fun.
- Part 1: How to Add Slack Emoji
- Part 2: How to Custom Slack Emoji
- Bonus Tip-Edit Emoji and Add Emoji to Your Video
Part 1: How to Add Slack Emoji
At Slack, you can find a Slack emoji for every emotion or occasion. Finding the perfect Slack emoji is as easy as browsing through the categorized sections. Better yet, the option to search for a Slack emoji makes it a cakewalk to get the exact Slack emoji to express oneself.
Also, you can add Slack emoji with a single tap. And it allows you to add unlimited Slack emoji in one message.
Let me show you how to add Slack emoji in a few quick steps:
1.Download and open Slack on your desktop or smartphone.
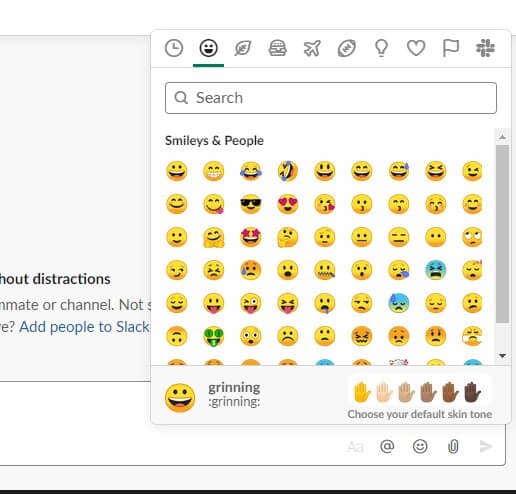
2.To add a Slack emoji, click on the Smiley face icon in the bottom right corner of the message box
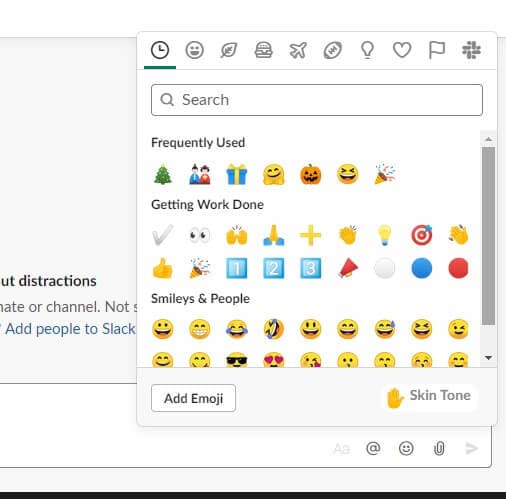
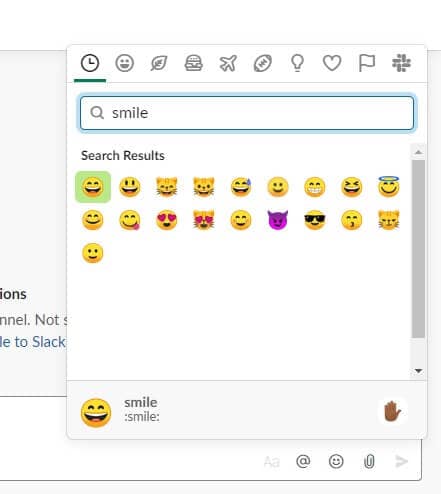
3.Browse through the categories to find the right Slack emoji for your message. In the search bar, type the kind of emoji you are looking for to find it faster.
4.Click on the Hand icon in the bottom right corner to choose the default skin tone for all your emojis. Finally, to add Slack emoji to your message, just tap on it. Add as many Slack emoji as you like just by tapping on them.
Part 2: How to Custom Slack Emoji
Using the commonly used emojis can get boring. Sometimes, even the Slack emoji collection falls short in expressing the exact feeling you wish to convey. However, the good news is that you can easily create a custom Slack emoji without any hassle.
A Slack custom emoji can range from your own picture to any other image. You can create a personalized custom Slack emoji to crack inside jokes or create your brand icon Slack emoji.
Here’s how to create an awesome custom Slack emoji-
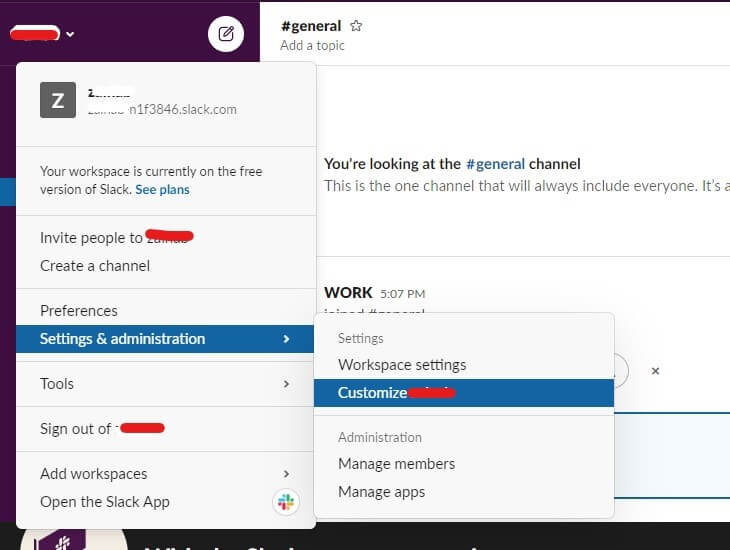
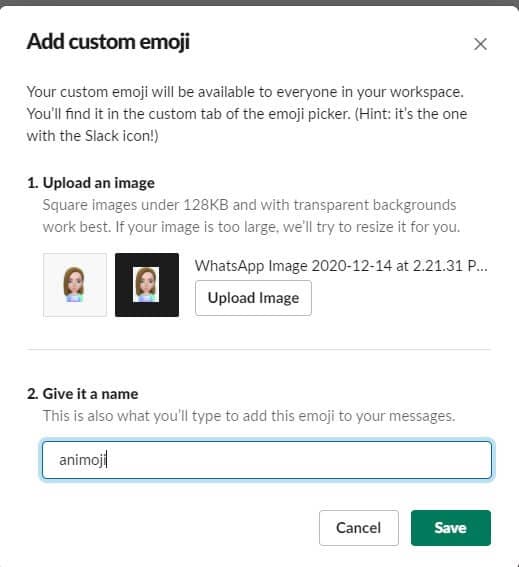
1.On your workspace, click on your company name or icon to open the settings drop-down menu. Tap on Settings&Administration<Customize.
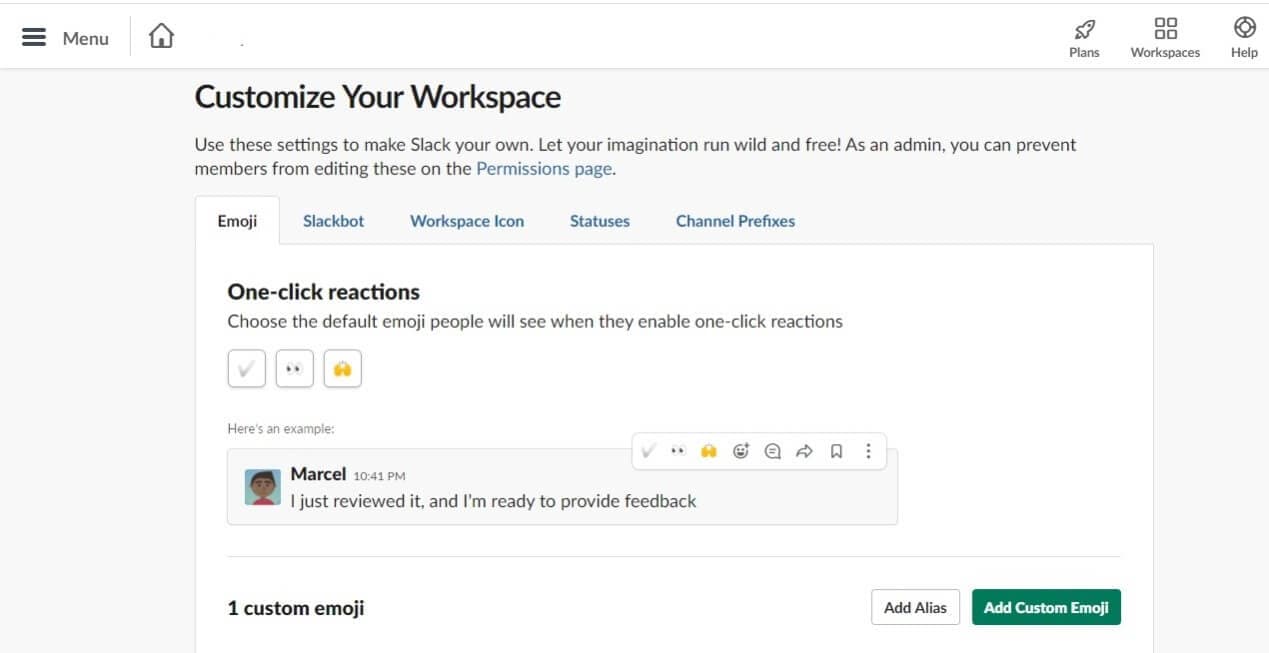
2.A new window will pop open. In the Emoji tab, click on Add Custom Emoji.
3.Here you can upload any image to make your custom Slack emoji. Click on Upload Image to select a file.
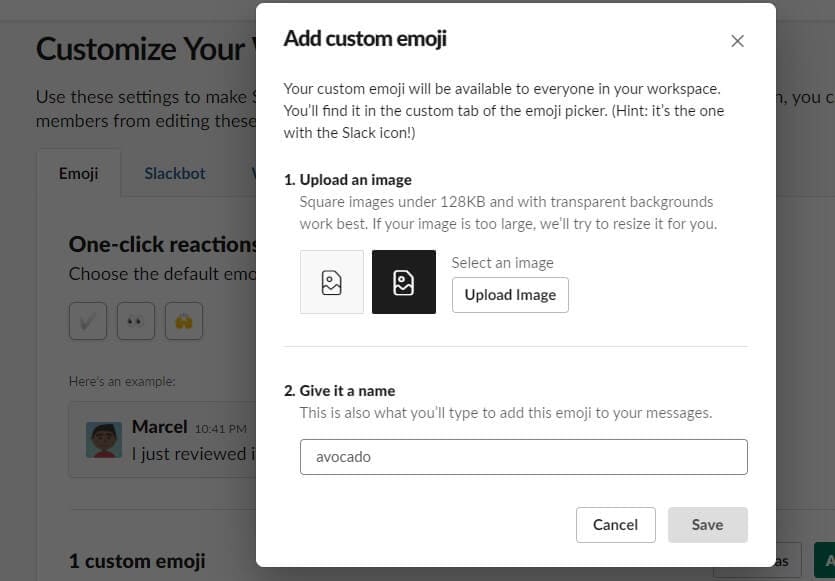
4.Then, give your emoji a name so you can easily find the custom Slack emoji while chatting. Click Save to finish.
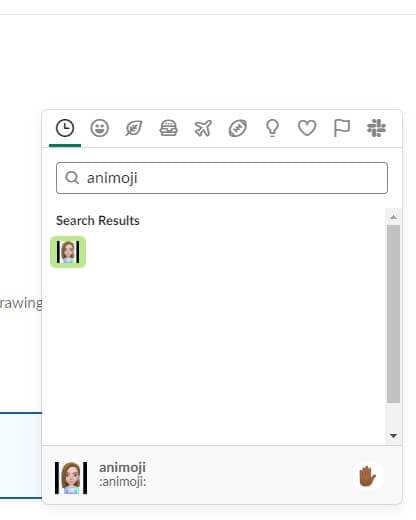
5.Now, go back to the workspace and click on the Smiley icon. Type the custom Slack emoji name to find it and click to send it.
Bonus Tip-Edit Emoji and Add Emoji to Your Video
Now, let me present a top-notch video editor to help you add Slack emoji to your video without needing any editing experience.
Wondershare Filmora is a powerful video editor with a highly intuitive interface. It is loaded with high-end editing tools that are incredibly easy to use. You can add keyframe animations to make your videos more dynamic with a single click. Motion tracking allows you to track the specified object’s movements throughout the video, even allowing you to blur certain parts of the video. From the Effects tab, you can add cinematic effects to your videos, or you can easily color match all your scenes with one tap or apply noise reduction.
If you wish to edit or add custom Slack emoji to your video, you can import the image to Filmora and then drag it to the track above the video in the timeline. You can then add animations or motion tracking to adjust the custom Slack emoji. Cool transitions and color adjustments can also be made to make the video more appealing and unique. Special effects or catchy captions are just a tap away to help you create stunning videos


Conclusion
With the introduction of emojis, the need for writing long messages has diminished. Using a Slack emoji can turn your conversations around and make them more interesting. Chatting has never been easier or more fun.
Add Slack emoji or react to what others have to say. It’s time to create a custom Slack emoji to wow your friends and colleagues with tiny emojis that are exclusive to just you. If you want to spice up your work chats, just add Slack emoji and enjoy.
Try out Wondershare Filmora to add Slack emoji to your videos to make them unique.
Shanoon Cox
Shanoon Cox is a writer and a lover of all things video.
Follow @Shanoon Cox
Shanoon Cox
Mar 27, 2024• Proven solutions
A Slack emoji is just like the emojis you usually use on Whatsapp, Messenger, or other chatting platforms. There is a wide range of emojis you can use to express yourself better or lighten the working environment.
Plus, the option to create a custom Slack emoji makes it more interesting. You can use it to create a new and unique Slack emoji to personalize your chatting experience. Why write long texts when you can just add Slack emoji to say it all?
Let me show you the ropes on how to create a custom Slack emoji and make your chatting experience more fun.
- Part 1: How to Add Slack Emoji
- Part 2: How to Custom Slack Emoji
- Bonus Tip-Edit Emoji and Add Emoji to Your Video
Part 1: How to Add Slack Emoji
At Slack, you can find a Slack emoji for every emotion or occasion. Finding the perfect Slack emoji is as easy as browsing through the categorized sections. Better yet, the option to search for a Slack emoji makes it a cakewalk to get the exact Slack emoji to express oneself.
Also, you can add Slack emoji with a single tap. And it allows you to add unlimited Slack emoji in one message.
Let me show you how to add Slack emoji in a few quick steps:
1.Download and open Slack on your desktop or smartphone.
2.To add a Slack emoji, click on the Smiley face icon in the bottom right corner of the message box
3.Browse through the categories to find the right Slack emoji for your message. In the search bar, type the kind of emoji you are looking for to find it faster.
4.Click on the Hand icon in the bottom right corner to choose the default skin tone for all your emojis. Finally, to add Slack emoji to your message, just tap on it. Add as many Slack emoji as you like just by tapping on them.
Part 2: How to Custom Slack Emoji
Using the commonly used emojis can get boring. Sometimes, even the Slack emoji collection falls short in expressing the exact feeling you wish to convey. However, the good news is that you can easily create a custom Slack emoji without any hassle.
A Slack custom emoji can range from your own picture to any other image. You can create a personalized custom Slack emoji to crack inside jokes or create your brand icon Slack emoji.
Here’s how to create an awesome custom Slack emoji-
1.On your workspace, click on your company name or icon to open the settings drop-down menu. Tap on Settings&Administration<Customize.
2.A new window will pop open. In the Emoji tab, click on Add Custom Emoji.
3.Here you can upload any image to make your custom Slack emoji. Click on Upload Image to select a file.
4.Then, give your emoji a name so you can easily find the custom Slack emoji while chatting. Click Save to finish.
5.Now, go back to the workspace and click on the Smiley icon. Type the custom Slack emoji name to find it and click to send it.
Bonus Tip-Edit Emoji and Add Emoji to Your Video
Now, let me present a top-notch video editor to help you add Slack emoji to your video without needing any editing experience.
Wondershare Filmora is a powerful video editor with a highly intuitive interface. It is loaded with high-end editing tools that are incredibly easy to use. You can add keyframe animations to make your videos more dynamic with a single click. Motion tracking allows you to track the specified object’s movements throughout the video, even allowing you to blur certain parts of the video. From the Effects tab, you can add cinematic effects to your videos, or you can easily color match all your scenes with one tap or apply noise reduction.
If you wish to edit or add custom Slack emoji to your video, you can import the image to Filmora and then drag it to the track above the video in the timeline. You can then add animations or motion tracking to adjust the custom Slack emoji. Cool transitions and color adjustments can also be made to make the video more appealing and unique. Special effects or catchy captions are just a tap away to help you create stunning videos
Conclusion
With the introduction of emojis, the need for writing long messages has diminished. Using a Slack emoji can turn your conversations around and make them more interesting. Chatting has never been easier or more fun.
Add Slack emoji or react to what others have to say. It’s time to create a custom Slack emoji to wow your friends and colleagues with tiny emojis that are exclusive to just you. If you want to spice up your work chats, just add Slack emoji and enjoy.
Try out Wondershare Filmora to add Slack emoji to your videos to make them unique.
Shanoon Cox
Shanoon Cox is a writer and a lover of all things video.
Follow @Shanoon Cox
How to Make a FLV Photo Slideshow
How to Make a FLV Photo Slideshow
Shanoon Cox
Mar 27, 2024• Proven solutions
FLV slideshow is a suitable way to share photos and videos online due to its small size and reasonable quality. Wondershare DVD Slideshow Builder brings more convenience to instantly make a slideshow with music , photos and lets you create FLV videos, as well as other video formats. You can create a FLV slideshow in easy steps as below.
Easy Guide to Make FLV Slideshow with Music

1 Import Photos & Video and Music for FLV Slideshow
Install and launch the slideshow maker, go to Organize tab and import your photos, videos and music files. Transitions between adjacent slides will be used. But you can change them by following step 2.
2 Apply Transition and Motion Effect
This slideshow maker includes more than 100 transition effects for slides switch. Before applying, double-click transition thumbnail to preview in player on the right. You could also randomize transitions or apply one transition to all slides in FLV slideshow.
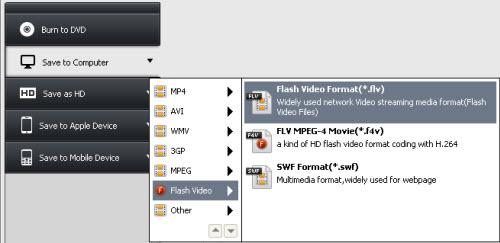
3 Save Photo Slideshow to FLV Video
Select Flash Video format as the output and make advanced settings by clicking Settings button. Finally, click Burn and wail a while, you get your FLV video to sharing on YouTube, Facebook, MySpace, Mobile Phone. Alternatively, play FLV video on computer via stand-alone FLV player.
FLV Slideshow Tips
For more detailed settings of FLV slideshow, click Settings button and specify various options, like encoder, resolution, frame rate, bit rate and audio settings.
To play FLV slideshow on Nokia mobile phone, you should set encode type to Nokia FLV series (*.flv). Once created, upload flv to Nokia phone or online and view FLV slideshow using FLV player or web browser plugin.
You could also upload FLV slideshow to YouTube to share with more people. FLV videos are perfectly supported by YouTube.
More: Convert All Popular Formats to FLV
Wondershare DVD Slideshow Builder Deluxe supports all popular video formats. Therefore, you can import videos that need to change format, and save it in another format. It’s not only a DVD slideshow maker, but only powerful FLV converter. For detailed supported input formats, check video format references.
More: Convert FLV to MP4, AVI, MOV, MPEG or Burn FLV to DVD
You could also import FLV to DVD Slideshow Builder Deluxe and save it as MP4, AVI, MOV and 3GP, or even burn FLV video to DVD with beautiful DVD menus. For detailed supported output formats, check video format references. Here, I recommended to save FLV to MP4 for its comprehensive support on various devices, such as iPhone, iPod, Apple TV, Gphone, Nokia phone, LG phone, PSP, Palm, Zune, etc.
About FLV Video (Flash Video)
Flash Video (*.FLV) is a container file format used to deliver video over the internet using Adobe Flash Player versions 6-10 (developed by Macromedia). Flash Video content may also be embedded within SWF files. FLV videos are widely used by international companies, including YouTube, Google Video, Yahoo! Video, metacafe, Reuters.com, and many other news providers. Flash Video could be watched on most operating systems, via the Adobe Flash Player and web browser plugin, or desired third-party FLV Players.
Shanoon Cox
Shanoon Cox is a writer and a lover of all things video.
Follow @Shanoon Cox
Shanoon Cox
Mar 27, 2024• Proven solutions
FLV slideshow is a suitable way to share photos and videos online due to its small size and reasonable quality. Wondershare DVD Slideshow Builder brings more convenience to instantly make a slideshow with music , photos and lets you create FLV videos, as well as other video formats. You can create a FLV slideshow in easy steps as below.
Easy Guide to Make FLV Slideshow with Music
1 Import Photos & Video and Music for FLV Slideshow
Install and launch the slideshow maker, go to Organize tab and import your photos, videos and music files. Transitions between adjacent slides will be used. But you can change them by following step 2.
2 Apply Transition and Motion Effect
This slideshow maker includes more than 100 transition effects for slides switch. Before applying, double-click transition thumbnail to preview in player on the right. You could also randomize transitions or apply one transition to all slides in FLV slideshow.
3 Save Photo Slideshow to FLV Video
Select Flash Video format as the output and make advanced settings by clicking Settings button. Finally, click Burn and wail a while, you get your FLV video to sharing on YouTube, Facebook, MySpace, Mobile Phone. Alternatively, play FLV video on computer via stand-alone FLV player.
FLV Slideshow Tips
For more detailed settings of FLV slideshow, click Settings button and specify various options, like encoder, resolution, frame rate, bit rate and audio settings.
To play FLV slideshow on Nokia mobile phone, you should set encode type to Nokia FLV series (*.flv). Once created, upload flv to Nokia phone or online and view FLV slideshow using FLV player or web browser plugin.
You could also upload FLV slideshow to YouTube to share with more people. FLV videos are perfectly supported by YouTube.
More: Convert All Popular Formats to FLV
Wondershare DVD Slideshow Builder Deluxe supports all popular video formats. Therefore, you can import videos that need to change format, and save it in another format. It’s not only a DVD slideshow maker, but only powerful FLV converter. For detailed supported input formats, check video format references.
More: Convert FLV to MP4, AVI, MOV, MPEG or Burn FLV to DVD
You could also import FLV to DVD Slideshow Builder Deluxe and save it as MP4, AVI, MOV and 3GP, or even burn FLV video to DVD with beautiful DVD menus. For detailed supported output formats, check video format references. Here, I recommended to save FLV to MP4 for its comprehensive support on various devices, such as iPhone, iPod, Apple TV, Gphone, Nokia phone, LG phone, PSP, Palm, Zune, etc.
About FLV Video (Flash Video)
Flash Video (*.FLV) is a container file format used to deliver video over the internet using Adobe Flash Player versions 6-10 (developed by Macromedia). Flash Video content may also be embedded within SWF files. FLV videos are widely used by international companies, including YouTube, Google Video, Yahoo! Video, metacafe, Reuters.com, and many other news providers. Flash Video could be watched on most operating systems, via the Adobe Flash Player and web browser plugin, or desired third-party FLV Players.
Shanoon Cox
Shanoon Cox is a writer and a lover of all things video.
Follow @Shanoon Cox
10 Best Memes Right Now (Include Image/ GIF/Video)
10 Trending Memes In 2024 Right Now (Include Image/ GIF/Video)

Ollie Mattison
Mar 27, 2024• Proven solutions
With several popular memes doing rounds on the Internet this year, 2019 can be said the “best memes year”. The memes are the latest things that speak louder than any other words. You get just 140 characters on Twitter which might not be enough for what you wish to post but, a powerful meme with a strong caption can do what any simple words cannot do. This is what each of the people is doing today.
When the meme is just released and hot like fire, each one of you wishes to use it. Below are by far the 10 best memes that you would definitely like to check out. Let’s laugh and have fun, forgetting all the stress of life.
Part 1: 10 Best Memes In 2024
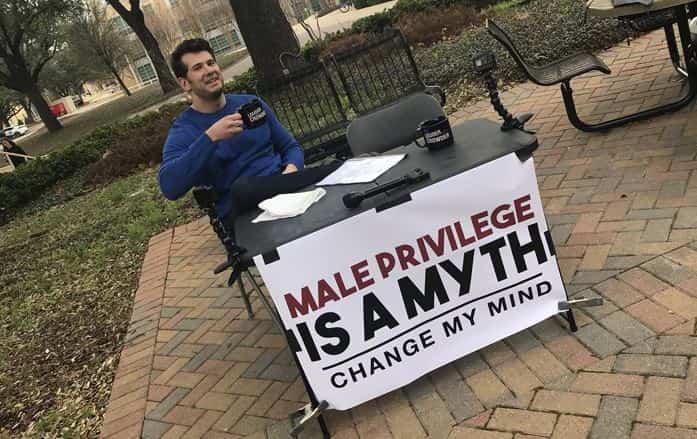
1. Steven Crowder’s “Change My Mind” Campus Sign
The conservative podcaster Steven Crowder tweeted an image on 16th February 2018 which went on to become one of the funniest memes of 2018. It had Crowder’s photograph behind a table poster that read “Male Privilege is a myth / Change My Mind”. The image had a backdrop of the Texas Christian University and he tweeted it with a caption, “Hello @TCU. Come one come all. #ChangeMyMind.”
The image was tweeted as part of Crowder’s YouTube and podcast promotions where various viewpoints of Crowder are opposed by the people and they convince him of these issues. This post garnered around 6400 likes and 900 retweets in just 4 days.
2. Gru’s Plan
When Despicable Me was released on July 9, 2010, Gru, the protagonist in the film shows a presentation of stealing a moon and notice a drawing of himself where he is sitting on the toilet in between the pages of the presentation.
The memes of this comic show a startling presentation with a 3rd page, where the panel of Gru looks back at the board in complete bewilderment. FieldMarshalSixDans, a Redditor used screencaps from the film and posted a four-panel version meme which was re-posted. It reaped about 250 comments and above 18000 votes in 1 day.
3. American Chopper Argument
In the year 2009, the YouTube channel Shemrock Nursery Rhymes created a meme of the nursery rhymes Johny Johny Yes Papa. This rhyme is a popular one featured under animated amateur music video. It shows a small boy who tries to steal sugar and confronted by his father for not taking permission.
In July 2009, Shemrock YouTube channel created best memes for this video by using the clips of Johny Johny and used the audio of another nursery rhymes Twinkle Twinkle which collected over 2.9 million views in the first 6 years of its posting.
4. Who Killed Hannibal?
It is a skit from the Eric Andre Show, also known as Eric Andre Shooting Hannibal Buress where Eric Andre, the host of the show can be seen shooting a gun multiple times and asking on camera Who Killed Hannibal?
It was actually a joke during the Season 2, episode 6 of The Eric Andre Show. It turned out to be the best memes of this year when the famous dialogue “Who Killed Hannibal” was replaced by “Why would X do this?” in a variety of expressive template.

5. Walmart Yodel Boy
The Walmart Yodel Boy is a video that was filmed in a Walmart on 24th March 2018. It was the video of the 12-year-old child artist, Mason Ramsay singing “Lovesick Blues”. He is better known for Hank Williams impressions. This video from the concert was uploaded from a YouTube account named ViralHog. This song started being remixed with several other captions and went viral in no time and is considered one of the best memes of this year.

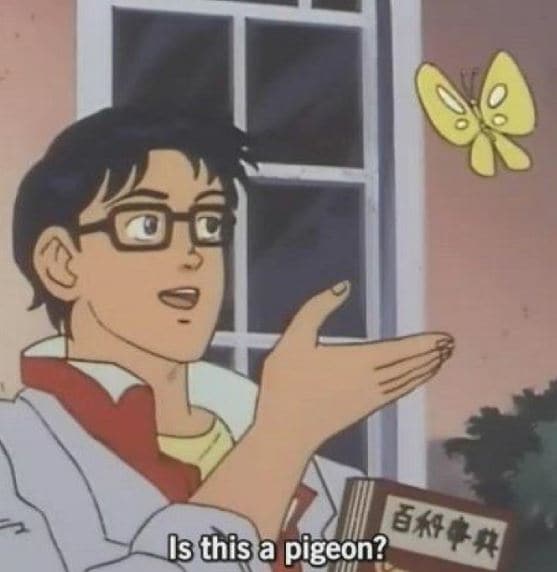
6. Is this a pigeon?
A shot from the anime series “The Brave Fighter of Sun Fighbird” had a scene in episode 3 of season 1 where professor Hiroshi Amano creates a human android, Yutaro Katori. While explaining mother Nature, Yutaro Katori thinks a butterfly to be a pigeon. One of the best memes is created when the reaction of this scene with the quote is used widely to show a confused expression on Tumblr.
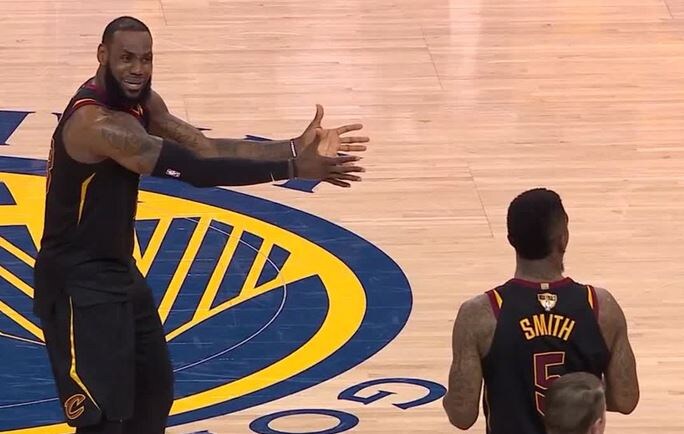
7. LeBron James’s NBA Finals Reaction
This is a video during the NBA finals when J.R.Smith, a player from Cleveland Cavaliers kept dribbling in the last 5 important seconds of the game against the Golden State Warriors and the time ran out. This is when Smith’s teammate Lebron James showed his utter disappointment and pointed out his mistake by stretching out his arms.
The reaction from James became the best memes of this year. As soon as the game was over, Lebron James’ reaction with caption started doing rounds on the Twitter that emoted disappointment and frustration. It garnered 29000 likes and 8800 retweets.
8. Tired Spongebob
Tired Spongebob is the lead character of the Spongebob Squarepants which used to air in the year 1999 and was from Episode 1. It is a still image of Spongebob where it appears to be out of breath and naked. Twitter has made this image popular by using it for showing exhaustion.

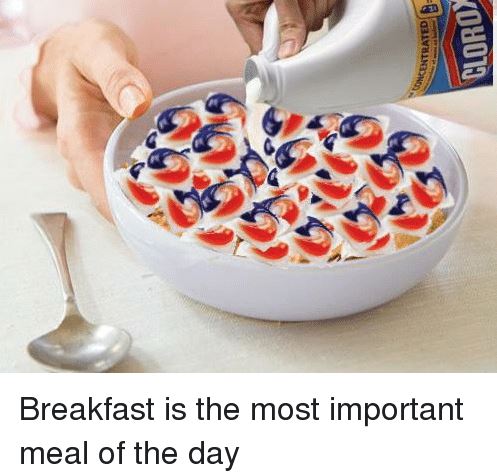
9. Tide Pods
Tide Pods is one of the best memes that shows how tide pods are compared to bleach drinking in the memes. When Procter Gamble launched its new product tide pods laundary detergent in 2012 it appeared like some flavored fruit snack due to its packaging.
Unfortunately, the attractive packaging of these laundry detergent capsules led to children consuming it and increasing calls to the poison control center. So, the Tide Pod eating memes are used to mock and compare it with the poisonous food and drinks in the online circuit.
10. Green M&M Bambi Copypasta
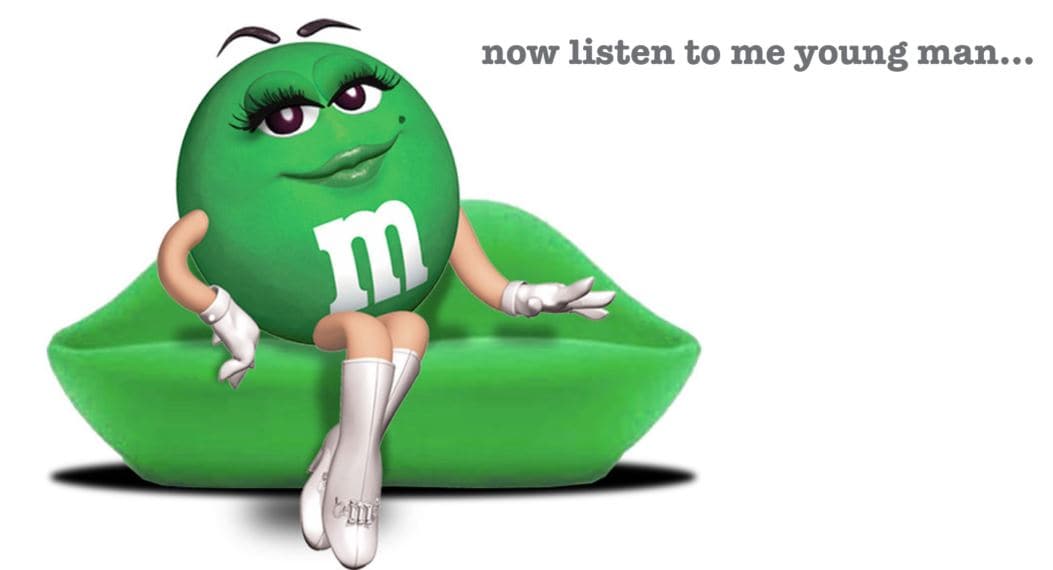
While a Tumblr post comment and response the Green M&M Bambi Copypasta was used and went on to be amongst the top 10 best memes of the year so far. Here the person role-plays the character of the Green M&M and demands a game named Bambi from the Gamestop on Play Station 2.
The aggressive character and dominating tone of the post have stirred several variations. The Green M&M role plays in the similar demanding tone of the character started doing the rounds on the online platform since then.
Or you may want to make a trending meme, like red glowing eye, please read this article: How to create a red glowing eyes effect in videos?
Part 2: Recommended Tool to Make Memes
The newest addition in the Filmora family is the Filmora Online Meme Maker that lets you create funny and best memes completely free. It is being widely used by all the meme lovers and is packed with some of the best features. GIF, image and video memes are all supported to make.
From adding texts with the use of both internal and external sources to adjusting size and color, the Filmora Online Meme Maker comes with an intuitive interface, several video effects, and a range of editing tools. It is easy to use and an amazing tool for creating the best meme. It also lets you import video from YouTube and Vimeo and there are no watermarks even when used free. Try it now!
Ollie Mattison
Ollie Mattison is a writer and a lover of all things video.
Follow @Ollie Mattison
Ollie Mattison
Mar 27, 2024• Proven solutions
With several popular memes doing rounds on the Internet this year, 2019 can be said the “best memes year”. The memes are the latest things that speak louder than any other words. You get just 140 characters on Twitter which might not be enough for what you wish to post but, a powerful meme with a strong caption can do what any simple words cannot do. This is what each of the people is doing today.
When the meme is just released and hot like fire, each one of you wishes to use it. Below are by far the 10 best memes that you would definitely like to check out. Let’s laugh and have fun, forgetting all the stress of life.
Part 1: 10 Best Memes In 2024
1. Steven Crowder’s “Change My Mind” Campus Sign
The conservative podcaster Steven Crowder tweeted an image on 16th February 2018 which went on to become one of the funniest memes of 2018. It had Crowder’s photograph behind a table poster that read “Male Privilege is a myth / Change My Mind”. The image had a backdrop of the Texas Christian University and he tweeted it with a caption, “Hello @TCU. Come one come all. #ChangeMyMind.”
The image was tweeted as part of Crowder’s YouTube and podcast promotions where various viewpoints of Crowder are opposed by the people and they convince him of these issues. This post garnered around 6400 likes and 900 retweets in just 4 days.
2. Gru’s Plan
When Despicable Me was released on July 9, 2010, Gru, the protagonist in the film shows a presentation of stealing a moon and notice a drawing of himself where he is sitting on the toilet in between the pages of the presentation.
The memes of this comic show a startling presentation with a 3rd page, where the panel of Gru looks back at the board in complete bewilderment. FieldMarshalSixDans, a Redditor used screencaps from the film and posted a four-panel version meme which was re-posted. It reaped about 250 comments and above 18000 votes in 1 day.
3. American Chopper Argument
In the year 2009, the YouTube channel Shemrock Nursery Rhymes created a meme of the nursery rhymes Johny Johny Yes Papa. This rhyme is a popular one featured under animated amateur music video. It shows a small boy who tries to steal sugar and confronted by his father for not taking permission.
In July 2009, Shemrock YouTube channel created best memes for this video by using the clips of Johny Johny and used the audio of another nursery rhymes Twinkle Twinkle which collected over 2.9 million views in the first 6 years of its posting.
4. Who Killed Hannibal?
It is a skit from the Eric Andre Show, also known as Eric Andre Shooting Hannibal Buress where Eric Andre, the host of the show can be seen shooting a gun multiple times and asking on camera Who Killed Hannibal?
It was actually a joke during the Season 2, episode 6 of The Eric Andre Show. It turned out to be the best memes of this year when the famous dialogue “Who Killed Hannibal” was replaced by “Why would X do this?” in a variety of expressive template.
5. Walmart Yodel Boy
The Walmart Yodel Boy is a video that was filmed in a Walmart on 24th March 2018. It was the video of the 12-year-old child artist, Mason Ramsay singing “Lovesick Blues”. He is better known for Hank Williams impressions. This video from the concert was uploaded from a YouTube account named ViralHog. This song started being remixed with several other captions and went viral in no time and is considered one of the best memes of this year.
6. Is this a pigeon?
A shot from the anime series “The Brave Fighter of Sun Fighbird” had a scene in episode 3 of season 1 where professor Hiroshi Amano creates a human android, Yutaro Katori. While explaining mother Nature, Yutaro Katori thinks a butterfly to be a pigeon. One of the best memes is created when the reaction of this scene with the quote is used widely to show a confused expression on Tumblr.
7. LeBron James’s NBA Finals Reaction
This is a video during the NBA finals when J.R.Smith, a player from Cleveland Cavaliers kept dribbling in the last 5 important seconds of the game against the Golden State Warriors and the time ran out. This is when Smith’s teammate Lebron James showed his utter disappointment and pointed out his mistake by stretching out his arms.
The reaction from James became the best memes of this year. As soon as the game was over, Lebron James’ reaction with caption started doing rounds on the Twitter that emoted disappointment and frustration. It garnered 29000 likes and 8800 retweets.
8. Tired Spongebob
Tired Spongebob is the lead character of the Spongebob Squarepants which used to air in the year 1999 and was from Episode 1. It is a still image of Spongebob where it appears to be out of breath and naked. Twitter has made this image popular by using it for showing exhaustion.
9. Tide Pods
Tide Pods is one of the best memes that shows how tide pods are compared to bleach drinking in the memes. When Procter Gamble launched its new product tide pods laundary detergent in 2012 it appeared like some flavored fruit snack due to its packaging.
Unfortunately, the attractive packaging of these laundry detergent capsules led to children consuming it and increasing calls to the poison control center. So, the Tide Pod eating memes are used to mock and compare it with the poisonous food and drinks in the online circuit.
10. Green M&M Bambi Copypasta
While a Tumblr post comment and response the Green M&M Bambi Copypasta was used and went on to be amongst the top 10 best memes of the year so far. Here the person role-plays the character of the Green M&M and demands a game named Bambi from the Gamestop on Play Station 2.
The aggressive character and dominating tone of the post have stirred several variations. The Green M&M role plays in the similar demanding tone of the character started doing the rounds on the online platform since then.
Or you may want to make a trending meme, like red glowing eye, please read this article: How to create a red glowing eyes effect in videos?
Part 2: Recommended Tool to Make Memes
The newest addition in the Filmora family is the Filmora Online Meme Maker that lets you create funny and best memes completely free. It is being widely used by all the meme lovers and is packed with some of the best features. GIF, image and video memes are all supported to make.
From adding texts with the use of both internal and external sources to adjusting size and color, the Filmora Online Meme Maker comes with an intuitive interface, several video effects, and a range of editing tools. It is easy to use and an amazing tool for creating the best meme. It also lets you import video from YouTube and Vimeo and there are no watermarks even when used free. Try it now!
Ollie Mattison
Ollie Mattison is a writer and a lover of all things video.
Follow @Ollie Mattison
Burn Photos to DVD | How to Burn Photos to DVD with Transitions and Music
How to Burn Photos to DVD with Transitions and Music
Shanoon Cox
Mar 27, 2024• Proven solutions
Photos are precious memories not only for you but also for your family members. As time goes on, the photos might fade out and be unable to retrieve. To avoid this, burn photos to DVD will be a great idea to preserve family memories eternally.
This article will show you how to burn photos to DVD Slideshow with transition, titles and music quickly and easily by using Wondershare DVD Slideshow Builder Deluxe . It also provides some tips on how to burn photos to DVD.
Part 1: How to Burn Photos to DVD with Transition, Titles and Music
Wondershare DVD Slideshow Builder Deluxe can help you quickly create and burn photos to DVD. Download the free trial version this photo DVD maker first.
Step 1. Add Photo or Video Files
In Organize tab, simply click the “Add Files” button to open the browse window, find your files and import them into the program, you can drag and drop photos or videos to organize them on storyboard. Click the Expand button to get a larger viewer.

Step 2. Customize Photo Slideshow Transitions
Generally speaking, transition effects will be automatically inserted between every two photos/videos when you import the photos. But you can customize them by clicking the Personalize tab, then drag and drop a transition from the list to the thumbnail between two slides.
You are also able to add background music here: click the Music button and choose a music file from your computer.

Step 3. Choose DVD Menu
Now switch to Create tab to author a DVD menu from template and burn to DVD disc quickly:
- On the right hand side of the screen, double click on desired menu template to apply a DVD menu template.
- Click the Edit button under the preview windows to customize your DVD menu or right click on menu for more options.
- You can also make a professional DVD menu using dynamic DVD menu templates.
BTW, if you don’t want a DVD menu, just check the “Disable DVD Menu” option.

Step 4. Burn Photos to DVD Disc
Now click the Preview button beneath the preview window to make sure the photo DVD slideshow is exactly what you want. Go back to Personalize tab to change if necessary. After that, click “Burn” button to start burning your DVD slideshow to DVD.
You can also output photo slideshow to watch on Youtube, Mobile Phone, iPhone, PSP, etc. through options on the left. Below are the instructions to burn DVD for watch on TV:

- Insert a blank DVD disc, and do the following.
- Click “Burn to DVD”. Then specify the number of DVD copies. You can also choose to generate ISO Image files or DVD Folders.
- Make sure the PAL or NTSC TV Standard settings is right. If you don’t know which standard is used in your country, click the “Help” button. The wrong TV standard would cause playback incompatibility problem.
- Then click “Start” to burn DVD slideshow. If you have checked Create DVD Folder and/or Create DVD Image File options, the corresponding files will also be created to the specified folder.
Now sit back and relax, when burning complete, insert the created DVD disc into your DVD player to watch photo DVD slideshow on TV.
Learn more: User Guide of DVD Slideshow Builder Deluxe
Part 2: More Photo to DVD Tips
More about NTSC/PAL TV Standard
Nowadays, there are three video formats around the world. But each one is incompatible with others. For instance, NTSC is used in North America, Canada and Japan; while most of other regions PAL/SECAM. To apply TV Standard in DVD Slideshow Builder Deluxe , go to “Create“ -> Option tab and locate TV Standard option to select NTSC or PAL. If you are not sure which one to choose, please click “Help” button, select your country, then click “OK” , the program will choose the right TV standard for you.
Burn Photos to DVD/CD as Data Disc
If you only want to burn photo to DVD for backup and further use, you only need a burning photo to DVD software like ImgBurn (Free) or Nero (commercial). These software helps you burn all digital media files to DVD, of course you can burn photos to DVD for backup purpose. Notice that some photo DVD maker allows you burn slideshow as well as the original photos. This way, you turn photos to DVD slideshow with transition, and at the same time, backup photos to DVD for other uses.
Scan Photos to DVD - Digitize Photos
If you use traditional camera and have got loads of photos in album, you can scan photos to computer so that convert photo to digital format. Afterwards, you can get more from these digital photos, like backup photos to DVD, send to others as DVD gift, make a photo DVD show to play on TV, etc. All these could be done with your favorite photo DVD maker software. Now see how to transform your printed photos to digital first:
Select a good photo scanner -> Prepare your photos to scan -> Start photo scanning -> Adjust scanned photos
Scanning printed photos to computer is not an easy job. It needs patience and some tips and tricks. As you may know, some companies provide photo scanning service. For the Step 4, you can also adjust digital photos in your selected photo DVD maker. Anyway, you need to get your digital photos ready before you burn photos to DVD with transitions and music.
Shanoon Cox
Shanoon Cox is a writer and a lover of all things video.
Follow @Shanoon Cox
Shanoon Cox
Mar 27, 2024• Proven solutions
Photos are precious memories not only for you but also for your family members. As time goes on, the photos might fade out and be unable to retrieve. To avoid this, burn photos to DVD will be a great idea to preserve family memories eternally.
This article will show you how to burn photos to DVD Slideshow with transition, titles and music quickly and easily by using Wondershare DVD Slideshow Builder Deluxe . It also provides some tips on how to burn photos to DVD.
Part 1: How to Burn Photos to DVD with Transition, Titles and Music
Wondershare DVD Slideshow Builder Deluxe can help you quickly create and burn photos to DVD. Download the free trial version this photo DVD maker first.
Step 1. Add Photo or Video Files
In Organize tab, simply click the “Add Files” button to open the browse window, find your files and import them into the program, you can drag and drop photos or videos to organize them on storyboard. Click the Expand button to get a larger viewer.
Step 2. Customize Photo Slideshow Transitions
Generally speaking, transition effects will be automatically inserted between every two photos/videos when you import the photos. But you can customize them by clicking the Personalize tab, then drag and drop a transition from the list to the thumbnail between two slides.
You are also able to add background music here: click the Music button and choose a music file from your computer.
Step 3. Choose DVD Menu
Now switch to Create tab to author a DVD menu from template and burn to DVD disc quickly:
- On the right hand side of the screen, double click on desired menu template to apply a DVD menu template.
- Click the Edit button under the preview windows to customize your DVD menu or right click on menu for more options.
- You can also make a professional DVD menu using dynamic DVD menu templates.
BTW, if you don’t want a DVD menu, just check the “Disable DVD Menu” option.
Step 4. Burn Photos to DVD Disc
Now click the Preview button beneath the preview window to make sure the photo DVD slideshow is exactly what you want. Go back to Personalize tab to change if necessary. After that, click “Burn” button to start burning your DVD slideshow to DVD.
You can also output photo slideshow to watch on Youtube, Mobile Phone, iPhone, PSP, etc. through options on the left. Below are the instructions to burn DVD for watch on TV:
- Insert a blank DVD disc, and do the following.
- Click “Burn to DVD”. Then specify the number of DVD copies. You can also choose to generate ISO Image files or DVD Folders.
- Make sure the PAL or NTSC TV Standard settings is right. If you don’t know which standard is used in your country, click the “Help” button. The wrong TV standard would cause playback incompatibility problem.
- Then click “Start” to burn DVD slideshow. If you have checked Create DVD Folder and/or Create DVD Image File options, the corresponding files will also be created to the specified folder.
Now sit back and relax, when burning complete, insert the created DVD disc into your DVD player to watch photo DVD slideshow on TV.
Learn more: User Guide of DVD Slideshow Builder Deluxe
Part 2: More Photo to DVD Tips
More about NTSC/PAL TV Standard
Nowadays, there are three video formats around the world. But each one is incompatible with others. For instance, NTSC is used in North America, Canada and Japan; while most of other regions PAL/SECAM. To apply TV Standard in DVD Slideshow Builder Deluxe , go to “Create“ -> Option tab and locate TV Standard option to select NTSC or PAL. If you are not sure which one to choose, please click “Help” button, select your country, then click “OK” , the program will choose the right TV standard for you.
Burn Photos to DVD/CD as Data Disc
If you only want to burn photo to DVD for backup and further use, you only need a burning photo to DVD software like ImgBurn (Free) or Nero (commercial). These software helps you burn all digital media files to DVD, of course you can burn photos to DVD for backup purpose. Notice that some photo DVD maker allows you burn slideshow as well as the original photos. This way, you turn photos to DVD slideshow with transition, and at the same time, backup photos to DVD for other uses.
Scan Photos to DVD - Digitize Photos
If you use traditional camera and have got loads of photos in album, you can scan photos to computer so that convert photo to digital format. Afterwards, you can get more from these digital photos, like backup photos to DVD, send to others as DVD gift, make a photo DVD show to play on TV, etc. All these could be done with your favorite photo DVD maker software. Now see how to transform your printed photos to digital first:
Select a good photo scanner -> Prepare your photos to scan -> Start photo scanning -> Adjust scanned photos
Scanning printed photos to computer is not an easy job. It needs patience and some tips and tricks. As you may know, some companies provide photo scanning service. For the Step 4, you can also adjust digital photos in your selected photo DVD maker. Anyway, you need to get your digital photos ready before you burn photos to DVD with transitions and music.
Shanoon Cox
Shanoon Cox is a writer and a lover of all things video.
Follow @Shanoon Cox
Top 10 Storyboarding Software [Free&Paid]
Top 10 Storyboarding Software in 2024

Liza Brown
Mar 27, 2024• Proven solutions
Several different creative sectors rely on storyboarding for their creative process, including filmmakers and animators and UX designers, game designers, and creative directors. However, the process of hand-drawing each frame or shot can take a great deal of time if you have to do it by hand. Our goal is to make storyboarding easier and more efficient by bringing you this list of free and paid tools, storyboarding software, and apps.
You can add text, sound, and script to your original sketches with these tools (or make use of assets from a library if you do not have time to sketch your own). Alternatively, you can share your storyboarding progress within the project, either by a link or a PDF - or get immediate feedback. Finally, you can continue working from anywhere with apps that work across multiple devices - desktop, mobile, and tablet.
No matter what kind of tool you prefer, from a simple 2D sketch tool like Make Storyboard to a 3D drawing tool like Storyboard Pro, you’ll find the best options on this page.
You might be interested in:
1. Storyboarder by Wonder Unit
Price: Free
Platforms: Windows, Mac, and Linux.
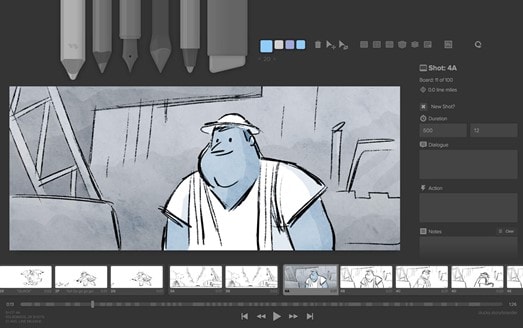
If you’re on a smaller budget, Storyboarder is an excellent option. It’s free and open-source. In the program’s clean interface, you have all the tools you need, so drawing shapes and characters is a breeze. In addition to writing dialogue, you can also enter timing information and the type of shot.
The Storyboarder and Photoshop apps integrate seamlessly, which means you can refine your board in Photoshop and have it updated in Storyboarder. In addition, you can export videos to Premiere, Final Cut, Avid, PDF, or Animated GIF from this software.
2. Toon Boom Storyboard Pro
Price: $60/mo or $999 one-time fee
Platforms: Mac, Windows
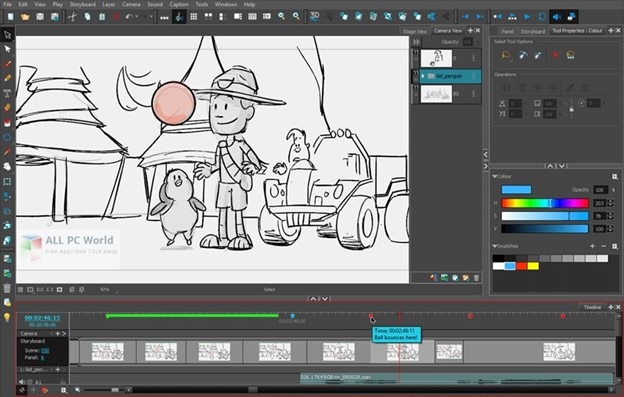
Toon Boom Storyboard Pro is the complete opposite of free. A standout among storyboarding programs, it’s also one of the most expensive. However, in most studios, boarding and animating is done using Toon Boom, so you may want to learn about this if you’d like to break into the industry. As a result, the monthly fee is a lot lower than the initial cost, allowing most people to take advantage of the service.
You can use Toon Boom for a month and test the waters before committing yourself to a huge license fee. How can you benefit from this program? Sketching and animation go hand-in-hand in this process. Drawing your boards and seeing how they would animate is a great way to test your script while making sure you’re on target with your scenes.
The program is primarily designed for animators. It can be used for ad agencies and for making small skits. Nevertheless, the Story Flow tool makes switching between board and script for writers incredibly easy. In addition to creating dynamic camera movements, you can also use some 3D effects that work well for 3D animators. Create layered panels in Photoshop quickly and easily by importing Final Draft scripts. There is plenty of support available for all the common programs in the art industry.
3. Plot
Price: $10/month (14 days Free Trial Available)
Platforms: Windows, Linux, and Mac

Storytelling is super easy with the plot. There are no limits to the number of boards, projects, and users you can have. With some nice features targeted toward animators, it is a web-based storyboarding app for beginners.
A drawing pane is available on whichever operating system you run this program on. Drawing your frames this way also lets you add dialogues and stage directions directly to your project. In addition, it is easy to move through different scenes in the app because it is visual. You can click and drag pieces around to change the scene. It couldn’t be easier.
In addition to the collaboration features, we consider it to be exceptional and above the norm for products in this price range. As long as you have a desktop program to work on your drawings, you’ll have more control. When you import the drawings into Plot, you can then arrange them accordingly. Hence, you’ve still got collaborative features with online management of very detailed drawings.
4. FrameForge Storyboard Studio
Price: $498.95 one-time fee or $12.99/month (Core Edition); $799 one-time fee or $24.99/month (Professional Edition)
Platforms: Windows, Mac, and Android.
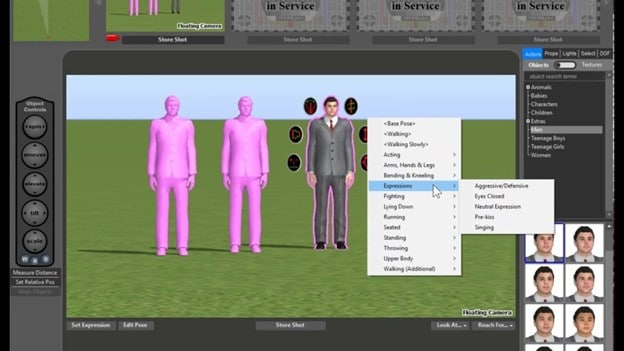
Even without animation, drawing, or highly technical computer skills, your team can benefit from FrameForge, with HBO, Netflix, and BBC as users.
There are two versions of FrameForge’s product: Core and Professional. Professional offers planning capabilities (down to the inch) for dollies and cranes. Scripts from any program can be imported into the software. In addition to movement arrows, framing notes, angle of view, focal length, and more, the storyboards ensure that your video team understands all aspects of production, from preparation to post-production.
Mobile users can use it on any mobile device, and PowerPoint presentations can be downloaded as a final product. Team members who want to produce more elaborate and lengthy videos for entertainment purposes might find FrameForge useful.
5. Studiobinder
Price: $29/month (Indie); $49/month (Professional); $99/month (Studio) Free Trial is also available.
Platform: Windows, Linux, and Mac.
Visualizations can be personalized at every level in Studiobinder. Filters can be used to sort columns, order scenes, add images, adjust aspect ratios, color code images, and add notes to locations. In addition, project management features such as task assignment and commenting help Studiobinder make collaboration easy.
Also, the platform includes a handy presentation mode so you can show your team your projects. The company boasts impressive clients such as BuzzFeed, ESPN, and CBS Interactive. Team members who need to collaborate on various stages of the video production process and who prefer customizable tools should take advantage of this option.
6. Boords
Price: $12-$24/month
Platforms: Windows, Linux, and Mac

In the software industry, online SaaS products have quickly become the norm. While desktop programs are not going away, we see more and more web-based options such as Boards that provide unique solutions.
The Boards software is a native storyboard platform that provides tons of free templates and collaboration tools. In addition, clients can log into their projects and add comments directly from their computers.
For teams working together on a project, you may also set up multiple user accounts. Storyboards in Boords can be presented in animatic form before being animated, thanks to flexible frame sizes and tons of free templates.
Despite the affordable monthly price, this product works on every major operating system. It is rare to find a program that offers this much functionality at such an affordable price. Boords is an excellent solution for collaborative work. You can try it for a while until you decide if it’s right for you, but there is no commitment involved.
7. makeStoryboard
Price: Free; $12/month (Professional); $36/month (Team)
Platforms: Windows, and Mac.

MakeStoryboard provides a simple, straightforward interface for uploading camera shots, drawing stick figures with its built-in tool, and incorporating text for scene details if you are not interested in the fancier options in the list. In addition, any drawing tablet can be used with marker, pencil, and pen tools.
Additional details unique to your team and use case can also be entered in custom text fields. Then, using a PDF format, you can export your storyboard when you’re ready to pitch. Finally, stakeholders can review it using a private link without requiring an account in an alternative method. The best part is that it has a free subscription plan, making it an excellent option for teams on a small budget.
8. Canva
Price: Free
Platforms: Works on all major Operating Systems

It doesn’t have to be stressful to create a storyboard, and Canva makes it easy with a large library of templates, millions of stock photos (or the ability to upload your own), and color frames. The font type, colors, headers, and subheaders can be customized.
If you’re working on a script or design with someone else, you can grant access to collaborate, and when you’re done you can share the design through email or as a PDF. On the other hand, if your team needs an easy and simple tool to manage simpler projects or get started with storyboarding, this may be your best choice.
9. PanelForge
Price: Free (Public Beta); $7.31/month (Pro); $1,411/year (Studio)
Platforms: Works on all Major Operating Systems
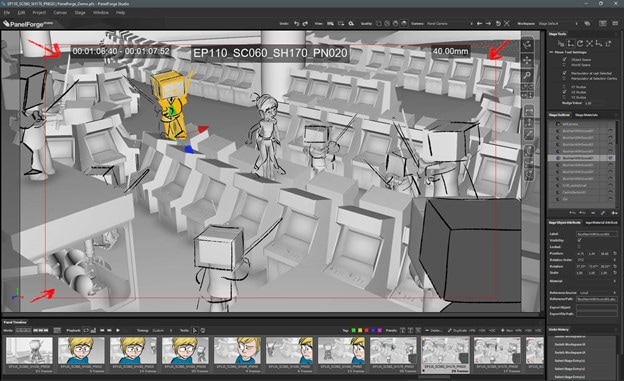
PanelForge delivers a feature-rich, drag-and-drop storyboarding solution with flexible frames and drag-and-drop tools. Storyboarding is free to try and offers a suite of paid plans for anyone working on animatics and more complex projects.
Drawings and 3D designs can both be created with PanelForge. Aside from creating animatics, you can also import and export files from Adobe Premiere and Final Cut Pro. The PanelForge tool is ideal for experienced marketers and storyboarders familiar with visualization tools.
10. Adobe Photoshop
Price: $9.99/mo
Platforms: Mac and Windows.
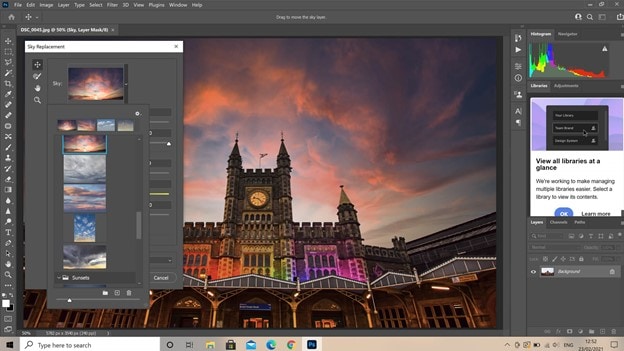
I think it will stay around for a long time. It’s been around for 20+ years. Yet, doesn’t it seem funny how Photoshop can be used for so much more than photo editing? In addition to storyboarding, we see it used for digital painting, pixel art, etc. The digital drawing capability of PS is the same as that of other programs. There are now more brushes available for the PS environment, so there’s even more support.
Additionally, you can download free storyboard templates in PSD format for Photoshop. This program doesn’t need too much explanation because every artist is already aware of it. However, Linux users are most likely to be disappointed by the lack of support.
Conclusion
So, these are some of the best free and paid to storyboard software that you can find in 2021. Each piece of software has its own characteristics and way of being used. In the end, it all depends upon your usage and preferences to decide which software you will use to achieve your goals. If you have enough budget then you can work with paid tools as they offer more features. If you have limited or no budget, you can try to free tools as they offer pretty good features.
Liza Brown
Liza Brown is a writer and a lover of all things video.
Follow @Liza Brown
Liza Brown
Mar 27, 2024• Proven solutions
Several different creative sectors rely on storyboarding for their creative process, including filmmakers and animators and UX designers, game designers, and creative directors. However, the process of hand-drawing each frame or shot can take a great deal of time if you have to do it by hand. Our goal is to make storyboarding easier and more efficient by bringing you this list of free and paid tools, storyboarding software, and apps.
You can add text, sound, and script to your original sketches with these tools (or make use of assets from a library if you do not have time to sketch your own). Alternatively, you can share your storyboarding progress within the project, either by a link or a PDF - or get immediate feedback. Finally, you can continue working from anywhere with apps that work across multiple devices - desktop, mobile, and tablet.
No matter what kind of tool you prefer, from a simple 2D sketch tool like Make Storyboard to a 3D drawing tool like Storyboard Pro, you’ll find the best options on this page.
You might be interested in:
1. Storyboarder by Wonder Unit
Price: Free
Platforms: Windows, Mac, and Linux.
If you’re on a smaller budget, Storyboarder is an excellent option. It’s free and open-source. In the program’s clean interface, you have all the tools you need, so drawing shapes and characters is a breeze. In addition to writing dialogue, you can also enter timing information and the type of shot.
The Storyboarder and Photoshop apps integrate seamlessly, which means you can refine your board in Photoshop and have it updated in Storyboarder. In addition, you can export videos to Premiere, Final Cut, Avid, PDF, or Animated GIF from this software.
2. Toon Boom Storyboard Pro
Price: $60/mo or $999 one-time fee
Platforms: Mac, Windows
Toon Boom Storyboard Pro is the complete opposite of free. A standout among storyboarding programs, it’s also one of the most expensive. However, in most studios, boarding and animating is done using Toon Boom, so you may want to learn about this if you’d like to break into the industry. As a result, the monthly fee is a lot lower than the initial cost, allowing most people to take advantage of the service.
You can use Toon Boom for a month and test the waters before committing yourself to a huge license fee. How can you benefit from this program? Sketching and animation go hand-in-hand in this process. Drawing your boards and seeing how they would animate is a great way to test your script while making sure you’re on target with your scenes.
The program is primarily designed for animators. It can be used for ad agencies and for making small skits. Nevertheless, the Story Flow tool makes switching between board and script for writers incredibly easy. In addition to creating dynamic camera movements, you can also use some 3D effects that work well for 3D animators. Create layered panels in Photoshop quickly and easily by importing Final Draft scripts. There is plenty of support available for all the common programs in the art industry.
3. Plot
Price: $10/month (14 days Free Trial Available)
Platforms: Windows, Linux, and Mac
Storytelling is super easy with the plot. There are no limits to the number of boards, projects, and users you can have. With some nice features targeted toward animators, it is a web-based storyboarding app for beginners.
A drawing pane is available on whichever operating system you run this program on. Drawing your frames this way also lets you add dialogues and stage directions directly to your project. In addition, it is easy to move through different scenes in the app because it is visual. You can click and drag pieces around to change the scene. It couldn’t be easier.
In addition to the collaboration features, we consider it to be exceptional and above the norm for products in this price range. As long as you have a desktop program to work on your drawings, you’ll have more control. When you import the drawings into Plot, you can then arrange them accordingly. Hence, you’ve still got collaborative features with online management of very detailed drawings.
4. FrameForge Storyboard Studio
Price: $498.95 one-time fee or $12.99/month (Core Edition); $799 one-time fee or $24.99/month (Professional Edition)
Platforms: Windows, Mac, and Android.
Even without animation, drawing, or highly technical computer skills, your team can benefit from FrameForge, with HBO, Netflix, and BBC as users.
There are two versions of FrameForge’s product: Core and Professional. Professional offers planning capabilities (down to the inch) for dollies and cranes. Scripts from any program can be imported into the software. In addition to movement arrows, framing notes, angle of view, focal length, and more, the storyboards ensure that your video team understands all aspects of production, from preparation to post-production.
Mobile users can use it on any mobile device, and PowerPoint presentations can be downloaded as a final product. Team members who want to produce more elaborate and lengthy videos for entertainment purposes might find FrameForge useful.
5. Studiobinder
Price: $29/month (Indie); $49/month (Professional); $99/month (Studio) Free Trial is also available.
Platform: Windows, Linux, and Mac.
Visualizations can be personalized at every level in Studiobinder. Filters can be used to sort columns, order scenes, add images, adjust aspect ratios, color code images, and add notes to locations. In addition, project management features such as task assignment and commenting help Studiobinder make collaboration easy.
Also, the platform includes a handy presentation mode so you can show your team your projects. The company boasts impressive clients such as BuzzFeed, ESPN, and CBS Interactive. Team members who need to collaborate on various stages of the video production process and who prefer customizable tools should take advantage of this option.
6. Boords
Price: $12-$24/month
Platforms: Windows, Linux, and Mac
In the software industry, online SaaS products have quickly become the norm. While desktop programs are not going away, we see more and more web-based options such as Boards that provide unique solutions.
The Boards software is a native storyboard platform that provides tons of free templates and collaboration tools. In addition, clients can log into their projects and add comments directly from their computers.
For teams working together on a project, you may also set up multiple user accounts. Storyboards in Boords can be presented in animatic form before being animated, thanks to flexible frame sizes and tons of free templates.
Despite the affordable monthly price, this product works on every major operating system. It is rare to find a program that offers this much functionality at such an affordable price. Boords is an excellent solution for collaborative work. You can try it for a while until you decide if it’s right for you, but there is no commitment involved.
7. makeStoryboard
Price: Free; $12/month (Professional); $36/month (Team)
Platforms: Windows, and Mac.
MakeStoryboard provides a simple, straightforward interface for uploading camera shots, drawing stick figures with its built-in tool, and incorporating text for scene details if you are not interested in the fancier options in the list. In addition, any drawing tablet can be used with marker, pencil, and pen tools.
Additional details unique to your team and use case can also be entered in custom text fields. Then, using a PDF format, you can export your storyboard when you’re ready to pitch. Finally, stakeholders can review it using a private link without requiring an account in an alternative method. The best part is that it has a free subscription plan, making it an excellent option for teams on a small budget.
8. Canva
Price: Free
Platforms: Works on all major Operating Systems
It doesn’t have to be stressful to create a storyboard, and Canva makes it easy with a large library of templates, millions of stock photos (or the ability to upload your own), and color frames. The font type, colors, headers, and subheaders can be customized.
If you’re working on a script or design with someone else, you can grant access to collaborate, and when you’re done you can share the design through email or as a PDF. On the other hand, if your team needs an easy and simple tool to manage simpler projects or get started with storyboarding, this may be your best choice.
9. PanelForge
Price: Free (Public Beta); $7.31/month (Pro); $1,411/year (Studio)
Platforms: Works on all Major Operating Systems
PanelForge delivers a feature-rich, drag-and-drop storyboarding solution with flexible frames and drag-and-drop tools. Storyboarding is free to try and offers a suite of paid plans for anyone working on animatics and more complex projects.
Drawings and 3D designs can both be created with PanelForge. Aside from creating animatics, you can also import and export files from Adobe Premiere and Final Cut Pro. The PanelForge tool is ideal for experienced marketers and storyboarders familiar with visualization tools.
10. Adobe Photoshop
Price: $9.99/mo
Platforms: Mac and Windows.
I think it will stay around for a long time. It’s been around for 20+ years. Yet, doesn’t it seem funny how Photoshop can be used for so much more than photo editing? In addition to storyboarding, we see it used for digital painting, pixel art, etc. The digital drawing capability of PS is the same as that of other programs. There are now more brushes available for the PS environment, so there’s even more support.
Additionally, you can download free storyboard templates in PSD format for Photoshop. This program doesn’t need too much explanation because every artist is already aware of it. However, Linux users are most likely to be disappointed by the lack of support.
Conclusion
So, these are some of the best free and paid to storyboard software that you can find in 2021. Each piece of software has its own characteristics and way of being used. In the end, it all depends upon your usage and preferences to decide which software you will use to achieve your goals. If you have enough budget then you can work with paid tools as they offer more features. If you have limited or no budget, you can try to free tools as they offer pretty good features.
Liza Brown
Liza Brown is a writer and a lover of all things video.
Follow @Liza Brown
How to Make a Wonderful Video Slideshow with Your Travel Photos
How to Make Video Slideshow with Your Travel Photos
Ollie Mattison
Mar 27, 2024• Proven solutions
We all love traveling and for a good reason. It allows us to relax, it removes the pressure from our life and it just makes the entire experience a lot better. But if you are a fan of taking picture while travelling, why not try to create a video slideshow with your images? This is one of the best and most original ways you can use it in order to share your travels with others. It works magically and it manages to bring in front some of those unique moments. However, you do need to have the proper tools when you want to create such a slideshow, but that’s great as we are here to help you with that.
How can you create a travel slideshow with travel photos
Things you need to know before creating it
Before you create the travel slideshow you have to keep in mind a few things. If you don’t then the results will not be as good as you expect. You have to be committed to the idea of having the best results and as long as you do that the outcome will be very well worth it.
You need to try and consider your audience because based on that the slideshow will have a specific format. You also need to think about telling a story as that will make it a lot more interesting other than just having a bunch of images aligned together in a non-meaningful manner.
Wondershare Filmora – The best tool to create a video slideshow with your travel photos
But one has to wonder, what tool should you use to create such a travel slideshow? Wondershare Filmora is the application of choice in this regard because it does help offer a huge variety of amazing features that all add up in order to deliver great value!
- Wondershare Filmora is great for beginners as it makes editing a breeze thanks to the stellar interface
- It also integrates transitions as well as filters and effects. It provides you with a refined set of tools that help maintain a good focus on results.
- It helps you add sound effects and a variety of music types to help you with the story.
- You can burn the result to DVD or you can share it on social media and YouTube/Vimeo among others right from within the app.
How can you create video slideshows with Wondershare Filmora?
Creating a unique slideshow video with this tool is actually very easy and it does provide you with a huge amount of value should you choose to use it. Here are several things you need to consider when making a travel slideshow video. First, choose the right music for the travel slideshow; second, adjust the duration of the photos; third, transitions and effects.
Here are the steps you need to focus on when creating a travel slideshow video with Wondershare Filmora:
Filmstock Stock Media Library ](https://filmstock.wondershare.com/creative-theme-tourism?spm=rs.filmora%5Fweb&source%5Fchannel=seo%5Farticle )
Step 1: Download and install Wondershare Filmora, then open it.
Add all the travel photos into the applications. You can add in multiple folders in order to make sorting the images a lot easier.
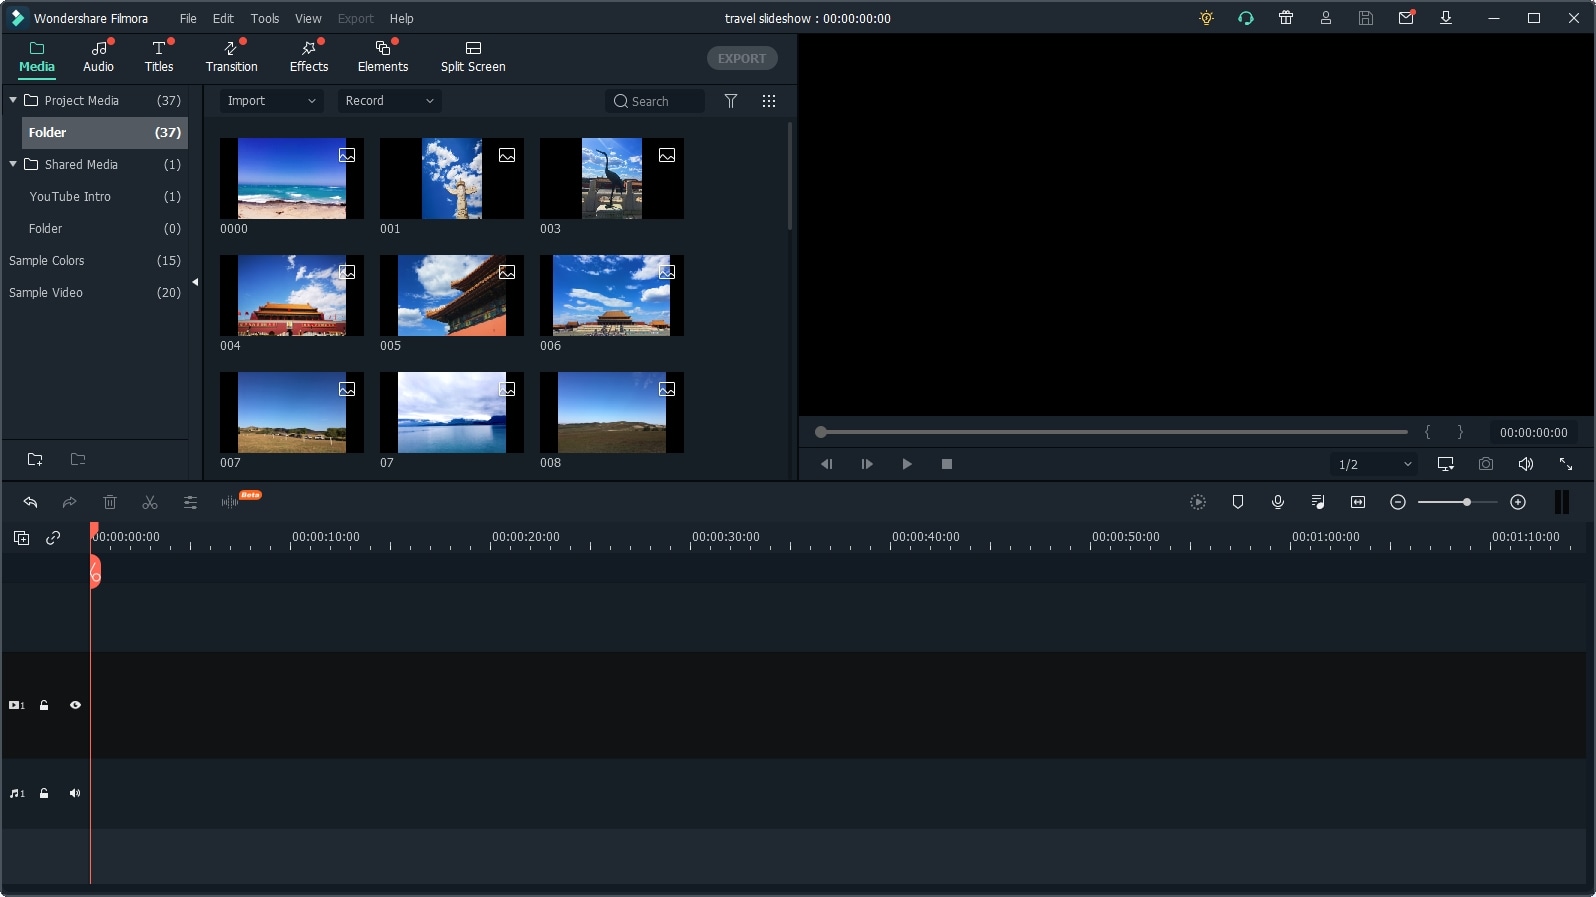
Next, set up the photo duration to the desired length, so that you don’t need to adjust the photo duration one by one.

Step 2: Now, it’s time to determine and add music in the background. Add some sounds and royalty-free music in Wondershare Filmora and then use the media library to help you give more of an impact to the entire experience.

If you want to sync the photo to the background music, you can use the Beat Detection tool in Filmora and mark the highlights accordingly.
Step 3: Once you did that, you will have to drag and then drop the images directly to the timeline. Here is where you can change things like saturation, hue, brightness, contrast and other features.
You can also rotate the images and crop them if you see fit. If some of the travel photos have different aspect ratios, you can select Crop to Fit so all the photos will be in the same aspect ratio without blackbar.
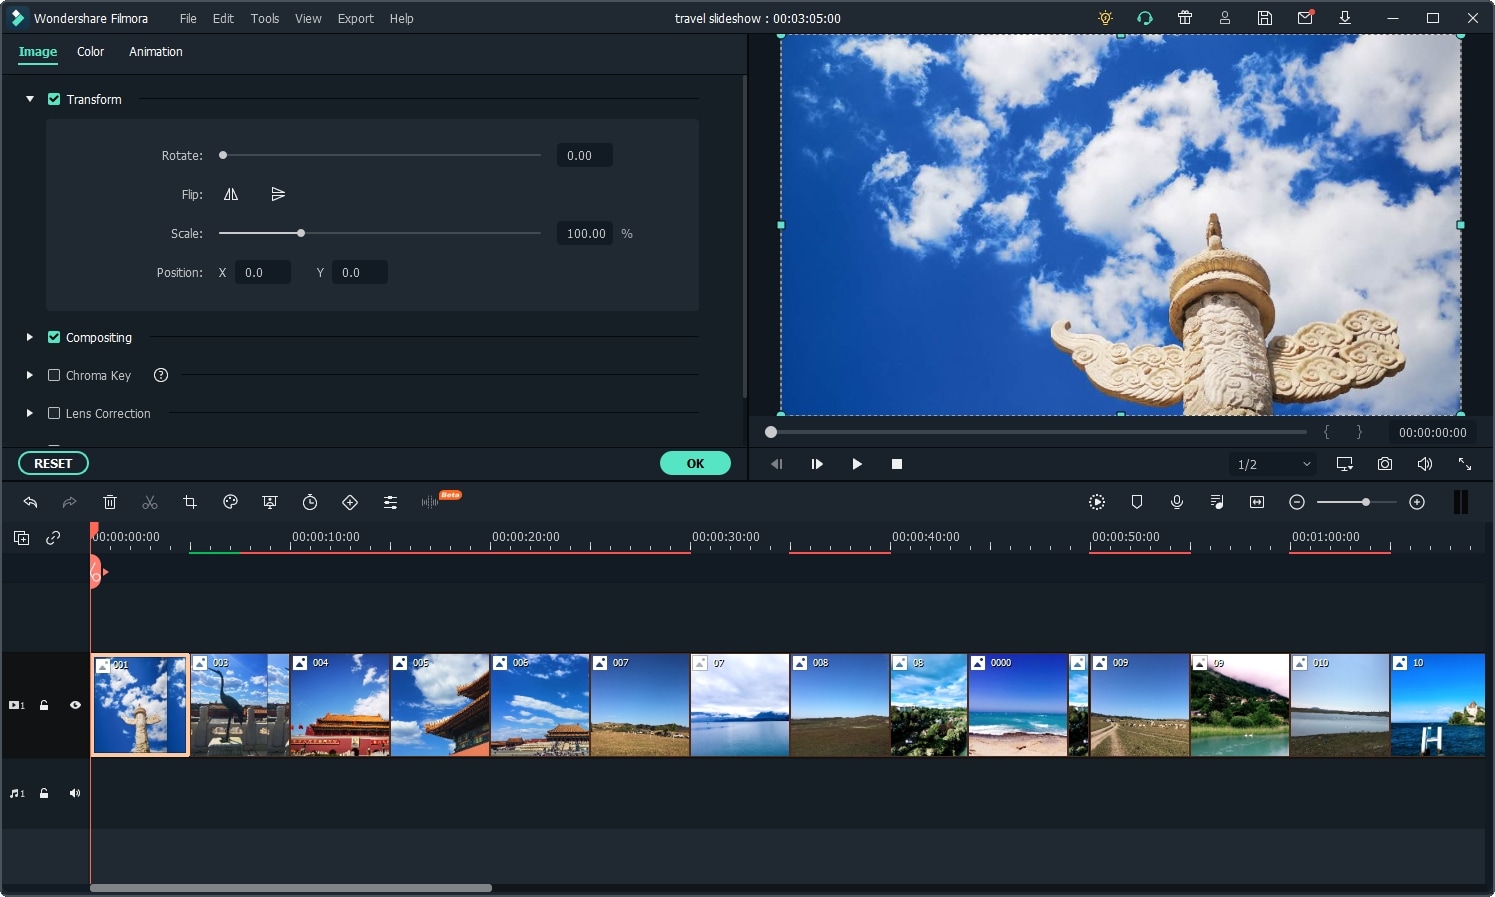
Step 4: At this point, you do need to try and add transitions between each of the images.
When you are done with that, you have to select the filters and overlays that will help you make your travel slideshow look better. This is an important step and you do want to spend a good amount of time with it.
Step 5: Lastly, you will have to export the slideshow as you see fit, but you also have the option to share it on YouTube if you so desire.

Conclusion
Wondershare Filmora is a very good application for those that want a unique, fun travel slideshow. It allows you to get all the tools and high-quality features that you need in order to take the experience to the next level. We recommend you to check it out right away as it’s well worth the investment Download Mac Version ](https://tools.techidaily.com/wondershare/filmora/download/ )
Ollie Mattison
Ollie Mattison is a writer and a lover of all things video.
Follow @Ollie Mattison
Ollie Mattison
Mar 27, 2024• Proven solutions
We all love traveling and for a good reason. It allows us to relax, it removes the pressure from our life and it just makes the entire experience a lot better. But if you are a fan of taking picture while travelling, why not try to create a video slideshow with your images? This is one of the best and most original ways you can use it in order to share your travels with others. It works magically and it manages to bring in front some of those unique moments. However, you do need to have the proper tools when you want to create such a slideshow, but that’s great as we are here to help you with that.
How can you create a travel slideshow with travel photos
Things you need to know before creating it
Before you create the travel slideshow you have to keep in mind a few things. If you don’t then the results will not be as good as you expect. You have to be committed to the idea of having the best results and as long as you do that the outcome will be very well worth it.
You need to try and consider your audience because based on that the slideshow will have a specific format. You also need to think about telling a story as that will make it a lot more interesting other than just having a bunch of images aligned together in a non-meaningful manner.
Wondershare Filmora – The best tool to create a video slideshow with your travel photos
But one has to wonder, what tool should you use to create such a travel slideshow? Wondershare Filmora is the application of choice in this regard because it does help offer a huge variety of amazing features that all add up in order to deliver great value!
- Wondershare Filmora is great for beginners as it makes editing a breeze thanks to the stellar interface
- It also integrates transitions as well as filters and effects. It provides you with a refined set of tools that help maintain a good focus on results.
- It helps you add sound effects and a variety of music types to help you with the story.
- You can burn the result to DVD or you can share it on social media and YouTube/Vimeo among others right from within the app.
How can you create video slideshows with Wondershare Filmora?
Creating a unique slideshow video with this tool is actually very easy and it does provide you with a huge amount of value should you choose to use it. Here are several things you need to consider when making a travel slideshow video. First, choose the right music for the travel slideshow; second, adjust the duration of the photos; third, transitions and effects.
Here are the steps you need to focus on when creating a travel slideshow video with Wondershare Filmora:
Filmstock Stock Media Library ](https://filmstock.wondershare.com/creative-theme-tourism?spm=rs.filmora%5Fweb&source%5Fchannel=seo%5Farticle )
Step 1: Download and install Wondershare Filmora, then open it.
Add all the travel photos into the applications. You can add in multiple folders in order to make sorting the images a lot easier.
Next, set up the photo duration to the desired length, so that you don’t need to adjust the photo duration one by one.
Step 2: Now, it’s time to determine and add music in the background. Add some sounds and royalty-free music in Wondershare Filmora and then use the media library to help you give more of an impact to the entire experience.
If you want to sync the photo to the background music, you can use the Beat Detection tool in Filmora and mark the highlights accordingly.
Step 3: Once you did that, you will have to drag and then drop the images directly to the timeline. Here is where you can change things like saturation, hue, brightness, contrast and other features.
You can also rotate the images and crop them if you see fit. If some of the travel photos have different aspect ratios, you can select Crop to Fit so all the photos will be in the same aspect ratio without blackbar.
Step 4: At this point, you do need to try and add transitions between each of the images.
When you are done with that, you have to select the filters and overlays that will help you make your travel slideshow look better. This is an important step and you do want to spend a good amount of time with it.
Step 5: Lastly, you will have to export the slideshow as you see fit, but you also have the option to share it on YouTube if you so desire.
Conclusion
Wondershare Filmora is a very good application for those that want a unique, fun travel slideshow. It allows you to get all the tools and high-quality features that you need in order to take the experience to the next level. We recommend you to check it out right away as it’s well worth the investment Download Mac Version ](https://tools.techidaily.com/wondershare/filmora/download/ )
Ollie Mattison
Ollie Mattison is a writer and a lover of all things video.
Follow @Ollie Mattison
Also read:
- [New] In 2024, Authenticating A Step-by-Step for Youtube Users
- [New] In 2024, Unlocking Visual Potential The Power of LUT Transformations
- [Updated] Protocols and Performance MacOS Meets Mixer
- 2024 Approved Best iOS and Android Apps You Can Use to Create Animoji and Memoji Videos
- 2024 Approved Is This a Pigeon Meme Generator
- Charting Your Path Strategies That Lead to 1M Audience
- How to Burn Photos to DVD with Transitions and Music for 2024
- How To Fix Unresponsive Phone Touchscreen Of Vivo Y100 5G | Dr.fone
- How to Make a Funny Meme on MacBook for 2024
- How to Use ChatGPT to Write Better Social Media Posts
- In 2024, Audio Visual Transcription Tool
- In 2024, Overview of the Best Honor Magic Vs 2 Screen Mirroring App | Dr.fone
- MacBook Showdown: Comparing MacBook Pro & MacBook Air to Determine Which One Suits Your Needs
- New 2024 Approved Top 10 Free Emoji Websites to Download Emojis Online
- New How to Make an Emoji of Yourself on Mobile ? Emoji Yourself for 2024
- New In 2024, 10 Popular Cartoon Characters That Should Top Your List
- New What Is Emoji?
- Title: Updated 2024 Approved How to Add Bitmoji to Keyboard? Complete Guide
- Author: Jan
- Created at : 2025-02-16 17:50:55
- Updated at : 2025-02-19 16:57:34
- Link: https://meme-emoji.techidaily.com/updated-2024-approved-how-to-add-bitmoji-to-keyboard-complete-guide/
- License: This work is licensed under CC BY-NC-SA 4.0.