
Updated 2024 Approved 7 Free Apps to Get Emojis on Android and iPhone
7 Free Apps to Get Emojis on Android and iPhone
7 Free Apps to Get Emojis on Android and iPhone

Shanoon Cox
Mar 27, 2024• Proven solutions
Are you looking for apps to get emoji on your phone? An emoji is technically a symbolic representation of our feelings. You can use it to show your love or confusion for something or say that you are angry without actually having to say anything.
Emojis are a whole new language of communication. But why bother to download emojis when one can write a text? Well, because it’s faster and easier than writing. A simple ‘thumbs up’ emoji wraps up an appreciation pretty good. Using an emoji in your text or email can add a hint of color and give it extra meaning. Also, if you add emojis, it can boost engagement rates. And it is FUN!
- Part 1: Free Apps to Get Emojis on Android
- Part 2: How to Get Emojis on iPhone
- Part 3: Add Emojis to Your Video Using Wondershare Filmora
Part 1: Free Apps to Get Emojis on Android
I know you are excited to start using emojis right away. Now the question on your mind must be how to get emojis on Android?
Here are 5, top of list apps to get emojis. Could you give it a read, and then take your pick?
#KiKa Keyboard (Android)
KiKa is a trendy keyboard that lets you have all the fun. If you’re looking to spice up your android keyboards, KiKa does the trick. It is customizable, so you can make your keyboard attractive by changing the background image or change the font or size of the keyboard. Won’t it be cool to have a game of thrones themed keyboard?
Besides, Kika uses artificial intelligence to predict words as well as emojis. It works on texts, social media, and emails too. Time to up your game with this excellent emoji app.
- Access Google Play on your phone
- Download the Kika keyboard. Launch it to get the emoji.
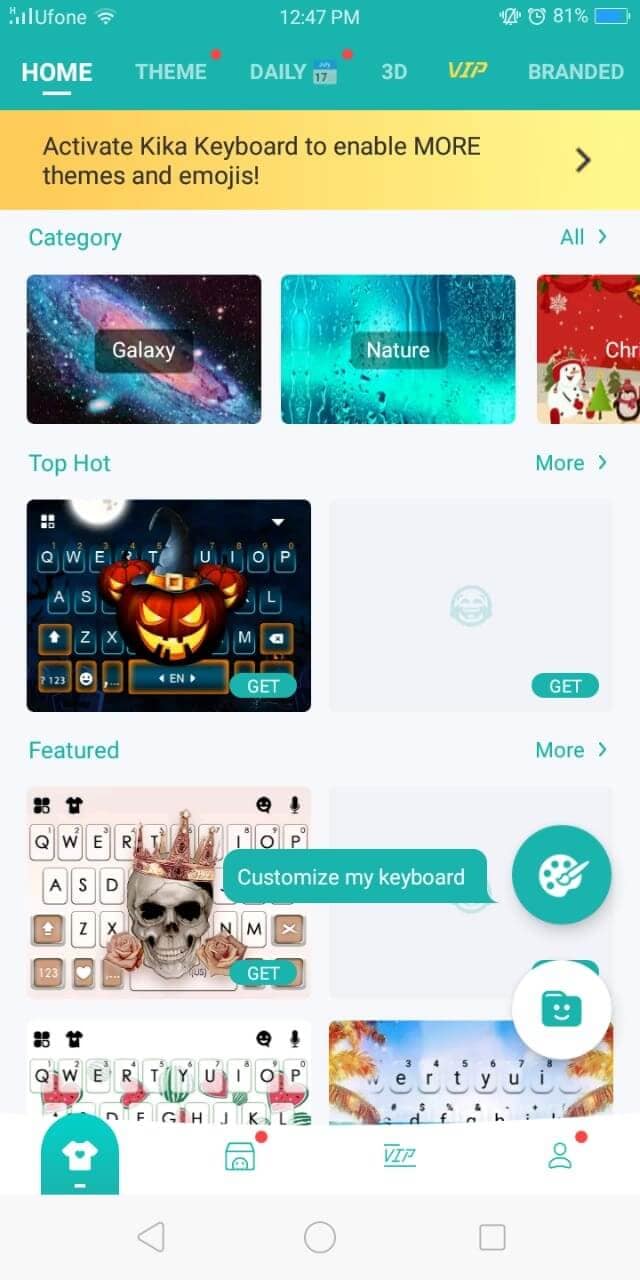
Rest assured, it is free for use. You are just one step away from having more expressive and engaging conversations.
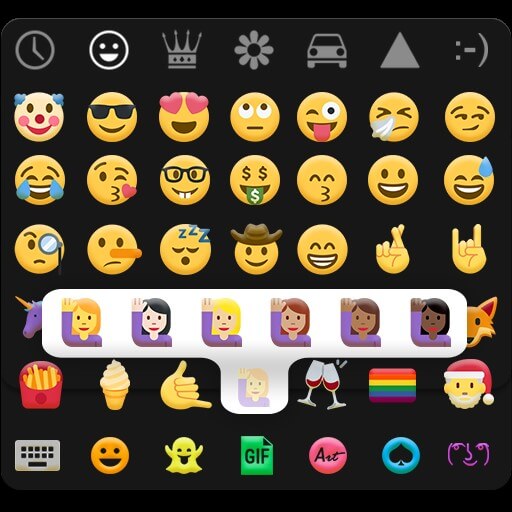
#Emoji Keyboard(Android)
The emoji keyboard is popular because it offers more than 5000 cute emojis. Apart from that, you can choose a themed keyboard or add your picture as the background. It lets you type at lightning speed with cool fonts. Now it is easy to decorate your keyboard and customize it according to your personality. From unicorns to supervillains, take your pick and custom-design a cool keyboard. It makes chatting incredibly easy with gestures and smooth swipe typing.
- Hop on to Google Play
- Instant download Emoji keyboard to add a dash of fun to your texts.
- Launch it, and you will get the emojis.
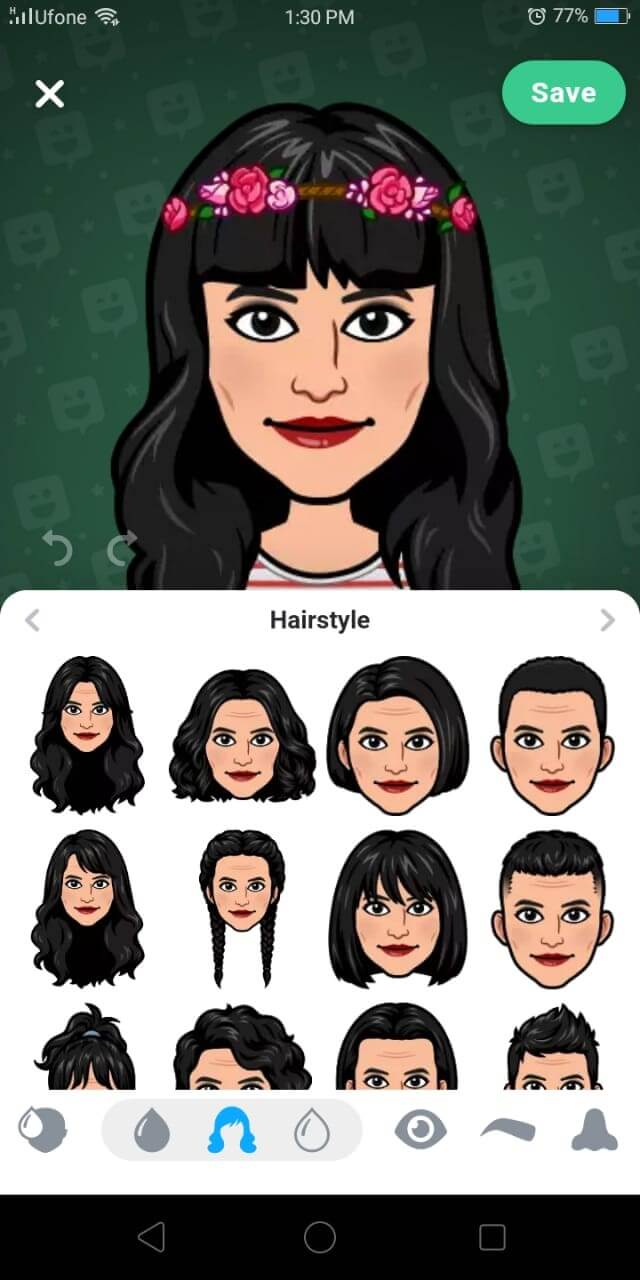
#Bitmoji(Android)
If you want to get emoji that looks just like you, Bitmoji is the app for you. Take a selfie and let the emoji look like you. Dress it up to match the real-life you. An animated version of you. A library full of your avatar stickers to compliment your texts with creativity and a personal touch. Be angry or romantic, and send over a Bitmoji to make it clear how you feel. No need to type long texts anymore. There’s a Bitmoji for every emotion.
- Install Bitmoji from Google Play and Sign in.
- Go to Settings on your phone, tap Languages and Input>On-screen keyboard
- Click Manage Keyboards and then tap Bitmoji Keyboard
#Ginger Keyboard
The ginger keyboard is built for personal as well as business communication. Along with a library of more than a thousand emojis, you get grammar, and spell check features too. Use the free pre-set themes or buy a special one from the store to decorate your keyboard. It also predicts emojis as you type. Go ahead and creatively transform your typing experience with Ginger Keyboard.
- Download Ginger Keyboard from Google Play.
- Follow the steps to sign in.
- Enable the keyboard, and all good to go.
#WhatSmiley
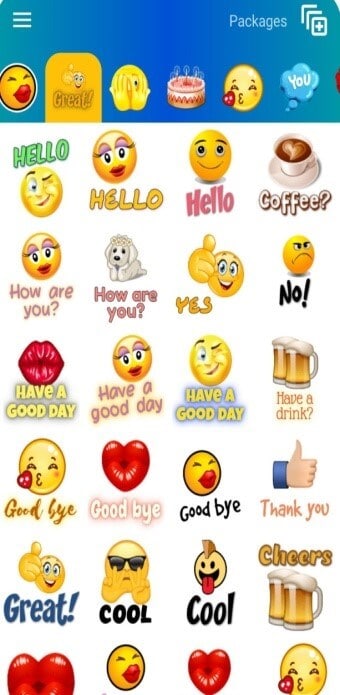
Want to download emojis that are unique and popular? WhatSmiley offers over 2400 emojis to transform your chatting experience. You can add emojis on any social media platform, Whatsapp, or even text (MMS). Emojis are frequently updated, so the fun never stops. You can even customize the emojis and change the background color.
- Download Whatsmiley on your phone and open it.
- Select the emoji you wish to send.
- A pop up will display the apps. Choose the app through which you want to send.
Part 2: How to Get Emojis on iPhone
After emojis took the world by storm, iPhone users were also gifted with this trending communication medium. Although there are probably a dozen apps to download emojis on your iPhone, let me discuss the two easiest methods.
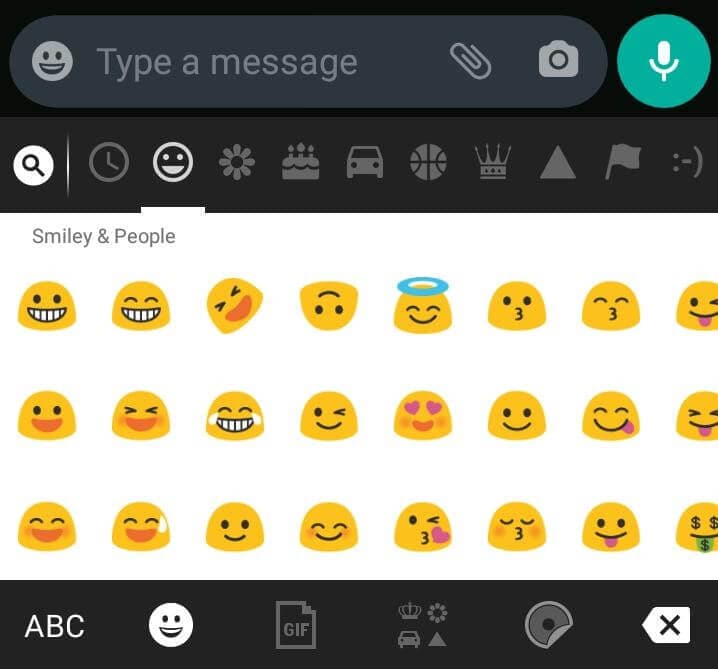
#The Built-In Keyboard on iPhone
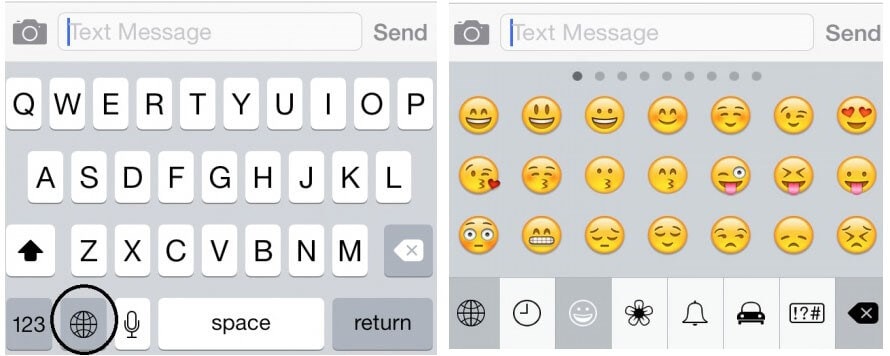
With the increasing popularity of emojis, iPhone found a simple solution for its dedicated users by introducing a built-in emoji keyboard. All you got to do is click enable.
Here is how you can enable the built-in keyboard to get emojis.
- Launch Settings on your home screen.
- Tap General and then click on Keyboard.

- Select Add new keyboard. Swipe down and click on Emoji.
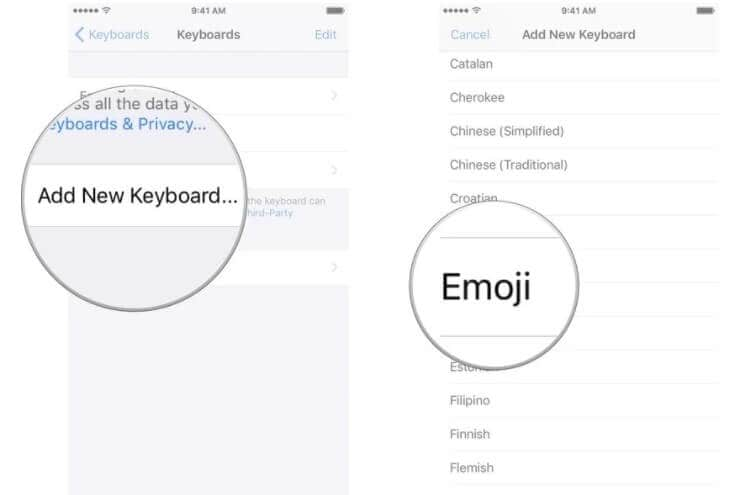
- Ta-Da! Emoji keyboard enabled! And you will be able to get the emoji.
# Emoji Keyboard App
Does the built-in emojis seem boring and wish to add that extra oomph to your texts? The Emoji keyboard app brings you the latest emojis that can be used on all iPhone apps. If you get bored again, you can even order new emojis. Cool, right?
- Open the App Store and install the Emoji Keyboard.
- Launch it, and you’re good to go. Easy peasy.
Apart from being Ad-free, it’s free and requires no registrations. Definitely a dream come true, isn’t it?
Part 3: Add Emojis to Your Video Using Wondershare Filmora
Now you know all the ways to add emojis on texts, emails, and statuses. But Wondershare Filmora wants to fan that creativity in you by allowing you to get much more artistic with emojis.
Wondershare Filmora is a video editing app with a sleek interface. You can use it to add a wide range of emojis to your videos. Imagine customizing your video with a beating heart or a laughing emoji. It offers a wide range of cute emojis arranged in categories as shapes, badges, pets, emojis, etc., making it easier to select the desired type of emoji.
Let me show you a detailed guide to add emojis through Filmora:
1. Download and install Filmora. Then launch it.


2. Click File<Import Media<Import Media Files to import your video to Filmora. Then drag and drop the video to your timeline.
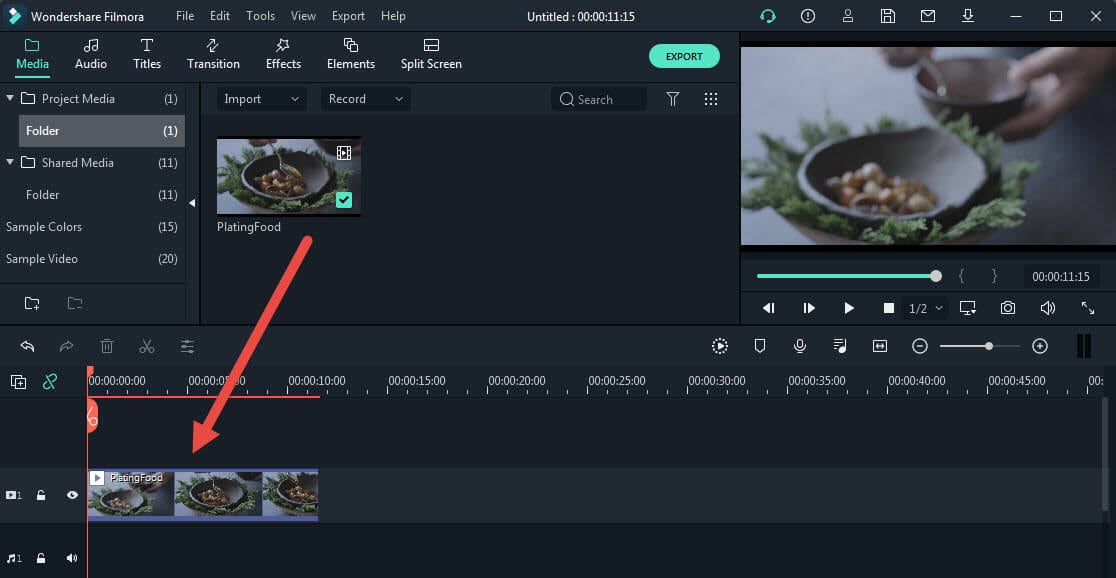
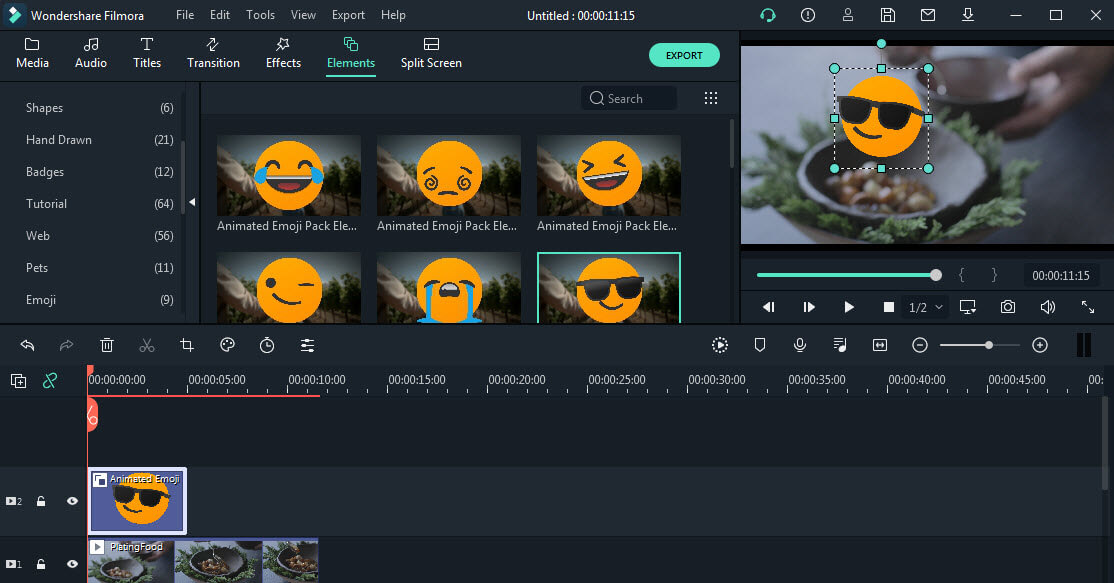
3. Now click on Elements<Emoji categories and add any emoji to the video.

Tips:
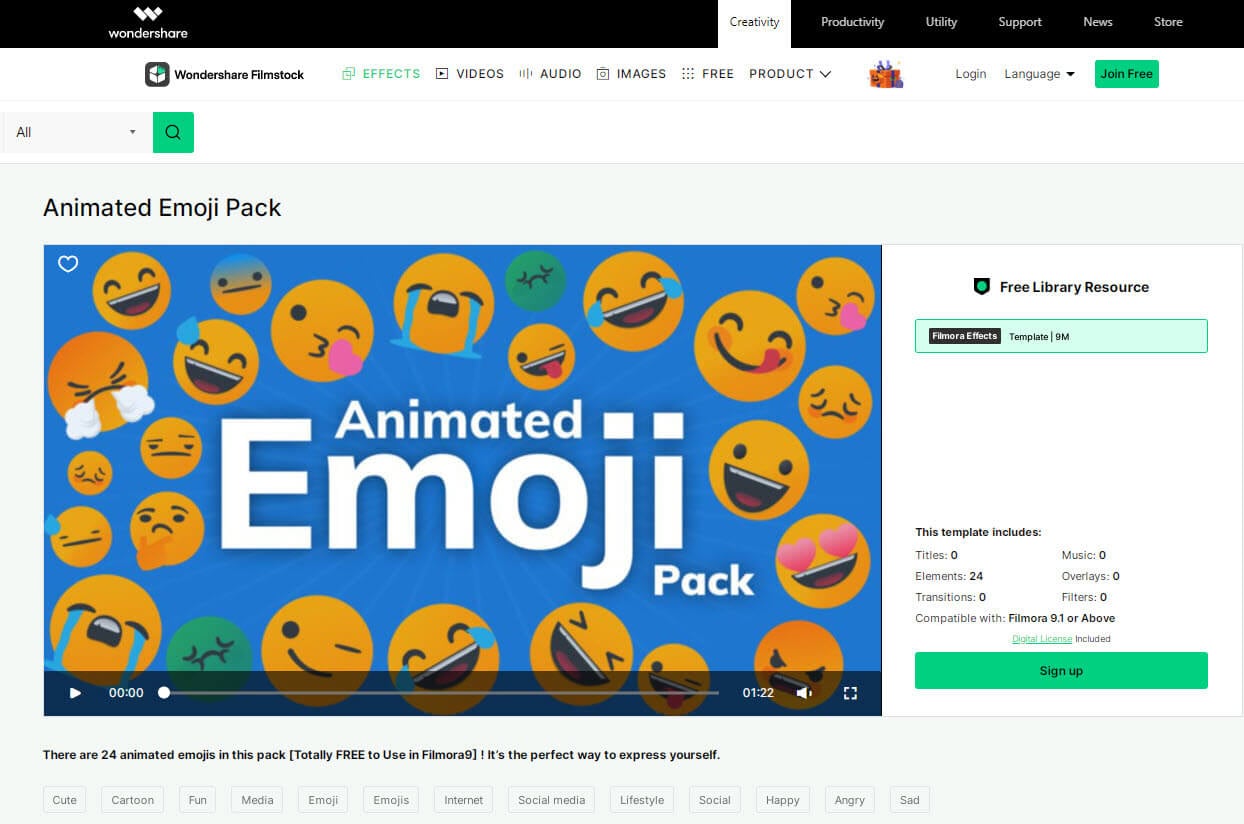
You can also access Wondershare Filmstock (Filmora’s effects store) to download the Animated Emoji Pack and get more emojis. This animated emoji pack is totally free now!
4. Then drag and drop the emoji to the video track above your video. In the viewer panel, drag to adjust the size of emoji. You can also add multiple emojis to one video.
5. Finally click the Export button to convert the video. You can upload it to YouTube, Instagram, TikTok, or any other video platforms as you like after you finish the export.

Conclusion
Emojis have revolutionized the way we communicate. There is no denying that emojis are better at portraying whatever we are trying to say and even convey our feelings much more accurately than words do.
Despite the advancements in technology, not every version of the phone has an in-built emoji collection. Since we don’t want anyone to feel left out of the fun, we compiled this easy to follow guide containing some of the best apps to download emojis.
Moreover, add emojis to your videos through Filmora to make them extra expressive. Decorate them with a blip of color and a hint of an emoji or two. Emojis are cute and fun. Use them wisely.
Shanoon Cox
Shanoon Cox is a writer and a lover of all things video.
Follow @Shanoon Cox
Shanoon Cox
Mar 27, 2024• Proven solutions
Are you looking for apps to get emoji on your phone? An emoji is technically a symbolic representation of our feelings. You can use it to show your love or confusion for something or say that you are angry without actually having to say anything.
Emojis are a whole new language of communication. But why bother to download emojis when one can write a text? Well, because it’s faster and easier than writing. A simple ‘thumbs up’ emoji wraps up an appreciation pretty good. Using an emoji in your text or email can add a hint of color and give it extra meaning. Also, if you add emojis, it can boost engagement rates. And it is FUN!
- Part 1: Free Apps to Get Emojis on Android
- Part 2: How to Get Emojis on iPhone
- Part 3: Add Emojis to Your Video Using Wondershare Filmora
Part 1: Free Apps to Get Emojis on Android
I know you are excited to start using emojis right away. Now the question on your mind must be how to get emojis on Android?
Here are 5, top of list apps to get emojis. Could you give it a read, and then take your pick?
#KiKa Keyboard (Android)
KiKa is a trendy keyboard that lets you have all the fun. If you’re looking to spice up your android keyboards, KiKa does the trick. It is customizable, so you can make your keyboard attractive by changing the background image or change the font or size of the keyboard. Won’t it be cool to have a game of thrones themed keyboard?
Besides, Kika uses artificial intelligence to predict words as well as emojis. It works on texts, social media, and emails too. Time to up your game with this excellent emoji app.
- Access Google Play on your phone
- Download the Kika keyboard. Launch it to get the emoji.
Rest assured, it is free for use. You are just one step away from having more expressive and engaging conversations.
#Emoji Keyboard(Android)
The emoji keyboard is popular because it offers more than 5000 cute emojis. Apart from that, you can choose a themed keyboard or add your picture as the background. It lets you type at lightning speed with cool fonts. Now it is easy to decorate your keyboard and customize it according to your personality. From unicorns to supervillains, take your pick and custom-design a cool keyboard. It makes chatting incredibly easy with gestures and smooth swipe typing.
- Hop on to Google Play
- Instant download Emoji keyboard to add a dash of fun to your texts.
- Launch it, and you will get the emojis.
#Bitmoji(Android)
If you want to get emoji that looks just like you, Bitmoji is the app for you. Take a selfie and let the emoji look like you. Dress it up to match the real-life you. An animated version of you. A library full of your avatar stickers to compliment your texts with creativity and a personal touch. Be angry or romantic, and send over a Bitmoji to make it clear how you feel. No need to type long texts anymore. There’s a Bitmoji for every emotion.
- Install Bitmoji from Google Play and Sign in.
- Go to Settings on your phone, tap Languages and Input>On-screen keyboard
- Click Manage Keyboards and then tap Bitmoji Keyboard
#Ginger Keyboard
The ginger keyboard is built for personal as well as business communication. Along with a library of more than a thousand emojis, you get grammar, and spell check features too. Use the free pre-set themes or buy a special one from the store to decorate your keyboard. It also predicts emojis as you type. Go ahead and creatively transform your typing experience with Ginger Keyboard.
- Download Ginger Keyboard from Google Play.
- Follow the steps to sign in.
- Enable the keyboard, and all good to go.
#WhatSmiley
Want to download emojis that are unique and popular? WhatSmiley offers over 2400 emojis to transform your chatting experience. You can add emojis on any social media platform, Whatsapp, or even text (MMS). Emojis are frequently updated, so the fun never stops. You can even customize the emojis and change the background color.
- Download Whatsmiley on your phone and open it.
- Select the emoji you wish to send.
- A pop up will display the apps. Choose the app through which you want to send.
Part 2: How to Get Emojis on iPhone
After emojis took the world by storm, iPhone users were also gifted with this trending communication medium. Although there are probably a dozen apps to download emojis on your iPhone, let me discuss the two easiest methods.
#The Built-In Keyboard on iPhone
With the increasing popularity of emojis, iPhone found a simple solution for its dedicated users by introducing a built-in emoji keyboard. All you got to do is click enable.
Here is how you can enable the built-in keyboard to get emojis.
- Launch Settings on your home screen.
- Tap General and then click on Keyboard.
- Select Add new keyboard. Swipe down and click on Emoji.
- Ta-Da! Emoji keyboard enabled! And you will be able to get the emoji.
# Emoji Keyboard App
Does the built-in emojis seem boring and wish to add that extra oomph to your texts? The Emoji keyboard app brings you the latest emojis that can be used on all iPhone apps. If you get bored again, you can even order new emojis. Cool, right?
- Open the App Store and install the Emoji Keyboard.
- Launch it, and you’re good to go. Easy peasy.
Apart from being Ad-free, it’s free and requires no registrations. Definitely a dream come true, isn’t it?
Part 3: Add Emojis to Your Video Using Wondershare Filmora
Now you know all the ways to add emojis on texts, emails, and statuses. But Wondershare Filmora wants to fan that creativity in you by allowing you to get much more artistic with emojis.
Wondershare Filmora is a video editing app with a sleek interface. You can use it to add a wide range of emojis to your videos. Imagine customizing your video with a beating heart or a laughing emoji. It offers a wide range of cute emojis arranged in categories as shapes, badges, pets, emojis, etc., making it easier to select the desired type of emoji.
Let me show you a detailed guide to add emojis through Filmora:
1. Download and install Filmora. Then launch it.
2. Click File<Import Media<Import Media Files to import your video to Filmora. Then drag and drop the video to your timeline.
3. Now click on Elements<Emoji categories and add any emoji to the video.
Tips:
You can also access Wondershare Filmstock (Filmora’s effects store) to download the Animated Emoji Pack and get more emojis. This animated emoji pack is totally free now!
4. Then drag and drop the emoji to the video track above your video. In the viewer panel, drag to adjust the size of emoji. You can also add multiple emojis to one video.
5. Finally click the Export button to convert the video. You can upload it to YouTube, Instagram, TikTok, or any other video platforms as you like after you finish the export.
Conclusion
Emojis have revolutionized the way we communicate. There is no denying that emojis are better at portraying whatever we are trying to say and even convey our feelings much more accurately than words do.
Despite the advancements in technology, not every version of the phone has an in-built emoji collection. Since we don’t want anyone to feel left out of the fun, we compiled this easy to follow guide containing some of the best apps to download emojis.
Moreover, add emojis to your videos through Filmora to make them extra expressive. Decorate them with a blip of color and a hint of an emoji or two. Emojis are cute and fun. Use them wisely.
Shanoon Cox
Shanoon Cox is a writer and a lover of all things video.
Follow @Shanoon Cox
How to Make Memes with White Background Step by Step
How to Make Memes with White Background Step by Step

Ollie Mattison
Mar 27, 2024• Proven solutions
World seems fun and humorous, as we wake up to a variety of memes every day. Especially memes having captions are so cool and funny over the social media . A white background with your meme enhances the significance of captions over the video or image in the meme. So, if you too desire to know how to make memes with white background, you have hit the right spot.
In this article, we are going to explain you the detailed process of creating memes with white background. Stay tuned to explore!
- Part1: Create memes with white background by Filmora meme maker
- Part2: How to make memes with white background on phone
Part 1: Create memes with white background by Filmora meme maker
If you are curious enough to know how to make memes with white background online, then Filmora Meme Maker is the right choice for you. You don’t have to install or download any app or software. Just browse and edit the photo or video to create a white background meme and you are good to go. This meme maker can create photo, GIF and video memes alike for you. Moreover, you can add texts, alter fonts, font size and color as well as move the text anywhere in the meme.
This is a fast tool that runs straight on your browser and comes with a decoder and encoder. You can even directly add videos from URL by including the online link to this meme maker program. You can convert a video to a GIF meme with Filmora Meme Maker.
Here comes the detailed process for how to make memes with white background –
Step 1: First and foremost, browse for the official website of Filmora Online Meme Maker page. Drag and drop the desired image over here.

Step 2: On the meme editor page customize the background to white and then select tools from the left side panel to customize the meme further. Add texts, change color, font size and move the text around the background to position it appropriately and match your meme.

Step 3: When everything is as per your wish, click on the ‘CREATE’ button. It will ensure that the changes that you have made will be saved properly. If you are satisfied with the changes and want to go ahead with it, hit the ‘DOWNLOAD’ button.
Step 4: When the ‘DOWNLOAD’ button is pressed, the meme with black and white background is saved on your computer. You can now share it on Reddit, Instagram, Facebook, Twitter or any other social media platform of your choice.

Part 2: How to make memes with white background on phone
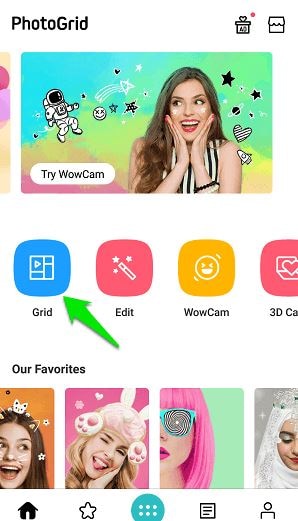
Among the various apps available in the market, we have considered PhotoGrid to make memes with white background. Both Play Store and iTunes can offer a good number of these apps to create memes having white background. Here, we are considering an Android phone for that matter.
Step by step guide for creating memes with white background –
Step 1: From the Play Store, download the app on your Android phone. Run the app on your mobile device and click on the ‘Grid’ for selecting the image that you wish to add to your meme.
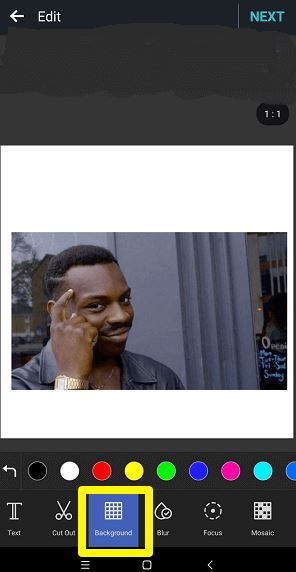
Step 2: When the picture is loaded on Photo Grid, you need to click on the ‘Background’ tab from the menu at the bottom. Pick white color from the menu over here, though usually it is selected by default.
Step 3: Adjust the position and size of the image as you desire by pinching and zooming with your fingers. Once the position and dimensions are fixed as per your requirements, hit the ‘Text’ option. Enter the text you want to include in the meme and then click the ‘tick’ box.
Step 4: Your text is movable across the image area and is resizable as well using your fingers. You can alter the alignment, font, border, color etc. for every text you enter here.
Step 5: When everything else is sorted, press the ‘NEXT’ button on the top corner and hit ‘Save’. This is how to make memes with white background.
Using Photo Grid, you can also create video memes following the same guide as that of the photo memes. As everything is created in a square size, you can seamlessly use it on any social media platform including Reddit, Instagram, etc.
Conclusion
From this article, Filmora Meme Maker is one of the top meme makers in the market. Not only picture or GIF but video memes can also be done using this tool. As there is no need of downloading the software on your system or mobile, you save lot of time and space on your hard drive. We are hopeful that you are comfortable with how to make memes with white background using Filmora Meme Maker online.
Ollie Mattison
Ollie Mattison is a writer and a lover of all things video.
Follow @Ollie Mattison
Ollie Mattison
Mar 27, 2024• Proven solutions
World seems fun and humorous, as we wake up to a variety of memes every day. Especially memes having captions are so cool and funny over the social media . A white background with your meme enhances the significance of captions over the video or image in the meme. So, if you too desire to know how to make memes with white background, you have hit the right spot.
In this article, we are going to explain you the detailed process of creating memes with white background. Stay tuned to explore!
- Part1: Create memes with white background by Filmora meme maker
- Part2: How to make memes with white background on phone
Part 1: Create memes with white background by Filmora meme maker
If you are curious enough to know how to make memes with white background online, then Filmora Meme Maker is the right choice for you. You don’t have to install or download any app or software. Just browse and edit the photo or video to create a white background meme and you are good to go. This meme maker can create photo, GIF and video memes alike for you. Moreover, you can add texts, alter fonts, font size and color as well as move the text anywhere in the meme.
This is a fast tool that runs straight on your browser and comes with a decoder and encoder. You can even directly add videos from URL by including the online link to this meme maker program. You can convert a video to a GIF meme with Filmora Meme Maker.
Here comes the detailed process for how to make memes with white background –
Step 1: First and foremost, browse for the official website of Filmora Online Meme Maker page. Drag and drop the desired image over here.
Step 2: On the meme editor page customize the background to white and then select tools from the left side panel to customize the meme further. Add texts, change color, font size and move the text around the background to position it appropriately and match your meme.
Step 3: When everything is as per your wish, click on the ‘CREATE’ button. It will ensure that the changes that you have made will be saved properly. If you are satisfied with the changes and want to go ahead with it, hit the ‘DOWNLOAD’ button.
Step 4: When the ‘DOWNLOAD’ button is pressed, the meme with black and white background is saved on your computer. You can now share it on Reddit, Instagram, Facebook, Twitter or any other social media platform of your choice.
Part 2: How to make memes with white background on phone
Among the various apps available in the market, we have considered PhotoGrid to make memes with white background. Both Play Store and iTunes can offer a good number of these apps to create memes having white background. Here, we are considering an Android phone for that matter.
Step by step guide for creating memes with white background –
Step 1: From the Play Store, download the app on your Android phone. Run the app on your mobile device and click on the ‘Grid’ for selecting the image that you wish to add to your meme.
Step 2: When the picture is loaded on Photo Grid, you need to click on the ‘Background’ tab from the menu at the bottom. Pick white color from the menu over here, though usually it is selected by default.
Step 3: Adjust the position and size of the image as you desire by pinching and zooming with your fingers. Once the position and dimensions are fixed as per your requirements, hit the ‘Text’ option. Enter the text you want to include in the meme and then click the ‘tick’ box.
Step 4: Your text is movable across the image area and is resizable as well using your fingers. You can alter the alignment, font, border, color etc. for every text you enter here.
Step 5: When everything else is sorted, press the ‘NEXT’ button on the top corner and hit ‘Save’. This is how to make memes with white background.
Using Photo Grid, you can also create video memes following the same guide as that of the photo memes. As everything is created in a square size, you can seamlessly use it on any social media platform including Reddit, Instagram, etc.
Conclusion
From this article, Filmora Meme Maker is one of the top meme makers in the market. Not only picture or GIF but video memes can also be done using this tool. As there is no need of downloading the software on your system or mobile, you save lot of time and space on your hard drive. We are hopeful that you are comfortable with how to make memes with white background using Filmora Meme Maker online.
Ollie Mattison
Ollie Mattison is a writer and a lover of all things video.
Follow @Ollie Mattison
How to Make a Memorable Honeymoon Video
How to Make a Memorable Honeymoon Video
Ollie Mattison
Mar 27, 2024• Proven solutions
The honeymoon is maybe one of the most important times in our life. It’s unique, refined and filled with emotion which is why you should always try to consider exploring all the opportunities that this has to offer. But if you go on a honeymoon, you do want to have a video that you can cherish forever, don’t you? If you do, here are example of fancy honey moon video and some of the best ideas that you can use to create the best, most immersive and memorable honeymoon video.
Tips on creating a memorable honeymoon video
Choosing the right camera
There are many affordable 1080p or 4k cameras that you can use and all of them come with various features and prices. Obviously, you should try and focus on finding the right one that suits your needs. Take your time and study the prices and features then select the one you want based on your budget and expertise.
Get lots of photos
Another great tip is that you need to get as many photos as you can. No matter where you choose to go, there are tons of scenes, people, monuments and landmarks that you can choose to photograph. Take your time and try to capture as many of them as you possibly can. Granted, it will take a little bit of time but it will offer you the insight and fun you need in order to have a great slideshow in the end.
Organize a story from your photos
Once you have the photos, you should try to organize a story from the images. The best honeymoon movies are the ones that include a story so think about that and you will have quite a bit of fun as you immerse yourself into this experience, that’s for sure.
Add songs and overlays
You should try and consider adding songs and overlays because this will make the movie more fun and immersive. Once you complete it, you will need to share it with friends and family!
Edit your honeymoon video with Wondershare Filmora
Why choose Wondershare Filmora
If you are not good at video editing, or if you are a beginner and bothered by the complex steps of some professional video editor, Wondershare Filmora is here to save you. This is the best movie creation tool that helps you create you honeymoon movies from images all while delivering the entire set of tools you need to get a one of a kind and fun experience. If you always wanted an incredible and unique, refined movie creation experience then this is the app to use.
=“” style=”width: 100%; height: 278.438px;”;
Download Mac Version ](https://tools.techidaily.com/wondershare/filmora/download/ )
Wondershare Filmora is very easy to use but it also manages to offer a lot of power. This is great for people that want to access basic editing features such as splitting, reverse, rotate and crop but which might also want some advanced features as well. You are bound to enjoy the entire experience for sure and the outcome will be very well worth it.
Aside from that, Wondershare Filmora also allows you to access a fresh interface that makes editing such a video a breeze. You can even add a variety of overlays and filters which do add up to offer you a very refined, exciting and refreshing experience at all times. It’s all about having the right focus and attention to detail but rest assured that the outcome will be well worth it. Once you have the movie, you can share it on Vimeo, YouTube and Facebook with a single click. The app also allows you to burn it to DVD if you so desire.
How to edit the honeymoon video with Wondershare Filmora
All you have to do is to go through the next steps:
Step 1: Import your honeymoon photos and videos
Gather all the videos and images that you have from your honeymoon then paste them inside the app.

Step 2: Tone your videos with editing tools
Add in video tones with features like reverse, trim, rotate, overlays, transitions, text and so on. This will help you refine the movie and offer it the unique experience you always wanted.
Step 3: Add music from Filmora library
Once you have that, add the music from the integrated royalty free library to ignite your love story.
Step 4: Save and share you video

Complete the video by saving it and then you can feel free to share it with friends.
Wondershare Filmora is the best solution for those that want a refined and fun honeymoon video. All you have to do is to try it out and rest assured that you are bound to love the results Download Mac Version ](https://tools.techidaily.com/wondershare/filmora/download/ )
Ollie Mattison
Ollie Mattison is a writer and a lover of all things video.
Follow @Ollie Mattison
Ollie Mattison
Mar 27, 2024• Proven solutions
The honeymoon is maybe one of the most important times in our life. It’s unique, refined and filled with emotion which is why you should always try to consider exploring all the opportunities that this has to offer. But if you go on a honeymoon, you do want to have a video that you can cherish forever, don’t you? If you do, here are example of fancy honey moon video and some of the best ideas that you can use to create the best, most immersive and memorable honeymoon video.
Tips on creating a memorable honeymoon video
Choosing the right camera
There are many affordable 1080p or 4k cameras that you can use and all of them come with various features and prices. Obviously, you should try and focus on finding the right one that suits your needs. Take your time and study the prices and features then select the one you want based on your budget and expertise.
Get lots of photos
Another great tip is that you need to get as many photos as you can. No matter where you choose to go, there are tons of scenes, people, monuments and landmarks that you can choose to photograph. Take your time and try to capture as many of them as you possibly can. Granted, it will take a little bit of time but it will offer you the insight and fun you need in order to have a great slideshow in the end.
Organize a story from your photos
Once you have the photos, you should try to organize a story from the images. The best honeymoon movies are the ones that include a story so think about that and you will have quite a bit of fun as you immerse yourself into this experience, that’s for sure.
Add songs and overlays
You should try and consider adding songs and overlays because this will make the movie more fun and immersive. Once you complete it, you will need to share it with friends and family!
Edit your honeymoon video with Wondershare Filmora
Why choose Wondershare Filmora
If you are not good at video editing, or if you are a beginner and bothered by the complex steps of some professional video editor, Wondershare Filmora is here to save you. This is the best movie creation tool that helps you create you honeymoon movies from images all while delivering the entire set of tools you need to get a one of a kind and fun experience. If you always wanted an incredible and unique, refined movie creation experience then this is the app to use.
=“” style=”width: 100%; height: 278.438px;”;
Download Mac Version ](https://tools.techidaily.com/wondershare/filmora/download/ )
Wondershare Filmora is very easy to use but it also manages to offer a lot of power. This is great for people that want to access basic editing features such as splitting, reverse, rotate and crop but which might also want some advanced features as well. You are bound to enjoy the entire experience for sure and the outcome will be very well worth it.
Aside from that, Wondershare Filmora also allows you to access a fresh interface that makes editing such a video a breeze. You can even add a variety of overlays and filters which do add up to offer you a very refined, exciting and refreshing experience at all times. It’s all about having the right focus and attention to detail but rest assured that the outcome will be well worth it. Once you have the movie, you can share it on Vimeo, YouTube and Facebook with a single click. The app also allows you to burn it to DVD if you so desire.
How to edit the honeymoon video with Wondershare Filmora
All you have to do is to go through the next steps:
Step 1: Import your honeymoon photos and videos
Gather all the videos and images that you have from your honeymoon then paste them inside the app.
Step 2: Tone your videos with editing tools
Add in video tones with features like reverse, trim, rotate, overlays, transitions, text and so on. This will help you refine the movie and offer it the unique experience you always wanted.
Step 3: Add music from Filmora library
Once you have that, add the music from the integrated royalty free library to ignite your love story.
Step 4: Save and share you video
Complete the video by saving it and then you can feel free to share it with friends.
Wondershare Filmora is the best solution for those that want a refined and fun honeymoon video. All you have to do is to try it out and rest assured that you are bound to love the results Download Mac Version ](https://tools.techidaily.com/wondershare/filmora/download/ )
Ollie Mattison
Ollie Mattison is a writer and a lover of all things video.
Follow @Ollie Mattison
How to Make a Photo Collage on Mac/iPhone Using iPhoto?
How to Make a Photo Collage on Mac/iPhone Using iPhoto?
Shanoon Cox
Mar 27, 2024• Proven solutions
iPhoto is a photo library familiar to iOS users. It can help you easily organize, store and sort images, and even make a slide show to help you enjoy photos. This is why, even though Apple no longer develops iPhoto, some people use it.
Update: On April 8, 2015, Apple has launched a new Photos app on OS X Yosemite, which means Apple has stopped developing iPhoto. However, if you like iPhoto, you can still use it.
The following will introduce how to use the iPhoto collage maker on Mac or iPhone. At the end of this article, iPhoto alternative software will serve as your reference.
Part 1: How to Make a Photo Collage in iPhoto?
Here are the quick steps to create a photo collage with iPhoto.
Step 1: Launch iPhoto and click “Events” in the side menu.
Step 2: Hold “Shift” and click each photo you want to include in your photo collage.
Step 3: Click the “+” button in the lower-left corner and select Card in the pop-up window.
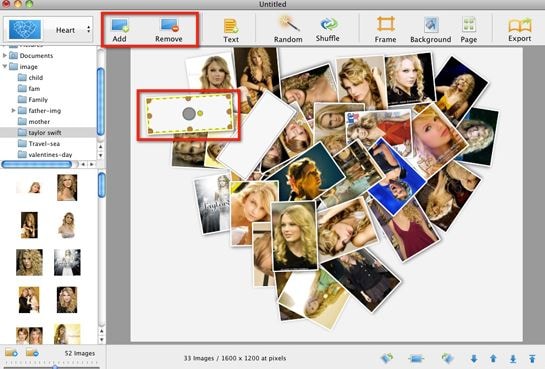
Step 4: Choose “Picture Collage”, which should be under the Any Occasion section if you are using the iPhoto 11.
Step 5: You’ll notice that all the templates are sorted based on the occasion.
Step 6: Drag photos to the template and pick a background, orientation and design.
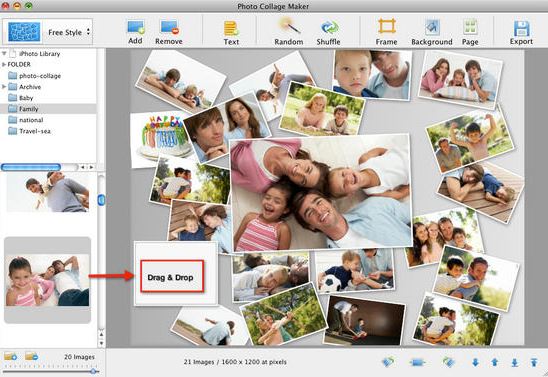
Step 7: Click the Buy button on the lower right-hand corner of the collage editor, or go to the Share menu and email it to yourself or family members.
But before you make a photo collage using iPhoto, here are some important things for you to know:
- Technically, iPhoto can’t make fancy photo collages like other Photo collages makers on Mac. So don’t expect too much of it. iPhoto only creates greeting cards with a simple collage layout.
- The templates iPhoto offers are quite limited and ordinary that you might feel a little disappointed.
- iPhoto offers no share options to save photo collages to desktop or to post on Facebook, which is a basic feature of picture collage editor.
Part 2: What Replaces iPhoto on Mac/iPhone?
Since iPhoto’s functions are not sufficient, we will introduce some alternative collage makers that you may be interested in.
Alternative to Make a Short Video, Slideshow, or Photo Collage: Wondershare Filmora
If there are too many photos to save or share with friends and family, you can use these images to make short videos to better collage and share. Filmora can do this for you, through which you can easily crop, add effects, split the screen, and merge photos. In order to make the “photo video” lively and exciting, you can also add music, audio, animation, title, music, etc. to it.
Alternative to Organize, Store, and Sort Images: iCloud
Migrating your photos to iCloud is a wise choice. iCloud is the best photo storage for iOS or Mac users. You don’t need to download other apps or software. Just allow iCloud to back up the photo’s library in the settings.
The best thing is that you can view iCloud photos anytime and anywhere after logging in to your iCloud account. You can also automatically share photos with others by opening “Shared Album”. However, if there are too many photos, a paid subscription may be required to upgrade the storage space.
Conclusion
Above are the steps to make a photo collage using iPhoto on Mac/iPhone. We also list alternative methods to meet the different needs of the Photo library. So, if this isn’t quite what you’re looking for, you can also use some online photo collage service instead. If you want to have more fun editing photo stories, welcome to download Filmora and make more memorable and interesting videos.
Shanoon Cox
Shanoon Cox is a writer and a lover of all things video.
Follow @Shanoon Cox
Shanoon Cox
Mar 27, 2024• Proven solutions
iPhoto is a photo library familiar to iOS users. It can help you easily organize, store and sort images, and even make a slide show to help you enjoy photos. This is why, even though Apple no longer develops iPhoto, some people use it.
Update: On April 8, 2015, Apple has launched a new Photos app on OS X Yosemite, which means Apple has stopped developing iPhoto. However, if you like iPhoto, you can still use it.
The following will introduce how to use the iPhoto collage maker on Mac or iPhone. At the end of this article, iPhoto alternative software will serve as your reference.
Part 1: How to Make a Photo Collage in iPhoto?
Here are the quick steps to create a photo collage with iPhoto.
Step 1: Launch iPhoto and click “Events” in the side menu.
Step 2: Hold “Shift” and click each photo you want to include in your photo collage.
Step 3: Click the “+” button in the lower-left corner and select Card in the pop-up window.
Step 4: Choose “Picture Collage”, which should be under the Any Occasion section if you are using the iPhoto 11.
Step 5: You’ll notice that all the templates are sorted based on the occasion.
Step 6: Drag photos to the template and pick a background, orientation and design.
Step 7: Click the Buy button on the lower right-hand corner of the collage editor, or go to the Share menu and email it to yourself or family members.
But before you make a photo collage using iPhoto, here are some important things for you to know:
- Technically, iPhoto can’t make fancy photo collages like other Photo collages makers on Mac. So don’t expect too much of it. iPhoto only creates greeting cards with a simple collage layout.
- The templates iPhoto offers are quite limited and ordinary that you might feel a little disappointed.
- iPhoto offers no share options to save photo collages to desktop or to post on Facebook, which is a basic feature of picture collage editor.
Part 2: What Replaces iPhoto on Mac/iPhone?
Since iPhoto’s functions are not sufficient, we will introduce some alternative collage makers that you may be interested in.
Alternative to Make a Short Video, Slideshow, or Photo Collage: Wondershare Filmora
If there are too many photos to save or share with friends and family, you can use these images to make short videos to better collage and share. Filmora can do this for you, through which you can easily crop, add effects, split the screen, and merge photos. In order to make the “photo video” lively and exciting, you can also add music, audio, animation, title, music, etc. to it.
Alternative to Organize, Store, and Sort Images: iCloud
Migrating your photos to iCloud is a wise choice. iCloud is the best photo storage for iOS or Mac users. You don’t need to download other apps or software. Just allow iCloud to back up the photo’s library in the settings.
The best thing is that you can view iCloud photos anytime and anywhere after logging in to your iCloud account. You can also automatically share photos with others by opening “Shared Album”. However, if there are too many photos, a paid subscription may be required to upgrade the storage space.
Conclusion
Above are the steps to make a photo collage using iPhoto on Mac/iPhone. We also list alternative methods to meet the different needs of the Photo library. So, if this isn’t quite what you’re looking for, you can also use some online photo collage service instead. If you want to have more fun editing photo stories, welcome to download Filmora and make more memorable and interesting videos.
Shanoon Cox
Shanoon Cox is a writer and a lover of all things video.
Follow @Shanoon Cox
10 Popular Cartoon Characters That Should Top Your List [2023 Updated]
10 Popular Cartoon Characters That Should Top Your List
Shanoon Cox
Mar 27, 2024• Proven solutions
Childhood is a book with different chapters filled with joy, fun, school, chocolates, and our favorite cartoon characters. The most fantasizing thing for a child is the popular cartoon characters which they see as a tutor who teaches them to become honest, humble and most importantly they show us how to overcome problems in our life. All the famous cartoon characters are still famous among millennials who used to watch them in their childhood. In this article, we are going to dive back into childhood again and you will be amazed to see those characters again in front of your eyes.
Get ready for something mesmerizing today!
Part 1: 10 Popular Cartoon Characters of All Time
Everyone has a role model in their life and this is is a no brainer as we always have a superhero from the cartoon world whom we follow and wanna be like them. Let’s talk about some famous cartoon characters that everyone in this world is aware of.
- 1. Bugs Bunny
- 2. Scooby-Doo
- 3. SpongeBob SquarePants
- 4. Daffy Duck
- 5. Tom Cat
- 6. Mickey Mouse
- 7. Jerry Mouse
- 8. Snoopy
- 9. Winnie-the-Pooh
- 10. Donald Duck
1. Bugs Bunny
Bugs bunny is a famous cartoon character that was created in back 1930s by Leon Schlesinger and its one of the best and popular cartoon characters of all time. Bugs bunny is associated with Looney Tunes and Merrie Melodie’s animated stories. Bugs bunny is known for his insouciant and flippant personality because bugs bunny was always happy and he was also known as Happy Rabbit. The message bugs bunny sent to the world was to be happy in all situations in life.
2. Scooby-Doo
Scooby-Doo is a famous cartoon character that was created back in 1969 and this character is associated with Hanna-Barbera, an American animation company. The character is famous for its curiosity about solving supernatural mysteries and making people laugh with his crazy styles. Scooby-Doo is a natural detective and has made people fantasize about solving mysteries more easily. Scooby is so famous today that people who are in their mid-30s still watch it with their kids because of the unique character it plays.
3. SpongeBob SquarePants
SpongeBob SquarePants was created back in 1999 by Stephen Hillenburg, a marine science educator. SpongeBob SquarePants made its debut on Nickelodeon in 1999. The show becomes a superhit and SpongeBob was the next superstar with the most successful character at that time. This cartoon character is famous for his friendship with his aquatic friends and the energetic and optimistic nature of SpongeBob made inspired everyone to be hopeful in any situation.
4. Daffy Duck
Daffy Duck is a famous cartoon character that was produced in the late 1930s by Warner Bros. The cartoon is associated with cartoon series like Merrie Melodies and Looney Tunes. The cartoon character was famous for the way he would hope around in the water and yell, Woo-hoo! Woo-hoo!. Daffy Duck has always entertained people with his quirky ways of jumping into the water and making people laugh out. The message from this character was very clear and entertaining
5. Tom Cat
Tom Cat needs no introduction as it’s the furious and popular cartoon character of all time. It was created by Joseph Barbera and William Hanna in 1940. Tom is associated with the Tom & Jerry cartoon series and it made people laugh with silly fights and chasing all over the series. Tom was very annoyed by Jerry and he wanted to make a meal of Jerry as that used to make people laugh. However, the deep message Tom has given to the viewers was that whenever Jerry was in serious trouble apart from their silly fights, Tom used to save Jerry and would ignore him sarcastically. So, the message was to spread the love even if you are irritated with a person.
6. Mickey Mouse
Walt Disney created a mouse in 1928 and that was named Mickey Mouse. The cartoon character is still famous among kids and adults as a childhood memory. Mickey is famous for his nice character and stubborn attitude. Mickey and his girlfriend Minnie Mouse with his pet dog Pluto were seen with Donald Duck and Goofy. Mickey always inspired people to stay honest and loving to friends and loved ones and people who like Mickey follow the same.
7. Jerry Mouse
Jerry Mouse is one of the most notorious and crazy characters of the Tom & Jerry cartoon series. He was very much liked by people and the way he used to irritate Tom in the cartoon series was amazing. If you want to learn different ways of annoying a friend then you better take classes from Jerry as he has the craziest ways of teasing a friend without getting caught.
8. Snoopy
Ah! Snoopy, the cute dog was created by Charles M. Schulz in 1950 for a comic strip. Snoopy was the most iconic and recognizable character and was very famous for the character. Snoopy was famous for his sleep as he used to sleep all day long and he used to find different ways to live an easier life. The message it sent to the people was very clear to become easy on life as whatever the time is today, it will ultimately pass.
9. Winnie-the-Pooh
Winnie-the-Pooh was a cartoon character featured in 1928 in A.A Milne’s House at Pooh Corner. Pooh was a yellow furred bear who loved honey and lived in a forest surrounded by hundred-acre wood. He lived there with his friends who were a donkey, pig, own, rabbit and birds. Winnie was always an adventurous character and helped his friends in every situation. People liked the way Winnie used to do things and roam around the forest with his friends.
10. Donald Duck
Donald Duck is a cartoon character created by Walt Disney in 1934 with yellow legs and feet. Donald Duck wears a typical sailor shirt and a cap to look like a gentleman in every way. Donald Duck first appeared in The Wise Little Hen in 1934 and become one of the most popular characters with its style and anger-related issues. Though Donald Duck was very strict it inspired people to be gentle and easy with being tough.
Conclusion
In this article, you learned about the popular cartoon characters that made your childhood awesome. Also, the brief given in this guide about the famous cartoon characters is amazing and you can get all the information about the cartoon characters without checking different information about them. Given that cartoons are fun to watch but we have also introduced to Filmora where you can create your cartoon video by using the features and tools on the timeline. If you find this guide helpful then don’t forget to tell us about your favorite cartoon character and why do you like them.
Shanoon Cox
Shanoon Cox is a writer and a lover of all things video.
Follow @Shanoon Cox
Shanoon Cox
Mar 27, 2024• Proven solutions
Childhood is a book with different chapters filled with joy, fun, school, chocolates, and our favorite cartoon characters. The most fantasizing thing for a child is the popular cartoon characters which they see as a tutor who teaches them to become honest, humble and most importantly they show us how to overcome problems in our life. All the famous cartoon characters are still famous among millennials who used to watch them in their childhood. In this article, we are going to dive back into childhood again and you will be amazed to see those characters again in front of your eyes.
Get ready for something mesmerizing today!
Part 1: 10 Popular Cartoon Characters of All Time
Everyone has a role model in their life and this is is a no brainer as we always have a superhero from the cartoon world whom we follow and wanna be like them. Let’s talk about some famous cartoon characters that everyone in this world is aware of.
- 1. Bugs Bunny
- 2. Scooby-Doo
- 3. SpongeBob SquarePants
- 4. Daffy Duck
- 5. Tom Cat
- 6. Mickey Mouse
- 7. Jerry Mouse
- 8. Snoopy
- 9. Winnie-the-Pooh
- 10. Donald Duck
1. Bugs Bunny
Bugs bunny is a famous cartoon character that was created in back 1930s by Leon Schlesinger and its one of the best and popular cartoon characters of all time. Bugs bunny is associated with Looney Tunes and Merrie Melodie’s animated stories. Bugs bunny is known for his insouciant and flippant personality because bugs bunny was always happy and he was also known as Happy Rabbit. The message bugs bunny sent to the world was to be happy in all situations in life.
2. Scooby-Doo
Scooby-Doo is a famous cartoon character that was created back in 1969 and this character is associated with Hanna-Barbera, an American animation company. The character is famous for its curiosity about solving supernatural mysteries and making people laugh with his crazy styles. Scooby-Doo is a natural detective and has made people fantasize about solving mysteries more easily. Scooby is so famous today that people who are in their mid-30s still watch it with their kids because of the unique character it plays.
3. SpongeBob SquarePants
SpongeBob SquarePants was created back in 1999 by Stephen Hillenburg, a marine science educator. SpongeBob SquarePants made its debut on Nickelodeon in 1999. The show becomes a superhit and SpongeBob was the next superstar with the most successful character at that time. This cartoon character is famous for his friendship with his aquatic friends and the energetic and optimistic nature of SpongeBob made inspired everyone to be hopeful in any situation.
4. Daffy Duck
Daffy Duck is a famous cartoon character that was produced in the late 1930s by Warner Bros. The cartoon is associated with cartoon series like Merrie Melodies and Looney Tunes. The cartoon character was famous for the way he would hope around in the water and yell, Woo-hoo! Woo-hoo!. Daffy Duck has always entertained people with his quirky ways of jumping into the water and making people laugh out. The message from this character was very clear and entertaining
5. Tom Cat
Tom Cat needs no introduction as it’s the furious and popular cartoon character of all time. It was created by Joseph Barbera and William Hanna in 1940. Tom is associated with the Tom & Jerry cartoon series and it made people laugh with silly fights and chasing all over the series. Tom was very annoyed by Jerry and he wanted to make a meal of Jerry as that used to make people laugh. However, the deep message Tom has given to the viewers was that whenever Jerry was in serious trouble apart from their silly fights, Tom used to save Jerry and would ignore him sarcastically. So, the message was to spread the love even if you are irritated with a person.
6. Mickey Mouse
Walt Disney created a mouse in 1928 and that was named Mickey Mouse. The cartoon character is still famous among kids and adults as a childhood memory. Mickey is famous for his nice character and stubborn attitude. Mickey and his girlfriend Minnie Mouse with his pet dog Pluto were seen with Donald Duck and Goofy. Mickey always inspired people to stay honest and loving to friends and loved ones and people who like Mickey follow the same.
7. Jerry Mouse
Jerry Mouse is one of the most notorious and crazy characters of the Tom & Jerry cartoon series. He was very much liked by people and the way he used to irritate Tom in the cartoon series was amazing. If you want to learn different ways of annoying a friend then you better take classes from Jerry as he has the craziest ways of teasing a friend without getting caught.
8. Snoopy
Ah! Snoopy, the cute dog was created by Charles M. Schulz in 1950 for a comic strip. Snoopy was the most iconic and recognizable character and was very famous for the character. Snoopy was famous for his sleep as he used to sleep all day long and he used to find different ways to live an easier life. The message it sent to the people was very clear to become easy on life as whatever the time is today, it will ultimately pass.
9. Winnie-the-Pooh
Winnie-the-Pooh was a cartoon character featured in 1928 in A.A Milne’s House at Pooh Corner. Pooh was a yellow furred bear who loved honey and lived in a forest surrounded by hundred-acre wood. He lived there with his friends who were a donkey, pig, own, rabbit and birds. Winnie was always an adventurous character and helped his friends in every situation. People liked the way Winnie used to do things and roam around the forest with his friends.
10. Donald Duck
Donald Duck is a cartoon character created by Walt Disney in 1934 with yellow legs and feet. Donald Duck wears a typical sailor shirt and a cap to look like a gentleman in every way. Donald Duck first appeared in The Wise Little Hen in 1934 and become one of the most popular characters with its style and anger-related issues. Though Donald Duck was very strict it inspired people to be gentle and easy with being tough.
Conclusion
In this article, you learned about the popular cartoon characters that made your childhood awesome. Also, the brief given in this guide about the famous cartoon characters is amazing and you can get all the information about the cartoon characters without checking different information about them. Given that cartoons are fun to watch but we have also introduced to Filmora where you can create your cartoon video by using the features and tools on the timeline. If you find this guide helpful then don’t forget to tell us about your favorite cartoon character and why do you like them.
Shanoon Cox
Shanoon Cox is a writer and a lover of all things video.
Follow @Shanoon Cox
How to Add Stickers to WhatsApp-The Ultimate Guide
How to Add Stickers to WhatsApp-The Ultimate Guide
Shanoon Cox
Mar 27, 2024• Proven solutions
Whatsapp has recently added the stickers feature, and people are going crazy about adding stickers to WhatsApp. But the question is how to add stickers to Whatsapp? To help with that, we will walk you through a detailed guide on how to add stickers to Whatsapp and bring a dash of fun to boring texts.
Now, if you don’t know how to add stickers to WhatsApp and use stickers on Whatsapp, we have you covered.
- Part 1: How to Create Stickers for WhatsApp
- Part 2: How to Add Stickers to WhatsApp
- Part 3: How to Send Stickers on WhatsApp
- Part 4: Bonus Tip—Add Sticker to Your Video with Wondershare Filmora
Part 1: How to Create Stickers for WhatsApp
Whatsapp stickers are now a significant part of our daily conversations. Because let’s face it, life would be boring without them. Perhaps it’s time to up your game by learning how to add stickers to Whatsapp
Even though Whatsapp has a vast library of stickers available, creating a unique sticker is more fun. And the latest apps have made it incredibly easy to create customized stickers. So all you need to do now is learn how to use stickers in Whatsapp
Sticker Make for Whatsapp is one such app. It is free and requires no registrations. Download the app from Google Store and start creating hilarious stickers to surprise your friends.
1. Download Sticker Make and launch it. On the homepage, you will be presented with two options. Click Create to make a sticker from scratch using your own image or click on Animated to insert your picture in a sticker template.
2. Choose any image from your gallery. Crop it to the size and shape you wish to include. Use the Freehand tool or click Automatically to let the app crop a face itself.
3. Click Next and now erase the background or make careful cropping.
4. You can even outline your sticker and adjust its width and color.
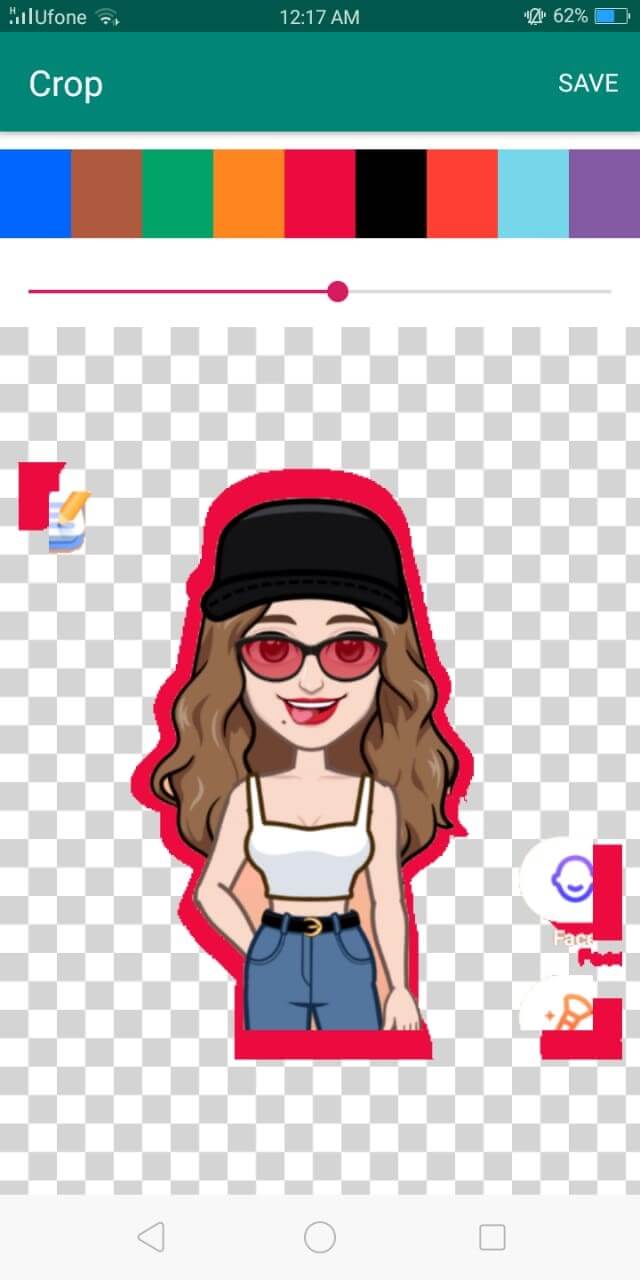
5. You can even add texts and change fonts.

6. Click on the square in the bottom panel to choose from a list of cool backgrounds for your sticker.
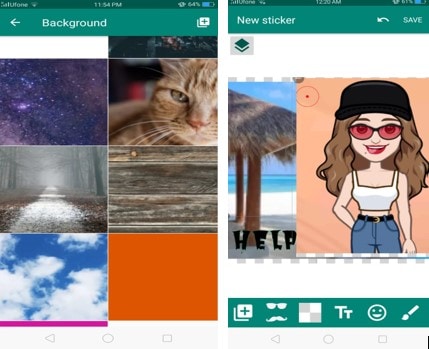
7. Choose to add themed emojis or decorate using a variety of images in the library of Sticker Make. Once you are done, click Save, enter pack name, and click Ok.
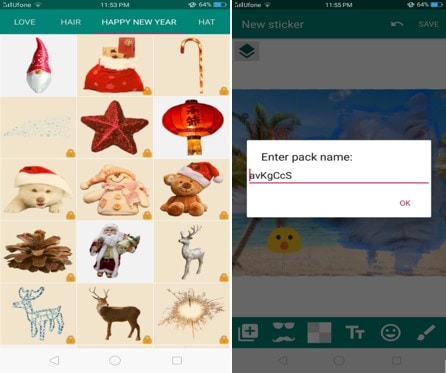
(P.S Make sure that the stickers are precisely 512x512 pixels and no more than 100kb)
Part 2: How to Add Stickers to WhatsApp
Now, you must be wondering how to add stickers to Whatsapp. Let me ease your worry. In this part, I will walk you through a step-by-step guide on how to use stickers in Whatsapp and a few additional features too.
You can save the stickers you receive from other people-
- Click on the sticker you receive
- Tap Add to favorites

If you wish you get more exciting stickers to better express yourself-
- Open Whatsapp chat, either individual or group chat.
- Click on the emoji and then click the sticker beside GIF (the square shape)
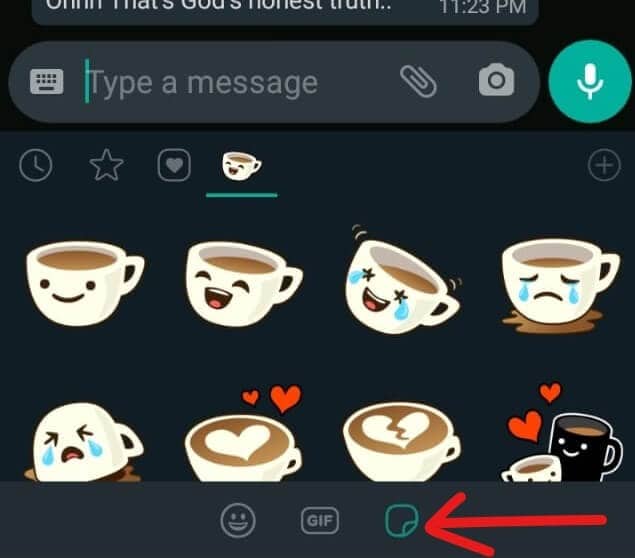
- Tap on the + sign on the upper right corner of your keyboard.
- Here you choose to download any number of sticker packs or click Get More Stickers from Google Play.
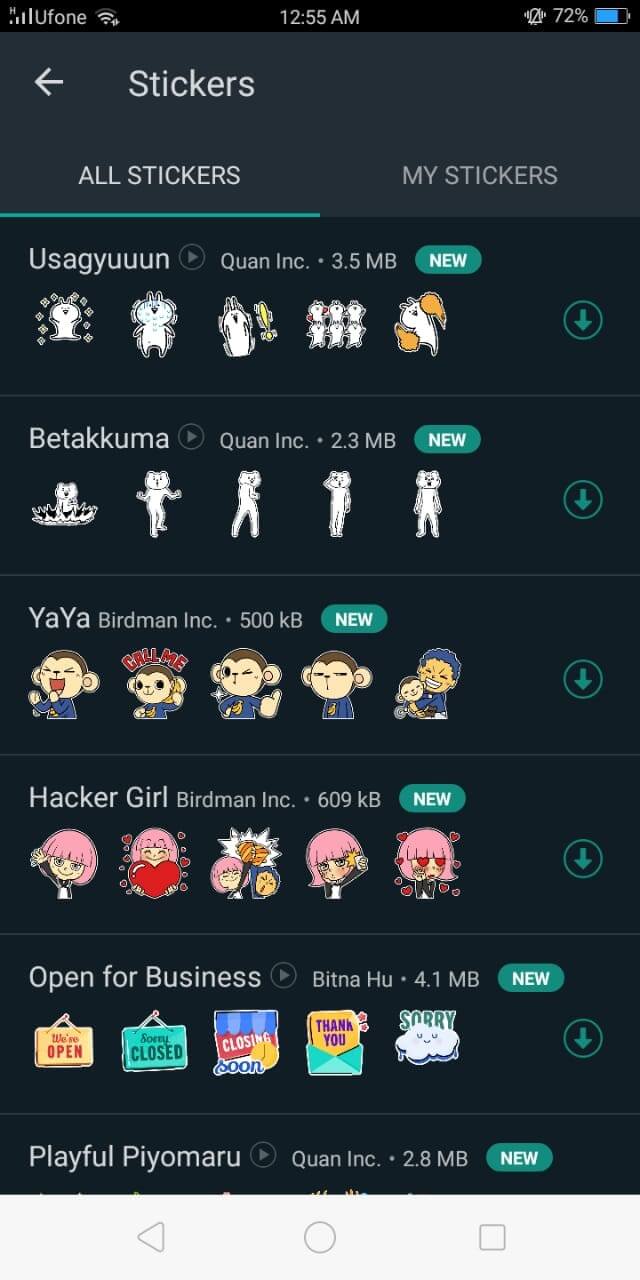
- Tap the download sign beside the sticker pack to start downloading.
- Once the download is complete, it will be displayed among the other stickers in your list.
Other features:
- Clock sign- This sign has all the stickers you recently used
- Star sign- It contains your favorite stickers
- Heart- In this, there are several categories. Whatsapp automatically arranges all your stickers in these categories as happy, sad, romantic, etc.
Part 3: How to Send Stickers on WhatsApp
So far, you have learned to create a custom sticker and then how to use Whatsapp stickers. All credit goes to the apps that made this task cakewalk (and some credit goes to your creativity too). Now that the worst is over, you have come to the final and best part of our article.
In 3 quick steps, you will be able to learn how to add stickers to Whatsapp and surprise your friends with hilarious stickers.
1.Open individual or group chat.
2.Click on the emoji and then tap the stickers on the bottom panel.
3.Choose the sticker that best fits your mood and intention from the various categories. Click it and voila! Sent!
Easy peasy, right?
Bonus Tip—Add Sticker to Your Video with Wondershare Filmora
Although videos themselves are gripping enough, the addition of a customized sticker exclusive to you will be a cherry on top. Wondershare Filmora, with its user-friendly interface, is here just for that. You can now not only add your customized stickers to your video, but multiple effects can also be applied to enhance the video. Filmora is specially designed to offer professional editing tools to beginners. It has an in-built library of special effects and filters to help you create a stunningly cinematic video. Apply motion tracking, keyframe animations, or color match your videos. Add catchy captions or aesthetic filters to create a cool cinematic video
Let’s get right to it:
1.Download and install Filmora. Launch it. And click on Import-Import Media Files.
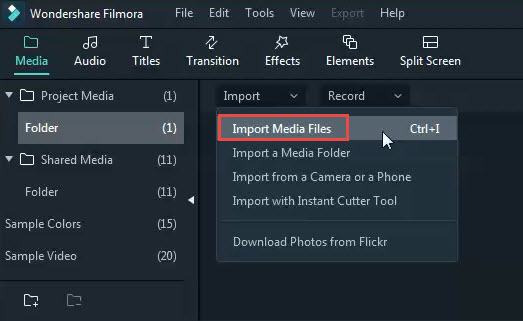
2. Then import your sticker into Filmora and drag and drop it to the video track or choose a sticker from the Elements (Note that both must be added to the video track).
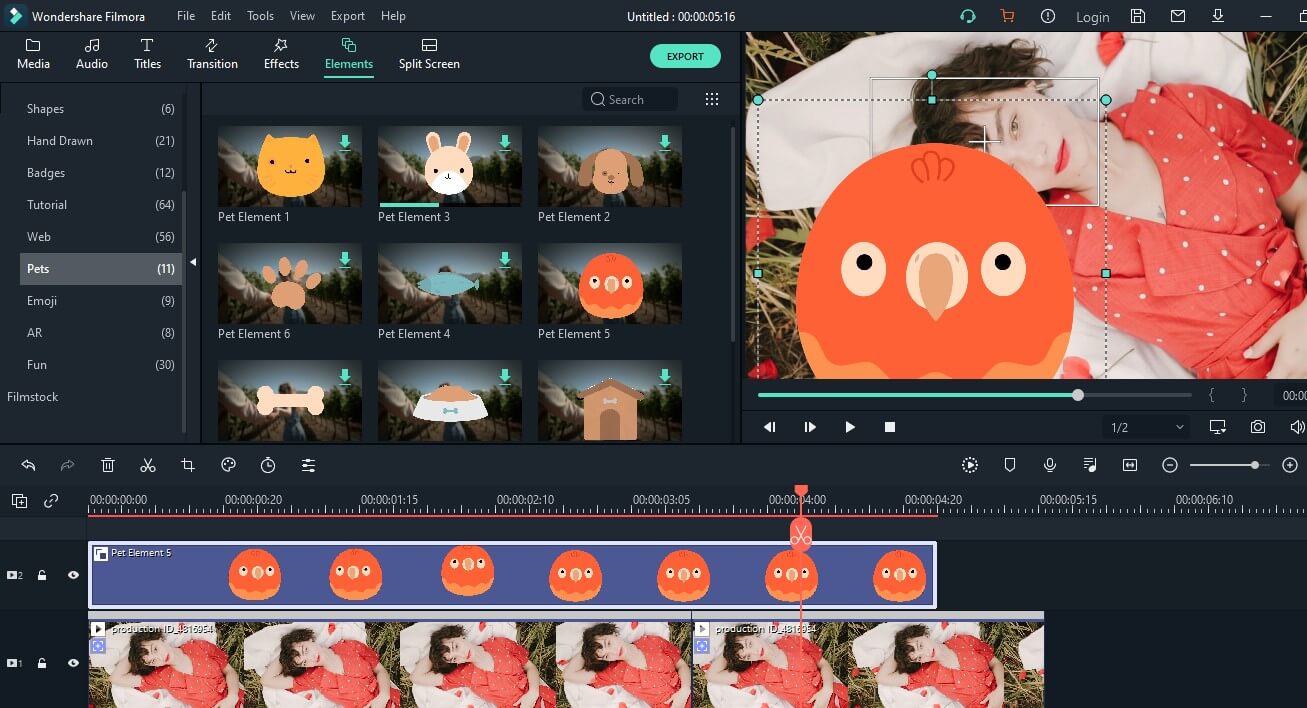
3. Double-click on the sticker in the timeline to adjust the additional parameters. In Video, you can adjust the size or rotation of the sticker. Tap Color to adjust the tint, temperature, or saturation of the sticker. You can also add 3D motion to the sticker in the Motion.
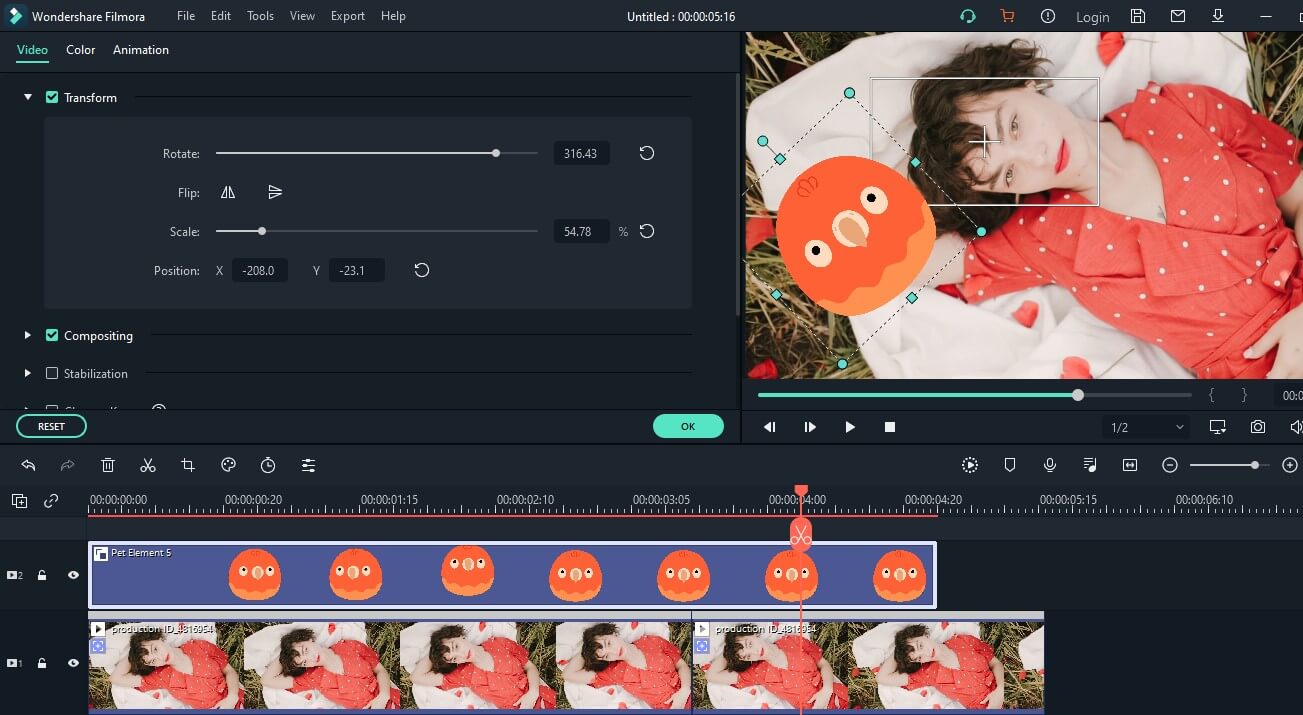
4. And in the viewer panel, click on the sticker and drag it to adjust the size or change the location.
5. Click Export and save it to your computer in the desired resolution.
Ready to Create and Add Stickers?
Stickers have been around long enough to become boringly ordinary. So, to keep the fun side of texting alive, you can now master how to use stickers on Whatsapp after creating your own personalized stickers.
You can start being creative with Sticker Make for Whatsapp. And if you didn’t know how to add stickers in Whatsapp, by now, you must have mastered it (hopefully).
Last but not least, to stand out in a crowd, you need to bring to light something others can’t. Inserting custom-made stickers in your videos might do the trick. Decorate your videos with Wondershare Filmora and create impressive masterpieces. Take note from this ultimate guide on how to add stickers to Whatsapp and transform your texting experience.
Let the fun begin!
Shanoon Cox
Shanoon Cox is a writer and a lover of all things video.
Follow @Shanoon Cox
Shanoon Cox
Mar 27, 2024• Proven solutions
Whatsapp has recently added the stickers feature, and people are going crazy about adding stickers to WhatsApp. But the question is how to add stickers to Whatsapp? To help with that, we will walk you through a detailed guide on how to add stickers to Whatsapp and bring a dash of fun to boring texts.
Now, if you don’t know how to add stickers to WhatsApp and use stickers on Whatsapp, we have you covered.
- Part 1: How to Create Stickers for WhatsApp
- Part 2: How to Add Stickers to WhatsApp
- Part 3: How to Send Stickers on WhatsApp
- Part 4: Bonus Tip—Add Sticker to Your Video with Wondershare Filmora
Part 1: How to Create Stickers for WhatsApp
Whatsapp stickers are now a significant part of our daily conversations. Because let’s face it, life would be boring without them. Perhaps it’s time to up your game by learning how to add stickers to Whatsapp
Even though Whatsapp has a vast library of stickers available, creating a unique sticker is more fun. And the latest apps have made it incredibly easy to create customized stickers. So all you need to do now is learn how to use stickers in Whatsapp
Sticker Make for Whatsapp is one such app. It is free and requires no registrations. Download the app from Google Store and start creating hilarious stickers to surprise your friends.
1. Download Sticker Make and launch it. On the homepage, you will be presented with two options. Click Create to make a sticker from scratch using your own image or click on Animated to insert your picture in a sticker template.
2. Choose any image from your gallery. Crop it to the size and shape you wish to include. Use the Freehand tool or click Automatically to let the app crop a face itself.
3. Click Next and now erase the background or make careful cropping.
4. You can even outline your sticker and adjust its width and color.
5. You can even add texts and change fonts.
6. Click on the square in the bottom panel to choose from a list of cool backgrounds for your sticker.
7. Choose to add themed emojis or decorate using a variety of images in the library of Sticker Make. Once you are done, click Save, enter pack name, and click Ok.
(P.S Make sure that the stickers are precisely 512x512 pixels and no more than 100kb)
Part 2: How to Add Stickers to WhatsApp
Now, you must be wondering how to add stickers to Whatsapp. Let me ease your worry. In this part, I will walk you through a step-by-step guide on how to use stickers in Whatsapp and a few additional features too.
You can save the stickers you receive from other people-
- Click on the sticker you receive
- Tap Add to favorites
If you wish you get more exciting stickers to better express yourself-
- Open Whatsapp chat, either individual or group chat.
- Click on the emoji and then click the sticker beside GIF (the square shape)
- Tap on the + sign on the upper right corner of your keyboard.
- Here you choose to download any number of sticker packs or click Get More Stickers from Google Play.
- Tap the download sign beside the sticker pack to start downloading.
- Once the download is complete, it will be displayed among the other stickers in your list.
Other features:
- Clock sign- This sign has all the stickers you recently used
- Star sign- It contains your favorite stickers
- Heart- In this, there are several categories. Whatsapp automatically arranges all your stickers in these categories as happy, sad, romantic, etc.
Part 3: How to Send Stickers on WhatsApp
So far, you have learned to create a custom sticker and then how to use Whatsapp stickers. All credit goes to the apps that made this task cakewalk (and some credit goes to your creativity too). Now that the worst is over, you have come to the final and best part of our article.
In 3 quick steps, you will be able to learn how to add stickers to Whatsapp and surprise your friends with hilarious stickers.
1.Open individual or group chat.
2.Click on the emoji and then tap the stickers on the bottom panel.
3.Choose the sticker that best fits your mood and intention from the various categories. Click it and voila! Sent!
Easy peasy, right?
Bonus Tip—Add Sticker to Your Video with Wondershare Filmora
Although videos themselves are gripping enough, the addition of a customized sticker exclusive to you will be a cherry on top. Wondershare Filmora, with its user-friendly interface, is here just for that. You can now not only add your customized stickers to your video, but multiple effects can also be applied to enhance the video. Filmora is specially designed to offer professional editing tools to beginners. It has an in-built library of special effects and filters to help you create a stunningly cinematic video. Apply motion tracking, keyframe animations, or color match your videos. Add catchy captions or aesthetic filters to create a cool cinematic video
Let’s get right to it:
1.Download and install Filmora. Launch it. And click on Import-Import Media Files.
2. Then import your sticker into Filmora and drag and drop it to the video track or choose a sticker from the Elements (Note that both must be added to the video track).
3. Double-click on the sticker in the timeline to adjust the additional parameters. In Video, you can adjust the size or rotation of the sticker. Tap Color to adjust the tint, temperature, or saturation of the sticker. You can also add 3D motion to the sticker in the Motion.
4. And in the viewer panel, click on the sticker and drag it to adjust the size or change the location.
5. Click Export and save it to your computer in the desired resolution.
Ready to Create and Add Stickers?
Stickers have been around long enough to become boringly ordinary. So, to keep the fun side of texting alive, you can now master how to use stickers on Whatsapp after creating your own personalized stickers.
You can start being creative with Sticker Make for Whatsapp. And if you didn’t know how to add stickers in Whatsapp, by now, you must have mastered it (hopefully).
Last but not least, to stand out in a crowd, you need to bring to light something others can’t. Inserting custom-made stickers in your videos might do the trick. Decorate your videos with Wondershare Filmora and create impressive masterpieces. Take note from this ultimate guide on how to add stickers to Whatsapp and transform your texting experience.
Let the fun begin!
Shanoon Cox
Shanoon Cox is a writer and a lover of all things video.
Follow @Shanoon Cox
Also read:
- [New] 2024 Approved Locate and Watch Vintage Facebook Moments
- [New] 2024 Approved Step-by-Step Process of Setting Up Your Logitech Webcam for Video
- 20 Wonderful Stop Motion Ideas for Beginners and Kids - Filmora
- 2024 Approved Master Guide Implementing Chapters in Vimeo
- Cost of Monitoring Your Digital Wallet with YL Computing’s Coin Balancer App
- Elevate Video Popularity 12 Key Strategies Unveiled
- How to Make a Triggered Meme?
- How to Make a Wonderful Video Slideshow with Your Travel Photos
- New 2024 Approved Edit MP4 Videos Like a Pro Top 10 Free Tools
- Quickly Change the Pace of Videos in Your Instagram Feed
- The Significance of 'Tags': Clarifying Its Meaning in Digital Terms
- Updated The Essential Guide to Emoji, Memoji, Animoji, and Bitmoji
- Title: Updated 2024 Approved 7 Free Apps to Get Emojis on Android and iPhone
- Author: Jan
- Created at : 2025-02-15 17:06:54
- Updated at : 2025-02-19 17:27:18
- Link: https://meme-emoji.techidaily.com/updated-2024-approved-7-free-apps-to-get-emojis-on-android-and-iphone/
- License: This work is licensed under CC BY-NC-SA 4.0.