
New In 2024, How to Make a iMovie Photo Slideshow with Music? IMovie Tutorial
How to Make a iMovie Photo Slideshow with Music? [IMovie Tutorial]
How to Make a iMovie Photo Slideshow with Music? [iMovie Tutorial]

Shanoon Cox
Mar 27, 2024• Proven solutions
Makings a slideshow is a great way to share photos and videos with friends and families. The good news is that you can totally make a slideshow on Mac for free with iMovie. iMovie is the pre-installed program coming with every new Mac. It provides a simple yet professional way to make slideshow movies from your photos, videos, and music.
If you haven’t iMovie installed on your Mac yet, just go to iTunes and download it for free. In the following part, I’ll share with you the step-by-step tutorial on how to make a slideshow on Mac using the free video editing software iMovie.
If you are an iOS user, check our picks of best photo slideshow apps for iPhone or iPad.
Ways for iMovie Photo Slideshow with Music Making
To make a photo slideshow with music in iMovie, you can follow these steps.
1. Create a New Project
After launching iMovie, click the Project button and then click Create New. Select Movie to combine photos, videos and music to make a slideshow.

2. Import Photos, Videos, and Audio Files
Now go to the My Media tab and click the Import icon to add your photos, videos, and music to iMovie, in this way, you can import any media files from any location on your Mac. But if you have arranged all your videos, photos, and music tracks in the Photos app, you can just switch to Photos under the Libraries tab on the left to import.

3. Arrange Media in Timeline and Adjust
Now, it’s time to place all these photos and videos in the timeline in order and do some adjustments. You can use the Magic Wand tool to improve the photo quality automatically, do some color correction, or add a filter to the photo. If you preview the video clip, you will see more options that allow you to do more editing, such as changing speed.
4. Apply Transitions & Effects
Transitions and effects will help you to create a slideshow in a more professional way. Some transitions such as cross dissolve, fade and cross blur are very popular in the slideshow, but remember don’t use lots of different transitions in one slideshow since too many transitions will distract the viewer’s attention. To apply a transition in the slideshow, just drag and drop it between two photos in the timeline.

5. Add Titles and Text
Using some opener titles and credits at the beginning and ending part of your slideshow will make it cool as well. You can add some famous quotes and words to better demonstrate.
Just to the Titles tab and select one of the title templates and drop it to the timeline first and then write your own words in the preview window.

6. Add Music to Slideshow
You can download some royalty-free music and sound effects from websites such as Filmstock stock media library or iTunes or import your own audio as we said before to use it as the slideshow background music. To sync with the slideshow, you may need to trim and edit the audio accordingly. For detailed information about iMovie audio editing, you can check how to add background music to iMovie.
Filmstock Stock Media Library ](https://tools.techidaily.com/wondershare/filmora/download/ )
7. Export and Share Your Slideshow video
Play the slideshow and check the result in the preview window. If everything goes well, you can now export and share or save it. You can save the slideshow video in MP4 format, or share it to Vimeo or add the slideshow to Theater to load it on your other Apple devices so you can easily watch it on your iOS devices or Apple TV.
I hope the above tutorial about how to make a slideshow on iMovie will be helpful for your stunning slideshow creation.
If you’re running an old macOS version and having iPhoto installed on your Mac, here are the detailed steps about How to make slideshow in iMovie with iPhoto project.
Step 1. Import Photos from the iPhoto Library
iMovie works seamlessly with iPhoto. You are suggested to drag and drop photos from iPhoto to the iMovie project. If no library exists in iPhoto, create one and import photos to iPhoto first. To add videos, you could go to either “File/Import” or Event Library, and then drag and drop selected videos to the timeline.
After photos and videos are imported to the iMovie slideshow project, you can preview the raw slideshow simply by pressing Space bar on your keyboard. And then make adjustments to clips and transitions. For example, mouse over one clip or “double arrow” button and click on the settings icon, then you could access clip adjustment, video adjustment, transition adjustment, etc.

Step 2. Add Music to Your iMovie Slideshow Project
Music sets the tone of your slideshow. Adding musing to the iMovie slideshow is just as simple as adding photos and videos.
So click the audio icon in the bottom right corner, and drag and drop the desired audio file to the timeline. Multiple songs could be added to iMovie.
However, iMovie doesn’t support multiple soundtracks. If necessary, you need to combine multiple song tracks with an external audio editor before importing them to the iMovie slideshow. You can also apply audio effects and filter sound using an equalizer.

Step 3. Export Your iMovie Slideshow Video
iMovie makes sharing possibilities endless. For those who upload their videos online, iMovie allows users to directly upload to MobileMe Gallery, YouTube, Facebook, Vimeo, CNN iReport, etc.
If you select to share the iMovie slideshow using Media Browser, you will get a slideshow appeared in other Mac applications like iWeb. It’s a good idea to export the iMovie slideshow to iTunes so that you can play back slideshow quickly and easily sync with your mobile devices like iPhone, iPod, and iPad.

You may also like: How to Add Text with iMovie in Mac and iPhone >>
Recommendation: Create Slideshow on Mac with More Templates and Transitions with Filmora
If you want to make a slideshow with some templates on Mac, you can try Wondershare Filmora . Filmora can turn photos and videos into attractive slideshow videos with various inbuilt filters, transitions, elements, animations, effects, and overlays. Click the Free Download button and have a try.


Check the ultimate guide about making a slideshow with music and titles in Filmora .
If you are going to make a slideshow with music on Windows, you may need a slideshow-making tool to do it by yourself. Wondershare Filmora will also be a good choice. It helps you instantly make such an impressive slideshow from photos and videos for sharing virtually anywhere.
Shanoon Cox
Shanoon Cox is a writer and a lover of all things video.
Follow @Shanoon Cox
Shanoon Cox
Mar 27, 2024• Proven solutions
Makings a slideshow is a great way to share photos and videos with friends and families. The good news is that you can totally make a slideshow on Mac for free with iMovie. iMovie is the pre-installed program coming with every new Mac. It provides a simple yet professional way to make slideshow movies from your photos, videos, and music.
If you haven’t iMovie installed on your Mac yet, just go to iTunes and download it for free. In the following part, I’ll share with you the step-by-step tutorial on how to make a slideshow on Mac using the free video editing software iMovie.
If you are an iOS user, check our picks of best photo slideshow apps for iPhone or iPad.
Ways for iMovie Photo Slideshow with Music Making
To make a photo slideshow with music in iMovie, you can follow these steps.
1. Create a New Project
After launching iMovie, click the Project button and then click Create New. Select Movie to combine photos, videos and music to make a slideshow.
2. Import Photos, Videos, and Audio Files
Now go to the My Media tab and click the Import icon to add your photos, videos, and music to iMovie, in this way, you can import any media files from any location on your Mac. But if you have arranged all your videos, photos, and music tracks in the Photos app, you can just switch to Photos under the Libraries tab on the left to import.
3. Arrange Media in Timeline and Adjust
Now, it’s time to place all these photos and videos in the timeline in order and do some adjustments. You can use the Magic Wand tool to improve the photo quality automatically, do some color correction, or add a filter to the photo. If you preview the video clip, you will see more options that allow you to do more editing, such as changing speed.
4. Apply Transitions & Effects
Transitions and effects will help you to create a slideshow in a more professional way. Some transitions such as cross dissolve, fade and cross blur are very popular in the slideshow, but remember don’t use lots of different transitions in one slideshow since too many transitions will distract the viewer’s attention. To apply a transition in the slideshow, just drag and drop it between two photos in the timeline.
5. Add Titles and Text
Using some opener titles and credits at the beginning and ending part of your slideshow will make it cool as well. You can add some famous quotes and words to better demonstrate.
Just to the Titles tab and select one of the title templates and drop it to the timeline first and then write your own words in the preview window.
6. Add Music to Slideshow
You can download some royalty-free music and sound effects from websites such as Filmstock stock media library or iTunes or import your own audio as we said before to use it as the slideshow background music. To sync with the slideshow, you may need to trim and edit the audio accordingly. For detailed information about iMovie audio editing, you can check how to add background music to iMovie.
Filmstock Stock Media Library ](https://tools.techidaily.com/wondershare/filmora/download/ )
7. Export and Share Your Slideshow video
Play the slideshow and check the result in the preview window. If everything goes well, you can now export and share or save it. You can save the slideshow video in MP4 format, or share it to Vimeo or add the slideshow to Theater to load it on your other Apple devices so you can easily watch it on your iOS devices or Apple TV.
I hope the above tutorial about how to make a slideshow on iMovie will be helpful for your stunning slideshow creation.
If you’re running an old macOS version and having iPhoto installed on your Mac, here are the detailed steps about How to make slideshow in iMovie with iPhoto project.
Step 1. Import Photos from the iPhoto Library
iMovie works seamlessly with iPhoto. You are suggested to drag and drop photos from iPhoto to the iMovie project. If no library exists in iPhoto, create one and import photos to iPhoto first. To add videos, you could go to either “File/Import” or Event Library, and then drag and drop selected videos to the timeline.
After photos and videos are imported to the iMovie slideshow project, you can preview the raw slideshow simply by pressing Space bar on your keyboard. And then make adjustments to clips and transitions. For example, mouse over one clip or “double arrow” button and click on the settings icon, then you could access clip adjustment, video adjustment, transition adjustment, etc.
Step 2. Add Music to Your iMovie Slideshow Project
Music sets the tone of your slideshow. Adding musing to the iMovie slideshow is just as simple as adding photos and videos.
So click the audio icon in the bottom right corner, and drag and drop the desired audio file to the timeline. Multiple songs could be added to iMovie.
However, iMovie doesn’t support multiple soundtracks. If necessary, you need to combine multiple song tracks with an external audio editor before importing them to the iMovie slideshow. You can also apply audio effects and filter sound using an equalizer.
Step 3. Export Your iMovie Slideshow Video
iMovie makes sharing possibilities endless. For those who upload their videos online, iMovie allows users to directly upload to MobileMe Gallery, YouTube, Facebook, Vimeo, CNN iReport, etc.
If you select to share the iMovie slideshow using Media Browser, you will get a slideshow appeared in other Mac applications like iWeb. It’s a good idea to export the iMovie slideshow to iTunes so that you can play back slideshow quickly and easily sync with your mobile devices like iPhone, iPod, and iPad.
You may also like: How to Add Text with iMovie in Mac and iPhone >>
Recommendation: Create Slideshow on Mac with More Templates and Transitions with Filmora
If you want to make a slideshow with some templates on Mac, you can try Wondershare Filmora . Filmora can turn photos and videos into attractive slideshow videos with various inbuilt filters, transitions, elements, animations, effects, and overlays. Click the Free Download button and have a try.
Check the ultimate guide about making a slideshow with music and titles in Filmora .
If you are going to make a slideshow with music on Windows, you may need a slideshow-making tool to do it by yourself. Wondershare Filmora will also be a good choice. It helps you instantly make such an impressive slideshow from photos and videos for sharing virtually anywhere.
Shanoon Cox
Shanoon Cox is a writer and a lover of all things video.
Follow @Shanoon Cox
How to Add Emojis To Discord
How to Add Emojis To Discord

Richard Bennett
Mar 27, 2024• Proven solutions
Who doesn’t like emoticons? They are fun, easy to use, and, best of all, highly expressive of your emotions that you cannot convey over messages otherwise.
A 2019 survey shows 70% of mobile users used emoji in texting or on social media daily. This shows the popularity of emoji in our world today.
Similarly, as a Discord user, you must have come across thousands of emoji in it. These are images uploaded on the server and called custom emojis that this gaming community can use for effective communication with friends and other players.
With the emoji and gaming industry growing, it is safe to say that discord emoji’s popularity and use will only increase.
Read ahead to see how you can add emojis on Discord if you want to have fun chats with your friends too.
- Part 1: Adding and Sending Emoji To Chat On Discord?
- Part 2: Adding Emojis To Discord Channel Name Or Nickname?
- Part 3: Adding Custom Emojis To Discord Server On Windows/Mac?
- Part 4: Adding Custom Emojis To Discord Server On iPhone And Android?
- Part 5: Managing Emojis in Discord Server
Part 1: How to Add and Send Emoji To Chat On Discord?
One of the best things about Discord’s emoji feature is that there are two ways to add them. You can either access emoji on the Discord account or upload them yourself.
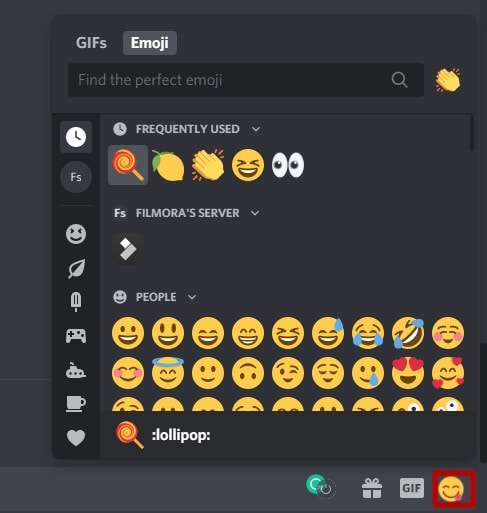
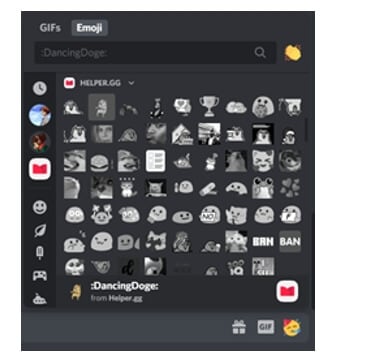
You can access the emoji menu for all Discord platforms by pressing the grey smiley face next to the message box. This will be on the right of the box for desktops, and for mobile apps, it will be on the left.
Discord-exclusive and standard emoji are present in the emoji menu, along with a part that keeps track of your most-used emoji.
On the other hand, you can also add custom emoticons to your Discord server if you have permission to do so.
Once you add and access the emoji on your device, select the one you want to send to your friends and press enter to send.
Part 2: How to Add Emojis To Discord Channel Name Or Nickname?
As an owner of a Discord channel, it is easy for you to add emoji to Discord. Follow the steps below to figure out how to add emojis to Discord channels:
- Use the emoji list to find the one you want to use in your channel name.
- Select the emoji “browser” column and copy it either with the mouse or “Ctrl + C” on the keyboard.
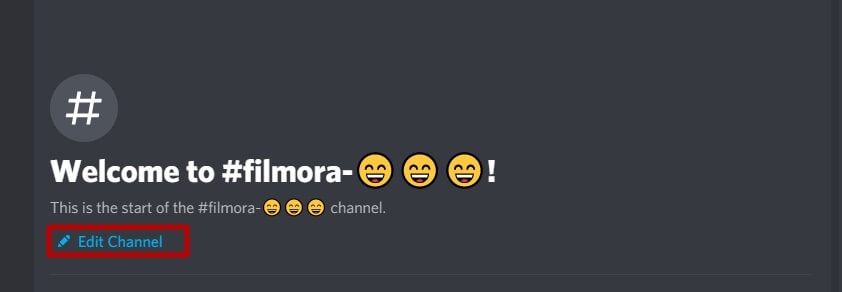
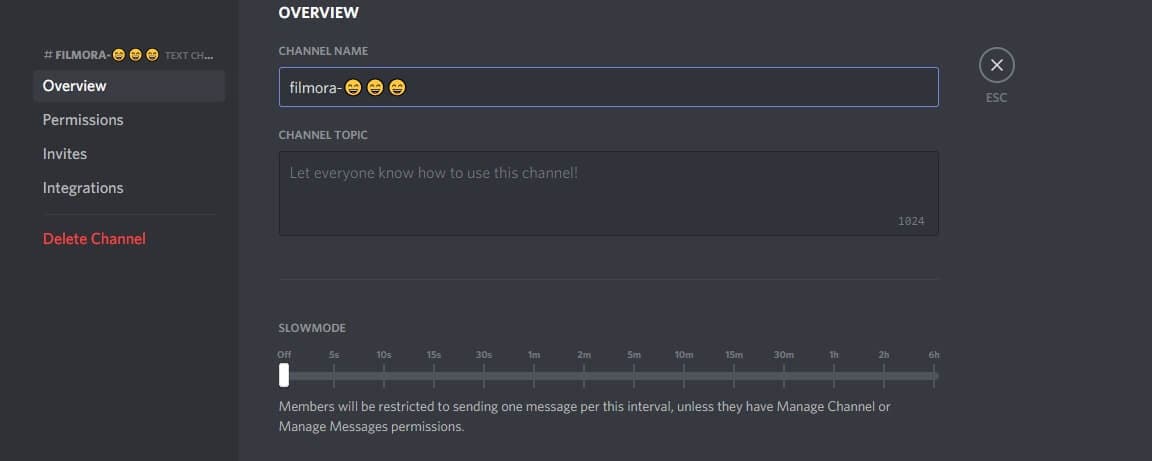
- Access your Discord server, right-click the channel where the emoji will be and use the dropdown menu to select the “Edit Channel.”
- In the “Channel Name” box, past the selected emoji using “Ctrl + V” from the keyboard.
- Select “Save Changes” to save the name with the emoji.
Part 3: How to Add Custom Emojis To Discord Server On Windows/Mac?
You can add custom emoji on Discord, but only if you are a server owner or administrator. Use the Discord server settings on either the desktop versions for Windows or Mac or the Discord Website.
Follow the steps below for either platform:
- Access your Discord server to begin and press the arrow pointing down in the channel list with the server name—Press “Server Settings” in the menu

- As the server’s settings open, you can add custom emojis in the “Emoji” tab. You can find a requirements list at the top that includes emoji names with a minimum of two characters and a file size limit of 256 KB. You can add fifty normal and an additional fifty animated emoji GIFs using the standard servers
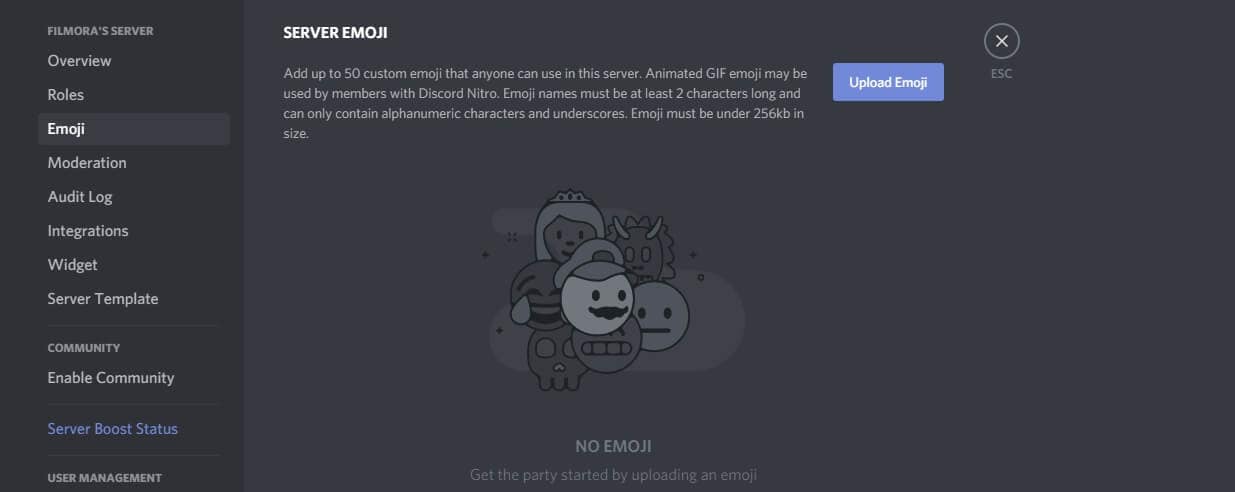
- Select “Upload Emoji” to insert a custom emoji, either standard or animated
- With the help of your device’s local storage, upload the file. However, for the emoji to be added to the lists, the file should align with Discord’s requirements.
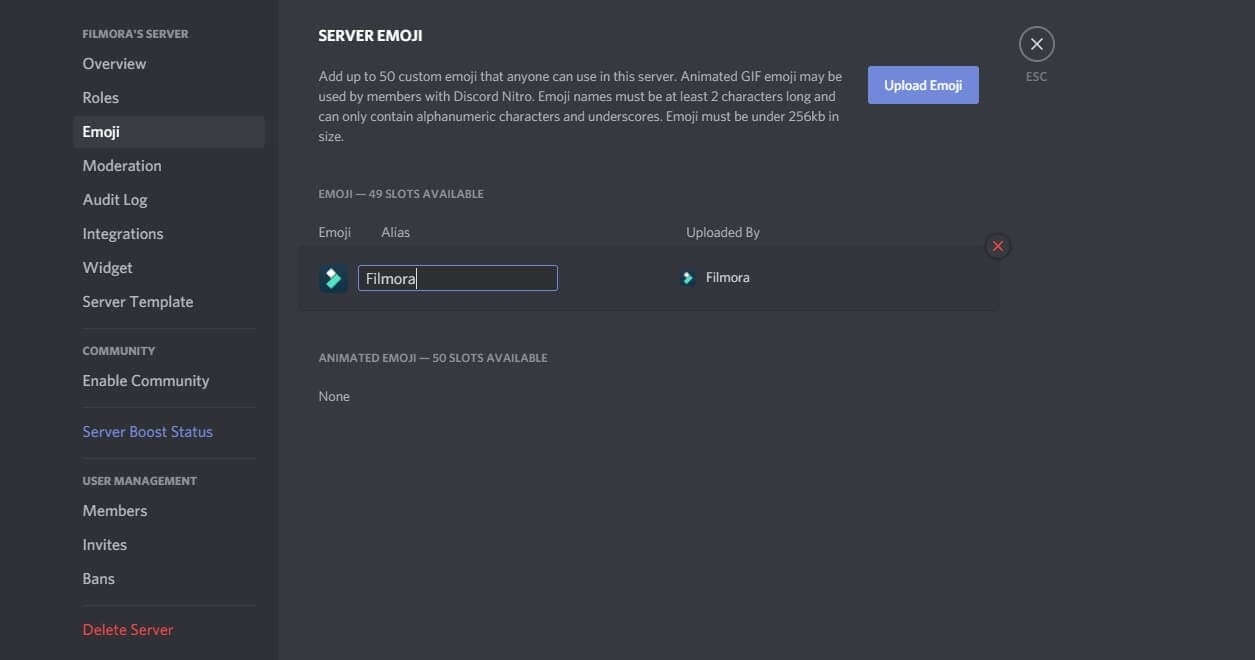
- For every emoji image that you upload, an alias tag will be created for that custom emoji using the file’s name. This tag is used to update a message with an emoji.
- A default alias name like this can be replaced by selecting the “Alias” box with the custom emoji and then creating a new name.
- Enjoy your emoji in chats as soon as you upload them to the Discord server!
Boost your server with Discord Nitro subscribers today to insert more than the standard fifty emoji!
Part 4: How to Add Custom Emojis To Discord Server On iPhone And Android?
How cool is it that you can add custom emoji to your smartphone as well? Whether you have an iPhone or an Android, you can use the same menu as Windows and Mac to upload emoji.
Discord’s interface is similar across all devices, so the following steps work on Android and Apple.
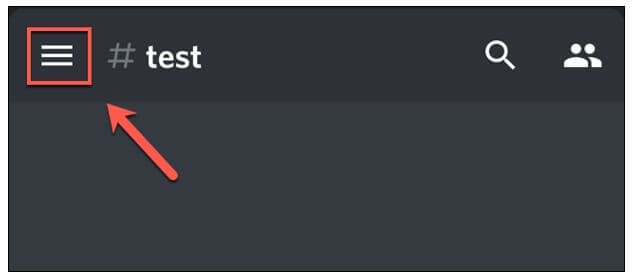
- Begin by opening the app on your device to access the server. Press the hamburger menu located at the top left in an open server and channel.
- As the channel and server list opens for Discord, you can see a three-dot menu right next to the channel list with the server name. Tap on it to proceed.
- To get to your server settings, press “Settings” in the Discord server menu that shows up.
- Under the “Server Settings” menu, select “Emoji” to access the custom emoji settings.
- As the “Emoji” menu opens, you can see an emoji requirement list
- Press “Upload Emoji” to upload any emoji that aligns with these requirements
- Press the custom emoji file, tap “Crop” if it needs cropping, and then use the “Upload” option
- After you upload the emoji file, replace the alias tag by tapping on it. This will redirect you to that specific emoji’s settings
- Type the name you want using the “Alias” box to create the tag used to insert emoji in messages
- Save this new tag with the “Save” icon placed in the bottom right
- Any changes you make to the custom emoji’s alias are applied to it instantly for your use.
Emoji bring fun to the conversations you have with friends, and it is very easy to add them to your server as well. These show up in the emoji pop-up list once you add them. The chat message bar contains the emoji icon from where you can access them.
It is essential to name your emoji with only alphanumeric characters and underscores using at least two characters.
The Discord emoji size is 32x32 pixels, so even if you upload up to 128x128 pixel size emojis, they will be resized to the default dimensions. Furthermore, emoji file sizes are at most 256kb.
If you want to use custom emojis, you can’t do so without a Nitro subscription because it is only functional on the server they are uploaded to. Even if you find a way to access the emoji from some other server, only its text code will be visible.
If you attempt to use the Emoji Picker to pick an emoji, you’ll get the following message:
Bonus: How to Manage Emoji in Discord Server?
You can’t remove or add emoji specific to a server on your own as a member. You need the server owner to toggle the permission of Manager Emoji in your domain.
On the other hand, as a server owner, you can give others this role with the following steps.
- Open Roles: Open the Server Settings and select “Roles” from the menu on the side.
- Toggle Manage Emoji: Pick the role you want to apply the permission to, and then toggle emoji’s slider to “on,” save changes, and you’re done!
FAQs About Discord Emojis
1. Why Do I See Grey Emoji In The Emoji Menu?
Greyed-out emoji in the menu means that either those emoji are animated, or you don’t have the permission to post them on other servers.
2. How Can I Get More Custom Emoji On The Server?
You can upload 50 emojis to your Discord server. But if you want more options, you need a Discord Nitro subscription to boost your server specs.
3. What Is The Discord Emoji Size?
Discord allows you to upload an emoji of up to 128x128 pixels, but it will resize it to 32x32 since that is its standard size.
Conclusion
Emojis make any chat fun, and where gaming is involved, they help you communicate better with your friends.
Discord has thousands of custom emojis that you can easily add to your server through your computer, whether it is your chat or the channel name. Follow our guide for a seamless process to add emoji to Discord and make your gaming experience better!
Richard Bennett
Richard Bennett is a writer and a lover of all things video.
Follow @Richard Bennett
Richard Bennett
Mar 27, 2024• Proven solutions
Who doesn’t like emoticons? They are fun, easy to use, and, best of all, highly expressive of your emotions that you cannot convey over messages otherwise.
A 2019 survey shows 70% of mobile users used emoji in texting or on social media daily. This shows the popularity of emoji in our world today.
Similarly, as a Discord user, you must have come across thousands of emoji in it. These are images uploaded on the server and called custom emojis that this gaming community can use for effective communication with friends and other players.
With the emoji and gaming industry growing, it is safe to say that discord emoji’s popularity and use will only increase.
Read ahead to see how you can add emojis on Discord if you want to have fun chats with your friends too.
- Part 1: Adding and Sending Emoji To Chat On Discord?
- Part 2: Adding Emojis To Discord Channel Name Or Nickname?
- Part 3: Adding Custom Emojis To Discord Server On Windows/Mac?
- Part 4: Adding Custom Emojis To Discord Server On iPhone And Android?
- Part 5: Managing Emojis in Discord Server
Part 1: How to Add and Send Emoji To Chat On Discord?
One of the best things about Discord’s emoji feature is that there are two ways to add them. You can either access emoji on the Discord account or upload them yourself.
You can access the emoji menu for all Discord platforms by pressing the grey smiley face next to the message box. This will be on the right of the box for desktops, and for mobile apps, it will be on the left.
Discord-exclusive and standard emoji are present in the emoji menu, along with a part that keeps track of your most-used emoji.
On the other hand, you can also add custom emoticons to your Discord server if you have permission to do so.
Once you add and access the emoji on your device, select the one you want to send to your friends and press enter to send.
Part 2: How to Add Emojis To Discord Channel Name Or Nickname?
As an owner of a Discord channel, it is easy for you to add emoji to Discord. Follow the steps below to figure out how to add emojis to Discord channels:
- Use the emoji list to find the one you want to use in your channel name.
- Select the emoji “browser” column and copy it either with the mouse or “Ctrl + C” on the keyboard.
- Access your Discord server, right-click the channel where the emoji will be and use the dropdown menu to select the “Edit Channel.”
- In the “Channel Name” box, past the selected emoji using “Ctrl + V” from the keyboard.
- Select “Save Changes” to save the name with the emoji.
Part 3: How to Add Custom Emojis To Discord Server On Windows/Mac?
You can add custom emoji on Discord, but only if you are a server owner or administrator. Use the Discord server settings on either the desktop versions for Windows or Mac or the Discord Website.
Follow the steps below for either platform:
- Access your Discord server to begin and press the arrow pointing down in the channel list with the server name—Press “Server Settings” in the menu
- As the server’s settings open, you can add custom emojis in the “Emoji” tab. You can find a requirements list at the top that includes emoji names with a minimum of two characters and a file size limit of 256 KB. You can add fifty normal and an additional fifty animated emoji GIFs using the standard servers
- Select “Upload Emoji” to insert a custom emoji, either standard or animated
- With the help of your device’s local storage, upload the file. However, for the emoji to be added to the lists, the file should align with Discord’s requirements.
- For every emoji image that you upload, an alias tag will be created for that custom emoji using the file’s name. This tag is used to update a message with an emoji.
- A default alias name like this can be replaced by selecting the “Alias” box with the custom emoji and then creating a new name.
- Enjoy your emoji in chats as soon as you upload them to the Discord server!
Boost your server with Discord Nitro subscribers today to insert more than the standard fifty emoji!
Part 4: How to Add Custom Emojis To Discord Server On iPhone And Android?
How cool is it that you can add custom emoji to your smartphone as well? Whether you have an iPhone or an Android, you can use the same menu as Windows and Mac to upload emoji.
Discord’s interface is similar across all devices, so the following steps work on Android and Apple.
- Begin by opening the app on your device to access the server. Press the hamburger menu located at the top left in an open server and channel.
- As the channel and server list opens for Discord, you can see a three-dot menu right next to the channel list with the server name. Tap on it to proceed.
- To get to your server settings, press “Settings” in the Discord server menu that shows up.
- Under the “Server Settings” menu, select “Emoji” to access the custom emoji settings.
- As the “Emoji” menu opens, you can see an emoji requirement list
- Press “Upload Emoji” to upload any emoji that aligns with these requirements
- Press the custom emoji file, tap “Crop” if it needs cropping, and then use the “Upload” option
- After you upload the emoji file, replace the alias tag by tapping on it. This will redirect you to that specific emoji’s settings
- Type the name you want using the “Alias” box to create the tag used to insert emoji in messages
- Save this new tag with the “Save” icon placed in the bottom right
- Any changes you make to the custom emoji’s alias are applied to it instantly for your use.
Emoji bring fun to the conversations you have with friends, and it is very easy to add them to your server as well. These show up in the emoji pop-up list once you add them. The chat message bar contains the emoji icon from where you can access them.
It is essential to name your emoji with only alphanumeric characters and underscores using at least two characters.
The Discord emoji size is 32x32 pixels, so even if you upload up to 128x128 pixel size emojis, they will be resized to the default dimensions. Furthermore, emoji file sizes are at most 256kb.
If you want to use custom emojis, you can’t do so without a Nitro subscription because it is only functional on the server they are uploaded to. Even if you find a way to access the emoji from some other server, only its text code will be visible.
If you attempt to use the Emoji Picker to pick an emoji, you’ll get the following message:
Bonus: How to Manage Emoji in Discord Server?
You can’t remove or add emoji specific to a server on your own as a member. You need the server owner to toggle the permission of Manager Emoji in your domain.
On the other hand, as a server owner, you can give others this role with the following steps.
- Open Roles: Open the Server Settings and select “Roles” from the menu on the side.
- Toggle Manage Emoji: Pick the role you want to apply the permission to, and then toggle emoji’s slider to “on,” save changes, and you’re done!
FAQs About Discord Emojis
1. Why Do I See Grey Emoji In The Emoji Menu?
Greyed-out emoji in the menu means that either those emoji are animated, or you don’t have the permission to post them on other servers.
2. How Can I Get More Custom Emoji On The Server?
You can upload 50 emojis to your Discord server. But if you want more options, you need a Discord Nitro subscription to boost your server specs.
3. What Is The Discord Emoji Size?
Discord allows you to upload an emoji of up to 128x128 pixels, but it will resize it to 32x32 since that is its standard size.
Conclusion
Emojis make any chat fun, and where gaming is involved, they help you communicate better with your friends.
Discord has thousands of custom emojis that you can easily add to your server through your computer, whether it is your chat or the channel name. Follow our guide for a seamless process to add emoji to Discord and make your gaming experience better!
Richard Bennett
Richard Bennett is a writer and a lover of all things video.
Follow @Richard Bennett
Best Photo Slideshow Maker: How to Make a Photo Slideshow [2023 Update]
Best Photo Slideshow Maker: How to Make a Photo Slideshow
Shanoon Cox
Mar 27, 2024• Proven solutions
Have you ever taken so many photos for your family, friends and special events? One fun-filled way of sharing them is to make a photo slideshow. That helps back up the memories in your life. What’s more, it can all be done in just a few simple clicks if you use slideshow maker like DVD Slideshow Builder Deluxe . With this programs, you can easily weave photos and video into work of art to amaze anyone. Here let’s see how to easily and creatively make a photo slideshow and burn to DVD with these all-in-one slideshow tools.
Download and run DVD slideshow builder , then follow the steps below to see how to make a photo slideshow.

Ways for Photo Slidehow making
Step 1. Add photo or video files to the photo slideshow maker
After running the photo slideshow maker, you’ll start from the “Organize” tab. On the interface, there are two Add Files buttons any of which you can click to add your photos and videos. Then just drag and drop photos or videos to arrange their order on storyboard. If you want to edit the photos, click “Edit” to add effects, crop photos, repair red-eye or add caption.
Tip: To have a large viewe of all the files, click the “Expand” button on top right corner of storyboard.

Step 2. Customize the slideshow like background music and transitions
When importing your files, more than 100 transition effects will be randomly and automatically applied between every two photo or video. However, you can change them anytime in the “Personalize” tab. Just drag and drop a transition from the list to the thumbnail between two slides. You can also add effects, motion or intro/credit as you like.
Adding music can greatly enhance the vibe of your photo slideshow. To achieve this, click “Music” on the storyboard. This photo slideshow maker enables you to add several different pieces of music according to your needs. If you want to add your own voice, just click “Voice Over” to record and then add it to the slideshow.

Step 3 Create photo slideshow and burn to DVD

Go to the “Create” tab and click the “Preview” button to make sure the photo slideshow is good enough. Go back to Personalize tab to change if necessary. When you are happy with the result, choose the options on the left to export photo slideshow to DVD, PC, portable devices, etc. You can also directly upload slideshow to Youtube and send message to Facebook and Twitter friends.

Now sit back and relax, it’ll only take a while to get your photo slideshow for sharing anywhere.
Shanoon Cox
Shanoon Cox is a writer and a lover of all things video.
Follow @Shanoon Cox
Shanoon Cox
Mar 27, 2024• Proven solutions
Have you ever taken so many photos for your family, friends and special events? One fun-filled way of sharing them is to make a photo slideshow. That helps back up the memories in your life. What’s more, it can all be done in just a few simple clicks if you use slideshow maker like DVD Slideshow Builder Deluxe . With this programs, you can easily weave photos and video into work of art to amaze anyone. Here let’s see how to easily and creatively make a photo slideshow and burn to DVD with these all-in-one slideshow tools.
Download and run DVD slideshow builder , then follow the steps below to see how to make a photo slideshow.
Ways for Photo Slidehow making
Step 1. Add photo or video files to the photo slideshow maker
After running the photo slideshow maker, you’ll start from the “Organize” tab. On the interface, there are two Add Files buttons any of which you can click to add your photos and videos. Then just drag and drop photos or videos to arrange their order on storyboard. If you want to edit the photos, click “Edit” to add effects, crop photos, repair red-eye or add caption.
Tip: To have a large viewe of all the files, click the “Expand” button on top right corner of storyboard.
Step 2. Customize the slideshow like background music and transitions
When importing your files, more than 100 transition effects will be randomly and automatically applied between every two photo or video. However, you can change them anytime in the “Personalize” tab. Just drag and drop a transition from the list to the thumbnail between two slides. You can also add effects, motion or intro/credit as you like.
Adding music can greatly enhance the vibe of your photo slideshow. To achieve this, click “Music” on the storyboard. This photo slideshow maker enables you to add several different pieces of music according to your needs. If you want to add your own voice, just click “Voice Over” to record and then add it to the slideshow.
Step 3 Create photo slideshow and burn to DVD
Go to the “Create” tab and click the “Preview” button to make sure the photo slideshow is good enough. Go back to Personalize tab to change if necessary. When you are happy with the result, choose the options on the left to export photo slideshow to DVD, PC, portable devices, etc. You can also directly upload slideshow to Youtube and send message to Facebook and Twitter friends.
Now sit back and relax, it’ll only take a while to get your photo slideshow for sharing anywhere.
Shanoon Cox
Shanoon Cox is a writer and a lover of all things video.
Follow @Shanoon Cox
Best 10 Emoji Apps to Emoji Yourself-Make an Emoji of Yourself
Best 10 Emoji Apps to Emoji Yourself-Make an Emoji of Yourself
Shanoon Cox
Mar 27, 2024• Proven solutions
Sharing emoji is the latest trend in communication on almost all online social media platforms. Emoji makes a conversation funny, engaging and conveys the message you intend perfectly. There are a lot of emoji apps available in the play store that can be downloaded on any device to get more emojis. These emoji apps provide hundreds of emoji suitable for all situations and occasions, needed while interacting online.
Some emoji apps help to emoji yourself, which means you will be able to make an emoji avatar that looks like yourself. These emoji apps absorb your appearance and create funny emojis, with your looks, which is more fun than using regular emojis.
- Best 8 Emoji Apps to Make an Emoji of Yourself
- Bonus Tip - Add Emoji to Your Video with Wondershare Filmora
Best 8 Emoji Apps to Make an Emoji of Yourself
Since sharing emojis has been a trend for some time, there a lot of apps that help to emoji yourself in the online market. These emoji apps provide a lot of editing features and captions to make your emoji more appealing and message conveying.
Let’s have a look at some of the best apps that helps to make an emoji of yourself.
- 1.Bitmoji (iPhone and Android)
- 2.Zmoji(iPhone and Android)
- 3.Avatoon(iPhone and Android)
- 4.Emoji My Face (iPhone)
- 5.Mirror(iPhone and Android)
- 6.MojiPop (iPhone and Android)
- 7.Face Cam (Android)
- 8.Facemoji (iPhone)
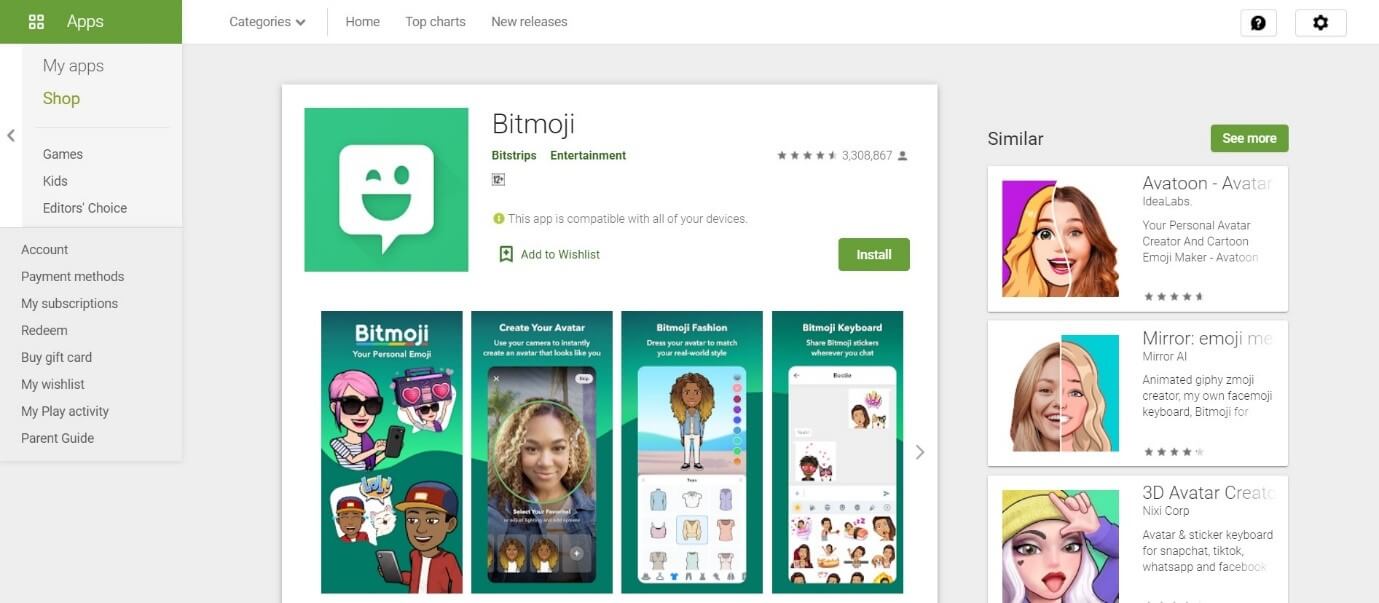
1.Bitmoji (iPhone and Android)
Bitmoji is one of the widely used applications that can help you to emoji yourself. This emoji app offers a variety of customizable options, a wide range of accessories and costumes to make your avatar look cooler than ordinary emojis.
Price:
- Free
- Include in-app purchases
Features:
- Can create an expressive avatar of yourself
- A huge library of stickers to choose from
- Option to create 2 person emoji to share on Snapchat
- Access to emoji from the chatting platform. For ios users, direct access from keyboards
2. Zmoji(iPhone and Android)
Zmoji is a customizable emoji app that helps to emoji yourself easily. It allows you to make an avatar that looks exactly like you but in a cartoonish style. You can also edit your avatar’s clothes, accessories, and other details.
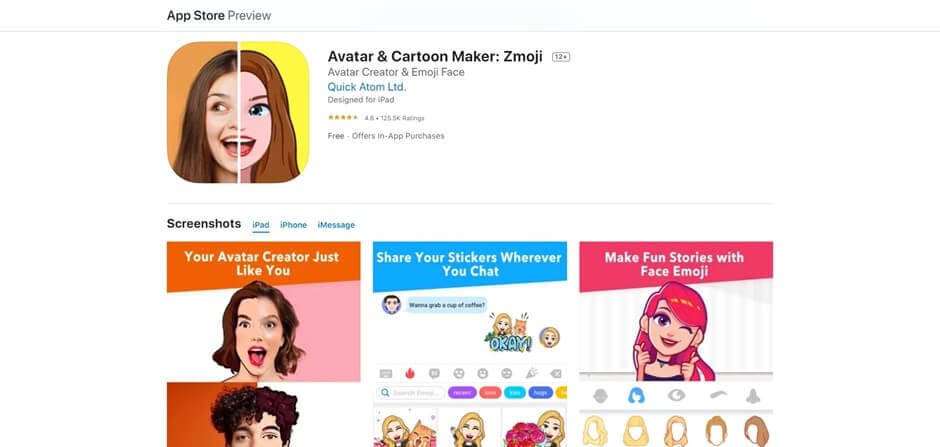
Price:
- Free
- Zmoji Premium with extra features = $99.99 per year
- Include in-app purchases
Features:
- Easy and quick creation of an avatar
- Emoji, GIFs, and avatars that you can use directly from your phone keyboard
- A variety of facial features and a big library
3. Avatoon(iPhone and Android)
Avatoon is a powerful emoji application that helps to make an emoji of yourself, with the same facial appearance. These emojis allow you to expresses all your excitement and moods in a way words can’t. This emoji app also allows the customization of the emoji background.
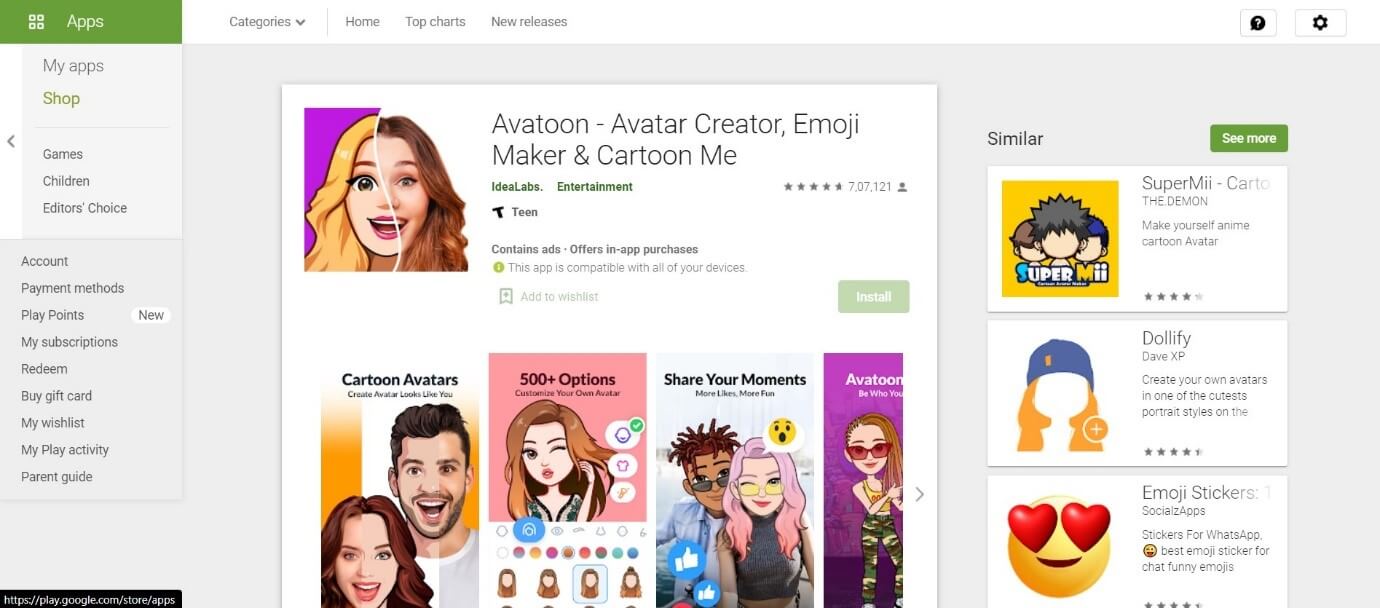
Price:
- Free
- Avatoon Premium with extra features = $49.99 per year
- Include in-app purchases
Features:
- Awesome facial recognition feature
- Easily customize clothes to nose and hair to eyes
- Eye-catching clothes and costumes to try on
- Effortlessly share the created emojis while interacting on any social media platform
4. Emoji My Face (iPhone)
Emoji My Face is an iPhone exclusive emoji app that helps to create wonderful emoji of yourself or your friends from any photos in your storage. It is one of the best apps have to have fun on social media platforms or to prank your friends by sending crazy emojis.

Price:
- Free
- Include in-app purchases
Features:
- Well designed, beautiful emoji icon of yourself
- Cool emoji expressions that can make anyone laugh
- Compactable to share on all most all social platforms like WhatsApp, Facebook, Line, Twitter, messenger, mail WeChat, etc.
5. Mirror(iPhone and Android)
Mirror is an emoji app that helps you to emoji yourself in all the funny and entertaining ways possible. You can either take a snap or yourself or upload a photo to recreate your appearance for the emoji.

Price:
- Free
- Include in-app purchases
- Subscription: $9.99 per month
Features:
- Personalized emoji and more than 150 stickers are available
- A mirror keyboard is available, to give emoji suggestions as you text
- Cool emoji icons with attractive accessories and addition of emojis to the library every week
6. MojiPop (iPhone and Android)
MojiPop is an instant emoji app that allows you to customize every single detail of the emoji you are creating. It allows you to click pictures of yourself or friends and create humorous emoji icons that can surprise anybody.
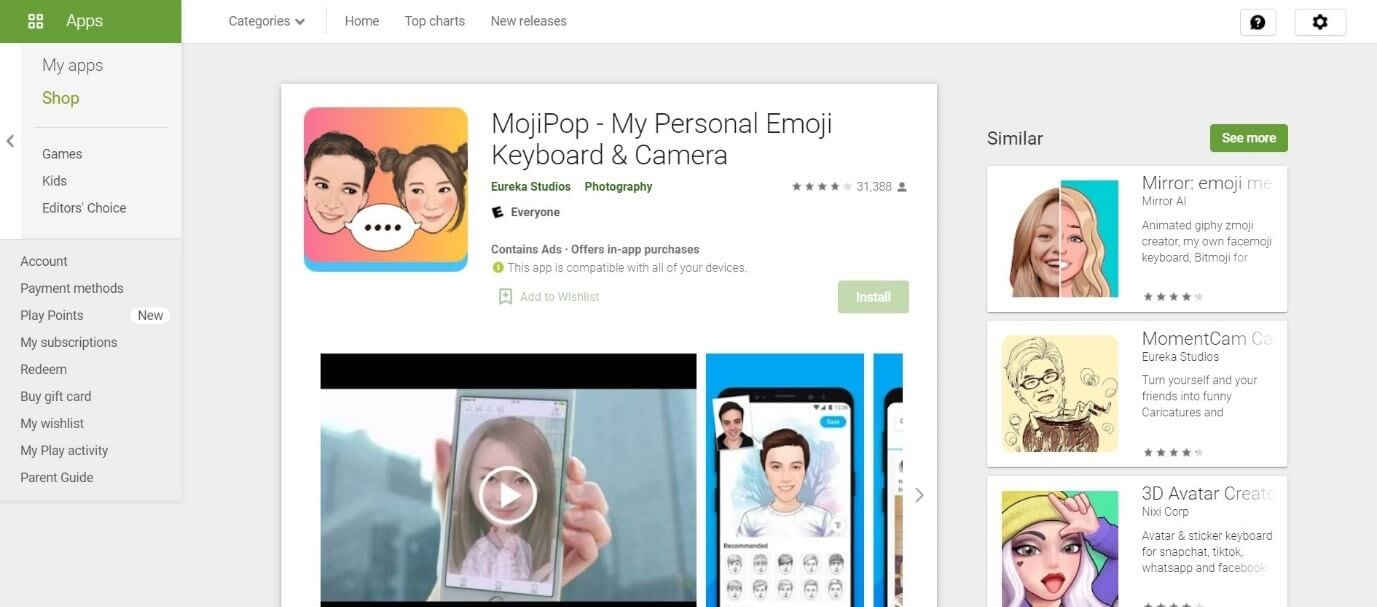
Price:
- Free
- Include in-app purchases
- Premium:$5.99 for 1 month, $29.99 per year
Features:
- Advanced facial recognition that allows you to create live looking emojis
- Thousands of emoji stickers available in the library
- Editing features like adding funny accessories, changing the theme, adding a caption, etc.
7. Face Cam (Android)
Face Cam is an android exclusive emoji app that helps you to make an emoji of yourself very easily. It helps to create live looking 3D emoji of yourself which can add extra fun to all your social media interactions.

Price:
- Free
- Include in-app purchases
Features:
- A variety of expressions that fit your personality and style
- Allows to choose from skin tones, hair colors, hairstyles, eye colors, accessories, and more
- Create a group emoji of 2 people to add more fun
- Easy sharing on social media platforms
8. Facemoji (iPhone)
Facemoji is an emoji app that helps you to be yourself while interacting with your friends and family on social media apps. This emoji app helps to emoji yourself to a cooler, funnier, and friendly cartoon version of yourself for better communication.
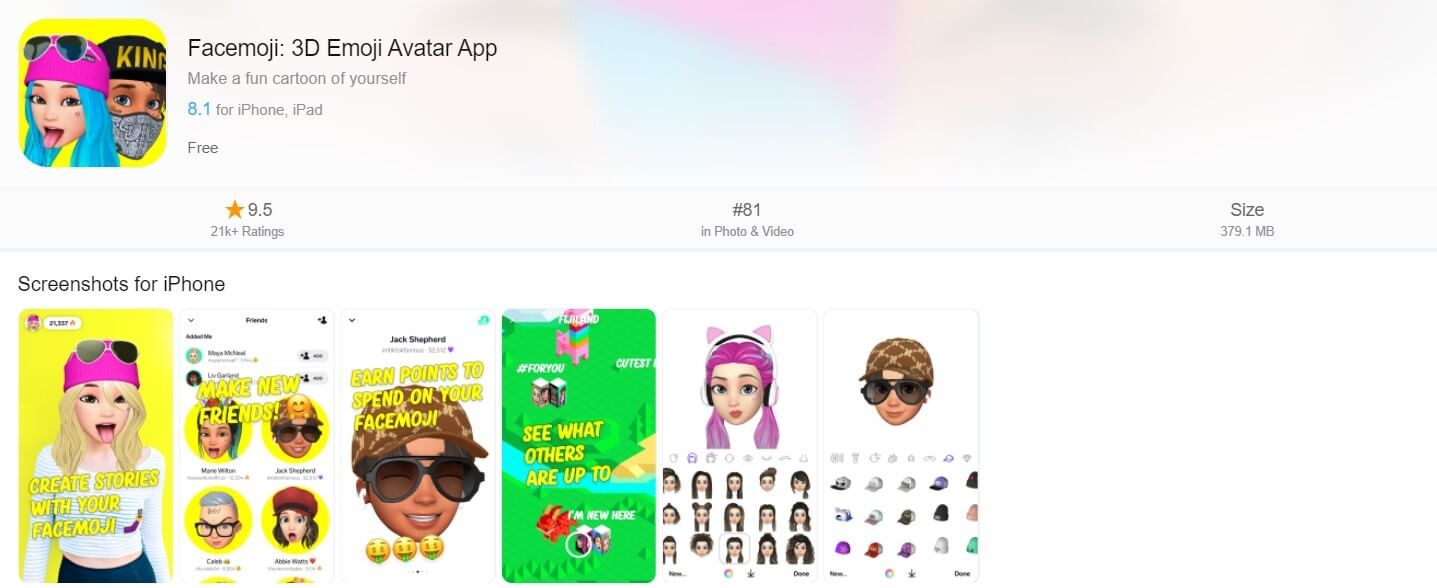
Price:
- Free
Features:
- A number of emoji styles and expressions
- A lot of customizable options suitable for any situation or occasion
- A lot of accessories and background options to make the emoji more appealing
Bonus Tip - Add Emoji to Your Video with Wondershare Filmora
Wondershare Filmora is an amazing application that is preferred for video editing both by professional videographers and immatures alike. This application has extensive video editing features that can help to boost the clarity, make it more creative and appealing to any audience.
Wondershar Filmora can also help you to add cool emojis of yourself to any video. These emojis help you to convey expressions and messages words can’t and also makes the video more appealing.
Let’s see how this can be done
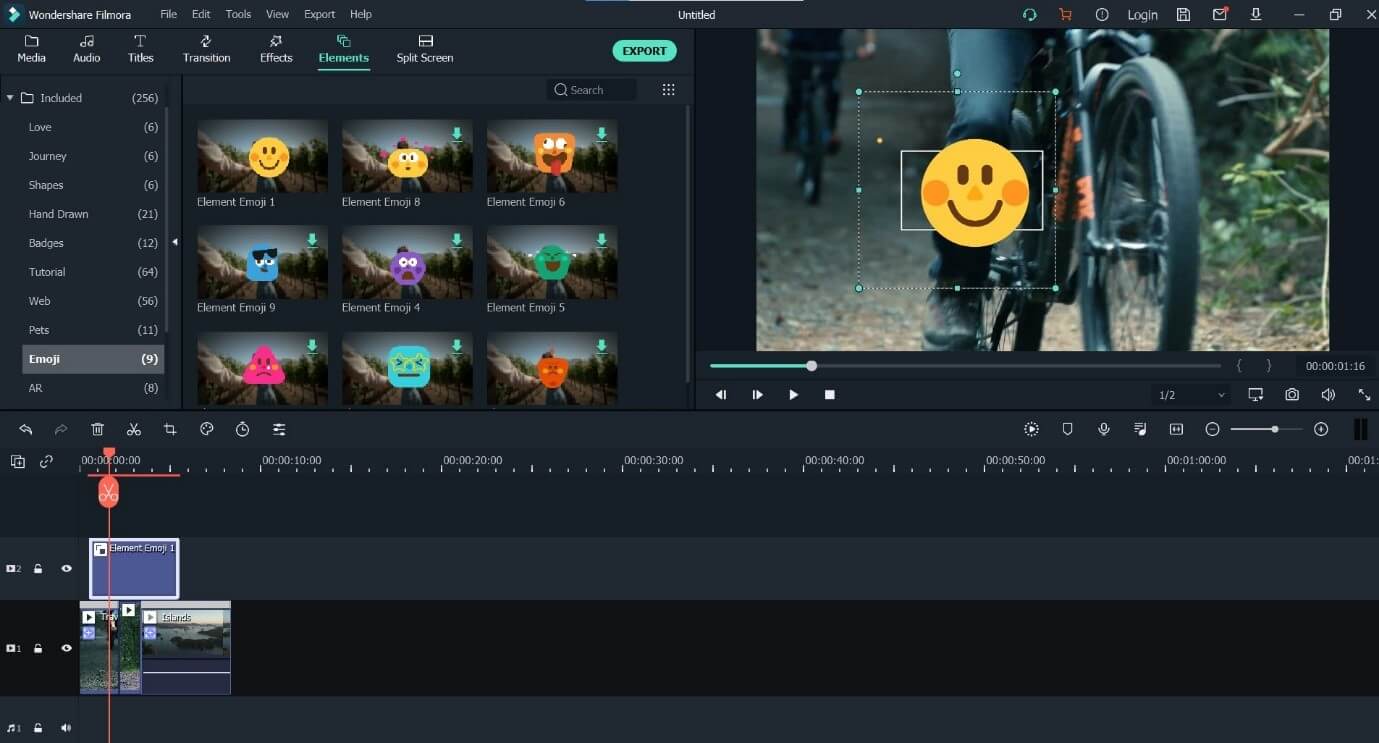
Step 1: Open the Wondershare Filmora app, and select New Project.
Step 2: Import the video clip and drag & drop it to the Filmora timeline.
Step 3: Open the editing menu by double-clicking on the video clip on your timeline and mark the box beside Motion Tracking.
![]()
Step 4: A tracker box will appear. Move the box on top of the moving object in the video and tap on Start Tracking.
![]()
Step 5: From the Elements bar, drag and drop the memoji you wish to track above the video. After dropping u can adjust the size, orientation, or position if necessary.
Step 6: Double click the video clip on which you have enabled motion tracking on the timeline, and from the Motion Tracking dropdown menu, select the object to follow the movement.
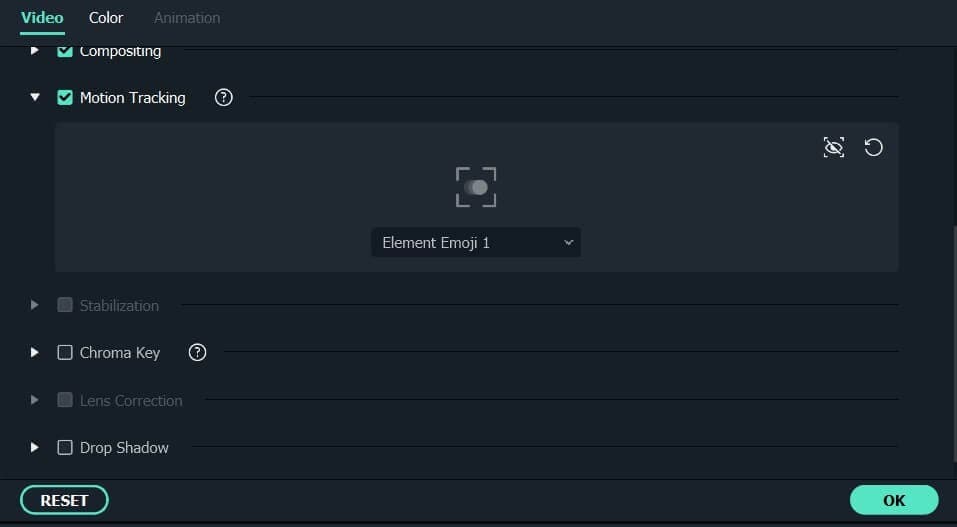
Step 7: Check the tracking result by playing back the video. And finally click Export to export the video to your local device, or to YouTube directly.
Conclusion
Emoji is one of the creative ways of communication of your generation. They help to convey messages and expressions that words sometimes can’t. The above listed are the best emoji apps that can be used to make an emoji of yourself. These emoji apps offer a lot of exciting and attractive features to emoji yourself in the best way possible.
Emojis can also be added to videos using video editing apps like Wondershare Filmora. Filmora allows you to add memojis to any videos and further customize it as you wish. Try out the emoji apps we have suggested and give us feedback about our suggestions. Thank you.
Shanoon Cox
Shanoon Cox is a writer and a lover of all things video.
Follow @Shanoon Cox
Shanoon Cox
Mar 27, 2024• Proven solutions
Sharing emoji is the latest trend in communication on almost all online social media platforms. Emoji makes a conversation funny, engaging and conveys the message you intend perfectly. There are a lot of emoji apps available in the play store that can be downloaded on any device to get more emojis. These emoji apps provide hundreds of emoji suitable for all situations and occasions, needed while interacting online.
Some emoji apps help to emoji yourself, which means you will be able to make an emoji avatar that looks like yourself. These emoji apps absorb your appearance and create funny emojis, with your looks, which is more fun than using regular emojis.
- Best 8 Emoji Apps to Make an Emoji of Yourself
- Bonus Tip - Add Emoji to Your Video with Wondershare Filmora
Best 8 Emoji Apps to Make an Emoji of Yourself
Since sharing emojis has been a trend for some time, there a lot of apps that help to emoji yourself in the online market. These emoji apps provide a lot of editing features and captions to make your emoji more appealing and message conveying.
Let’s have a look at some of the best apps that helps to make an emoji of yourself.
- 1.Bitmoji (iPhone and Android)
- 2.Zmoji(iPhone and Android)
- 3.Avatoon(iPhone and Android)
- 4.Emoji My Face (iPhone)
- 5.Mirror(iPhone and Android)
- 6.MojiPop (iPhone and Android)
- 7.Face Cam (Android)
- 8.Facemoji (iPhone)
1.Bitmoji (iPhone and Android)
Bitmoji is one of the widely used applications that can help you to emoji yourself. This emoji app offers a variety of customizable options, a wide range of accessories and costumes to make your avatar look cooler than ordinary emojis.
Price:
- Free
- Include in-app purchases
Features:
- Can create an expressive avatar of yourself
- A huge library of stickers to choose from
- Option to create 2 person emoji to share on Snapchat
- Access to emoji from the chatting platform. For ios users, direct access from keyboards
2. Zmoji(iPhone and Android)
Zmoji is a customizable emoji app that helps to emoji yourself easily. It allows you to make an avatar that looks exactly like you but in a cartoonish style. You can also edit your avatar’s clothes, accessories, and other details.
Price:
- Free
- Zmoji Premium with extra features = $99.99 per year
- Include in-app purchases
Features:
- Easy and quick creation of an avatar
- Emoji, GIFs, and avatars that you can use directly from your phone keyboard
- A variety of facial features and a big library
3. Avatoon(iPhone and Android)
Avatoon is a powerful emoji application that helps to make an emoji of yourself, with the same facial appearance. These emojis allow you to expresses all your excitement and moods in a way words can’t. This emoji app also allows the customization of the emoji background.
Price:
- Free
- Avatoon Premium with extra features = $49.99 per year
- Include in-app purchases
Features:
- Awesome facial recognition feature
- Easily customize clothes to nose and hair to eyes
- Eye-catching clothes and costumes to try on
- Effortlessly share the created emojis while interacting on any social media platform
4. Emoji My Face (iPhone)
Emoji My Face is an iPhone exclusive emoji app that helps to create wonderful emoji of yourself or your friends from any photos in your storage. It is one of the best apps have to have fun on social media platforms or to prank your friends by sending crazy emojis.
Price:
- Free
- Include in-app purchases
Features:
- Well designed, beautiful emoji icon of yourself
- Cool emoji expressions that can make anyone laugh
- Compactable to share on all most all social platforms like WhatsApp, Facebook, Line, Twitter, messenger, mail WeChat, etc.
5. Mirror(iPhone and Android)
Mirror is an emoji app that helps you to emoji yourself in all the funny and entertaining ways possible. You can either take a snap or yourself or upload a photo to recreate your appearance for the emoji.
Price:
- Free
- Include in-app purchases
- Subscription: $9.99 per month
Features:
- Personalized emoji and more than 150 stickers are available
- A mirror keyboard is available, to give emoji suggestions as you text
- Cool emoji icons with attractive accessories and addition of emojis to the library every week
6. MojiPop (iPhone and Android)
MojiPop is an instant emoji app that allows you to customize every single detail of the emoji you are creating. It allows you to click pictures of yourself or friends and create humorous emoji icons that can surprise anybody.
Price:
- Free
- Include in-app purchases
- Premium:$5.99 for 1 month, $29.99 per year
Features:
- Advanced facial recognition that allows you to create live looking emojis
- Thousands of emoji stickers available in the library
- Editing features like adding funny accessories, changing the theme, adding a caption, etc.
7. Face Cam (Android)
Face Cam is an android exclusive emoji app that helps you to make an emoji of yourself very easily. It helps to create live looking 3D emoji of yourself which can add extra fun to all your social media interactions.
Price:
- Free
- Include in-app purchases
Features:
- A variety of expressions that fit your personality and style
- Allows to choose from skin tones, hair colors, hairstyles, eye colors, accessories, and more
- Create a group emoji of 2 people to add more fun
- Easy sharing on social media platforms
8. Facemoji (iPhone)
Facemoji is an emoji app that helps you to be yourself while interacting with your friends and family on social media apps. This emoji app helps to emoji yourself to a cooler, funnier, and friendly cartoon version of yourself for better communication.
Price:
- Free
Features:
- A number of emoji styles and expressions
- A lot of customizable options suitable for any situation or occasion
- A lot of accessories and background options to make the emoji more appealing
Bonus Tip - Add Emoji to Your Video with Wondershare Filmora
Wondershare Filmora is an amazing application that is preferred for video editing both by professional videographers and immatures alike. This application has extensive video editing features that can help to boost the clarity, make it more creative and appealing to any audience.
Wondershar Filmora can also help you to add cool emojis of yourself to any video. These emojis help you to convey expressions and messages words can’t and also makes the video more appealing.
Let’s see how this can be done
Step 1: Open the Wondershare Filmora app, and select New Project.
Step 2: Import the video clip and drag & drop it to the Filmora timeline.
Step 3: Open the editing menu by double-clicking on the video clip on your timeline and mark the box beside Motion Tracking.
![]()
Step 4: A tracker box will appear. Move the box on top of the moving object in the video and tap on Start Tracking.
![]()
Step 5: From the Elements bar, drag and drop the memoji you wish to track above the video. After dropping u can adjust the size, orientation, or position if necessary.
Step 6: Double click the video clip on which you have enabled motion tracking on the timeline, and from the Motion Tracking dropdown menu, select the object to follow the movement.
Step 7: Check the tracking result by playing back the video. And finally click Export to export the video to your local device, or to YouTube directly.
Conclusion
Emoji is one of the creative ways of communication of your generation. They help to convey messages and expressions that words sometimes can’t. The above listed are the best emoji apps that can be used to make an emoji of yourself. These emoji apps offer a lot of exciting and attractive features to emoji yourself in the best way possible.
Emojis can also be added to videos using video editing apps like Wondershare Filmora. Filmora allows you to add memojis to any videos and further customize it as you wish. Try out the emoji apps we have suggested and give us feedback about our suggestions. Thank you.
Shanoon Cox
Shanoon Cox is a writer and a lover of all things video.
Follow @Shanoon Cox
Top 5 Best Websites to Add Emojis to Photo Online
Are you in love with those funny emojis you see in messenger apps and want to add them to your images too? Guess what? You can add emojis to photos online conveniently through a few websites. Emojis enhance how a picture looks instantly.
People can use an emoji on a friend’s image to make them look funny or hide their face with a smiley emoji. Why upload boring and the same kind of photos all the time when emojis can add the much-needed magical touch? So, if you want to add emoji to photos online, look no further and learn about the best websites that allow you do that easily.
In this article
01 Top 5 Websites to Add Emojis to Photo Online
02 How to Add Emojis to Photo on Wondershare Filmora
Part 1: Top 5 Websites to Add Emojis to Photo Online
#1: Kapwing

One of the best websites is Kapwing, which lets you add emojis to any photo you want. Kapwing is an easy-to-use online tool, which means you will not have to download any tool. But to start using it, you will have to sign up. You can do that by using your Google ID. When it comes to the number of emojis it has, it boasts more than 250 different emojis. It lets you add custom emojis; let’s say you have a pack of custom emojis with you that you want to use; you can do that effortlessly.
Key Features
- It’s an online tool and free to use.
- You need to sign up to save your work.
- It has more than 250 emojis to choose from.
- Kapwing is easy to use.
Steps to Follow to Use Kapwing
Step 1: Visit the official website of Kapwing. You will see the Start Editing option; please click on that.
Step 2: You will see the workspace with an option that says “click to upload.” Click on it.
Step 3: Now, upload a photo that you want to add the emoji too. The image will be uploaded.
Step 4: To add an emoji, look towards the left menu, and you will see the Add Media option. Click on that.
Step 5: You will see the upload, projects, and emojis options. Click on the emojis option.
Step 6: Emojis will appear. Click on one, and it will be uploaded to the main photo. You can drag, shrink, zoom, or rotate the emoji used. You can add as many emojis you want.
Related: How to make a slo-mo video on Kapwing
#2: Image Online.Co

The next good online tool that you can try is Image Online.Co. It’s a pretty basic tool that lets you upload a photo and add an emoji the right way. It has more than 100 emojis, which is not a lot. But features all the popular emojis that will suit all kinds of images. And it allows you to add your custom emojis, which is why people prefer to use Image Online.Co. Using it is very easy, and the interface of the online tool is easy to understand.
Key Features
- It is a 100% free online tool that won’t ask you to sign up or log in.
- The tool has 100+ emojis to choose from.
- The interface is easy to understand.
- The tool is easy to use.
Steps to Follow to Use Image Online.Co
Step 1: Visit https://emoji.imageonline.co/ , which is their official website.
Step 2: Click on the Select Photo option, else directly drop an image from your local folder.
Step 3: If you want, you can add a custom emoji that you already have.
Step 4: Add an emoji from the right menu and rotate or zoom in or zoom out.
#3: Canva

Canva is arguably one of the best ways to make your photos look better. This tool has tons of features, and the best part is that you can customize a picture with an emoji using one of their templates. It has 250+ emojis and lets you add your customized emoji. And to start using Canva, you will have to sign up.
Key Features
- Canva has more than 250 emojis.
- It lets you edit your photos to enhance their quality.
- One-month free trial.
- You can choose from different templates.
Steps to Follow to Use Canva
Step 1: First, visit https://www.canva.com/ and sign up using your Facebook account or Gmail.
Step 2: Choose the kind of work you would like to do, and you will be taken to the photo editing page.
Step 3: Upload an image and click on the more option.
Step 4: Click on the emoji option and choose an emoji to add to the image. To save, click on the download option.
Related: How to Animate Pictures in Canva
#4: PiZap

PiZap is a photo editing tool that lets you add emojis too. To start using, you will have to log in or sign up. You can use your Facebook, Twitter, or Google account to sign up. It provides you with various graphics, fonts, and other photo editing features to make the image look better than before. The basic tool comes for free and has 232 emojis currently.
Key Features
- The basic tool comes for free.
- There are numerous emojis to choose from.
- The image quality doesn’t lose its original quality.
- Using the tool is easy, and the interface is intuitive.
Steps to Follow to Use PiZap
Step 1: Visit www.pizap.com and click on the try for free option.
Step 2: Click on the edit photo option, and upload an image.
Step 3: From the left-side toolbar, click on the Graphics option. Scroll a bit, and you will see the emoji section.
Step 4: Click on any of the emojis you like to add to the photo. You can adjust the emojis as you want.
#5: Pixelied
![]()
The last website that we have is Pixelied. The free tool will let you edit your image and add emojis, which will be enough if you don’t want many features. Using the tool is easy, and the emojis Pixelied has are great. They are different than general emojis and look better! Plus, the tool provides 300+ fantastic emojis.
Key Features
- The tool has an excellent collection of emojis.
- Adding emojis is extremely easy.
- It is free to use and doesn’t require any photo editing experience.
- The tool also offers various photo editing features.
How to Use Pixelied?
Step 1: Visit pixelied.com and click on the Upload Your Image option.
Step 2: On the left, you will find tons of icons. Use the search bar and type emojis.
Step 3: Browse through the emojis and click on one that you like. You can use multiple emojis, too, if you want. To save, click on the download option.
Part 2: How to Add Emojis to Photo on Wondershare Filmora
Filmora video editor provides tons of emojis that you can add for free, so you can add them to photos directly. What’s more, you can also upload your own emoji and use it in Filmora. All you need to do is download the tool on your Windows or Mac computer and start using it to add an emoji. There are two ways to go about it:
Use Emojis from Elements

Step 1: Launch Wondershare Filmora and click on create a new project.
Step 2: Click on the Elements option on the top and use the search bar to search for emojis.
Step 3: Click on any of the emojis that you like and adjust them.
Step 4: To save the photo with emojis, just click the camera icon to take a screenshot .
The video below shows the animated emojis that you can try in Filmora, take a look and have fun.
For Win 7 or later (64-bit)
For macOS 10.12 or later
Upload Your Own Emoji
Step 1: Launch Wondershare Filmora and add both the emoji and photo.
Step 2: Drag both of them into the timeline.
Step 3: Use the viewer panel to adjust the size of the emoji.

For Win 7 or later (64-bit)
For macOS 10.12 or later
Besides adding emojis to photos or videos, you can also add stickers to videos in Filmora to have fun.
Conclusion
And that’s how you can add an emoji to a photo online easily. You can try all five websites to add emojis to your photos, and if you want, you can download Wondershare Filmora to further edit the image. So, try these tools and make your photo look fun and fantastic!
02 How to Add Emojis to Photo on Wondershare Filmora
Part 1: Top 5 Websites to Add Emojis to Photo Online
#1: Kapwing
One of the best websites is Kapwing, which lets you add emojis to any photo you want. Kapwing is an easy-to-use online tool, which means you will not have to download any tool. But to start using it, you will have to sign up. You can do that by using your Google ID. When it comes to the number of emojis it has, it boasts more than 250 different emojis. It lets you add custom emojis; let’s say you have a pack of custom emojis with you that you want to use; you can do that effortlessly.
Key Features
- It’s an online tool and free to use.
- You need to sign up to save your work.
- It has more than 250 emojis to choose from.
- Kapwing is easy to use.
Steps to Follow to Use Kapwing
Step 1: Visit the official website of Kapwing. You will see the Start Editing option; please click on that.
Step 2: You will see the workspace with an option that says “click to upload.” Click on it.
Step 3: Now, upload a photo that you want to add the emoji too. The image will be uploaded.
Step 4: To add an emoji, look towards the left menu, and you will see the Add Media option. Click on that.
Step 5: You will see the upload, projects, and emojis options. Click on the emojis option.
Step 6: Emojis will appear. Click on one, and it will be uploaded to the main photo. You can drag, shrink, zoom, or rotate the emoji used. You can add as many emojis you want.
Related: How to make a slo-mo video on Kapwing
#2: Image Online.Co
The next good online tool that you can try is Image Online.Co. It’s a pretty basic tool that lets you upload a photo and add an emoji the right way. It has more than 100 emojis, which is not a lot. But features all the popular emojis that will suit all kinds of images. And it allows you to add your custom emojis, which is why people prefer to use Image Online.Co. Using it is very easy, and the interface of the online tool is easy to understand.
Key Features
- It is a 100% free online tool that won’t ask you to sign up or log in.
- The tool has 100+ emojis to choose from.
- The interface is easy to understand.
- The tool is easy to use.
Steps to Follow to Use Image Online.Co
Step 1: Visit https://emoji.imageonline.co/ , which is their official website.
Step 2: Click on the Select Photo option, else directly drop an image from your local folder.
Step 3: If you want, you can add a custom emoji that you already have.
Step 4: Add an emoji from the right menu and rotate or zoom in or zoom out.
#3: Canva
Canva is arguably one of the best ways to make your photos look better. This tool has tons of features, and the best part is that you can customize a picture with an emoji using one of their templates. It has 250+ emojis and lets you add your customized emoji. And to start using Canva, you will have to sign up.
Key Features
- Canva has more than 250 emojis.
- It lets you edit your photos to enhance their quality.
- One-month free trial.
- You can choose from different templates.
Steps to Follow to Use Canva
Step 1: First, visit https://www.canva.com/ and sign up using your Facebook account or Gmail.
Step 2: Choose the kind of work you would like to do, and you will be taken to the photo editing page.
Step 3: Upload an image and click on the more option.
Step 4: Click on the emoji option and choose an emoji to add to the image. To save, click on the download option.
Related: How to Animate Pictures in Canva
#4: PiZap
PiZap is a photo editing tool that lets you add emojis too. To start using, you will have to log in or sign up. You can use your Facebook, Twitter, or Google account to sign up. It provides you with various graphics, fonts, and other photo editing features to make the image look better than before. The basic tool comes for free and has 232 emojis currently.
Key Features
- The basic tool comes for free.
- There are numerous emojis to choose from.
- The image quality doesn’t lose its original quality.
- Using the tool is easy, and the interface is intuitive.
Steps to Follow to Use PiZap
Step 1: Visit www.pizap.com and click on the try for free option.
Step 2: Click on the edit photo option, and upload an image.
Step 3: From the left-side toolbar, click on the Graphics option. Scroll a bit, and you will see the emoji section.
Step 4: Click on any of the emojis you like to add to the photo. You can adjust the emojis as you want.
#5: Pixelied
![]()
The last website that we have is Pixelied. The free tool will let you edit your image and add emojis, which will be enough if you don’t want many features. Using the tool is easy, and the emojis Pixelied has are great. They are different than general emojis and look better! Plus, the tool provides 300+ fantastic emojis.
Key Features
- The tool has an excellent collection of emojis.
- Adding emojis is extremely easy.
- It is free to use and doesn’t require any photo editing experience.
- The tool also offers various photo editing features.
How to Use Pixelied?
Step 1: Visit pixelied.com and click on the Upload Your Image option.
Step 2: On the left, you will find tons of icons. Use the search bar and type emojis.
Step 3: Browse through the emojis and click on one that you like. You can use multiple emojis, too, if you want. To save, click on the download option.
Part 2: How to Add Emojis to Photo on Wondershare Filmora
Filmora video editor provides tons of emojis that you can add for free, so you can add them to photos directly. What’s more, you can also upload your own emoji and use it in Filmora. All you need to do is download the tool on your Windows or Mac computer and start using it to add an emoji. There are two ways to go about it:
Use Emojis from Elements
Step 1: Launch Wondershare Filmora and click on create a new project.
Step 2: Click on the Elements option on the top and use the search bar to search for emojis.
Step 3: Click on any of the emojis that you like and adjust them.
Step 4: To save the photo with emojis, just click the camera icon to take a screenshot .
The video below shows the animated emojis that you can try in Filmora, take a look and have fun.
For Win 7 or later (64-bit)
For macOS 10.12 or later
Upload Your Own Emoji
Step 1: Launch Wondershare Filmora and add both the emoji and photo.
Step 2: Drag both of them into the timeline.
Step 3: Use the viewer panel to adjust the size of the emoji.
For Win 7 or later (64-bit)
For macOS 10.12 or later
Besides adding emojis to photos or videos, you can also add stickers to videos in Filmora to have fun.
Conclusion
And that’s how you can add an emoji to a photo online easily. You can try all five websites to add emojis to your photos, and if you want, you can download Wondershare Filmora to further edit the image. So, try these tools and make your photo look fun and fantastic!
How to Add Stickers to WhatsApp-The Ultimate Guide
How to Add Stickers to WhatsApp-The Ultimate Guide
Shanoon Cox
Mar 27, 2024• Proven solutions
Whatsapp has recently added the stickers feature, and people are going crazy about adding stickers to WhatsApp. But the question is how to add stickers to Whatsapp? To help with that, we will walk you through a detailed guide on how to add stickers to Whatsapp and bring a dash of fun to boring texts.
Now, if you don’t know how to add stickers to WhatsApp and use stickers on Whatsapp, we have you covered.
- Part 1: How to Create Stickers for WhatsApp
- Part 2: How to Add Stickers to WhatsApp
- Part 3: How to Send Stickers on WhatsApp
- Part 4: Bonus Tip—Add Sticker to Your Video with Wondershare Filmora
Part 1: How to Create Stickers for WhatsApp
Whatsapp stickers are now a significant part of our daily conversations. Because let’s face it, life would be boring without them. Perhaps it’s time to up your game by learning how to add stickers to Whatsapp
Even though Whatsapp has a vast library of stickers available, creating a unique sticker is more fun. And the latest apps have made it incredibly easy to create customized stickers. So all you need to do now is learn how to use stickers in Whatsapp
Sticker Make for Whatsapp is one such app. It is free and requires no registrations. Download the app from Google Store and start creating hilarious stickers to surprise your friends.
1. Download Sticker Make and launch it. On the homepage, you will be presented with two options. Click Create to make a sticker from scratch using your own image or click on Animated to insert your picture in a sticker template.
2. Choose any image from your gallery. Crop it to the size and shape you wish to include. Use the Freehand tool or click Automatically to let the app crop a face itself.
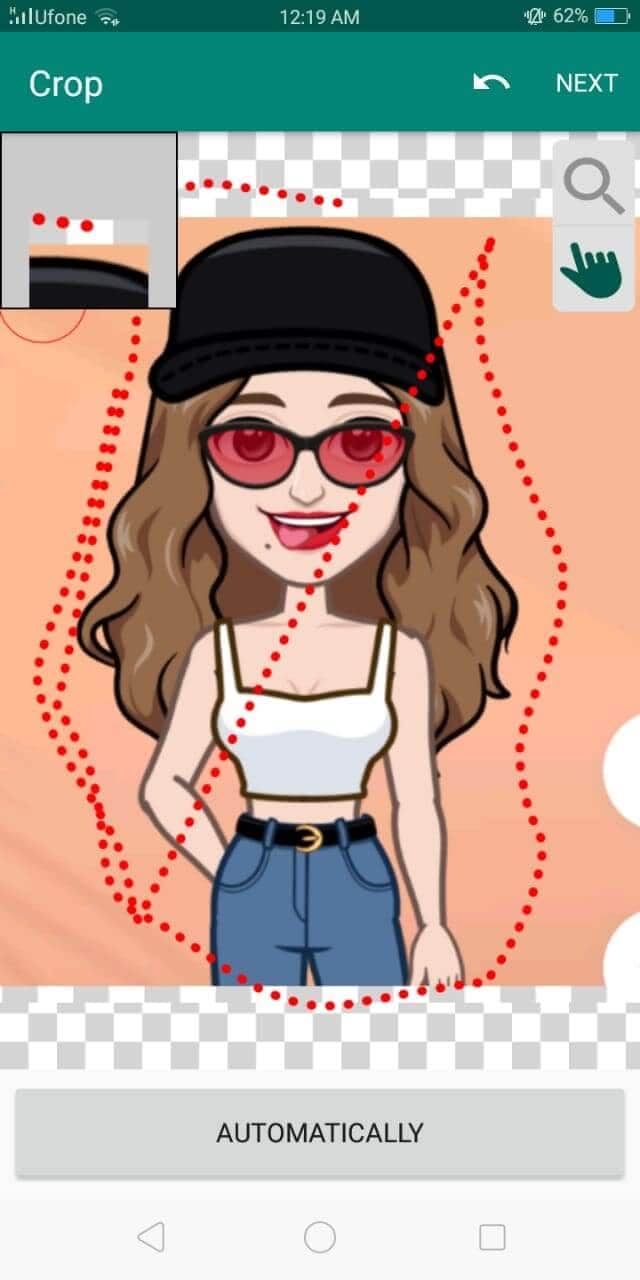
3. Click Next and now erase the background or make careful cropping.
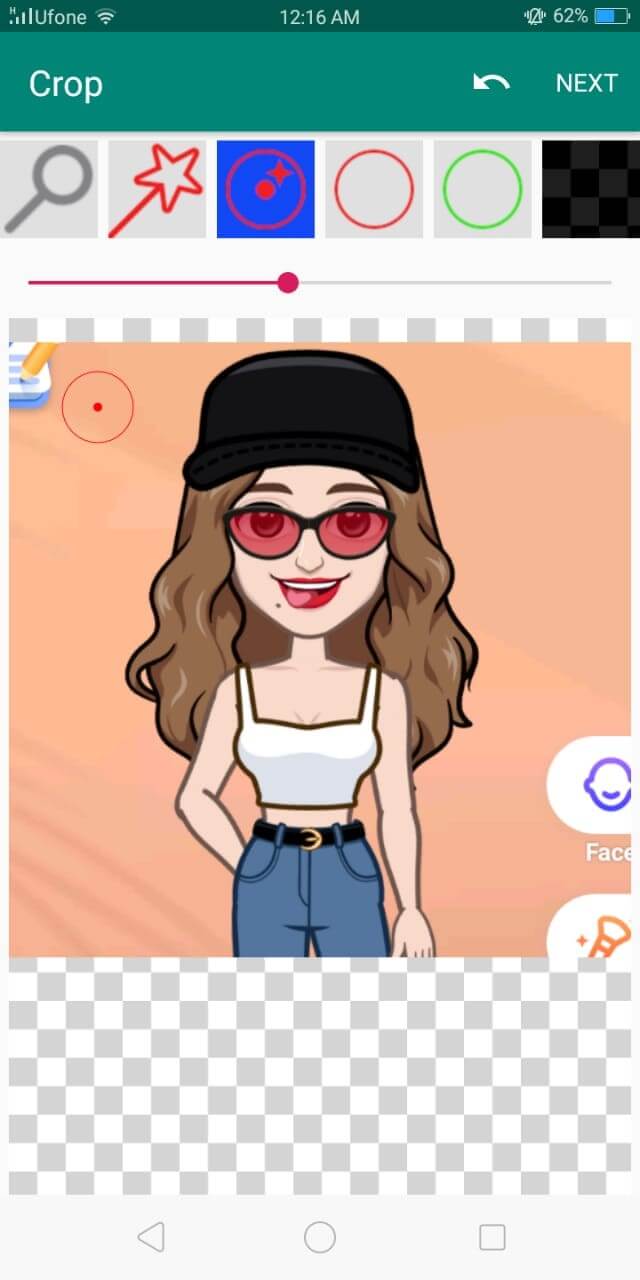
4. You can even outline your sticker and adjust its width and color.
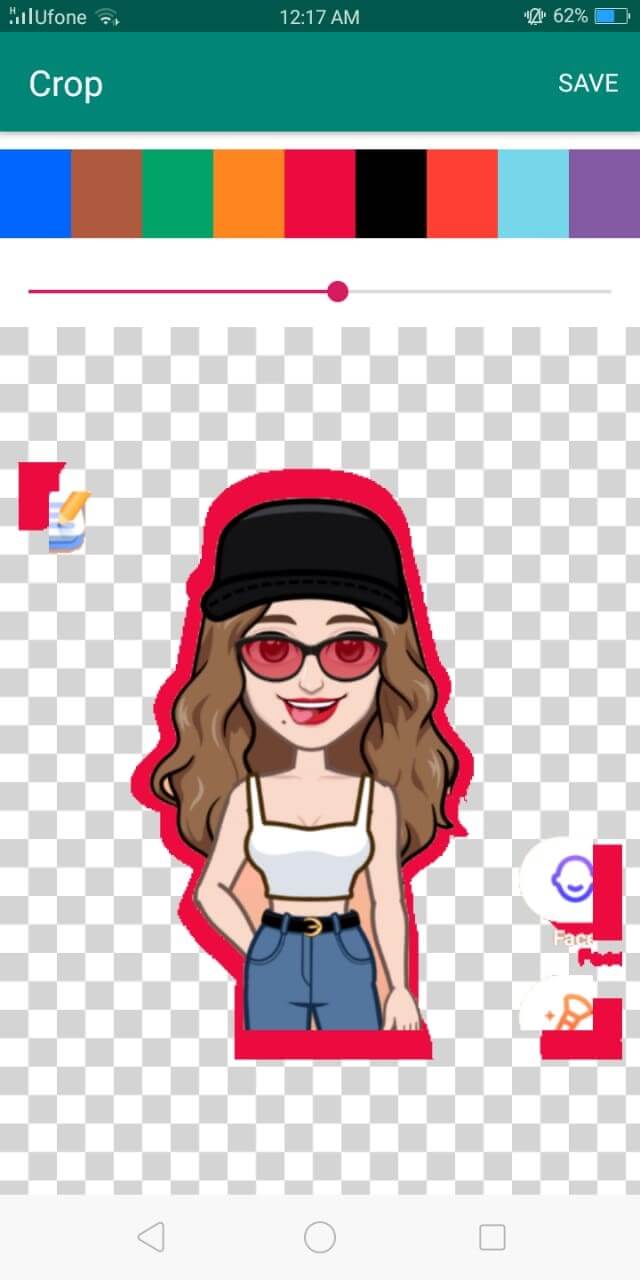
5. You can even add texts and change fonts.

6. Click on the square in the bottom panel to choose from a list of cool backgrounds for your sticker.
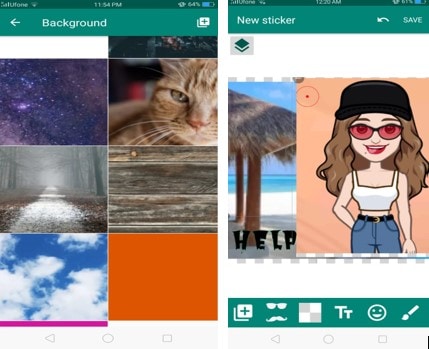
7. Choose to add themed emojis or decorate using a variety of images in the library of Sticker Make. Once you are done, click Save, enter pack name, and click Ok.
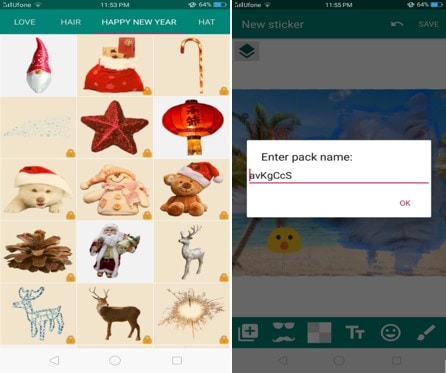
(P.S Make sure that the stickers are precisely 512x512 pixels and no more than 100kb)
Part 2: How to Add Stickers to WhatsApp
Now, you must be wondering how to add stickers to Whatsapp. Let me ease your worry. In this part, I will walk you through a step-by-step guide on how to use stickers in Whatsapp and a few additional features too.
You can save the stickers you receive from other people-
- Click on the sticker you receive
- Tap Add to favorites

If you wish you get more exciting stickers to better express yourself-
- Open Whatsapp chat, either individual or group chat.
- Click on the emoji and then click the sticker beside GIF (the square shape)
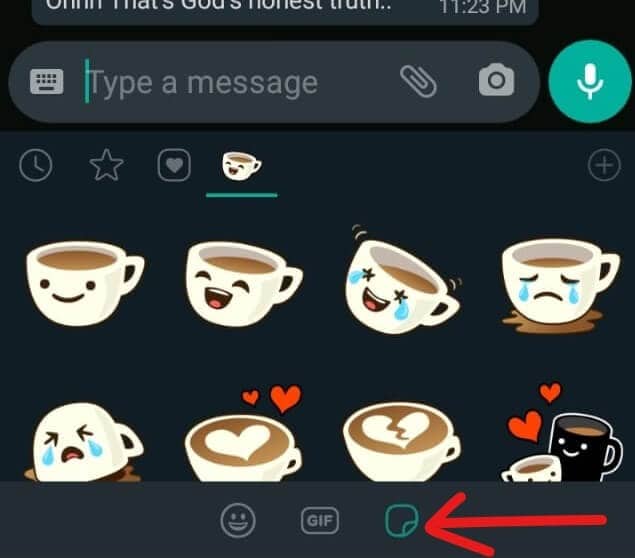
- Tap on the + sign on the upper right corner of your keyboard.
- Here you choose to download any number of sticker packs or click Get More Stickers from Google Play.
- Tap the download sign beside the sticker pack to start downloading.
- Once the download is complete, it will be displayed among the other stickers in your list.
Other features:
- Clock sign- This sign has all the stickers you recently used
- Star sign- It contains your favorite stickers
- Heart- In this, there are several categories. Whatsapp automatically arranges all your stickers in these categories as happy, sad, romantic, etc.
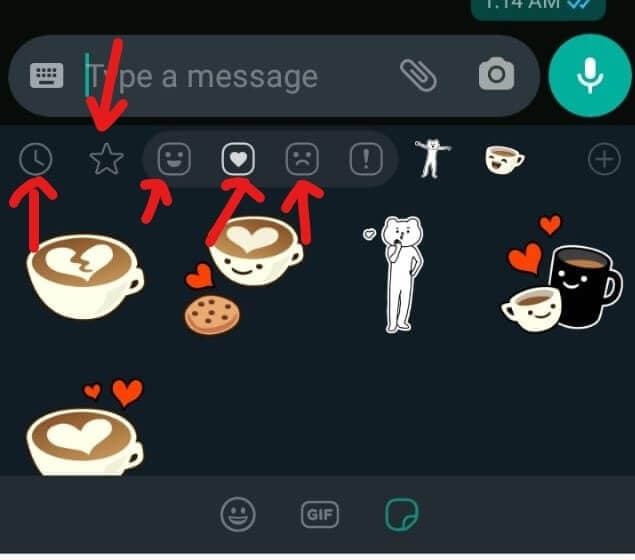
Part 3: How to Send Stickers on WhatsApp
So far, you have learned to create a custom sticker and then how to use Whatsapp stickers. All credit goes to the apps that made this task cakewalk (and some credit goes to your creativity too). Now that the worst is over, you have come to the final and best part of our article.
In 3 quick steps, you will be able to learn how to add stickers to Whatsapp and surprise your friends with hilarious stickers.
1.Open individual or group chat.
2.Click on the emoji and then tap the stickers on the bottom panel.
3.Choose the sticker that best fits your mood and intention from the various categories. Click it and voila! Sent!
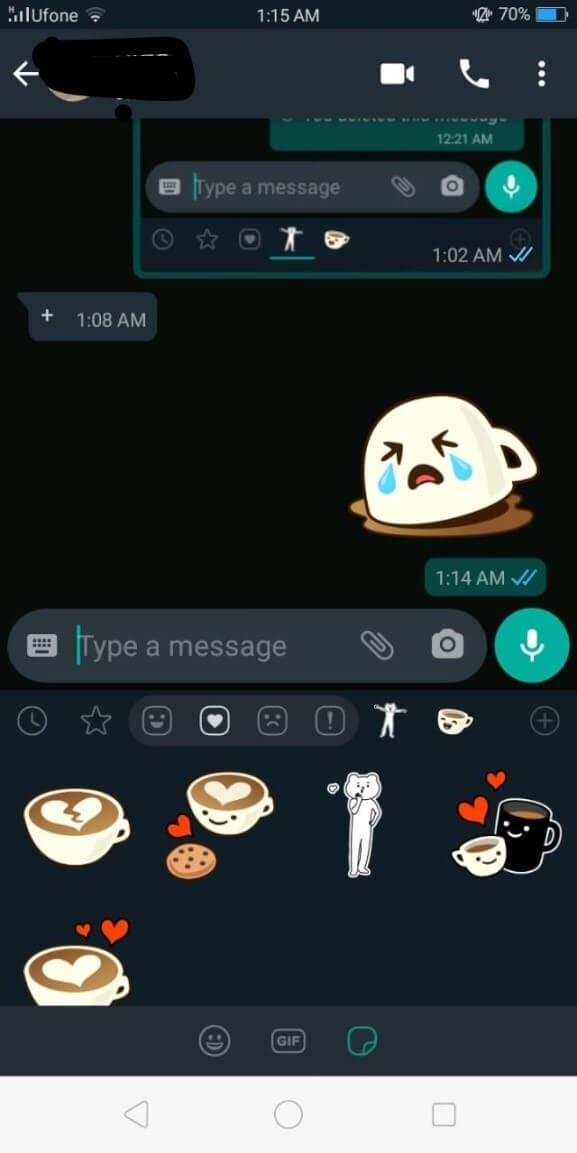
Easy peasy, right?
Bonus Tip—Add Sticker to Your Video with Wondershare Filmora
Although videos themselves are gripping enough, the addition of a customized sticker exclusive to you will be a cherry on top. Wondershare Filmora, with its user-friendly interface, is here just for that. You can now not only add your customized stickers to your video, but multiple effects can also be applied to enhance the video. Filmora is specially designed to offer professional editing tools to beginners. It has an in-built library of special effects and filters to help you create a stunningly cinematic video. Apply motion tracking, keyframe animations, or color match your videos. Add catchy captions or aesthetic filters to create a cool cinematic video
Let’s get right to it:
1.Download and install Filmora. Launch it. And click on Import-Import Media Files.
2. Then import your sticker into Filmora and drag and drop it to the video track or choose a sticker from the Elements (Note that both must be added to the video track).
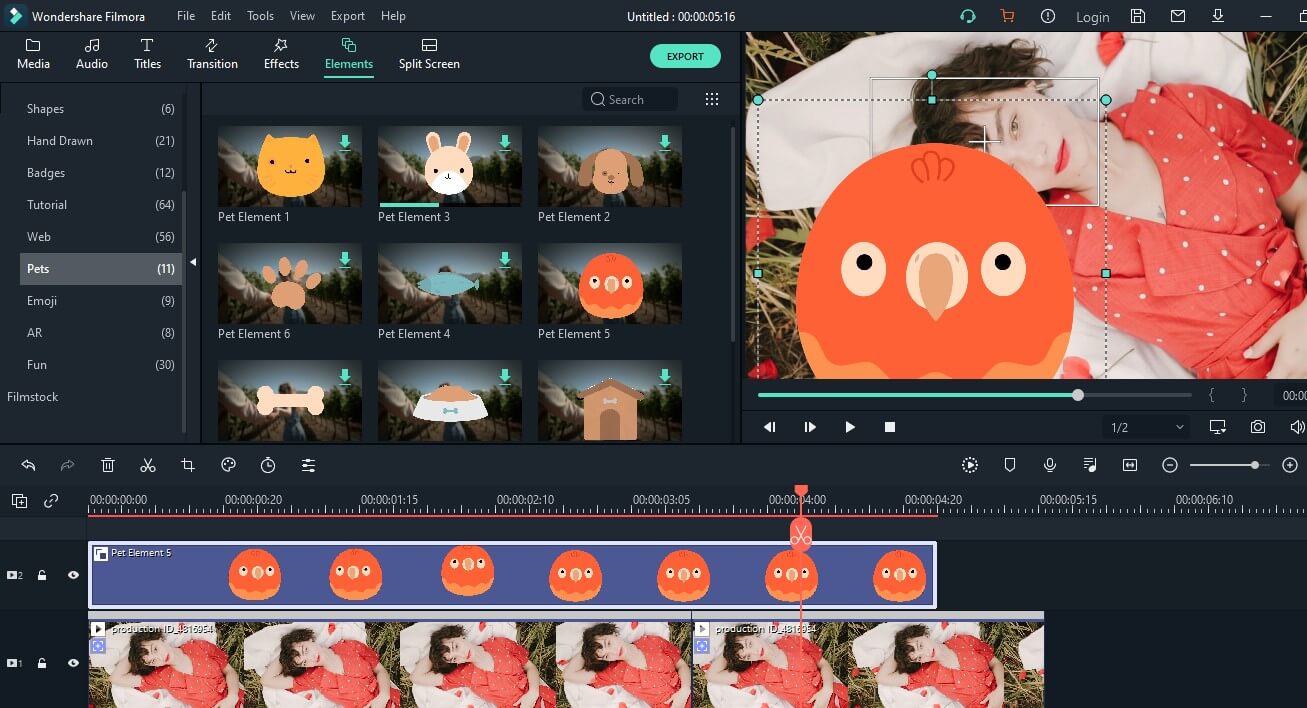
3. Double-click on the sticker in the timeline to adjust the additional parameters. In Video, you can adjust the size or rotation of the sticker. Tap Color to adjust the tint, temperature, or saturation of the sticker. You can also add 3D motion to the sticker in the Motion.
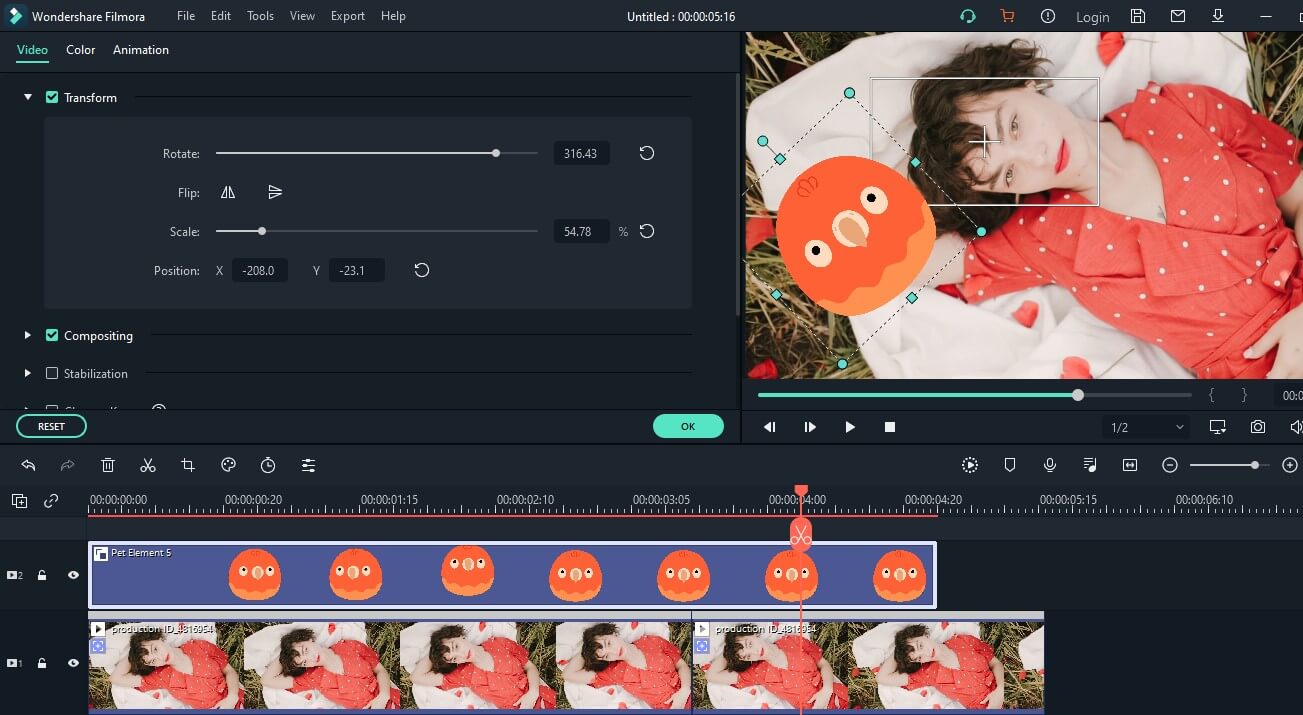
4. And in the viewer panel, click on the sticker and drag it to adjust the size or change the location.
5. Click Export and save it to your computer in the desired resolution.

Ready to Create and Add Stickers?
Stickers have been around long enough to become boringly ordinary. So, to keep the fun side of texting alive, you can now master how to use stickers on Whatsapp after creating your own personalized stickers.
You can start being creative with Sticker Make for Whatsapp. And if you didn’t know how to add stickers in Whatsapp, by now, you must have mastered it (hopefully).
Last but not least, to stand out in a crowd, you need to bring to light something others can’t. Inserting custom-made stickers in your videos might do the trick. Decorate your videos with Wondershare Filmora and create impressive masterpieces. Take note from this ultimate guide on how to add stickers to Whatsapp and transform your texting experience.
Let the fun begin!
Shanoon Cox
Shanoon Cox is a writer and a lover of all things video.
Follow @Shanoon Cox
Shanoon Cox
Mar 27, 2024• Proven solutions
Whatsapp has recently added the stickers feature, and people are going crazy about adding stickers to WhatsApp. But the question is how to add stickers to Whatsapp? To help with that, we will walk you through a detailed guide on how to add stickers to Whatsapp and bring a dash of fun to boring texts.
Now, if you don’t know how to add stickers to WhatsApp and use stickers on Whatsapp, we have you covered.
- Part 1: How to Create Stickers for WhatsApp
- Part 2: How to Add Stickers to WhatsApp
- Part 3: How to Send Stickers on WhatsApp
- Part 4: Bonus Tip—Add Sticker to Your Video with Wondershare Filmora
Part 1: How to Create Stickers for WhatsApp
Whatsapp stickers are now a significant part of our daily conversations. Because let’s face it, life would be boring without them. Perhaps it’s time to up your game by learning how to add stickers to Whatsapp
Even though Whatsapp has a vast library of stickers available, creating a unique sticker is more fun. And the latest apps have made it incredibly easy to create customized stickers. So all you need to do now is learn how to use stickers in Whatsapp
Sticker Make for Whatsapp is one such app. It is free and requires no registrations. Download the app from Google Store and start creating hilarious stickers to surprise your friends.
1. Download Sticker Make and launch it. On the homepage, you will be presented with two options. Click Create to make a sticker from scratch using your own image or click on Animated to insert your picture in a sticker template.
2. Choose any image from your gallery. Crop it to the size and shape you wish to include. Use the Freehand tool or click Automatically to let the app crop a face itself.
3. Click Next and now erase the background or make careful cropping.
4. You can even outline your sticker and adjust its width and color.
5. You can even add texts and change fonts.
6. Click on the square in the bottom panel to choose from a list of cool backgrounds for your sticker.
7. Choose to add themed emojis or decorate using a variety of images in the library of Sticker Make. Once you are done, click Save, enter pack name, and click Ok.
(P.S Make sure that the stickers are precisely 512x512 pixels and no more than 100kb)
Part 2: How to Add Stickers to WhatsApp
Now, you must be wondering how to add stickers to Whatsapp. Let me ease your worry. In this part, I will walk you through a step-by-step guide on how to use stickers in Whatsapp and a few additional features too.
You can save the stickers you receive from other people-
- Click on the sticker you receive
- Tap Add to favorites
If you wish you get more exciting stickers to better express yourself-
- Open Whatsapp chat, either individual or group chat.
- Click on the emoji and then click the sticker beside GIF (the square shape)
- Tap on the + sign on the upper right corner of your keyboard.
- Here you choose to download any number of sticker packs or click Get More Stickers from Google Play.
- Tap the download sign beside the sticker pack to start downloading.
- Once the download is complete, it will be displayed among the other stickers in your list.
Other features:
- Clock sign- This sign has all the stickers you recently used
- Star sign- It contains your favorite stickers
- Heart- In this, there are several categories. Whatsapp automatically arranges all your stickers in these categories as happy, sad, romantic, etc.
Part 3: How to Send Stickers on WhatsApp
So far, you have learned to create a custom sticker and then how to use Whatsapp stickers. All credit goes to the apps that made this task cakewalk (and some credit goes to your creativity too). Now that the worst is over, you have come to the final and best part of our article.
In 3 quick steps, you will be able to learn how to add stickers to Whatsapp and surprise your friends with hilarious stickers.
1.Open individual or group chat.
2.Click on the emoji and then tap the stickers on the bottom panel.
3.Choose the sticker that best fits your mood and intention from the various categories. Click it and voila! Sent!
Easy peasy, right?
Bonus Tip—Add Sticker to Your Video with Wondershare Filmora
Although videos themselves are gripping enough, the addition of a customized sticker exclusive to you will be a cherry on top. Wondershare Filmora, with its user-friendly interface, is here just for that. You can now not only add your customized stickers to your video, but multiple effects can also be applied to enhance the video. Filmora is specially designed to offer professional editing tools to beginners. It has an in-built library of special effects and filters to help you create a stunningly cinematic video. Apply motion tracking, keyframe animations, or color match your videos. Add catchy captions or aesthetic filters to create a cool cinematic video
Let’s get right to it:
1.Download and install Filmora. Launch it. And click on Import-Import Media Files.
2. Then import your sticker into Filmora and drag and drop it to the video track or choose a sticker from the Elements (Note that both must be added to the video track).
3. Double-click on the sticker in the timeline to adjust the additional parameters. In Video, you can adjust the size or rotation of the sticker. Tap Color to adjust the tint, temperature, or saturation of the sticker. You can also add 3D motion to the sticker in the Motion.
4. And in the viewer panel, click on the sticker and drag it to adjust the size or change the location.
5. Click Export and save it to your computer in the desired resolution.
Ready to Create and Add Stickers?
Stickers have been around long enough to become boringly ordinary. So, to keep the fun side of texting alive, you can now master how to use stickers on Whatsapp after creating your own personalized stickers.
You can start being creative with Sticker Make for Whatsapp. And if you didn’t know how to add stickers in Whatsapp, by now, you must have mastered it (hopefully).
Last but not least, to stand out in a crowd, you need to bring to light something others can’t. Inserting custom-made stickers in your videos might do the trick. Decorate your videos with Wondershare Filmora and create impressive masterpieces. Take note from this ultimate guide on how to add stickers to Whatsapp and transform your texting experience.
Let the fun begin!
Shanoon Cox
Shanoon Cox is a writer and a lover of all things video.
Follow @Shanoon Cox
How Add Emojis/Stickers to Videos [on PC/Mac/Mobile/Online]
How to Add Emojis to Videos: The Ultimate Guide

Liza Brown
Mar 27, 2024• Proven solutions
The way we communicate has changed so much in the first two decades of the 21st century. In the late 1990s, when emojis were first introduced to the global market nobody could have guessed just how popular they are going to become. An emoji is an ideogram that is commonly used in electronic messages, but there are countless creative ways to incorporate them in the visual content you’re sharing to your Facebook account or your YouTube channel. Read on if you would like to find out how to add an emoji to a video you’re editing on a Mac, PC, iPhone or an Android device.
- Part 1: Add Animated Emojis to Videos in Flimora [3 Ways]
- Part 2: Add Animated Emojis & Stickers to Videos in iPhone for FREE
- Part 3: Add Animated Emojis to Videos in Android
- Part 4: Add Animated Emojis & Stickers to Videos Online
How to Add Animated Emojis to Videos in Flimora? [Windows & Mac]
Gamers, YouTubers and all other Mac and PC users who’d like to add a smiley or any other emoji to a video should try processing their footage with the Filmora video editor . Performing basic video editing tasks like cutting or trimming the footage, choosing a soundtrack for a video or adding an emoji to a single shot or an entire sequence can all be completed in just a couple of clicks. Here’s how you can add an emoji to a video clip in Filmora.
1. Use the Filmora’s Built-in Animated Emoji Library
Create a new project
Launch Filmora and then select the New Project option from the app’s welcome window. Afterward, you can set the project’s aspect ratio, frame rate and resolution from the Project Settings tab that can be accessed from the File drop-down menu. When done, you should proceed to import a video clip to which you want to add an emoji.
Place the Footage onto the Timeline
The media files you import into your projects in Filmora are located in the software’s Media Tab, and you can just drag them from the Media Tab and drop them onto a video track on the timeline. Remove all parts of the video clip you don’t want to use and head over to the Elements Tab that is located in the upper left corner of the screen.
Choose an Emoji
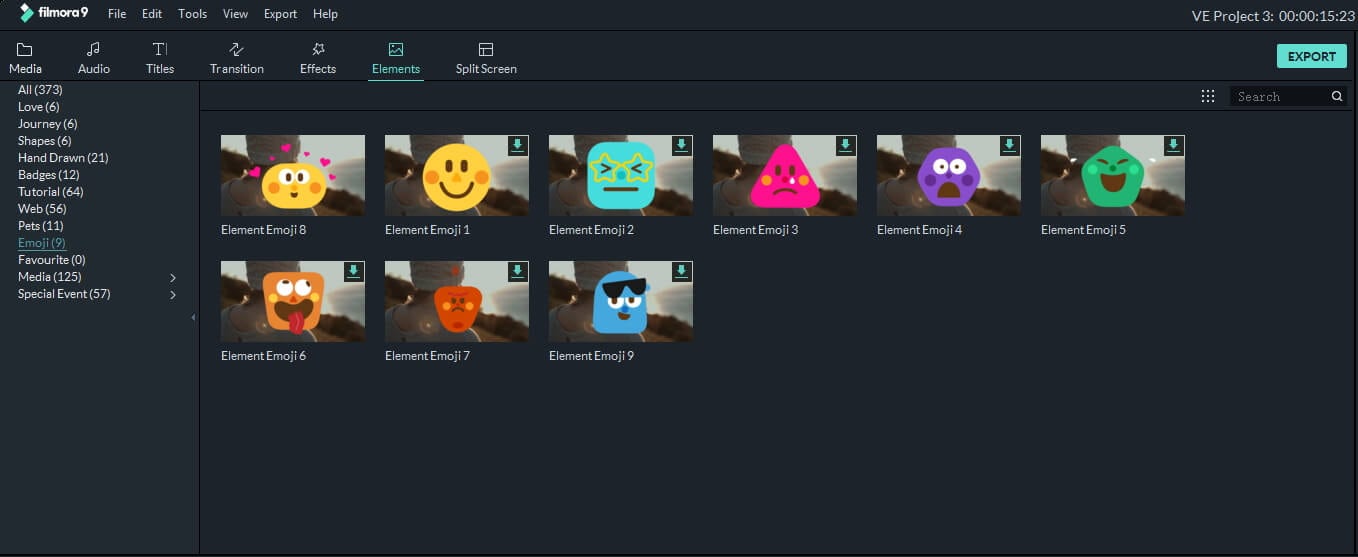
The Elements Tab contains different categories such as Shapes, Badges or Pets. Click on the Emoji category to start browsing through Filmora’s collection of emojis and simply drag and drop the emoji you like above the video clip to which you’d like to add it. You can then adjust its duration, position on the screen or size. Optionally, you can double-click on the emoji to access the Motion tab that enables you to choose between different motion effects.
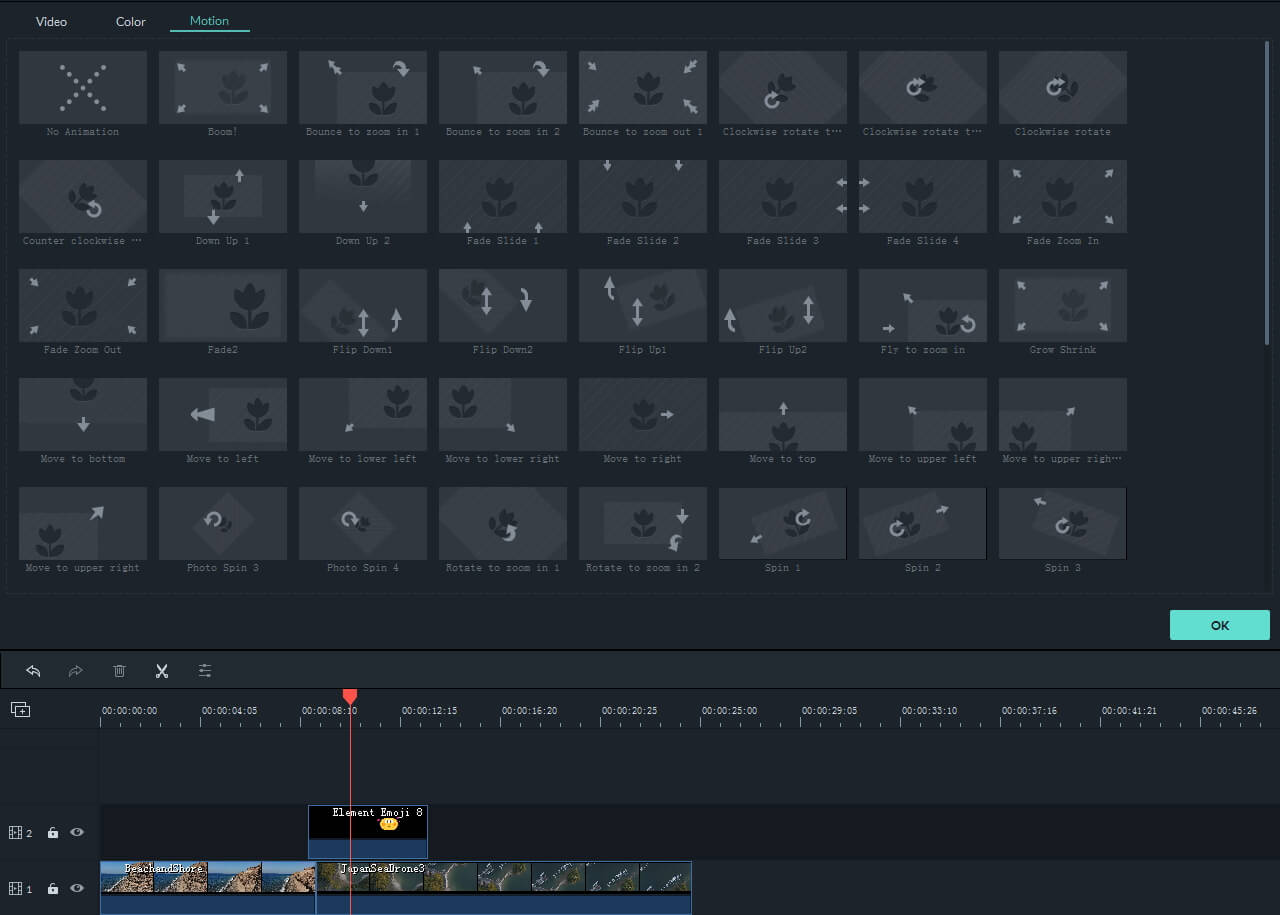
Export the Project
Preview the results by hitting the space button on your keyboard or clicking on the Play button that is located below the app’s preview window. In case you don’t want to make any more edits to the footage, you should click on the Export button and choose if you want to export your project to a hard drive on your computer or to your YouTube or Vimeo channel. Select the output file format, click on the Export and wait for the rendering process to be completed.
With Filmora video editor, you can also add animated texts and titles to video, or apply various elements such as hand drawn, badges and elements for tutorial. Click to learn more details about how to edit videos in Filmora .
2. Download Additional Animated Emojis from Filmostocks for Free
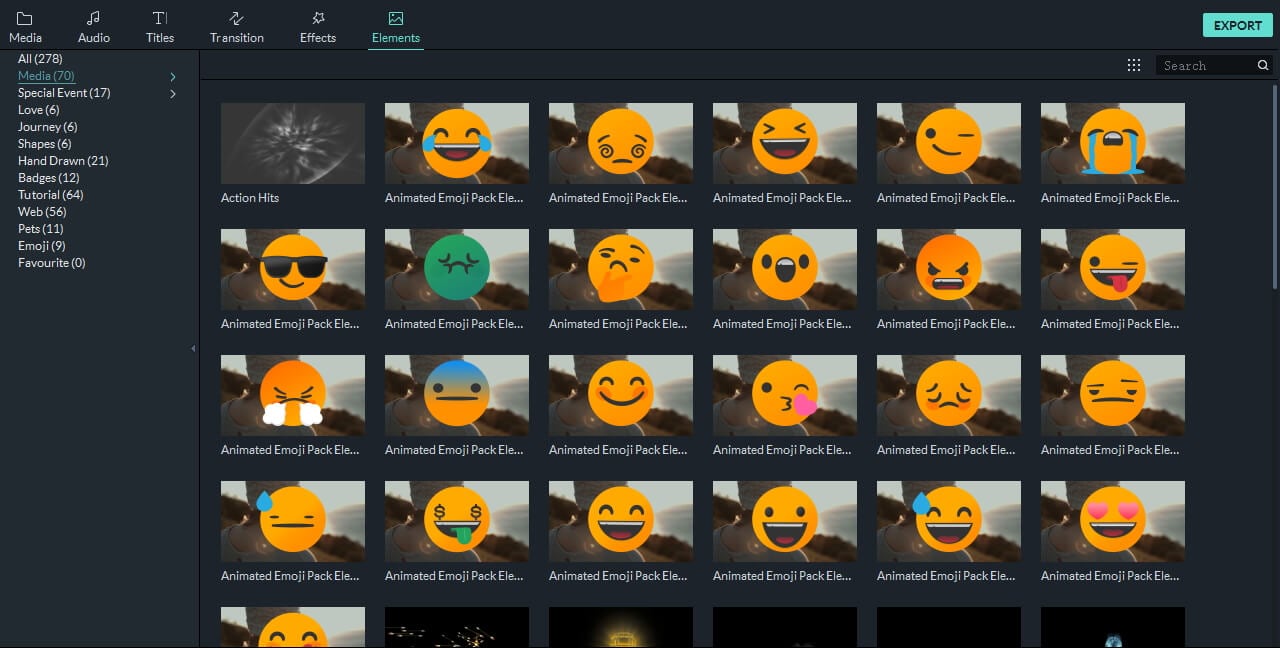
There are only nine emojis available in the Filmora’s built-in Emojis category, but you can easily broaden the range of emoji genres you have the access to by downloading the Animated Emoji Pack from Filmstock effects store . You don’t have to spend any additional money on this pack that contains 24 different emojis, but you must create an account on Filmstock before you can download the Animated Emoji Pack to your computer. The process of adding the emojis from this pack to videos is the same as the process of adding one of the emojis from the built-in Emojis category. Filmstock is so much more than an endless source of emojis for your videos since it offers a variety of visual and audio stock footage and visual effects. Even if you are using Adobe After Effects, you can also download and use some visual effects templates for AE.
3. Bonus: Animate Sticker and Emojis Your Download from Internet with Filmora
Instead of adding pre-animated ideograms to your videos, you can simply download a still image of a sticker or an emoji and animate it with Filmora. However, you should search for emojis that have a transparent background in order to blend it quicker with the source footage. Once you find a smiley or any other emoji you’d like to add to a video you should save it on your hard drive and import it into a project in Filmora.
You should then place the emoji at the exact spot on the timeline where you want it to appear in the final cut of the video. Double-click on the still image file and proceed to adjust its size or position from the Transform menu or choose a motion effect from the Motion tab. When done, commence the rendering process by clicking on the Export button. You can check our step guide about How to add picture to video to get more clues about that.
How to Add Emojis and Stickers to Videos on an iPhone
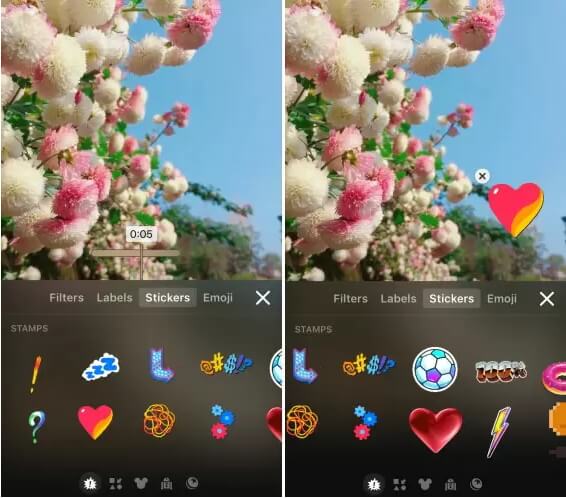
Waiting to edit the high-resolution videos you recorded with your iPhone on a computer is not always an option, because in certain situations you just want to polish a video you recorded and post it on social media as fast as you can. The Apple’s Clip app that can be downloaded for free from the AppStore seems to be a perfect solution for all iPhone users who want to add emojis to their videos before sharing them on Facebook, Instagram or any other popular social media networks.
The Clip app offers a rich selection of stickers and emojis that can be accessed by tapping on the icon that looks like a star within a circle. There are more than 30 emojis available, but you can also use the iPhone’s emoji keyboard to add emojis to videos in the Clip app. All of the app’s stickers and emojis are fully customizable, which means that you can change their size, screen position or insert text effortlessly. Once the video editing process is completed you can store a video on Dropbox or share it via AirDrop.
Best App for Adding Stickers and Emojis on Android Devices
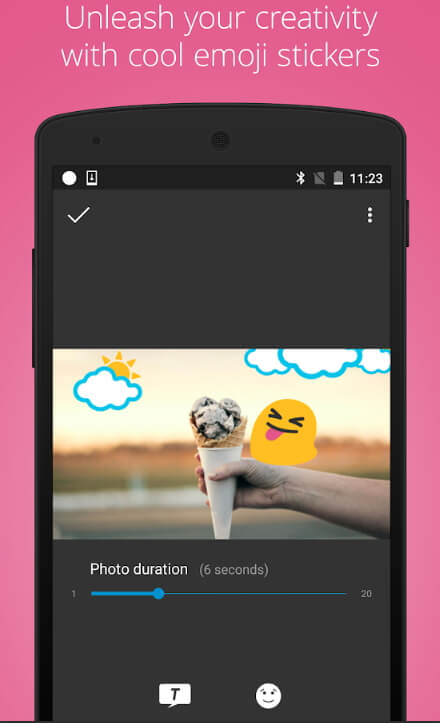
The WeVideo app for Android devices is equipped with all video editing tools you are going to need to produce a visually impressive video. In case you decide to purchase and install WeVideo on your phone, you will be able to cut, trim or arrange video clips as you see fit. The app also features a collection of emojis that can be added easily to all videos you decide to edit with it. The best part is that you can export all of your projects in 4K Ultra HD resolution and publish them to YouTube, Vimeo or Dropbox from the app so you don’t have to spend extra time on waiting for the file to be uploaded to the social media platform on which you want to share the video.
Using Kapwing Meme Maker to Add Stickers and Emojis Online
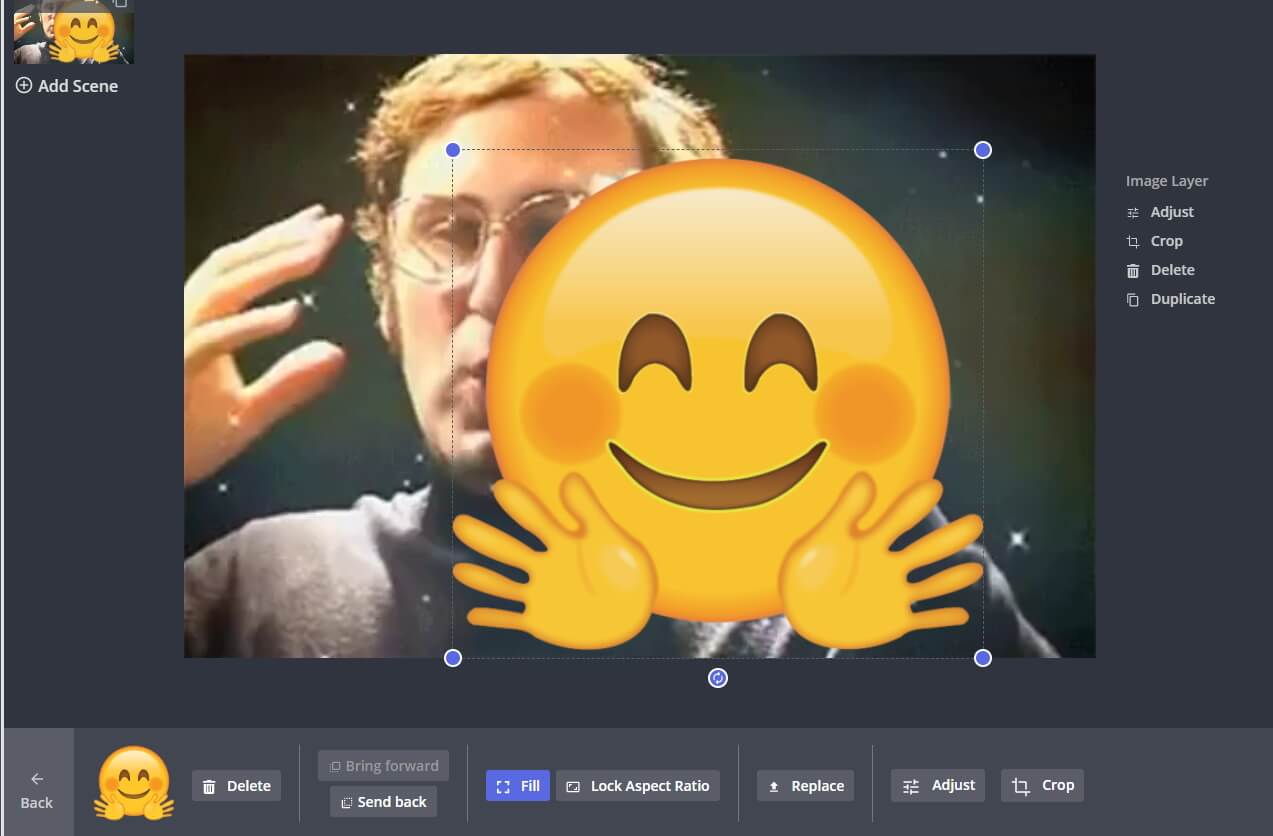
Web-based video editing platforms like Kapwing have been growing in popularity recently because they enable social media content creators to produce social media videos in a brief period of time. The Kapwing Meme Maker tool doesn’t feature any built-in stickers or emojis, so you must either upload a still image with a transparent ground to the platform or use its Text tool to add emojis to a video. Moreover, you won’t be able to animate the emojis you add to video clips with the Kapwing Meme Maker tool since the Kapwing platform doesn’t offer any animation tools. Despite this Kapwing is still one of the best online video editing platforms you can use to add emojis and stickers to videos.
A Few Tips to Help you Incorporate Emojis in Your Videos
Which emoji you are going to add to a video depends on factors that range from the topic of the video to the audience you are trying to reach. So, if you can’t find the emoji that fits perfectly to your video you should head over to emojipedia or any other website that lets you download thousands of emojis for free. You should keep in mind that emojis can have different meanings in different cultures, which is the reason why you must make sure that the emoji you’re adding to your video isn’t inappropriate or offensive in the context in which you’re using it. It is also worth noting that the emojis you download from the Internet should have a transparent background and that they should be saved in the PNG file format.
You may also like: Add Emojis to Videos on YouTube/Facebook/Snapchat [Step by Step Guide] >>
Conclusion
A single image overlay like an emoji can make your video more dynamic and more entertaining to watch, but you must discover creative and innovative ways to incorporate these visual elements into the story your video is telling. Each video editing app we presented in this article enables you to add emojis to videos in just a few easy steps, so you should choose the video editor that you feel most comfortable using. Do you add emojis to your videos often? Leave a comment below and share your favorite emojis with us.
Liza Brown
Liza Brown is a writer and a lover of all things video.
Follow @Liza Brown
Liza Brown
Mar 27, 2024• Proven solutions
The way we communicate has changed so much in the first two decades of the 21st century. In the late 1990s, when emojis were first introduced to the global market nobody could have guessed just how popular they are going to become. An emoji is an ideogram that is commonly used in electronic messages, but there are countless creative ways to incorporate them in the visual content you’re sharing to your Facebook account or your YouTube channel. Read on if you would like to find out how to add an emoji to a video you’re editing on a Mac, PC, iPhone or an Android device.
- Part 1: Add Animated Emojis to Videos in Flimora [3 Ways]
- Part 2: Add Animated Emojis & Stickers to Videos in iPhone for FREE
- Part 3: Add Animated Emojis to Videos in Android
- Part 4: Add Animated Emojis & Stickers to Videos Online
How to Add Animated Emojis to Videos in Flimora? [Windows & Mac]
Gamers, YouTubers and all other Mac and PC users who’d like to add a smiley or any other emoji to a video should try processing their footage with the Filmora video editor . Performing basic video editing tasks like cutting or trimming the footage, choosing a soundtrack for a video or adding an emoji to a single shot or an entire sequence can all be completed in just a couple of clicks. Here’s how you can add an emoji to a video clip in Filmora.
1. Use the Filmora’s Built-in Animated Emoji Library
Create a new project
Launch Filmora and then select the New Project option from the app’s welcome window. Afterward, you can set the project’s aspect ratio, frame rate and resolution from the Project Settings tab that can be accessed from the File drop-down menu. When done, you should proceed to import a video clip to which you want to add an emoji.
Place the Footage onto the Timeline
The media files you import into your projects in Filmora are located in the software’s Media Tab, and you can just drag them from the Media Tab and drop them onto a video track on the timeline. Remove all parts of the video clip you don’t want to use and head over to the Elements Tab that is located in the upper left corner of the screen.
Choose an Emoji
The Elements Tab contains different categories such as Shapes, Badges or Pets. Click on the Emoji category to start browsing through Filmora’s collection of emojis and simply drag and drop the emoji you like above the video clip to which you’d like to add it. You can then adjust its duration, position on the screen or size. Optionally, you can double-click on the emoji to access the Motion tab that enables you to choose between different motion effects.
Export the Project
Preview the results by hitting the space button on your keyboard or clicking on the Play button that is located below the app’s preview window. In case you don’t want to make any more edits to the footage, you should click on the Export button and choose if you want to export your project to a hard drive on your computer or to your YouTube or Vimeo channel. Select the output file format, click on the Export and wait for the rendering process to be completed.
With Filmora video editor, you can also add animated texts and titles to video, or apply various elements such as hand drawn, badges and elements for tutorial. Click to learn more details about how to edit videos in Filmora .
2. Download Additional Animated Emojis from Filmostocks for Free
There are only nine emojis available in the Filmora’s built-in Emojis category, but you can easily broaden the range of emoji genres you have the access to by downloading the Animated Emoji Pack from Filmstock effects store . You don’t have to spend any additional money on this pack that contains 24 different emojis, but you must create an account on Filmstock before you can download the Animated Emoji Pack to your computer. The process of adding the emojis from this pack to videos is the same as the process of adding one of the emojis from the built-in Emojis category. Filmstock is so much more than an endless source of emojis for your videos since it offers a variety of visual and audio stock footage and visual effects. Even if you are using Adobe After Effects, you can also download and use some visual effects templates for AE.
3. Bonus: Animate Sticker and Emojis Your Download from Internet with Filmora
Instead of adding pre-animated ideograms to your videos, you can simply download a still image of a sticker or an emoji and animate it with Filmora. However, you should search for emojis that have a transparent background in order to blend it quicker with the source footage. Once you find a smiley or any other emoji you’d like to add to a video you should save it on your hard drive and import it into a project in Filmora.
You should then place the emoji at the exact spot on the timeline where you want it to appear in the final cut of the video. Double-click on the still image file and proceed to adjust its size or position from the Transform menu or choose a motion effect from the Motion tab. When done, commence the rendering process by clicking on the Export button. You can check our step guide about How to add picture to video to get more clues about that.
How to Add Emojis and Stickers to Videos on an iPhone
Waiting to edit the high-resolution videos you recorded with your iPhone on a computer is not always an option, because in certain situations you just want to polish a video you recorded and post it on social media as fast as you can. The Apple’s Clip app that can be downloaded for free from the AppStore seems to be a perfect solution for all iPhone users who want to add emojis to their videos before sharing them on Facebook, Instagram or any other popular social media networks.
The Clip app offers a rich selection of stickers and emojis that can be accessed by tapping on the icon that looks like a star within a circle. There are more than 30 emojis available, but you can also use the iPhone’s emoji keyboard to add emojis to videos in the Clip app. All of the app’s stickers and emojis are fully customizable, which means that you can change their size, screen position or insert text effortlessly. Once the video editing process is completed you can store a video on Dropbox or share it via AirDrop.
Best App for Adding Stickers and Emojis on Android Devices
The WeVideo app for Android devices is equipped with all video editing tools you are going to need to produce a visually impressive video. In case you decide to purchase and install WeVideo on your phone, you will be able to cut, trim or arrange video clips as you see fit. The app also features a collection of emojis that can be added easily to all videos you decide to edit with it. The best part is that you can export all of your projects in 4K Ultra HD resolution and publish them to YouTube, Vimeo or Dropbox from the app so you don’t have to spend extra time on waiting for the file to be uploaded to the social media platform on which you want to share the video.
Using Kapwing Meme Maker to Add Stickers and Emojis Online
Web-based video editing platforms like Kapwing have been growing in popularity recently because they enable social media content creators to produce social media videos in a brief period of time. The Kapwing Meme Maker tool doesn’t feature any built-in stickers or emojis, so you must either upload a still image with a transparent ground to the platform or use its Text tool to add emojis to a video. Moreover, you won’t be able to animate the emojis you add to video clips with the Kapwing Meme Maker tool since the Kapwing platform doesn’t offer any animation tools. Despite this Kapwing is still one of the best online video editing platforms you can use to add emojis and stickers to videos.
A Few Tips to Help you Incorporate Emojis in Your Videos
Which emoji you are going to add to a video depends on factors that range from the topic of the video to the audience you are trying to reach. So, if you can’t find the emoji that fits perfectly to your video you should head over to emojipedia or any other website that lets you download thousands of emojis for free. You should keep in mind that emojis can have different meanings in different cultures, which is the reason why you must make sure that the emoji you’re adding to your video isn’t inappropriate or offensive in the context in which you’re using it. It is also worth noting that the emojis you download from the Internet should have a transparent background and that they should be saved in the PNG file format.
You may also like: Add Emojis to Videos on YouTube/Facebook/Snapchat [Step by Step Guide] >>
Conclusion
A single image overlay like an emoji can make your video more dynamic and more entertaining to watch, but you must discover creative and innovative ways to incorporate these visual elements into the story your video is telling. Each video editing app we presented in this article enables you to add emojis to videos in just a few easy steps, so you should choose the video editor that you feel most comfortable using. Do you add emojis to your videos often? Leave a comment below and share your favorite emojis with us.
Liza Brown
Liza Brown is a writer and a lover of all things video.
Follow @Liza Brown
Also read:
- [New] Detailed Methodology to Masterboard Use in Desktop/iOS/Android Zoom Sessions for 2024
- [Updated] 2024 Approved Speak with Ease Simple PUBG Sound Tweaks
- [Updated] Top Innovators Defining Next-Gen VR Experiences
- 10 Next-Gen Mobile Solutions Beyond OpenAI's GPT
- 2024 Approved 7 Free Apps to Get Emojis on Android and iPhone
- All You Need to Know Before The Launch of Samsung Galaxy Z Flip 6 - Pricing Info, Release Date & Feature Guide
- Encrypting External Hard Drives in Windows 11: Discover the Top Two Techniques
- How To Use Special Features - Virtual Location On Honor Magic 5 Lite? | Dr.fone
- In 2024, Top 12 Best Meme Makers Online for FREE
- Line Chat Review – A Deep Dive Into Its Performance & Security
- New Best 10 Free Manga Sites to Read Online for 2024
- Recupera Tutto Il Contenuto Eliminato: 3 Fasi per Restaurare Da Spambin -
- Updated How to Make a Photo Collage on Mac/iPhone Using iPhoto, In 2024
- Title: New In 2024, How to Make a iMovie Photo Slideshow with Music? IMovie Tutorial
- Author: Jan
- Created at : 2025-02-17 18:23:07
- Updated at : 2025-02-19 18:57:03
- Link: https://meme-emoji.techidaily.com/new-in-2024-how-to-make-a-imovie-photo-slideshow-with-music-imovie-tutorial/
- License: This work is licensed under CC BY-NC-SA 4.0.