
New How to Make Memes with White Background Step by Step
How to Make Memes with White Background Step by Step
How to Make Memes with White Background Step by Step

Ollie Mattison
Mar 27, 2024• Proven solutions
World seems fun and humorous, as we wake up to a variety of memes every day. Especially memes having captions are so cool and funny over the social media . A white background with your meme enhances the significance of captions over the video or image in the meme. So, if you too desire to know how to make memes with white background, you have hit the right spot.
In this article, we are going to explain you the detailed process of creating memes with white background. Stay tuned to explore!
- Part1: Create memes with white background by Filmora meme maker
- Part2: How to make memes with white background on phone
Part 1: Create memes with white background by Filmora meme maker
If you are curious enough to know how to make memes with white background online, then Filmora Meme Maker is the right choice for you. You don’t have to install or download any app or software. Just browse and edit the photo or video to create a white background meme and you are good to go. This meme maker can create photo, GIF and video memes alike for you. Moreover, you can add texts, alter fonts, font size and color as well as move the text anywhere in the meme.
This is a fast tool that runs straight on your browser and comes with a decoder and encoder. You can even directly add videos from URL by including the online link to this meme maker program. You can convert a video to a GIF meme with Filmora Meme Maker.
Here comes the detailed process for how to make memes with white background –
Step 1: First and foremost, browse for the official website of Filmora Online Meme Maker page. Drag and drop the desired image over here.

Step 2: On the meme editor page customize the background to white and then select tools from the left side panel to customize the meme further. Add texts, change color, font size and move the text around the background to position it appropriately and match your meme.

Step 3: When everything is as per your wish, click on the ‘CREATE’ button. It will ensure that the changes that you have made will be saved properly. If you are satisfied with the changes and want to go ahead with it, hit the ‘DOWNLOAD’ button.
Step 4: When the ‘DOWNLOAD’ button is pressed, the meme with black and white background is saved on your computer. You can now share it on Reddit, Instagram, Facebook, Twitter or any other social media platform of your choice.

Part 2: How to make memes with white background on phone
Among the various apps available in the market, we have considered PhotoGrid to make memes with white background. Both Play Store and iTunes can offer a good number of these apps to create memes having white background. Here, we are considering an Android phone for that matter.
Step by step guide for creating memes with white background –
Step 1: From the Play Store, download the app on your Android phone. Run the app on your mobile device and click on the ‘Grid’ for selecting the image that you wish to add to your meme.
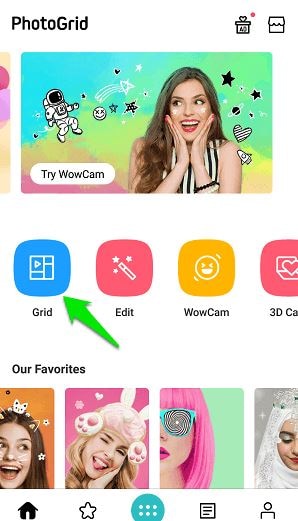
Step 2: When the picture is loaded on Photo Grid, you need to click on the ‘Background’ tab from the menu at the bottom. Pick white color from the menu over here, though usually it is selected by default.
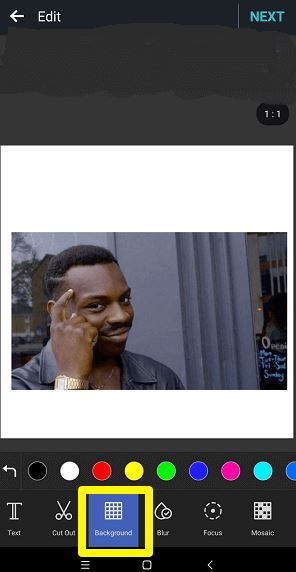
Step 3: Adjust the position and size of the image as you desire by pinching and zooming with your fingers. Once the position and dimensions are fixed as per your requirements, hit the ‘Text’ option. Enter the text you want to include in the meme and then click the ‘tick’ box.
Step 4: Your text is movable across the image area and is resizable as well using your fingers. You can alter the alignment, font, border, color etc. for every text you enter here.
Step 5: When everything else is sorted, press the ‘NEXT’ button on the top corner and hit ‘Save’. This is how to make memes with white background.
Using Photo Grid, you can also create video memes following the same guide as that of the photo memes. As everything is created in a square size, you can seamlessly use it on any social media platform including Reddit, Instagram, etc.
Conclusion
From this article, Filmora Meme Maker is one of the top meme makers in the market. Not only picture or GIF but video memes can also be done using this tool. As there is no need of downloading the software on your system or mobile, you save lot of time and space on your hard drive. We are hopeful that you are comfortable with how to make memes with white background using Filmora Meme Maker online.
Ollie Mattison
Ollie Mattison is a writer and a lover of all things video.
Follow @Ollie Mattison
Ollie Mattison
Mar 27, 2024• Proven solutions
World seems fun and humorous, as we wake up to a variety of memes every day. Especially memes having captions are so cool and funny over the social media . A white background with your meme enhances the significance of captions over the video or image in the meme. So, if you too desire to know how to make memes with white background, you have hit the right spot.
In this article, we are going to explain you the detailed process of creating memes with white background. Stay tuned to explore!
- Part1: Create memes with white background by Filmora meme maker
- Part2: How to make memes with white background on phone
Part 1: Create memes with white background by Filmora meme maker
If you are curious enough to know how to make memes with white background online, then Filmora Meme Maker is the right choice for you. You don’t have to install or download any app or software. Just browse and edit the photo or video to create a white background meme and you are good to go. This meme maker can create photo, GIF and video memes alike for you. Moreover, you can add texts, alter fonts, font size and color as well as move the text anywhere in the meme.
This is a fast tool that runs straight on your browser and comes with a decoder and encoder. You can even directly add videos from URL by including the online link to this meme maker program. You can convert a video to a GIF meme with Filmora Meme Maker.
Here comes the detailed process for how to make memes with white background –
Step 1: First and foremost, browse for the official website of Filmora Online Meme Maker page. Drag and drop the desired image over here.
Step 2: On the meme editor page customize the background to white and then select tools from the left side panel to customize the meme further. Add texts, change color, font size and move the text around the background to position it appropriately and match your meme.
Step 3: When everything is as per your wish, click on the ‘CREATE’ button. It will ensure that the changes that you have made will be saved properly. If you are satisfied with the changes and want to go ahead with it, hit the ‘DOWNLOAD’ button.
Step 4: When the ‘DOWNLOAD’ button is pressed, the meme with black and white background is saved on your computer. You can now share it on Reddit, Instagram, Facebook, Twitter or any other social media platform of your choice.
Part 2: How to make memes with white background on phone
Among the various apps available in the market, we have considered PhotoGrid to make memes with white background. Both Play Store and iTunes can offer a good number of these apps to create memes having white background. Here, we are considering an Android phone for that matter.
Step by step guide for creating memes with white background –
Step 1: From the Play Store, download the app on your Android phone. Run the app on your mobile device and click on the ‘Grid’ for selecting the image that you wish to add to your meme.
Step 2: When the picture is loaded on Photo Grid, you need to click on the ‘Background’ tab from the menu at the bottom. Pick white color from the menu over here, though usually it is selected by default.
Step 3: Adjust the position and size of the image as you desire by pinching and zooming with your fingers. Once the position and dimensions are fixed as per your requirements, hit the ‘Text’ option. Enter the text you want to include in the meme and then click the ‘tick’ box.
Step 4: Your text is movable across the image area and is resizable as well using your fingers. You can alter the alignment, font, border, color etc. for every text you enter here.
Step 5: When everything else is sorted, press the ‘NEXT’ button on the top corner and hit ‘Save’. This is how to make memes with white background.
Using Photo Grid, you can also create video memes following the same guide as that of the photo memes. As everything is created in a square size, you can seamlessly use it on any social media platform including Reddit, Instagram, etc.
Conclusion
From this article, Filmora Meme Maker is one of the top meme makers in the market. Not only picture or GIF but video memes can also be done using this tool. As there is no need of downloading the software on your system or mobile, you save lot of time and space on your hard drive. We are hopeful that you are comfortable with how to make memes with white background using Filmora Meme Maker online.
Ollie Mattison
Ollie Mattison is a writer and a lover of all things video.
Follow @Ollie Mattison
How to Burn Photos to DVD with Transitions and Music
How to Burn Photos to DVD with Transitions and Music

Shanoon Cox
Mar 27, 2024• Proven solutions
Photos are precious memories not only for you but also for your family members. As time goes on, the photos might fade out and be unable to retrieve. To avoid this, burn photos to DVD will be a great idea to preserve family memories eternally.
This article will show you how to burn photos to DVD Slideshow with transition, titles and music quickly and easily by using Wondershare DVD Slideshow Builder Deluxe . It also provides some tips on how to burn photos to DVD.
Part 1: How to Burn Photos to DVD with Transition, Titles and Music
Wondershare DVD Slideshow Builder Deluxe can help you quickly create and burn photos to DVD. Download the free trial version this photo DVD maker first.


Step 1. Add Photo or Video Files
In Organize tab, simply click the “Add Files” button to open the browse window, find your files and import them into the program, you can drag and drop photos or videos to organize them on storyboard. Click the Expand button to get a larger viewer.

Step 2. Customize Photo Slideshow Transitions
Generally speaking, transition effects will be automatically inserted between every two photos/videos when you import the photos. But you can customize them by clicking the Personalize tab, then drag and drop a transition from the list to the thumbnail between two slides.
You are also able to add background music here: click the Music button and choose a music file from your computer.

Step 3. Choose DVD Menu
Now switch to Create tab to author a DVD menu from template and burn to DVD disc quickly:
- On the right hand side of the screen, double click on desired menu template to apply a DVD menu template.
- Click the Edit button under the preview windows to customize your DVD menu or right click on menu for more options.
- You can also make a professional DVD menu using dynamic DVD menu templates.
BTW, if you don’t want a DVD menu, just check the “Disable DVD Menu” option.

Step 4. Burn Photos to DVD Disc
Now click the Preview button beneath the preview window to make sure the photo DVD slideshow is exactly what you want. Go back to Personalize tab to change if necessary. After that, click “Burn” button to start burning your DVD slideshow to DVD.
You can also output photo slideshow to watch on Youtube, Mobile Phone, iPhone, PSP, etc. through options on the left. Below are the instructions to burn DVD for watch on TV:

- Insert a blank DVD disc, and do the following.
- Click “Burn to DVD”. Then specify the number of DVD copies. You can also choose to generate ISO Image files or DVD Folders.
- Make sure the PAL or NTSC TV Standard settings is right. If you don’t know which standard is used in your country, click the “Help” button. The wrong TV standard would cause playback incompatibility problem.
- Then click “Start” to burn DVD slideshow. If you have checked Create DVD Folder and/or Create DVD Image File options, the corresponding files will also be created to the specified folder.
Now sit back and relax, when burning complete, insert the created DVD disc into your DVD player to watch photo DVD slideshow on TV.
Learn more: User Guide of DVD Slideshow Builder Deluxe
Part 2: More Photo to DVD Tips
More about NTSC/PAL TV Standard
Nowadays, there are three video formats around the world. But each one is incompatible with others. For instance, NTSC is used in North America, Canada and Japan; while most of other regions PAL/SECAM. To apply TV Standard in DVD Slideshow Builder Deluxe , go to “Create“ -> Option tab and locate TV Standard option to select NTSC or PAL. If you are not sure which one to choose, please click “Help” button, select your country, then click “OK” , the program will choose the right TV standard for you.
Burn Photos to DVD/CD as Data Disc
If you only want to burn photo to DVD for backup and further use, you only need a burning photo to DVD software like ImgBurn (Free) or Nero (commercial). These software helps you burn all digital media files to DVD, of course you can burn photos to DVD for backup purpose. Notice that some photo DVD maker allows you burn slideshow as well as the original photos. This way, you turn photos to DVD slideshow with transition, and at the same time, backup photos to DVD for other uses.
Scan Photos to DVD - Digitize Photos
If you use traditional camera and have got loads of photos in album, you can scan photos to computer so that convert photo to digital format. Afterwards, you can get more from these digital photos, like backup photos to DVD, send to others as DVD gift, make a photo DVD show to play on TV, etc. All these could be done with your favorite photo DVD maker software. Now see how to transform your printed photos to digital first:
Select a good photo scanner -> Prepare your photos to scan -> Start photo scanning -> Adjust scanned photos
Scanning printed photos to computer is not an easy job. It needs patience and some tips and tricks. As you may know, some companies provide photo scanning service. For the Step 4, you can also adjust digital photos in your selected photo DVD maker. Anyway, you need to get your digital photos ready before you burn photos to DVD with transitions and music.
Shanoon Cox
Shanoon Cox is a writer and a lover of all things video.
Follow @Shanoon Cox
Shanoon Cox
Mar 27, 2024• Proven solutions
Photos are precious memories not only for you but also for your family members. As time goes on, the photos might fade out and be unable to retrieve. To avoid this, burn photos to DVD will be a great idea to preserve family memories eternally.
This article will show you how to burn photos to DVD Slideshow with transition, titles and music quickly and easily by using Wondershare DVD Slideshow Builder Deluxe . It also provides some tips on how to burn photos to DVD.
Part 1: How to Burn Photos to DVD with Transition, Titles and Music
Wondershare DVD Slideshow Builder Deluxe can help you quickly create and burn photos to DVD. Download the free trial version this photo DVD maker first.
Step 1. Add Photo or Video Files
In Organize tab, simply click the “Add Files” button to open the browse window, find your files and import them into the program, you can drag and drop photos or videos to organize them on storyboard. Click the Expand button to get a larger viewer.
Step 2. Customize Photo Slideshow Transitions
Generally speaking, transition effects will be automatically inserted between every two photos/videos when you import the photos. But you can customize them by clicking the Personalize tab, then drag and drop a transition from the list to the thumbnail between two slides.
You are also able to add background music here: click the Music button and choose a music file from your computer.
Step 3. Choose DVD Menu
Now switch to Create tab to author a DVD menu from template and burn to DVD disc quickly:
- On the right hand side of the screen, double click on desired menu template to apply a DVD menu template.
- Click the Edit button under the preview windows to customize your DVD menu or right click on menu for more options.
- You can also make a professional DVD menu using dynamic DVD menu templates.
BTW, if you don’t want a DVD menu, just check the “Disable DVD Menu” option.
Step 4. Burn Photos to DVD Disc
Now click the Preview button beneath the preview window to make sure the photo DVD slideshow is exactly what you want. Go back to Personalize tab to change if necessary. After that, click “Burn” button to start burning your DVD slideshow to DVD.
You can also output photo slideshow to watch on Youtube, Mobile Phone, iPhone, PSP, etc. through options on the left. Below are the instructions to burn DVD for watch on TV:
- Insert a blank DVD disc, and do the following.
- Click “Burn to DVD”. Then specify the number of DVD copies. You can also choose to generate ISO Image files or DVD Folders.
- Make sure the PAL or NTSC TV Standard settings is right. If you don’t know which standard is used in your country, click the “Help” button. The wrong TV standard would cause playback incompatibility problem.
- Then click “Start” to burn DVD slideshow. If you have checked Create DVD Folder and/or Create DVD Image File options, the corresponding files will also be created to the specified folder.
Now sit back and relax, when burning complete, insert the created DVD disc into your DVD player to watch photo DVD slideshow on TV.
Learn more: User Guide of DVD Slideshow Builder Deluxe
Part 2: More Photo to DVD Tips
More about NTSC/PAL TV Standard
Nowadays, there are three video formats around the world. But each one is incompatible with others. For instance, NTSC is used in North America, Canada and Japan; while most of other regions PAL/SECAM. To apply TV Standard in DVD Slideshow Builder Deluxe , go to “Create“ -> Option tab and locate TV Standard option to select NTSC or PAL. If you are not sure which one to choose, please click “Help” button, select your country, then click “OK” , the program will choose the right TV standard for you.
Burn Photos to DVD/CD as Data Disc
If you only want to burn photo to DVD for backup and further use, you only need a burning photo to DVD software like ImgBurn (Free) or Nero (commercial). These software helps you burn all digital media files to DVD, of course you can burn photos to DVD for backup purpose. Notice that some photo DVD maker allows you burn slideshow as well as the original photos. This way, you turn photos to DVD slideshow with transition, and at the same time, backup photos to DVD for other uses.
Scan Photos to DVD - Digitize Photos
If you use traditional camera and have got loads of photos in album, you can scan photos to computer so that convert photo to digital format. Afterwards, you can get more from these digital photos, like backup photos to DVD, send to others as DVD gift, make a photo DVD show to play on TV, etc. All these could be done with your favorite photo DVD maker software. Now see how to transform your printed photos to digital first:
Select a good photo scanner -> Prepare your photos to scan -> Start photo scanning -> Adjust scanned photos
Scanning printed photos to computer is not an easy job. It needs patience and some tips and tricks. As you may know, some companies provide photo scanning service. For the Step 4, you can also adjust digital photos in your selected photo DVD maker. Anyway, you need to get your digital photos ready before you burn photos to DVD with transitions and music.
Shanoon Cox
Shanoon Cox is a writer and a lover of all things video.
Follow @Shanoon Cox
Best Emoji Removers to Remove Emojis From Pictures [Online/PC/Mobile]
Thanks to technology, editing photos have become easy. You can crop and rotate a photo, add filters, and even add emojis. While removing emojis is easy while you are editing an image and have not saved your work, but what if you have and want to get rid of the emojis you added to the picture? How to go about that?
So, if you want to remove an emoji from a picture and the picture is already saved, don’t worry; this post will help you learn about the top ways to remove it. Keep reading!
Related: How to Remove Unwanted Objects from Photo
In this article
01 Best Emoji Removers Online to Remove Emojis from Pictures
02 Best Emoji Removers on Windows/Mac Computer
03 Best Emoji Remover Apps on iPhone and Android
Part 1: Best Emoji Removers Online to Remove Emojis from Pictures
1. Inpaint
So, the first online emoji remover that you can try is Inpaint. This is a simple to use tool and will remove unwanted objects, such as emojis, from a picture by intelligently filling it with textures that match the surrounding image data.
The image formats Inpaint accepts are JPG, WebP, and PNG. Just remember to use only the recommended image formats, and you can start using them right away. You don’t need to log in or sign up to start using it.
Features
- An online tool that removes unwanted objects quickly.
- You don’t need to sign up or log in.
- It accepts JPG, PNG, and WebP formats.
- 4.2MP is the maximum image resolution.
Website: https://theinpaint.com/
2. Pixlr
The next popular online tool is Pixlr. Pixlr is a popular photo editing tool that allows you to fix your pictures as well. You can use the tool online either using your computer web browser or mobile.
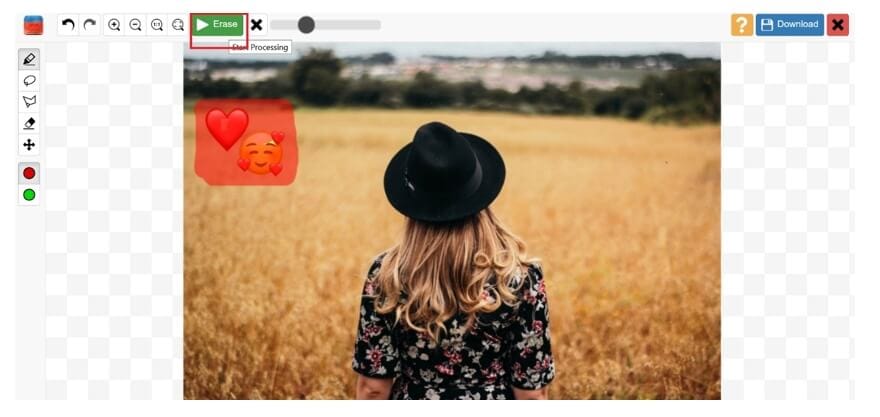
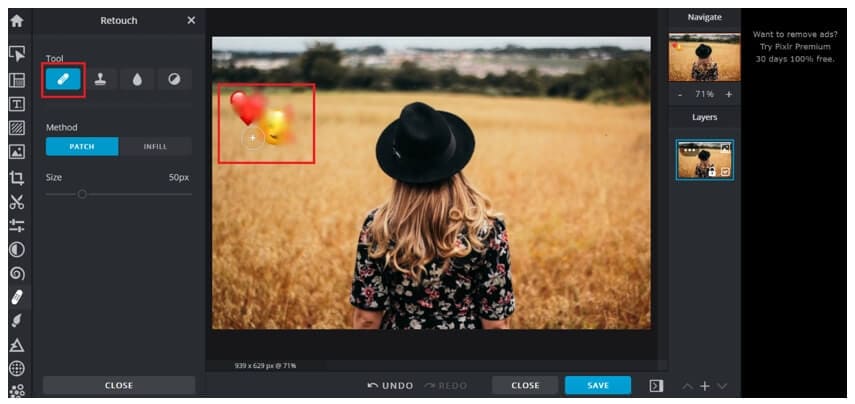
Whatever works for you. It doesn’t only let you remove emojis but erase background as well. But since you want to remove emojis, you will have to add the image and click on the retouch button from the toolbar. Then, you need to click on the image multiple times so that its surroundings overlap the emojis.
Features
- Pixlr can be used on both mobile and web browsers.
- Multiple photo editing tools are available.
- Removes emojis by blending them with the surroundings.
- Using Pixlr is easy and convenient.
Website: https://pixlr.com/
3. Fotor

Fotor is a professional photo editing tool, which lets you clone an emoji with a part of the image. The online tool asks you to sign up using your Google account to save your work. So, if you want to know how to remove emoji from a photo, you can use the clone feature.
Once you upload an image with emojis, move your cursor to the tool section in the left menu bar. Scroll down, and you will see the Clone option. Touch one part of the image that you want to use instead of the emoji. The first dot will be the area you want to clone and place the second dot on the emoji. And all done.
Website: https://www.fotor.com/
Features
- You can clone the emoji to remove it.
- A professional tool with lots of editing features.
- One needs to sign up or log in before using Fotor.
- The tool retains the original picture quality.
Related: Best Online Photo Editors
Part 2: Best Emoji Removers on Windows/Mac Computer
1. Adobe Photoshop
Adobe Photoshop is arguably one of the best photo editing tools that only allows you to enhance a photo but fix issues, such as removing emojis, unwanted objects, and so on. Adobe Photoshop is a professional tool and might not be the best for those new to it, but if you have used Adobe Photoshop earlier, you can use the Lasso Tool or the Marqueel Tool, which you will find on the left toolbar to remove emojis and unwanted items. Once done, save the image, and yes, the original picture quality will be retained.
Key Features
- A professional photo editing tool.
- It has multiple photo editing features and lets you remove emojis.
- You can draw on the emoji with a pen or pencil.
- It autosaves your work.
2. Wondershare Fotophire
Wondershare Fotophire is a fantastic photo editing tool that works magically on all kinds of images. Whether your photo is loaded with multiple emojis, you can remove them easily using Fotophire. If you are thinking about how to remove emojis from pictures using Fotophire, it’s pretty easy.
You need to clone any part of the image, and the tool will automatically use its algorithm to fill the emoji with its surroundings so that the filled area looks natural and blends well with the rest of the photo. Fotophire is a good option for both beginners and pros.
Key Features
- It removes all kinds of unwanted objects from an image, including emojis.
- Using Fotophire is easy and convenient.
- A good tool for both pros and beginners.
- Background doesn’t get impacted, and the original image quality remains intact.
3. GIMP
GIMP is a free and open-source photo editor, which allows you to remove emojis from a photo. It is available for Windows, macOS, GNU/Linux, and other operating systems. GIMP has been designed for everyone who would want their picture to look better.
If you wish to manipulate a high-quality image, you don’t have to worry about that because it accepts bigger-size photos as well. GIMP lets you clone an area and use that part on the emoji. You can also adjust the opacity of the cloned item depending on your requirements.
Key Features
- It lets you clone the surrounding area to hide an emoji.
- Accepts all the top image formats.
- It doesn’t pixelate the image after editing it.
- A free tool to use with lots of photo editing features.
4. Jihosoft Photo Eraser
Jihosoft Photo Eraser is a good photo editor tool that removes emojis or unwanted objects from an image by analyzing the surroundings. Once done, it will fill the selected emojis with the intelligently-generated textures. If you no longer want the emojis to be there is an image, Jihosoft Photo Eraser will be an ideal tool to use. The tool’s primary purpose is to remove unwanted items from an image, which is why it is an excellent software to go for.
Key Features
- It removes unwanted objects, such as emojis, from a photo.
- It allows the cloning of things to replace emojis.
- Using Jihosoft Photo Eraser is easy.
- The photo quality remains intact.
Part 3: Best Emoji Remover Apps on iPhone and Android
1. Snapseed
Snapseed is a photo editing app that is available for both iPhone and Android users. It has a masking feature, which lets you mask any object in a photo, including an emoji. Snapseed is a good tool to get rid of unwanted items from any image.
It has around 29 photo editing tools, which will help a user to enhance the photo quality. Using it is very easy because all the tools are readily available on the main screen. You just need to select the right tool and get started with the work.
Key Features
- It helps in removing emojis and unwanted objects from a photo.
- It works on both RAW and JPG files.
- It has multiple photo editing tools.
- Using Snapseed is easy.
2. AirBrush
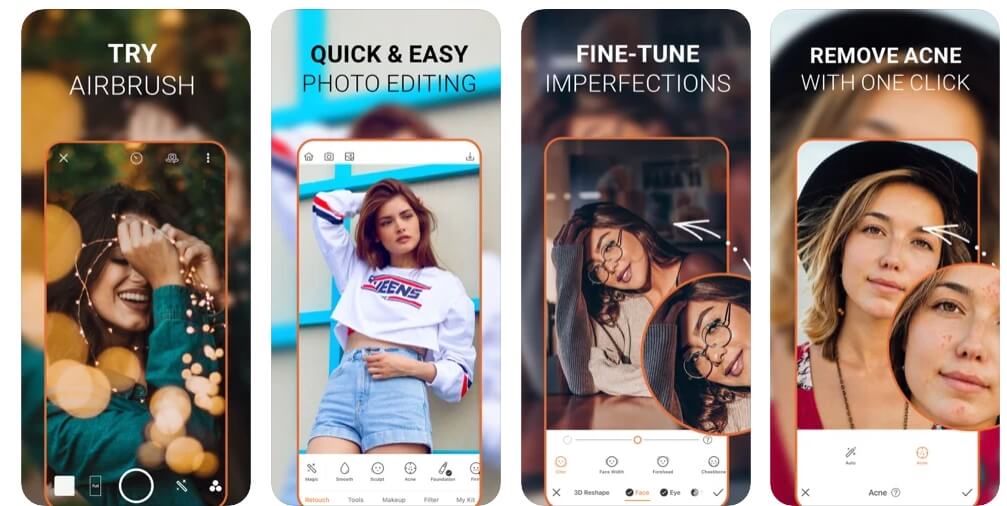
AirBrush is a leading photo editing tool for iPhone users and has a high rating of 4.9. The tool makes editing an image effortlessly. If you don’t want the emojis to ruin your photo, use AirBrush to deal with it quickly. Moreover, it lets you edit your photos further, for example, remove blemishes, make the image look smooth and glowing, add filters to give it a magical touch, and so much more! The tool has quite a lot of features that you will like.
Key Features
- It removes emojis and unwanted objects from an image.
- Using AirBrush is easy.
- It removes emojis quickly.
- It has many photo editing tools.
3. TouchRetouch
If you are looking for a professional photo editing tool that will let you do much more than just remove emojis, you should try TouchRetouch. You can use it to remove unwanted items, such as emojis, lines, blemishes, imperfections, and more.
It has a rating of 4.8, which is great looking at the kind of photo editing features TouchRetouch offers. No matter what objects you want to get rid of in your photo, TouchRetouch can let you do that easily.
Key Features
- It removes all kinds of unwanted objects quickly.
- It provides you with a single-flick line removal function.
- TouchRetouch is easy to use.
- It offers easy to understand tutorials.
FAQ About Removing Emojis from Pictures
How Do I Remove an Emoji from a Hidden Face?
It depends on the kind of tool you have picked. Typically, the tool will let you select the emoji and mask it with its surroundings to blend in well. So, let’s say you are on a dating site and you can’t see how the person looks like because they have hidden their face with an emoji.
In such a case, even if you use an emoji remover tool, it won’t show the actual face, instead replace it with the surrounding. Emoji removal tools are for personal use only.
Conclusion
So, now you know about the easy ways to remove emojis from pictures. Try any of the tools and remove unwanted objects and emojis from any photo you want. The tools that we have listed here are trusted by many and are easy to use.
02 Best Emoji Removers on Windows/Mac Computer
03 Best Emoji Remover Apps on iPhone and Android
Part 1: Best Emoji Removers Online to Remove Emojis from Pictures
1. Inpaint
So, the first online emoji remover that you can try is Inpaint. This is a simple to use tool and will remove unwanted objects, such as emojis, from a picture by intelligently filling it with textures that match the surrounding image data.
The image formats Inpaint accepts are JPG, WebP, and PNG. Just remember to use only the recommended image formats, and you can start using them right away. You don’t need to log in or sign up to start using it.
Features
- An online tool that removes unwanted objects quickly.
- You don’t need to sign up or log in.
- It accepts JPG, PNG, and WebP formats.
- 4.2MP is the maximum image resolution.
Website: https://theinpaint.com/
2. Pixlr
The next popular online tool is Pixlr. Pixlr is a popular photo editing tool that allows you to fix your pictures as well. You can use the tool online either using your computer web browser or mobile.
Whatever works for you. It doesn’t only let you remove emojis but erase background as well. But since you want to remove emojis, you will have to add the image and click on the retouch button from the toolbar. Then, you need to click on the image multiple times so that its surroundings overlap the emojis.
Features
- Pixlr can be used on both mobile and web browsers.
- Multiple photo editing tools are available.
- Removes emojis by blending them with the surroundings.
- Using Pixlr is easy and convenient.
Website: https://pixlr.com/
3. Fotor
Fotor is a professional photo editing tool, which lets you clone an emoji with a part of the image. The online tool asks you to sign up using your Google account to save your work. So, if you want to know how to remove emoji from a photo, you can use the clone feature.
Once you upload an image with emojis, move your cursor to the tool section in the left menu bar. Scroll down, and you will see the Clone option. Touch one part of the image that you want to use instead of the emoji. The first dot will be the area you want to clone and place the second dot on the emoji. And all done.
Website: https://www.fotor.com/
Features
- You can clone the emoji to remove it.
- A professional tool with lots of editing features.
- One needs to sign up or log in before using Fotor.
- The tool retains the original picture quality.
Related: Best Online Photo Editors
Part 2: Best Emoji Removers on Windows/Mac Computer
1. Adobe Photoshop
Adobe Photoshop is arguably one of the best photo editing tools that only allows you to enhance a photo but fix issues, such as removing emojis, unwanted objects, and so on. Adobe Photoshop is a professional tool and might not be the best for those new to it, but if you have used Adobe Photoshop earlier, you can use the Lasso Tool or the Marqueel Tool, which you will find on the left toolbar to remove emojis and unwanted items. Once done, save the image, and yes, the original picture quality will be retained.
Key Features
- A professional photo editing tool.
- It has multiple photo editing features and lets you remove emojis.
- You can draw on the emoji with a pen or pencil.
- It autosaves your work.
2. Wondershare Fotophire
Wondershare Fotophire is a fantastic photo editing tool that works magically on all kinds of images. Whether your photo is loaded with multiple emojis, you can remove them easily using Fotophire. If you are thinking about how to remove emojis from pictures using Fotophire, it’s pretty easy.
You need to clone any part of the image, and the tool will automatically use its algorithm to fill the emoji with its surroundings so that the filled area looks natural and blends well with the rest of the photo. Fotophire is a good option for both beginners and pros.
Key Features
- It removes all kinds of unwanted objects from an image, including emojis.
- Using Fotophire is easy and convenient.
- A good tool for both pros and beginners.
- Background doesn’t get impacted, and the original image quality remains intact.
3. GIMP
GIMP is a free and open-source photo editor, which allows you to remove emojis from a photo. It is available for Windows, macOS, GNU/Linux, and other operating systems. GIMP has been designed for everyone who would want their picture to look better.
If you wish to manipulate a high-quality image, you don’t have to worry about that because it accepts bigger-size photos as well. GIMP lets you clone an area and use that part on the emoji. You can also adjust the opacity of the cloned item depending on your requirements.
Key Features
- It lets you clone the surrounding area to hide an emoji.
- Accepts all the top image formats.
- It doesn’t pixelate the image after editing it.
- A free tool to use with lots of photo editing features.
4. Jihosoft Photo Eraser
Jihosoft Photo Eraser is a good photo editor tool that removes emojis or unwanted objects from an image by analyzing the surroundings. Once done, it will fill the selected emojis with the intelligently-generated textures. If you no longer want the emojis to be there is an image, Jihosoft Photo Eraser will be an ideal tool to use. The tool’s primary purpose is to remove unwanted items from an image, which is why it is an excellent software to go for.
Key Features
- It removes unwanted objects, such as emojis, from a photo.
- It allows the cloning of things to replace emojis.
- Using Jihosoft Photo Eraser is easy.
- The photo quality remains intact.
Part 3: Best Emoji Remover Apps on iPhone and Android
1. Snapseed
Snapseed is a photo editing app that is available for both iPhone and Android users. It has a masking feature, which lets you mask any object in a photo, including an emoji. Snapseed is a good tool to get rid of unwanted items from any image.
It has around 29 photo editing tools, which will help a user to enhance the photo quality. Using it is very easy because all the tools are readily available on the main screen. You just need to select the right tool and get started with the work.
Key Features
- It helps in removing emojis and unwanted objects from a photo.
- It works on both RAW and JPG files.
- It has multiple photo editing tools.
- Using Snapseed is easy.
2. AirBrush
AirBrush is a leading photo editing tool for iPhone users and has a high rating of 4.9. The tool makes editing an image effortlessly. If you don’t want the emojis to ruin your photo, use AirBrush to deal with it quickly. Moreover, it lets you edit your photos further, for example, remove blemishes, make the image look smooth and glowing, add filters to give it a magical touch, and so much more! The tool has quite a lot of features that you will like.
Key Features
- It removes emojis and unwanted objects from an image.
- Using AirBrush is easy.
- It removes emojis quickly.
- It has many photo editing tools.
3. TouchRetouch
If you are looking for a professional photo editing tool that will let you do much more than just remove emojis, you should try TouchRetouch. You can use it to remove unwanted items, such as emojis, lines, blemishes, imperfections, and more.
It has a rating of 4.8, which is great looking at the kind of photo editing features TouchRetouch offers. No matter what objects you want to get rid of in your photo, TouchRetouch can let you do that easily.
Key Features
- It removes all kinds of unwanted objects quickly.
- It provides you with a single-flick line removal function.
- TouchRetouch is easy to use.
- It offers easy to understand tutorials.
FAQ About Removing Emojis from Pictures
How Do I Remove an Emoji from a Hidden Face?
It depends on the kind of tool you have picked. Typically, the tool will let you select the emoji and mask it with its surroundings to blend in well. So, let’s say you are on a dating site and you can’t see how the person looks like because they have hidden their face with an emoji.
In such a case, even if you use an emoji remover tool, it won’t show the actual face, instead replace it with the surrounding. Emoji removal tools are for personal use only.
Conclusion
So, now you know about the easy ways to remove emojis from pictures. Try any of the tools and remove unwanted objects and emojis from any photo you want. The tools that we have listed here are trusted by many and are easy to use.
Generating the Nut Button Meme
Generating the Nut Button Meme
Ollie Mattison
Mar 27, 2024• Proven solutions
Generating the Nut Button Meme
The Nut Button meme started out as an immature joke, with a word ‘Nut’ written across a blue button, and for a number of years, this meme was used mostly for bad sex jokes. However, the meme has evolved through the years and meme makers from around the world use it to make social media, gaming and countless other types of jokes.
Commonly, the Nut Button meme suggests that a person, in many cases the creator of the meme, likes doing something in certain types of situations, like listening to crappy music when they feel down or taking revenge on their enemies when they have the opportunity. Generating this type of meme doesn’t require too much effort as it often contains one word. Some versions of this meme include the motive that prompts the hand in the meme to push the button, but using this element of the meme is optional.
A Few Good Examples of the Nut Button Meme
Taking the first concept that comes to your mind won’t necessarily make this meme as effective as you’d like it to be, so you have to think carefully which button the hand is going to hit.
Hitting the Divorce button can be a painful process in real life, but it can also be an endless source of fun if the reason why the hand hits it is so ridiculous that it could never be an actual reason for a divorce.
This meme can also be used to make fun of world leaders and their bad decisions or pop-culture figures that often do ill-advised things.

The elements of the Nut meme are always the same, although their topics can vary because the hand and the blue button are irreplaceable parts of this meme.
Generating the Nut Button Meme
We suggest using Filmora Online Meme Maker to generate your meme because this online tool lets you create memes without watermarks for free. What’s more, you don’t even have to sign up in order to make a meme from images, GIFs or videos.
Step 1 – Uploading the Meme Template
You can click the “Copy the image” link below and the image link will be copied automatically.
![]()
Copy the image
After arriving at Filmora Online Meme Maker ‘s home page, you’ll be asked to upload the image. Paste the image’s URL into the Enter a URL box. After uploading a picture from your computer, you’ll be asked if you would like to crop, flip or rotate it. Click on the OK button to confirm the changes you’ve made and proceed to the next step of the process.

Step 2 – Adding Text to the Image
When a new page loads you will get access to all tools Filmora Online Meme Maker offers. Make sure that the Text Inside option is selected, since on nearly all examples of this meme the text is positioned within the image.

Insert the text into the text boxes, and reposition it on the picture so it is placed between the blue button and hand. You can add as many text boxes as you want to the picture, but Nut Button memes commonly include just one or two lines of text.

The color of the text, size, and font can all be changed in the Text Options menu, so before hitting the Create button you can experiment with these tools in order to generate a better meme.
Step 3 – Saving the Meme
Finally, click on the download button, and when a new page loads and you’re ready to share your new Nut Button meme on social media.

The Filmora Online Meme Maker is mobile friendly, which means that you can use this platform to make memes from your Smartphone.
Conclusion
The Nut Button meme can be used in a wide array of different contexts, and it is up to you which one you’re going to use. You can mock stereotypical answers to questions, world leaders or make a joke at your own expense. Whichever topic you choose, the Filmora Online Meme Maker will help you express your creativity fully. What is your favorite Nut Button meme? Leave a comment below and let us know.
Ollie Mattison
Ollie Mattison is a writer and a lover of all things video.
Follow @Ollie Mattison
Ollie Mattison
Mar 27, 2024• Proven solutions
Generating the Nut Button Meme
The Nut Button meme started out as an immature joke, with a word ‘Nut’ written across a blue button, and for a number of years, this meme was used mostly for bad sex jokes. However, the meme has evolved through the years and meme makers from around the world use it to make social media, gaming and countless other types of jokes.
Commonly, the Nut Button meme suggests that a person, in many cases the creator of the meme, likes doing something in certain types of situations, like listening to crappy music when they feel down or taking revenge on their enemies when they have the opportunity. Generating this type of meme doesn’t require too much effort as it often contains one word. Some versions of this meme include the motive that prompts the hand in the meme to push the button, but using this element of the meme is optional.
A Few Good Examples of the Nut Button Meme
Taking the first concept that comes to your mind won’t necessarily make this meme as effective as you’d like it to be, so you have to think carefully which button the hand is going to hit.
Hitting the Divorce button can be a painful process in real life, but it can also be an endless source of fun if the reason why the hand hits it is so ridiculous that it could never be an actual reason for a divorce.
This meme can also be used to make fun of world leaders and their bad decisions or pop-culture figures that often do ill-advised things.
The elements of the Nut meme are always the same, although their topics can vary because the hand and the blue button are irreplaceable parts of this meme.
Generating the Nut Button Meme
We suggest using Filmora Online Meme Maker to generate your meme because this online tool lets you create memes without watermarks for free. What’s more, you don’t even have to sign up in order to make a meme from images, GIFs or videos.
Step 1 – Uploading the Meme Template
You can click the “Copy the image” link below and the image link will be copied automatically.
![]()
Copy the image
After arriving at Filmora Online Meme Maker ‘s home page, you’ll be asked to upload the image. Paste the image’s URL into the Enter a URL box. After uploading a picture from your computer, you’ll be asked if you would like to crop, flip or rotate it. Click on the OK button to confirm the changes you’ve made and proceed to the next step of the process.
Step 2 – Adding Text to the Image
When a new page loads you will get access to all tools Filmora Online Meme Maker offers. Make sure that the Text Inside option is selected, since on nearly all examples of this meme the text is positioned within the image.
Insert the text into the text boxes, and reposition it on the picture so it is placed between the blue button and hand. You can add as many text boxes as you want to the picture, but Nut Button memes commonly include just one or two lines of text.
The color of the text, size, and font can all be changed in the Text Options menu, so before hitting the Create button you can experiment with these tools in order to generate a better meme.
Step 3 – Saving the Meme
Finally, click on the download button, and when a new page loads and you’re ready to share your new Nut Button meme on social media.
The Filmora Online Meme Maker is mobile friendly, which means that you can use this platform to make memes from your Smartphone.
Conclusion
The Nut Button meme can be used in a wide array of different contexts, and it is up to you which one you’re going to use. You can mock stereotypical answers to questions, world leaders or make a joke at your own expense. Whichever topic you choose, the Filmora Online Meme Maker will help you express your creativity fully. What is your favorite Nut Button meme? Leave a comment below and let us know.
Ollie Mattison
Ollie Mattison is a writer and a lover of all things video.
Follow @Ollie Mattison
How to Make a Video for Your Baby’s First Year
How to Make an Adorable Video for Your Baby’s First Year
Ollie Mattison
Mar 27, 2024• Proven solutions
Your baby grows up very fast and being able to see him grow is maybe one of the most interesting and exciting moments in your life. Documenting the first year is amazing and it will surely offer you an extraordinary value so try to do that the best way you can. Imagine how touched your child would be when he/she, at the age of 18, watch something like this:
How to make the baby’s first year video
Filming tips
Shooting a good baby’s first year video can take a little bit of preparation and it will surely offer you an extraordinary experience in the long run. It will also help offer you an incredible value to begin with which is always impressive.
Stabilize the camera - The first thing you need to do is to stabilize the camera. Using a tripod can be the best option here so take your time and results will be great for sure. Of course, placing the camera on your counter will also help, so try to keep that in mind as it can indeed be a very good option to begin with.
Lighting - You will also have to play with the proper lighting setup. A good light will help you get much better results and even though it can take some time to get the best experience, it really is a truly amazing option that you do not want to miss.
Focus - Of course, focus on the baby. Yes, focus but don’t zoom in and out all the time. Find a good pattern that will help keep the baby steady and do all in your power to get the best results. Granted, it will take some time to get good results but don’t rush it otherwise the experience will not be as good as you would expect.
Audio - Moreover, audio should be your focus here as well. Take the time and do something good here, a good audio will always pay off very well so get a good audio setup if you want to obtain a stellar experience.
Props - Also, we recommend you to use props. These can really make a good video and they will even add in some much needed fun to your setup. Try to find the best possible props and add them in your video. Some good prop examples would be a stuffed animal, a toy, maybe even the family pet. All of these are great and well worth your time.
Editing tips
Once you finished capturing the movie, you will have to go to editing. This is where you have to use a good video editing tool that will help provide a good baby’s first year video in the end. With that in mind, Wondershare Filmora can be the tool of choice as it offers you all the features you need in order to create a good baby video.
=“” style=”width: 100%; height: 278.438px;”;
 Download Mac Version ](https://tools.techidaily.com/wondershare/filmora/download/ )
Adjust saturation - You should try to use the app in order to adjust the saturation as this can lead to some very bad results if you’re not careful. Find the proper saturation levels and opt for them right away.
Trim, cut, or split - If needed, split, cut or even trim the video. There will be times when you will need the reversing effect as well. All of these effects are accessible via the Wondershare Filmora video app.
Advanced editing - Plus, you will also need to apply a green screen effect as this will help you place your baby in a variety of funny locations, be it a funny MV or a Hollywood movie. The app can also help you clone the baby with PIP effects and you can also use it to add filters, overlays or text.
Wondershare Filmora will offer you an extraordinary set of tools and it will bring in front a very good value right from the start. The interface of the app is user friendly and you will have no problem using it as you see fit. Also, you can create the baby’s first year video on both Mac and Windows as the app supports both platforms. It also delivers immediate support for camcorders and smartphones so you can use any device you want for video capture. With its help you can share videos to DVD or YouTube too if you so desire. Don’t hesitate and access this great tool as fast as possible to get a good outcome!
Ollie Mattison
Ollie Mattison is a writer and a lover of all things video.
Follow @Ollie Mattison
Ollie Mattison
Mar 27, 2024• Proven solutions
Your baby grows up very fast and being able to see him grow is maybe one of the most interesting and exciting moments in your life. Documenting the first year is amazing and it will surely offer you an extraordinary value so try to do that the best way you can. Imagine how touched your child would be when he/she, at the age of 18, watch something like this:
How to make the baby’s first year video
Filming tips
Shooting a good baby’s first year video can take a little bit of preparation and it will surely offer you an extraordinary experience in the long run. It will also help offer you an incredible value to begin with which is always impressive.
Stabilize the camera - The first thing you need to do is to stabilize the camera. Using a tripod can be the best option here so take your time and results will be great for sure. Of course, placing the camera on your counter will also help, so try to keep that in mind as it can indeed be a very good option to begin with.
Lighting - You will also have to play with the proper lighting setup. A good light will help you get much better results and even though it can take some time to get the best experience, it really is a truly amazing option that you do not want to miss.
Focus - Of course, focus on the baby. Yes, focus but don’t zoom in and out all the time. Find a good pattern that will help keep the baby steady and do all in your power to get the best results. Granted, it will take some time to get good results but don’t rush it otherwise the experience will not be as good as you would expect.
Audio - Moreover, audio should be your focus here as well. Take the time and do something good here, a good audio will always pay off very well so get a good audio setup if you want to obtain a stellar experience.
Props - Also, we recommend you to use props. These can really make a good video and they will even add in some much needed fun to your setup. Try to find the best possible props and add them in your video. Some good prop examples would be a stuffed animal, a toy, maybe even the family pet. All of these are great and well worth your time.
Editing tips
Once you finished capturing the movie, you will have to go to editing. This is where you have to use a good video editing tool that will help provide a good baby’s first year video in the end. With that in mind, Wondershare Filmora can be the tool of choice as it offers you all the features you need in order to create a good baby video.
=“” style=”width: 100%; height: 278.438px;”;
Download Mac Version ](https://tools.techidaily.com/wondershare/filmora/download/ )
Adjust saturation - You should try to use the app in order to adjust the saturation as this can lead to some very bad results if you’re not careful. Find the proper saturation levels and opt for them right away.
Trim, cut, or split - If needed, split, cut or even trim the video. There will be times when you will need the reversing effect as well. All of these effects are accessible via the Wondershare Filmora video app.
Advanced editing - Plus, you will also need to apply a green screen effect as this will help you place your baby in a variety of funny locations, be it a funny MV or a Hollywood movie. The app can also help you clone the baby with PIP effects and you can also use it to add filters, overlays or text.
Wondershare Filmora will offer you an extraordinary set of tools and it will bring in front a very good value right from the start. The interface of the app is user friendly and you will have no problem using it as you see fit. Also, you can create the baby’s first year video on both Mac and Windows as the app supports both platforms. It also delivers immediate support for camcorders and smartphones so you can use any device you want for video capture. With its help you can share videos to DVD or YouTube too if you so desire. Don’t hesitate and access this great tool as fast as possible to get a good outcome!
Ollie Mattison
Ollie Mattison is a writer and a lover of all things video.
Follow @Ollie Mattison
How to Make an Emoji of Yourself on Android and iPhone [Emoji Yourself]
How to Make an Emoji of Yourself on Android and iPhone [Emoji Yourself]
Shanoon Cox
Mar 27, 2024• Proven solutions

The introduction of stickers and emojis have transformed the texting experience—no more boring texts. Just make an emoji of yourself in every mood and instantly express yourself in a better and funnier way.
Whether you own an iPhone or an Android device, you can easily emoji yourself that exactly mimics your appearance and reaction. It’s time to up your chatting game and make exciting emojis.
In this article, we will show you how to amaze your friends by teaching you to make an emoji of yourself in no time.
Part 1: Make an Emoji of Yourself on iPhone
iPhone has now introduced a fun feature that lets you make an emoji of yourself, the exact mirror image of you, just smaller and animated.
Here’s how you can make an emoji of yourself in 2 easy ways:
Method 1-By the iPhone Message app
iPhone has now introduced an in-built feature to let you make an emoji of yourself without having to download any other apps. However, you can only make an emoji of yourself in iOS 13 or later.
For the lucky lot of you, let me walk you through how to make an emoji of yourself in a few simple steps:
1.Open your iMessages. Go to a previous chat or tap the New Message Make sure your Appstore icon is toggled on to display the app tray. Hit the Animoji icon, represented by the monkey. Swipe to find the + plus sign for New Memoji to emoji yourself.

2.Now you can make an emoji of yourself by adding even the smallest details. Start by selecting your skin color. You can even add freckles or adjust your skin color’s warmth or paleness with a slider.

3.Hairstyle-Select the style that mimics the real you or goes for your dream hair-do.

4.Head Shape-Select the age group from kids, adults, old, and your face cut by choosing the chin that best fits you.

5.Nose & Lips- After selecting your eye color, shape, and brows, choose a nose shape and a lipstick color and intensity.

6.Eyewear/Headwear-Add glasses, adjust tint shade, color, and choose a hat, cap, or turban as you like. Finally, click Done to save the emoji.

Method 2-Using the Avatoon app
If you want to make an emoji of yourself that is more fun and personalized, from your dress to your pose, Avatoon is your way to go. With more than 500 customizable options, Avatoon lets you make an emoji of yourself meticulously, allowing you add avid details that pave the way for a hilariously amazing texting experience
1.Install and launch Avatoon app.
2.Now, choose the face shape that best matches your features and also select your face color. Add freckles(if you have any).

3.Next up is the hairstyle. There is a range of hairstyles from straight to wavy. Pick one you like best. You can choose the eye shape, color, brow, nose, lips, and finally, add some funky or formal eyewear to complete the look. Press Save.
4.After you make an emoji of yourself, you can further fine-tune it by adding detailed features and accessories using coins. Choose a stylish dress for your avatar from the Clothes tab or add a fun background.
5.Click on Photoboothto fit your emoji in a themed photo for an event or celebration.
6.Click on Poses and select your pose and share directly to any social media platform or save to phone.
Part 2: Make an Emoji of Yourself on Android
Now you can make an emoji of yourself even on an Android phone with the Mirror emoji app. Take your texting experience to the next level. Quickly make an emoji of yourself and wow your friends and family with the cute mini version of yourself.
1.Install and launch Mirror. Now, to make an emoji of yourself for your current look, take a selfie or click the gallery icon to choose an existing image to emoji yourself.

2.Click the left one to make an original avatar or the right one if you wish to make an emoji of yourself as an anime. Click Next.

3.Now, customize your emoji. Add a hairstyle, choose your glasses, cap, headphones, turban, scarf, or even devil horns.

4.Customize your dress color to your liking. Then, click Next.

5.Once you make an emoji of yourself, Mirror will display a range of fun stickers for instant sharing.

6.Click on any sticker, choose a mood using the emojis displayed and click to share or save to the device.

7.In the Sticker backstab, choose a themed sticker set and click Add to WhatsApp.

Conclusion-Ready to Emoji Yourself?
With texts being taken over by stickers and emojis, it’s high time for you to enter the league. Make an emoji of yourself in different moods and add funny backgrounds to express yourself fully and hilariously.
Use the in-built iPhone feature or a powerful app to make an emoji of yourself stand out from the crowd of mainstream messages. And take inspiration from our guide to surprise your friends with an emoji that looks exactly like you, just a bit smaller.
Here, we recommend Wondershare Filmora , due to its AR camera feature, which makes taking selfies more interesting. This AR camera function includes animoji and memoji avatars for a fun and excellent video.
Go on and make an emoji of yourself. Show your friends how awesome and unique you are with a beautifully personalized emoji.
Good luck!
Shanoon Cox
Shanoon Cox is a writer and a lover of all things video.
Follow @Shanoon Cox
Shanoon Cox
Mar 27, 2024• Proven solutions
The introduction of stickers and emojis have transformed the texting experience—no more boring texts. Just make an emoji of yourself in every mood and instantly express yourself in a better and funnier way.
Whether you own an iPhone or an Android device, you can easily emoji yourself that exactly mimics your appearance and reaction. It’s time to up your chatting game and make exciting emojis.
In this article, we will show you how to amaze your friends by teaching you to make an emoji of yourself in no time.
Part 1: Make an Emoji of Yourself on iPhone
iPhone has now introduced a fun feature that lets you make an emoji of yourself, the exact mirror image of you, just smaller and animated.
Here’s how you can make an emoji of yourself in 2 easy ways:
Method 1-By the iPhone Message app
iPhone has now introduced an in-built feature to let you make an emoji of yourself without having to download any other apps. However, you can only make an emoji of yourself in iOS 13 or later.
For the lucky lot of you, let me walk you through how to make an emoji of yourself in a few simple steps:
1.Open your iMessages. Go to a previous chat or tap the New Message Make sure your Appstore icon is toggled on to display the app tray. Hit the Animoji icon, represented by the monkey. Swipe to find the + plus sign for New Memoji to emoji yourself.
2.Now you can make an emoji of yourself by adding even the smallest details. Start by selecting your skin color. You can even add freckles or adjust your skin color’s warmth or paleness with a slider.
3.Hairstyle-Select the style that mimics the real you or goes for your dream hair-do.
4.Head Shape-Select the age group from kids, adults, old, and your face cut by choosing the chin that best fits you.
5.Nose & Lips- After selecting your eye color, shape, and brows, choose a nose shape and a lipstick color and intensity.
6.Eyewear/Headwear-Add glasses, adjust tint shade, color, and choose a hat, cap, or turban as you like. Finally, click Done to save the emoji.
Method 2-Using the Avatoon app
If you want to make an emoji of yourself that is more fun and personalized, from your dress to your pose, Avatoon is your way to go. With more than 500 customizable options, Avatoon lets you make an emoji of yourself meticulously, allowing you add avid details that pave the way for a hilariously amazing texting experience
1.Install and launch Avatoon app.
2.Now, choose the face shape that best matches your features and also select your face color. Add freckles(if you have any).
3.Next up is the hairstyle. There is a range of hairstyles from straight to wavy. Pick one you like best. You can choose the eye shape, color, brow, nose, lips, and finally, add some funky or formal eyewear to complete the look. Press Save.
4.After you make an emoji of yourself, you can further fine-tune it by adding detailed features and accessories using coins. Choose a stylish dress for your avatar from the Clothes tab or add a fun background.
5.Click on Photoboothto fit your emoji in a themed photo for an event or celebration.
6.Click on Poses and select your pose and share directly to any social media platform or save to phone.
Part 2: Make an Emoji of Yourself on Android
Now you can make an emoji of yourself even on an Android phone with the Mirror emoji app. Take your texting experience to the next level. Quickly make an emoji of yourself and wow your friends and family with the cute mini version of yourself.
1.Install and launch Mirror. Now, to make an emoji of yourself for your current look, take a selfie or click the gallery icon to choose an existing image to emoji yourself.
2.Click the left one to make an original avatar or the right one if you wish to make an emoji of yourself as an anime. Click Next.
3.Now, customize your emoji. Add a hairstyle, choose your glasses, cap, headphones, turban, scarf, or even devil horns.
4.Customize your dress color to your liking. Then, click Next.
5.Once you make an emoji of yourself, Mirror will display a range of fun stickers for instant sharing.
6.Click on any sticker, choose a mood using the emojis displayed and click to share or save to the device.
7.In the Sticker backstab, choose a themed sticker set and click Add to WhatsApp.
Conclusion-Ready to Emoji Yourself?
With texts being taken over by stickers and emojis, it’s high time for you to enter the league. Make an emoji of yourself in different moods and add funny backgrounds to express yourself fully and hilariously.
Use the in-built iPhone feature or a powerful app to make an emoji of yourself stand out from the crowd of mainstream messages. And take inspiration from our guide to surprise your friends with an emoji that looks exactly like you, just a bit smaller.
Here, we recommend Wondershare Filmora , due to its AR camera feature, which makes taking selfies more interesting. This AR camera function includes animoji and memoji avatars for a fun and excellent video.
Go on and make an emoji of yourself. Show your friends how awesome and unique you are with a beautifully personalized emoji.
Good luck!
Shanoon Cox
Shanoon Cox is a writer and a lover of all things video.
Follow @Shanoon Cox
How to Make a iMovie Photo Slideshow with Music?
How to Make a iMovie Photo Slideshow with Music? [iMovie Tutorial]
Shanoon Cox
Mar 27, 2024• Proven solutions
Makings a slideshow is a great way to share photos and videos with friends and families. The good news is that you can totally make a slideshow on Mac for free with iMovie. iMovie is the pre-installed program coming with every new Mac. It provides a simple yet professional way to make slideshow movies from your photos, videos, and music.
If you haven’t iMovie installed on your Mac yet, just go to iTunes and download it for free. In the following part, I’ll share with you the step-by-step tutorial on how to make a slideshow on Mac using the free video editing software iMovie.
If you are an iOS user, check our picks of best photo slideshow apps for iPhone or iPad.
Ways for iMovie Photo Slideshow with Music Making
To make a photo slideshow with music in iMovie, you can follow these steps.
1. Create a New Project
After launching iMovie, click the Project button and then click Create New. Select Movie to combine photos, videos and music to make a slideshow.

2. Import Photos, Videos, and Audio Files
Now go to the My Media tab and click the Import icon to add your photos, videos, and music to iMovie, in this way, you can import any media files from any location on your Mac. But if you have arranged all your videos, photos, and music tracks in the Photos app, you can just switch to Photos under the Libraries tab on the left to import.

3. Arrange Media in Timeline and Adjust
Now, it’s time to place all these photos and videos in the timeline in order and do some adjustments. You can use the Magic Wand tool to improve the photo quality automatically, do some color correction, or add a filter to the photo. If you preview the video clip, you will see more options that allow you to do more editing, such as changing speed.
4. Apply Transitions & Effects
Transitions and effects will help you to create a slideshow in a more professional way. Some transitions such as cross dissolve, fade and cross blur are very popular in the slideshow, but remember don’t use lots of different transitions in one slideshow since too many transitions will distract the viewer’s attention. To apply a transition in the slideshow, just drag and drop it between two photos in the timeline.

5. Add Titles and Text
Using some opener titles and credits at the beginning and ending part of your slideshow will make it cool as well. You can add some famous quotes and words to better demonstrate.
Just to the Titles tab and select one of the title templates and drop it to the timeline first and then write your own words in the preview window.

6. Add Music to Slideshow
You can download some royalty-free music and sound effects from websites such as Filmstock stock media library or iTunes or import your own audio as we said before to use it as the slideshow background music. To sync with the slideshow, you may need to trim and edit the audio accordingly. For detailed information about iMovie audio editing, you can check how to add background music to iMovie.
Filmstock Stock Media Library ](https://tools.techidaily.com/wondershare/filmora/download/ )
7. Export and Share Your Slideshow video
Play the slideshow and check the result in the preview window. If everything goes well, you can now export and share or save it. You can save the slideshow video in MP4 format, or share it to Vimeo or add the slideshow to Theater to load it on your other Apple devices so you can easily watch it on your iOS devices or Apple TV.
I hope the above tutorial about how to make a slideshow on iMovie will be helpful for your stunning slideshow creation.
If you’re running an old macOS version and having iPhoto installed on your Mac, here are the detailed steps about How to make slideshow in iMovie with iPhoto project.
Step 1. Import Photos from the iPhoto Library
iMovie works seamlessly with iPhoto. You are suggested to drag and drop photos from iPhoto to the iMovie project. If no library exists in iPhoto, create one and import photos to iPhoto first. To add videos, you could go to either “File/Import” or Event Library, and then drag and drop selected videos to the timeline.
After photos and videos are imported to the iMovie slideshow project, you can preview the raw slideshow simply by pressing Space bar on your keyboard. And then make adjustments to clips and transitions. For example, mouse over one clip or “double arrow” button and click on the settings icon, then you could access clip adjustment, video adjustment, transition adjustment, etc.

Step 2. Add Music to Your iMovie Slideshow Project
Music sets the tone of your slideshow. Adding musing to the iMovie slideshow is just as simple as adding photos and videos.
So click the audio icon in the bottom right corner, and drag and drop the desired audio file to the timeline. Multiple songs could be added to iMovie.
However, iMovie doesn’t support multiple soundtracks. If necessary, you need to combine multiple song tracks with an external audio editor before importing them to the iMovie slideshow. You can also apply audio effects and filter sound using an equalizer.

Step 3. Export Your iMovie Slideshow Video
iMovie makes sharing possibilities endless. For those who upload their videos online, iMovie allows users to directly upload to MobileMe Gallery, YouTube, Facebook, Vimeo, CNN iReport, etc.
If you select to share the iMovie slideshow using Media Browser, you will get a slideshow appeared in other Mac applications like iWeb. It’s a good idea to export the iMovie slideshow to iTunes so that you can play back slideshow quickly and easily sync with your mobile devices like iPhone, iPod, and iPad.

You may also like: How to Add Text with iMovie in Mac and iPhone >>
Recommendation: Create Slideshow on Mac with More Templates and Transitions with Filmora
If you want to make a slideshow with some templates on Mac, you can try Wondershare Filmora . Filmora can turn photos and videos into attractive slideshow videos with various inbuilt filters, transitions, elements, animations, effects, and overlays. Click the Free Download button and have a try.
Check the ultimate guide about making a slideshow with music and titles in Filmora .
If you are going to make a slideshow with music on Windows, you may need a slideshow-making tool to do it by yourself. Wondershare Filmora will also be a good choice. It helps you instantly make such an impressive slideshow from photos and videos for sharing virtually anywhere.
Shanoon Cox
Shanoon Cox is a writer and a lover of all things video.
Follow @Shanoon Cox
Shanoon Cox
Mar 27, 2024• Proven solutions
Makings a slideshow is a great way to share photos and videos with friends and families. The good news is that you can totally make a slideshow on Mac for free with iMovie. iMovie is the pre-installed program coming with every new Mac. It provides a simple yet professional way to make slideshow movies from your photos, videos, and music.
If you haven’t iMovie installed on your Mac yet, just go to iTunes and download it for free. In the following part, I’ll share with you the step-by-step tutorial on how to make a slideshow on Mac using the free video editing software iMovie.
If you are an iOS user, check our picks of best photo slideshow apps for iPhone or iPad.
Ways for iMovie Photo Slideshow with Music Making
To make a photo slideshow with music in iMovie, you can follow these steps.
1. Create a New Project
After launching iMovie, click the Project button and then click Create New. Select Movie to combine photos, videos and music to make a slideshow.
2. Import Photos, Videos, and Audio Files
Now go to the My Media tab and click the Import icon to add your photos, videos, and music to iMovie, in this way, you can import any media files from any location on your Mac. But if you have arranged all your videos, photos, and music tracks in the Photos app, you can just switch to Photos under the Libraries tab on the left to import.
3. Arrange Media in Timeline and Adjust
Now, it’s time to place all these photos and videos in the timeline in order and do some adjustments. You can use the Magic Wand tool to improve the photo quality automatically, do some color correction, or add a filter to the photo. If you preview the video clip, you will see more options that allow you to do more editing, such as changing speed.
4. Apply Transitions & Effects
Transitions and effects will help you to create a slideshow in a more professional way. Some transitions such as cross dissolve, fade and cross blur are very popular in the slideshow, but remember don’t use lots of different transitions in one slideshow since too many transitions will distract the viewer’s attention. To apply a transition in the slideshow, just drag and drop it between two photos in the timeline.
5. Add Titles and Text
Using some opener titles and credits at the beginning and ending part of your slideshow will make it cool as well. You can add some famous quotes and words to better demonstrate.
Just to the Titles tab and select one of the title templates and drop it to the timeline first and then write your own words in the preview window.
6. Add Music to Slideshow
You can download some royalty-free music and sound effects from websites such as Filmstock stock media library or iTunes or import your own audio as we said before to use it as the slideshow background music. To sync with the slideshow, you may need to trim and edit the audio accordingly. For detailed information about iMovie audio editing, you can check how to add background music to iMovie.
Filmstock Stock Media Library ](https://tools.techidaily.com/wondershare/filmora/download/ )
7. Export and Share Your Slideshow video
Play the slideshow and check the result in the preview window. If everything goes well, you can now export and share or save it. You can save the slideshow video in MP4 format, or share it to Vimeo or add the slideshow to Theater to load it on your other Apple devices so you can easily watch it on your iOS devices or Apple TV.
I hope the above tutorial about how to make a slideshow on iMovie will be helpful for your stunning slideshow creation.
If you’re running an old macOS version and having iPhoto installed on your Mac, here are the detailed steps about How to make slideshow in iMovie with iPhoto project.
Step 1. Import Photos from the iPhoto Library
iMovie works seamlessly with iPhoto. You are suggested to drag and drop photos from iPhoto to the iMovie project. If no library exists in iPhoto, create one and import photos to iPhoto first. To add videos, you could go to either “File/Import” or Event Library, and then drag and drop selected videos to the timeline.
After photos and videos are imported to the iMovie slideshow project, you can preview the raw slideshow simply by pressing Space bar on your keyboard. And then make adjustments to clips and transitions. For example, mouse over one clip or “double arrow” button and click on the settings icon, then you could access clip adjustment, video adjustment, transition adjustment, etc.
Step 2. Add Music to Your iMovie Slideshow Project
Music sets the tone of your slideshow. Adding musing to the iMovie slideshow is just as simple as adding photos and videos.
So click the audio icon in the bottom right corner, and drag and drop the desired audio file to the timeline. Multiple songs could be added to iMovie.
However, iMovie doesn’t support multiple soundtracks. If necessary, you need to combine multiple song tracks with an external audio editor before importing them to the iMovie slideshow. You can also apply audio effects and filter sound using an equalizer.
Step 3. Export Your iMovie Slideshow Video
iMovie makes sharing possibilities endless. For those who upload their videos online, iMovie allows users to directly upload to MobileMe Gallery, YouTube, Facebook, Vimeo, CNN iReport, etc.
If you select to share the iMovie slideshow using Media Browser, you will get a slideshow appeared in other Mac applications like iWeb. It’s a good idea to export the iMovie slideshow to iTunes so that you can play back slideshow quickly and easily sync with your mobile devices like iPhone, iPod, and iPad.
You may also like: How to Add Text with iMovie in Mac and iPhone >>
Recommendation: Create Slideshow on Mac with More Templates and Transitions with Filmora
If you want to make a slideshow with some templates on Mac, you can try Wondershare Filmora . Filmora can turn photos and videos into attractive slideshow videos with various inbuilt filters, transitions, elements, animations, effects, and overlays. Click the Free Download button and have a try.
Check the ultimate guide about making a slideshow with music and titles in Filmora .
If you are going to make a slideshow with music on Windows, you may need a slideshow-making tool to do it by yourself. Wondershare Filmora will also be a good choice. It helps you instantly make such an impressive slideshow from photos and videos for sharing virtually anywhere.
Shanoon Cox
Shanoon Cox is a writer and a lover of all things video.
Follow @Shanoon Cox
Also read:
- [New] Essential Strategies for Documenting PS3 Matches
- 6 Solutions to Fix Error 505 in Google Play Store on Vivo Y27 4G | Dr.fone
- Calls on Vivo V29e Go Straight to Voicemail? 12 Fixes | Dr.fone
- Enhance Your Mobile Experience with These 8 Premier Multi-Number Apps
- In 2024, Top 10 Storyboarding Software
- In 2024, Unlock Your Nokia C12 Pros Potential The Top 20 Lock Screen Apps You Need to Try
- New 6 Best Voice Changers for 2024
- New How to Edit Memoji on Android and iPhone for 2024
- New In 2024, 10 Popular Cartoon Characters That Should Top Your List 2023 Updated
- New In 2024, How to Make an Adorable Video for Your Babys First Year
- Strategies for Apple-Listed Podcast Success for 2024
- Streaming with Flair Xbox One Edition
- Successfully Update Your HP ZBook 15 G3 with the Latest Windows Drivers - Step-by-Step Instructions
- Updated How to Make a FLV Photo Slideshow with Music
- Updated In 2024, How to Make Memes with White Background Step by Step
- Title: New How to Make Memes with White Background Step by Step
- Author: Jan
- Created at : 2024-09-28 16:38:34
- Updated at : 2024-09-30 18:33:08
- Link: https://meme-emoji.techidaily.com/new-how-to-make-memes-with-white-background-step-by-step/
- License: This work is licensed under CC BY-NC-SA 4.0.