
New Add Emojis to Videos on YouTube/Facebook/Snapchat 2023 Guide
Add Emojis to Videos on YouTube/Facebook/Snapchat [2023 Guide]
Add Emojis to Videos on YouTube/Facebook/Snapchat [Step by Step Guide]

Liza Brown
Mar 27, 2024• Proven solutions
Emojis are a great way to express one’s emotion more vividly through a depiction rather than a plain conventional text. By the passage of time, the trend of using emoji on social media domain has drastically increased around the world. Since emoji are ubiquitous and its influence on culture is increasingly huge, using emoji has now become a trend.
A plain conventional text or video may not emphasize the meaning behind the phrase, but adding emoji to it is like adding a soul to the intentions behind the message. It helps outshine the theme and make a video more appealing at the same time.
So, with all this being known, let’s take a tour to a complete guide to how to accessorize a video on multiple social media domains and make it far more attractive and meaningful.
Best Tool to Help You Add Emojis to Videos in Few Clicks
Gamers, YouTubers and all other Mac and PC users who’d like to add a smiley or any other emoji to a video should try processing their footage with the Filmora video editor.
Performing basic video editing tasks like cutting or trimming the footage, choosing a soundtrack for a video or adding an emoji to a single shot or an entire sequence can all be completed in just a couple of clicks.
Filmora is free to download. Import your videos after you launch the software, you then can add any animated emojis into wherever you want. Have a try now! Emojis inside are so Cute

How to Add Emojis to YouTube Videos?
You can now add emojis to any of the YouTube videos using an online free tool called Kapwing.
Below are the basic steps about how to add emojis to YouTube videos anywhere using Kapwing.
Step 1: Open free tool Meme Maker and tap on “get started”.
Step 2: Copy the link of the targeted YouTube video and paste the URL of your YouTube video.
Step 3: One of the ways to insert emoji using Kapwing is to directly upload an emoji having a transparent background. In the toolbar, click on “upload” and paste its URL there. The image will be placed onto the targeted video as an overlay by importing it. Another way to add emoji is to click “add text” where you will have options to insert emojis.
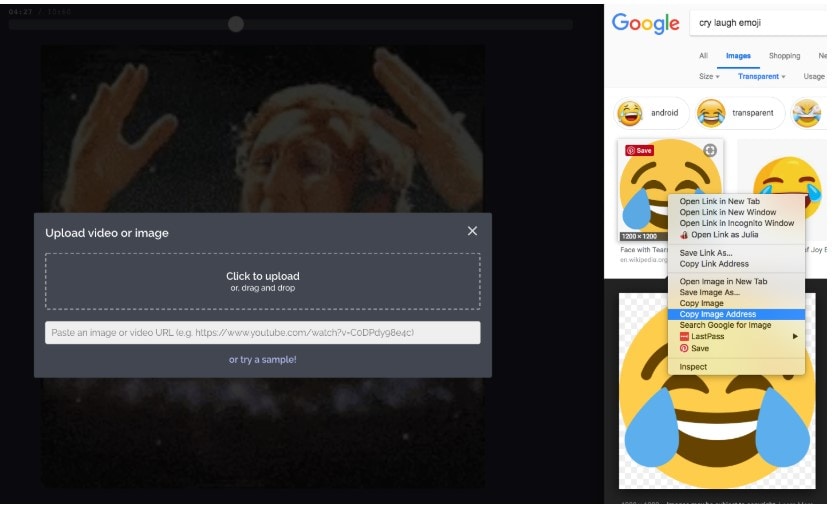
Step 4: You can now play around with editing options in Kapwing to adjust accordingly.
How to Use Emojis on YouTube?
YouTube provides you an option to insert emoji on your YouTube account description, tag and titles with great ease with the use of YouTube certified plugin, Tube Buddy.
Step 1: Install this plugin on chrome browser.
Step 2: Open “info and settings” option in your YouTube targeted video.
Step 3: Tap on description box, tags or title where an emoji icon will be shown. Tap on the emoji icon to display a list of emojis. You can also search for an emoji in the search bar.
How to Add Emojis in Snapchat Videos?
Step 1: Install Snapchat if you don’t already have it. Then run Snapchat.
Step 2: Record a video by keeping your fingers on the record button.
Step 3: Choose and tap an emoji of your choice to add in your video. Hold your fingers on emoji to place to the desired frame/clip of your recorded video.
Step 4: The emoji can be resized by dragging or pinching it in. You can add more than one emoji.
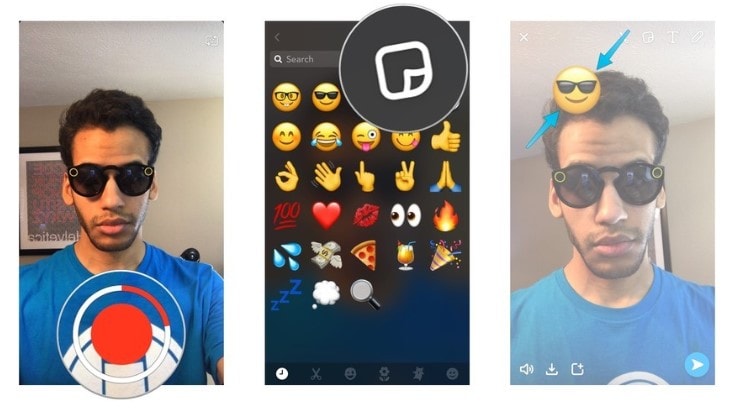
Image from iMore
How to Add Emojis to Facebook?
If you are wondering about how to add emojis to Facebook videos then, unfortunately, Facebook only offers “go live” option on Facebook where an emoji cannot be inserted. But you can insert emoji to Facebook status, comment or in your messenger conversation easily by following the step below for status:
Step 1: Click “what’s on your mind” to add new status on Facebook.
Step 2: At the bottom right side of the status box is an emoji icon. Click on it. This will open a list of emojis that you can choose as many as you want
Step 3: Click on the emoji icon back again to close the list when you are done. Click on post to share the post on your wall.
How to Add Emojis to Videos on iMovie?
Step 1: Search for the desired emoji on the internet with transparent background. Go to iMovie and select a clip of your video where you want to insert an emoji.
Step 2: Go to the “Import” option into the toolbar above, select your desired emoji from the list. This emoji will be added to the iMovie library.
Step 3: Click on that emoji. This overlays that emoji onto that video clip. You can scale the emoji up and down and drag it anywhere on the video.
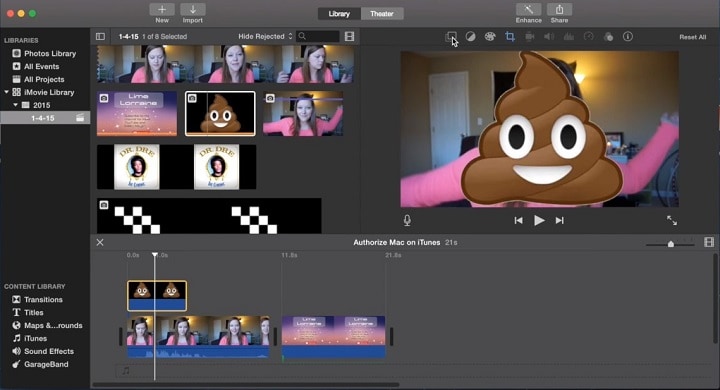
Image from YouSubtitles
How to Add Emojis to Videos Online?
Blurbiz, is an online application for editing YouTube, Instagram, Facebook and Snapchat videos. Just follow the steps below, then you can add emojis you want.
Step 1: Create and name the project in Blurbiz.
Step 2: Upload either your video, sticker or gif whichever you want an emoji to be placed in.
Step 3: Hover over the video and click on the “edit” button.
Step 4: Tap on “upload” at the top left side of the pane. Upload emoji with .png extension from your desktop.
Step 5: Drag and drop to overlay the emoji onto your video. Resize and position an emoji accordingly.
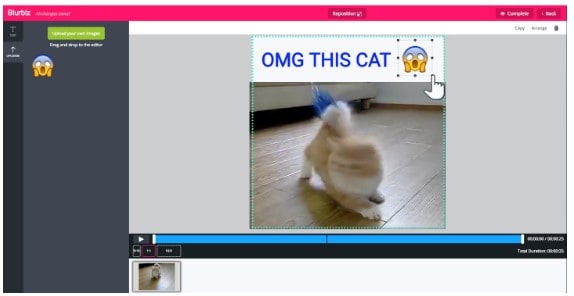
Step 6: Tap on “complete” at the top right corner when you are done. You can download an mp4 format video.
How to Add Emojis to Videos Android?
WeVideo , is an app to create and edit videos to the next level and provide one with ample special effects to add on to your videos.
Alongside using basic editing features like cutting, trimming or arranging video clips, you can amplify your editing game by adding emoji to your videos. Moreover, you can export your projects in high quality and share them on either Vimeo, YouTube or Dropbox.

Conclusion
Be it any video on any social media platform or your local device, with this thorough guide, you must be able to accessorize your video and take it to another level of emotional expression and message details in your video by using fun emojis.

Liza Brown
Liza Brown is a writer and a lover of all things video.
Follow @Liza Brown
Liza Brown
Mar 27, 2024• Proven solutions
Emojis are a great way to express one’s emotion more vividly through a depiction rather than a plain conventional text. By the passage of time, the trend of using emoji on social media domain has drastically increased around the world. Since emoji are ubiquitous and its influence on culture is increasingly huge, using emoji has now become a trend.
A plain conventional text or video may not emphasize the meaning behind the phrase, but adding emoji to it is like adding a soul to the intentions behind the message. It helps outshine the theme and make a video more appealing at the same time.
So, with all this being known, let’s take a tour to a complete guide to how to accessorize a video on multiple social media domains and make it far more attractive and meaningful.
Best Tool to Help You Add Emojis to Videos in Few Clicks
Gamers, YouTubers and all other Mac and PC users who’d like to add a smiley or any other emoji to a video should try processing their footage with the Filmora video editor.
Performing basic video editing tasks like cutting or trimming the footage, choosing a soundtrack for a video or adding an emoji to a single shot or an entire sequence can all be completed in just a couple of clicks.
Filmora is free to download. Import your videos after you launch the software, you then can add any animated emojis into wherever you want. Have a try now! Emojis inside are so Cute
How to Add Emojis to YouTube Videos?
You can now add emojis to any of the YouTube videos using an online free tool called Kapwing.
Below are the basic steps about how to add emojis to YouTube videos anywhere using Kapwing.
Step 1: Open free tool Meme Maker and tap on “get started”.
Step 2: Copy the link of the targeted YouTube video and paste the URL of your YouTube video.
Step 3: One of the ways to insert emoji using Kapwing is to directly upload an emoji having a transparent background. In the toolbar, click on “upload” and paste its URL there. The image will be placed onto the targeted video as an overlay by importing it. Another way to add emoji is to click “add text” where you will have options to insert emojis.
Step 4: You can now play around with editing options in Kapwing to adjust accordingly.
How to Use Emojis on YouTube?
YouTube provides you an option to insert emoji on your YouTube account description, tag and titles with great ease with the use of YouTube certified plugin, Tube Buddy.
Step 1: Install this plugin on chrome browser.
Step 2: Open “info and settings” option in your YouTube targeted video.
Step 3: Tap on description box, tags or title where an emoji icon will be shown. Tap on the emoji icon to display a list of emojis. You can also search for an emoji in the search bar.
How to Add Emojis in Snapchat Videos?
Step 1: Install Snapchat if you don’t already have it. Then run Snapchat.
Step 2: Record a video by keeping your fingers on the record button.
Step 3: Choose and tap an emoji of your choice to add in your video. Hold your fingers on emoji to place to the desired frame/clip of your recorded video.
Step 4: The emoji can be resized by dragging or pinching it in. You can add more than one emoji.
Image from iMore
How to Add Emojis to Facebook?
If you are wondering about how to add emojis to Facebook videos then, unfortunately, Facebook only offers “go live” option on Facebook where an emoji cannot be inserted. But you can insert emoji to Facebook status, comment or in your messenger conversation easily by following the step below for status:
Step 1: Click “what’s on your mind” to add new status on Facebook.
Step 2: At the bottom right side of the status box is an emoji icon. Click on it. This will open a list of emojis that you can choose as many as you want
Step 3: Click on the emoji icon back again to close the list when you are done. Click on post to share the post on your wall.
How to Add Emojis to Videos on iMovie?
Step 1: Search for the desired emoji on the internet with transparent background. Go to iMovie and select a clip of your video where you want to insert an emoji.
Step 2: Go to the “Import” option into the toolbar above, select your desired emoji from the list. This emoji will be added to the iMovie library.
Step 3: Click on that emoji. This overlays that emoji onto that video clip. You can scale the emoji up and down and drag it anywhere on the video.
Image from YouSubtitles
How to Add Emojis to Videos Online?
Blurbiz, is an online application for editing YouTube, Instagram, Facebook and Snapchat videos. Just follow the steps below, then you can add emojis you want.
Step 1: Create and name the project in Blurbiz.
Step 2: Upload either your video, sticker or gif whichever you want an emoji to be placed in.
Step 3: Hover over the video and click on the “edit” button.
Step 4: Tap on “upload” at the top left side of the pane. Upload emoji with .png extension from your desktop.
Step 5: Drag and drop to overlay the emoji onto your video. Resize and position an emoji accordingly.
Step 6: Tap on “complete” at the top right corner when you are done. You can download an mp4 format video.
How to Add Emojis to Videos Android?
WeVideo , is an app to create and edit videos to the next level and provide one with ample special effects to add on to your videos.
Alongside using basic editing features like cutting, trimming or arranging video clips, you can amplify your editing game by adding emoji to your videos. Moreover, you can export your projects in high quality and share them on either Vimeo, YouTube or Dropbox.
Conclusion
Be it any video on any social media platform or your local device, with this thorough guide, you must be able to accessorize your video and take it to another level of emotional expression and message details in your video by using fun emojis.
Liza Brown
Liza Brown is a writer and a lover of all things video.
Follow @Liza Brown
Liza Brown
Mar 27, 2024• Proven solutions
Emojis are a great way to express one’s emotion more vividly through a depiction rather than a plain conventional text. By the passage of time, the trend of using emoji on social media domain has drastically increased around the world. Since emoji are ubiquitous and its influence on culture is increasingly huge, using emoji has now become a trend.
A plain conventional text or video may not emphasize the meaning behind the phrase, but adding emoji to it is like adding a soul to the intentions behind the message. It helps outshine the theme and make a video more appealing at the same time.
So, with all this being known, let’s take a tour to a complete guide to how to accessorize a video on multiple social media domains and make it far more attractive and meaningful.
Best Tool to Help You Add Emojis to Videos in Few Clicks
Gamers, YouTubers and all other Mac and PC users who’d like to add a smiley or any other emoji to a video should try processing their footage with the Filmora video editor.
Performing basic video editing tasks like cutting or trimming the footage, choosing a soundtrack for a video or adding an emoji to a single shot or an entire sequence can all be completed in just a couple of clicks.
Filmora is free to download. Import your videos after you launch the software, you then can add any animated emojis into wherever you want. Have a try now! Emojis inside are so Cute
How to Add Emojis to YouTube Videos?
You can now add emojis to any of the YouTube videos using an online free tool called Kapwing.
Below are the basic steps about how to add emojis to YouTube videos anywhere using Kapwing.
Step 1: Open free tool Meme Maker and tap on “get started”.
Step 2: Copy the link of the targeted YouTube video and paste the URL of your YouTube video.
Step 3: One of the ways to insert emoji using Kapwing is to directly upload an emoji having a transparent background. In the toolbar, click on “upload” and paste its URL there. The image will be placed onto the targeted video as an overlay by importing it. Another way to add emoji is to click “add text” where you will have options to insert emojis.
Step 4: You can now play around with editing options in Kapwing to adjust accordingly.
How to Use Emojis on YouTube?
YouTube provides you an option to insert emoji on your YouTube account description, tag and titles with great ease with the use of YouTube certified plugin, Tube Buddy.
Step 1: Install this plugin on chrome browser.
Step 2: Open “info and settings” option in your YouTube targeted video.
Step 3: Tap on description box, tags or title where an emoji icon will be shown. Tap on the emoji icon to display a list of emojis. You can also search for an emoji in the search bar.
How to Add Emojis in Snapchat Videos?
Step 1: Install Snapchat if you don’t already have it. Then run Snapchat.
Step 2: Record a video by keeping your fingers on the record button.
Step 3: Choose and tap an emoji of your choice to add in your video. Hold your fingers on emoji to place to the desired frame/clip of your recorded video.
Step 4: The emoji can be resized by dragging or pinching it in. You can add more than one emoji.
Image from iMore
How to Add Emojis to Facebook?
If you are wondering about how to add emojis to Facebook videos then, unfortunately, Facebook only offers “go live” option on Facebook where an emoji cannot be inserted. But you can insert emoji to Facebook status, comment or in your messenger conversation easily by following the step below for status:
Step 1: Click “what’s on your mind” to add new status on Facebook.
Step 2: At the bottom right side of the status box is an emoji icon. Click on it. This will open a list of emojis that you can choose as many as you want
Step 3: Click on the emoji icon back again to close the list when you are done. Click on post to share the post on your wall.
How to Add Emojis to Videos on iMovie?
Step 1: Search for the desired emoji on the internet with transparent background. Go to iMovie and select a clip of your video where you want to insert an emoji.
Step 2: Go to the “Import” option into the toolbar above, select your desired emoji from the list. This emoji will be added to the iMovie library.
Step 3: Click on that emoji. This overlays that emoji onto that video clip. You can scale the emoji up and down and drag it anywhere on the video.
Image from YouSubtitles
How to Add Emojis to Videos Online?
Blurbiz, is an online application for editing YouTube, Instagram, Facebook and Snapchat videos. Just follow the steps below, then you can add emojis you want.
Step 1: Create and name the project in Blurbiz.
Step 2: Upload either your video, sticker or gif whichever you want an emoji to be placed in.
Step 3: Hover over the video and click on the “edit” button.
Step 4: Tap on “upload” at the top left side of the pane. Upload emoji with .png extension from your desktop.
Step 5: Drag and drop to overlay the emoji onto your video. Resize and position an emoji accordingly.
Step 6: Tap on “complete” at the top right corner when you are done. You can download an mp4 format video.
How to Add Emojis to Videos Android?
WeVideo , is an app to create and edit videos to the next level and provide one with ample special effects to add on to your videos.
Alongside using basic editing features like cutting, trimming or arranging video clips, you can amplify your editing game by adding emoji to your videos. Moreover, you can export your projects in high quality and share them on either Vimeo, YouTube or Dropbox.
Conclusion
Be it any video on any social media platform or your local device, with this thorough guide, you must be able to accessorize your video and take it to another level of emotional expression and message details in your video by using fun emojis.
Liza Brown
Liza Brown is a writer and a lover of all things video.
Follow @Liza Brown
How to Make a Funny Meme on MacBook
How to Make a Funny Meme on MacBook
Liza Brown
Dec 14, 2023• Proven solutions
Everyone these days is living and breathing over the internet. One of the most popular things over the internet is a meme. No matter where you look on social media, you are going to come across memes. Funny memes or memes provoking sadness, there is a lot. You might love memes, but you might not have the idea that there are different kinds of memes.
There are different types of memes, such as image memes, video memes, and GIF memes. The table below is going to show you the difference between the three.
| Image Meme | Video Meme | GIF Meme |
|---|---|---|
| Static Images | Videos | Moving Static Images |
| Contains Text | Contain Text | Contains Text |
| Contains No Music | Contain Music | Contains No Music |
| Isn’t Animated | Isn’t Animated | Animated |
How to Make a GIF or a Video Meme on Mac?
If you want to create a video or GIF meme on your Mac device, here are the steps that you need to follow.
- Find Your Video or Image
When you are looking to make a meme, you will have to collect the video. However, if you are planning to create a GIF meme, you have to find the right picture. You can use the videos and images that you have in the Mac image gallery.
In case you are using a video editor, you can access their official site for some images to create your meme.
- Find Caption
Now, you have to think of a captioning for the meme. This can be serious or funny when you make meme.
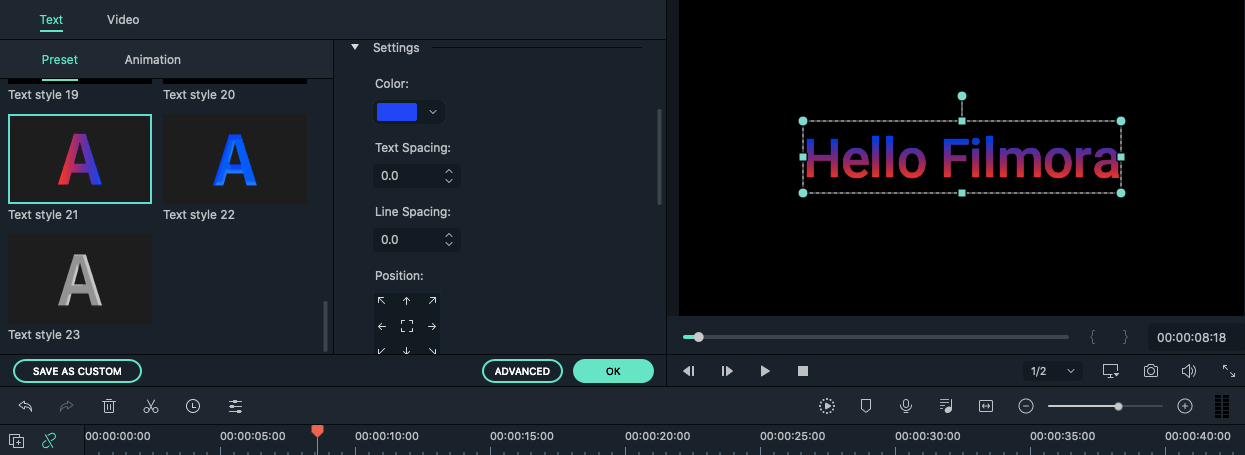
- Add the Caption
The first thing that you need to do is open the image or video that you have saved on the laptop. As soon as you click on the ‘Markup icon’ you will find a display bar pop-up. Look for icon ‘T’ to click and then insert the text you want.
When you click on the ‘T’ icon, a text box is going to appear over the picture. Click on the box labeled ‘Text’ for bringing inserting the caption.
If you want, you can change the alignment, color, italics, bolding, font, and underline, too.
- Save the Meme
Now that you have created your desired meme, save it on your Mac device. Then share the final product on the social media platform.
Steps of Creating Video or GIF Meme Using FilmoraX
You can also use a video editor to create your Video or make meme in GIF. With FilmoraX, it is easy to do so. In case you want to make meme, but are new to this process, then FilmoraX is just the perfect tool for you. With the help of this meme maker, you can easily create a video, GIF, and image memes.
FilmoraX can process memes much faster than its counterparts. It comes with an advanced encoder or decoder that ensures fast action. The video editor lets you upload videos with the help of a URL. Its output format is highly flexible and will convert your video to GIF in no time. With its help, you can edit fonts, add text, and move them as you want. What’s more, the video editor doesn’t include a watermark in the video.
Here is a guide that will help you to create the funny video meme using FilmoraX on your Mac device.
- Download and Install FilmoraX
The first thing that you have to do is download and install FilmoraX on Mac in case you do not have it already.
- Drag and Drop the Video
Now that you have the meme maker, drag and drop on the video that you want. This will import the video to the meme maker.
- Edit the Video with Funny Text or stickers
Go to the meme editor page when you are done choosing the video, image, or GIF. Now, from the left panel, you have to customize the video meme. You can also use the FilmoraX video trimmer to cut the video as per your requirements. Add texts, alter fonts, and preview the changes that you have made.
- Export
When you are done making the change, you have to click on the ‘Export’ button to apply the changes to the video meme. After you have shared the meme on your social media pages, download it.

Ingredients to Make an Effective Meme
Memes keep gaining far-reaching traction. Businesses can join in on creating memes that will be suitable for their brand. However, while creating a meme, a business or an individual needs to keep a few things in mind.
- Be Witty
The point of a meme is basically to be fun and silly. However, in the depth of it, you will find a witty connotation. This ties it to something more grave and important. So, the subject matter of the meme doesn’t have to be serious, but if you relate it to a far-reaching topic adding a witty comment will make the meme popular.
- Creating Memes off Existing and Successful Trends
You should play off the existing trend. This is a popular method that is used by many across the web. By adapting a video in trend, you can add your own spin to it. This method is particularly known as memejacking.
- Use Good Quality Video and Images
You might think that for a meme you do not quality video or image. However, that is not true. Even the picture frame that you are adding is important. Keep in mind that everything inside the meme is communicating something. The absence of something is also communicating certain things. Hence, unless you really mean to post a bad quality video or photo, make sure you do your best to get top-quality content.
- Consider If It Works for the Audience
There is an audience for everything over the social media channels. However, meme-makers often tend to forget how personal it is. So, when you are making a joke, you have to make sure others are getting it. Simply because something is in trend, you shouldn’t go for it. You should only post it if it works for the brand of your profile.
Conclusion
Memes can be of different types but what matters the most is they make the viewers laugh. If you keep the above tips in mind, you will be able to make a meme successfully. By using a meme maker like FilmoraX , the job becomes even easier.
Learn More: 10 Best Meme Maker App or Website You Need to Know>>>
Liza Brown
Liza Brown is a writer and a lover of all things video.
Follow @Liza Brown
Liza Brown
Dec 14, 2023• Proven solutions
Everyone these days is living and breathing over the internet. One of the most popular things over the internet is a meme. No matter where you look on social media, you are going to come across memes. Funny memes or memes provoking sadness, there is a lot. You might love memes, but you might not have the idea that there are different kinds of memes.
There are different types of memes, such as image memes, video memes, and GIF memes. The table below is going to show you the difference between the three.
| Image Meme | Video Meme | GIF Meme |
|---|---|---|
| Static Images | Videos | Moving Static Images |
| Contains Text | Contain Text | Contains Text |
| Contains No Music | Contain Music | Contains No Music |
| Isn’t Animated | Isn’t Animated | Animated |
How to Make a GIF or a Video Meme on Mac?
If you want to create a video or GIF meme on your Mac device, here are the steps that you need to follow.
- Find Your Video or Image
When you are looking to make a meme, you will have to collect the video. However, if you are planning to create a GIF meme, you have to find the right picture. You can use the videos and images that you have in the Mac image gallery.
In case you are using a video editor, you can access their official site for some images to create your meme.
- Find Caption
Now, you have to think of a captioning for the meme. This can be serious or funny when you make meme.
- Add the Caption
The first thing that you need to do is open the image or video that you have saved on the laptop. As soon as you click on the ‘Markup icon’ you will find a display bar pop-up. Look for icon ‘T’ to click and then insert the text you want.
When you click on the ‘T’ icon, a text box is going to appear over the picture. Click on the box labeled ‘Text’ for bringing inserting the caption.
If you want, you can change the alignment, color, italics, bolding, font, and underline, too.
- Save the Meme
Now that you have created your desired meme, save it on your Mac device. Then share the final product on the social media platform.
Steps of Creating Video or GIF Meme Using FilmoraX
You can also use a video editor to create your Video or make meme in GIF. With FilmoraX, it is easy to do so. In case you want to make meme, but are new to this process, then FilmoraX is just the perfect tool for you. With the help of this meme maker, you can easily create a video, GIF, and image memes.
FilmoraX can process memes much faster than its counterparts. It comes with an advanced encoder or decoder that ensures fast action. The video editor lets you upload videos with the help of a URL. Its output format is highly flexible and will convert your video to GIF in no time. With its help, you can edit fonts, add text, and move them as you want. What’s more, the video editor doesn’t include a watermark in the video.
Here is a guide that will help you to create the funny video meme using FilmoraX on your Mac device.
- Download and Install FilmoraX
The first thing that you have to do is download and install FilmoraX on Mac in case you do not have it already.
- Drag and Drop the Video
Now that you have the meme maker, drag and drop on the video that you want. This will import the video to the meme maker.
- Edit the Video with Funny Text or stickers
Go to the meme editor page when you are done choosing the video, image, or GIF. Now, from the left panel, you have to customize the video meme. You can also use the FilmoraX video trimmer to cut the video as per your requirements. Add texts, alter fonts, and preview the changes that you have made.
- Export
When you are done making the change, you have to click on the ‘Export’ button to apply the changes to the video meme. After you have shared the meme on your social media pages, download it.
Ingredients to Make an Effective Meme
Memes keep gaining far-reaching traction. Businesses can join in on creating memes that will be suitable for their brand. However, while creating a meme, a business or an individual needs to keep a few things in mind.
- Be Witty
The point of a meme is basically to be fun and silly. However, in the depth of it, you will find a witty connotation. This ties it to something more grave and important. So, the subject matter of the meme doesn’t have to be serious, but if you relate it to a far-reaching topic adding a witty comment will make the meme popular.
- Creating Memes off Existing and Successful Trends
You should play off the existing trend. This is a popular method that is used by many across the web. By adapting a video in trend, you can add your own spin to it. This method is particularly known as memejacking.
- Use Good Quality Video and Images
You might think that for a meme you do not quality video or image. However, that is not true. Even the picture frame that you are adding is important. Keep in mind that everything inside the meme is communicating something. The absence of something is also communicating certain things. Hence, unless you really mean to post a bad quality video or photo, make sure you do your best to get top-quality content.
- Consider If It Works for the Audience
There is an audience for everything over the social media channels. However, meme-makers often tend to forget how personal it is. So, when you are making a joke, you have to make sure others are getting it. Simply because something is in trend, you shouldn’t go for it. You should only post it if it works for the brand of your profile.
Conclusion
Memes can be of different types but what matters the most is they make the viewers laugh. If you keep the above tips in mind, you will be able to make a meme successfully. By using a meme maker like FilmoraX , the job becomes even easier.
Learn More: 10 Best Meme Maker App or Website You Need to Know>>>
Liza Brown
Liza Brown is a writer and a lover of all things video.
Follow @Liza Brown
How to Use Emojis on Windows 10 and Windows 11?
If you ever wondered how to use emojis on Windows, or since when the emojis are around and what is their significance, you will find all your answers here. Because Windows 10 offers a great range of emojis that help you express your feelings and reactions in fewer words, they have recently gained a decent level of popularity, mostly amongst youngsters and millennials.
With that said, in the following sections, you will learn how to use emojis on Windows 10 using both keyboard shortcuts and touch keyboard, how to get emojis on Windows 10 to make your text or conversation look more versatile, and what new has been added to the latest operating system released by Microsoft, i.e., Windows 11.
In this article
01 Part 1: The History of Emojis in Windows
02 Part 2: How to Use Emojis with Keyboard Shortcuts
03 Part 3: How to Use Emojis on Windows PC with Touch Keyboard
04 Part 4: What’s New in Emojis in Windows 11
05 Part 5: How to Get More Emojis in Windows 11
Part 1: The History of Emojis in Windows
Although emojis are present in some form or the other since the mid-‘90s, they were not quite popular back then. With the evolution of smartphones, these iconic characters got attention from the then-teenagers. Seeing this, in 2012, Microsoft introduced the first-ever set of black-and-white emojis with the release of Windows 8, and after some time, the company also added the same to Windows 7 that was rolled out along with the updates for the OS.
With the release of Windows 10 in 2015, a wide range of full-fledged colored emojis was introduced and received a large number of positive reactions from the users. As of today, emojis have become an integral part of everyone’s day-to-day text conversation, be it on Skype, WhatsApp, Facebook, or any other such platform.
Part 2: How to Use Emojis with Keyboard Shortcuts
A keyboard shortcut is a combination of two or more keys that are pressed simultaneously to trigger a pre-assigned event or action. A good example of a keyboard shortcut is ‘Ctrl + S’ which, when pressed, saves the document you’re working on.
While learning the process of how to use emoji in Windows 10, it is equally imperative to memorize the shortcut keys to insert those icons without taking your hands off the keyboard. This not only saves your time, but it also prevents you from going through the lengthy process of opening the emojis keyboard, navigating through all the available icons to choose the one you’re looking for, and then clicking it to insert in the document or conversation.
Nevertheless, it would be a good idea to learn how to launch the emojis keyboard, and the process is simple. All you need to do is:
- Make sure that your keyboard cursor is in an app that can accept text inputs. A text editor like MS Word or WordPad could be a good example
- Press the Windows + ; (semicolon) or Windows + . (period) keys together to open the emojis keyboard

Once the keyboard is open, you can click any of the available emojis to insert it in your conversion or text content.
As for the shortcuts, depending on the type of expression you want to convey, there could be thousands of them. Some of the commonly used emojis and their universal shortcut keys for both Windows 10 and Windows 11 include:
: (colon) + ) (right brace) will create a smiley face
: (colon) + ( (left brace) will create a sad face
: (colon) + ; (semicolon) will create a wink face
…and so on. You can conduct a quick online search to get the entire list of keyboard shortcuts and the emojis that they will create. For your convenience, a link from the Microsoft official website is given below:
Part 3: How to Use Emojis on Windows PC with Touch Keyboard
If you have Microsoft Surface or any other device that has Windows 10 or Windows 11 installed on it, and can accept inputs via touch keyboard, you can enable the feature in the operating system, and then use the touch keyboard to add emojis to your conversion or content. You can follow the instructions given below to enable touch keyboard, and then learn how to use emojis on Windows 11 or Windows 10 via touch:
- Right-click anywhere on the taskbar (Windows 11 is used here for demonstration), and then click Taskbar settings

- From the right area of the Settings window that opens next, scroll down to the Taskbar corner icons section, and then turn on the Touch keyboard switch

- Launch an app that can accept text inputs, e.g., a text editor, chatting app, etc. Click or tap the Touch keyboard icon from the notification area that is present at the bottom-right corner of the screen.

- Click or tap the Emojis icon from the upper-left corner of the touch keyboard that opens up, and then touch your preferred emoji to add it to your text or conversation.

Part 4: What’s New in Emojis in Windows 11
In addition to learning how to use emojis on Windows 10, it is also important to know what’s new with them or the emojis panel in Windows 11, the latest operating system released by Microsoft this year, i.e., 2021.
In Windows 11, although you can launch the emojis keyboard using the same shortcuts, i.e., ‘Windows + .’ or ‘Windows + ;’ keys as mentioned earlier, the emojis keyboard itself has four sections, namely:
- Emojis – Contains various emojis and smileys
- GIF – Gives you access to various animated GIFs from Tenor
- Kamojis – Lets you add the ASCII characters for emojis, e.g., :-) or :-(
- Symbols – To add important symbols to your text, e.g., ©, ®, etc.
In addition to this, the 2D Clippy emoji has also been introduced with Windows 11, and can be located by launching the emojis keyboard, and typing ‘Clippy’.
Part 5: How to Get More Emojis in Windows 11
If the built-in emoji library doesn’t contain your favorite expressions, you can always get several more by following the instructions given below:
- Launch your favorite web browser on Windows 11, and then go to http://www.iemoji.com/
- Click an emoji from the available options or copy one from your favorite portal, and paste it in the Paste Emoji here field

- Review the emoji in the MESSAGE PREVIEW field, and click Create from the Options section to generate the emoji that can be sent as a message or image

- Alternatively, click Copy from the Options section itself, and then go to the text editor or any other portal you want to use the emoji in, and press Ctrl + V to paste and insert the emoji in your conversation or text without any hassle.

Conclusion
While the emojis were introduced to Windows as late as 2012, Windows 11 has a wide range of these virtual objects or faces for various occasions and to convey different expressions respectively. Furthermore, Windows 11 also gives you access to Tenor’s GIFs, and ASCII characters with particular combinations to represent the emojis, as it was done back in the days of button-operated cellphones.
Also, if the built-in emoji keyboard doesn’t have your favorite expressions and smileys, you can always generate your custom ones by going to http://www.iemoji.com/ , and using the options that the website offers. All in all, it’s easy to learn how to use emojis on Windows as long as you have access to the correct tutorial that explains the process in an easy manner.
02 Part 2: How to Use Emojis with Keyboard Shortcuts
03 Part 3: How to Use Emojis on Windows PC with Touch Keyboard
04 Part 4: What’s New in Emojis in Windows 11
05 Part 5: How to Get More Emojis in Windows 11
Part 1: The History of Emojis in Windows
Although emojis are present in some form or the other since the mid-‘90s, they were not quite popular back then. With the evolution of smartphones, these iconic characters got attention from the then-teenagers. Seeing this, in 2012, Microsoft introduced the first-ever set of black-and-white emojis with the release of Windows 8, and after some time, the company also added the same to Windows 7 that was rolled out along with the updates for the OS.
With the release of Windows 10 in 2015, a wide range of full-fledged colored emojis was introduced and received a large number of positive reactions from the users. As of today, emojis have become an integral part of everyone’s day-to-day text conversation, be it on Skype, WhatsApp, Facebook, or any other such platform.
Part 2: How to Use Emojis with Keyboard Shortcuts
A keyboard shortcut is a combination of two or more keys that are pressed simultaneously to trigger a pre-assigned event or action. A good example of a keyboard shortcut is ‘Ctrl + S’ which, when pressed, saves the document you’re working on.
While learning the process of how to use emoji in Windows 10, it is equally imperative to memorize the shortcut keys to insert those icons without taking your hands off the keyboard. This not only saves your time, but it also prevents you from going through the lengthy process of opening the emojis keyboard, navigating through all the available icons to choose the one you’re looking for, and then clicking it to insert in the document or conversation.
Nevertheless, it would be a good idea to learn how to launch the emojis keyboard, and the process is simple. All you need to do is:
- Make sure that your keyboard cursor is in an app that can accept text inputs. A text editor like MS Word or WordPad could be a good example
- Press the Windows + ; (semicolon) or Windows + . (period) keys together to open the emojis keyboard
Once the keyboard is open, you can click any of the available emojis to insert it in your conversion or text content.
As for the shortcuts, depending on the type of expression you want to convey, there could be thousands of them. Some of the commonly used emojis and their universal shortcut keys for both Windows 10 and Windows 11 include:
: (colon) + ) (right brace) will create a smiley face
: (colon) + ( (left brace) will create a sad face
: (colon) + ; (semicolon) will create a wink face
…and so on. You can conduct a quick online search to get the entire list of keyboard shortcuts and the emojis that they will create. For your convenience, a link from the Microsoft official website is given below:
Part 3: How to Use Emojis on Windows PC with Touch Keyboard
If you have Microsoft Surface or any other device that has Windows 10 or Windows 11 installed on it, and can accept inputs via touch keyboard, you can enable the feature in the operating system, and then use the touch keyboard to add emojis to your conversion or content. You can follow the instructions given below to enable touch keyboard, and then learn how to use emojis on Windows 11 or Windows 10 via touch:
- Right-click anywhere on the taskbar (Windows 11 is used here for demonstration), and then click Taskbar settings
- From the right area of the Settings window that opens next, scroll down to the Taskbar corner icons section, and then turn on the Touch keyboard switch
- Launch an app that can accept text inputs, e.g., a text editor, chatting app, etc. Click or tap the Touch keyboard icon from the notification area that is present at the bottom-right corner of the screen.
- Click or tap the Emojis icon from the upper-left corner of the touch keyboard that opens up, and then touch your preferred emoji to add it to your text or conversation.
Part 4: What’s New in Emojis in Windows 11
In addition to learning how to use emojis on Windows 10, it is also important to know what’s new with them or the emojis panel in Windows 11, the latest operating system released by Microsoft this year, i.e., 2021.
In Windows 11, although you can launch the emojis keyboard using the same shortcuts, i.e., ‘Windows + .’ or ‘Windows + ;’ keys as mentioned earlier, the emojis keyboard itself has four sections, namely:
- Emojis – Contains various emojis and smileys
- GIF – Gives you access to various animated GIFs from Tenor
- Kamojis – Lets you add the ASCII characters for emojis, e.g., :-) or :-(
- Symbols – To add important symbols to your text, e.g., ©, ®, etc.
In addition to this, the 2D Clippy emoji has also been introduced with Windows 11, and can be located by launching the emojis keyboard, and typing ‘Clippy’.
Part 5: How to Get More Emojis in Windows 11
If the built-in emoji library doesn’t contain your favorite expressions, you can always get several more by following the instructions given below:
- Launch your favorite web browser on Windows 11, and then go to http://www.iemoji.com/
- Click an emoji from the available options or copy one from your favorite portal, and paste it in the Paste Emoji here field
- Review the emoji in the MESSAGE PREVIEW field, and click Create from the Options section to generate the emoji that can be sent as a message or image
- Alternatively, click Copy from the Options section itself, and then go to the text editor or any other portal you want to use the emoji in, and press Ctrl + V to paste and insert the emoji in your conversation or text without any hassle.
Conclusion
While the emojis were introduced to Windows as late as 2012, Windows 11 has a wide range of these virtual objects or faces for various occasions and to convey different expressions respectively. Furthermore, Windows 11 also gives you access to Tenor’s GIFs, and ASCII characters with particular combinations to represent the emojis, as it was done back in the days of button-operated cellphones.
Also, if the built-in emoji keyboard doesn’t have your favorite expressions and smileys, you can always generate your custom ones by going to http://www.iemoji.com/ , and using the options that the website offers. All in all, it’s easy to learn how to use emojis on Windows as long as you have access to the correct tutorial that explains the process in an easy manner.
How to Make a Wonderful Video Slideshow with Your Travel Photos
How to Make Video Slideshow with Your Travel Photos

Ollie Mattison
Mar 27, 2024• Proven solutions
We all love traveling and for a good reason. It allows us to relax, it removes the pressure from our life and it just makes the entire experience a lot better. But if you are a fan of taking picture while travelling, why not try to create a video slideshow with your images? This is one of the best and most original ways you can use it in order to share your travels with others. It works magically and it manages to bring in front some of those unique moments. However, you do need to have the proper tools when you want to create such a slideshow, but that’s great as we are here to help you with that.
How can you create a travel slideshow with travel photos
Things you need to know before creating it
Before you create the travel slideshow you have to keep in mind a few things. If you don’t then the results will not be as good as you expect. You have to be committed to the idea of having the best results and as long as you do that the outcome will be very well worth it.
You need to try and consider your audience because based on that the slideshow will have a specific format. You also need to think about telling a story as that will make it a lot more interesting other than just having a bunch of images aligned together in a non-meaningful manner.
Wondershare Filmora – The best tool to create a video slideshow with your travel photos
But one has to wonder, what tool should you use to create such a travel slideshow? Wondershare Filmora is the application of choice in this regard because it does help offer a huge variety of amazing features that all add up in order to deliver great value!
- Wondershare Filmora is great for beginners as it makes editing a breeze thanks to the stellar interface
- It also integrates transitions as well as filters and effects. It provides you with a refined set of tools that help maintain a good focus on results.
- It helps you add sound effects and a variety of music types to help you with the story.
- You can burn the result to DVD or you can share it on social media and YouTube/Vimeo among others right from within the app.
How can you create video slideshows with Wondershare Filmora?
Creating a unique slideshow video with this tool is actually very easy and it does provide you with a huge amount of value should you choose to use it. Here are several things you need to consider when making a travel slideshow video. First, choose the right music for the travel slideshow; second, adjust the duration of the photos; third, transitions and effects.
Here are the steps you need to focus on when creating a travel slideshow video with Wondershare Filmora:
Filmstock Stock Media Library ](https://filmstock.wondershare.com/creative-theme-tourism?spm=rs.filmora%5Fweb&source%5Fchannel=seo%5Farticle )
Step 1: Download and install Wondershare Filmora, then open it.
Add all the travel photos into the applications. You can add in multiple folders in order to make sorting the images a lot easier.
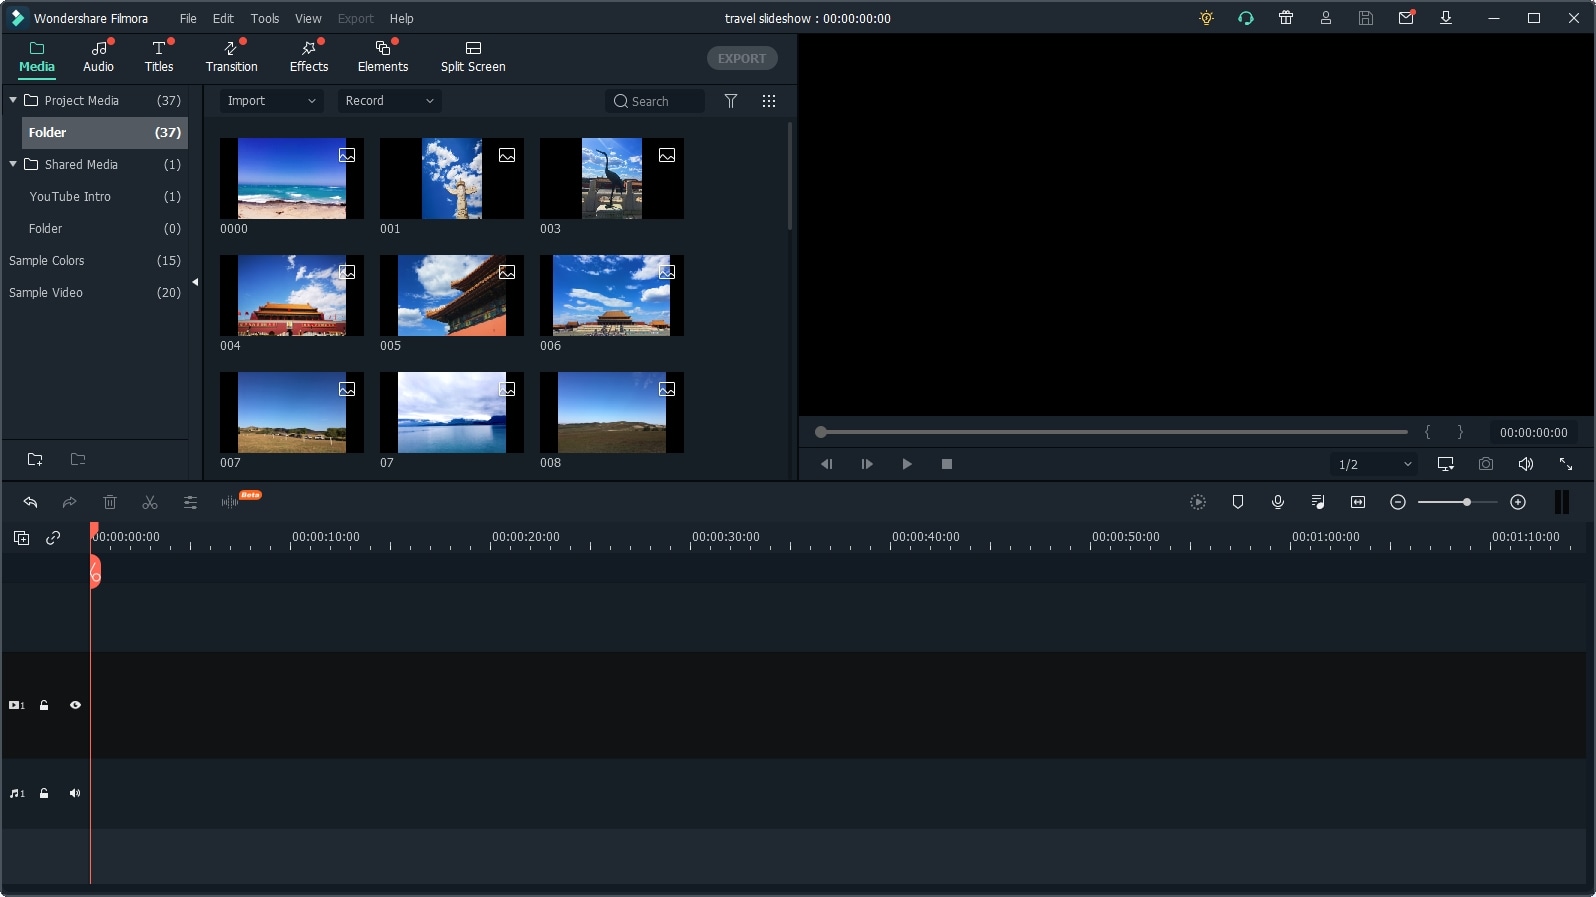
Next, set up the photo duration to the desired length, so that you don’t need to adjust the photo duration one by one.

Step 2: Now, it’s time to determine and add music in the background. Add some sounds and royalty-free music in Wondershare Filmora and then use the media library to help you give more of an impact to the entire experience.

If you want to sync the photo to the background music, you can use the Beat Detection tool in Filmora and mark the highlights accordingly.
Step 3: Once you did that, you will have to drag and then drop the images directly to the timeline. Here is where you can change things like saturation, hue, brightness, contrast and other features.
You can also rotate the images and crop them if you see fit. If some of the travel photos have different aspect ratios, you can select Crop to Fit so all the photos will be in the same aspect ratio without blackbar.
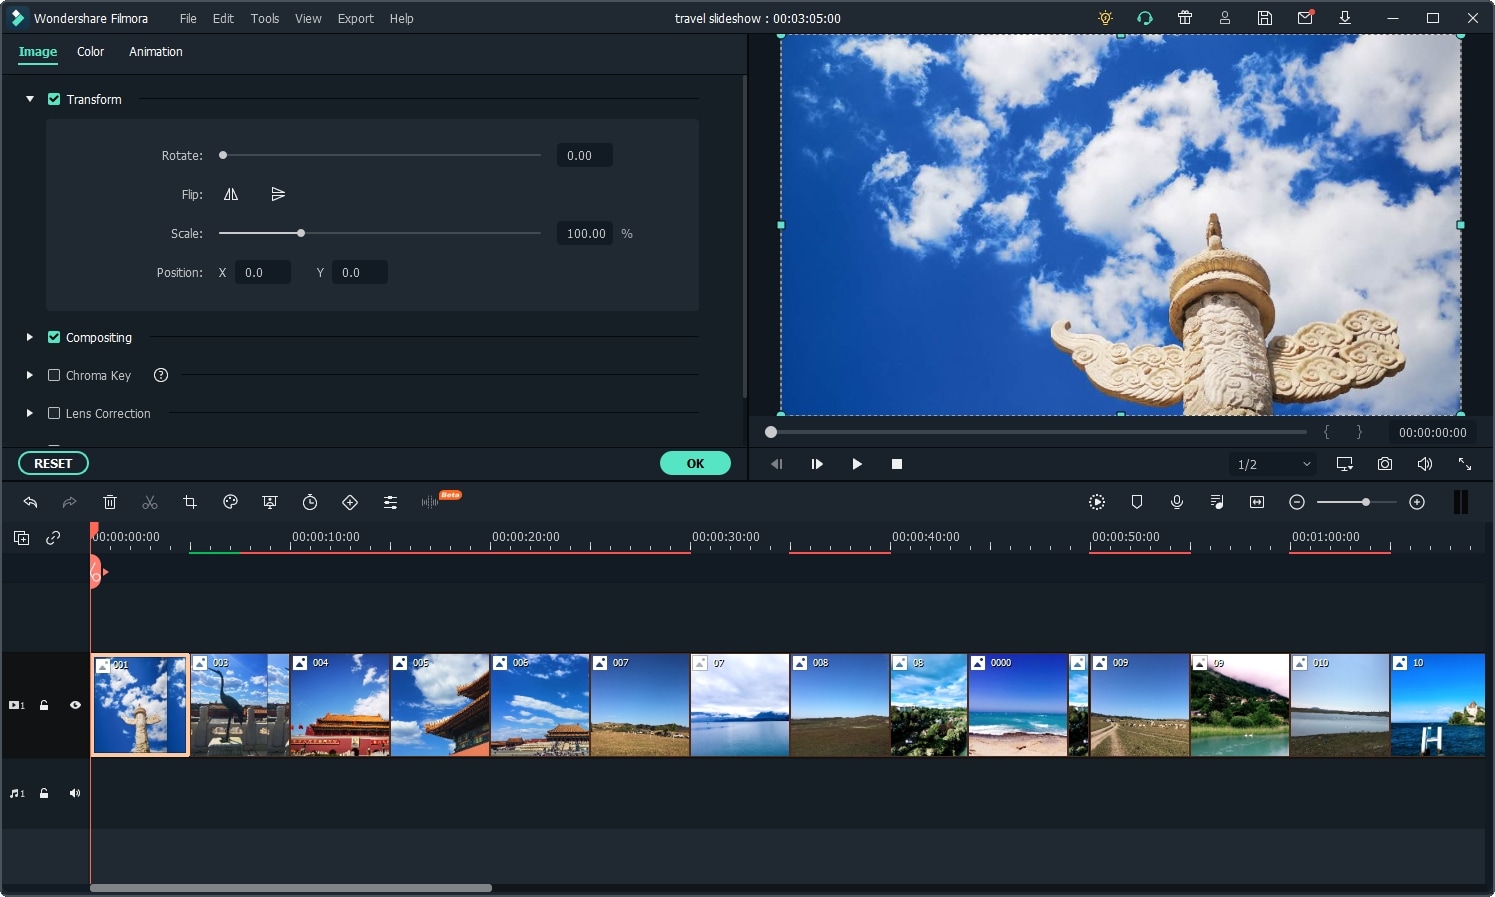
Step 4: At this point, you do need to try and add transitions between each of the images.
When you are done with that, you have to select the filters and overlays that will help you make your travel slideshow look better. This is an important step and you do want to spend a good amount of time with it.
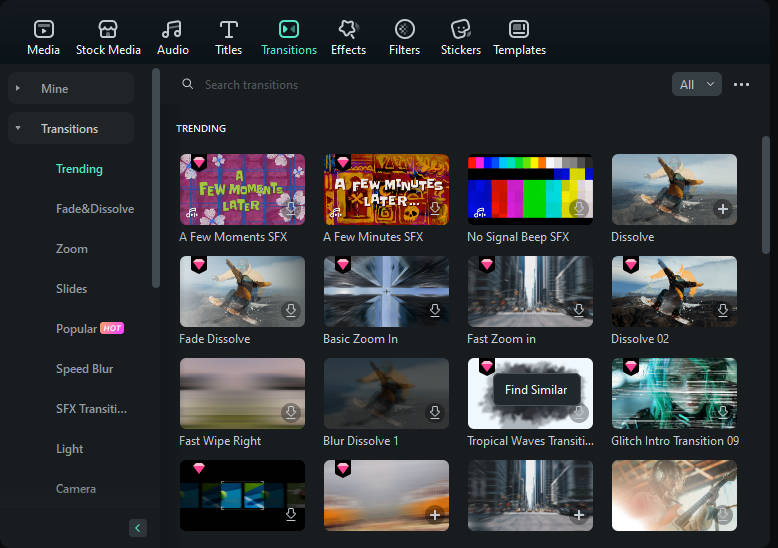
Step 5: Lastly, you will have to export the slideshow as you see fit, but you also have the option to share it on YouTube if you so desire.

Conclusion
Wondershare Filmora is a very good application for those that want a unique, fun travel slideshow. It allows you to get all the tools and high-quality features that you need in order to take the experience to the next level. We recommend you to check it out right away as it’s well worth the investment Download Mac Version ](https://tools.techidaily.com/wondershare/filmora/download/ )
Ollie Mattison
Ollie Mattison is a writer and a lover of all things video.
Follow @Ollie Mattison
Ollie Mattison
Mar 27, 2024• Proven solutions
We all love traveling and for a good reason. It allows us to relax, it removes the pressure from our life and it just makes the entire experience a lot better. But if you are a fan of taking picture while travelling, why not try to create a video slideshow with your images? This is one of the best and most original ways you can use it in order to share your travels with others. It works magically and it manages to bring in front some of those unique moments. However, you do need to have the proper tools when you want to create such a slideshow, but that’s great as we are here to help you with that.
How can you create a travel slideshow with travel photos
Things you need to know before creating it
Before you create the travel slideshow you have to keep in mind a few things. If you don’t then the results will not be as good as you expect. You have to be committed to the idea of having the best results and as long as you do that the outcome will be very well worth it.
You need to try and consider your audience because based on that the slideshow will have a specific format. You also need to think about telling a story as that will make it a lot more interesting other than just having a bunch of images aligned together in a non-meaningful manner.
Wondershare Filmora – The best tool to create a video slideshow with your travel photos
But one has to wonder, what tool should you use to create such a travel slideshow? Wondershare Filmora is the application of choice in this regard because it does help offer a huge variety of amazing features that all add up in order to deliver great value!
- Wondershare Filmora is great for beginners as it makes editing a breeze thanks to the stellar interface
- It also integrates transitions as well as filters and effects. It provides you with a refined set of tools that help maintain a good focus on results.
- It helps you add sound effects and a variety of music types to help you with the story.
- You can burn the result to DVD or you can share it on social media and YouTube/Vimeo among others right from within the app.
How can you create video slideshows with Wondershare Filmora?
Creating a unique slideshow video with this tool is actually very easy and it does provide you with a huge amount of value should you choose to use it. Here are several things you need to consider when making a travel slideshow video. First, choose the right music for the travel slideshow; second, adjust the duration of the photos; third, transitions and effects.
Here are the steps you need to focus on when creating a travel slideshow video with Wondershare Filmora:
Filmstock Stock Media Library ](https://filmstock.wondershare.com/creative-theme-tourism?spm=rs.filmora%5Fweb&source%5Fchannel=seo%5Farticle )
Step 1: Download and install Wondershare Filmora, then open it.
Add all the travel photos into the applications. You can add in multiple folders in order to make sorting the images a lot easier.
Next, set up the photo duration to the desired length, so that you don’t need to adjust the photo duration one by one.
Step 2: Now, it’s time to determine and add music in the background. Add some sounds and royalty-free music in Wondershare Filmora and then use the media library to help you give more of an impact to the entire experience.
If you want to sync the photo to the background music, you can use the Beat Detection tool in Filmora and mark the highlights accordingly.
Step 3: Once you did that, you will have to drag and then drop the images directly to the timeline. Here is where you can change things like saturation, hue, brightness, contrast and other features.
You can also rotate the images and crop them if you see fit. If some of the travel photos have different aspect ratios, you can select Crop to Fit so all the photos will be in the same aspect ratio without blackbar.
Step 4: At this point, you do need to try and add transitions between each of the images.
When you are done with that, you have to select the filters and overlays that will help you make your travel slideshow look better. This is an important step and you do want to spend a good amount of time with it.
Step 5: Lastly, you will have to export the slideshow as you see fit, but you also have the option to share it on YouTube if you so desire.
Conclusion
Wondershare Filmora is a very good application for those that want a unique, fun travel slideshow. It allows you to get all the tools and high-quality features that you need in order to take the experience to the next level. We recommend you to check it out right away as it’s well worth the investment Download Mac Version ](https://tools.techidaily.com/wondershare/filmora/download/ )
Ollie Mattison
Ollie Mattison is a writer and a lover of all things video.
Follow @Ollie Mattison
Best Photo Slideshow Maker: How to Make a Photo Slideshow
Best Photo Slideshow Maker: How to Make a Photo Slideshow

Shanoon Cox
Mar 27, 2024• Proven solutions
Have you ever taken so many photos for your family, friends and special events? One fun-filled way of sharing them is to make a photo slideshow. That helps back up the memories in your life. What’s more, it can all be done in just a few simple clicks if you use slideshow maker like DVD Slideshow Builder Deluxe . With this programs, you can easily weave photos and video into work of art to amaze anyone. Here let’s see how to easily and creatively make a photo slideshow and burn to DVD with these all-in-one slideshow tools.
Download and run DVD slideshow builder , then follow the steps below to see how to make a photo slideshow.

Ways for Photo Slidehow making
Step 1. Add photo or video files to the photo slideshow maker
After running the photo slideshow maker, you’ll start from the “Organize” tab. On the interface, there are two Add Files buttons any of which you can click to add your photos and videos. Then just drag and drop photos or videos to arrange their order on storyboard. If you want to edit the photos, click “Edit” to add effects, crop photos, repair red-eye or add caption.
Tip: To have a large viewe of all the files, click the “Expand” button on top right corner of storyboard.

Step 2. Customize the slideshow like background music and transitions
When importing your files, more than 100 transition effects will be randomly and automatically applied between every two photo or video. However, you can change them anytime in the “Personalize” tab. Just drag and drop a transition from the list to the thumbnail between two slides. You can also add effects, motion or intro/credit as you like.
Adding music can greatly enhance the vibe of your photo slideshow. To achieve this, click “Music” on the storyboard. This photo slideshow maker enables you to add several different pieces of music according to your needs. If you want to add your own voice, just click “Voice Over” to record and then add it to the slideshow.

Step 3 Create photo slideshow and burn to DVD

Go to the “Create” tab and click the “Preview” button to make sure the photo slideshow is good enough. Go back to Personalize tab to change if necessary. When you are happy with the result, choose the options on the left to export photo slideshow to DVD, PC, portable devices, etc. You can also directly upload slideshow to Youtube and send message to Facebook and Twitter friends.

Now sit back and relax, it’ll only take a while to get your photo slideshow for sharing anywhere.
Shanoon Cox
Shanoon Cox is a writer and a lover of all things video.
Follow @Shanoon Cox
Shanoon Cox
Mar 27, 2024• Proven solutions
Have you ever taken so many photos for your family, friends and special events? One fun-filled way of sharing them is to make a photo slideshow. That helps back up the memories in your life. What’s more, it can all be done in just a few simple clicks if you use slideshow maker like DVD Slideshow Builder Deluxe . With this programs, you can easily weave photos and video into work of art to amaze anyone. Here let’s see how to easily and creatively make a photo slideshow and burn to DVD with these all-in-one slideshow tools.
Download and run DVD slideshow builder , then follow the steps below to see how to make a photo slideshow.
Ways for Photo Slidehow making
Step 1. Add photo or video files to the photo slideshow maker
After running the photo slideshow maker, you’ll start from the “Organize” tab. On the interface, there are two Add Files buttons any of which you can click to add your photos and videos. Then just drag and drop photos or videos to arrange their order on storyboard. If you want to edit the photos, click “Edit” to add effects, crop photos, repair red-eye or add caption.
Tip: To have a large viewe of all the files, click the “Expand” button on top right corner of storyboard.
Step 2. Customize the slideshow like background music and transitions
When importing your files, more than 100 transition effects will be randomly and automatically applied between every two photo or video. However, you can change them anytime in the “Personalize” tab. Just drag and drop a transition from the list to the thumbnail between two slides. You can also add effects, motion or intro/credit as you like.
Adding music can greatly enhance the vibe of your photo slideshow. To achieve this, click “Music” on the storyboard. This photo slideshow maker enables you to add several different pieces of music according to your needs. If you want to add your own voice, just click “Voice Over” to record and then add it to the slideshow.
Step 3 Create photo slideshow and burn to DVD
Go to the “Create” tab and click the “Preview” button to make sure the photo slideshow is good enough. Go back to Personalize tab to change if necessary. When you are happy with the result, choose the options on the left to export photo slideshow to DVD, PC, portable devices, etc. You can also directly upload slideshow to Youtube and send message to Facebook and Twitter friends.
Now sit back and relax, it’ll only take a while to get your photo slideshow for sharing anywhere.
Shanoon Cox
Shanoon Cox is a writer and a lover of all things video.
Follow @Shanoon Cox
Top 6 Animated Emoji Video Effects
6 Popular Animated Emoji Video Effects in 2024

Max Wales
Mar 27, 2024• Proven solutions
The daily grind of hard work, starting from dawn to dusk, has become overwhelming and mind-crushing. An average mind requires entertainment and recreation to work better and function properly. This brings us to the need for funny videos that make use of animated emoji to make our life more bearable.
Emojis like laughing emojis and thumbs-up emojis have a quirky way of increasing the serotonin levels in our body. Therefore, this article shall walk you through the top 6 animated emoji video effects presented by Wondershare Filmstock . In addition to this, there will be 8 peculiar ideas to make the video funny.
If you want to know the steps to edit video with animated emojis in Filmora, we have got you! So, without delaying it any longer, let us dig in!
- Part 1: Top 6 Animated Emoji Video Effects for Filmora Video Editor
- Part 2: 8 Ideas for Making Funny Videos with Animated Emoji
- Part 2: How to Edit Video with Animated Emoji in Filmora?
Part 1: Top 6 Animated Emoji Video Effects for Filmora Video Editor
The section shall revolve around the top 6animated emoji video effects that are presented by an online effects store known as Wondershare Filmstock. This website allows the user to have access to an unlimited range of effects, transitions, titles, graphics, elements, images, audio, and visual effects. One can unleash their creative ideas and download effects for every relevant situation.
Along with this, it is constantly growing and unique media with no fear of attribution. If this is not the ideal case scenario, then we don’t know what it will be! The following set of effects are the top 6 animated emoji video effects to incorporate in your YouTube introductory videos, TikTok clips, and Instagram stories or reels.
1. Animated Emoji Pack
Animated kiss emoji, animated dancing emoji, and laughing emoji, this emoji pack has covered your basics. With 24 elements, Animated Emoji Pack provides an easy way to express yourself and say it out loud using the language of emojis.
2. Emoji Stickers Pack
If you are on the verge of a nervous breakdown and require a stickers pack with 32 elements that include a crying emoji, this pack has to be your answer. In addition to this, this effect is 100% compatible with Wondershare Filmora 9.6 and above.
3. Message Bubbles Pack
With message and chat bubbles that make communication a lot faster and quick, allow me to introduce you to Message Bubbles Pack. It constitutes animated cute emoji faces and texting graphics to make your social media fun and interesting.
4. 3D Social Media Icons Pack
Incorporated with 12 titles, 60 elements, 4 overlays, and 6 transitions, 3D Social Media Icons Pack is sure to fill your shoes. One can have access to unlimited emoji animated in 3D animation and showcase themselves as the cool and classy one of the lot.
5. Cute Cartoon Emoji Pack
The Cartoon Emoji Pack is an amalgamation of a wide range of cartoon emojis to express yourself as best as you can. With the right choice of emoji, one can communicate themselves whilst using a total of 25 elements.
6. Reactions Stickers Pack
With a speech and thought bubble, Reaction Sticker Pack presents all sorts of reaction emojis and smileys. In addition to this, the template offers 11 titles, 4 overlays, 40 elements, and 2 transitions. Get ready to express your reactions in the funniest way.
Part 2: 8 Ideas for Making Funny Videos with Animated Emoji
The use of free animated emoji to make videos funny has become a thing now. Furthermore, it lets the user express themselves as a coping mechanism. Win-win situation, right? The article provides 8 fruitful ideas for making videos funny with these animated emojis. Let us have a look at them!

1. Face Swap with Animated Emoji
The first idea is sure to make the audience burst into laughter. For starters, one can swap their faces with animated emojis like an animated dancing emoji or a crying emoji. You can tell your audience what you are feeling right at the moment as you use those emojis and then show your real face.
2. Sharing a Story
One can share a funny story with their audience by using the power of animated emojis. They can explain what happened with a series of steps and incorporate emojis in the background that sync with the emotional reaction of the user as well as the audience.
3. Dream Wedding Video
The next idea is related to a wedding video. To make it funnier, the user can first create a video of the dream wedding planned for them. Combine it with the actual wedding video and then use 3D animated emojis to express how everything was messed up and, in the end, and didn’t go as planned.
4. Thoughts on Books and Netflix Series
The next idea is a workable and effective tool to make your video funnier. The content creator can make a video of a book he read or the Netflix series he watched and provide the audience with his thoughts. They can communicate the flaws of the movie or a book using animated sticker packs and gifs to make it funny and interesting.
5. Coworkers and Superiors Video
In this idea, the user can make a video showing his workplace and include all his superiors and coworkers. Afterward, he can edit the video by expressing himself what he actually feels about them and using different emojis to display the reaction of his coworkers in the video.
6. Video Techniques
The different video techniques can be used to make people laugh and be attracted to the video. For once, the user can quickly zoom in to the character when he is speaking to create a dramatic pull. In addition to this, one can also keep the camera on even after their dialogue delivery is concluded. This will capture an off-the-record reaction.
7. Capturing the Pets
The best idea yet is capturing the pets in the video. The user can record their pets doing insane and crazy things and insert emojis to bring a funny addition to the video. Along with this, one can use the thinking emoji to assume what their pet has been thinking at the moment.
8. A Random Day of your Life
One can add the element of surprise and laughter by making a video on their random day and how they want it to go. Record the video of your whole day and then combine it with a wide range of emojis such as crying emoji, laughing emoji, and kiss emoji.
Part 3: How to Edit Video with Animated Emoji in Filmora?
The last part of this article covers a brief introduction to a renowned video editing software and provides a step-by-step guideline to edit videos using animated emojis. Wondershare Filmora makes sure that the user has the right tools and mechanism to make their editing journey fun and reliable. It offers an effortless and user-friendly interface, a wide range of effects and transitions, and a motion tracking feature.
In addition to this, one can count on this software to change the backgrounds, insert split screens, discover filters and overlays, control speed, and personalize the creation. If you are all set to use this amazing video editing software, follow the procedure keenly to avoid any future inconvenience.
Step 1: Initiating the Project
Install Wondershare Filmora in your system and launch it as soon as the process concludes. Tap on the “New Project” tab on the welcome window of the software. Set the aspect ratio for your video. The resolution can be changed by clicking on the “File” option and then “Project Settings.”
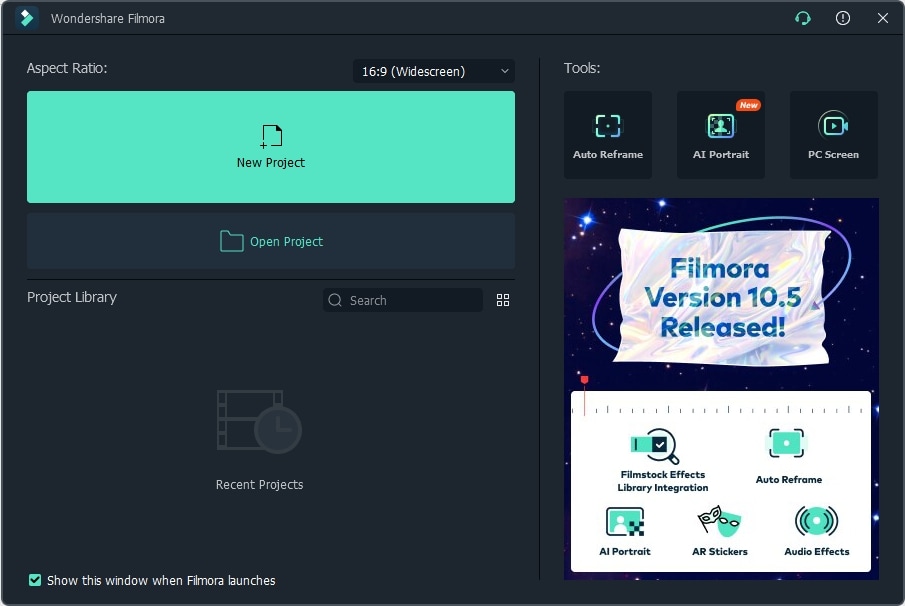
Step 2: Importing the Video
Now, tap on the “Import Media Files Here” menu option, which is located on the left side of the interface of Filmora. Tap on the targeted video to import it. Moving on, drag and drop the media file to the timeline.
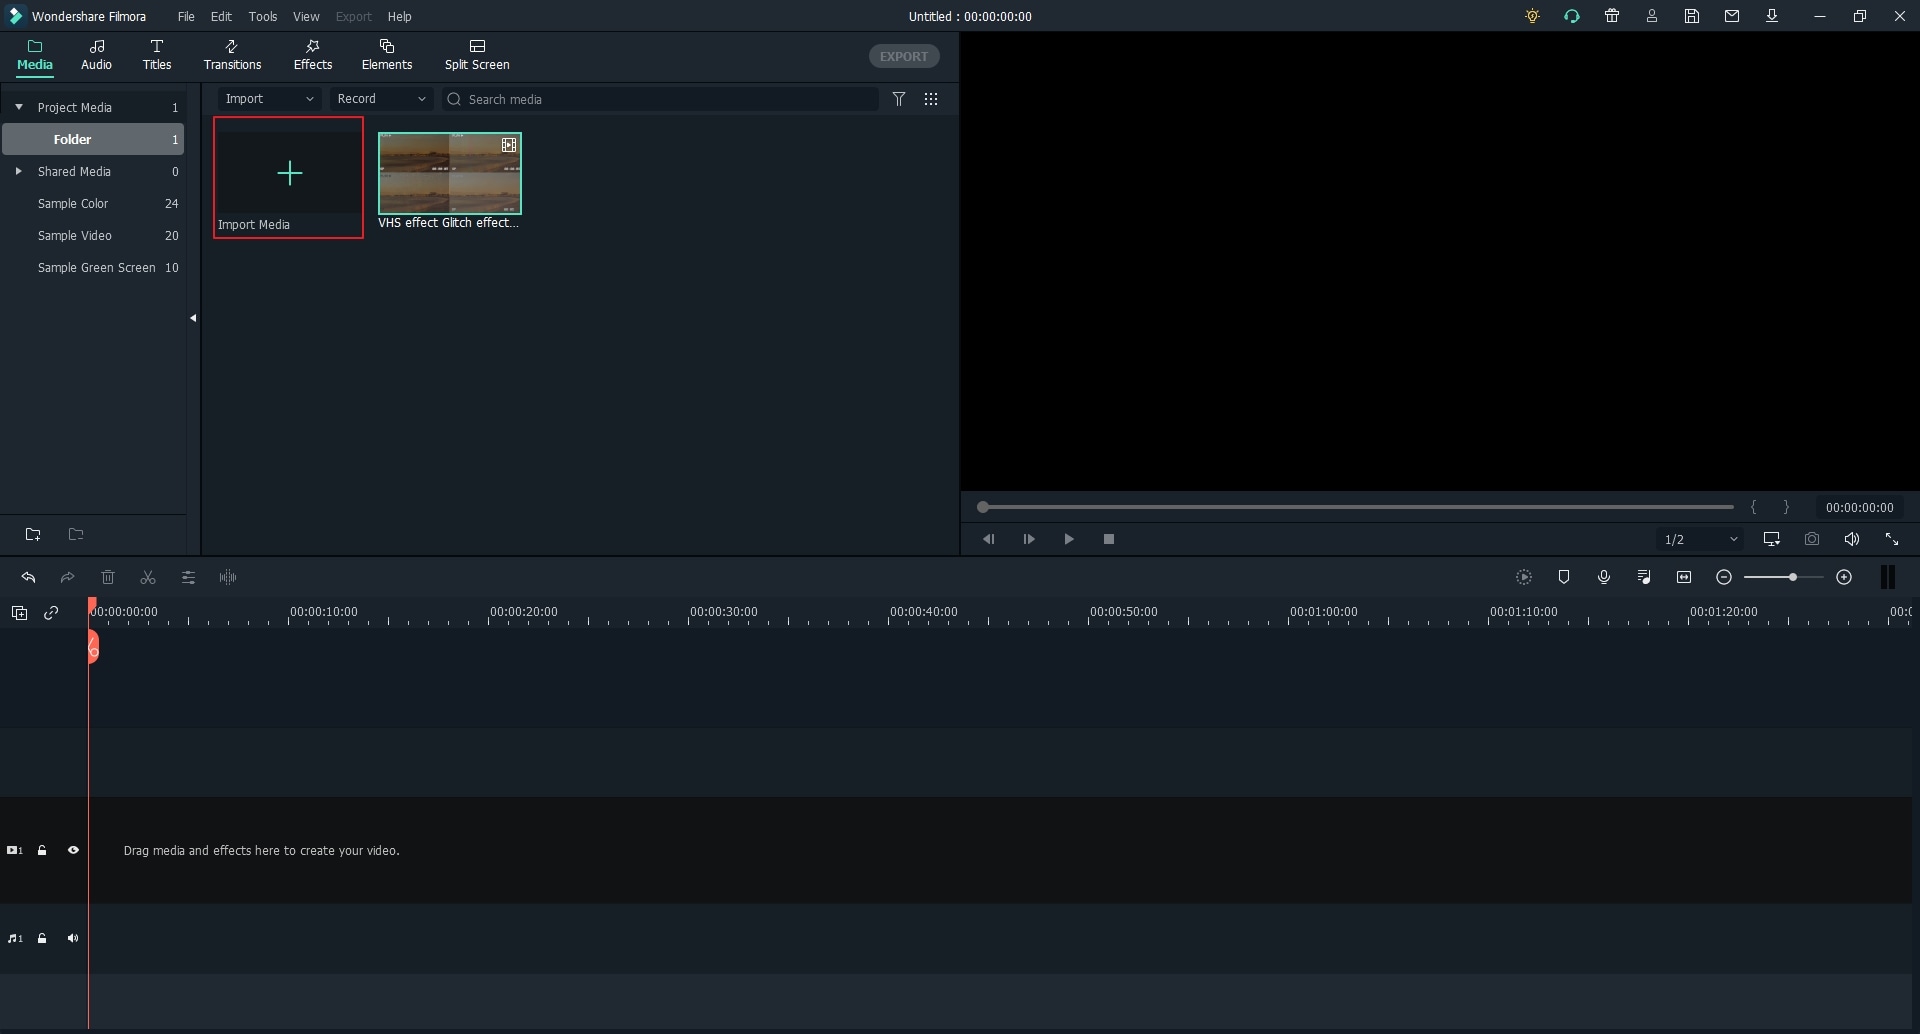
Step 3: Processing the Video
Import the media files to the video track so that they can be manipulated. Now, process the video as you wish to. You can edit, trim, split, rotate, resize, crop, and combine videos.
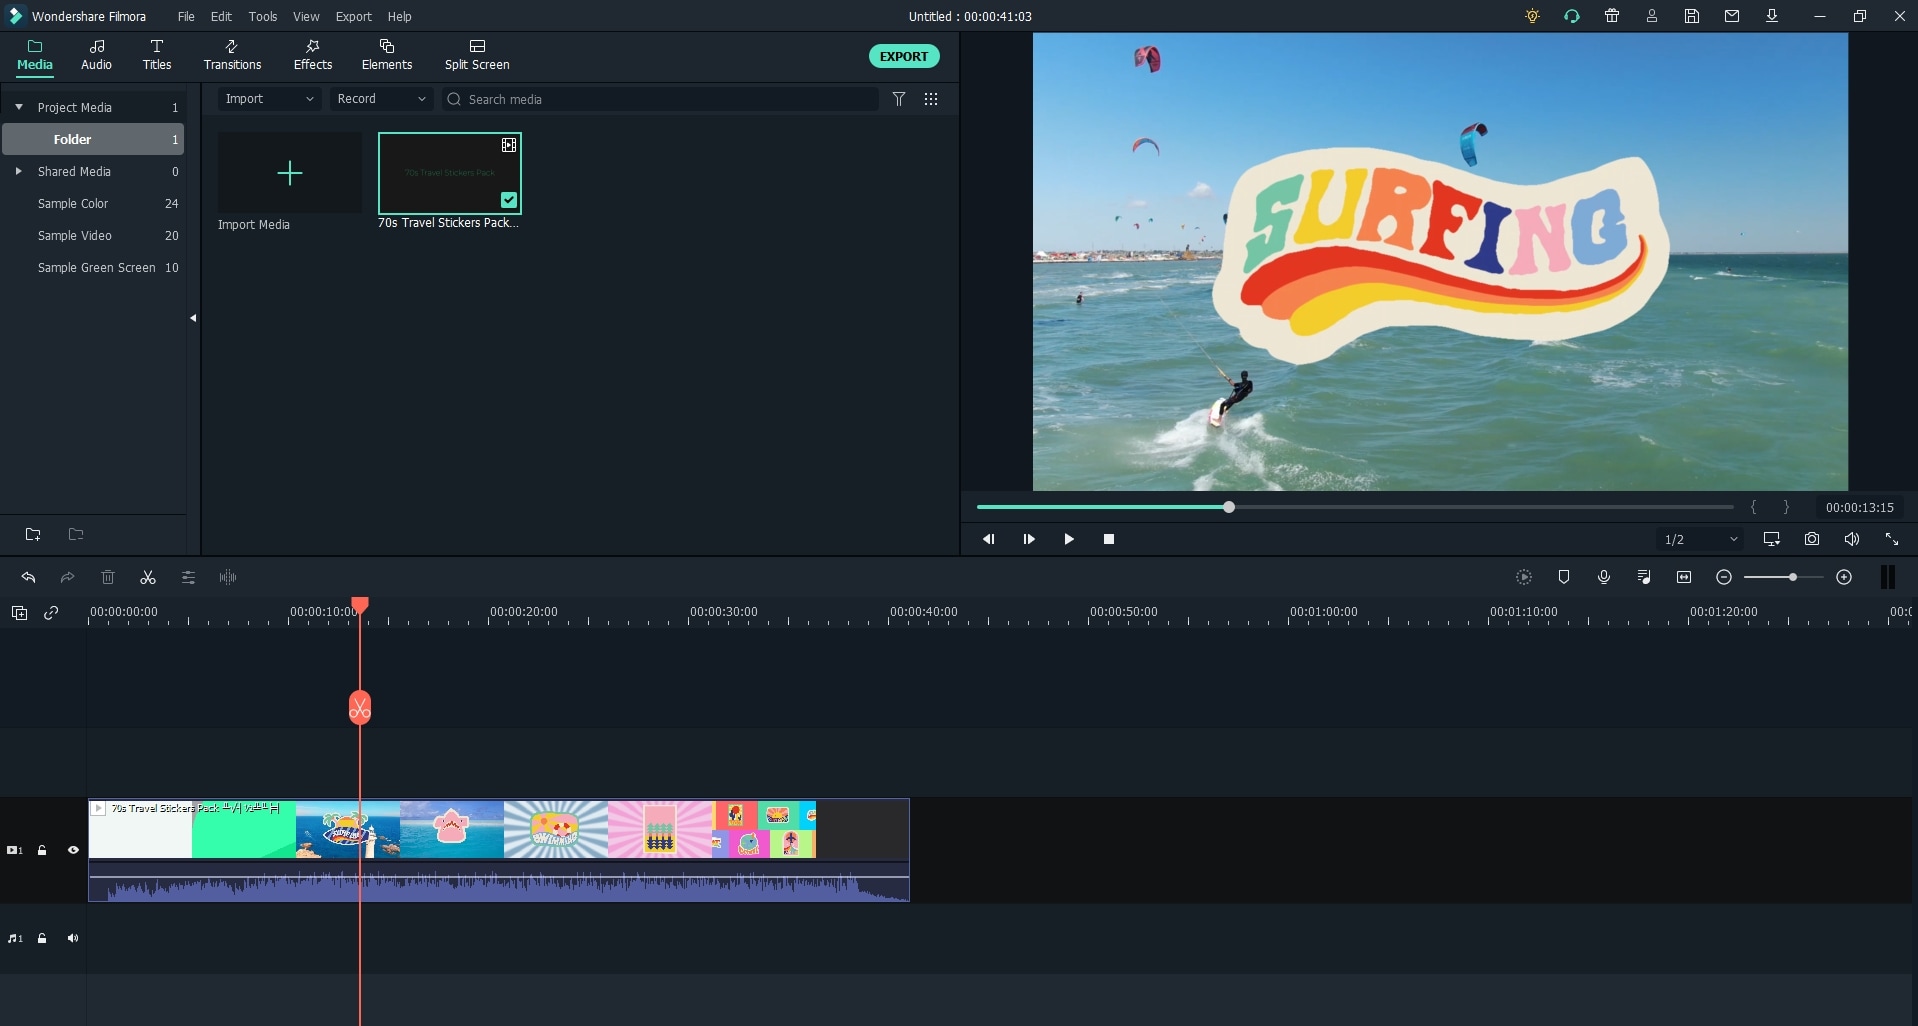
Step 4: Adding the Emoji
On the top left section of the window, navigate to the “Elements” tab. From there, pick out the “Emoji” category and browse a wide range of emojis. Drag and drop the emojis to your video. You can relocate and resize the emoji based on the video dimensions.
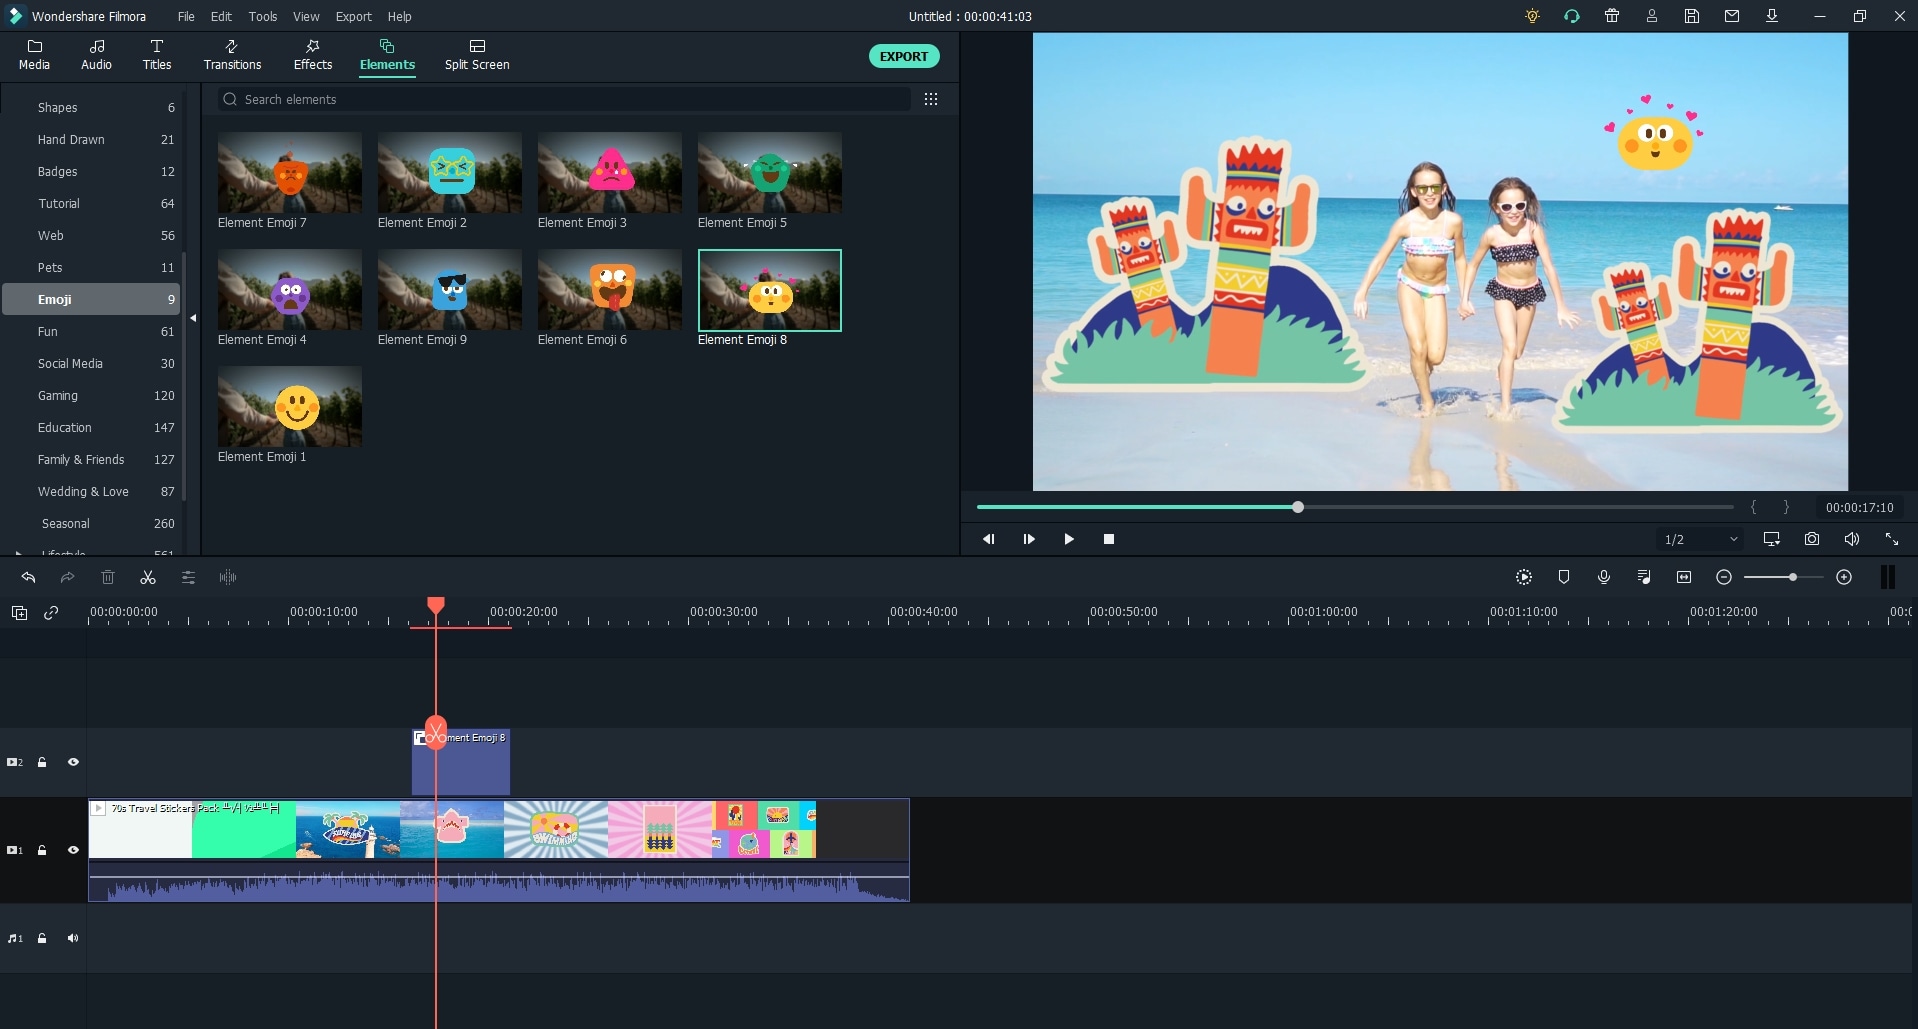
Step 5: Exporting the Video
Click on “Export,” located on the top right corner of the window. Pick out the output video format and hit “Export” to finalize the editing process.
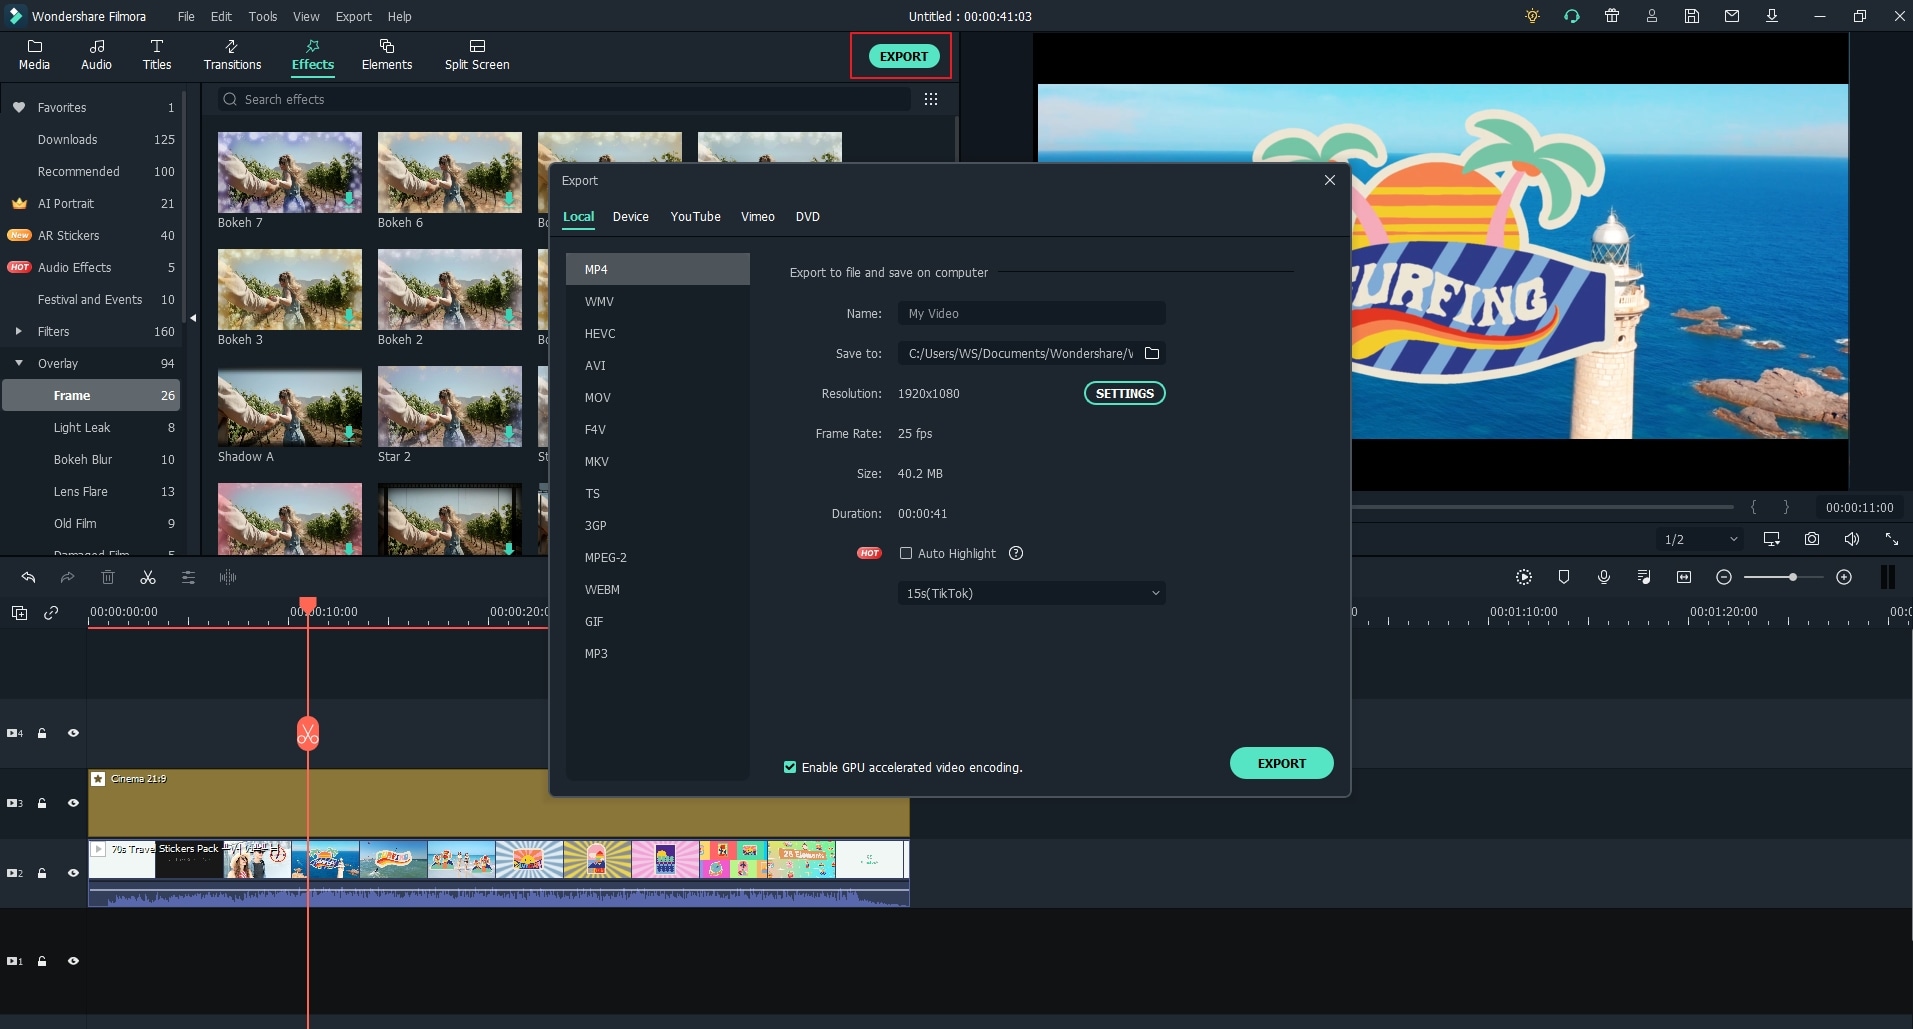
Wrapping Up
The article put forward a detailed description of 8 viable ideas that are sure to make the video funnier. Furthermore, Wondershare Filmstock was introduced as an online effects store, and Wondershare Filmora was presented as an amazing video editing software. One can have a look at the effects offered by Filmora in section 1 to make their videos interesting, funny, and watchable.
Max Wales
Max Wales is a writer and a lover of all things video.
Follow @Max Wales
Max Wales
Mar 27, 2024• Proven solutions
The daily grind of hard work, starting from dawn to dusk, has become overwhelming and mind-crushing. An average mind requires entertainment and recreation to work better and function properly. This brings us to the need for funny videos that make use of animated emoji to make our life more bearable.
Emojis like laughing emojis and thumbs-up emojis have a quirky way of increasing the serotonin levels in our body. Therefore, this article shall walk you through the top 6 animated emoji video effects presented by Wondershare Filmstock . In addition to this, there will be 8 peculiar ideas to make the video funny.
If you want to know the steps to edit video with animated emojis in Filmora, we have got you! So, without delaying it any longer, let us dig in!
- Part 1: Top 6 Animated Emoji Video Effects for Filmora Video Editor
- Part 2: 8 Ideas for Making Funny Videos with Animated Emoji
- Part 2: How to Edit Video with Animated Emoji in Filmora?
Part 1: Top 6 Animated Emoji Video Effects for Filmora Video Editor
The section shall revolve around the top 6animated emoji video effects that are presented by an online effects store known as Wondershare Filmstock. This website allows the user to have access to an unlimited range of effects, transitions, titles, graphics, elements, images, audio, and visual effects. One can unleash their creative ideas and download effects for every relevant situation.
Along with this, it is constantly growing and unique media with no fear of attribution. If this is not the ideal case scenario, then we don’t know what it will be! The following set of effects are the top 6 animated emoji video effects to incorporate in your YouTube introductory videos, TikTok clips, and Instagram stories or reels.
1. Animated Emoji Pack
Animated kiss emoji, animated dancing emoji, and laughing emoji, this emoji pack has covered your basics. With 24 elements, Animated Emoji Pack provides an easy way to express yourself and say it out loud using the language of emojis.
2. Emoji Stickers Pack
If you are on the verge of a nervous breakdown and require a stickers pack with 32 elements that include a crying emoji, this pack has to be your answer. In addition to this, this effect is 100% compatible with Wondershare Filmora 9.6 and above.
3. Message Bubbles Pack
With message and chat bubbles that make communication a lot faster and quick, allow me to introduce you to Message Bubbles Pack. It constitutes animated cute emoji faces and texting graphics to make your social media fun and interesting.
4. 3D Social Media Icons Pack
Incorporated with 12 titles, 60 elements, 4 overlays, and 6 transitions, 3D Social Media Icons Pack is sure to fill your shoes. One can have access to unlimited emoji animated in 3D animation and showcase themselves as the cool and classy one of the lot.
5. Cute Cartoon Emoji Pack
The Cartoon Emoji Pack is an amalgamation of a wide range of cartoon emojis to express yourself as best as you can. With the right choice of emoji, one can communicate themselves whilst using a total of 25 elements.
6. Reactions Stickers Pack
With a speech and thought bubble, Reaction Sticker Pack presents all sorts of reaction emojis and smileys. In addition to this, the template offers 11 titles, 4 overlays, 40 elements, and 2 transitions. Get ready to express your reactions in the funniest way.
Part 2: 8 Ideas for Making Funny Videos with Animated Emoji
The use of free animated emoji to make videos funny has become a thing now. Furthermore, it lets the user express themselves as a coping mechanism. Win-win situation, right? The article provides 8 fruitful ideas for making videos funny with these animated emojis. Let us have a look at them!
1. Face Swap with Animated Emoji
The first idea is sure to make the audience burst into laughter. For starters, one can swap their faces with animated emojis like an animated dancing emoji or a crying emoji. You can tell your audience what you are feeling right at the moment as you use those emojis and then show your real face.
2. Sharing a Story
One can share a funny story with their audience by using the power of animated emojis. They can explain what happened with a series of steps and incorporate emojis in the background that sync with the emotional reaction of the user as well as the audience.
3. Dream Wedding Video
The next idea is related to a wedding video. To make it funnier, the user can first create a video of the dream wedding planned for them. Combine it with the actual wedding video and then use 3D animated emojis to express how everything was messed up and, in the end, and didn’t go as planned.
4. Thoughts on Books and Netflix Series
The next idea is a workable and effective tool to make your video funnier. The content creator can make a video of a book he read or the Netflix series he watched and provide the audience with his thoughts. They can communicate the flaws of the movie or a book using animated sticker packs and gifs to make it funny and interesting.
5. Coworkers and Superiors Video
In this idea, the user can make a video showing his workplace and include all his superiors and coworkers. Afterward, he can edit the video by expressing himself what he actually feels about them and using different emojis to display the reaction of his coworkers in the video.
6. Video Techniques
The different video techniques can be used to make people laugh and be attracted to the video. For once, the user can quickly zoom in to the character when he is speaking to create a dramatic pull. In addition to this, one can also keep the camera on even after their dialogue delivery is concluded. This will capture an off-the-record reaction.
7. Capturing the Pets
The best idea yet is capturing the pets in the video. The user can record their pets doing insane and crazy things and insert emojis to bring a funny addition to the video. Along with this, one can use the thinking emoji to assume what their pet has been thinking at the moment.
8. A Random Day of your Life
One can add the element of surprise and laughter by making a video on their random day and how they want it to go. Record the video of your whole day and then combine it with a wide range of emojis such as crying emoji, laughing emoji, and kiss emoji.
Part 3: How to Edit Video with Animated Emoji in Filmora?
The last part of this article covers a brief introduction to a renowned video editing software and provides a step-by-step guideline to edit videos using animated emojis. Wondershare Filmora makes sure that the user has the right tools and mechanism to make their editing journey fun and reliable. It offers an effortless and user-friendly interface, a wide range of effects and transitions, and a motion tracking feature.
In addition to this, one can count on this software to change the backgrounds, insert split screens, discover filters and overlays, control speed, and personalize the creation. If you are all set to use this amazing video editing software, follow the procedure keenly to avoid any future inconvenience.
Step 1: Initiating the Project
Install Wondershare Filmora in your system and launch it as soon as the process concludes. Tap on the “New Project” tab on the welcome window of the software. Set the aspect ratio for your video. The resolution can be changed by clicking on the “File” option and then “Project Settings.”
Step 2: Importing the Video
Now, tap on the “Import Media Files Here” menu option, which is located on the left side of the interface of Filmora. Tap on the targeted video to import it. Moving on, drag and drop the media file to the timeline.
Step 3: Processing the Video
Import the media files to the video track so that they can be manipulated. Now, process the video as you wish to. You can edit, trim, split, rotate, resize, crop, and combine videos.
Step 4: Adding the Emoji
On the top left section of the window, navigate to the “Elements” tab. From there, pick out the “Emoji” category and browse a wide range of emojis. Drag and drop the emojis to your video. You can relocate and resize the emoji based on the video dimensions.
Step 5: Exporting the Video
Click on “Export,” located on the top right corner of the window. Pick out the output video format and hit “Export” to finalize the editing process.
Wrapping Up
The article put forward a detailed description of 8 viable ideas that are sure to make the video funnier. Furthermore, Wondershare Filmstock was introduced as an online effects store, and Wondershare Filmora was presented as an amazing video editing software. One can have a look at the effects offered by Filmora in section 1 to make their videos interesting, funny, and watchable.
Max Wales
Max Wales is a writer and a lover of all things video.
Follow @Max Wales
Also read:
- [New] Luminous Leadership Elevating Content Through Insta Hits
- [New] Template Wizardry A Blueprint for Creating Viral TikToks for 2024
- [Updated] 2024 Approved Elite Nintendo Switch Fighters Showdown (Max 156)
- 2024 Approved Top 5 Best TV for Ps5 and Xbox Series X
- Effortless AAC Upgrade From WMA on the Web: Discover How Movavi Can Help You!
- How to Make a FLV Photo Slideshow for 2024
- In 2024, Will iSpoofer update On Google Pixel Fold | Dr.fone
- New How to Add Bitmoji to Keyboard, In 2024
- New How to Make a iMovie Photo Slideshow with Music, In 2024
- Purchase MacX MediaTrans at a Reduced Price – Shop Online!
- Transforming Your Career Path with a ChatGPT-Powered Resume Guide
- Updated 2024 Approved How to Make a Slideshow with Music
- Updated How to Add Bitmoji to Keyboard for 2024
- Title: New Add Emojis to Videos on YouTube/Facebook/Snapchat 2023 Guide
- Author: Jan
- Created at : 2024-10-04 01:26:10
- Updated at : 2024-10-05 17:35:59
- Link: https://meme-emoji.techidaily.com/new-add-emojis-to-videos-on-youtubefacebooksnapchat-2023-guide/
- License: This work is licensed under CC BY-NC-SA 4.0.