
In 2024, Top 10 Storyboarding Software Free&Paid
Top 10 Storyboarding Software [Free&Paid]
Top 10 Storyboarding Software in 2024

Liza Brown
Mar 27, 2024• Proven solutions
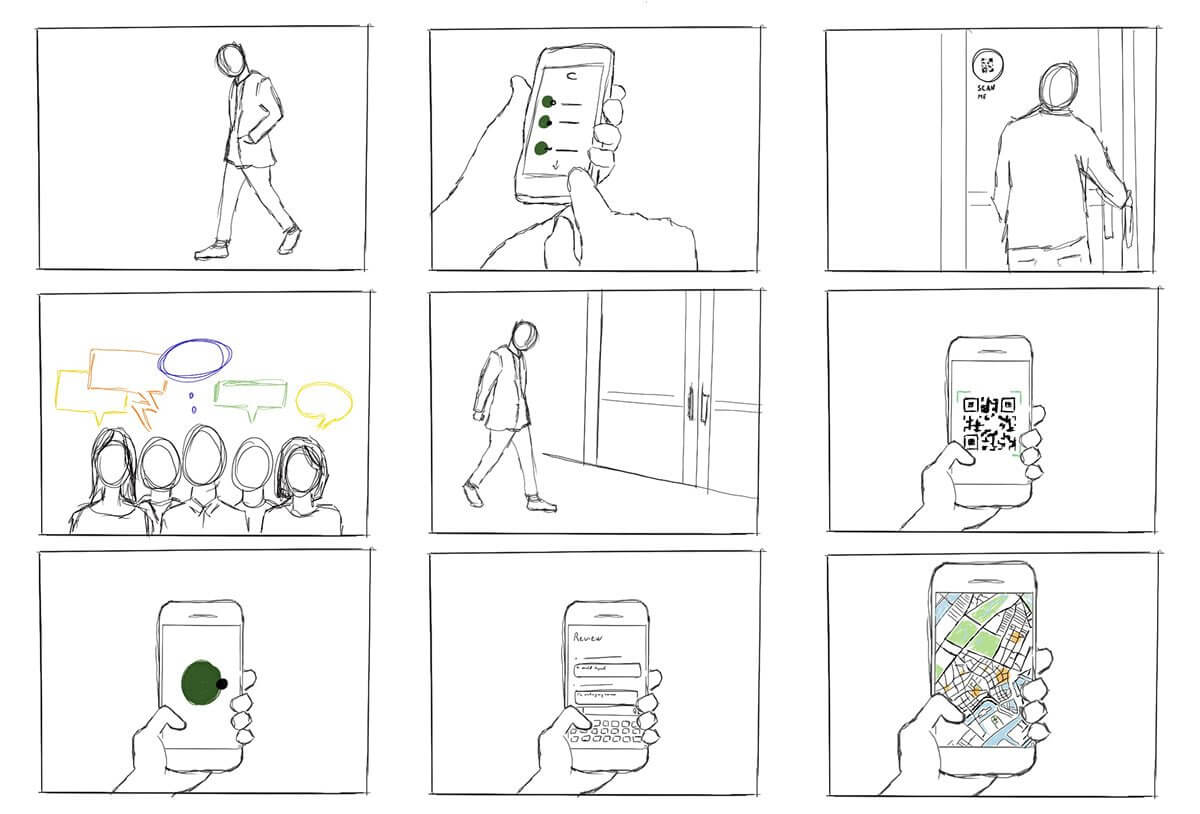
Several different creative sectors rely on storyboarding for their creative process, including filmmakers and animators and UX designers, game designers, and creative directors. However, the process of hand-drawing each frame or shot can take a great deal of time if you have to do it by hand. Our goal is to make storyboarding easier and more efficient by bringing you this list of free and paid tools, storyboarding software, and apps.
You can add text, sound, and script to your original sketches with these tools (or make use of assets from a library if you do not have time to sketch your own). Alternatively, you can share your storyboarding progress within the project, either by a link or a PDF - or get immediate feedback. Finally, you can continue working from anywhere with apps that work across multiple devices - desktop, mobile, and tablet.
No matter what kind of tool you prefer, from a simple 2D sketch tool like Make Storyboard to a 3D drawing tool like Storyboard Pro, you’ll find the best options on this page.
You might be interested in:
1. Storyboarder by Wonder Unit
Price: Free
Platforms: Windows, Mac, and Linux.
If you’re on a smaller budget, Storyboarder is an excellent option. It’s free and open-source. In the program’s clean interface, you have all the tools you need, so drawing shapes and characters is a breeze. In addition to writing dialogue, you can also enter timing information and the type of shot.
The Storyboarder and Photoshop apps integrate seamlessly, which means you can refine your board in Photoshop and have it updated in Storyboarder. In addition, you can export videos to Premiere, Final Cut, Avid, PDF, or Animated GIF from this software.
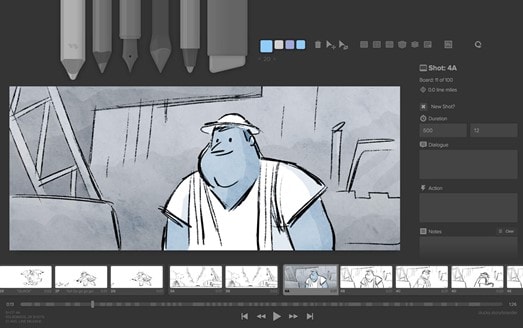
2. Toon Boom Storyboard Pro
Price: $60/mo or $999 one-time fee
Platforms: Mac, Windows
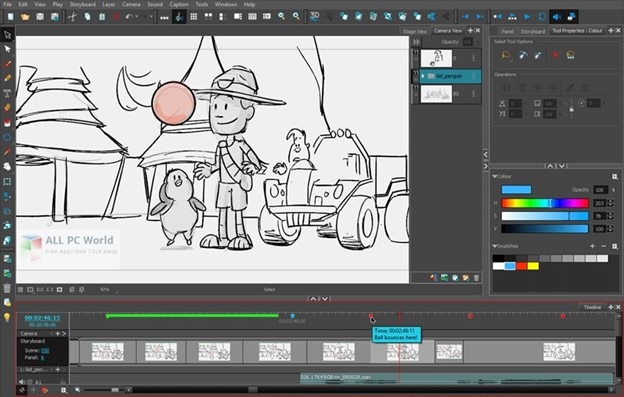
Toon Boom Storyboard Pro is the complete opposite of free. A standout among storyboarding programs, it’s also one of the most expensive. However, in most studios, boarding and animating is done using Toon Boom, so you may want to learn about this if you’d like to break into the industry. As a result, the monthly fee is a lot lower than the initial cost, allowing most people to take advantage of the service.
You can use Toon Boom for a month and test the waters before committing yourself to a huge license fee. How can you benefit from this program? Sketching and animation go hand-in-hand in this process. Drawing your boards and seeing how they would animate is a great way to test your script while making sure you’re on target with your scenes.
The program is primarily designed for animators. It can be used for ad agencies and for making small skits. Nevertheless, the Story Flow tool makes switching between board and script for writers incredibly easy. In addition to creating dynamic camera movements, you can also use some 3D effects that work well for 3D animators. Create layered panels in Photoshop quickly and easily by importing Final Draft scripts. There is plenty of support available for all the common programs in the art industry.
3. Plot
Price: $10/month (14 days Free Trial Available)
Platforms: Windows, Linux, and Mac

Storytelling is super easy with the plot. There are no limits to the number of boards, projects, and users you can have. With some nice features targeted toward animators, it is a web-based storyboarding app for beginners.
A drawing pane is available on whichever operating system you run this program on. Drawing your frames this way also lets you add dialogues and stage directions directly to your project. In addition, it is easy to move through different scenes in the app because it is visual. You can click and drag pieces around to change the scene. It couldn’t be easier.
In addition to the collaboration features, we consider it to be exceptional and above the norm for products in this price range. As long as you have a desktop program to work on your drawings, you’ll have more control. When you import the drawings into Plot, you can then arrange them accordingly. Hence, you’ve still got collaborative features with online management of very detailed drawings.
4. FrameForge Storyboard Studio
Price: $498.95 one-time fee or $12.99/month (Core Edition); $799 one-time fee or $24.99/month (Professional Edition)
Platforms: Windows, Mac, and Android.
Even without animation, drawing, or highly technical computer skills, your team can benefit from FrameForge, with HBO, Netflix, and BBC as users.
There are two versions of FrameForge’s product: Core and Professional. Professional offers planning capabilities (down to the inch) for dollies and cranes. Scripts from any program can be imported into the software. In addition to movement arrows, framing notes, angle of view, focal length, and more, the storyboards ensure that your video team understands all aspects of production, from preparation to post-production.
Mobile users can use it on any mobile device, and PowerPoint presentations can be downloaded as a final product. Team members who want to produce more elaborate and lengthy videos for entertainment purposes might find FrameForge useful.
5. Studiobinder
Price: $29/month (Indie); $49/month (Professional); $99/month (Studio) Free Trial is also available.
Platform: Windows, Linux, and Mac.
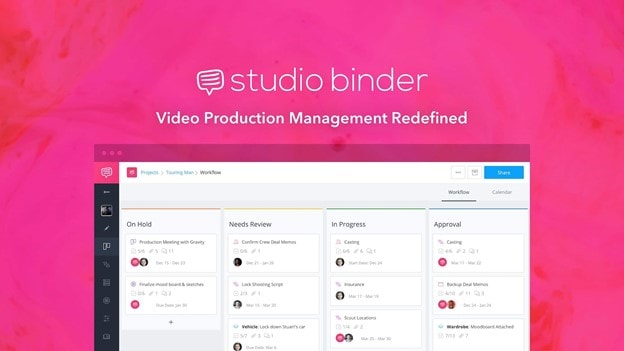
Visualizations can be personalized at every level in Studiobinder. Filters can be used to sort columns, order scenes, add images, adjust aspect ratios, color code images, and add notes to locations. In addition, project management features such as task assignment and commenting help Studiobinder make collaboration easy.
Also, the platform includes a handy presentation mode so you can show your team your projects. The company boasts impressive clients such as BuzzFeed, ESPN, and CBS Interactive. Team members who need to collaborate on various stages of the video production process and who prefer customizable tools should take advantage of this option.
6. Boords
Price: $12-$24/month
Platforms: Windows, Linux, and Mac

In the software industry, online SaaS products have quickly become the norm. While desktop programs are not going away, we see more and more web-based options such as Boards that provide unique solutions.
The Boards software is a native storyboard platform that provides tons of free templates and collaboration tools. In addition, clients can log into their projects and add comments directly from their computers.
For teams working together on a project, you may also set up multiple user accounts. Storyboards in Boords can be presented in animatic form before being animated, thanks to flexible frame sizes and tons of free templates.
Despite the affordable monthly price, this product works on every major operating system. It is rare to find a program that offers this much functionality at such an affordable price. Boords is an excellent solution for collaborative work. You can try it for a while until you decide if it’s right for you, but there is no commitment involved.
7. makeStoryboard
Price: Free; $12/month (Professional); $36/month (Team)
Platforms: Windows, and Mac.

MakeStoryboard provides a simple, straightforward interface for uploading camera shots, drawing stick figures with its built-in tool, and incorporating text for scene details if you are not interested in the fancier options in the list. In addition, any drawing tablet can be used with marker, pencil, and pen tools.
Additional details unique to your team and use case can also be entered in custom text fields. Then, using a PDF format, you can export your storyboard when you’re ready to pitch. Finally, stakeholders can review it using a private link without requiring an account in an alternative method. The best part is that it has a free subscription plan, making it an excellent option for teams on a small budget.
8. Canva
Price: Free
Platforms: Works on all major Operating Systems

It doesn’t have to be stressful to create a storyboard, and Canva makes it easy with a large library of templates, millions of stock photos (or the ability to upload your own), and color frames. The font type, colors, headers, and subheaders can be customized.
If you’re working on a script or design with someone else, you can grant access to collaborate, and when you’re done you can share the design through email or as a PDF. On the other hand, if your team needs an easy and simple tool to manage simpler projects or get started with storyboarding, this may be your best choice.
9. PanelForge
Price: Free (Public Beta); $7.31/month (Pro); $1,411/year (Studio)
Platforms: Works on all Major Operating Systems
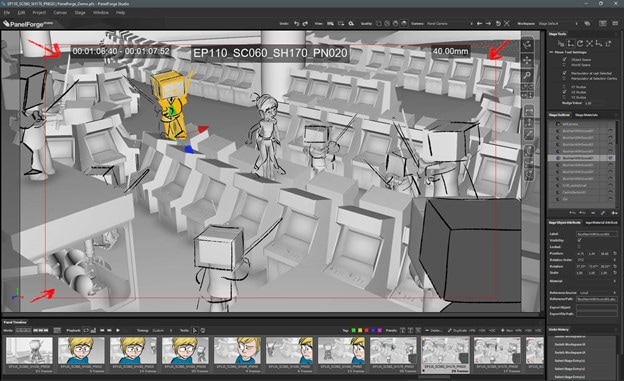
PanelForge delivers a feature-rich, drag-and-drop storyboarding solution with flexible frames and drag-and-drop tools. Storyboarding is free to try and offers a suite of paid plans for anyone working on animatics and more complex projects.
Drawings and 3D designs can both be created with PanelForge. Aside from creating animatics, you can also import and export files from Adobe Premiere and Final Cut Pro. The PanelForge tool is ideal for experienced marketers and storyboarders familiar with visualization tools.
10. Adobe Photoshop
Price: $9.99/mo
Platforms: Mac and Windows.
I think it will stay around for a long time. It’s been around for 20+ years. Yet, doesn’t it seem funny how Photoshop can be used for so much more than photo editing? In addition to storyboarding, we see it used for digital painting, pixel art, etc. The digital drawing capability of PS is the same as that of other programs. There are now more brushes available for the PS environment, so there’s even more support.
Additionally, you can download free storyboard templates in PSD format for Photoshop. This program doesn’t need too much explanation because every artist is already aware of it. However, Linux users are most likely to be disappointed by the lack of support.
Conclusion
So, these are some of the best free and paid to storyboard software that you can find in 2021. Each piece of software has its own characteristics and way of being used. In the end, it all depends upon your usage and preferences to decide which software you will use to achieve your goals. If you have enough budget then you can work with paid tools as they offer more features. If you have limited or no budget, you can try to free tools as they offer pretty good features.


Liza Brown
Liza Brown is a writer and a lover of all things video.
Follow @Liza Brown
Liza Brown
Mar 27, 2024• Proven solutions
Several different creative sectors rely on storyboarding for their creative process, including filmmakers and animators and UX designers, game designers, and creative directors. However, the process of hand-drawing each frame or shot can take a great deal of time if you have to do it by hand. Our goal is to make storyboarding easier and more efficient by bringing you this list of free and paid tools, storyboarding software, and apps.
You can add text, sound, and script to your original sketches with these tools (or make use of assets from a library if you do not have time to sketch your own). Alternatively, you can share your storyboarding progress within the project, either by a link or a PDF - or get immediate feedback. Finally, you can continue working from anywhere with apps that work across multiple devices - desktop, mobile, and tablet.
No matter what kind of tool you prefer, from a simple 2D sketch tool like Make Storyboard to a 3D drawing tool like Storyboard Pro, you’ll find the best options on this page.
You might be interested in:
1. Storyboarder by Wonder Unit
Price: Free
Platforms: Windows, Mac, and Linux.
If you’re on a smaller budget, Storyboarder is an excellent option. It’s free and open-source. In the program’s clean interface, you have all the tools you need, so drawing shapes and characters is a breeze. In addition to writing dialogue, you can also enter timing information and the type of shot.
The Storyboarder and Photoshop apps integrate seamlessly, which means you can refine your board in Photoshop and have it updated in Storyboarder. In addition, you can export videos to Premiere, Final Cut, Avid, PDF, or Animated GIF from this software.
2. Toon Boom Storyboard Pro
Price: $60/mo or $999 one-time fee
Platforms: Mac, Windows
Toon Boom Storyboard Pro is the complete opposite of free. A standout among storyboarding programs, it’s also one of the most expensive. However, in most studios, boarding and animating is done using Toon Boom, so you may want to learn about this if you’d like to break into the industry. As a result, the monthly fee is a lot lower than the initial cost, allowing most people to take advantage of the service.
You can use Toon Boom for a month and test the waters before committing yourself to a huge license fee. How can you benefit from this program? Sketching and animation go hand-in-hand in this process. Drawing your boards and seeing how they would animate is a great way to test your script while making sure you’re on target with your scenes.
The program is primarily designed for animators. It can be used for ad agencies and for making small skits. Nevertheless, the Story Flow tool makes switching between board and script for writers incredibly easy. In addition to creating dynamic camera movements, you can also use some 3D effects that work well for 3D animators. Create layered panels in Photoshop quickly and easily by importing Final Draft scripts. There is plenty of support available for all the common programs in the art industry.
3. Plot
Price: $10/month (14 days Free Trial Available)
Platforms: Windows, Linux, and Mac
Storytelling is super easy with the plot. There are no limits to the number of boards, projects, and users you can have. With some nice features targeted toward animators, it is a web-based storyboarding app for beginners.
A drawing pane is available on whichever operating system you run this program on. Drawing your frames this way also lets you add dialogues and stage directions directly to your project. In addition, it is easy to move through different scenes in the app because it is visual. You can click and drag pieces around to change the scene. It couldn’t be easier.
In addition to the collaboration features, we consider it to be exceptional and above the norm for products in this price range. As long as you have a desktop program to work on your drawings, you’ll have more control. When you import the drawings into Plot, you can then arrange them accordingly. Hence, you’ve still got collaborative features with online management of very detailed drawings.
4. FrameForge Storyboard Studio
Price: $498.95 one-time fee or $12.99/month (Core Edition); $799 one-time fee or $24.99/month (Professional Edition)
Platforms: Windows, Mac, and Android.
Even without animation, drawing, or highly technical computer skills, your team can benefit from FrameForge, with HBO, Netflix, and BBC as users.
There are two versions of FrameForge’s product: Core and Professional. Professional offers planning capabilities (down to the inch) for dollies and cranes. Scripts from any program can be imported into the software. In addition to movement arrows, framing notes, angle of view, focal length, and more, the storyboards ensure that your video team understands all aspects of production, from preparation to post-production.
Mobile users can use it on any mobile device, and PowerPoint presentations can be downloaded as a final product. Team members who want to produce more elaborate and lengthy videos for entertainment purposes might find FrameForge useful.
5. Studiobinder
Price: $29/month (Indie); $49/month (Professional); $99/month (Studio) Free Trial is also available.
Platform: Windows, Linux, and Mac.
Visualizations can be personalized at every level in Studiobinder. Filters can be used to sort columns, order scenes, add images, adjust aspect ratios, color code images, and add notes to locations. In addition, project management features such as task assignment and commenting help Studiobinder make collaboration easy.
Also, the platform includes a handy presentation mode so you can show your team your projects. The company boasts impressive clients such as BuzzFeed, ESPN, and CBS Interactive. Team members who need to collaborate on various stages of the video production process and who prefer customizable tools should take advantage of this option.
6. Boords
Price: $12-$24/month
Platforms: Windows, Linux, and Mac
In the software industry, online SaaS products have quickly become the norm. While desktop programs are not going away, we see more and more web-based options such as Boards that provide unique solutions.
The Boards software is a native storyboard platform that provides tons of free templates and collaboration tools. In addition, clients can log into their projects and add comments directly from their computers.
For teams working together on a project, you may also set up multiple user accounts. Storyboards in Boords can be presented in animatic form before being animated, thanks to flexible frame sizes and tons of free templates.
Despite the affordable monthly price, this product works on every major operating system. It is rare to find a program that offers this much functionality at such an affordable price. Boords is an excellent solution for collaborative work. You can try it for a while until you decide if it’s right for you, but there is no commitment involved.
7. makeStoryboard
Price: Free; $12/month (Professional); $36/month (Team)
Platforms: Windows, and Mac.
MakeStoryboard provides a simple, straightforward interface for uploading camera shots, drawing stick figures with its built-in tool, and incorporating text for scene details if you are not interested in the fancier options in the list. In addition, any drawing tablet can be used with marker, pencil, and pen tools.
Additional details unique to your team and use case can also be entered in custom text fields. Then, using a PDF format, you can export your storyboard when you’re ready to pitch. Finally, stakeholders can review it using a private link without requiring an account in an alternative method. The best part is that it has a free subscription plan, making it an excellent option for teams on a small budget.
8. Canva
Price: Free
Platforms: Works on all major Operating Systems
It doesn’t have to be stressful to create a storyboard, and Canva makes it easy with a large library of templates, millions of stock photos (or the ability to upload your own), and color frames. The font type, colors, headers, and subheaders can be customized.
If you’re working on a script or design with someone else, you can grant access to collaborate, and when you’re done you can share the design through email or as a PDF. On the other hand, if your team needs an easy and simple tool to manage simpler projects or get started with storyboarding, this may be your best choice.
9. PanelForge
Price: Free (Public Beta); $7.31/month (Pro); $1,411/year (Studio)
Platforms: Works on all Major Operating Systems
PanelForge delivers a feature-rich, drag-and-drop storyboarding solution with flexible frames and drag-and-drop tools. Storyboarding is free to try and offers a suite of paid plans for anyone working on animatics and more complex projects.
Drawings and 3D designs can both be created with PanelForge. Aside from creating animatics, you can also import and export files from Adobe Premiere and Final Cut Pro. The PanelForge tool is ideal for experienced marketers and storyboarders familiar with visualization tools.
10. Adobe Photoshop
Price: $9.99/mo
Platforms: Mac and Windows.
I think it will stay around for a long time. It’s been around for 20+ years. Yet, doesn’t it seem funny how Photoshop can be used for so much more than photo editing? In addition to storyboarding, we see it used for digital painting, pixel art, etc. The digital drawing capability of PS is the same as that of other programs. There are now more brushes available for the PS environment, so there’s even more support.
Additionally, you can download free storyboard templates in PSD format for Photoshop. This program doesn’t need too much explanation because every artist is already aware of it. However, Linux users are most likely to be disappointed by the lack of support.
Conclusion
So, these are some of the best free and paid to storyboard software that you can find in 2021. Each piece of software has its own characteristics and way of being used. In the end, it all depends upon your usage and preferences to decide which software you will use to achieve your goals. If you have enough budget then you can work with paid tools as they offer more features. If you have limited or no budget, you can try to free tools as they offer pretty good features.
Liza Brown
Liza Brown is a writer and a lover of all things video.
Follow @Liza Brown
How Add Emojis/Stickers to Videos [on PC/Mac/Mobile/Online]
How to Add Emojis to Videos: The Ultimate Guide
Liza Brown
Mar 27, 2024• Proven solutions
The way we communicate has changed so much in the first two decades of the 21st century. In the late 1990s, when emojis were first introduced to the global market nobody could have guessed just how popular they are going to become. An emoji is an ideogram that is commonly used in electronic messages, but there are countless creative ways to incorporate them in the visual content you’re sharing to your Facebook account or your YouTube channel. Read on if you would like to find out how to add an emoji to a video you’re editing on a Mac, PC, iPhone or an Android device.
- Part 1: Add Animated Emojis to Videos in Flimora [3 Ways]
- Part 2: Add Animated Emojis & Stickers to Videos in iPhone for FREE
- Part 3: Add Animated Emojis to Videos in Android
- Part 4: Add Animated Emojis & Stickers to Videos Online
How to Add Animated Emojis to Videos in Flimora? [Windows & Mac][
Gamers, YouTubers and all other Mac and PC users who’d like to add a smiley or any other emoji to a video should try processing their footage with the Filmora video editor . Performing basic video editing tasks like cutting or trimming the footage, choosing a soundtrack for a video or adding an emoji to a single shot or an entire sequence can all be completed in just a couple of clicks. Here’s how you can add an emoji to a video clip in Filmora.
1. Use the Filmora’s Built-in Animated Emoji Library
Create a new project
Launch Filmora and then select the New Project option from the app’s welcome window. Afterward, you can set the project’s aspect ratio, frame rate and resolution from the Project Settings tab that can be accessed from the File drop-down menu. When done, you should proceed to import a video clip to which you want to add an emoji.
Place the Footage onto the Timeline
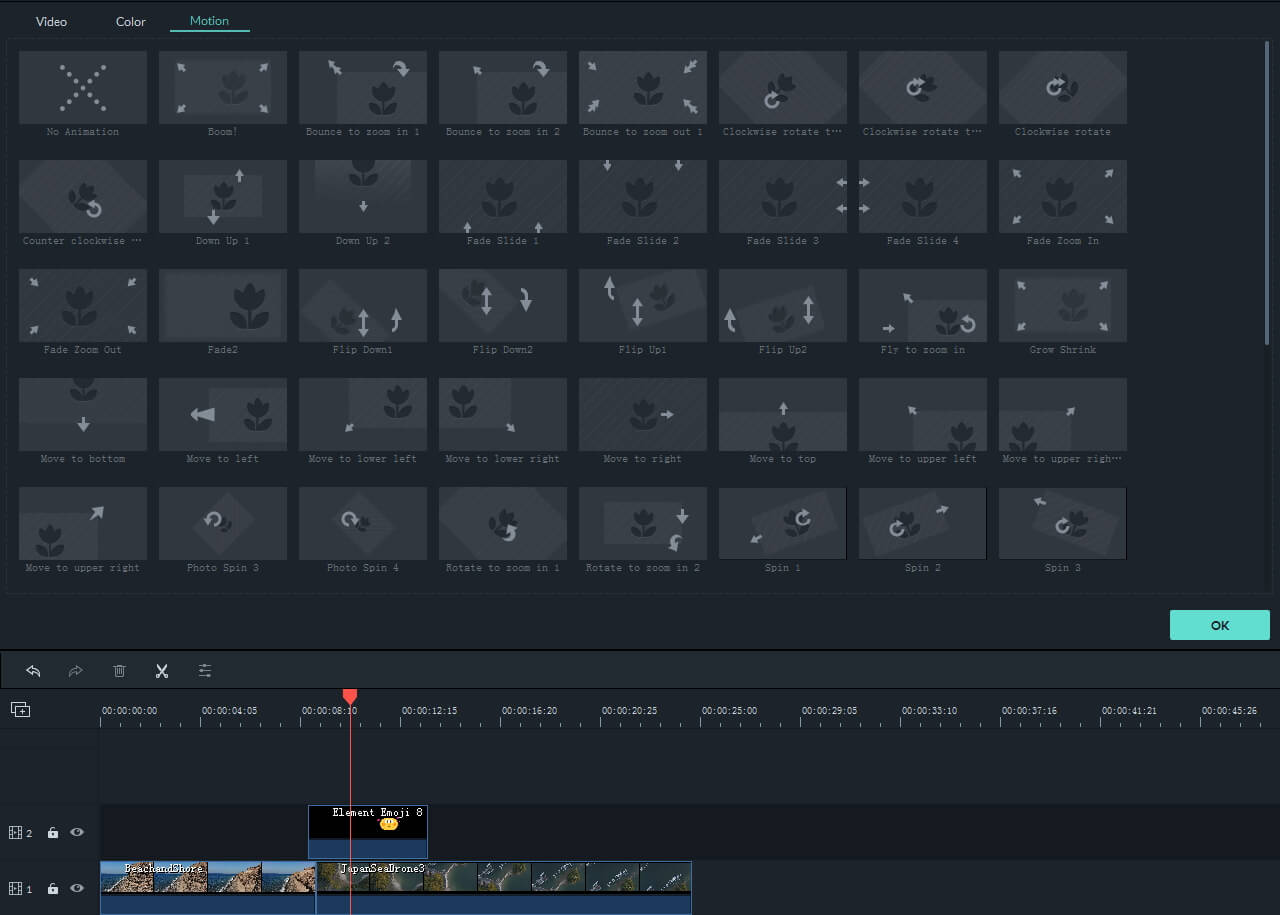
The media files you import into your projects in Filmora are located in the software’s Media Tab, and you can just drag them from the Media Tab and drop them onto a video track on the timeline. Remove all parts of the video clip you don’t want to use and head over to the Elements Tab that is located in the upper left corner of the screen.
Choose an Emoji
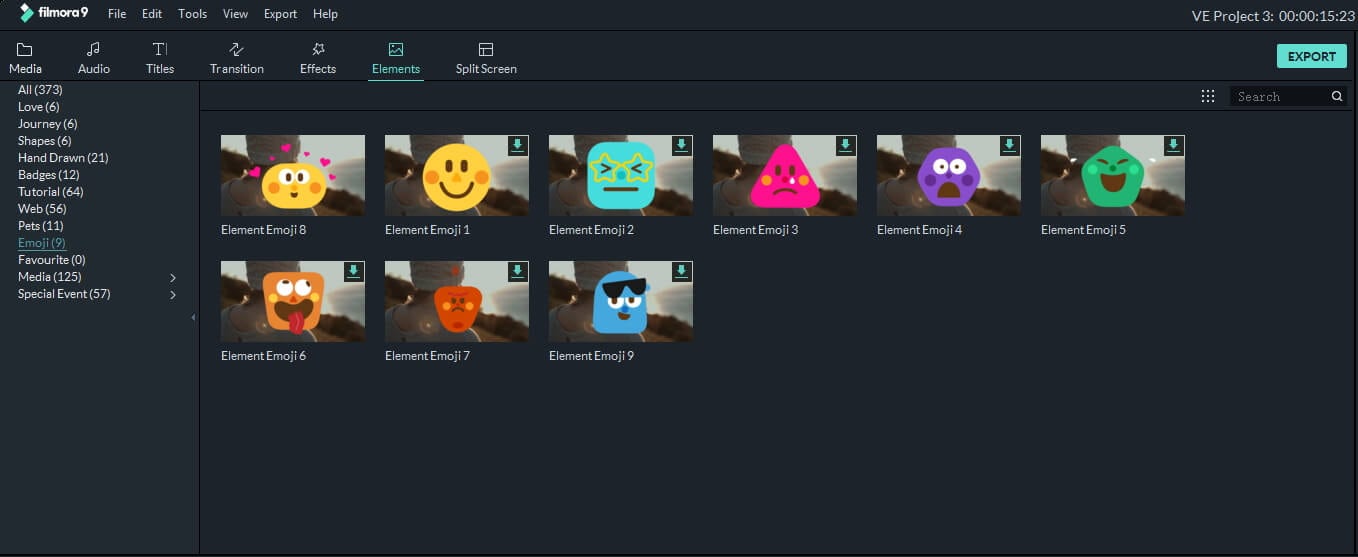
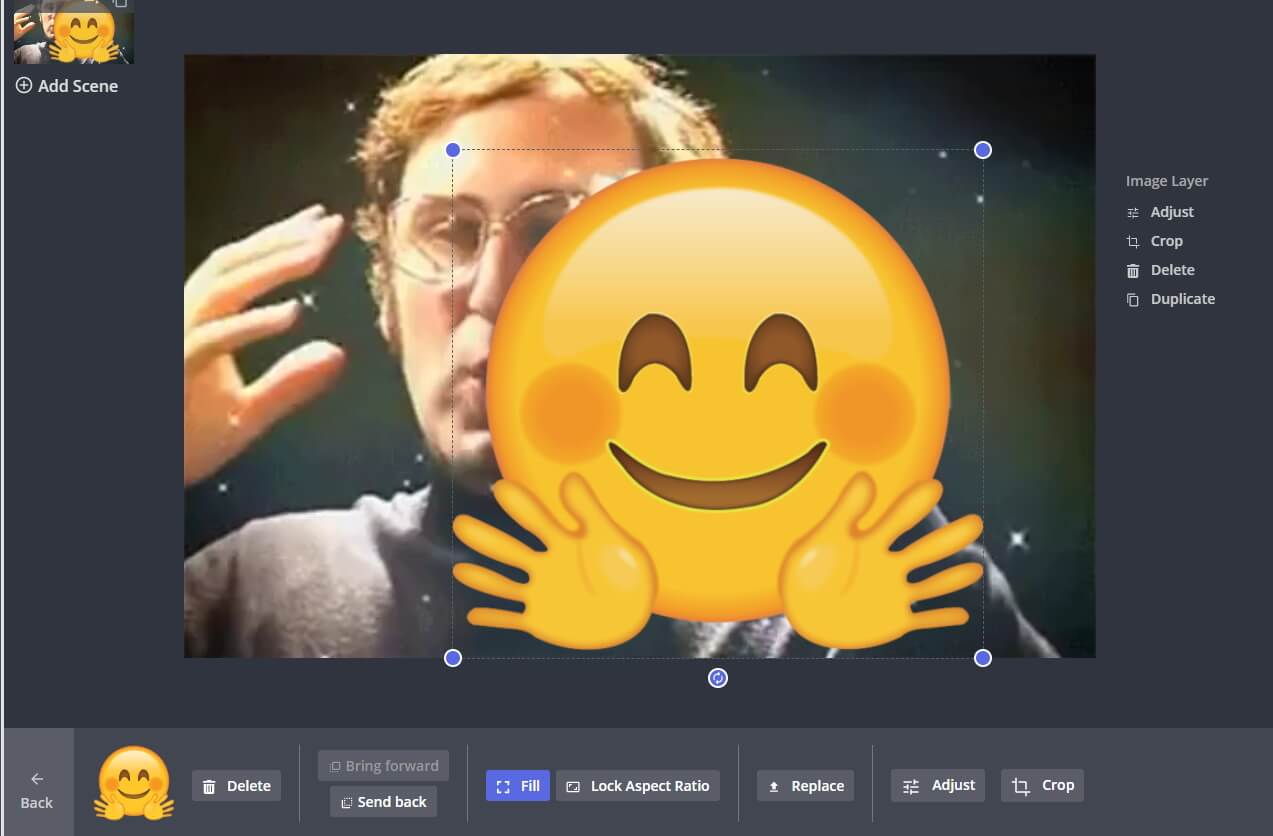
The Elements Tab contains different categories such as Shapes, Badges or Pets. Click on the Emoji category to start browsing through Filmora’s collection of emojis and simply drag and drop the emoji you like above the video clip to which you’d like to add it. You can then adjust its duration, position on the screen or size. Optionally, you can double-click on the emoji to access the Motion tab that enables you to choose between different motion effects.
Export the Project
Preview the results by hitting the space button on your keyboard or clicking on the Play button that is located below the app’s preview window. In case you don’t want to make any more edits to the footage, you should click on the Export button and choose if you want to export your project to a hard drive on your computer or to your YouTube or Vimeo channel. Select the output file format, click on the Export and wait for the rendering process to be completed.
With Filmora video editor, you can also add animated texts and titles to video, or apply various elements such as hand drawn, badges and elements for tutorial. Click to learn more details about how to edit videos in Filmora .
2. Download Additional Animated Emojis from Filmostocks for Free
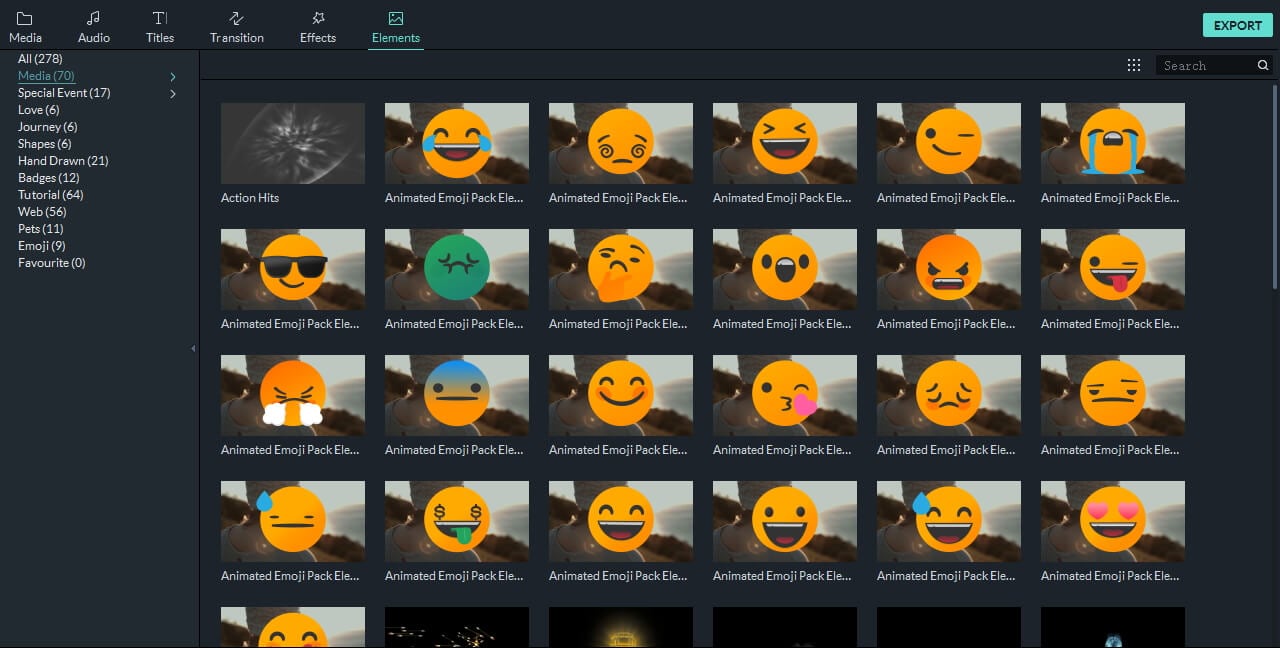
There are only nine emojis available in the Filmora’s built-in Emojis category, but you can easily broaden the range of emoji genres you have the access to by downloading the Animated Emoji Pack from Filmstock effects store . You don’t have to spend any additional money on this pack that contains 24 different emojis, but you must create an account on Filmstock before you can download the Animated Emoji Pack to your computer. The process of adding the emojis from this pack to videos is the same as the process of adding one of the emojis from the built-in Emojis category. Filmstock is so much more than an endless source of emojis for your videos since it offers a variety of visual and audio stock footage and visual effects. Even if you are using Adobe After Effects, you can also download and use some visual effects templates for AE.
3. Bonus: Animate Sticker and Emojis Your Download from Internet with Filmora
Instead of adding pre-animated ideograms to your videos, you can simply download a still image of a sticker or an emoji and animate it with Filmora. However, you should search for emojis that have a transparent background in order to blend it quicker with the source footage. Once you find a smiley or any other emoji you’d like to add to a video you should save it on your hard drive and import it into a project in Filmora.
You should then place the emoji at the exact spot on the timeline where you want it to appear in the final cut of the video. Double-click on the still image file and proceed to adjust its size or position from the Transform menu or choose a motion effect from the Motion tab. When done, commence the rendering process by clicking on the Export button. You can check our step guide about How to add picture to video to get more clues about that.
How to Add Emojis and Stickers to Videos on an iPhone
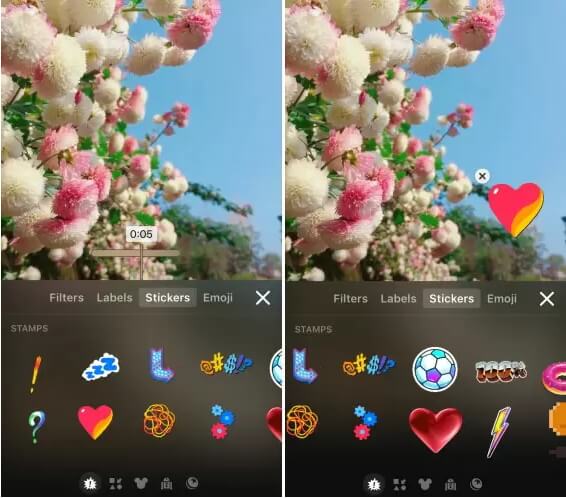
Waiting to edit the high-resolution videos you recorded with your iPhone on a computer is not always an option, because in certain situations you just want to polish a video you recorded and post it on social media as fast as you can. The Apple’s Clip app that can be downloaded for free from the AppStore seems to be a perfect solution for all iPhone users who want to add emojis to their videos before sharing them on Facebook, Instagram or any other popular social media networks.
The Clip app offers a rich selection of stickers and emojis that can be accessed by tapping on the icon that looks like a star within a circle. There are more than 30 emojis available, but you can also use the iPhone’s emoji keyboard to add emojis to videos in the Clip app. All of the app’s stickers and emojis are fully customizable, which means that you can change their size, screen position or insert text effortlessly. Once the video editing process is completed you can store a video on Dropbox or share it via AirDrop.
Best App for Adding Stickers and Emojis on Android Devices
The WeVideo app for Android devices is equipped with all video editing tools you are going to need to produce a visually impressive video. In case you decide to purchase and install WeVideo on your phone, you will be able to cut, trim or arrange video clips as you see fit. The app also features a collection of emojis that can be added easily to all videos you decide to edit with it. The best part is that you can export all of your projects in 4K Ultra HD resolution and publish them to YouTube, Vimeo or Dropbox from the app so you don’t have to spend extra time on waiting for the file to be uploaded to the social media platform on which you want to share the video.
Using Kapwing Meme Maker to Add Stickers and Emojis Online
Web-based video editing platforms like Kapwing have been growing in popularity recently because they enable social media content creators to produce social media videos in a brief period of time. The Kapwing Meme Maker tool doesn’t feature any built-in stickers or emojis, so you must either upload a still image with a transparent ground to the platform or use its Text tool to add emojis to a video. Moreover, you won’t be able to animate the emojis you add to video clips with the Kapwing Meme Maker tool since the Kapwing platform doesn’t offer any animation tools. Despite this Kapwing is still one of the best online video editing platforms you can use to add emojis and stickers to videos.
A Few Tips to Help you Incorporate Emojis in Your Videos
Which emoji you are going to add to a video depends on factors that range from the topic of the video to the audience you are trying to reach. So, if you can’t find the emoji that fits perfectly to your video you should head over to emojipedia or any other website that lets you download thousands of emojis for free. You should keep in mind that emojis can have different meanings in different cultures, which is the reason why you must make sure that the emoji you’re adding to your video isn’t inappropriate or offensive in the context in which you’re using it. It is also worth noting that the emojis you download from the Internet should have a transparent background and that they should be saved in the PNG file format.
You may also like: Add Emojis to Videos on YouTube/Facebook/Snapchat [Step by Step Guide] >>
Conclusion
A single image overlay like an emoji can make your video more dynamic and more entertaining to watch, but you must discover creative and innovative ways to incorporate these visual elements into the story your video is telling. Each video editing app we presented in this article enables you to add emojis to videos in just a few easy steps, so you should choose the video editor that you feel most comfortable using. Do you add emojis to your videos often? Leave a comment below and share your favorite emojis with us.
Liza Brown
Liza Brown is a writer and a lover of all things video.
Follow @Liza Brown
Liza Brown
Mar 27, 2024• Proven solutions
The way we communicate has changed so much in the first two decades of the 21st century. In the late 1990s, when emojis were first introduced to the global market nobody could have guessed just how popular they are going to become. An emoji is an ideogram that is commonly used in electronic messages, but there are countless creative ways to incorporate them in the visual content you’re sharing to your Facebook account or your YouTube channel. Read on if you would like to find out how to add an emoji to a video you’re editing on a Mac, PC, iPhone or an Android device.
- Part 1: Add Animated Emojis to Videos in Flimora [3 Ways]
- Part 2: Add Animated Emojis & Stickers to Videos in iPhone for FREE
- Part 3: Add Animated Emojis to Videos in Android
- Part 4: Add Animated Emojis & Stickers to Videos Online
How to Add Animated Emojis to Videos in Flimora? [Windows & Mac][
Gamers, YouTubers and all other Mac and PC users who’d like to add a smiley or any other emoji to a video should try processing their footage with the Filmora video editor . Performing basic video editing tasks like cutting or trimming the footage, choosing a soundtrack for a video or adding an emoji to a single shot or an entire sequence can all be completed in just a couple of clicks. Here’s how you can add an emoji to a video clip in Filmora.
1. Use the Filmora’s Built-in Animated Emoji Library
Create a new project
Launch Filmora and then select the New Project option from the app’s welcome window. Afterward, you can set the project’s aspect ratio, frame rate and resolution from the Project Settings tab that can be accessed from the File drop-down menu. When done, you should proceed to import a video clip to which you want to add an emoji.
Place the Footage onto the Timeline
The media files you import into your projects in Filmora are located in the software’s Media Tab, and you can just drag them from the Media Tab and drop them onto a video track on the timeline. Remove all parts of the video clip you don’t want to use and head over to the Elements Tab that is located in the upper left corner of the screen.
Choose an Emoji
The Elements Tab contains different categories such as Shapes, Badges or Pets. Click on the Emoji category to start browsing through Filmora’s collection of emojis and simply drag and drop the emoji you like above the video clip to which you’d like to add it. You can then adjust its duration, position on the screen or size. Optionally, you can double-click on the emoji to access the Motion tab that enables you to choose between different motion effects.
Export the Project
Preview the results by hitting the space button on your keyboard or clicking on the Play button that is located below the app’s preview window. In case you don’t want to make any more edits to the footage, you should click on the Export button and choose if you want to export your project to a hard drive on your computer or to your YouTube or Vimeo channel. Select the output file format, click on the Export and wait for the rendering process to be completed.
With Filmora video editor, you can also add animated texts and titles to video, or apply various elements such as hand drawn, badges and elements for tutorial. Click to learn more details about how to edit videos in Filmora .
2. Download Additional Animated Emojis from Filmostocks for Free
There are only nine emojis available in the Filmora’s built-in Emojis category, but you can easily broaden the range of emoji genres you have the access to by downloading the Animated Emoji Pack from Filmstock effects store . You don’t have to spend any additional money on this pack that contains 24 different emojis, but you must create an account on Filmstock before you can download the Animated Emoji Pack to your computer. The process of adding the emojis from this pack to videos is the same as the process of adding one of the emojis from the built-in Emojis category. Filmstock is so much more than an endless source of emojis for your videos since it offers a variety of visual and audio stock footage and visual effects. Even if you are using Adobe After Effects, you can also download and use some visual effects templates for AE.
3. Bonus: Animate Sticker and Emojis Your Download from Internet with Filmora
Instead of adding pre-animated ideograms to your videos, you can simply download a still image of a sticker or an emoji and animate it with Filmora. However, you should search for emojis that have a transparent background in order to blend it quicker with the source footage. Once you find a smiley or any other emoji you’d like to add to a video you should save it on your hard drive and import it into a project in Filmora.
You should then place the emoji at the exact spot on the timeline where you want it to appear in the final cut of the video. Double-click on the still image file and proceed to adjust its size or position from the Transform menu or choose a motion effect from the Motion tab. When done, commence the rendering process by clicking on the Export button. You can check our step guide about How to add picture to video to get more clues about that.
How to Add Emojis and Stickers to Videos on an iPhone
Waiting to edit the high-resolution videos you recorded with your iPhone on a computer is not always an option, because in certain situations you just want to polish a video you recorded and post it on social media as fast as you can. The Apple’s Clip app that can be downloaded for free from the AppStore seems to be a perfect solution for all iPhone users who want to add emojis to their videos before sharing them on Facebook, Instagram or any other popular social media networks.
The Clip app offers a rich selection of stickers and emojis that can be accessed by tapping on the icon that looks like a star within a circle. There are more than 30 emojis available, but you can also use the iPhone’s emoji keyboard to add emojis to videos in the Clip app. All of the app’s stickers and emojis are fully customizable, which means that you can change their size, screen position or insert text effortlessly. Once the video editing process is completed you can store a video on Dropbox or share it via AirDrop.
Best App for Adding Stickers and Emojis on Android Devices
The WeVideo app for Android devices is equipped with all video editing tools you are going to need to produce a visually impressive video. In case you decide to purchase and install WeVideo on your phone, you will be able to cut, trim or arrange video clips as you see fit. The app also features a collection of emojis that can be added easily to all videos you decide to edit with it. The best part is that you can export all of your projects in 4K Ultra HD resolution and publish them to YouTube, Vimeo or Dropbox from the app so you don’t have to spend extra time on waiting for the file to be uploaded to the social media platform on which you want to share the video.
Using Kapwing Meme Maker to Add Stickers and Emojis Online
Web-based video editing platforms like Kapwing have been growing in popularity recently because they enable social media content creators to produce social media videos in a brief period of time. The Kapwing Meme Maker tool doesn’t feature any built-in stickers or emojis, so you must either upload a still image with a transparent ground to the platform or use its Text tool to add emojis to a video. Moreover, you won’t be able to animate the emojis you add to video clips with the Kapwing Meme Maker tool since the Kapwing platform doesn’t offer any animation tools. Despite this Kapwing is still one of the best online video editing platforms you can use to add emojis and stickers to videos.
A Few Tips to Help you Incorporate Emojis in Your Videos
Which emoji you are going to add to a video depends on factors that range from the topic of the video to the audience you are trying to reach. So, if you can’t find the emoji that fits perfectly to your video you should head over to emojipedia or any other website that lets you download thousands of emojis for free. You should keep in mind that emojis can have different meanings in different cultures, which is the reason why you must make sure that the emoji you’re adding to your video isn’t inappropriate or offensive in the context in which you’re using it. It is also worth noting that the emojis you download from the Internet should have a transparent background and that they should be saved in the PNG file format.
You may also like: Add Emojis to Videos on YouTube/Facebook/Snapchat [Step by Step Guide] >>
Conclusion
A single image overlay like an emoji can make your video more dynamic and more entertaining to watch, but you must discover creative and innovative ways to incorporate these visual elements into the story your video is telling. Each video editing app we presented in this article enables you to add emojis to videos in just a few easy steps, so you should choose the video editor that you feel most comfortable using. Do you add emojis to your videos often? Leave a comment below and share your favorite emojis with us.
Liza Brown
Liza Brown is a writer and a lover of all things video.
Follow @Liza Brown
How to Make a Meme (Step by Step)
How to Make a Meme (Step by Step)

Ollie Mattison
Mar 27, 2024• Proven solutions
When you browse the Internet, memes are practically everywhere. These memes are found in varied forms, ranging from video meme, to GIF and images. Through memes you can express your ideas in a creative and humorous way. In case your business requires meme marketing and you have no clue about how to make a meme then there is n nothing to worry about. We are here to ease off your stress.
In this article we are going to help you create the most effective memes. Stay tuned for more.
- Part1: Research meme first
- Part2: Think about your content
- Part3: Create memes right now
- Part4: Tips on making a popular meme
Part 1: Research meme first
1. Know your memes
Understanding and knowing what exactly your meme needs to do can be achieved by observing the recent the viral memes in the market. The recent viral memes would inspire your new creation to make a better meme evoking funnier emotions. There might be a specific meme that has garnered ample exposure over the social media and has been trending for weeks. You can gauge by studying them that whether your idea has been already implemented by any of them or it’s a fresh idea that you can use to strengthen your meme marketing.

2. Focus on popular stuff
While you are making memes, it’s important to refer popular movies, series, events, books, video games, comic characters etc. for enhancing the humor in memes . Funny videos about kids, accident videos and bike crashes, etc. with the right filter makes memes relatable. You can even spread a social message with a fun factor using video memes.
Part 2: Think about your content
1. Be Funny
Entertainment value is of utmost priority when you are planning for a successful meme. Though, making memes relatable to the audience is a key factor, you don’t need to be serious, just for the sake of it. Your meme should carry a witty and funny tone. You need to pick the copy and language meeting to the parameters we have just elaborated in this section.
2. Keep it short
Owning to the short attention span of online users, your memes need to be pretty short, without missing the message. While you are thinking how to make a meme, keep in mind that your meme should strike the right chord with the audience and impress them at the first place. Catchy phrases, captions from popular comic series or a funny TV show that is relatable to most people can help you create an amazing image, GIF or video meme.
Part 3: Create memes right now
When you are in a dilemma about how to make a meme or a video meme to be specific, you would require an effective meme maker tool . As without having a reliable tool for editing your video memes, it is not possible to transform your ideas into funny memes. We recommend Filmora online meme maker to materialize your idea.
Filmora meme maker is an online tool which you can use for completely free. Creating image, GIF and video memes is possible with this online program without requiring much time. Moreover, you don’t have to login to create your video memes. One of the most intuitive programs that require no tedious process, but simple drag and drop and click actions for importing GIF, image, and video. Apart from that you get the flexibility to add text inside or out of the text, GIF or video as per your heart’s content. Altering the text color and size is also possible with Filmora.
You don’t have to download online videos, as it supports YouTube and Vimeo video link. All that you need to do is copy and paste the URL for creating online video material with ease, without the hassle of downloading it to your computer and then working on it.
Here comes the detailed guide for Filmora online meme maker to create a video meme –
Step 1: Import image, GIF or video
Browse to the Filmora online meme maker website and then tap on ‘Click here to upload’ or drag to import material. You can even import YouTube and Vimeo links for creating video memes.

Step 2: Edit memes
Once you have selected the video/GIF/image you navigate to the meme editor page, you can customize your meme by tapping the tools on the left panel. The preview window there will show the changes you are doing to the imported item. Play with the text color and size in the meme and keep what suits you the most. Also, you can decide whether you wish to input text inside or outside and the file format for your meme can also be selected from this editor page.
Tips: Humorous or ironic text turns memes more popular, and don’t forget to select fonts that perfectly blend with the caption and background of the text and overall meme.

Step 3: Export and share
At last, tap on the ‘CREATE’ button once you are happy with the creation. Allow some time, so that the meme is generated with all the aspects you have incorporated to it. Once done, hit the ‘DOWNLOAD’ button and save the meme. Well, now that everything is on point, you can share it across social media platforms such as Reddit, Facebook, or Instagram.

Part 4: Tips on making a popular meme
1. Traditional and dank memes are popular, but video memes is on trend now
Though, the market is flooding with wide subcategories of memes, some of them are really taking the internet by storm. For making a popular meme that brings more exposure for your brand, you need to focus on the trending ones .
The main categories of memes are –
Traditional (normie) – This category of memes contain stock photo or viral video/movie/magazine screenshot. The photos and texts on them perfectly sync with the right visual tone.
Dank memes – They involve humor which is out of context. They also revive a dying meme or one that is pretty old and not in use by continuously overusing it.
2. Reddit is a great place to share
You shouldn’t let go of any opportunity that comes your way. You need to share them at the right place and Reddit undoubtedly has an upper hand in that case. When you have the right content gain through it – It is a subreddit where you can share your meme after researching and creating it. But, be sure that here you need to share your own creation, not someone else’s copyright products.
R/DankMemes – This one is more focused at quality. You can look here to find out the most popular memes. You might plan to post your memes after they get significantly popular over the internet and then post them or lose mass downvotes. This space helps you how to perfectly analyze and then post your meme on the right time.
Conclusion
Once we are thorough with this article, we are confident that you understood how to make a meme. And, there is no doubt that opting for Filmora online meme maker will surely help you gain popularity over the internet. This tool is quick to use and requires no space to get stored on your PC. So, now you have one awesome tool for helping you out in meme making and being popular!
Ollie Mattison
Ollie Mattison is a writer and a lover of all things video.
Follow @Ollie Mattison
Ollie Mattison
Mar 27, 2024• Proven solutions
When you browse the Internet, memes are practically everywhere. These memes are found in varied forms, ranging from video meme, to GIF and images. Through memes you can express your ideas in a creative and humorous way. In case your business requires meme marketing and you have no clue about how to make a meme then there is n nothing to worry about. We are here to ease off your stress.
In this article we are going to help you create the most effective memes. Stay tuned for more.
- Part1: Research meme first
- Part2: Think about your content
- Part3: Create memes right now
- Part4: Tips on making a popular meme
Part 1: Research meme first
1. Know your memes
Understanding and knowing what exactly your meme needs to do can be achieved by observing the recent the viral memes in the market. The recent viral memes would inspire your new creation to make a better meme evoking funnier emotions. There might be a specific meme that has garnered ample exposure over the social media and has been trending for weeks. You can gauge by studying them that whether your idea has been already implemented by any of them or it’s a fresh idea that you can use to strengthen your meme marketing.
2. Focus on popular stuff
While you are making memes, it’s important to refer popular movies, series, events, books, video games, comic characters etc. for enhancing the humor in memes . Funny videos about kids, accident videos and bike crashes, etc. with the right filter makes memes relatable. You can even spread a social message with a fun factor using video memes.
Part 2: Think about your content
1. Be Funny
Entertainment value is of utmost priority when you are planning for a successful meme. Though, making memes relatable to the audience is a key factor, you don’t need to be serious, just for the sake of it. Your meme should carry a witty and funny tone. You need to pick the copy and language meeting to the parameters we have just elaborated in this section.
2. Keep it short
Owning to the short attention span of online users, your memes need to be pretty short, without missing the message. While you are thinking how to make a meme, keep in mind that your meme should strike the right chord with the audience and impress them at the first place. Catchy phrases, captions from popular comic series or a funny TV show that is relatable to most people can help you create an amazing image, GIF or video meme.
Part 3: Create memes right now
When you are in a dilemma about how to make a meme or a video meme to be specific, you would require an effective meme maker tool . As without having a reliable tool for editing your video memes, it is not possible to transform your ideas into funny memes. We recommend Filmora online meme maker to materialize your idea.
Filmora meme maker is an online tool which you can use for completely free. Creating image, GIF and video memes is possible with this online program without requiring much time. Moreover, you don’t have to login to create your video memes. One of the most intuitive programs that require no tedious process, but simple drag and drop and click actions for importing GIF, image, and video. Apart from that you get the flexibility to add text inside or out of the text, GIF or video as per your heart’s content. Altering the text color and size is also possible with Filmora.
You don’t have to download online videos, as it supports YouTube and Vimeo video link. All that you need to do is copy and paste the URL for creating online video material with ease, without the hassle of downloading it to your computer and then working on it.
Here comes the detailed guide for Filmora online meme maker to create a video meme –
Step 1: Import image, GIF or video
Browse to the Filmora online meme maker website and then tap on ‘Click here to upload’ or drag to import material. You can even import YouTube and Vimeo links for creating video memes.
Step 2: Edit memes
Once you have selected the video/GIF/image you navigate to the meme editor page, you can customize your meme by tapping the tools on the left panel. The preview window there will show the changes you are doing to the imported item. Play with the text color and size in the meme and keep what suits you the most. Also, you can decide whether you wish to input text inside or outside and the file format for your meme can also be selected from this editor page.
Tips: Humorous or ironic text turns memes more popular, and don’t forget to select fonts that perfectly blend with the caption and background of the text and overall meme.
Step 3: Export and share
At last, tap on the ‘CREATE’ button once you are happy with the creation. Allow some time, so that the meme is generated with all the aspects you have incorporated to it. Once done, hit the ‘DOWNLOAD’ button and save the meme. Well, now that everything is on point, you can share it across social media platforms such as Reddit, Facebook, or Instagram.
Part 4: Tips on making a popular meme
1. Traditional and dank memes are popular, but video memes is on trend now
Though, the market is flooding with wide subcategories of memes, some of them are really taking the internet by storm. For making a popular meme that brings more exposure for your brand, you need to focus on the trending ones .
The main categories of memes are –
Traditional (normie) – This category of memes contain stock photo or viral video/movie/magazine screenshot. The photos and texts on them perfectly sync with the right visual tone.
Dank memes – They involve humor which is out of context. They also revive a dying meme or one that is pretty old and not in use by continuously overusing it.
2. Reddit is a great place to share
You shouldn’t let go of any opportunity that comes your way. You need to share them at the right place and Reddit undoubtedly has an upper hand in that case. When you have the right content gain through it – It is a subreddit where you can share your meme after researching and creating it. But, be sure that here you need to share your own creation, not someone else’s copyright products.
R/DankMemes – This one is more focused at quality. You can look here to find out the most popular memes. You might plan to post your memes after they get significantly popular over the internet and then post them or lose mass downvotes. This space helps you how to perfectly analyze and then post your meme on the right time.
Conclusion
Once we are thorough with this article, we are confident that you understood how to make a meme. And, there is no doubt that opting for Filmora online meme maker will surely help you gain popularity over the internet. This tool is quick to use and requires no space to get stored on your PC. So, now you have one awesome tool for helping you out in meme making and being popular!
Ollie Mattison
Ollie Mattison is a writer and a lover of all things video.
Follow @Ollie Mattison
How to Make a Slideshow with Music
How to Make a Slideshow with Music

Shanoon Cox
Mar 27, 2024• Proven solutions
Nowadays, we tend to store our experiences of important occasions in photos and videos since cameras and camcorders are popular. To better preserve these sweet memories, make a slideshow with music, photos and videos is a good idea. It’s not as difficult as you think since all you need are: a good slideshow maker, photos and videos you want to show, music to go along with your slideshow. Here is a tutorial about how to make a slideshow with music with Wondershare Filmora video editor and Wondershare DVD Slideshow Builder .
Read more: 20 Best Slideshow Songs for Different Occasions [Royalty-Free]
How to create slideshow with music in Filmora?
Note: The video tutorial about how to make slideshow in minutes is created with the previous version of Filmora video editor. Most of the steps are similar and creating a music slideshow with the latest Filmora is very easy. As we said before, all you need is your photos and music tracks, then follow the steps below to start.
Step 1. Download Filmora and Run it
Click the Free Download button above to download and install Wondershare Filmora on your computer and then launch it.
In case you want to change the default aspect ratio setting in the splash screen, you can choose 9:16 for portrait mode, 1:1 for Instagram slideshow and more. And then click New Project to create a project to continue.
Step 2. Import Photos and Music
After that, you need to import all your photo and music media to the Media Library and then drag and drop them to the timeline directly. Filmora allows you to change the order the photos in the timeline, and the photo duration as well.
You can also rotate photos and crop them manually to fit your project.
Note: If you find some black bar on your photos in preview, it is recommended to change Photo Placement to Crop and Zoom under Preference before drag-n-drop to timeline.
Step 3. Add Transitions

There are hundreds of transitions available in Filmora which you should totally have a try. You can apply a specific transition between each selected photo, or apply random transitions to selected photos.
Filmora features more than 30 transitions especially for Slideshow, such as cross merge, cross split, swap and sweep clockwise. Of course, you can also use some 3D transition, ripple and dissolve, or speed blur transitions.
You can also adjust the transition duration accordingly.
To make your photos slideshow looks better, it is highly recommended to apply filters and overlays effects.
Step 4. Add background music
You can choose background music or sound effect from the inbuilt audio library in Filmora or drag and drop the music track file from computer to the timeline directly. Filmora features the voiceover recording tool which helps you to record your own voice easily.
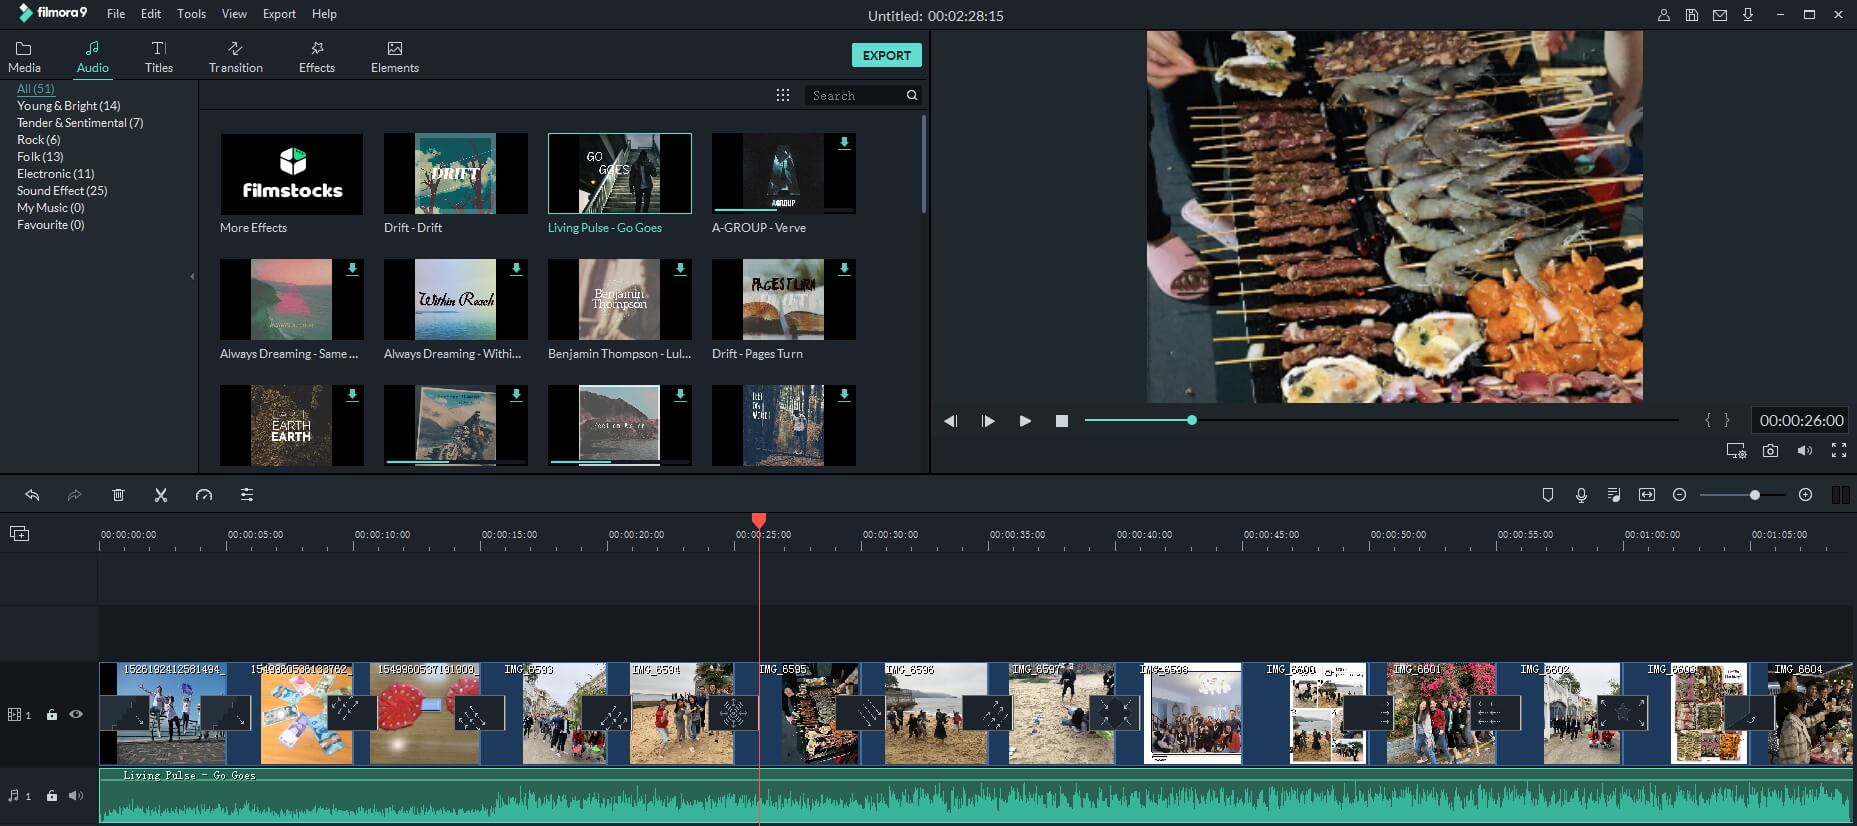
Step 5. Export and Save
Finally, it’s time to save and export the music slideshow as you see fit. You have several options, you can save it on the computer in different formats, or you can share it to YouTube or Vimeo directly, or you can burn it to DVD.
Why choose Filmora to create music slideshow?
- Filmora supports most of popular image formats such as .jpg, .png, .bmp, .gif, .tif, and .tiff.
- Filmora allows you to crop, pan & zoom the slideshow manually or automatically by applying Pan & Zoom Photo Placement.
- Filmora has inbuilt music track and sound effect library, and stunning transitions, effects and elements presets.
- Filmora allows you to record your own voiceover and apply fade in and fade out effects.
- Besides creating photo slideshow, you can use it to create videos for both your YouTube marketing, daily sharing and business.
How to make a slideshow with DVD Slideshow Builder

Tips for Make a Slideshow with Music
1. Install slideshow software and import photos and videos
Install the software and import your digital photos to the storyboard by clicking ‘“Add Files” (there is no quantity limitation of photos). You can also add videos from computer or camera.
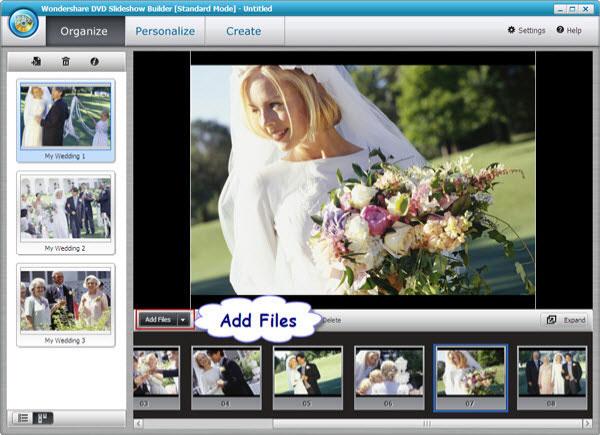
2. Add music to your photo slideshow
Go to the “Personalize” tab. Click “Music” toolbar to add background music or just drag the music to the background track. In the timeline, you can drag the slider to make the music best suit the photos and videos. If you need to edit the music, double click the clip and in the pop up window, trim music and adjust music volume as you like.
Tip: If you want to synchronize background music with the slideshow, click “Settings” (it’s on the right upper corner) and choose “Slideshow” tab, then tick the checkbox under the “Synchronize“. At last, click “OK” button.
3 .Select movie styles and add decorations
There are also 480+ free styles and transition effects that can be used for your picture slideshow with music in this tab. Choose your favorite styles and drag it on the photos. You can also add decoration text, clipart and effects on your digital photos. To make add more fun, you can also add intro movie and credit movie to your picture slideshow with music by clicking the “Intro/Credit” build-in button.

4 . Preview and save your slideshow with music
Go to “Publish” tab, you can preview the photo video by click the preview button first. Then publish it to the format you want. If you want to watch your photo slideshow with music to iPod or iPhone, you’d better publish it to MP4 format. This slideshow software also enables you to share your slideshow directly to YouTube by filling in the necessary information. Besides, you can burn DVD slideshow with music by clicking the “Burn to DVD” button and putting a DVD disc in your computer.
We shared two ways of making slideshow with music, whether you are using Filmora or DVD slideshow maker, leave a comment below and let me know your choice.
Shanoon Cox
Shanoon Cox is a writer and a lover of all things video.
Follow @Shanoon Cox
Shanoon Cox
Mar 27, 2024• Proven solutions
Nowadays, we tend to store our experiences of important occasions in photos and videos since cameras and camcorders are popular. To better preserve these sweet memories, make a slideshow with music, photos and videos is a good idea. It’s not as difficult as you think since all you need are: a good slideshow maker, photos and videos you want to show, music to go along with your slideshow. Here is a tutorial about how to make a slideshow with music with Wondershare Filmora video editor and Wondershare DVD Slideshow Builder .
Read more: 20 Best Slideshow Songs for Different Occasions [Royalty-Free]
How to create slideshow with music in Filmora?
Note: The video tutorial about how to make slideshow in minutes is created with the previous version of Filmora video editor. Most of the steps are similar and creating a music slideshow with the latest Filmora is very easy. As we said before, all you need is your photos and music tracks, then follow the steps below to start.
Step 1. Download Filmora and Run it
Click the Free Download button above to download and install Wondershare Filmora on your computer and then launch it.
In case you want to change the default aspect ratio setting in the splash screen, you can choose 9:16 for portrait mode, 1:1 for Instagram slideshow and more. And then click New Project to create a project to continue.
Step 2. Import Photos and Music
After that, you need to import all your photo and music media to the Media Library and then drag and drop them to the timeline directly. Filmora allows you to change the order the photos in the timeline, and the photo duration as well.
You can also rotate photos and crop them manually to fit your project.
Note: If you find some black bar on your photos in preview, it is recommended to change Photo Placement to Crop and Zoom under Preference before drag-n-drop to timeline.
Step 3. Add Transitions
There are hundreds of transitions available in Filmora which you should totally have a try. You can apply a specific transition between each selected photo, or apply random transitions to selected photos.
Filmora features more than 30 transitions especially for Slideshow, such as cross merge, cross split, swap and sweep clockwise. Of course, you can also use some 3D transition, ripple and dissolve, or speed blur transitions.
You can also adjust the transition duration accordingly.
To make your photos slideshow looks better, it is highly recommended to apply filters and overlays effects.
Step 4. Add background music
You can choose background music or sound effect from the inbuilt audio library in Filmora or drag and drop the music track file from computer to the timeline directly. Filmora features the voiceover recording tool which helps you to record your own voice easily.
Step 5. Export and Save
Finally, it’s time to save and export the music slideshow as you see fit. You have several options, you can save it on the computer in different formats, or you can share it to YouTube or Vimeo directly, or you can burn it to DVD.
Why choose Filmora to create music slideshow?
- Filmora supports most of popular image formats such as .jpg, .png, .bmp, .gif, .tif, and .tiff.
- Filmora allows you to crop, pan & zoom the slideshow manually or automatically by applying Pan & Zoom Photo Placement.
- Filmora has inbuilt music track and sound effect library, and stunning transitions, effects and elements presets.
- Filmora allows you to record your own voiceover and apply fade in and fade out effects.
- Besides creating photo slideshow, you can use it to create videos for both your YouTube marketing, daily sharing and business.
How to make a slideshow with DVD Slideshow Builder
Tips for Make a Slideshow with Music
1. Install slideshow software and import photos and videos
Install the software and import your digital photos to the storyboard by clicking ‘“Add Files” (there is no quantity limitation of photos). You can also add videos from computer or camera.
2. Add music to your photo slideshow
Go to the “Personalize” tab. Click “Music” toolbar to add background music or just drag the music to the background track. In the timeline, you can drag the slider to make the music best suit the photos and videos. If you need to edit the music, double click the clip and in the pop up window, trim music and adjust music volume as you like.
Tip: If you want to synchronize background music with the slideshow, click “Settings” (it’s on the right upper corner) and choose “Slideshow” tab, then tick the checkbox under the “Synchronize“. At last, click “OK” button.
3 .Select movie styles and add decorations
There are also 480+ free styles and transition effects that can be used for your picture slideshow with music in this tab. Choose your favorite styles and drag it on the photos. You can also add decoration text, clipart and effects on your digital photos. To make add more fun, you can also add intro movie and credit movie to your picture slideshow with music by clicking the “Intro/Credit” build-in button.
4 . Preview and save your slideshow with music
Go to “Publish” tab, you can preview the photo video by click the preview button first. Then publish it to the format you want. If you want to watch your photo slideshow with music to iPod or iPhone, you’d better publish it to MP4 format. This slideshow software also enables you to share your slideshow directly to YouTube by filling in the necessary information. Besides, you can burn DVD slideshow with music by clicking the “Burn to DVD” button and putting a DVD disc in your computer.
We shared two ways of making slideshow with music, whether you are using Filmora or DVD slideshow maker, leave a comment below and let me know your choice.
Shanoon Cox
Shanoon Cox is a writer and a lover of all things video.
Follow @Shanoon Cox
Best Photo Slideshow Maker: How to Make a Photo Slideshow [2023 Update]
Best Photo Slideshow Maker: How to Make a Photo Slideshow
Shanoon Cox
Mar 27, 2024• Proven solutions
Have you ever taken so many photos for your family, friends and special events? One fun-filled way of sharing them is to make a photo slideshow. That helps back up the memories in your life. What’s more, it can all be done in just a few simple clicks if you use slideshow maker like DVD Slideshow Builder Deluxe . With this programs, you can easily weave photos and video into work of art to amaze anyone. Here let’s see how to easily and creatively make a photo slideshow and burn to DVD with these all-in-one slideshow tools.
Download and run DVD slideshow builder , then follow the steps below to see how to make a photo slideshow.
Ways for Photo Slidehow making
Step 1. Add photo or video files to the photo slideshow maker
After running the photo slideshow maker, you’ll start from the “Organize” tab. On the interface, there are two Add Files buttons any of which you can click to add your photos and videos. Then just drag and drop photos or videos to arrange their order on storyboard. If you want to edit the photos, click “Edit” to add effects, crop photos, repair red-eye or add caption.
Tip: To have a large viewe of all the files, click the “Expand” button on top right corner of storyboard.

Step 2. Customize the slideshow like background music and transitions
When importing your files, more than 100 transition effects will be randomly and automatically applied between every two photo or video. However, you can change them anytime in the “Personalize” tab. Just drag and drop a transition from the list to the thumbnail between two slides. You can also add effects, motion or intro/credit as you like.
Adding music can greatly enhance the vibe of your photo slideshow. To achieve this, click “Music” on the storyboard. This photo slideshow maker enables you to add several different pieces of music according to your needs. If you want to add your own voice, just click “Voice Over” to record and then add it to the slideshow.

Step 3 Create photo slideshow and burn to DVD

Go to the “Create” tab and click the “Preview” button to make sure the photo slideshow is good enough. Go back to Personalize tab to change if necessary. When you are happy with the result, choose the options on the left to export photo slideshow to DVD, PC, portable devices, etc. You can also directly upload slideshow to Youtube and send message to Facebook and Twitter friends.

Now sit back and relax, it’ll only take a while to get your photo slideshow for sharing anywhere.
Shanoon Cox
Shanoon Cox is a writer and a lover of all things video.
Follow @Shanoon Cox
Shanoon Cox
Mar 27, 2024• Proven solutions
Have you ever taken so many photos for your family, friends and special events? One fun-filled way of sharing them is to make a photo slideshow. That helps back up the memories in your life. What’s more, it can all be done in just a few simple clicks if you use slideshow maker like DVD Slideshow Builder Deluxe . With this programs, you can easily weave photos and video into work of art to amaze anyone. Here let’s see how to easily and creatively make a photo slideshow and burn to DVD with these all-in-one slideshow tools.
Download and run DVD slideshow builder , then follow the steps below to see how to make a photo slideshow.
Ways for Photo Slidehow making
Step 1. Add photo or video files to the photo slideshow maker
After running the photo slideshow maker, you’ll start from the “Organize” tab. On the interface, there are two Add Files buttons any of which you can click to add your photos and videos. Then just drag and drop photos or videos to arrange their order on storyboard. If you want to edit the photos, click “Edit” to add effects, crop photos, repair red-eye or add caption.
Tip: To have a large viewe of all the files, click the “Expand” button on top right corner of storyboard.
Step 2. Customize the slideshow like background music and transitions
When importing your files, more than 100 transition effects will be randomly and automatically applied between every two photo or video. However, you can change them anytime in the “Personalize” tab. Just drag and drop a transition from the list to the thumbnail between two slides. You can also add effects, motion or intro/credit as you like.
Adding music can greatly enhance the vibe of your photo slideshow. To achieve this, click “Music” on the storyboard. This photo slideshow maker enables you to add several different pieces of music according to your needs. If you want to add your own voice, just click “Voice Over” to record and then add it to the slideshow.
Step 3 Create photo slideshow and burn to DVD
Go to the “Create” tab and click the “Preview” button to make sure the photo slideshow is good enough. Go back to Personalize tab to change if necessary. When you are happy with the result, choose the options on the left to export photo slideshow to DVD, PC, portable devices, etc. You can also directly upload slideshow to Youtube and send message to Facebook and Twitter friends.
Now sit back and relax, it’ll only take a while to get your photo slideshow for sharing anywhere.
Shanoon Cox
Shanoon Cox is a writer and a lover of all things video.
Follow @Shanoon Cox
How to Make an Emoji of Yourself on Android and iPhone [Emoji Yourself]
How to Make an Emoji of Yourself on Android and iPhone [Emoji Yourself]
Shanoon Cox
Mar 27, 2024• Proven solutions
The introduction of stickers and emojis have transformed the texting experience—no more boring texts. Just make an emoji of yourself in every mood and instantly express yourself in a better and funnier way.
Whether you own an iPhone or an Android device, you can easily emoji yourself that exactly mimics your appearance and reaction. It’s time to up your chatting game and make exciting emojis.
In this article, we will show you how to amaze your friends by teaching you to make an emoji of yourself in no time.
Part 1: Make an Emoji of Yourself on iPhone
iPhone has now introduced a fun feature that lets you make an emoji of yourself, the exact mirror image of you, just smaller and animated.
Here’s how you can make an emoji of yourself in 2 easy ways:
Method 1-By the iPhone Message app
iPhone has now introduced an in-built feature to let you make an emoji of yourself without having to download any other apps. However, you can only make an emoji of yourself in iOS 13 or later.
For the lucky lot of you, let me walk you through how to make an emoji of yourself in a few simple steps:
1.Open your iMessages. Go to a previous chat or tap the New Message Make sure your Appstore icon is toggled on to display the app tray. Hit the Animoji icon, represented by the monkey. Swipe to find the + plus sign for New Memoji to emoji yourself.

2.Now you can make an emoji of yourself by adding even the smallest details. Start by selecting your skin color. You can even add freckles or adjust your skin color’s warmth or paleness with a slider.

3.Hairstyle-Select the style that mimics the real you or goes for your dream hair-do.

4.Head Shape-Select the age group from kids, adults, old, and your face cut by choosing the chin that best fits you.

5.Nose & Lips- After selecting your eye color, shape, and brows, choose a nose shape and a lipstick color and intensity.

6.Eyewear/Headwear-Add glasses, adjust tint shade, color, and choose a hat, cap, or turban as you like. Finally, click Done to save the emoji.

Method 2-Using the Avatoon app
If you want to make an emoji of yourself that is more fun and personalized, from your dress to your pose, Avatoon is your way to go. With more than 500 customizable options, Avatoon lets you make an emoji of yourself meticulously, allowing you add avid details that pave the way for a hilariously amazing texting experience
1.Install and launch Avatoon app.
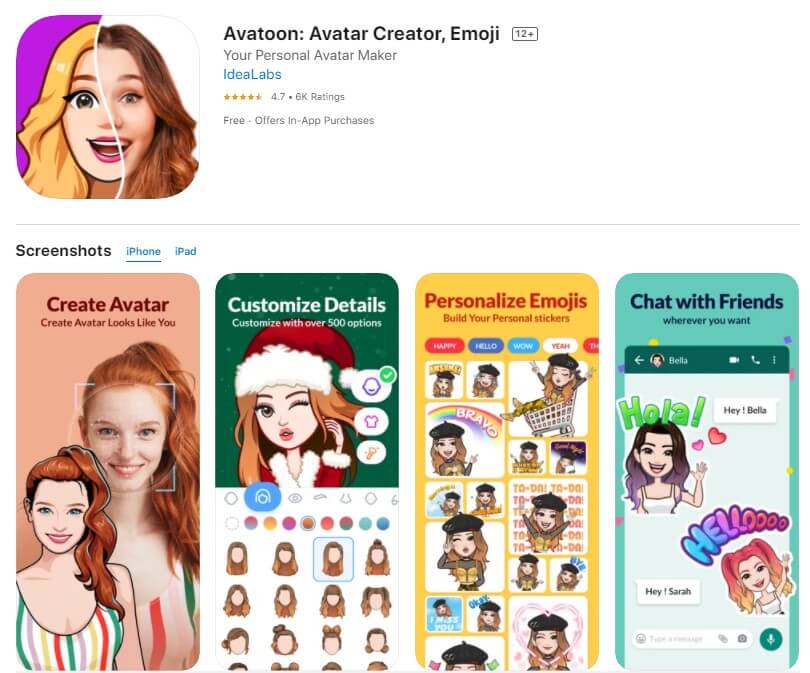
2.Now, choose the face shape that best matches your features and also select your face color. Add freckles(if you have any).

3.Next up is the hairstyle. There is a range of hairstyles from straight to wavy. Pick one you like best. You can choose the eye shape, color, brow, nose, lips, and finally, add some funky or formal eyewear to complete the look. Press Save.
4.After you make an emoji of yourself, you can further fine-tune it by adding detailed features and accessories using coins. Choose a stylish dress for your avatar from the Clothes tab or add a fun background.
5.Click on Photoboothto fit your emoji in a themed photo for an event or celebration.
6.Click on Poses and select your pose and share directly to any social media platform or save to phone.
Part 2: Make an Emoji of Yourself on Android
Now you can make an emoji of yourself even on an Android phone with the Mirror emoji app. Take your texting experience to the next level. Quickly make an emoji of yourself and wow your friends and family with the cute mini version of yourself.
1.Install and launch Mirror. Now, to make an emoji of yourself for your current look, take a selfie or click the gallery icon to choose an existing image to emoji yourself.

2.Click the left one to make an original avatar or the right one if you wish to make an emoji of yourself as an anime. Click Next.

3.Now, customize your emoji. Add a hairstyle, choose your glasses, cap, headphones, turban, scarf, or even devil horns.

4.Customize your dress color to your liking. Then, click Next.

5.Once you make an emoji of yourself, Mirror will display a range of fun stickers for instant sharing.

6.Click on any sticker, choose a mood using the emojis displayed and click to share or save to the device.

7.In the Sticker backstab, choose a themed sticker set and click Add to WhatsApp.

Conclusion-Ready to Emoji Yourself?
With texts being taken over by stickers and emojis, it’s high time for you to enter the league. Make an emoji of yourself in different moods and add funny backgrounds to express yourself fully and hilariously.
Use the in-built iPhone feature or a powerful app to make an emoji of yourself stand out from the crowd of mainstream messages. And take inspiration from our guide to surprise your friends with an emoji that looks exactly like you, just a bit smaller.
Here, we recommend Wondershare Filmora , due to its AR camera feature, which makes taking selfies more interesting. This AR camera function includes animoji and memoji avatars for a fun and excellent video.
Go on and make an emoji of yourself. Show your friends how awesome and unique you are with a beautifully personalized emoji.
Good luck
Shanoon Cox
Shanoon Cox is a writer and a lover of all things video.
Follow @Shanoon Cox
Shanoon Cox
Mar 27, 2024• Proven solutions
The introduction of stickers and emojis have transformed the texting experience—no more boring texts. Just make an emoji of yourself in every mood and instantly express yourself in a better and funnier way.
Whether you own an iPhone or an Android device, you can easily emoji yourself that exactly mimics your appearance and reaction. It’s time to up your chatting game and make exciting emojis.
In this article, we will show you how to amaze your friends by teaching you to make an emoji of yourself in no time.
Part 1: Make an Emoji of Yourself on iPhone
iPhone has now introduced a fun feature that lets you make an emoji of yourself, the exact mirror image of you, just smaller and animated.
Here’s how you can make an emoji of yourself in 2 easy ways:
Method 1-By the iPhone Message app
iPhone has now introduced an in-built feature to let you make an emoji of yourself without having to download any other apps. However, you can only make an emoji of yourself in iOS 13 or later.
For the lucky lot of you, let me walk you through how to make an emoji of yourself in a few simple steps:
1.Open your iMessages. Go to a previous chat or tap the New Message Make sure your Appstore icon is toggled on to display the app tray. Hit the Animoji icon, represented by the monkey. Swipe to find the + plus sign for New Memoji to emoji yourself.
2.Now you can make an emoji of yourself by adding even the smallest details. Start by selecting your skin color. You can even add freckles or adjust your skin color’s warmth or paleness with a slider.
3.Hairstyle-Select the style that mimics the real you or goes for your dream hair-do.
4.Head Shape-Select the age group from kids, adults, old, and your face cut by choosing the chin that best fits you.
5.Nose & Lips- After selecting your eye color, shape, and brows, choose a nose shape and a lipstick color and intensity.
6.Eyewear/Headwear-Add glasses, adjust tint shade, color, and choose a hat, cap, or turban as you like. Finally, click Done to save the emoji.
Method 2-Using the Avatoon app
If you want to make an emoji of yourself that is more fun and personalized, from your dress to your pose, Avatoon is your way to go. With more than 500 customizable options, Avatoon lets you make an emoji of yourself meticulously, allowing you add avid details that pave the way for a hilariously amazing texting experience
1.Install and launch Avatoon app.
2.Now, choose the face shape that best matches your features and also select your face color. Add freckles(if you have any).
3.Next up is the hairstyle. There is a range of hairstyles from straight to wavy. Pick one you like best. You can choose the eye shape, color, brow, nose, lips, and finally, add some funky or formal eyewear to complete the look. Press Save.
4.After you make an emoji of yourself, you can further fine-tune it by adding detailed features and accessories using coins. Choose a stylish dress for your avatar from the Clothes tab or add a fun background.
5.Click on Photoboothto fit your emoji in a themed photo for an event or celebration.
6.Click on Poses and select your pose and share directly to any social media platform or save to phone.
Part 2: Make an Emoji of Yourself on Android
Now you can make an emoji of yourself even on an Android phone with the Mirror emoji app. Take your texting experience to the next level. Quickly make an emoji of yourself and wow your friends and family with the cute mini version of yourself.
1.Install and launch Mirror. Now, to make an emoji of yourself for your current look, take a selfie or click the gallery icon to choose an existing image to emoji yourself.
2.Click the left one to make an original avatar or the right one if you wish to make an emoji of yourself as an anime. Click Next.
3.Now, customize your emoji. Add a hairstyle, choose your glasses, cap, headphones, turban, scarf, or even devil horns.
4.Customize your dress color to your liking. Then, click Next.
5.Once you make an emoji of yourself, Mirror will display a range of fun stickers for instant sharing.
6.Click on any sticker, choose a mood using the emojis displayed and click to share or save to the device.
7.In the Sticker backstab, choose a themed sticker set and click Add to WhatsApp.
Conclusion-Ready to Emoji Yourself?
With texts being taken over by stickers and emojis, it’s high time for you to enter the league. Make an emoji of yourself in different moods and add funny backgrounds to express yourself fully and hilariously.
Use the in-built iPhone feature or a powerful app to make an emoji of yourself stand out from the crowd of mainstream messages. And take inspiration from our guide to surprise your friends with an emoji that looks exactly like you, just a bit smaller.
Here, we recommend Wondershare Filmora , due to its AR camera feature, which makes taking selfies more interesting. This AR camera function includes animoji and memoji avatars for a fun and excellent video.
Go on and make an emoji of yourself. Show your friends how awesome and unique you are with a beautifully personalized emoji.
Good luck
Shanoon Cox
Shanoon Cox is a writer and a lover of all things video.
Follow @Shanoon Cox
Distracted Boyfriend Meme Generator
Distracted Boyfriend Meme Generator
Ollie Mattison
Mar 27, 2024• Proven solutions
The Distracted Boyfriend meme is the embodiment of the awkward situation we find ourselves in when we want something other than what we already have. The original image was taken by Antonio Guillem and posted on iStock with a caption “Disloyal man with his girlfriend looking at another girl”. By early 2017, a few years after it was posted on iStock, the picture surfaced on social media, and it became a viral meme in a few short months. One of the first Distracted Boyfriend memes that featured a joke about staring at the sun during a solar eclipse was posted on Reddit and within 24 hours it gained 31.200 points.
The meme has since become synonymous with being unfaithful to girlfriends, ideologies, scientific evidence, photo cameras or virtually anything else. Despite its popularity, it is still difficult to make a good Distracted Boyfriend meme, so let’s have a look at some of the best versions of the meme that emerged on social networks.
The Distracted Girlfriend meme became popular soon after the Distracted Boyfriend meme went viral. The photo belongs to the same series of images posted to iStock by Antonio Guillem.

Copy the image
The facial expression of the girl in the photo makes it perfect meme material because she looks as if she’s just about to risk it all and do what she wants. Both Boyfriend and Girlfriend versions of this meme contain text over each of the characters in the picture. If you have a similar dilemma you can make your own version effortlessly. Here’s how.
How to Make a Distracted Boyfriend Meme?
Online meme generators often watermark the content you create or require you to sign in before you can make a meme, which is why we recommend using Filmora Online Meme Maker . The platform lets you generate memes for free, and it offers all the tools you’ll need to quickly make a watermark-free Distracted Boyfriend meme.
1. Uploading the Image
You can click the “Copy the image” link below and the image link will be copied automatically.

Copy the image
Enter the URL into the box. Click on the Upload button and wait for the new page to load, so you can start making adjustments to the picture.
If you saved the photo to your computer, you can click on the +icon once you arrive at the meme maker’s homepage and navigate to its destination on your hard drive.

2. Adding Text to Memes
The textual part of the Distracted Boyfriend meme is always incorporated into the photo, so make sure that the Text Inside option is selected and proceed to insert the text into the text boxes. Click on the Add Text Box button to add a third text box to the meme, and drag the text boxes displayed on the screen to their best positions.

The Text Options menu lets you pick a font or change the color and the size of the text. It also offers the standard text alignment features, so you can easily rearrange the text.
3. Downloading the Meme
Click on the Create button once you finish customizing the text and wait for the new page to load.

Conclusion
Click on the download button to save the meme you created or use some of the file sharing options to post the meme on social media platforms if you are accessing the Online Meme Maker from a mobile device.
The Distracted Boyfriend is one of the most popular memes in the last couple of years that has made us all laugh because we all understand how it feels to be tempted by the things we don’t have. Do you like generating the Distracted Boyfriend or Distracted Girlfriend memes? Leave a comment below and share your experiences with us.
Ollie Mattison
Ollie Mattison is a writer and a lover of all things video.
Follow @Ollie Mattison
Ollie Mattison
Mar 27, 2024• Proven solutions
The Distracted Boyfriend meme is the embodiment of the awkward situation we find ourselves in when we want something other than what we already have. The original image was taken by Antonio Guillem and posted on iStock with a caption “Disloyal man with his girlfriend looking at another girl”. By early 2017, a few years after it was posted on iStock, the picture surfaced on social media, and it became a viral meme in a few short months. One of the first Distracted Boyfriend memes that featured a joke about staring at the sun during a solar eclipse was posted on Reddit and within 24 hours it gained 31.200 points.
The meme has since become synonymous with being unfaithful to girlfriends, ideologies, scientific evidence, photo cameras or virtually anything else. Despite its popularity, it is still difficult to make a good Distracted Boyfriend meme, so let’s have a look at some of the best versions of the meme that emerged on social networks.
The Distracted Girlfriend meme became popular soon after the Distracted Boyfriend meme went viral. The photo belongs to the same series of images posted to iStock by Antonio Guillem.
Copy the image
The facial expression of the girl in the photo makes it perfect meme material because she looks as if she’s just about to risk it all and do what she wants. Both Boyfriend and Girlfriend versions of this meme contain text over each of the characters in the picture. If you have a similar dilemma you can make your own version effortlessly. Here’s how.
How to Make a Distracted Boyfriend Meme?
Online meme generators often watermark the content you create or require you to sign in before you can make a meme, which is why we recommend using Filmora Online Meme Maker . The platform lets you generate memes for free, and it offers all the tools you’ll need to quickly make a watermark-free Distracted Boyfriend meme.
1. Uploading the Image
You can click the “Copy the image” link below and the image link will be copied automatically.
Copy the image
Enter the URL into the box. Click on the Upload button and wait for the new page to load, so you can start making adjustments to the picture.
If you saved the photo to your computer, you can click on the +icon once you arrive at the meme maker’s homepage and navigate to its destination on your hard drive.
2. Adding Text to Memes
The textual part of the Distracted Boyfriend meme is always incorporated into the photo, so make sure that the Text Inside option is selected and proceed to insert the text into the text boxes. Click on the Add Text Box button to add a third text box to the meme, and drag the text boxes displayed on the screen to their best positions.
The Text Options menu lets you pick a font or change the color and the size of the text. It also offers the standard text alignment features, so you can easily rearrange the text.
3. Downloading the Meme
Click on the Create button once you finish customizing the text and wait for the new page to load.
Conclusion
Click on the download button to save the meme you created or use some of the file sharing options to post the meme on social media platforms if you are accessing the Online Meme Maker from a mobile device.
The Distracted Boyfriend is one of the most popular memes in the last couple of years that has made us all laugh because we all understand how it feels to be tempted by the things we don’t have. Do you like generating the Distracted Boyfriend or Distracted Girlfriend memes? Leave a comment below and share your experiences with us.
Ollie Mattison
Ollie Mattison is a writer and a lover of all things video.
Follow @Ollie Mattison
Also read:
- [New] Clickbait Crafting Secrets to Facebook's Favorites
- [Updated] In 2024, Upgrade Your Youtube Bio with Pro Templates
- 10 Most Popular Minion Memes that Moms Are Crazy About
- 2024 Approved Best 10 Emoji Makers to Create Your Own Emojis PC/Online/Android/iPhone
- 2024 Approved How to Add Emojis To Discord on Desktop Computer and Mobile
- 2024 Approved Mocking Sponge Bob Meme Generator
- Beam Brighter Adopting the Playful Cartoon Lens on Snapchat
- Enhanced Sound Clarity: New Audio Drivers in Win7 Release
- Forza Horizon 4 PC Fix - No More Vehicle Collisions!
- In 2024, What Is a SIM Network Unlock PIN? Get Your Oppo Find N3 Flip Phone Network-Ready
- New 2024 Approved What Is Emoji and What Does It Mean?
- New How to Make a iMovie Photo Slideshow with Music?
- Overcoming Barriers in German Learning
- Pushing Boundaries with Yuneec's Typhoon H Drone
- Updated In 2024, 10 Popular Cartoon Characters That Should Top Your List 2023 Updated
- Title: In 2024, Top 10 Storyboarding Software Free&Paid
- Author: Jan
- Created at : 2024-09-29 22:02:11
- Updated at : 2024-09-30 17:58:12
- Link: https://meme-emoji.techidaily.com/in-2024-top-10-storyboarding-software-freeandpaid/
- License: This work is licensed under CC BY-NC-SA 4.0.