
In 2024, How to Record Your Memorable Honeymoon Video
How to Record Your Memorable Honeymoon Video
How to Make a Memorable Honeymoon Video

Ollie Mattison
Mar 27, 2024• Proven solutions
The honeymoon is maybe one of the most important times in our life. It’s unique, refined and filled with emotion which is why you should always try to consider exploring all the opportunities that this has to offer. But if you go on a honeymoon, you do want to have a video that you can cherish forever, don’t you? If you do, here are example of fancy honey moon video and some of the best ideas that you can use to create the best, most immersive and memorable honeymoon video.
Tips on creating a memorable honeymoon video
Choosing the right camera
There are many affordable 1080p or 4k cameras that you can use and all of them come with various features and prices. Obviously, you should try and focus on finding the right one that suits your needs. Take your time and study the prices and features then select the one you want based on your budget and expertise.
Get lots of photos
Another great tip is that you need to get as many photos as you can. No matter where you choose to go, there are tons of scenes, people, monuments and landmarks that you can choose to photograph. Take your time and try to capture as many of them as you possibly can. Granted, it will take a little bit of time but it will offer you the insight and fun you need in order to have a great slideshow in the end.
Organize a story from your photos
Once you have the photos, you should try to organize a story from the images. The best honeymoon movies are the ones that include a story so think about that and you will have quite a bit of fun as you immerse yourself into this experience, that’s for sure.
Add songs and overlays
You should try and consider adding songs and overlays because this will make the movie more fun and immersive. Once you complete it, you will need to share it with friends and family!
Edit your honeymoon video with Wondershare Filmora
Why choose Wondershare Filmora
If you are not good at video editing, or if you are a beginner and bothered by the complex steps of some professional video editor, Wondershare Filmora is here to save you. This is the best movie creation tool that helps you create you honeymoon movies from images all while delivering the entire set of tools you need to get a one of a kind and fun experience. If you always wanted an incredible and unique, refined movie creation experience then this is the app to use.
=“” style=”width: 100%; height: 278.438px;”;
 Download Mac Version ](https://tools.techidaily.com/wondershare/filmora/download/ )
Wondershare Filmora is very easy to use but it also manages to offer a lot of power. This is great for people that want to access basic editing features such as splitting, reverse, rotate and crop but which might also want some advanced features as well. You are bound to enjoy the entire experience for sure and the outcome will be very well worth it.
Aside from that, Wondershare Filmora also allows you to access a fresh interface that makes editing such a video a breeze. You can even add a variety of overlays and filters which do add up to offer you a very refined, exciting and refreshing experience at all times. It’s all about having the right focus and attention to detail but rest assured that the outcome will be well worth it. Once you have the movie, you can share it on Vimeo, YouTube and Facebook with a single click. The app also allows you to burn it to DVD if you so desire.
How to edit the honeymoon video with Wondershare Filmora
All you have to do is to go through the next steps:
Step 1: Import your honeymoon photos and videos
Gather all the videos and images that you have from your honeymoon then paste them inside the app.

Step 2: Tone your videos with editing tools
Add in video tones with features like reverse, trim, rotate, overlays, transitions, text and so on. This will help you refine the movie and offer it the unique experience you always wanted.
Step 3: Add music from Filmora library
Once you have that, add the music from the integrated royalty free library to ignite your love story.
Step 4: Save and share you video

Complete the video by saving it and then you can feel free to share it with friends.
Wondershare Filmora is the best solution for those that want a refined and fun honeymoon video. All you have to do is to try it out and rest assured that you are bound to love the results!
Download Mac Version ](https://tools.techidaily.com/wondershare/filmora/download/ )
Ollie Mattison
Ollie Mattison is a writer and a lover of all things video.
Follow @Ollie Mattison
Ollie Mattison
Mar 27, 2024• Proven solutions
The honeymoon is maybe one of the most important times in our life. It’s unique, refined and filled with emotion which is why you should always try to consider exploring all the opportunities that this has to offer. But if you go on a honeymoon, you do want to have a video that you can cherish forever, don’t you? If you do, here are example of fancy honey moon video and some of the best ideas that you can use to create the best, most immersive and memorable honeymoon video.
Tips on creating a memorable honeymoon video
Choosing the right camera
There are many affordable 1080p or 4k cameras that you can use and all of them come with various features and prices. Obviously, you should try and focus on finding the right one that suits your needs. Take your time and study the prices and features then select the one you want based on your budget and expertise.
Get lots of photos
Another great tip is that you need to get as many photos as you can. No matter where you choose to go, there are tons of scenes, people, monuments and landmarks that you can choose to photograph. Take your time and try to capture as many of them as you possibly can. Granted, it will take a little bit of time but it will offer you the insight and fun you need in order to have a great slideshow in the end.
Organize a story from your photos
Once you have the photos, you should try to organize a story from the images. The best honeymoon movies are the ones that include a story so think about that and you will have quite a bit of fun as you immerse yourself into this experience, that’s for sure.
Add songs and overlays
You should try and consider adding songs and overlays because this will make the movie more fun and immersive. Once you complete it, you will need to share it with friends and family!
Edit your honeymoon video with Wondershare Filmora
Why choose Wondershare Filmora
If you are not good at video editing, or if you are a beginner and bothered by the complex steps of some professional video editor, Wondershare Filmora is here to save you. This is the best movie creation tool that helps you create you honeymoon movies from images all while delivering the entire set of tools you need to get a one of a kind and fun experience. If you always wanted an incredible and unique, refined movie creation experience then this is the app to use.
=“” style=”width: 100%; height: 278.438px;”;
Download Mac Version ](https://tools.techidaily.com/wondershare/filmora/download/ )
Wondershare Filmora is very easy to use but it also manages to offer a lot of power. This is great for people that want to access basic editing features such as splitting, reverse, rotate and crop but which might also want some advanced features as well. You are bound to enjoy the entire experience for sure and the outcome will be very well worth it.
Aside from that, Wondershare Filmora also allows you to access a fresh interface that makes editing such a video a breeze. You can even add a variety of overlays and filters which do add up to offer you a very refined, exciting and refreshing experience at all times. It’s all about having the right focus and attention to detail but rest assured that the outcome will be well worth it. Once you have the movie, you can share it on Vimeo, YouTube and Facebook with a single click. The app also allows you to burn it to DVD if you so desire.
How to edit the honeymoon video with Wondershare Filmora
All you have to do is to go through the next steps:
Step 1: Import your honeymoon photos and videos
Gather all the videos and images that you have from your honeymoon then paste them inside the app.
Step 2: Tone your videos with editing tools
Add in video tones with features like reverse, trim, rotate, overlays, transitions, text and so on. This will help you refine the movie and offer it the unique experience you always wanted.
Step 3: Add music from Filmora library
Once you have that, add the music from the integrated royalty free library to ignite your love story.
Step 4: Save and share you video
Complete the video by saving it and then you can feel free to share it with friends.
Wondershare Filmora is the best solution for those that want a refined and fun honeymoon video. All you have to do is to try it out and rest assured that you are bound to love the results!
Download Mac Version ](https://tools.techidaily.com/wondershare/filmora/download/ )
Ollie Mattison
Ollie Mattison is a writer and a lover of all things video.
Follow @Ollie Mattison
Ollie Mattison
Mar 27, 2024• Proven solutions
The honeymoon is maybe one of the most important times in our life. It’s unique, refined and filled with emotion which is why you should always try to consider exploring all the opportunities that this has to offer. But if you go on a honeymoon, you do want to have a video that you can cherish forever, don’t you? If you do, here are example of fancy honey moon video and some of the best ideas that you can use to create the best, most immersive and memorable honeymoon video.
Tips on creating a memorable honeymoon video
Choosing the right camera
There are many affordable 1080p or 4k cameras that you can use and all of them come with various features and prices. Obviously, you should try and focus on finding the right one that suits your needs. Take your time and study the prices and features then select the one you want based on your budget and expertise.
Get lots of photos
Another great tip is that you need to get as many photos as you can. No matter where you choose to go, there are tons of scenes, people, monuments and landmarks that you can choose to photograph. Take your time and try to capture as many of them as you possibly can. Granted, it will take a little bit of time but it will offer you the insight and fun you need in order to have a great slideshow in the end.
Organize a story from your photos
Once you have the photos, you should try to organize a story from the images. The best honeymoon movies are the ones that include a story so think about that and you will have quite a bit of fun as you immerse yourself into this experience, that’s for sure.
Add songs and overlays
You should try and consider adding songs and overlays because this will make the movie more fun and immersive. Once you complete it, you will need to share it with friends and family!
Edit your honeymoon video with Wondershare Filmora
Why choose Wondershare Filmora
If you are not good at video editing, or if you are a beginner and bothered by the complex steps of some professional video editor, Wondershare Filmora is here to save you. This is the best movie creation tool that helps you create you honeymoon movies from images all while delivering the entire set of tools you need to get a one of a kind and fun experience. If you always wanted an incredible and unique, refined movie creation experience then this is the app to use.
=“” style=”width: 100%; height: 278.438px;”;
Download Mac Version ](https://tools.techidaily.com/wondershare/filmora/download/ )
Wondershare Filmora is very easy to use but it also manages to offer a lot of power. This is great for people that want to access basic editing features such as splitting, reverse, rotate and crop but which might also want some advanced features as well. You are bound to enjoy the entire experience for sure and the outcome will be very well worth it.
Aside from that, Wondershare Filmora also allows you to access a fresh interface that makes editing such a video a breeze. You can even add a variety of overlays and filters which do add up to offer you a very refined, exciting and refreshing experience at all times. It’s all about having the right focus and attention to detail but rest assured that the outcome will be well worth it. Once you have the movie, you can share it on Vimeo, YouTube and Facebook with a single click. The app also allows you to burn it to DVD if you so desire.
How to edit the honeymoon video with Wondershare Filmora
All you have to do is to go through the next steps:
Step 1: Import your honeymoon photos and videos
Gather all the videos and images that you have from your honeymoon then paste them inside the app.
Step 2: Tone your videos with editing tools
Add in video tones with features like reverse, trim, rotate, overlays, transitions, text and so on. This will help you refine the movie and offer it the unique experience you always wanted.
Step 3: Add music from Filmora library
Once you have that, add the music from the integrated royalty free library to ignite your love story.
Step 4: Save and share you video
Complete the video by saving it and then you can feel free to share it with friends.
Wondershare Filmora is the best solution for those that want a refined and fun honeymoon video. All you have to do is to try it out and rest assured that you are bound to love the results!
Download Mac Version ](https://tools.techidaily.com/wondershare/filmora/download/ )
Ollie Mattison
Ollie Mattison is a writer and a lover of all things video.
Follow @Ollie Mattison
How to Make Memes on iPhone and Android
How to Make Memes on iPhone and Android
Ollie Mattison
Mar 27, 2024• Proven solutions
With growing demand on the internet, memes are spreading like wildfire. In case you want to promote your brand using various types of relatable memes that would drive more traffic for your website, then there is good news for you. It doesn’t matter, whether you own an Android or iOS device. We will help you out in learning how to make memes on iPhone/Android in this article. Keep reading!
- Part1: How to make memes on iPhone with Meme Generator
- Part2: How to make memes on Android with Memedroid
- Part3: Recommended - Making memes with Filmora meme maker online
Part 1: How to make memes on iPhone with Meme Generator
While planning to create memes on your iPhone, you might find Meme Generator as the most suitable tool. It helps you create hilarious memes and allows you to share on social media platforms like Twitter, Facebook, Messenger, Instagram, Dropbox, E-mail, Snapchat etc. you get 500 plus memes with example captions under different categories.
You can customize memes using your own photos and adding text, alter size and color of text using 10 different fonts. You can crop the image, move it, add border to it, filter/search memes, and scroll through each meme category. There are no watermark or auto upload of memes to protect your privacy. Here is the detailed guide –
Step 1: Install Meme Generator from App Store on your iPhone and launch the app.
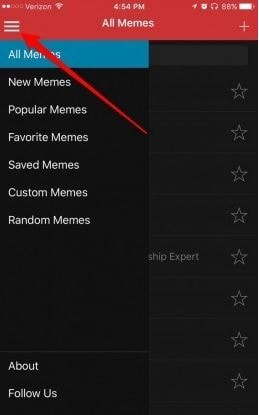
Step 2: Tap on the 3 horizontal lines on the top-left corner to browse memes. If you know the name, then search a meme and click on it.
Step 3: Use the example text or hit the ‘Text’ bar to add or edit your caption. Press the icons over the top-right corner for customizing your meme photo and caption options.
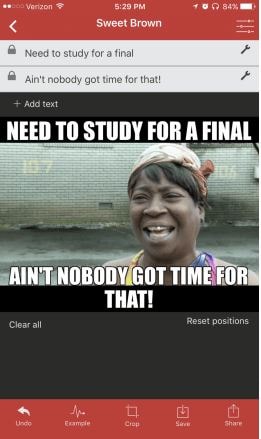
Step 4: Tap on the ‘Save’ or ‘Share’ button, once you are done editing the meme. You can find the meme on your ‘Photos’ app.
Part 2: How to make memes on Android with Memedroid
If you are wondering how to make memes on Android, then take the Memedroid app into consideration. You can create photos and GIF memes, jokes, avatars, graphics etc. with this app. There are numerous memes uploaded everyday on the app and you get the chance to let people vote for your meme too.
You get to use popular templates such as evil toddler, attached girlfriend, surprised koala with hilarious designs. The best rated memes are in the top gallery and you get the main gallery with latest funny memes too. You can design and save your memes and share them or download, it’s up to you. It supports a wide variety of languages such as English, French, Spanish, Italian, Portuguese etc.
Here are the steps for how to make memes on Android –
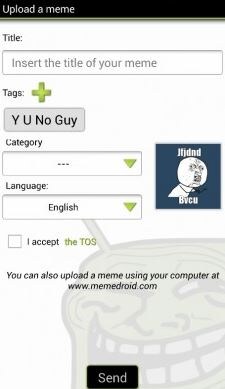
Step 1: Download and install the app on your mobile and launch it. Click on ‘Meme Factory’ to pick the background image and then you can swipe to explore the other features too. Alternatively, you can add your own photos if Meme factory was not of your choice. Hit ‘Upload Zone’ instead of ‘Meme Factory’ and register for a free account. On the ‘Upload’ screen, tap the ‘Select An Image’ button to pick a photo within 330MB size

Step 2: After selecting the background image, add captions at the top and bottom of the image. The ‘SAVE’ button can be found on the top-right, tap that to save. Likewise, for sharing the meme, hit the ‘SHARE’ button located at the bottom of the screen.
Step 3: Add tags and accept the ‘Terms of Service’ followed by ‘Send’ button. Wait a while, to get you meme ready for your audience.
Part 3: Recommended - Making memes with Filmora meme maker online
In order to make memes on iPhone/Android, you need a mobile device. But, what if you have a computer on which you need to create a meme? Well, Filmora meme maker is the apt choice for you. You don’t need to download apps or software on your Pc. It is the ultimate online solution.
Brief steps to introduce making memes. You can create image, GIF, and video memes adding nice fonts. It processes video/GIF/image memes rapidly than the competitors. Adding texts, fonts and altering font colors is so easy with it.
Here is the detailed guide to make memes on Android –
Step 1: Visit the official Filmora website and look for Filmora online meme maker. Import videos by dragging and dropping to the Filmora interface. You can even add online links to videos in order to upload them.

Step 2: After selecting the video/photo/GIF move to the meme editor page and customize your video meme using tools from the left pane. Include text, change fonts and then you can preview the changes.

Step 3: Tap on the ‘CREATE’ button to apply the changes, when you are satisfied. Press the ‘DOWNLOAD’ button and then share your meme on social media sites.

Conclusion
Coming towards the end of the article, we have discovered that Filmora creates brilliant memes and that too, in no time. No lengthy or annoying processes, nor you need apps that eat up your phone memory. Life is blissfully funny with meme making on Filmora.
Ollie Mattison
Ollie Mattison is a writer and a lover of all things video.
Follow @Ollie Mattison
Ollie Mattison
Mar 27, 2024• Proven solutions
With growing demand on the internet, memes are spreading like wildfire. In case you want to promote your brand using various types of relatable memes that would drive more traffic for your website, then there is good news for you. It doesn’t matter, whether you own an Android or iOS device. We will help you out in learning how to make memes on iPhone/Android in this article. Keep reading!
- Part1: How to make memes on iPhone with Meme Generator
- Part2: How to make memes on Android with Memedroid
- Part3: Recommended - Making memes with Filmora meme maker online
Part 1: How to make memes on iPhone with Meme Generator
While planning to create memes on your iPhone, you might find Meme Generator as the most suitable tool. It helps you create hilarious memes and allows you to share on social media platforms like Twitter, Facebook, Messenger, Instagram, Dropbox, E-mail, Snapchat etc. you get 500 plus memes with example captions under different categories.
You can customize memes using your own photos and adding text, alter size and color of text using 10 different fonts. You can crop the image, move it, add border to it, filter/search memes, and scroll through each meme category. There are no watermark or auto upload of memes to protect your privacy. Here is the detailed guide –
Step 1: Install Meme Generator from App Store on your iPhone and launch the app.
Step 2: Tap on the 3 horizontal lines on the top-left corner to browse memes. If you know the name, then search a meme and click on it.
Step 3: Use the example text or hit the ‘Text’ bar to add or edit your caption. Press the icons over the top-right corner for customizing your meme photo and caption options.
Step 4: Tap on the ‘Save’ or ‘Share’ button, once you are done editing the meme. You can find the meme on your ‘Photos’ app.
Part 2: How to make memes on Android with Memedroid
If you are wondering how to make memes on Android, then take the Memedroid app into consideration. You can create photos and GIF memes, jokes, avatars, graphics etc. with this app. There are numerous memes uploaded everyday on the app and you get the chance to let people vote for your meme too.
You get to use popular templates such as evil toddler, attached girlfriend, surprised koala with hilarious designs. The best rated memes are in the top gallery and you get the main gallery with latest funny memes too. You can design and save your memes and share them or download, it’s up to you. It supports a wide variety of languages such as English, French, Spanish, Italian, Portuguese etc.
Here are the steps for how to make memes on Android –
Step 1: Download and install the app on your mobile and launch it. Click on ‘Meme Factory’ to pick the background image and then you can swipe to explore the other features too. Alternatively, you can add your own photos if Meme factory was not of your choice. Hit ‘Upload Zone’ instead of ‘Meme Factory’ and register for a free account. On the ‘Upload’ screen, tap the ‘Select An Image’ button to pick a photo within 330MB size
Step 2: After selecting the background image, add captions at the top and bottom of the image. The ‘SAVE’ button can be found on the top-right, tap that to save. Likewise, for sharing the meme, hit the ‘SHARE’ button located at the bottom of the screen.
Step 3: Add tags and accept the ‘Terms of Service’ followed by ‘Send’ button. Wait a while, to get you meme ready for your audience.
Part 3: Recommended - Making memes with Filmora meme maker online
In order to make memes on iPhone/Android, you need a mobile device. But, what if you have a computer on which you need to create a meme? Well, Filmora meme maker is the apt choice for you. You don’t need to download apps or software on your Pc. It is the ultimate online solution.
Brief steps to introduce making memes. You can create image, GIF, and video memes adding nice fonts. It processes video/GIF/image memes rapidly than the competitors. Adding texts, fonts and altering font colors is so easy with it.
Here is the detailed guide to make memes on Android –
Step 1: Visit the official Filmora website and look for Filmora online meme maker. Import videos by dragging and dropping to the Filmora interface. You can even add online links to videos in order to upload them.
Step 2: After selecting the video/photo/GIF move to the meme editor page and customize your video meme using tools from the left pane. Include text, change fonts and then you can preview the changes.
Step 3: Tap on the ‘CREATE’ button to apply the changes, when you are satisfied. Press the ‘DOWNLOAD’ button and then share your meme on social media sites.
Conclusion
Coming towards the end of the article, we have discovered that Filmora creates brilliant memes and that too, in no time. No lengthy or annoying processes, nor you need apps that eat up your phone memory. Life is blissfully funny with meme making on Filmora.
Ollie Mattison
Ollie Mattison is a writer and a lover of all things video.
Follow @Ollie Mattison
How to Edit Memoji on Android and iPhone
How to Edit Memoji on Android and iPhone

Shanoon Cox
Mar 27, 2024• Proven solutions
A memoji is simply the cartoon avatar of you. You can easily learn how to edit memoji and make a custom memoji that is the exact mirror image of you. From eye color to freckles, you can add every feature that makes the memoji look like a mini cartoon version of you
Since a custom memoji is a more personalized way to express our emotions, it can be the perfect way to add a hint of humor to conversations. Everyone loves a unique sticker, especially if it looks like them. So, you can take help from our guide on how to change memoji and take your texting experience to the next level.
- Bonus Tip-Memoji VS Emoji
- Part 1: How to Edit Memoji on iPhone
- Part 2: How to Edit Memoji on Android
Bonus Tip—Memoji VS Emoji
Now you must be wondering what the difference between a memoji and emoji is. Well, there is the first major difference, which is that a memoji is the cartoon avatar of you, whereas an emoji is just around yellow-faced cartoon with various expressions
1.The memoji is solely based on a human face, but an emoji can be any object, place, or even a symbol. While you can mostly craft a custom emoji personalized to your style and likings, emojis are limited. Custom memoji can also be dressed and decorated to serve as the perfect mini-version of you, complete from earrings to freckles.
2.Moreover, almost everyone has the same set of emojis. But since memojis are created to look like a person, everyone has a very unique pack of memojis looking like the cartoon version of them.
Despite the differences, both memojis and emojis carry equal significance and can spice up your texting experience in hilarious ways.
Part 1: How to Edit Memoji on iPhone
Majority of you might be iPhone users and so it’s only fair to show you some easy ways on how to edit memoji on your iPhone. There are two ways to create a custom memoji and then edit it. Lets dive in!
Method 1: Edit Memoji in the Built-in Editor
The introduction of iOS13 has made it possible for the majority of iPhone users to create or edit their memojis as they like. But in order to use this built-in editor to create a custom memoji, make sure that your device is updated to iOS13.
In this Apple-exclusive editor, the steps are pretty straightforward. But to help you further, I will walk you along with the steps in detail
- Go to the iMessages and open a new message tab or a previous conversation and tap the Appstoreicon to reveal the app bar. Hit the Animoji icon represented by the three heads
![]()
- Choose the memoji you wish to edit and click the three dots in the bottom left corner. Click Editon the pop-up dialogue box. You can also tap on Duplicate to copy the same memoji.
- Now you will be given various options to craft a custom memoji that looks exactly like you, right down to every detail. Click on the Skintab to change the skin color, add freckles or a beauty spot
- Choose the hairstyleand hair color that suits you the best
- In the Browstab, select your brow style. Go through all the tabs to choose the perfect headwear, glasses, or even AirPods to create the perfect custom memoji
Method 2: Edit Memoji Using the Avatoon App
Avatoon is a great memoji maker app that lets you edit memoji from scratch and has an extensive collection of features you can choose from to make the cartoon look exactly like you. You can even auto-create a memoji by taking a selfie, and Avatoon will do the rest. In manual creation, you can select every detail from eyelashes, tattoos, headwear, and even jewelry.
Let me show the easy ways how to edit memoji using Avatoons powerful tools
- Firstly, download launch Avatoon.
- Choose Manual Creationto create a personalized custom emoji
- Now you can choose your face shape, hairstyle, eyes, brows, etc. Add headwear or glasses that depict your style
- Now that you have created a basic cartoon self, you can add much finer details by using coins.
- Click on the Photobooth at the bottom to choose a cool background for your memoji.
- Once you have decorated the memoji, tap on Poses, choose the mood you like and instantly share via different sharing platforms
Part 2: How to Edit Memoji on Android
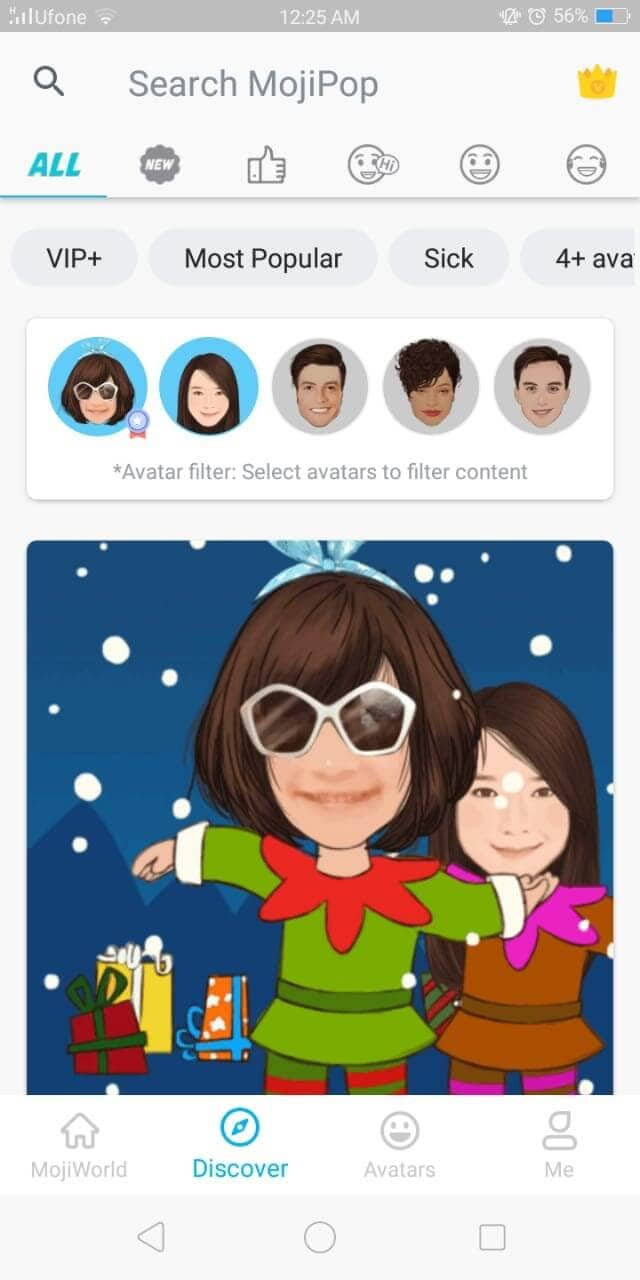
MojiPop is an amazing free app to make a custom emoji. It is packed with stickers and animated caricatures for every mood or emotion. Just take a selfie and start communicating using your cartoon face. You can even edit your memojis to suit your style. Then send the memoji to your friends to surprise them with a hilarious custom memoji
If you’re wondering how to edit memoji, here’s a short guide for you:
- Launch MojiPop and click on Create Avatar. Either take a selfie or choose an existing image from your gallery. Specify the age group.
![]()
- MojiPop instantly displays avatar styles, choose one that best fits you and click Next
![]()
- Select different features in tabs for hair, eyes, headwear to make the custom memoji look just like you. Click Confirmto save it.
- In the Discovertab, choose a gif template to wish someone or express your feelings.
- Click on the Share icon and choose the platform for instant sharing
Ready to Edit Memoji by Yourself?
Are you ready to make your conversations more interesting and engaging using custom memojis? Because who doesn’t love a mini version of themselves displaying how happy or angry they feel? What better to communicate without saying a word?
And we hope that our short tutorial on how to edit memoji helps you create different versions of yourself to express yourself better.
Now that you know how to edit memoji to your liking, what are you waiting for? Go on to edit and create a hilarious avatar of yourself and enjoy texting
Shanoon Cox
Shanoon Cox is a writer and a lover of all things video.
Follow @Shanoon Cox
Shanoon Cox
Mar 27, 2024• Proven solutions
A memoji is simply the cartoon avatar of you. You can easily learn how to edit memoji and make a custom memoji that is the exact mirror image of you. From eye color to freckles, you can add every feature that makes the memoji look like a mini cartoon version of you
Since a custom memoji is a more personalized way to express our emotions, it can be the perfect way to add a hint of humor to conversations. Everyone loves a unique sticker, especially if it looks like them. So, you can take help from our guide on how to change memoji and take your texting experience to the next level.
- Bonus Tip-Memoji VS Emoji
- Part 1: How to Edit Memoji on iPhone
- Part 2: How to Edit Memoji on Android
Bonus Tip—Memoji VS Emoji
Now you must be wondering what the difference between a memoji and emoji is. Well, there is the first major difference, which is that a memoji is the cartoon avatar of you, whereas an emoji is just around yellow-faced cartoon with various expressions
1.The memoji is solely based on a human face, but an emoji can be any object, place, or even a symbol. While you can mostly craft a custom emoji personalized to your style and likings, emojis are limited. Custom memoji can also be dressed and decorated to serve as the perfect mini-version of you, complete from earrings to freckles.
2.Moreover, almost everyone has the same set of emojis. But since memojis are created to look like a person, everyone has a very unique pack of memojis looking like the cartoon version of them.
Despite the differences, both memojis and emojis carry equal significance and can spice up your texting experience in hilarious ways.
Part 1: How to Edit Memoji on iPhone
Majority of you might be iPhone users and so it’s only fair to show you some easy ways on how to edit memoji on your iPhone. There are two ways to create a custom memoji and then edit it. Lets dive in!
Method 1: Edit Memoji in the Built-in Editor
The introduction of iOS13 has made it possible for the majority of iPhone users to create or edit their memojis as they like. But in order to use this built-in editor to create a custom memoji, make sure that your device is updated to iOS13.
In this Apple-exclusive editor, the steps are pretty straightforward. But to help you further, I will walk you along with the steps in detail
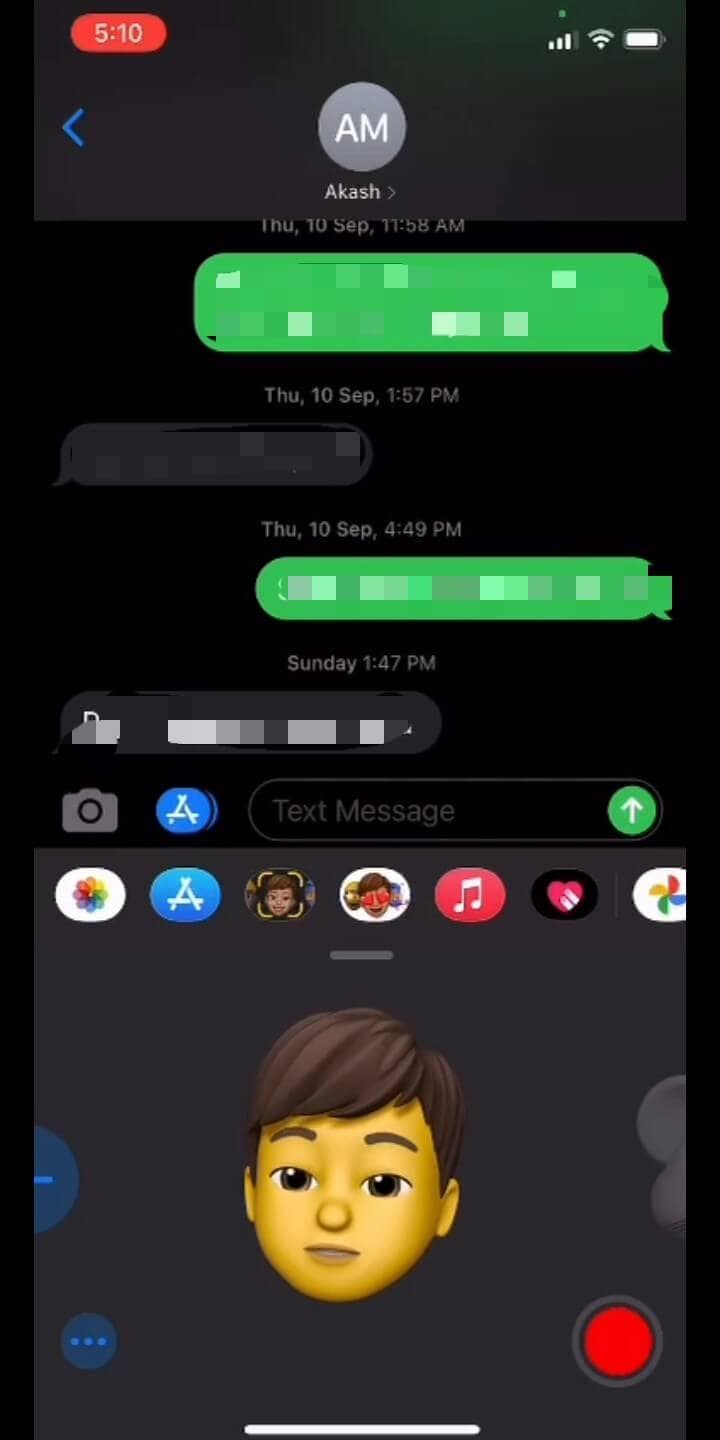
- Go to the iMessages and open a new message tab or a previous conversation and tap the Appstoreicon to reveal the app bar. Hit the Animoji icon represented by the three heads
![]()
- Choose the memoji you wish to edit and click the three dots in the bottom left corner. Click Editon the pop-up dialogue box. You can also tap on Duplicate to copy the same memoji.
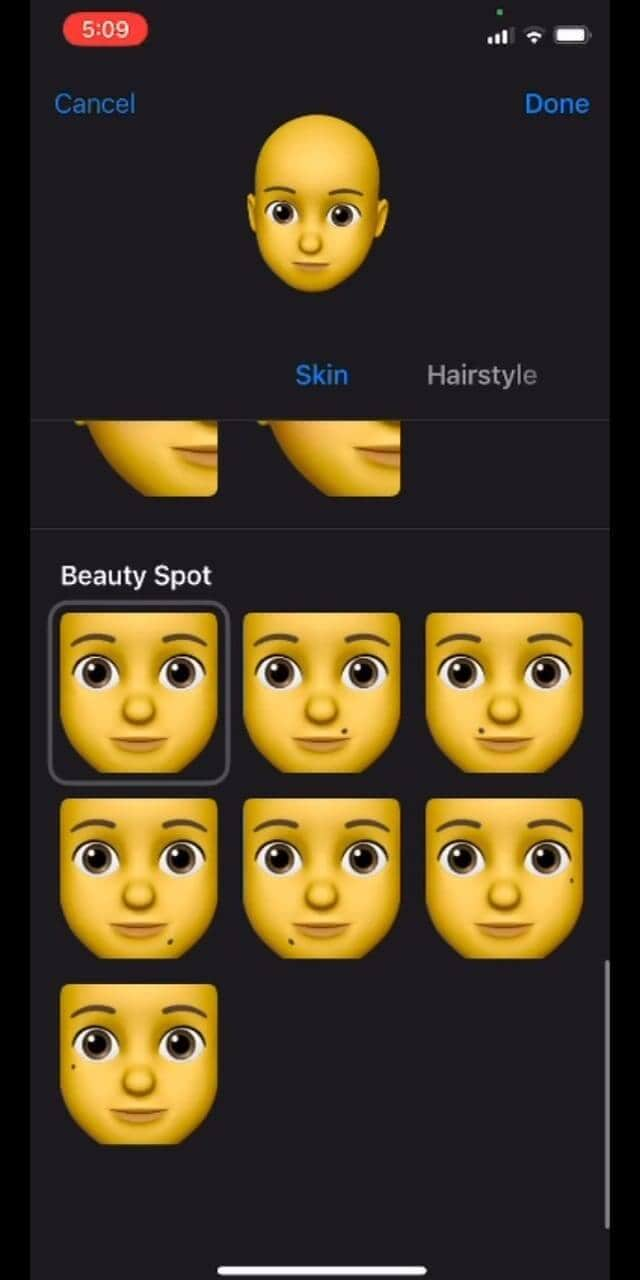
- Now you will be given various options to craft a custom memoji that looks exactly like you, right down to every detail. Click on the Skintab to change the skin color, add freckles or a beauty spot
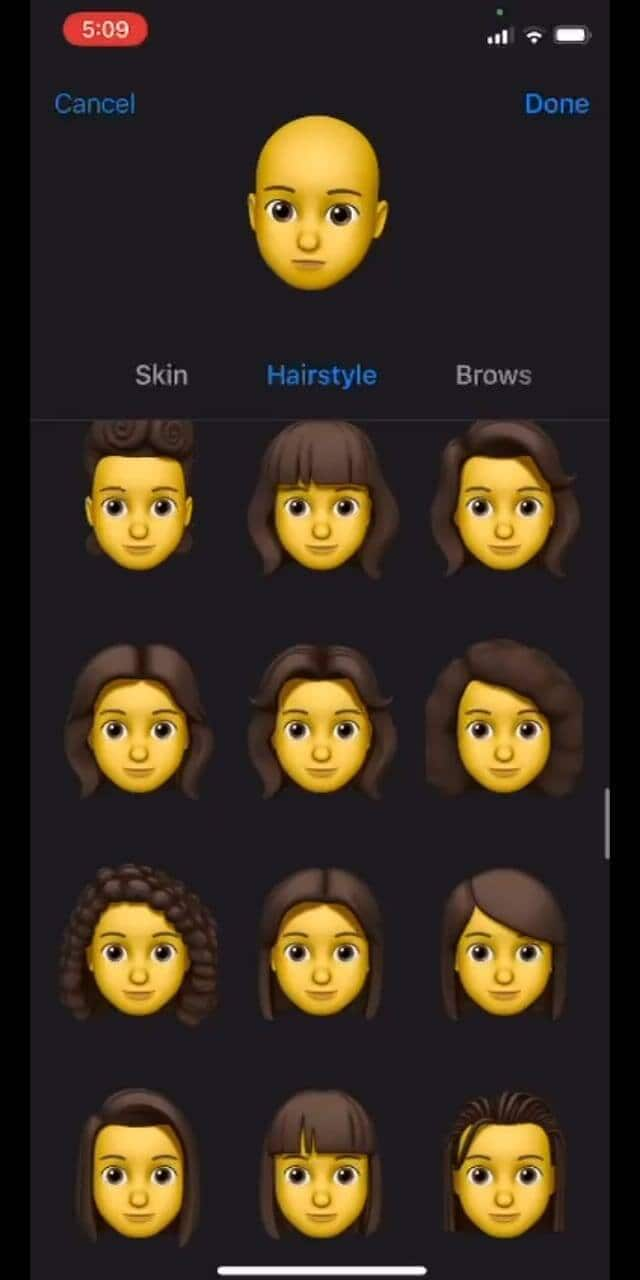
- Choose the hairstyleand hair color that suits you the best
- In the Browstab, select your brow style. Go through all the tabs to choose the perfect headwear, glasses, or even AirPods to create the perfect custom memoji
Method 2: Edit Memoji Using the Avatoon App
Avatoon is a great memoji maker app that lets you edit memoji from scratch and has an extensive collection of features you can choose from to make the cartoon look exactly like you. You can even auto-create a memoji by taking a selfie, and Avatoon will do the rest. In manual creation, you can select every detail from eyelashes, tattoos, headwear, and even jewelry.
Let me show the easy ways how to edit memoji using Avatoons powerful tools
- Firstly, download launch Avatoon.
- Choose Manual Creationto create a personalized custom emoji
- Now you can choose your face shape, hairstyle, eyes, brows, etc. Add headwear or glasses that depict your style
- Now that you have created a basic cartoon self, you can add much finer details by using coins.
- Click on the Photobooth at the bottom to choose a cool background for your memoji.
- Once you have decorated the memoji, tap on Poses, choose the mood you like and instantly share via different sharing platforms
Part 2: How to Edit Memoji on Android
MojiPop is an amazing free app to make a custom emoji. It is packed with stickers and animated caricatures for every mood or emotion. Just take a selfie and start communicating using your cartoon face. You can even edit your memojis to suit your style. Then send the memoji to your friends to surprise them with a hilarious custom memoji
If you’re wondering how to edit memoji, here’s a short guide for you:
- Launch MojiPop and click on Create Avatar. Either take a selfie or choose an existing image from your gallery. Specify the age group.
![]()
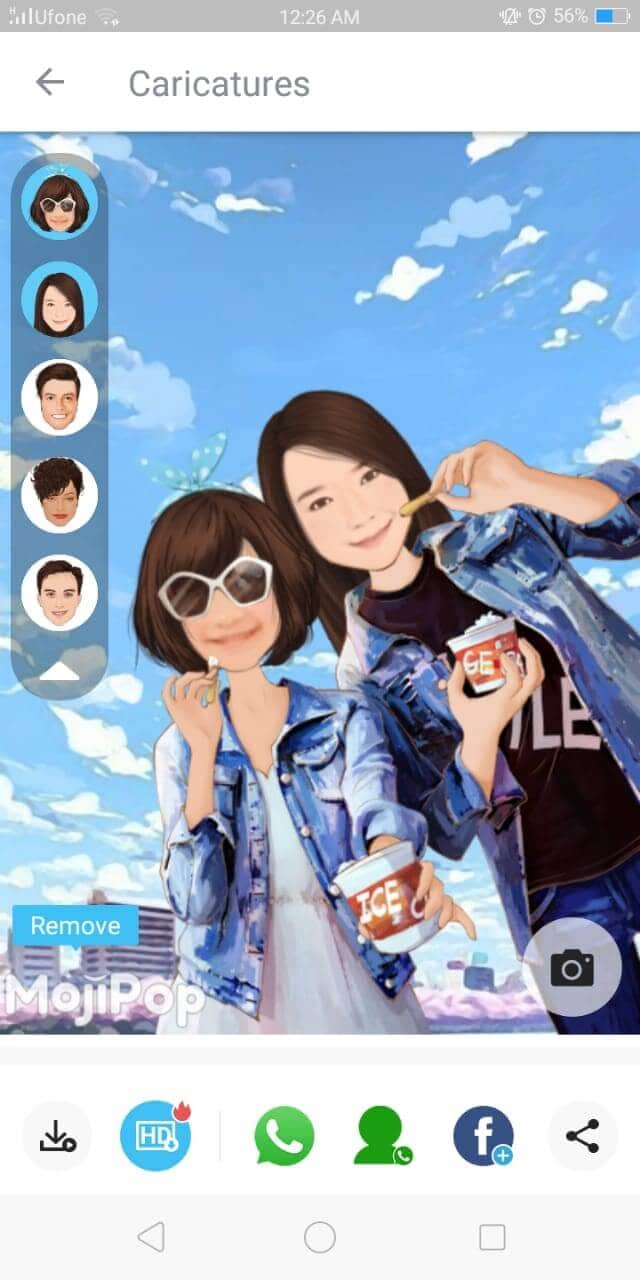
- MojiPop instantly displays avatar styles, choose one that best fits you and click Next
![]()
- Select different features in tabs for hair, eyes, headwear to make the custom memoji look just like you. Click Confirmto save it.
- In the Discovertab, choose a gif template to wish someone or express your feelings.
- Click on the Share icon and choose the platform for instant sharing
Ready to Edit Memoji by Yourself?
Are you ready to make your conversations more interesting and engaging using custom memojis? Because who doesn’t love a mini version of themselves displaying how happy or angry they feel? What better to communicate without saying a word?
And we hope that our short tutorial on how to edit memoji helps you create different versions of yourself to express yourself better.
Now that you know how to edit memoji to your liking, what are you waiting for? Go on to edit and create a hilarious avatar of yourself and enjoy texting
Shanoon Cox
Shanoon Cox is a writer and a lover of all things video.
Follow @Shanoon Cox
Shanoon Cox
Mar 27, 2024• Proven solutions
A memoji is simply the cartoon avatar of you. You can easily learn how to edit memoji and make a custom memoji that is the exact mirror image of you. From eye color to freckles, you can add every feature that makes the memoji look like a mini cartoon version of you
Since a custom memoji is a more personalized way to express our emotions, it can be the perfect way to add a hint of humor to conversations. Everyone loves a unique sticker, especially if it looks like them. So, you can take help from our guide on how to change memoji and take your texting experience to the next level.
- Bonus Tip-Memoji VS Emoji
- Part 1: How to Edit Memoji on iPhone
- Part 2: How to Edit Memoji on Android
Bonus Tip—Memoji VS Emoji
Now you must be wondering what the difference between a memoji and emoji is. Well, there is the first major difference, which is that a memoji is the cartoon avatar of you, whereas an emoji is just around yellow-faced cartoon with various expressions
1.The memoji is solely based on a human face, but an emoji can be any object, place, or even a symbol. While you can mostly craft a custom emoji personalized to your style and likings, emojis are limited. Custom memoji can also be dressed and decorated to serve as the perfect mini-version of you, complete from earrings to freckles.
2.Moreover, almost everyone has the same set of emojis. But since memojis are created to look like a person, everyone has a very unique pack of memojis looking like the cartoon version of them.
Despite the differences, both memojis and emojis carry equal significance and can spice up your texting experience in hilarious ways.
Part 1: How to Edit Memoji on iPhone
Majority of you might be iPhone users and so it’s only fair to show you some easy ways on how to edit memoji on your iPhone. There are two ways to create a custom memoji and then edit it. Lets dive in!
Method 1: Edit Memoji in the Built-in Editor
The introduction of iOS13 has made it possible for the majority of iPhone users to create or edit their memojis as they like. But in order to use this built-in editor to create a custom memoji, make sure that your device is updated to iOS13.
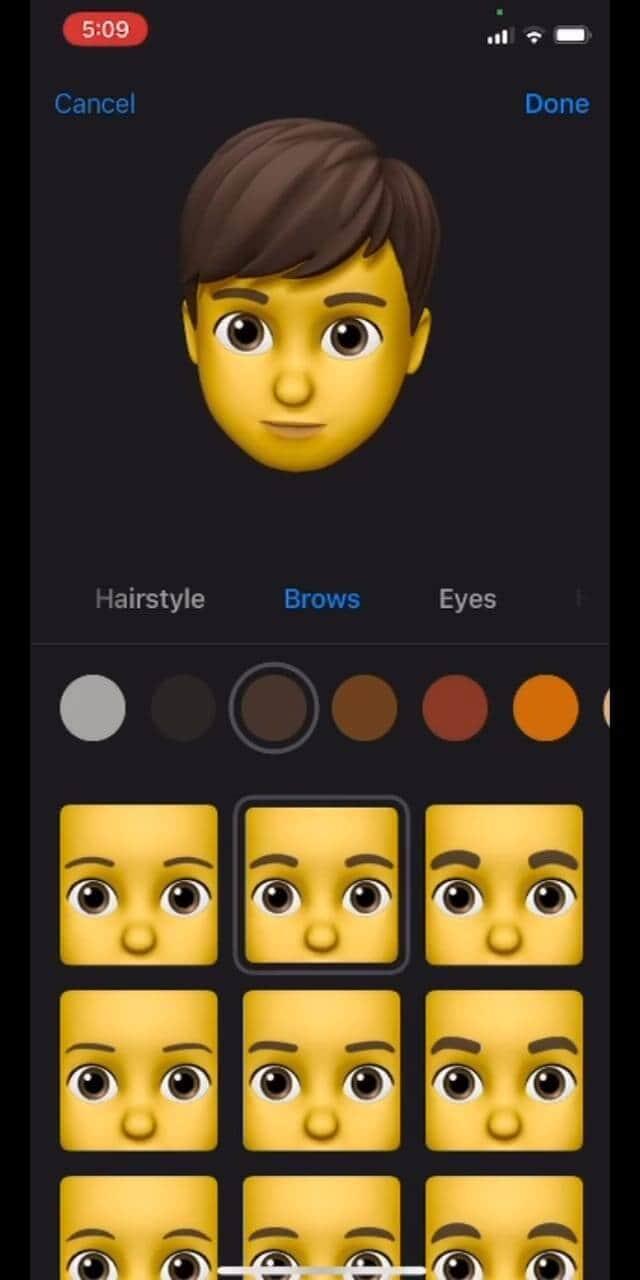
In this Apple-exclusive editor, the steps are pretty straightforward. But to help you further, I will walk you along with the steps in detail
- Go to the iMessages and open a new message tab or a previous conversation and tap the Appstoreicon to reveal the app bar. Hit the Animoji icon represented by the three heads
![]()
- Choose the memoji you wish to edit and click the three dots in the bottom left corner. Click Editon the pop-up dialogue box. You can also tap on Duplicate to copy the same memoji.
- Now you will be given various options to craft a custom memoji that looks exactly like you, right down to every detail. Click on the Skintab to change the skin color, add freckles or a beauty spot
- Choose the hairstyleand hair color that suits you the best
- In the Browstab, select your brow style. Go through all the tabs to choose the perfect headwear, glasses, or even AirPods to create the perfect custom memoji
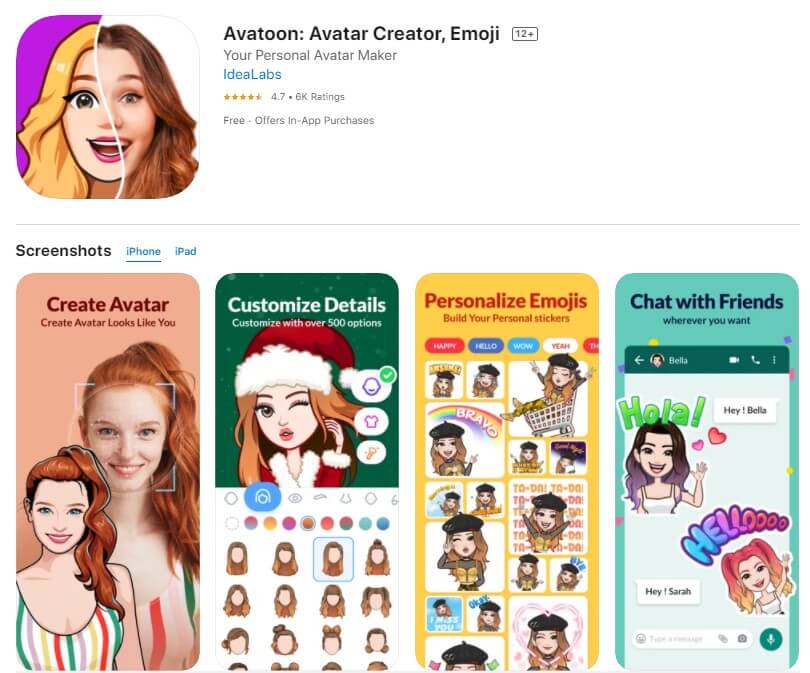
Method 2: Edit Memoji Using the Avatoon App
Avatoon is a great memoji maker app that lets you edit memoji from scratch and has an extensive collection of features you can choose from to make the cartoon look exactly like you. You can even auto-create a memoji by taking a selfie, and Avatoon will do the rest. In manual creation, you can select every detail from eyelashes, tattoos, headwear, and even jewelry.
Let me show the easy ways how to edit memoji using Avatoons powerful tools
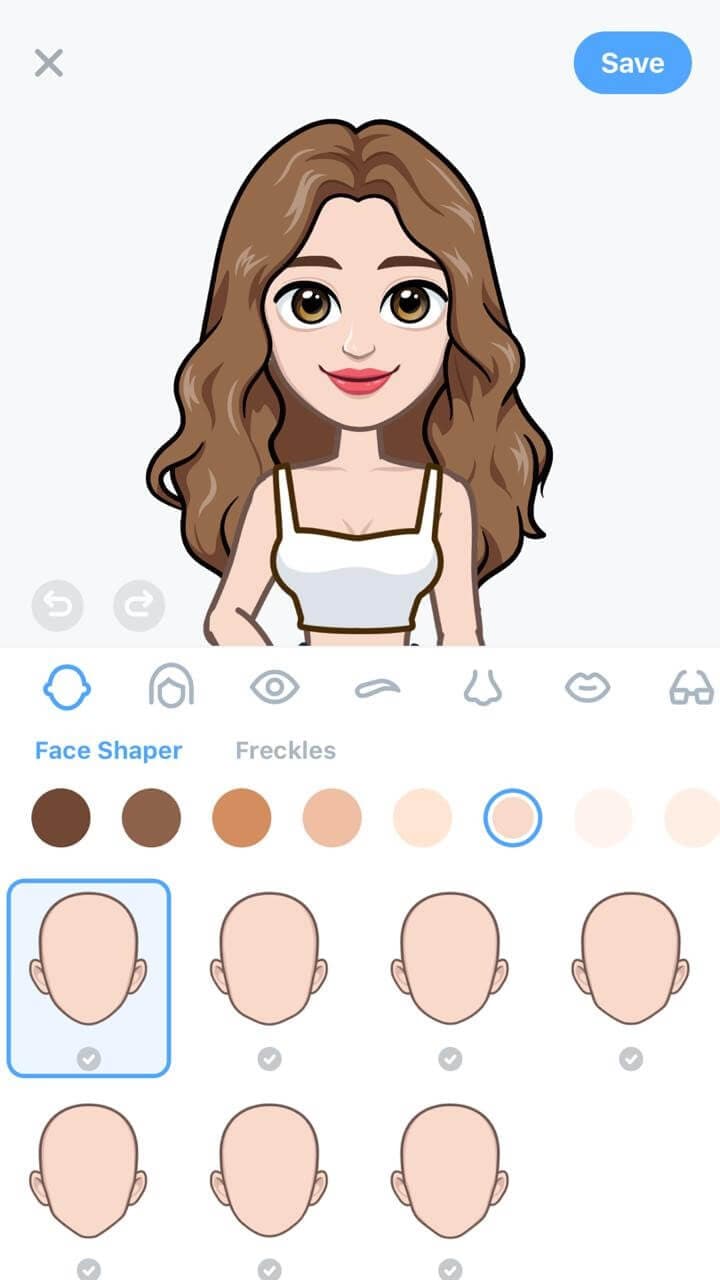
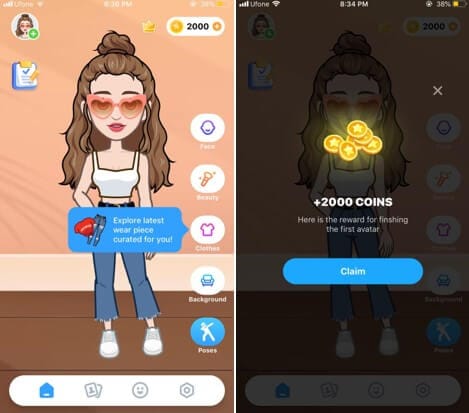
- Firstly, download launch Avatoon.
- Choose Manual Creationto create a personalized custom emoji
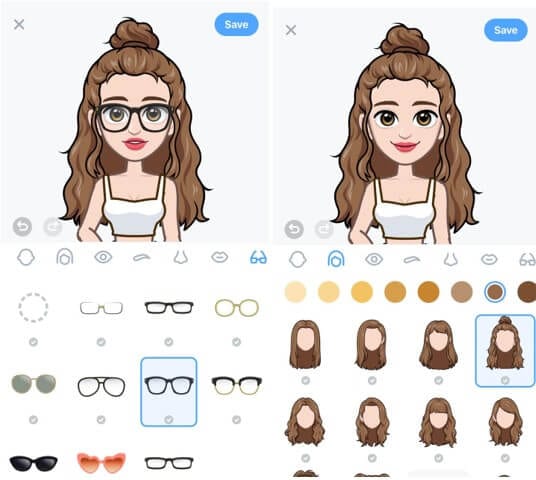
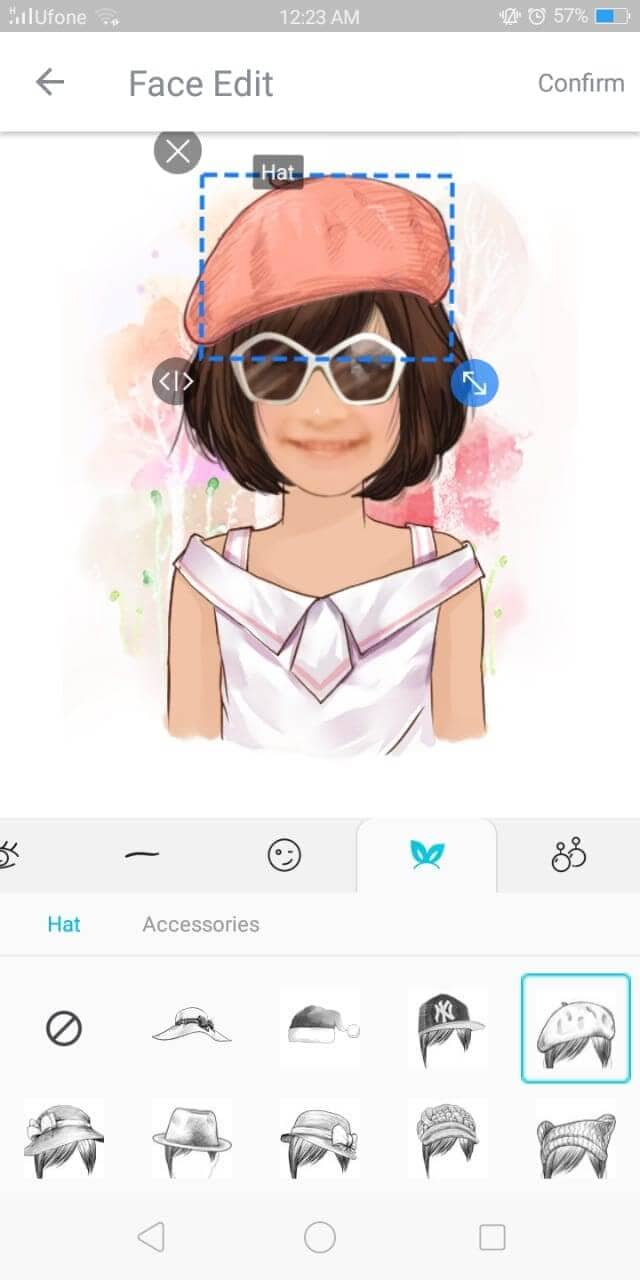
- Now you can choose your face shape, hairstyle, eyes, brows, etc. Add headwear or glasses that depict your style
- Now that you have created a basic cartoon self, you can add much finer details by using coins.
- Click on the Photobooth at the bottom to choose a cool background for your memoji.
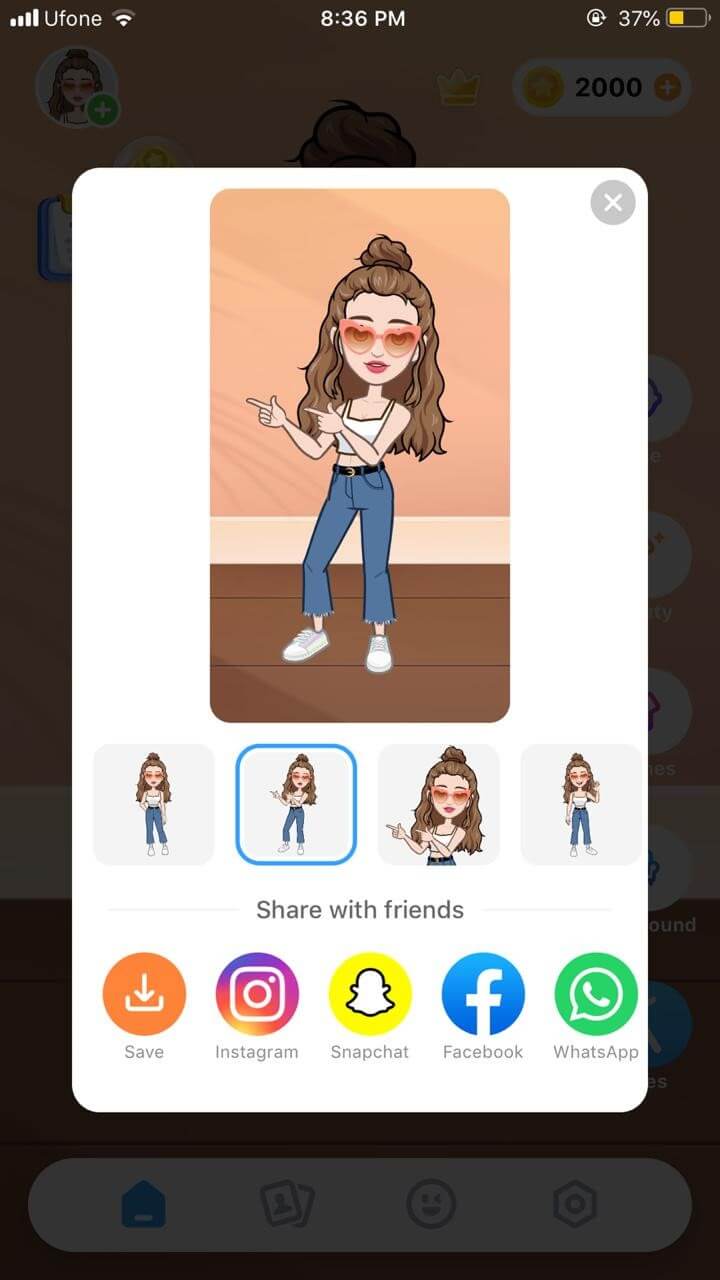
- Once you have decorated the memoji, tap on Poses, choose the mood you like and instantly share via different sharing platforms
Part 2: How to Edit Memoji on Android
MojiPop is an amazing free app to make a custom emoji. It is packed with stickers and animated caricatures for every mood or emotion. Just take a selfie and start communicating using your cartoon face. You can even edit your memojis to suit your style. Then send the memoji to your friends to surprise them with a hilarious custom memoji
If you’re wondering how to edit memoji, here’s a short guide for you:
- Launch MojiPop and click on Create Avatar. Either take a selfie or choose an existing image from your gallery. Specify the age group.
![]()
- MojiPop instantly displays avatar styles, choose one that best fits you and click Next
![]()
- Select different features in tabs for hair, eyes, headwear to make the custom memoji look just like you. Click Confirmto save it.
- In the Discovertab, choose a gif template to wish someone or express your feelings.
- Click on the Share icon and choose the platform for instant sharing
Ready to Edit Memoji by Yourself?
Are you ready to make your conversations more interesting and engaging using custom memojis? Because who doesn’t love a mini version of themselves displaying how happy or angry they feel? What better to communicate without saying a word?
And we hope that our short tutorial on how to edit memoji helps you create different versions of yourself to express yourself better.
Now that you know how to edit memoji to your liking, what are you waiting for? Go on to edit and create a hilarious avatar of yourself and enjoy texting
Shanoon Cox
Shanoon Cox is a writer and a lover of all things video.
Follow @Shanoon Cox
Shanoon Cox
Mar 27, 2024• Proven solutions
A memoji is simply the cartoon avatar of you. You can easily learn how to edit memoji and make a custom memoji that is the exact mirror image of you. From eye color to freckles, you can add every feature that makes the memoji look like a mini cartoon version of you
Since a custom memoji is a more personalized way to express our emotions, it can be the perfect way to add a hint of humor to conversations. Everyone loves a unique sticker, especially if it looks like them. So, you can take help from our guide on how to change memoji and take your texting experience to the next level.
- Bonus Tip-Memoji VS Emoji
- Part 1: How to Edit Memoji on iPhone
- Part 2: How to Edit Memoji on Android
Bonus Tip—Memoji VS Emoji
Now you must be wondering what the difference between a memoji and emoji is. Well, there is the first major difference, which is that a memoji is the cartoon avatar of you, whereas an emoji is just around yellow-faced cartoon with various expressions
1.The memoji is solely based on a human face, but an emoji can be any object, place, or even a symbol. While you can mostly craft a custom emoji personalized to your style and likings, emojis are limited. Custom memoji can also be dressed and decorated to serve as the perfect mini-version of you, complete from earrings to freckles.
2.Moreover, almost everyone has the same set of emojis. But since memojis are created to look like a person, everyone has a very unique pack of memojis looking like the cartoon version of them.
Despite the differences, both memojis and emojis carry equal significance and can spice up your texting experience in hilarious ways.
Part 1: How to Edit Memoji on iPhone
Majority of you might be iPhone users and so it’s only fair to show you some easy ways on how to edit memoji on your iPhone. There are two ways to create a custom memoji and then edit it. Lets dive in!
Method 1: Edit Memoji in the Built-in Editor
The introduction of iOS13 has made it possible for the majority of iPhone users to create or edit their memojis as they like. But in order to use this built-in editor to create a custom memoji, make sure that your device is updated to iOS13.
In this Apple-exclusive editor, the steps are pretty straightforward. But to help you further, I will walk you along with the steps in detail
- Go to the iMessages and open a new message tab or a previous conversation and tap the Appstoreicon to reveal the app bar. Hit the Animoji icon represented by the three heads
![]()
- Choose the memoji you wish to edit and click the three dots in the bottom left corner. Click Editon the pop-up dialogue box. You can also tap on Duplicate to copy the same memoji.
- Now you will be given various options to craft a custom memoji that looks exactly like you, right down to every detail. Click on the Skintab to change the skin color, add freckles or a beauty spot
- Choose the hairstyleand hair color that suits you the best
- In the Browstab, select your brow style. Go through all the tabs to choose the perfect headwear, glasses, or even AirPods to create the perfect custom memoji
Method 2: Edit Memoji Using the Avatoon App
Avatoon is a great memoji maker app that lets you edit memoji from scratch and has an extensive collection of features you can choose from to make the cartoon look exactly like you. You can even auto-create a memoji by taking a selfie, and Avatoon will do the rest. In manual creation, you can select every detail from eyelashes, tattoos, headwear, and even jewelry.
Let me show the easy ways how to edit memoji using Avatoons powerful tools
- Firstly, download launch Avatoon.
- Choose Manual Creationto create a personalized custom emoji
- Now you can choose your face shape, hairstyle, eyes, brows, etc. Add headwear or glasses that depict your style
- Now that you have created a basic cartoon self, you can add much finer details by using coins.
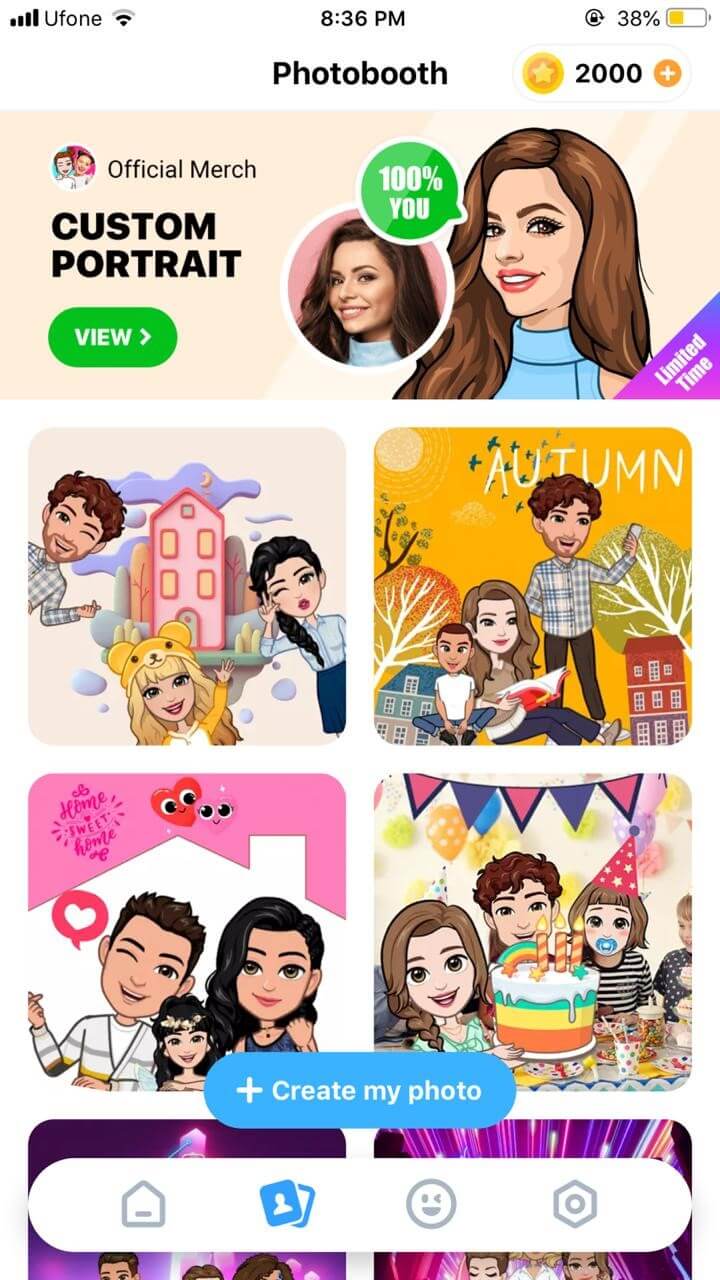
- Click on the Photobooth at the bottom to choose a cool background for your memoji.
- Once you have decorated the memoji, tap on Poses, choose the mood you like and instantly share via different sharing platforms
Part 2: How to Edit Memoji on Android
MojiPop is an amazing free app to make a custom emoji. It is packed with stickers and animated caricatures for every mood or emotion. Just take a selfie and start communicating using your cartoon face. You can even edit your memojis to suit your style. Then send the memoji to your friends to surprise them with a hilarious custom memoji
If you’re wondering how to edit memoji, here’s a short guide for you:
- Launch MojiPop and click on Create Avatar. Either take a selfie or choose an existing image from your gallery. Specify the age group.
![]()
- MojiPop instantly displays avatar styles, choose one that best fits you and click Next
![]()
- Select different features in tabs for hair, eyes, headwear to make the custom memoji look just like you. Click Confirmto save it.
- In the Discovertab, choose a gif template to wish someone or express your feelings.
- Click on the Share icon and choose the platform for instant sharing
Ready to Edit Memoji by Yourself?
Are you ready to make your conversations more interesting and engaging using custom memojis? Because who doesn’t love a mini version of themselves displaying how happy or angry they feel? What better to communicate without saying a word?
And we hope that our short tutorial on how to edit memoji helps you create different versions of yourself to express yourself better.
Now that you know how to edit memoji to your liking, what are you waiting for? Go on to edit and create a hilarious avatar of yourself and enjoy texting
Shanoon Cox
Shanoon Cox is a writer and a lover of all things video.
Follow @Shanoon Cox
How to Make a iMovie Photo Slideshow with Music?
How to Make a iMovie Photo Slideshow with Music? [iMovie Tutorial]
Shanoon Cox
Mar 27, 2024• Proven solutions
Makings a slideshow is a great way to share photos and videos with friends and families. The good news is that you can totally make a slideshow on Mac for free with iMovie. iMovie is the pre-installed program coming with every new Mac. It provides a simple yet professional way to make slideshow movies from your photos, videos, and music.
If you haven’t iMovie installed on your Mac yet, just go to iTunes and download it for free. In the following part, I’ll share with you the step-by-step tutorial on how to make a slideshow on Mac using the free video editing software iMovie.
If you are an iOS user, check our picks of best photo slideshow apps for iPhone or iPad.
Ways for iMovie Photo Slideshow with Music Making
To make a photo slideshow with music in iMovie, you can follow these steps.
1. Create a New Project
After launching iMovie, click the Project button and then click Create New. Select Movie to combine photos, videos and music to make a slideshow.

2. Import Photos, Videos, and Audio Files
Now go to the My Media tab and click the Import icon to add your photos, videos, and music to iMovie, in this way, you can import any media files from any location on your Mac. But if you have arranged all your videos, photos, and music tracks in the Photos app, you can just switch to Photos under the Libraries tab on the left to import.

3. Arrange Media in Timeline and Adjust
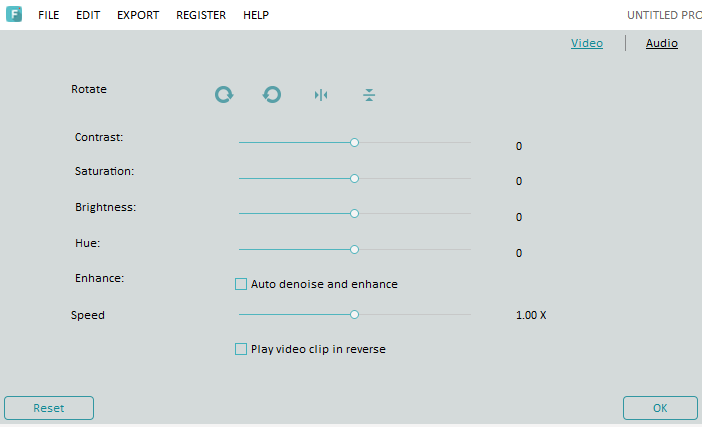
Now, it’s time to place all these photos and videos in the timeline in order and do some adjustments. You can use the Magic Wand tool to improve the photo quality automatically, do some color correction, or add a filter to the photo. If you preview the video clip, you will see more options that allow you to do more editing, such as changing speed.
4. Apply Transitions & Effects
Transitions and effects will help you to create a slideshow in a more professional way. Some transitions such as cross dissolve, fade and cross blur are very popular in the slideshow, but remember don’t use lots of different transitions in one slideshow since too many transitions will distract the viewer’s attention. To apply a transition in the slideshow, just drag and drop it between two photos in the timeline.

5. Add Titles and Text
Using some opener titles and credits at the beginning and ending part of your slideshow will make it cool as well. You can add some famous quotes and words to better demonstrate.
Just to the Titles tab and select one of the title templates and drop it to the timeline first and then write your own words in the preview window.

6. Add Music to Slideshow
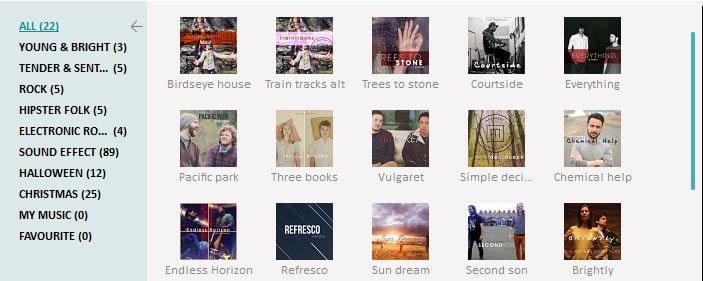
You can download some royalty-free music and sound effects from websites such as Filmstock stock media library or iTunes or import your own audio as we said before to use it as the slideshow background music. To sync with the slideshow, you may need to trim and edit the audio accordingly. For detailed information about iMovie audio editing, you can check how to add background music to iMovie.
Filmstock Stock Media Library ](https://tools.techidaily.com/wondershare/filmora/download/ )
7. Export and Share Your Slideshow video
Play the slideshow and check the result in the preview window. If everything goes well, you can now export and share or save it. You can save the slideshow video in MP4 format, or share it to Vimeo or add the slideshow to Theater to load it on your other Apple devices so you can easily watch it on your iOS devices or Apple TV.
I hope the above tutorial about how to make a slideshow on iMovie will be helpful for your stunning slideshow creation.
If you’re running an old macOS version and having iPhoto installed on your Mac, here are the detailed steps about How to make slideshow in iMovie with iPhoto project.
Step 1. Import Photos from the iPhoto Library
iMovie works seamlessly with iPhoto. You are suggested to drag and drop photos from iPhoto to the iMovie project. If no library exists in iPhoto, create one and import photos to iPhoto first. To add videos, you could go to either “File/Import” or Event Library, and then drag and drop selected videos to the timeline.
After photos and videos are imported to the iMovie slideshow project, you can preview the raw slideshow simply by pressing Space bar on your keyboard. And then make adjustments to clips and transitions. For example, mouse over one clip or “double arrow” button and click on the settings icon, then you could access clip adjustment, video adjustment, transition adjustment, etc.

Step 2. Add Music to Your iMovie Slideshow Project
Music sets the tone of your slideshow. Adding musing to the iMovie slideshow is just as simple as adding photos and videos.
So click the audio icon in the bottom right corner, and drag and drop the desired audio file to the timeline. Multiple songs could be added to iMovie.
However, iMovie doesn’t support multiple soundtracks. If necessary, you need to combine multiple song tracks with an external audio editor before importing them to the iMovie slideshow. You can also apply audio effects and filter sound using an equalizer.

Step 3. Export Your iMovie Slideshow Video
iMovie makes sharing possibilities endless. For those who upload their videos online, iMovie allows users to directly upload to MobileMe Gallery, YouTube, Facebook, Vimeo, CNN iReport, etc.
If you select to share the iMovie slideshow using Media Browser, you will get a slideshow appeared in other Mac applications like iWeb. It’s a good idea to export the iMovie slideshow to iTunes so that you can play back slideshow quickly and easily sync with your mobile devices like iPhone, iPod, and iPad.

You may also like: How to Add Text with iMovie in Mac and iPhone >>
Recommendation: Create Slideshow on Mac with More Templates and Transitions with Filmora
If you want to make a slideshow with some templates on Mac, you can try Wondershare Filmora . Filmora can turn photos and videos into attractive slideshow videos with various inbuilt filters, transitions, elements, animations, effects, and overlays. Click the Free Download button and have a try.

Check the ultimate guide about making a slideshow with music and titles in Filmora .
If you are going to make a slideshow with music on Windows, you may need a slideshow-making tool to do it by yourself. Wondershare Filmora will also be a good choice. It helps you instantly make such an impressive slideshow from photos and videos for sharing virtually anywhere.
Shanoon Cox
Shanoon Cox is a writer and a lover of all things video.
Follow @Shanoon Cox
Shanoon Cox
Mar 27, 2024• Proven solutions
Makings a slideshow is a great way to share photos and videos with friends and families. The good news is that you can totally make a slideshow on Mac for free with iMovie. iMovie is the pre-installed program coming with every new Mac. It provides a simple yet professional way to make slideshow movies from your photos, videos, and music.
If you haven’t iMovie installed on your Mac yet, just go to iTunes and download it for free. In the following part, I’ll share with you the step-by-step tutorial on how to make a slideshow on Mac using the free video editing software iMovie.
If you are an iOS user, check our picks of best photo slideshow apps for iPhone or iPad.
Ways for iMovie Photo Slideshow with Music Making
To make a photo slideshow with music in iMovie, you can follow these steps.
1. Create a New Project
After launching iMovie, click the Project button and then click Create New. Select Movie to combine photos, videos and music to make a slideshow.
2. Import Photos, Videos, and Audio Files
Now go to the My Media tab and click the Import icon to add your photos, videos, and music to iMovie, in this way, you can import any media files from any location on your Mac. But if you have arranged all your videos, photos, and music tracks in the Photos app, you can just switch to Photos under the Libraries tab on the left to import.
3. Arrange Media in Timeline and Adjust
Now, it’s time to place all these photos and videos in the timeline in order and do some adjustments. You can use the Magic Wand tool to improve the photo quality automatically, do some color correction, or add a filter to the photo. If you preview the video clip, you will see more options that allow you to do more editing, such as changing speed.
4. Apply Transitions & Effects
Transitions and effects will help you to create a slideshow in a more professional way. Some transitions such as cross dissolve, fade and cross blur are very popular in the slideshow, but remember don’t use lots of different transitions in one slideshow since too many transitions will distract the viewer’s attention. To apply a transition in the slideshow, just drag and drop it between two photos in the timeline.
5. Add Titles and Text
Using some opener titles and credits at the beginning and ending part of your slideshow will make it cool as well. You can add some famous quotes and words to better demonstrate.
Just to the Titles tab and select one of the title templates and drop it to the timeline first and then write your own words in the preview window.
6. Add Music to Slideshow
You can download some royalty-free music and sound effects from websites such as Filmstock stock media library or iTunes or import your own audio as we said before to use it as the slideshow background music. To sync with the slideshow, you may need to trim and edit the audio accordingly. For detailed information about iMovie audio editing, you can check how to add background music to iMovie.
Filmstock Stock Media Library ](https://tools.techidaily.com/wondershare/filmora/download/ )
7. Export and Share Your Slideshow video
Play the slideshow and check the result in the preview window. If everything goes well, you can now export and share or save it. You can save the slideshow video in MP4 format, or share it to Vimeo or add the slideshow to Theater to load it on your other Apple devices so you can easily watch it on your iOS devices or Apple TV.
I hope the above tutorial about how to make a slideshow on iMovie will be helpful for your stunning slideshow creation.
If you’re running an old macOS version and having iPhoto installed on your Mac, here are the detailed steps about How to make slideshow in iMovie with iPhoto project.
Step 1. Import Photos from the iPhoto Library
iMovie works seamlessly with iPhoto. You are suggested to drag and drop photos from iPhoto to the iMovie project. If no library exists in iPhoto, create one and import photos to iPhoto first. To add videos, you could go to either “File/Import” or Event Library, and then drag and drop selected videos to the timeline.
After photos and videos are imported to the iMovie slideshow project, you can preview the raw slideshow simply by pressing Space bar on your keyboard. And then make adjustments to clips and transitions. For example, mouse over one clip or “double arrow” button and click on the settings icon, then you could access clip adjustment, video adjustment, transition adjustment, etc.
Step 2. Add Music to Your iMovie Slideshow Project
Music sets the tone of your slideshow. Adding musing to the iMovie slideshow is just as simple as adding photos and videos.
So click the audio icon in the bottom right corner, and drag and drop the desired audio file to the timeline. Multiple songs could be added to iMovie.
However, iMovie doesn’t support multiple soundtracks. If necessary, you need to combine multiple song tracks with an external audio editor before importing them to the iMovie slideshow. You can also apply audio effects and filter sound using an equalizer.
Step 3. Export Your iMovie Slideshow Video
iMovie makes sharing possibilities endless. For those who upload their videos online, iMovie allows users to directly upload to MobileMe Gallery, YouTube, Facebook, Vimeo, CNN iReport, etc.
If you select to share the iMovie slideshow using Media Browser, you will get a slideshow appeared in other Mac applications like iWeb. It’s a good idea to export the iMovie slideshow to iTunes so that you can play back slideshow quickly and easily sync with your mobile devices like iPhone, iPod, and iPad.
You may also like: How to Add Text with iMovie in Mac and iPhone >>
Recommendation: Create Slideshow on Mac with More Templates and Transitions with Filmora
If you want to make a slideshow with some templates on Mac, you can try Wondershare Filmora . Filmora can turn photos and videos into attractive slideshow videos with various inbuilt filters, transitions, elements, animations, effects, and overlays. Click the Free Download button and have a try.
Check the ultimate guide about making a slideshow with music and titles in Filmora .
If you are going to make a slideshow with music on Windows, you may need a slideshow-making tool to do it by yourself. Wondershare Filmora will also be a good choice. It helps you instantly make such an impressive slideshow from photos and videos for sharing virtually anywhere.
Shanoon Cox
Shanoon Cox is a writer and a lover of all things video.
Follow @Shanoon Cox
Generating the Roll Safe-Think About It Meme
Generating the Roll Safe-Think About It Meme
Ollie Mattison
Mar 27, 2024• Proven solutions
Assumptions can lead you in a very wrong direction, and we’ve all made more foolish assumptions than we’d care to admit. As a matter of fact, seemingly brilliant life strategies are so common that they’ve become a meme. A guy named Reece Simpson made such a stupid and borderline sexist conclusion in one of the episodes of the Hood Documentary series, that it instantly became synonymous with all ideas that look good only in theory. The iconic image of him, placing the index finger to his temple with a comment: ‘You can’t be broke if you don’t check your bank account’ went viral only a six months after the documentary was initially released. In less than a week the tweet had 74.000 likes and 47.000 retweets.
Over time numerous variations of the meme emerged on social media, so in this article, we’re going to show you how you can make your own Roll Safe-Think About It memes in less than few minutes. But first, let have a look at some of the successful examples of this meme.
A Few Good Examples of the Roll Safe-Think About It Meme
Being slightly ironic while making a seemingly valid point is the true spirit of the Roll-Safe-Think About It meme, which is why using just any off the wall idea may not have the effect you’d like to achieve.

Can’t lose if you don’t play is a great illustration of what Roll Safe is all about. If you don’t try something you can’t fail at it, right? The assumption seems entirely legitimate, except it’s not, and that’s the catch.

A similar logic can be applied to romance, as there is zero chance to get cheated on if you weren’t in a relationship, to begin with. The only trouble is that if you adopt this way of thinking, you’ll never be in a relationship.
We all complain about financial troubles in one way or the other, and Roll Safe-Think About It offers a pretty funny way to do that. Once again, a seemingly valid point that only looks good in theory is the punch-line of the meme. There are so many different variations of this meme on the Internet, at the moment, but nearly all of them employ faulty logic to create the comical effect.
How to Make the Roll Safe-Think About It Meme
Generating a meme with the Filmora Online Meme Maker is free, quick and easy, and you can also use it to create memes from your Smartphone.
Attention: This post only provides the solutions to make memes for personal and non-commercial purpose. Since any redistribution without the approval of the copyright owners may violate the copyright laws, you’d better refer to the copyright laws in your country before doing so.
1. Importing the Images
On the home page of the Filmora Online Meme Maker offers you three quick ways to upload photos, videos or GIFs. You can either click on the + icon displayed in the middle of the screen and import a photo from a hard drive, drop the file from a folder on your computer to the designated section of the screen or use a URL to import meme templates.
So if you would like to create your Roll Safe-Think About It meme, you can start by copying the link the still image version or the GIF version of the meme. Click the “Copy the image” link below and the image link will be copied automatically.

Copy the image

Copy the image
Then, go to https://filmora.wondershare.com/meme-maker/ insert the image link you just copied by press Ctrl+V, click on the Upload button to start the upload process and wait until the template is uploaded.

Once the upload is complete you’ll be taken to another screen where you can choose whether you want the text to be inside the picture or outside. Which one of these options you’re going to use is up to you since there are versions where the text is placed both inside and outside of the picture.
2. Adding the Text to The Meme
Below the Text, Inside and Text Outside options you’ll be able to spot text boxes where you can add the punch-line of the meme. In the Text Options menu, you can select a new font, choose the text alignment you like the most or change the size and the color of the text. Scroll down to the bottom of the page and click on the Create button after you’ve added the text to the meme.

3. Downloading the Meme

A new page will load after the meme is generated, and you just have to click on the Download button and save it to your computer.
Those of you who use Filmora Online Meme Maker from their Smartphones can share their Roll Safe-Think About It memes directly from the platform. Sharing memes on social media is still not an option for Mac and PC users.
Conclusion
Adopting the logic behind the Roll Safe-Think About It memes in real life may not be the best of choices, but using it to cheer up your friends on social media can make your account more popular. Do you like making Roll Safe-Think About It memes? Share your experiences with us in the comments.
Ollie Mattison
Ollie Mattison is a writer and a lover of all things video.
Follow @Ollie Mattison
Ollie Mattison
Mar 27, 2024• Proven solutions
Assumptions can lead you in a very wrong direction, and we’ve all made more foolish assumptions than we’d care to admit. As a matter of fact, seemingly brilliant life strategies are so common that they’ve become a meme. A guy named Reece Simpson made such a stupid and borderline sexist conclusion in one of the episodes of the Hood Documentary series, that it instantly became synonymous with all ideas that look good only in theory. The iconic image of him, placing the index finger to his temple with a comment: ‘You can’t be broke if you don’t check your bank account’ went viral only a six months after the documentary was initially released. In less than a week the tweet had 74.000 likes and 47.000 retweets.
Over time numerous variations of the meme emerged on social media, so in this article, we’re going to show you how you can make your own Roll Safe-Think About It memes in less than few minutes. But first, let have a look at some of the successful examples of this meme.
A Few Good Examples of the Roll Safe-Think About It Meme
Being slightly ironic while making a seemingly valid point is the true spirit of the Roll-Safe-Think About It meme, which is why using just any off the wall idea may not have the effect you’d like to achieve.
Can’t lose if you don’t play is a great illustration of what Roll Safe is all about. If you don’t try something you can’t fail at it, right? The assumption seems entirely legitimate, except it’s not, and that’s the catch.
A similar logic can be applied to romance, as there is zero chance to get cheated on if you weren’t in a relationship, to begin with. The only trouble is that if you adopt this way of thinking, you’ll never be in a relationship.
We all complain about financial troubles in one way or the other, and Roll Safe-Think About It offers a pretty funny way to do that. Once again, a seemingly valid point that only looks good in theory is the punch-line of the meme. There are so many different variations of this meme on the Internet, at the moment, but nearly all of them employ faulty logic to create the comical effect.
How to Make the Roll Safe-Think About It Meme
Generating a meme with the Filmora Online Meme Maker is free, quick and easy, and you can also use it to create memes from your Smartphone.
Attention: This post only provides the solutions to make memes for personal and non-commercial purpose. Since any redistribution without the approval of the copyright owners may violate the copyright laws, you’d better refer to the copyright laws in your country before doing so.
1. Importing the Images
On the home page of the Filmora Online Meme Maker offers you three quick ways to upload photos, videos or GIFs. You can either click on the + icon displayed in the middle of the screen and import a photo from a hard drive, drop the file from a folder on your computer to the designated section of the screen or use a URL to import meme templates.
So if you would like to create your Roll Safe-Think About It meme, you can start by copying the link the still image version or the GIF version of the meme. Click the “Copy the image” link below and the image link will be copied automatically.
Copy the image
Copy the image
Then, go to https://filmora.wondershare.com/meme-maker/ insert the image link you just copied by press Ctrl+V, click on the Upload button to start the upload process and wait until the template is uploaded.
Once the upload is complete you’ll be taken to another screen where you can choose whether you want the text to be inside the picture or outside. Which one of these options you’re going to use is up to you since there are versions where the text is placed both inside and outside of the picture.
2. Adding the Text to The Meme
Below the Text, Inside and Text Outside options you’ll be able to spot text boxes where you can add the punch-line of the meme. In the Text Options menu, you can select a new font, choose the text alignment you like the most or change the size and the color of the text. Scroll down to the bottom of the page and click on the Create button after you’ve added the text to the meme.
3. Downloading the Meme
A new page will load after the meme is generated, and you just have to click on the Download button and save it to your computer.
Those of you who use Filmora Online Meme Maker from their Smartphones can share their Roll Safe-Think About It memes directly from the platform. Sharing memes on social media is still not an option for Mac and PC users.
Conclusion
Adopting the logic behind the Roll Safe-Think About It memes in real life may not be the best of choices, but using it to cheer up your friends on social media can make your account more popular. Do you like making Roll Safe-Think About It memes? Share your experiences with us in the comments.
Ollie Mattison
Ollie Mattison is a writer and a lover of all things video.
Follow @Ollie Mattison
How to Make an Emoji of Yourself on Android and iPhone [Emoji Yourself]
How to Make an Emoji of Yourself on Android and iPhone [Emoji Yourself]
Shanoon Cox
Mar 27, 2024• Proven solutions
The introduction of stickers and emojis have transformed the texting experience—no more boring texts. Just make an emoji of yourself in every mood and instantly express yourself in a better and funnier way.
Whether you own an iPhone or an Android device, you can easily emoji yourself that exactly mimics your appearance and reaction. It’s time to up your chatting game and make exciting emojis.
In this article, we will show you how to amaze your friends by teaching you to make an emoji of yourself in no time.
Part 1: Make an Emoji of Yourself on iPhone
iPhone has now introduced a fun feature that lets you make an emoji of yourself, the exact mirror image of you, just smaller and animated.
Here’s how you can make an emoji of yourself in 2 easy ways:
Method 1-By the iPhone Message app
iPhone has now introduced an in-built feature to let you make an emoji of yourself without having to download any other apps. However, you can only make an emoji of yourself in iOS 13 or later.
For the lucky lot of you, let me walk you through how to make an emoji of yourself in a few simple steps:
1.Open your iMessages. Go to a previous chat or tap the New Message Make sure your Appstore icon is toggled on to display the app tray. Hit the Animoji icon, represented by the monkey. Swipe to find the + plus sign for New Memoji to emoji yourself.

2.Now you can make an emoji of yourself by adding even the smallest details. Start by selecting your skin color. You can even add freckles or adjust your skin color’s warmth or paleness with a slider.

3.Hairstyle-Select the style that mimics the real you or goes for your dream hair-do.

4.Head Shape-Select the age group from kids, adults, old, and your face cut by choosing the chin that best fits you.

5.Nose & Lips- After selecting your eye color, shape, and brows, choose a nose shape and a lipstick color and intensity.

6.Eyewear/Headwear-Add glasses, adjust tint shade, color, and choose a hat, cap, or turban as you like. Finally, click Done to save the emoji.

Method 2-Using the Avatoon app
If you want to make an emoji of yourself that is more fun and personalized, from your dress to your pose, Avatoon is your way to go. With more than 500 customizable options, Avatoon lets you make an emoji of yourself meticulously, allowing you add avid details that pave the way for a hilariously amazing texting experience
1.Install and launch Avatoon app.
2.Now, choose the face shape that best matches your features and also select your face color. Add freckles(if you have any).

3.Next up is the hairstyle. There is a range of hairstyles from straight to wavy. Pick one you like best. You can choose the eye shape, color, brow, nose, lips, and finally, add some funky or formal eyewear to complete the look. Press Save.
4.After you make an emoji of yourself, you can further fine-tune it by adding detailed features and accessories using coins. Choose a stylish dress for your avatar from the Clothes tab or add a fun background.
5.Click on Photoboothto fit your emoji in a themed photo for an event or celebration.
6.Click on Poses and select your pose and share directly to any social media platform or save to phone.
Part 2: Make an Emoji of Yourself on Android
Now you can make an emoji of yourself even on an Android phone with the Mirror emoji app. Take your texting experience to the next level. Quickly make an emoji of yourself and wow your friends and family with the cute mini version of yourself.
1.Install and launch Mirror. Now, to make an emoji of yourself for your current look, take a selfie or click the gallery icon to choose an existing image to emoji yourself.

2.Click the left one to make an original avatar or the right one if you wish to make an emoji of yourself as an anime. Click Next.

3.Now, customize your emoji. Add a hairstyle, choose your glasses, cap, headphones, turban, scarf, or even devil horns.

4.Customize your dress color to your liking. Then, click Next.

5.Once you make an emoji of yourself, Mirror will display a range of fun stickers for instant sharing.

6.Click on any sticker, choose a mood using the emojis displayed and click to share or save to the device.

7.In the Sticker backstab, choose a themed sticker set and click Add to WhatsApp.

Conclusion-Ready to Emoji Yourself?
With texts being taken over by stickers and emojis, it’s high time for you to enter the league. Make an emoji of yourself in different moods and add funny backgrounds to express yourself fully and hilariously.
Use the in-built iPhone feature or a powerful app to make an emoji of yourself stand out from the crowd of mainstream messages. And take inspiration from our guide to surprise your friends with an emoji that looks exactly like you, just a bit smaller.
Here, we recommend Wondershare Filmora , due to its AR camera feature, which makes taking selfies more interesting. This AR camera function includes animoji and memoji avatars for a fun and excellent video.
Go on and make an emoji of yourself. Show your friends how awesome and unique you are with a beautifully personalized emoji.
Good luck!
Shanoon Cox
Shanoon Cox is a writer and a lover of all things video.
Follow @Shanoon Cox
Shanoon Cox
Mar 27, 2024• Proven solutions
The introduction of stickers and emojis have transformed the texting experience—no more boring texts. Just make an emoji of yourself in every mood and instantly express yourself in a better and funnier way.
Whether you own an iPhone or an Android device, you can easily emoji yourself that exactly mimics your appearance and reaction. It’s time to up your chatting game and make exciting emojis.
In this article, we will show you how to amaze your friends by teaching you to make an emoji of yourself in no time.
Part 1: Make an Emoji of Yourself on iPhone
iPhone has now introduced a fun feature that lets you make an emoji of yourself, the exact mirror image of you, just smaller and animated.
Here’s how you can make an emoji of yourself in 2 easy ways:
Method 1-By the iPhone Message app
iPhone has now introduced an in-built feature to let you make an emoji of yourself without having to download any other apps. However, you can only make an emoji of yourself in iOS 13 or later.
For the lucky lot of you, let me walk you through how to make an emoji of yourself in a few simple steps:
1.Open your iMessages. Go to a previous chat or tap the New Message Make sure your Appstore icon is toggled on to display the app tray. Hit the Animoji icon, represented by the monkey. Swipe to find the + plus sign for New Memoji to emoji yourself.
2.Now you can make an emoji of yourself by adding even the smallest details. Start by selecting your skin color. You can even add freckles or adjust your skin color’s warmth or paleness with a slider.
3.Hairstyle-Select the style that mimics the real you or goes for your dream hair-do.
4.Head Shape-Select the age group from kids, adults, old, and your face cut by choosing the chin that best fits you.
5.Nose & Lips- After selecting your eye color, shape, and brows, choose a nose shape and a lipstick color and intensity.
6.Eyewear/Headwear-Add glasses, adjust tint shade, color, and choose a hat, cap, or turban as you like. Finally, click Done to save the emoji.
Method 2-Using the Avatoon app
If you want to make an emoji of yourself that is more fun and personalized, from your dress to your pose, Avatoon is your way to go. With more than 500 customizable options, Avatoon lets you make an emoji of yourself meticulously, allowing you add avid details that pave the way for a hilariously amazing texting experience
1.Install and launch Avatoon app.
2.Now, choose the face shape that best matches your features and also select your face color. Add freckles(if you have any).
3.Next up is the hairstyle. There is a range of hairstyles from straight to wavy. Pick one you like best. You can choose the eye shape, color, brow, nose, lips, and finally, add some funky or formal eyewear to complete the look. Press Save.
4.After you make an emoji of yourself, you can further fine-tune it by adding detailed features and accessories using coins. Choose a stylish dress for your avatar from the Clothes tab or add a fun background.
5.Click on Photoboothto fit your emoji in a themed photo for an event or celebration.
6.Click on Poses and select your pose and share directly to any social media platform or save to phone.
Part 2: Make an Emoji of Yourself on Android
Now you can make an emoji of yourself even on an Android phone with the Mirror emoji app. Take your texting experience to the next level. Quickly make an emoji of yourself and wow your friends and family with the cute mini version of yourself.
1.Install and launch Mirror. Now, to make an emoji of yourself for your current look, take a selfie or click the gallery icon to choose an existing image to emoji yourself.
2.Click the left one to make an original avatar or the right one if you wish to make an emoji of yourself as an anime. Click Next.
3.Now, customize your emoji. Add a hairstyle, choose your glasses, cap, headphones, turban, scarf, or even devil horns.
4.Customize your dress color to your liking. Then, click Next.
5.Once you make an emoji of yourself, Mirror will display a range of fun stickers for instant sharing.
6.Click on any sticker, choose a mood using the emojis displayed and click to share or save to the device.
7.In the Sticker backstab, choose a themed sticker set and click Add to WhatsApp.
Conclusion-Ready to Emoji Yourself?
With texts being taken over by stickers and emojis, it’s high time for you to enter the league. Make an emoji of yourself in different moods and add funny backgrounds to express yourself fully and hilariously.
Use the in-built iPhone feature or a powerful app to make an emoji of yourself stand out from the crowd of mainstream messages. And take inspiration from our guide to surprise your friends with an emoji that looks exactly like you, just a bit smaller.
Here, we recommend Wondershare Filmora , due to its AR camera feature, which makes taking selfies more interesting. This AR camera function includes animoji and memoji avatars for a fun and excellent video.
Go on and make an emoji of yourself. Show your friends how awesome and unique you are with a beautifully personalized emoji.
Good luck!
Shanoon Cox
Shanoon Cox is a writer and a lover of all things video.
Follow @Shanoon Cox
How to Add Emojis to Videos: The Ultimate Guide
How to Add Emojis to Videos: The Ultimate Guide

Liza Brown
Mar 27, 2024• Proven solutions
The way we communicate has changed so much in the first two decades of the 21st century. In the late 1990s, when emojis were first introduced to the global market nobody could have guessed just how popular they are going to become. An emoji is an ideogram that is commonly used in electronic messages, but there are countless creative ways to incorporate them in the visual content you’re sharing to your Facebook account or your YouTube channel. Read on if you would like to find out how to add an emoji to a video you’re editing on a Mac, PC, iPhone or an Android device.
- Part 1: Add Animated Emojis to Videos in Flimora [3 Ways]
- Part 2: Add Animated Emojis & Stickers to Videos in iPhone for FREE
- Part 3: Add Animated Emojis to Videos in Android
- Part 4: Add Animated Emojis & Stickers to Videos Online
How to Add Animated Emojis to Videos in Flimora? [Windows & Mac]
Gamers, YouTubers and all other Mac and PC users who’d like to add a smiley or any other emoji to a video should try processing their footage with the Filmora video editor . Performing basic video editing tasks like cutting or trimming the footage, choosing a soundtrack for a video or adding an emoji to a single shot or an entire sequence can all be completed in just a couple of clicks. Here’s how you can add an emoji to a video clip in Filmora.
1. Use the Filmora’s Built-in Animated Emoji Library
Create a new project
Launch Filmora and then select the New Project option from the app’s welcome window. Afterward, you can set the project’s aspect ratio, frame rate and resolution from the Project Settings tab that can be accessed from the File drop-down menu. When done, you should proceed to import a video clip to which you want to add an emoji.
Place the Footage onto the Timeline
The media files you import into your projects in Filmora are located in the software’s Media Tab, and you can just drag them from the Media Tab and drop them onto a video track on the timeline. Remove all parts of the video clip you don’t want to use and head over to the Elements Tab that is located in the upper left corner of the screen.
Choose an Emoji
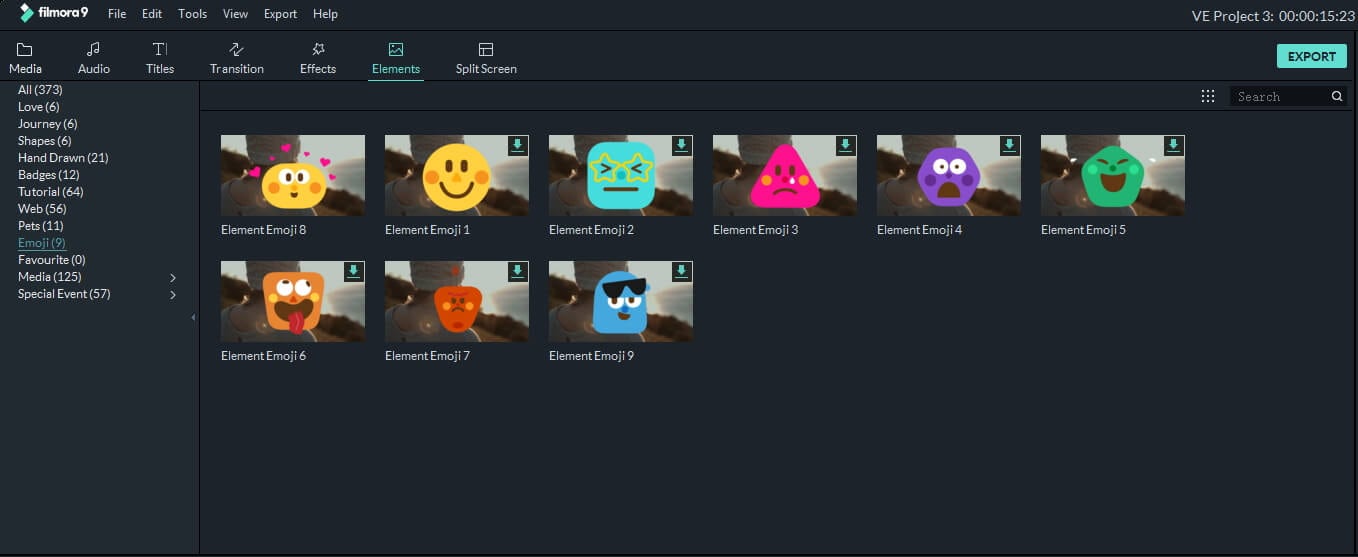
The Elements Tab contains different categories such as Shapes, Badges or Pets. Click on the Emoji category to start browsing through Filmora’s collection of emojis and simply drag and drop the emoji you like above the video clip to which you’d like to add it. You can then adjust its duration, position on the screen or size. Optionally, you can double-click on the emoji to access the Motion tab that enables you to choose between different motion effects.
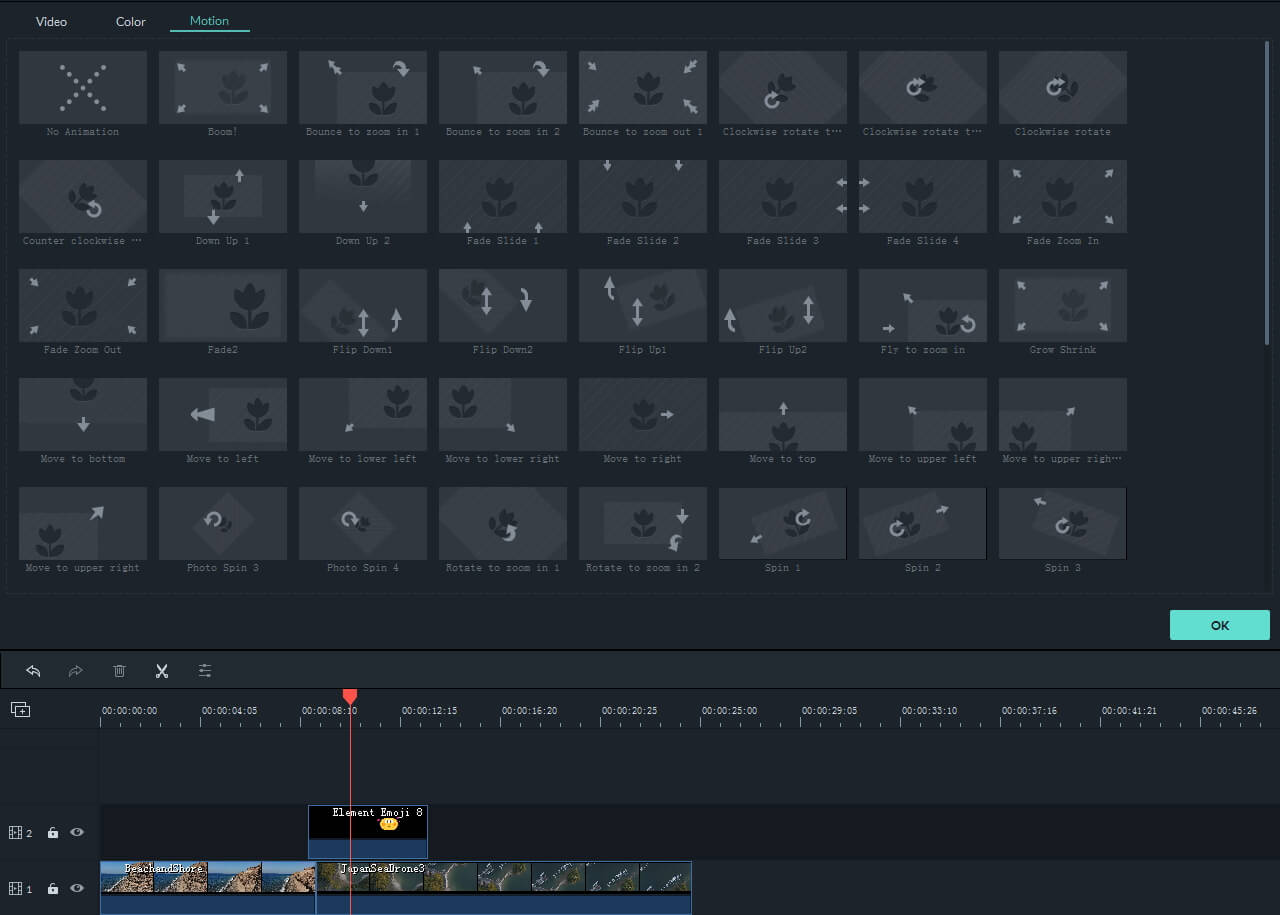
Export the Project
Preview the results by hitting the space button on your keyboard or clicking on the Play button that is located below the app’s preview window. In case you don’t want to make any more edits to the footage, you should click on the Export button and choose if you want to export your project to a hard drive on your computer or to your YouTube or Vimeo channel. Select the output file format, click on the Export and wait for the rendering process to be completed.
With Filmora video editor, you can also add animated texts and titles to video, or apply various elements such as hand drawn, badges and elements for tutorial. Click to learn more details about how to edit videos in Filmora .
2. Download Additional Animated Emojis from Filmostocks for Free
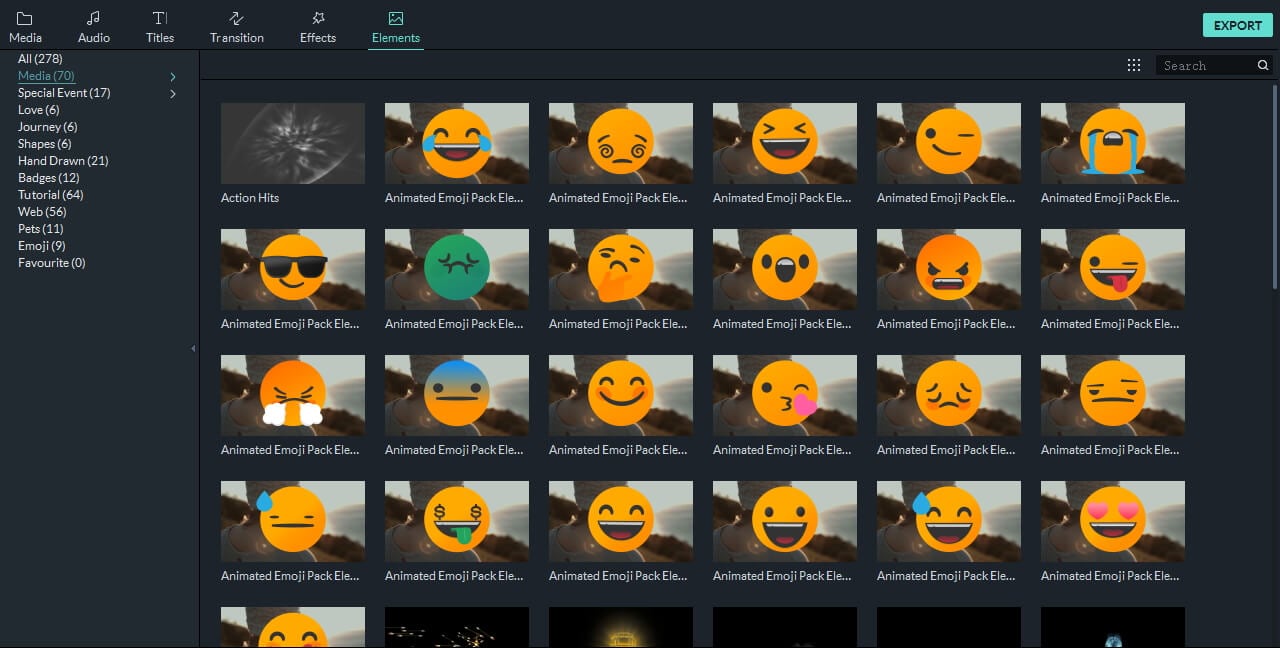
There are only nine emojis available in the Filmora’s built-in Emojis category, but you can easily broaden the range of emoji genres you have the access to by downloading the Animated Emoji Pack from Filmstock effects store . You don’t have to spend any additional money on this pack that contains 24 different emojis, but you must create an account on Filmstock before you can download the Animated Emoji Pack to your computer. The process of adding the emojis from this pack to videos is the same as the process of adding one of the emojis from the built-in Emojis category. Filmstock is so much more than an endless source of emojis for your videos since it offers a variety of visual and audio stock footage and visual effects. Even if you are using Adobe After Effects, you can also download and use some visual effects templates for AE.
3. Bonus: Animate Sticker and Emojis Your Download from Internet with Filmora
Instead of adding pre-animated ideograms to your videos, you can simply download a still image of a sticker or an emoji and animate it with Filmora. However, you should search for emojis that have a transparent background in order to blend it quicker with the source footage. Once you find a smiley or any other emoji you’d like to add to a video you should save it on your hard drive and import it into a project in Filmora.
You should then place the emoji at the exact spot on the timeline where you want it to appear in the final cut of the video. Double-click on the still image file and proceed to adjust its size or position from the Transform menu or choose a motion effect from the Motion tab. When done, commence the rendering process by clicking on the Export button. You can check our step guide about How to add picture to video to get more clues about that.
How to Add Emojis and Stickers to Videos on an iPhone
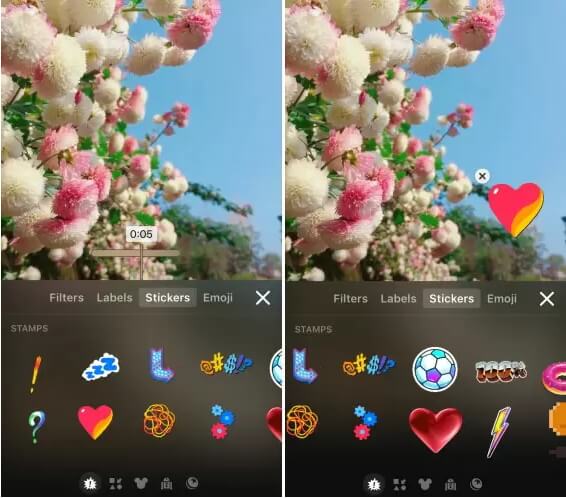
Waiting to edit the high-resolution videos you recorded with your iPhone on a computer is not always an option, because in certain situations you just want to polish a video you recorded and post it on social media as fast as you can. The Apple’s Clip app that can be downloaded for free from the AppStore seems to be a perfect solution for all iPhone users who want to add emojis to their videos before sharing them on Facebook, Instagram or any other popular social media networks.
The Clip app offers a rich selection of stickers and emojis that can be accessed by tapping on the icon that looks like a star within a circle. There are more than 30 emojis available, but you can also use the iPhone’s emoji keyboard to add emojis to videos in the Clip app. All of the app’s stickers and emojis are fully customizable, which means that you can change their size, screen position or insert text effortlessly. Once the video editing process is completed you can store a video on Dropbox or share it via AirDrop.
Best App for Adding Stickers and Emojis on Android Devices
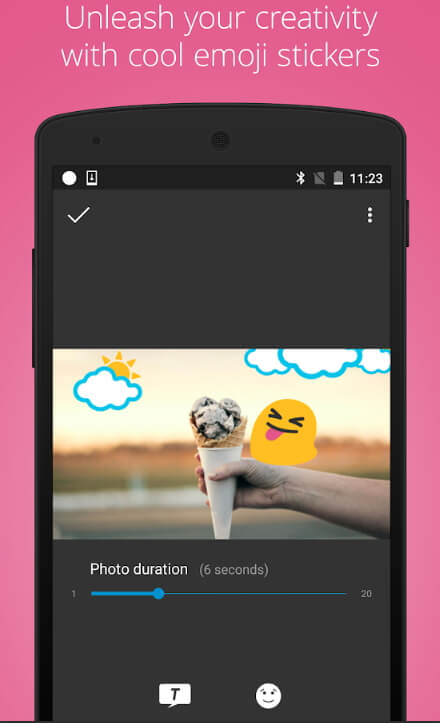
The WeVideo app for Android devices is equipped with all video editing tools you are going to need to produce a visually impressive video. In case you decide to purchase and install WeVideo on your phone, you will be able to cut, trim or arrange video clips as you see fit. The app also features a collection of emojis that can be added easily to all videos you decide to edit with it. The best part is that you can export all of your projects in 4K Ultra HD resolution and publish them to YouTube, Vimeo or Dropbox from the app so you don’t have to spend extra time on waiting for the file to be uploaded to the social media platform on which you want to share the video.
Using Kapwing Meme Maker to Add Stickers and Emojis Online
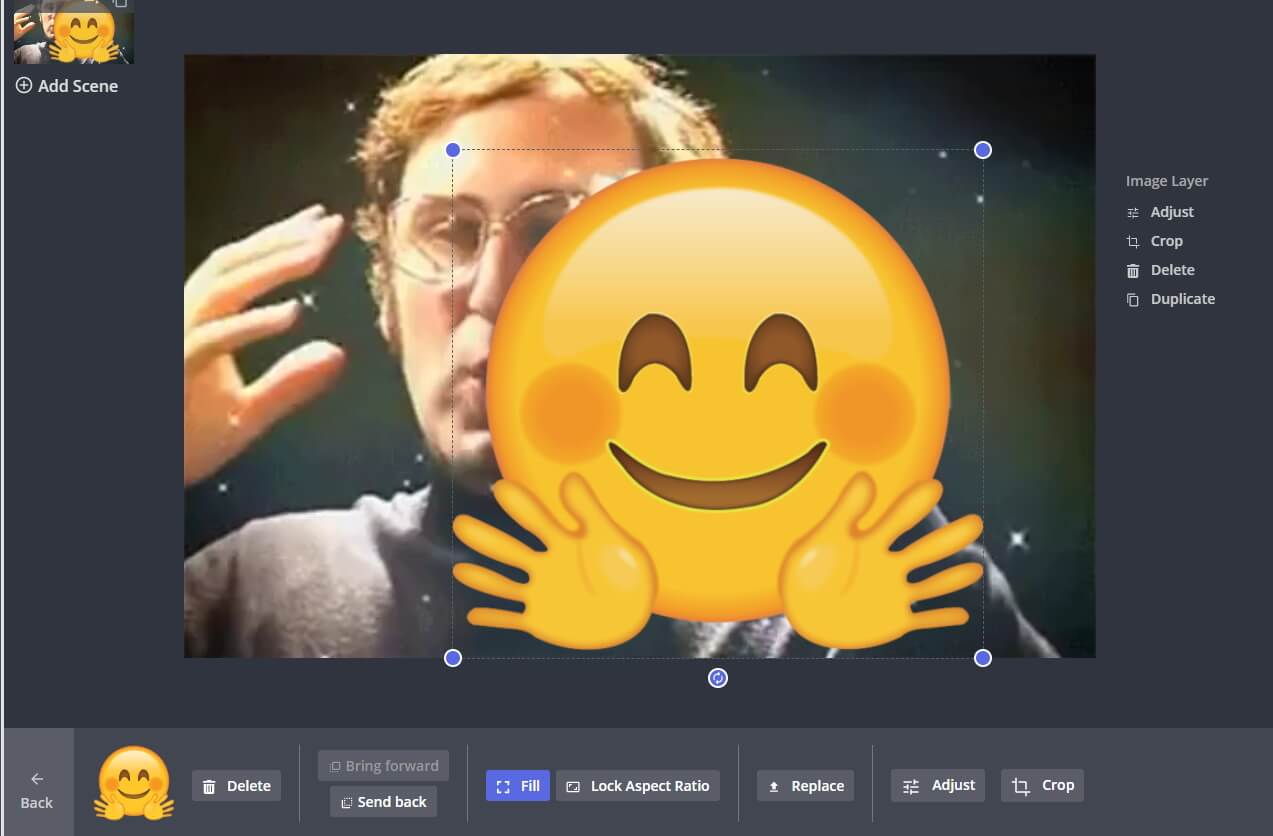
Web-based video editing platforms like Kapwing have been growing in popularity recently because they enable social media content creators to produce social media videos in a brief period of time. The Kapwing Meme Maker tool doesn’t feature any built-in stickers or emojis, so you must either upload a still image with a transparent ground to the platform or use its Text tool to add emojis to a video. Moreover, you won’t be able to animate the emojis you add to video clips with the Kapwing Meme Maker tool since the Kapwing platform doesn’t offer any animation tools. Despite this Kapwing is still one of the best online video editing platforms you can use to add emojis and stickers to videos.
A Few Tips to Help you Incorporate Emojis in Your Videos
Which emoji you are going to add to a video depends on factors that range from the topic of the video to the audience you are trying to reach. So, if you can’t find the emoji that fits perfectly to your video you should head over to emojipedia or any other website that lets you download thousands of emojis for free. You should keep in mind that emojis can have different meanings in different cultures, which is the reason why you must make sure that the emoji you’re adding to your video isn’t inappropriate or offensive in the context in which you’re using it. It is also worth noting that the emojis you download from the Internet should have a transparent background and that they should be saved in the PNG file format.
You may also like: Add Emojis to Videos on YouTube/Facebook/Snapchat [Step by Step Guide] >>
Conclusion
A single image overlay like an emoji can make your video more dynamic and more entertaining to watch, but you must discover creative and innovative ways to incorporate these visual elements into the story your video is telling. Each video editing app we presented in this article enables you to add emojis to videos in just a few easy steps, so you should choose the video editor that you feel most comfortable using. Do you add emojis to your videos often? Leave a comment below and share your favorite emojis with us.
Liza Brown
Liza Brown is a writer and a lover of all things video.
Follow @Liza Brown
Liza Brown
Mar 27, 2024• Proven solutions
The way we communicate has changed so much in the first two decades of the 21st century. In the late 1990s, when emojis were first introduced to the global market nobody could have guessed just how popular they are going to become. An emoji is an ideogram that is commonly used in electronic messages, but there are countless creative ways to incorporate them in the visual content you’re sharing to your Facebook account or your YouTube channel. Read on if you would like to find out how to add an emoji to a video you’re editing on a Mac, PC, iPhone or an Android device.
- Part 1: Add Animated Emojis to Videos in Flimora [3 Ways]
- Part 2: Add Animated Emojis & Stickers to Videos in iPhone for FREE
- Part 3: Add Animated Emojis to Videos in Android
- Part 4: Add Animated Emojis & Stickers to Videos Online
How to Add Animated Emojis to Videos in Flimora? [Windows & Mac]
Gamers, YouTubers and all other Mac and PC users who’d like to add a smiley or any other emoji to a video should try processing their footage with the Filmora video editor . Performing basic video editing tasks like cutting or trimming the footage, choosing a soundtrack for a video or adding an emoji to a single shot or an entire sequence can all be completed in just a couple of clicks. Here’s how you can add an emoji to a video clip in Filmora.
1. Use the Filmora’s Built-in Animated Emoji Library
Create a new project
Launch Filmora and then select the New Project option from the app’s welcome window. Afterward, you can set the project’s aspect ratio, frame rate and resolution from the Project Settings tab that can be accessed from the File drop-down menu. When done, you should proceed to import a video clip to which you want to add an emoji.
Place the Footage onto the Timeline
The media files you import into your projects in Filmora are located in the software’s Media Tab, and you can just drag them from the Media Tab and drop them onto a video track on the timeline. Remove all parts of the video clip you don’t want to use and head over to the Elements Tab that is located in the upper left corner of the screen.
Choose an Emoji
The Elements Tab contains different categories such as Shapes, Badges or Pets. Click on the Emoji category to start browsing through Filmora’s collection of emojis and simply drag and drop the emoji you like above the video clip to which you’d like to add it. You can then adjust its duration, position on the screen or size. Optionally, you can double-click on the emoji to access the Motion tab that enables you to choose between different motion effects.
Export the Project
Preview the results by hitting the space button on your keyboard or clicking on the Play button that is located below the app’s preview window. In case you don’t want to make any more edits to the footage, you should click on the Export button and choose if you want to export your project to a hard drive on your computer or to your YouTube or Vimeo channel. Select the output file format, click on the Export and wait for the rendering process to be completed.
With Filmora video editor, you can also add animated texts and titles to video, or apply various elements such as hand drawn, badges and elements for tutorial. Click to learn more details about how to edit videos in Filmora .
2. Download Additional Animated Emojis from Filmostocks for Free
There are only nine emojis available in the Filmora’s built-in Emojis category, but you can easily broaden the range of emoji genres you have the access to by downloading the Animated Emoji Pack from Filmstock effects store . You don’t have to spend any additional money on this pack that contains 24 different emojis, but you must create an account on Filmstock before you can download the Animated Emoji Pack to your computer. The process of adding the emojis from this pack to videos is the same as the process of adding one of the emojis from the built-in Emojis category. Filmstock is so much more than an endless source of emojis for your videos since it offers a variety of visual and audio stock footage and visual effects. Even if you are using Adobe After Effects, you can also download and use some visual effects templates for AE.
3. Bonus: Animate Sticker and Emojis Your Download from Internet with Filmora
Instead of adding pre-animated ideograms to your videos, you can simply download a still image of a sticker or an emoji and animate it with Filmora. However, you should search for emojis that have a transparent background in order to blend it quicker with the source footage. Once you find a smiley or any other emoji you’d like to add to a video you should save it on your hard drive and import it into a project in Filmora.
You should then place the emoji at the exact spot on the timeline where you want it to appear in the final cut of the video. Double-click on the still image file and proceed to adjust its size or position from the Transform menu or choose a motion effect from the Motion tab. When done, commence the rendering process by clicking on the Export button. You can check our step guide about How to add picture to video to get more clues about that.
How to Add Emojis and Stickers to Videos on an iPhone
Waiting to edit the high-resolution videos you recorded with your iPhone on a computer is not always an option, because in certain situations you just want to polish a video you recorded and post it on social media as fast as you can. The Apple’s Clip app that can be downloaded for free from the AppStore seems to be a perfect solution for all iPhone users who want to add emojis to their videos before sharing them on Facebook, Instagram or any other popular social media networks.
The Clip app offers a rich selection of stickers and emojis that can be accessed by tapping on the icon that looks like a star within a circle. There are more than 30 emojis available, but you can also use the iPhone’s emoji keyboard to add emojis to videos in the Clip app. All of the app’s stickers and emojis are fully customizable, which means that you can change their size, screen position or insert text effortlessly. Once the video editing process is completed you can store a video on Dropbox or share it via AirDrop.
Best App for Adding Stickers and Emojis on Android Devices
The WeVideo app for Android devices is equipped with all video editing tools you are going to need to produce a visually impressive video. In case you decide to purchase and install WeVideo on your phone, you will be able to cut, trim or arrange video clips as you see fit. The app also features a collection of emojis that can be added easily to all videos you decide to edit with it. The best part is that you can export all of your projects in 4K Ultra HD resolution and publish them to YouTube, Vimeo or Dropbox from the app so you don’t have to spend extra time on waiting for the file to be uploaded to the social media platform on which you want to share the video.
Using Kapwing Meme Maker to Add Stickers and Emojis Online
Web-based video editing platforms like Kapwing have been growing in popularity recently because they enable social media content creators to produce social media videos in a brief period of time. The Kapwing Meme Maker tool doesn’t feature any built-in stickers or emojis, so you must either upload a still image with a transparent ground to the platform or use its Text tool to add emojis to a video. Moreover, you won’t be able to animate the emojis you add to video clips with the Kapwing Meme Maker tool since the Kapwing platform doesn’t offer any animation tools. Despite this Kapwing is still one of the best online video editing platforms you can use to add emojis and stickers to videos.
A Few Tips to Help you Incorporate Emojis in Your Videos
Which emoji you are going to add to a video depends on factors that range from the topic of the video to the audience you are trying to reach. So, if you can’t find the emoji that fits perfectly to your video you should head over to emojipedia or any other website that lets you download thousands of emojis for free. You should keep in mind that emojis can have different meanings in different cultures, which is the reason why you must make sure that the emoji you’re adding to your video isn’t inappropriate or offensive in the context in which you’re using it. It is also worth noting that the emojis you download from the Internet should have a transparent background and that they should be saved in the PNG file format.
You may also like: Add Emojis to Videos on YouTube/Facebook/Snapchat [Step by Step Guide] >>
Conclusion
A single image overlay like an emoji can make your video more dynamic and more entertaining to watch, but you must discover creative and innovative ways to incorporate these visual elements into the story your video is telling. Each video editing app we presented in this article enables you to add emojis to videos in just a few easy steps, so you should choose the video editor that you feel most comfortable using. Do you add emojis to your videos often? Leave a comment below and share your favorite emojis with us.
Liza Brown
Liza Brown is a writer and a lover of all things video.
Follow @Liza Brown
Also read:
- [New] Examining the Perks and Pitfalls of VR
- [Updated] Apex Artists Among Online Video Titans for 2024
- 2024 Approved How to Make Memoji Talk-Make Memoji Video On Your Own
- 2024 Approved Your Pathway to Effective Zoom Hosting
- Advance Repair for Bad and Corrupt Video Files of Vivo T2 5G
- How to Save Streaming Content as Various File Types (MP4, AVI, MP3) on Windows and macOS
- How to Use Emojis on Windows for 2024
- In 2024, 6 Proven Ways to Unlock Vivo T2 Pro 5G Phone When You Forget the Password
- In 2024, Android Unlock Code Sim Unlock Your Infinix Zero 30 5G Phone and Remove Locked Screen
- In 2024, Mocking Sponge Bob Meme Generator
- New In 2024, How to Record Your Memorable Honeymoon Video
- Solutions for Enabling Audio in OBS Broadcasts for 2024
- Updated How to Burn Photos to DVD with Transitions and Music
- Updated How to Make Memoji Talk-Make Memoji Video On Your Own
- Updated In 2024, How to Add Emojis to Videos The Ultimate Guide
- Ways to trade pokemon go from far away On Honor Magic 5 Lite? | Dr.fone
- What Is Emoji and What Does It Mean, In 2024
- Title: In 2024, How to Record Your Memorable Honeymoon Video
- Author: Jan
- Created at : 2024-09-29 18:54:14
- Updated at : 2024-09-30 18:51:55
- Link: https://meme-emoji.techidaily.com/in-2024-how-to-record-your-memorable-honeymoon-video/
- License: This work is licensed under CC BY-NC-SA 4.0.