
How to Make a iMovie Photo Slideshow with Music? IMovie Tutorial
How to Make a iMovie Photo Slideshow with Music? [IMovie Tutorial]
How to Make a iMovie Photo Slideshow with Music? [iMovie Tutorial]

Shanoon Cox
Mar 27, 2024• Proven solutions
Makings a slideshow is a great way to share photos and videos with friends and families. The good news is that you can totally make a slideshow on Mac for free with iMovie. iMovie is the pre-installed program coming with every new Mac. It provides a simple yet professional way to make slideshow movies from your photos, videos, and music.
If you haven’t iMovie installed on your Mac yet, just go to iTunes and download it for free. In the following part, I’ll share with you the step-by-step tutorial on how to make a slideshow on Mac using the free video editing software iMovie.
If you are an iOS user, check our picks of best photo slideshow apps for iPhone or iPad.
Ways for iMovie Photo Slideshow with Music Making
To make a photo slideshow with music in iMovie, you can follow these steps.
1. Create a New Project
After launching iMovie, click the Project button and then click Create New. Select Movie to combine photos, videos and music to make a slideshow.

2. Import Photos, Videos, and Audio Files
Now go to the My Media tab and click the Import icon to add your photos, videos, and music to iMovie, in this way, you can import any media files from any location on your Mac. But if you have arranged all your videos, photos, and music tracks in the Photos app, you can just switch to Photos under the Libraries tab on the left to import.

3. Arrange Media in Timeline and Adjust
Now, it’s time to place all these photos and videos in the timeline in order and do some adjustments. You can use the Magic Wand tool to improve the photo quality automatically, do some color correction, or add a filter to the photo. If you preview the video clip, you will see more options that allow you to do more editing, such as changing speed.
4. Apply Transitions & Effects
Transitions and effects will help you to create a slideshow in a more professional way. Some transitions such as cross dissolve, fade and cross blur are very popular in the slideshow, but remember don’t use lots of different transitions in one slideshow since too many transitions will distract the viewer’s attention. To apply a transition in the slideshow, just drag and drop it between two photos in the timeline.

5. Add Titles and Text
Using some opener titles and credits at the beginning and ending part of your slideshow will make it cool as well. You can add some famous quotes and words to better demonstrate.
Just to the Titles tab and select one of the title templates and drop it to the timeline first and then write your own words in the preview window.

6. Add Music to Slideshow
You can download some royalty-free music and sound effects from websites such as Filmstock stock media library or iTunes or import your own audio as we said before to use it as the slideshow background music. To sync with the slideshow, you may need to trim and edit the audio accordingly. For detailed information about iMovie audio editing, you can check how to add background music to iMovie.
Filmstock Stock Media Library ](https://tools.techidaily.com/wondershare/filmora/download/ )
7. Export and Share Your Slideshow video
Play the slideshow and check the result in the preview window. If everything goes well, you can now export and share or save it. You can save the slideshow video in MP4 format, or share it to Vimeo or add the slideshow to Theater to load it on your other Apple devices so you can easily watch it on your iOS devices or Apple TV.
I hope the above tutorial about how to make a slideshow on iMovie will be helpful for your stunning slideshow creation.
If you’re running an old macOS version and having iPhoto installed on your Mac, here are the detailed steps about How to make slideshow in iMovie with iPhoto project.
Step 1. Import Photos from the iPhoto Library
iMovie works seamlessly with iPhoto. You are suggested to drag and drop photos from iPhoto to the iMovie project. If no library exists in iPhoto, create one and import photos to iPhoto first. To add videos, you could go to either “File/Import” or Event Library, and then drag and drop selected videos to the timeline.
After photos and videos are imported to the iMovie slideshow project, you can preview the raw slideshow simply by pressing Space bar on your keyboard. And then make adjustments to clips and transitions. For example, mouse over one clip or “double arrow” button and click on the settings icon, then you could access clip adjustment, video adjustment, transition adjustment, etc.

Step 2. Add Music to Your iMovie Slideshow Project
Music sets the tone of your slideshow. Adding musing to the iMovie slideshow is just as simple as adding photos and videos.
So click the audio icon in the bottom right corner, and drag and drop the desired audio file to the timeline. Multiple songs could be added to iMovie.
However, iMovie doesn’t support multiple soundtracks. If necessary, you need to combine multiple song tracks with an external audio editor before importing them to the iMovie slideshow. You can also apply audio effects and filter sound using an equalizer.

Step 3. Export Your iMovie Slideshow Video
iMovie makes sharing possibilities endless. For those who upload their videos online, iMovie allows users to directly upload to MobileMe Gallery, YouTube, Facebook, Vimeo, CNN iReport, etc.
If you select to share the iMovie slideshow using Media Browser, you will get a slideshow appeared in other Mac applications like iWeb. It’s a good idea to export the iMovie slideshow to iTunes so that you can play back slideshow quickly and easily sync with your mobile devices like iPhone, iPod, and iPad.

You may also like: How to Add Text with iMovie in Mac and iPhone >>
Recommendation: Create Slideshow on Mac with More Templates and Transitions with Filmora
If you want to make a slideshow with some templates on Mac, you can try Wondershare Filmora . Filmora can turn photos and videos into attractive slideshow videos with various inbuilt filters, transitions, elements, animations, effects, and overlays. Click the Free Download button and have a try.


Check the ultimate guide about making a slideshow with music and titles in Filmora .
If you are going to make a slideshow with music on Windows, you may need a slideshow-making tool to do it by yourself. Wondershare Filmora will also be a good choice. It helps you instantly make such an impressive slideshow from photos and videos for sharing virtually anywhere.
Shanoon Cox
Shanoon Cox is a writer and a lover of all things video.
Follow @Shanoon Cox
Shanoon Cox
Mar 27, 2024• Proven solutions
Makings a slideshow is a great way to share photos and videos with friends and families. The good news is that you can totally make a slideshow on Mac for free with iMovie. iMovie is the pre-installed program coming with every new Mac. It provides a simple yet professional way to make slideshow movies from your photos, videos, and music.
If you haven’t iMovie installed on your Mac yet, just go to iTunes and download it for free. In the following part, I’ll share with you the step-by-step tutorial on how to make a slideshow on Mac using the free video editing software iMovie.
If you are an iOS user, check our picks of best photo slideshow apps for iPhone or iPad.
Ways for iMovie Photo Slideshow with Music Making
To make a photo slideshow with music in iMovie, you can follow these steps.
1. Create a New Project
After launching iMovie, click the Project button and then click Create New. Select Movie to combine photos, videos and music to make a slideshow.
2. Import Photos, Videos, and Audio Files
Now go to the My Media tab and click the Import icon to add your photos, videos, and music to iMovie, in this way, you can import any media files from any location on your Mac. But if you have arranged all your videos, photos, and music tracks in the Photos app, you can just switch to Photos under the Libraries tab on the left to import.
3. Arrange Media in Timeline and Adjust
Now, it’s time to place all these photos and videos in the timeline in order and do some adjustments. You can use the Magic Wand tool to improve the photo quality automatically, do some color correction, or add a filter to the photo. If you preview the video clip, you will see more options that allow you to do more editing, such as changing speed.
4. Apply Transitions & Effects
Transitions and effects will help you to create a slideshow in a more professional way. Some transitions such as cross dissolve, fade and cross blur are very popular in the slideshow, but remember don’t use lots of different transitions in one slideshow since too many transitions will distract the viewer’s attention. To apply a transition in the slideshow, just drag and drop it between two photos in the timeline.
5. Add Titles and Text
Using some opener titles and credits at the beginning and ending part of your slideshow will make it cool as well. You can add some famous quotes and words to better demonstrate.
Just to the Titles tab and select one of the title templates and drop it to the timeline first and then write your own words in the preview window.
6. Add Music to Slideshow
You can download some royalty-free music and sound effects from websites such as Filmstock stock media library or iTunes or import your own audio as we said before to use it as the slideshow background music. To sync with the slideshow, you may need to trim and edit the audio accordingly. For detailed information about iMovie audio editing, you can check how to add background music to iMovie.
Filmstock Stock Media Library ](https://tools.techidaily.com/wondershare/filmora/download/ )
7. Export and Share Your Slideshow video
Play the slideshow and check the result in the preview window. If everything goes well, you can now export and share or save it. You can save the slideshow video in MP4 format, or share it to Vimeo or add the slideshow to Theater to load it on your other Apple devices so you can easily watch it on your iOS devices or Apple TV.
I hope the above tutorial about how to make a slideshow on iMovie will be helpful for your stunning slideshow creation.
If you’re running an old macOS version and having iPhoto installed on your Mac, here are the detailed steps about How to make slideshow in iMovie with iPhoto project.
Step 1. Import Photos from the iPhoto Library
iMovie works seamlessly with iPhoto. You are suggested to drag and drop photos from iPhoto to the iMovie project. If no library exists in iPhoto, create one and import photos to iPhoto first. To add videos, you could go to either “File/Import” or Event Library, and then drag and drop selected videos to the timeline.
After photos and videos are imported to the iMovie slideshow project, you can preview the raw slideshow simply by pressing Space bar on your keyboard. And then make adjustments to clips and transitions. For example, mouse over one clip or “double arrow” button and click on the settings icon, then you could access clip adjustment, video adjustment, transition adjustment, etc.
Step 2. Add Music to Your iMovie Slideshow Project
Music sets the tone of your slideshow. Adding musing to the iMovie slideshow is just as simple as adding photos and videos.
So click the audio icon in the bottom right corner, and drag and drop the desired audio file to the timeline. Multiple songs could be added to iMovie.
However, iMovie doesn’t support multiple soundtracks. If necessary, you need to combine multiple song tracks with an external audio editor before importing them to the iMovie slideshow. You can also apply audio effects and filter sound using an equalizer.
Step 3. Export Your iMovie Slideshow Video
iMovie makes sharing possibilities endless. For those who upload their videos online, iMovie allows users to directly upload to MobileMe Gallery, YouTube, Facebook, Vimeo, CNN iReport, etc.
If you select to share the iMovie slideshow using Media Browser, you will get a slideshow appeared in other Mac applications like iWeb. It’s a good idea to export the iMovie slideshow to iTunes so that you can play back slideshow quickly and easily sync with your mobile devices like iPhone, iPod, and iPad.
You may also like: How to Add Text with iMovie in Mac and iPhone >>
Recommendation: Create Slideshow on Mac with More Templates and Transitions with Filmora
If you want to make a slideshow with some templates on Mac, you can try Wondershare Filmora . Filmora can turn photos and videos into attractive slideshow videos with various inbuilt filters, transitions, elements, animations, effects, and overlays. Click the Free Download button and have a try.
Check the ultimate guide about making a slideshow with music and titles in Filmora .
If you are going to make a slideshow with music on Windows, you may need a slideshow-making tool to do it by yourself. Wondershare Filmora will also be a good choice. It helps you instantly make such an impressive slideshow from photos and videos for sharing virtually anywhere.
Shanoon Cox
Shanoon Cox is a writer and a lover of all things video.
Follow @Shanoon Cox
Making Triggered Memes with Filmora Video Editor
How to Make a Triggered Meme?

Ollie Mattison
Mar 27, 2024• Proven solutions
It is no secret that we all lose our cool from time. It’s only natural, after all, the world can be a frustrating place. We’re all enraged by different things, some of us can’t stand pineapple on pizza while others explode when being pranked. What we often don’t realize is that being triggered in front of a camera makes us perfect meme material. Even though the majority of memes are still images, some of the most memorable memes ever created were GIFs or short videos.
Making the triggered meme is easy when you know how, so in this article, we are going to show you how to make your next potentially viral meme, in just a few easy steps.
Filmora offers an easy to use video editor named Filmora Video Editor to make video and gif memes, and an online free meme maker named Filmora FREE Online Meme Maker which allows you to create images, videos and gifs memes for free. The video tutorial below will show you how to make a triggered video meme with Filmora. Download it and try it by yourself now.

The Things You Need to Make a Triggered Meme
Preparation is key to almost every important thing in life, including making a triggered meme featuring your bestie. Before you can capitalize on that amazing footage of triggered people you first have to make sure you have everything you need to generate a meme. Okay, let’s get started with the essentials to making a fun and effective meme.
1. A Triggered Template
You have virtually unlimited resources at your disposal, as this meme template can be easily found through a quick Google search. There is even an Android app called Triggered Meme Maker , that lets you do what its name suggests, make triggered memes. Making your own template in Microsoft Paint (we will show you how to make it in this article later) or any other photo editing software is also an option if you want to select the color of the background, rather than work with what you can find online.
2. A Video Editing Software
Memes are short videos that rarely last longer than 30 seconds, which is why you don’t need a powerful video editing suite like Final Cut Pro or Adobe Premiere Pro to make a good meme. A software like Wondershare Filmora that is easy to use and yet packed with cool visual effects and useful tools is a better choice if you just want to have a little fun with a video you recorded.
3. The Sound for the Triggered Meme
This ingredient of a good meme is easy to forget, but music or any other type of sound can make your meme funnier. In most cases, you’ll want to keep at least a portion of the original audio, but adding sound effects at different points of the meme can have a comical effect. The Filmora’s Music Library can serve as your endless source of royalty free music and sounds .
Making a Triggered Meme Template in Microsoft Paint
Creating a meme template is an easy task that can be handled from the Microsoft Paint in a couple of minutes. When you launch the software, click on the Fill with color icon located in the Tools section of the Paint’s ribbon. Activating this option enables you to change the color of the background with a single click. Proceed to select the color of the background from the color palette located on the far right side of the ribbon. We recommend choosing shades of green because the background is going to be used for the Chroma Key effect. You can click on the Edit Colors icon if you want to find a perfect color tone for the background. Right-click anywhere on the canvas to change its color.
Now you just need to add the text to your template. Select the Text option in the Tools menu and then proceed to select the font or the size of your text in the Font menu. Make sure that the Opaque feature is enabled in the Background menu in order to change the color of the textbox background. Adjusting the Color 1 option in the Color Menu will enable you to choose the text color, while the Color 2 option lets you pick the color of the background. Type triggered in the textbox, and center the text by clicking on the TAB button on your keyboard a few times. Now you have everything you need to start creating your own triggered meme.
How to Make a Triggered Meme?
Once you’ve successfully created a triggered template you can move on to the next step of the meme making process.
1. Adding Media to a Project
Open Filmora in the Full Feature Mode and import all the files you’re going to need during the process of making a meme. The files you import to your project will be stored in the Media Panel. Add the video to the timeline by dropping it over the video track. You can then remove the unwanted parts of the clip or add a still frame to the end of the video to prolong the triggered effect of the meme. Still frames in Filmora can be created by clicking on the Snapshot icon, that is located below the Preview Panel.
2. Using the Green Screen Effect
Place the triggered template to the Picture-in-Picture track and try to position it at the exact place in the video where the person gets triggered. Click on the Green Screen icon located in the toolbar to gain access to the PIP Edit window. The Chroma Key (Green Screen) option will be selected by default, so you just have to check the ‘Make parts of the clip transparent’ box. The green background of the template will become transparent and you’ll be able to see parts of your video, with the triggered text displayed below it.
3. Enhancing Colors and Applying Effects
In order to highlight just how much a person in the video got triggered, you can change the vibrance and saturation in a portion of a video clip by clicking on the Edit icon in the toolbar. In addition, other software’s color correction tools like brightness, tint or contrast can also be used to highlight the triggered moment.
After you adjust the color values, you can click on the Effects icon if you want to add motion blur or camera shake effects. Click on the Shake option in the Effects panel to start browsing through different effects and click on the plus icon to add the effect to the clip you selected. The Distortion category in the Effects panel features a number of blur effects you can use to make the video more entertaining. You can adjust the properties of all the effects you add to your meme and control how much of the effect is applied to the video.
4. Adding Music and Text Overlays to Your Meme
Increasing the number of visual elements in the video can help you create a funnier meme. A single word can change the meaning of a meme so if you want to add additional comment besides noting that the person got triggered you can click on the Text icon and select the text overlay you like. Click on the plus icon that is displayed over the effect to add it to a video clip. A textbox will appear over the video in the Preview window and you can drag it around the screen to reposition it or rotate it. Enable the No Animation option if you want the text to just appear and disappear from the screen.
Sounds can add to the comical effect of a meme. Carefully select what type of music or sound you want to use for a meme since it can improve the quality of your meme. Simply drag the audio file you imported into Filmora and place it on the audio track and adjust its duration to match the duration of the video. If you don’t have your own music you can try some of the tracks featured in the software’s music library.
4. Exporting the Triggered Meme from Filmora
When your meme is ready to hit the social media, you can click on the Export button. In the Export window, you can choose any of the available file formats, but the formats best suited for memes are either MP4 or GIF. Click on the Settings icon in the Output Description menu to change the frame rate, resolution or the quality of the video. Wondershare Filmora lets you export videos directly to your YouTube channel or your Facebook account, so you don’t have to waste time on posting the meme after the export process is completed.
The software also offers the option to save a meme you created to your hard drive if you don’t want to post a meme on social media right away. You just have to click on the Export button after adjusting the output settings and wait for the file to be exported.
Conclusion
The precious memories of your friends being enraged by the silliest things can be turned into hilarious memes effortlessly. A video editing software like Wondershare Filmora gives you all the tools you’ll need to quickly generate a triggered meme, so you can focus on having fun with your friends. What’s your favorite method of making memes?
Ollie Mattison
Ollie Mattison is a writer and a lover of all things video.
Follow @Ollie Mattison
Ollie Mattison
Mar 27, 2024• Proven solutions
It is no secret that we all lose our cool from time. It’s only natural, after all, the world can be a frustrating place. We’re all enraged by different things, some of us can’t stand pineapple on pizza while others explode when being pranked. What we often don’t realize is that being triggered in front of a camera makes us perfect meme material. Even though the majority of memes are still images, some of the most memorable memes ever created were GIFs or short videos.
Making the triggered meme is easy when you know how, so in this article, we are going to show you how to make your next potentially viral meme, in just a few easy steps.
Filmora offers an easy to use video editor named Filmora Video Editor to make video and gif memes, and an online free meme maker named Filmora FREE Online Meme Maker which allows you to create images, videos and gifs memes for free. The video tutorial below will show you how to make a triggered video meme with Filmora. Download it and try it by yourself now.
The Things You Need to Make a Triggered Meme
Preparation is key to almost every important thing in life, including making a triggered meme featuring your bestie. Before you can capitalize on that amazing footage of triggered people you first have to make sure you have everything you need to generate a meme. Okay, let’s get started with the essentials to making a fun and effective meme.
1. A Triggered Template
You have virtually unlimited resources at your disposal, as this meme template can be easily found through a quick Google search. There is even an Android app called Triggered Meme Maker , that lets you do what its name suggests, make triggered memes. Making your own template in Microsoft Paint (we will show you how to make it in this article later) or any other photo editing software is also an option if you want to select the color of the background, rather than work with what you can find online.
2. A Video Editing Software
Memes are short videos that rarely last longer than 30 seconds, which is why you don’t need a powerful video editing suite like Final Cut Pro or Adobe Premiere Pro to make a good meme. A software like Wondershare Filmora that is easy to use and yet packed with cool visual effects and useful tools is a better choice if you just want to have a little fun with a video you recorded.
3. The Sound for the Triggered Meme
This ingredient of a good meme is easy to forget, but music or any other type of sound can make your meme funnier. In most cases, you’ll want to keep at least a portion of the original audio, but adding sound effects at different points of the meme can have a comical effect. The Filmora’s Music Library can serve as your endless source of royalty free music and sounds .
Making a Triggered Meme Template in Microsoft Paint
Creating a meme template is an easy task that can be handled from the Microsoft Paint in a couple of minutes. When you launch the software, click on the Fill with color icon located in the Tools section of the Paint’s ribbon. Activating this option enables you to change the color of the background with a single click. Proceed to select the color of the background from the color palette located on the far right side of the ribbon. We recommend choosing shades of green because the background is going to be used for the Chroma Key effect. You can click on the Edit Colors icon if you want to find a perfect color tone for the background. Right-click anywhere on the canvas to change its color.
Now you just need to add the text to your template. Select the Text option in the Tools menu and then proceed to select the font or the size of your text in the Font menu. Make sure that the Opaque feature is enabled in the Background menu in order to change the color of the textbox background. Adjusting the Color 1 option in the Color Menu will enable you to choose the text color, while the Color 2 option lets you pick the color of the background. Type triggered in the textbox, and center the text by clicking on the TAB button on your keyboard a few times. Now you have everything you need to start creating your own triggered meme.
How to Make a Triggered Meme?
Once you’ve successfully created a triggered template you can move on to the next step of the meme making process.
1. Adding Media to a Project
Open Filmora in the Full Feature Mode and import all the files you’re going to need during the process of making a meme. The files you import to your project will be stored in the Media Panel. Add the video to the timeline by dropping it over the video track. You can then remove the unwanted parts of the clip or add a still frame to the end of the video to prolong the triggered effect of the meme. Still frames in Filmora can be created by clicking on the Snapshot icon, that is located below the Preview Panel.
2. Using the Green Screen Effect
Place the triggered template to the Picture-in-Picture track and try to position it at the exact place in the video where the person gets triggered. Click on the Green Screen icon located in the toolbar to gain access to the PIP Edit window. The Chroma Key (Green Screen) option will be selected by default, so you just have to check the ‘Make parts of the clip transparent’ box. The green background of the template will become transparent and you’ll be able to see parts of your video, with the triggered text displayed below it.
3. Enhancing Colors and Applying Effects
In order to highlight just how much a person in the video got triggered, you can change the vibrance and saturation in a portion of a video clip by clicking on the Edit icon in the toolbar. In addition, other software’s color correction tools like brightness, tint or contrast can also be used to highlight the triggered moment.
After you adjust the color values, you can click on the Effects icon if you want to add motion blur or camera shake effects. Click on the Shake option in the Effects panel to start browsing through different effects and click on the plus icon to add the effect to the clip you selected. The Distortion category in the Effects panel features a number of blur effects you can use to make the video more entertaining. You can adjust the properties of all the effects you add to your meme and control how much of the effect is applied to the video.
4. Adding Music and Text Overlays to Your Meme
Increasing the number of visual elements in the video can help you create a funnier meme. A single word can change the meaning of a meme so if you want to add additional comment besides noting that the person got triggered you can click on the Text icon and select the text overlay you like. Click on the plus icon that is displayed over the effect to add it to a video clip. A textbox will appear over the video in the Preview window and you can drag it around the screen to reposition it or rotate it. Enable the No Animation option if you want the text to just appear and disappear from the screen.
Sounds can add to the comical effect of a meme. Carefully select what type of music or sound you want to use for a meme since it can improve the quality of your meme. Simply drag the audio file you imported into Filmora and place it on the audio track and adjust its duration to match the duration of the video. If you don’t have your own music you can try some of the tracks featured in the software’s music library.
4. Exporting the Triggered Meme from Filmora
When your meme is ready to hit the social media, you can click on the Export button. In the Export window, you can choose any of the available file formats, but the formats best suited for memes are either MP4 or GIF. Click on the Settings icon in the Output Description menu to change the frame rate, resolution or the quality of the video. Wondershare Filmora lets you export videos directly to your YouTube channel or your Facebook account, so you don’t have to waste time on posting the meme after the export process is completed.
The software also offers the option to save a meme you created to your hard drive if you don’t want to post a meme on social media right away. You just have to click on the Export button after adjusting the output settings and wait for the file to be exported.
Conclusion
The precious memories of your friends being enraged by the silliest things can be turned into hilarious memes effortlessly. A video editing software like Wondershare Filmora gives you all the tools you’ll need to quickly generate a triggered meme, so you can focus on having fun with your friends. What’s your favorite method of making memes?
Ollie Mattison
Ollie Mattison is a writer and a lover of all things video.
Follow @Ollie Mattison
How to Make Memes with White Background Step by Step
How to Make Memes with White Background Step by Step
Ollie Mattison
Mar 27, 2024• Proven solutions
World seems fun and humorous, as we wake up to a variety of memes every day. Especially memes having captions are so cool and funny over the social media . A white background with your meme enhances the significance of captions over the video or image in the meme. So, if you too desire to know how to make memes with white background, you have hit the right spot.
In this article, we are going to explain you the detailed process of creating memes with white background. Stay tuned to explore!
- Part1: Create memes with white background by Filmora meme maker
- Part2: How to make memes with white background on phone
Part 1: Create memes with white background by Filmora meme maker
If you are curious enough to know how to make memes with white background online, then Filmora Meme Maker is the right choice for you. You don’t have to install or download any app or software. Just browse and edit the photo or video to create a white background meme and you are good to go. This meme maker can create photo, GIF and video memes alike for you. Moreover, you can add texts, alter fonts, font size and color as well as move the text anywhere in the meme.
This is a fast tool that runs straight on your browser and comes with a decoder and encoder. You can even directly add videos from URL by including the online link to this meme maker program. You can convert a video to a GIF meme with Filmora Meme Maker.
Here comes the detailed process for how to make memes with white background –
Step 1: First and foremost, browse for the official website of Filmora Online Meme Maker page. Drag and drop the desired image over here.

Step 2: On the meme editor page customize the background to white and then select tools from the left side panel to customize the meme further. Add texts, change color, font size and move the text around the background to position it appropriately and match your meme.

Step 3: When everything is as per your wish, click on the ‘CREATE’ button. It will ensure that the changes that you have made will be saved properly. If you are satisfied with the changes and want to go ahead with it, hit the ‘DOWNLOAD’ button.
Step 4: When the ‘DOWNLOAD’ button is pressed, the meme with black and white background is saved on your computer. You can now share it on Reddit, Instagram, Facebook, Twitter or any other social media platform of your choice.

Part 2: How to make memes with white background on phone
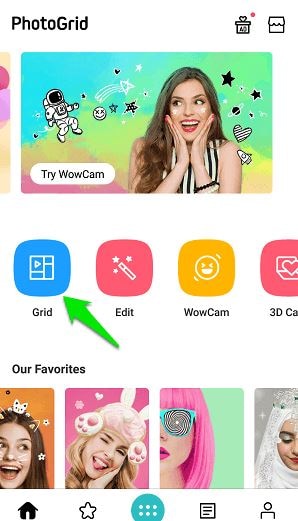
Among the various apps available in the market, we have considered PhotoGrid to make memes with white background. Both Play Store and iTunes can offer a good number of these apps to create memes having white background. Here, we are considering an Android phone for that matter.
Step by step guide for creating memes with white background –
Step 1: From the Play Store, download the app on your Android phone. Run the app on your mobile device and click on the ‘Grid’ for selecting the image that you wish to add to your meme.
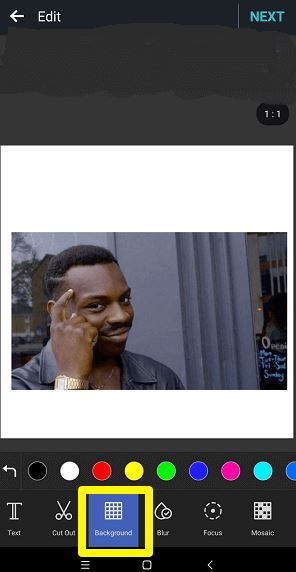
Step 2: When the picture is loaded on Photo Grid, you need to click on the ‘Background’ tab from the menu at the bottom. Pick white color from the menu over here, though usually it is selected by default.
Step 3: Adjust the position and size of the image as you desire by pinching and zooming with your fingers. Once the position and dimensions are fixed as per your requirements, hit the ‘Text’ option. Enter the text you want to include in the meme and then click the ‘tick’ box.
Step 4: Your text is movable across the image area and is resizable as well using your fingers. You can alter the alignment, font, border, color etc. for every text you enter here.
Step 5: When everything else is sorted, press the ‘NEXT’ button on the top corner and hit ‘Save’. This is how to make memes with white background.
Using Photo Grid, you can also create video memes following the same guide as that of the photo memes. As everything is created in a square size, you can seamlessly use it on any social media platform including Reddit, Instagram, etc.
Conclusion
From this article, Filmora Meme Maker is one of the top meme makers in the market. Not only picture or GIF but video memes can also be done using this tool. As there is no need of downloading the software on your system or mobile, you save lot of time and space on your hard drive. We are hopeful that you are comfortable with how to make memes with white background using Filmora Meme Maker online.
Ollie Mattison
Ollie Mattison is a writer and a lover of all things video.
Follow @Ollie Mattison
Ollie Mattison
Mar 27, 2024• Proven solutions
World seems fun and humorous, as we wake up to a variety of memes every day. Especially memes having captions are so cool and funny over the social media . A white background with your meme enhances the significance of captions over the video or image in the meme. So, if you too desire to know how to make memes with white background, you have hit the right spot.
In this article, we are going to explain you the detailed process of creating memes with white background. Stay tuned to explore!
- Part1: Create memes with white background by Filmora meme maker
- Part2: How to make memes with white background on phone
Part 1: Create memes with white background by Filmora meme maker
If you are curious enough to know how to make memes with white background online, then Filmora Meme Maker is the right choice for you. You don’t have to install or download any app or software. Just browse and edit the photo or video to create a white background meme and you are good to go. This meme maker can create photo, GIF and video memes alike for you. Moreover, you can add texts, alter fonts, font size and color as well as move the text anywhere in the meme.
This is a fast tool that runs straight on your browser and comes with a decoder and encoder. You can even directly add videos from URL by including the online link to this meme maker program. You can convert a video to a GIF meme with Filmora Meme Maker.
Here comes the detailed process for how to make memes with white background –
Step 1: First and foremost, browse for the official website of Filmora Online Meme Maker page. Drag and drop the desired image over here.
Step 2: On the meme editor page customize the background to white and then select tools from the left side panel to customize the meme further. Add texts, change color, font size and move the text around the background to position it appropriately and match your meme.
Step 3: When everything is as per your wish, click on the ‘CREATE’ button. It will ensure that the changes that you have made will be saved properly. If you are satisfied with the changes and want to go ahead with it, hit the ‘DOWNLOAD’ button.
Step 4: When the ‘DOWNLOAD’ button is pressed, the meme with black and white background is saved on your computer. You can now share it on Reddit, Instagram, Facebook, Twitter or any other social media platform of your choice.
Part 2: How to make memes with white background on phone
Among the various apps available in the market, we have considered PhotoGrid to make memes with white background. Both Play Store and iTunes can offer a good number of these apps to create memes having white background. Here, we are considering an Android phone for that matter.
Step by step guide for creating memes with white background –
Step 1: From the Play Store, download the app on your Android phone. Run the app on your mobile device and click on the ‘Grid’ for selecting the image that you wish to add to your meme.
Step 2: When the picture is loaded on Photo Grid, you need to click on the ‘Background’ tab from the menu at the bottom. Pick white color from the menu over here, though usually it is selected by default.
Step 3: Adjust the position and size of the image as you desire by pinching and zooming with your fingers. Once the position and dimensions are fixed as per your requirements, hit the ‘Text’ option. Enter the text you want to include in the meme and then click the ‘tick’ box.
Step 4: Your text is movable across the image area and is resizable as well using your fingers. You can alter the alignment, font, border, color etc. for every text you enter here.
Step 5: When everything else is sorted, press the ‘NEXT’ button on the top corner and hit ‘Save’. This is how to make memes with white background.
Using Photo Grid, you can also create video memes following the same guide as that of the photo memes. As everything is created in a square size, you can seamlessly use it on any social media platform including Reddit, Instagram, etc.
Conclusion
From this article, Filmora Meme Maker is one of the top meme makers in the market. Not only picture or GIF but video memes can also be done using this tool. As there is no need of downloading the software on your system or mobile, you save lot of time and space on your hard drive. We are hopeful that you are comfortable with how to make memes with white background using Filmora Meme Maker online.
Ollie Mattison
Ollie Mattison is a writer and a lover of all things video.
Follow @Ollie Mattison
How to Make a Memorable Honeymoon Video
How to Make a Memorable Honeymoon Video
Ollie Mattison
Mar 27, 2024• Proven solutions
The honeymoon is maybe one of the most important times in our life. It’s unique, refined and filled with emotion which is why you should always try to consider exploring all the opportunities that this has to offer. But if you go on a honeymoon, you do want to have a video that you can cherish forever, don’t you? If you do, here are example of fancy honey moon video and some of the best ideas that you can use to create the best, most immersive and memorable honeymoon video.
Tips on creating a memorable honeymoon video
Choosing the right camera
There are many affordable 1080p or 4k cameras that you can use and all of them come with various features and prices. Obviously, you should try and focus on finding the right one that suits your needs. Take your time and study the prices and features then select the one you want based on your budget and expertise.
Get lots of photos
Another great tip is that you need to get as many photos as you can. No matter where you choose to go, there are tons of scenes, people, monuments and landmarks that you can choose to photograph. Take your time and try to capture as many of them as you possibly can. Granted, it will take a little bit of time but it will offer you the insight and fun you need in order to have a great slideshow in the end.
Organize a story from your photos
Once you have the photos, you should try to organize a story from the images. The best honeymoon movies are the ones that include a story so think about that and you will have quite a bit of fun as you immerse yourself into this experience, that’s for sure.
Add songs and overlays
You should try and consider adding songs and overlays because this will make the movie more fun and immersive. Once you complete it, you will need to share it with friends and family!
Edit your honeymoon video with Wondershare Filmora
Why choose Wondershare Filmora
If you are not good at video editing, or if you are a beginner and bothered by the complex steps of some professional video editor, Wondershare Filmora is here to save you. This is the best movie creation tool that helps you create you honeymoon movies from images all while delivering the entire set of tools you need to get a one of a kind and fun experience. If you always wanted an incredible and unique, refined movie creation experience then this is the app to use.
=“” style=”width: 100%; height: 278.438px;”;
Download Mac Version ](https://tools.techidaily.com/wondershare/filmora/download/ )
Wondershare Filmora is very easy to use but it also manages to offer a lot of power. This is great for people that want to access basic editing features such as splitting, reverse, rotate and crop but which might also want some advanced features as well. You are bound to enjoy the entire experience for sure and the outcome will be very well worth it.
Aside from that, Wondershare Filmora also allows you to access a fresh interface that makes editing such a video a breeze. You can even add a variety of overlays and filters which do add up to offer you a very refined, exciting and refreshing experience at all times. It’s all about having the right focus and attention to detail but rest assured that the outcome will be well worth it. Once you have the movie, you can share it on Vimeo, YouTube and Facebook with a single click. The app also allows you to burn it to DVD if you so desire.
How to edit the honeymoon video with Wondershare Filmora
All you have to do is to go through the next steps:
Step 1: Import your honeymoon photos and videos
Gather all the videos and images that you have from your honeymoon then paste them inside the app.

Step 2: Tone your videos with editing tools
Add in video tones with features like reverse, trim, rotate, overlays, transitions, text and so on. This will help you refine the movie and offer it the unique experience you always wanted.
Step 3: Add music from Filmora library
Once you have that, add the music from the integrated royalty free library to ignite your love story.
Step 4: Save and share you video

Complete the video by saving it and then you can feel free to share it with friends.
Wondershare Filmora is the best solution for those that want a refined and fun honeymoon video. All you have to do is to try it out and rest assured that you are bound to love the results!
Download Mac Version ](https://tools.techidaily.com/wondershare/filmora/download/ )
Ollie Mattison
Ollie Mattison is a writer and a lover of all things video.
Follow @Ollie Mattison
Ollie Mattison
Mar 27, 2024• Proven solutions
The honeymoon is maybe one of the most important times in our life. It’s unique, refined and filled with emotion which is why you should always try to consider exploring all the opportunities that this has to offer. But if you go on a honeymoon, you do want to have a video that you can cherish forever, don’t you? If you do, here are example of fancy honey moon video and some of the best ideas that you can use to create the best, most immersive and memorable honeymoon video.
Tips on creating a memorable honeymoon video
Choosing the right camera
There are many affordable 1080p or 4k cameras that you can use and all of them come with various features and prices. Obviously, you should try and focus on finding the right one that suits your needs. Take your time and study the prices and features then select the one you want based on your budget and expertise.
Get lots of photos
Another great tip is that you need to get as many photos as you can. No matter where you choose to go, there are tons of scenes, people, monuments and landmarks that you can choose to photograph. Take your time and try to capture as many of them as you possibly can. Granted, it will take a little bit of time but it will offer you the insight and fun you need in order to have a great slideshow in the end.
Organize a story from your photos
Once you have the photos, you should try to organize a story from the images. The best honeymoon movies are the ones that include a story so think about that and you will have quite a bit of fun as you immerse yourself into this experience, that’s for sure.
Add songs and overlays
You should try and consider adding songs and overlays because this will make the movie more fun and immersive. Once you complete it, you will need to share it with friends and family!
Edit your honeymoon video with Wondershare Filmora
Why choose Wondershare Filmora
If you are not good at video editing, or if you are a beginner and bothered by the complex steps of some professional video editor, Wondershare Filmora is here to save you. This is the best movie creation tool that helps you create you honeymoon movies from images all while delivering the entire set of tools you need to get a one of a kind and fun experience. If you always wanted an incredible and unique, refined movie creation experience then this is the app to use.
=“” style=”width: 100%; height: 278.438px;”;
Download Mac Version ](https://tools.techidaily.com/wondershare/filmora/download/ )
Wondershare Filmora is very easy to use but it also manages to offer a lot of power. This is great for people that want to access basic editing features such as splitting, reverse, rotate and crop but which might also want some advanced features as well. You are bound to enjoy the entire experience for sure and the outcome will be very well worth it.
Aside from that, Wondershare Filmora also allows you to access a fresh interface that makes editing such a video a breeze. You can even add a variety of overlays and filters which do add up to offer you a very refined, exciting and refreshing experience at all times. It’s all about having the right focus and attention to detail but rest assured that the outcome will be well worth it. Once you have the movie, you can share it on Vimeo, YouTube and Facebook with a single click. The app also allows you to burn it to DVD if you so desire.
How to edit the honeymoon video with Wondershare Filmora
All you have to do is to go through the next steps:
Step 1: Import your honeymoon photos and videos
Gather all the videos and images that you have from your honeymoon then paste them inside the app.
Step 2: Tone your videos with editing tools
Add in video tones with features like reverse, trim, rotate, overlays, transitions, text and so on. This will help you refine the movie and offer it the unique experience you always wanted.
Step 3: Add music from Filmora library
Once you have that, add the music from the integrated royalty free library to ignite your love story.
Step 4: Save and share you video
Complete the video by saving it and then you can feel free to share it with friends.
Wondershare Filmora is the best solution for those that want a refined and fun honeymoon video. All you have to do is to try it out and rest assured that you are bound to love the results!
Download Mac Version ](https://tools.techidaily.com/wondershare/filmora/download/ )
Ollie Mattison
Ollie Mattison is a writer and a lover of all things video.
Follow @Ollie Mattison
Mocking Sponge Bob Meme Generator
Mocking Sponge Bob Meme Generator
Ollie Mattison
Mar 27, 2024• Proven solutions
The still frame taken from the episode titled ‘Little Yellow Book’ of the animated series SpongeBob SquarePants has gone viral a few years ago, and since then it has become one of the funniest memes used to mock all sorts of private and public issues. If you’d like to learn how to make the Mocking SpongeBob meme, you’ve come to the right place, because in this article we’re going to show you how you can accomplish this using Filmora Online Meme Maker .
Making The Mocking SpongeBob Meme
Attention: This post only provides the solutions to make memes for personal and non-commercial purpose. Since any redistribution without the approval of the copyright owners may violate the copyright laws, you’d better refer to the copyright laws in your country before doing so.
There are hundreds of online meme generators you can use to quickly make a great joke or depict a situation you frequently find yourself in, but a large portion of these platforms watermark your memes, which can be frustrating at times. That’s why we recommend using Filmora Online Meme Maker that lets you generate the mocking SpongeBob meme and all other types of memes for free. Here’s how to make a mocking SpongeBob meme is just a few simple steps without having to register or create an account.
Step 1 – Uploading the SpongeBob Meme Template
Filmora Meme Maker offers you 2 ways to upload images, videos, and gifs.
- Drop a file or click the + icon to upload your upload
- Enter the URL of your media file to upload
You can find the sponge bobbmeme templates on a number of platforms, such as Imgur and Know Your Meme . Or you can click the “Copy the image” link below and the image link will be copied automatically.
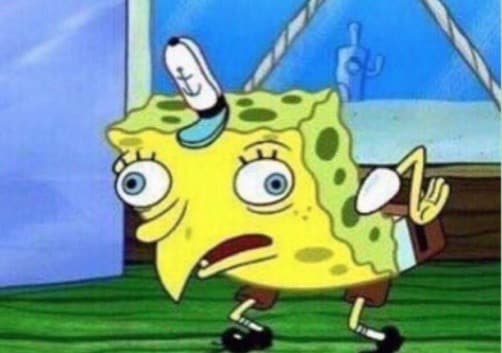
Copy the image
Then, go to https://filmora.wondershare.com/meme-maker/ insert the image link you just copied by press Ctrl+V, click on the Upload button to start the upload process and wait until the template is uploaded.

The Edit Your Image window will pop up on the screen if you decide to upload the template from a compute, so you can just drag one of the handles to crop it. If you want, you can rotate or flip the picture, before you hit the OK button.
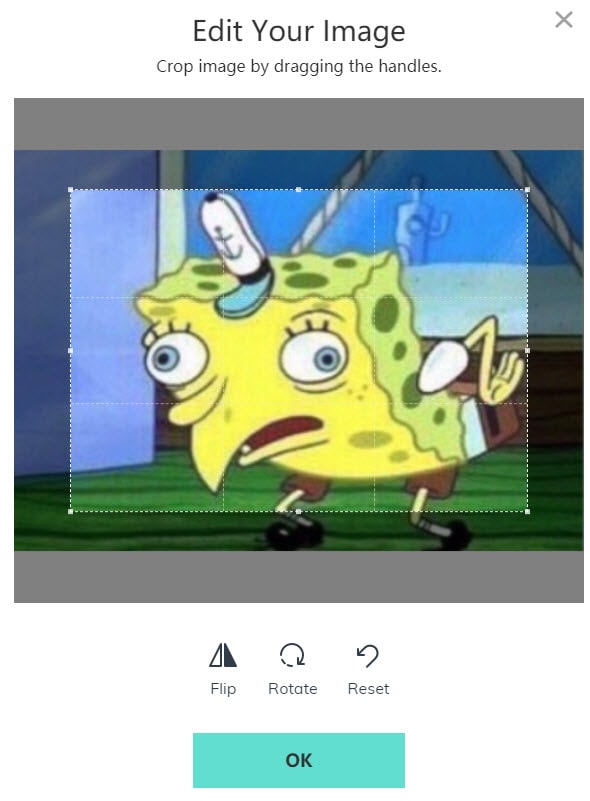
Step 2 – Adding Text to the Meme
The Editing panel will appear on the screen, with the SpongeBob picture displayed in the middle of the screen. On the left side of the webpage, you’ll be able to see the Text Inside and Text Outside tools that let you choose the position of the text in the picture. Select the Outside Text option because a great majority of Mocking SpongeBob memes doesn’t feature text within the image. Below these tools you can find Top and Bottom text boxes, so you can just choose the position of the text and then insert it into appropriate boxes.
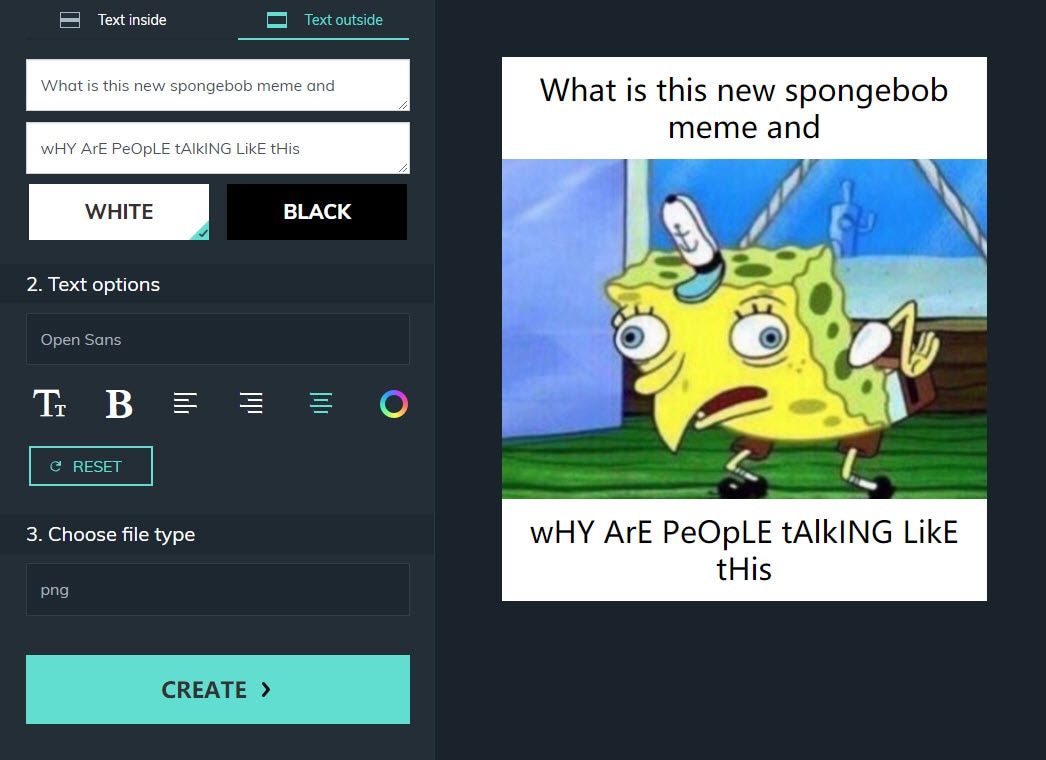
There is a lot of fonts to choose from, and you can easily select the text size, change the color of the text or align the text. After customizing the texts you can choose the file type since the Filmora Online Meme Maker lets you generate GIFs, videos and images.
Step 3 – Export and Download the Mocking SpongeBob Meme
Click on the Create button once you’re happy with the results, then click on the Download button to save it to your computer and upload it to your social media account. If you’re using a Smartphone you can tap on the Share button and select a social media platform on which you want to post your mocking SpongeBob meme.

Conclusion
Combining text and images is easy with the Filmora Online Maker since you just have to choose the position and the style of the text and download the meme. However, coming up with great jokes that will make the meme viral is up to you. What is your favorite mocking SpongeBob meme? Leave a comment below and let us know.
Ollie Mattison
Ollie Mattison is a writer and a lover of all things video.
Follow @Ollie Mattison
Ollie Mattison
Mar 27, 2024• Proven solutions
The still frame taken from the episode titled ‘Little Yellow Book’ of the animated series SpongeBob SquarePants has gone viral a few years ago, and since then it has become one of the funniest memes used to mock all sorts of private and public issues. If you’d like to learn how to make the Mocking SpongeBob meme, you’ve come to the right place, because in this article we’re going to show you how you can accomplish this using Filmora Online Meme Maker .
Making The Mocking SpongeBob Meme
Attention: This post only provides the solutions to make memes for personal and non-commercial purpose. Since any redistribution without the approval of the copyright owners may violate the copyright laws, you’d better refer to the copyright laws in your country before doing so.
There are hundreds of online meme generators you can use to quickly make a great joke or depict a situation you frequently find yourself in, but a large portion of these platforms watermark your memes, which can be frustrating at times. That’s why we recommend using Filmora Online Meme Maker that lets you generate the mocking SpongeBob meme and all other types of memes for free. Here’s how to make a mocking SpongeBob meme is just a few simple steps without having to register or create an account.
Step 1 – Uploading the SpongeBob Meme Template
Filmora Meme Maker offers you 2 ways to upload images, videos, and gifs.
- Drop a file or click the + icon to upload your upload
- Enter the URL of your media file to upload
You can find the sponge bobbmeme templates on a number of platforms, such as Imgur and Know Your Meme . Or you can click the “Copy the image” link below and the image link will be copied automatically.
Copy the image
Then, go to https://filmora.wondershare.com/meme-maker/ insert the image link you just copied by press Ctrl+V, click on the Upload button to start the upload process and wait until the template is uploaded.
The Edit Your Image window will pop up on the screen if you decide to upload the template from a compute, so you can just drag one of the handles to crop it. If you want, you can rotate or flip the picture, before you hit the OK button.
Step 2 – Adding Text to the Meme
The Editing panel will appear on the screen, with the SpongeBob picture displayed in the middle of the screen. On the left side of the webpage, you’ll be able to see the Text Inside and Text Outside tools that let you choose the position of the text in the picture. Select the Outside Text option because a great majority of Mocking SpongeBob memes doesn’t feature text within the image. Below these tools you can find Top and Bottom text boxes, so you can just choose the position of the text and then insert it into appropriate boxes.
There is a lot of fonts to choose from, and you can easily select the text size, change the color of the text or align the text. After customizing the texts you can choose the file type since the Filmora Online Meme Maker lets you generate GIFs, videos and images.
Step 3 – Export and Download the Mocking SpongeBob Meme
Click on the Create button once you’re happy with the results, then click on the Download button to save it to your computer and upload it to your social media account. If you’re using a Smartphone you can tap on the Share button and select a social media platform on which you want to post your mocking SpongeBob meme.
Conclusion
Combining text and images is easy with the Filmora Online Maker since you just have to choose the position and the style of the text and download the meme. However, coming up with great jokes that will make the meme viral is up to you. What is your favorite mocking SpongeBob meme? Leave a comment below and let us know.
Ollie Mattison
Ollie Mattison is a writer and a lover of all things video.
Follow @Ollie Mattison
The Essential Guide to Emoji, Memoji, Animoji, and Bitmoji
The Essential Guide to Emoji, Memoji, Animoji, and Bitmoji
Shanoon Cox
Mar 27, 2024• Proven solutions
Did you know there are 3,304 emojis as of now? Why do we even need emojis? Well, Emojis and emoticons have a long history within digital communication, internet culture, and digital content. Nowadays, emoticons have evolved into different animated versions like emoji, Bitmoji, Animoji, and Memoji. All these types of emoticons have become an important communication tool in the contemporary online world – especially on social media apps like Facebook, Instagram, and Snapchat. If you are confused between emojis, Bitmojis, Animoji, and Memoji, read this guide to understand better!
Here is an introduction to emoji, bitmoji, Animoji, and memoji.
1.What Is Emoji?
Anybody with a smartphone should know what an emoji is. Open up your keypad, and the ideograms and smileys present there are called emojis.
We can say that emojis are an advanced form of emoticons, but instead of typographic expressions, they are in the form of pictures. In simple words, an emoji is a small digital icon or image that expresses your emotions or ideas.
Emojis are widely used in our day-to-day communications through electronic messages and web pages. The emojis on our mobile phones exist in various genres, including facial expressions, places, food items, types of weather, animals, and other everyday objects.
Over the years, the emoji lexicon has constantly evolved to become all-inclusive as emojis are for everyone. Nowadays, emojis can be used across cultures, across screens, and across time. Whether you are white or black, Muslim or Christian, or gay or transgender, there is an emoji representing you and your culture!
2.What is Animoji?
Animojis are popular on iOS devices. Apple devices include an animated emoji feature that is called Animoji. Animoji is a 3D animated emoji that responds to your facial expressions. You can create and emojis on your phone using the front camera face ID system.

Animoji is created with the facial ID software allowing the screen to record and register your facial expressions and movements. The animojis recognize and copy your facial movements like pouting, lowering eyebrow, or rolling the eyeball.
Thus, Animoji is a customized or personalized animated emoji. Animojis have a range of expressions, and they also mimic to match the audio. The current full set of Animoji includes alien, bore, bear, cat, cow, dog, chicken, fox, dragon, rabbit, and many more!
Furthermore, Animojis can be shared as a video (with sound) via different messaging apps like WhatsApp and Facebook Messenger.
3.What is Memoji?
Animojis evolve into Memojis. In simple words, Memojis are personalized Animojis. Such Animojis are 3D animated emojis that look exactly like you or an animated version of you.

Memoji was first introduced by Apple, where the iPhone face ID camera system creates your avatar copying your facial expressions in real-time recording. Some high-end Android devices have also introduced the Memoji feature like the Samsung AR emoji.
The best thing about memojis is that you can completely customize them to suit you. From changing the shape of the head to brows, and hair color to eye color, you can make your Memoji look like you as much as possible.
Like other emojis, Memojis can also be shared on different popular messaging apps like WhatsApp, Facebook, and Instagram.
4.What is Bitmoji?
If you are an avid Snapchat user, then you must know what a Bitmoji is. Bitmojis are like Memojis, but they belong to the Bitmoji app owned by Bitstrips.
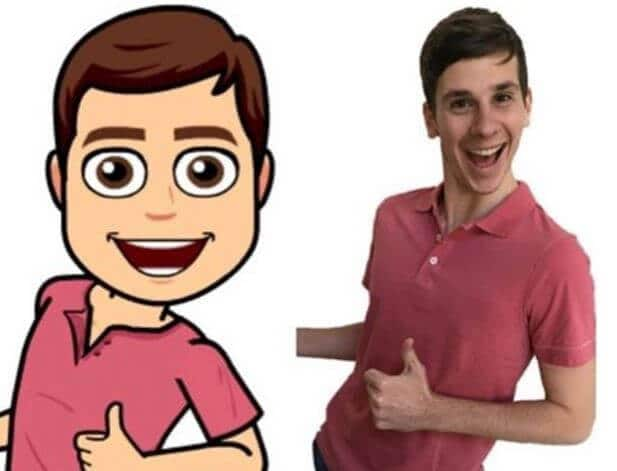
Bitstrips is a company that makes personalized emojis and cartoon avatars. Snapchat acquired Bitstrips in 2007 and later on introduced it as a feature in the Snapchat app. Over the years, Snapchat released new versions, and now it supports Bitmojis. Thus, all Snapchat users can create their own personal emojis using the Bitmoji app.
Bitmojis are customizable to a great extent allowing you to create your own cartoon version. You can also choose from a massive library of different moods and expressions, featuring your avatar.
You can also share your little cartoon versions of Bitmojis on different social media accounts. Moreover, you can put them into any chat message or even status update!
Conclusion
If it weren’t for emojis, the online messaging world would be so boring! Emojis add a touch of fun and emotion to everything. Therefore, the majority of us today use emojis to express our emotions through digital communication.
Thus, emojis have become the language of the digital era and social media apps. So, whether you use Emojis, Animojis, Memojis, or Bitmojis, they will lighten the mood and make any conversation fun!
Shanoon Cox
Shanoon Cox is a writer and a lover of all things video.
Follow @Shanoon Cox
Shanoon Cox
Mar 27, 2024• Proven solutions
Did you know there are 3,304 emojis as of now? Why do we even need emojis? Well, Emojis and emoticons have a long history within digital communication, internet culture, and digital content. Nowadays, emoticons have evolved into different animated versions like emoji, Bitmoji, Animoji, and Memoji. All these types of emoticons have become an important communication tool in the contemporary online world – especially on social media apps like Facebook, Instagram, and Snapchat. If you are confused between emojis, Bitmojis, Animoji, and Memoji, read this guide to understand better!
Here is an introduction to emoji, bitmoji, Animoji, and memoji.
1.What Is Emoji?
Anybody with a smartphone should know what an emoji is. Open up your keypad, and the ideograms and smileys present there are called emojis.
We can say that emojis are an advanced form of emoticons, but instead of typographic expressions, they are in the form of pictures. In simple words, an emoji is a small digital icon or image that expresses your emotions or ideas.
Emojis are widely used in our day-to-day communications through electronic messages and web pages. The emojis on our mobile phones exist in various genres, including facial expressions, places, food items, types of weather, animals, and other everyday objects.
Over the years, the emoji lexicon has constantly evolved to become all-inclusive as emojis are for everyone. Nowadays, emojis can be used across cultures, across screens, and across time. Whether you are white or black, Muslim or Christian, or gay or transgender, there is an emoji representing you and your culture!
2.What is Animoji?
Animojis are popular on iOS devices. Apple devices include an animated emoji feature that is called Animoji. Animoji is a 3D animated emoji that responds to your facial expressions. You can create and emojis on your phone using the front camera face ID system.
Animoji is created with the facial ID software allowing the screen to record and register your facial expressions and movements. The animojis recognize and copy your facial movements like pouting, lowering eyebrow, or rolling the eyeball.
Thus, Animoji is a customized or personalized animated emoji. Animojis have a range of expressions, and they also mimic to match the audio. The current full set of Animoji includes alien, bore, bear, cat, cow, dog, chicken, fox, dragon, rabbit, and many more!
Furthermore, Animojis can be shared as a video (with sound) via different messaging apps like WhatsApp and Facebook Messenger.
3.What is Memoji?
Animojis evolve into Memojis. In simple words, Memojis are personalized Animojis. Such Animojis are 3D animated emojis that look exactly like you or an animated version of you.
Memoji was first introduced by Apple, where the iPhone face ID camera system creates your avatar copying your facial expressions in real-time recording. Some high-end Android devices have also introduced the Memoji feature like the Samsung AR emoji.
The best thing about memojis is that you can completely customize them to suit you. From changing the shape of the head to brows, and hair color to eye color, you can make your Memoji look like you as much as possible.
Like other emojis, Memojis can also be shared on different popular messaging apps like WhatsApp, Facebook, and Instagram.
4.What is Bitmoji?
If you are an avid Snapchat user, then you must know what a Bitmoji is. Bitmojis are like Memojis, but they belong to the Bitmoji app owned by Bitstrips.
Bitstrips is a company that makes personalized emojis and cartoon avatars. Snapchat acquired Bitstrips in 2007 and later on introduced it as a feature in the Snapchat app. Over the years, Snapchat released new versions, and now it supports Bitmojis. Thus, all Snapchat users can create their own personal emojis using the Bitmoji app.
Bitmojis are customizable to a great extent allowing you to create your own cartoon version. You can also choose from a massive library of different moods and expressions, featuring your avatar.
You can also share your little cartoon versions of Bitmojis on different social media accounts. Moreover, you can put them into any chat message or even status update!
Conclusion
If it weren’t for emojis, the online messaging world would be so boring! Emojis add a touch of fun and emotion to everything. Therefore, the majority of us today use emojis to express our emotions through digital communication.
Thus, emojis have become the language of the digital era and social media apps. So, whether you use Emojis, Animojis, Memojis, or Bitmojis, they will lighten the mood and make any conversation fun!
Shanoon Cox
Shanoon Cox is a writer and a lover of all things video.
Follow @Shanoon Cox
Top 12 Best Meme Makers Online for FREE
Top 12 Best Meme Makers Online for FREE
Ollie Mattison
Mar 27, 2024• Proven solutions
Memes have become a central part of many online conversations. They pop up a lot on social media, especially platforms such as Twitter, Tumblr and Facebook . People even converse with each other using meme keyboards.
With memes taking over popular culture, you may want to make a meme for yourself. By using a meme maker, you can do just that! Here is a look at the top 10+ best meme maker online options that you can use for free.
10+ Best Meme Makers Online
1. Filmora Free Meme Generator
Filmora meme maker is a totally free meme generator without a watermark. Also, you don’t need to sign up or log in first to use it. It supports importing images, GIFs, and videos in one place. Just drag and drop to import, so easy to use. More importantly, if you want to select a white or black background to input the caption, Filmora meme maker can help you quickly. Changing text size, color and position is also available. After editing is done, just one click to export your work within a few seconds. You can also freely upload to social media platforms, like FB and IG.
- Place text anywhere (inside and outside of image)
- Support exporting to popular image and video formats, including jpg, png, gif, mp4
- It is totally free to use, no subscription or cost
[
3. Wondershare PixStudio
Wondershare PixStudio owns massive templates that can help you create your memes easily. You can feel free to upload your image and start to design it with text, colors and filters to the images.
Features:
- Free and easy to use.
- Ability to create memes with your images.
- Option to add filters to images for your memes.
- Option to change font and text color.
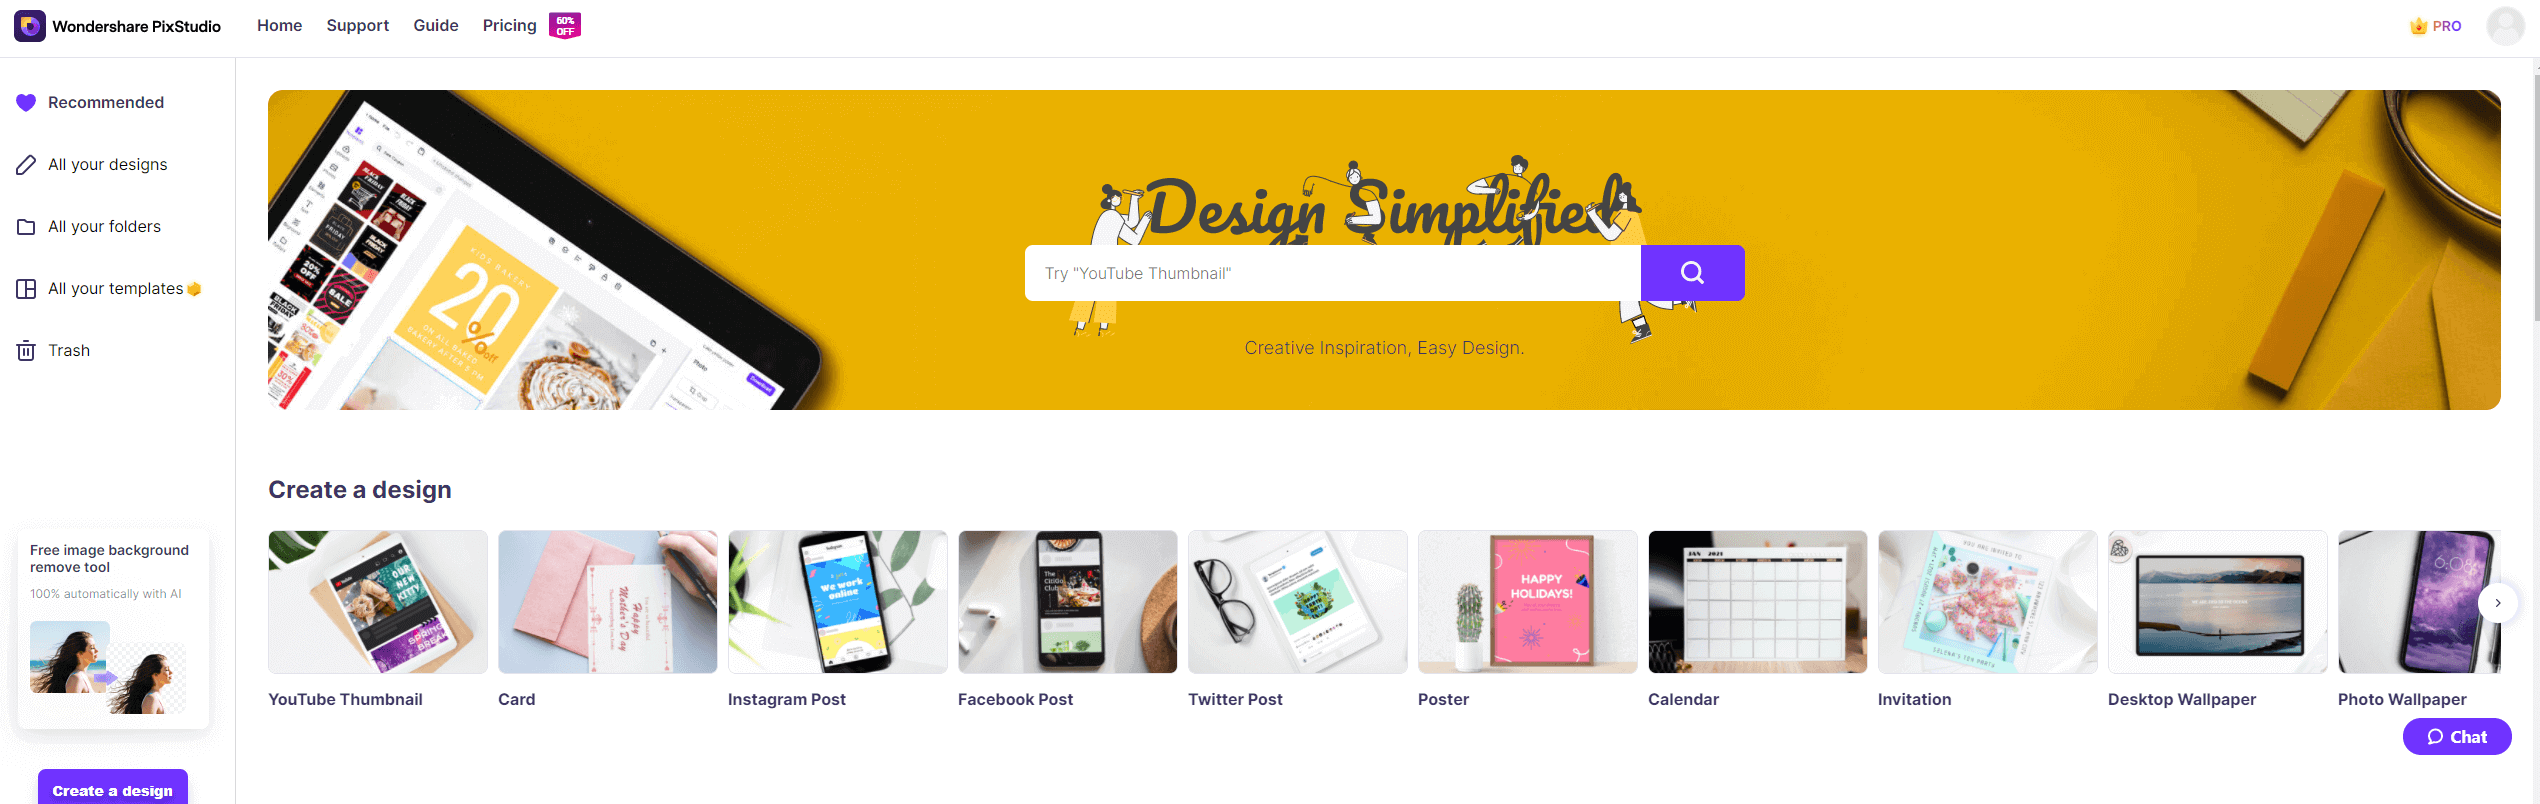
4. Quickmeme
Quickmeme is the best meme maker option for anyone who wants a simple experience, without too many frills. You can check out featured memes, which show you the most popular ones right now.
All you need to do to create a meme is go on “upload a funny” to start from scratch. If you want to select a famous picture and add your own text, you can do so using the “caption a meme” option.
Features:
- Create a meme with your own images or famous images.
- Login with Facebook to set up your account and save the memes you create.
5. MemeGenerator
One of the most popular tools for creating memes, MemeGenerator is the meme maker online that you can use when you want to add some funny captions to images. You can check out all the popular images that are being used to create memes by other people.
If you want to create a meme with one of those images, simply click on them or you can choose “create” to start making a meme with your own image or character.
Features:
- Create memes with custom images or characters.
- Add your own text to famous meme images.
- Send and share memes through the site.

6. Imgur
Imgur is mostly known as an image hosting platform. People will host images on Imgur so they can share them with friends or on social media. But there is also a meme creation tool that you can use on the site.
All you need to do is select one of the default images on the site, or use your own, and you can add the text that you want. Selecting the text to put at the top and bottom of the image is very easy with Imgur.
Features:
- Takes under a minute to create a meme with your own image or pre-selected ones.
- Imgur also offers an image hosting service.
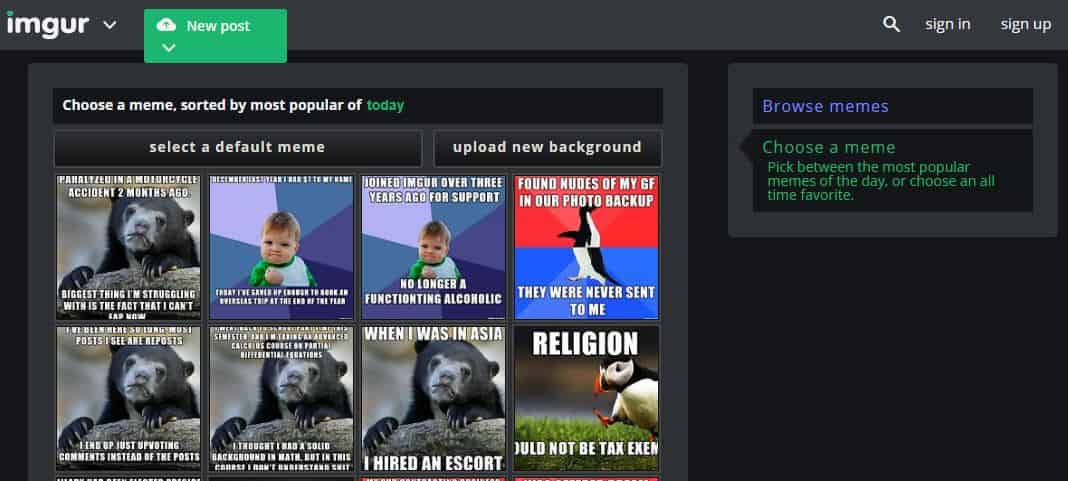
7. Make a Meme
When you go on Make a Meme, you will immediately see images of all the most famous memes from around the world. You can click on those images, where you get an interface asking for the top text, bottom text, and your custom title. Then you click on “make a meme” and your image is ready.
You can even upload your own image and then add text to it in a similar way. You have the option to preview your memes before you create them as well.
Features:
- Create memes from custom images or popular ones.
- Add top and bottom text easily.
- Create custom meme titles.
- Preview memes before making them.
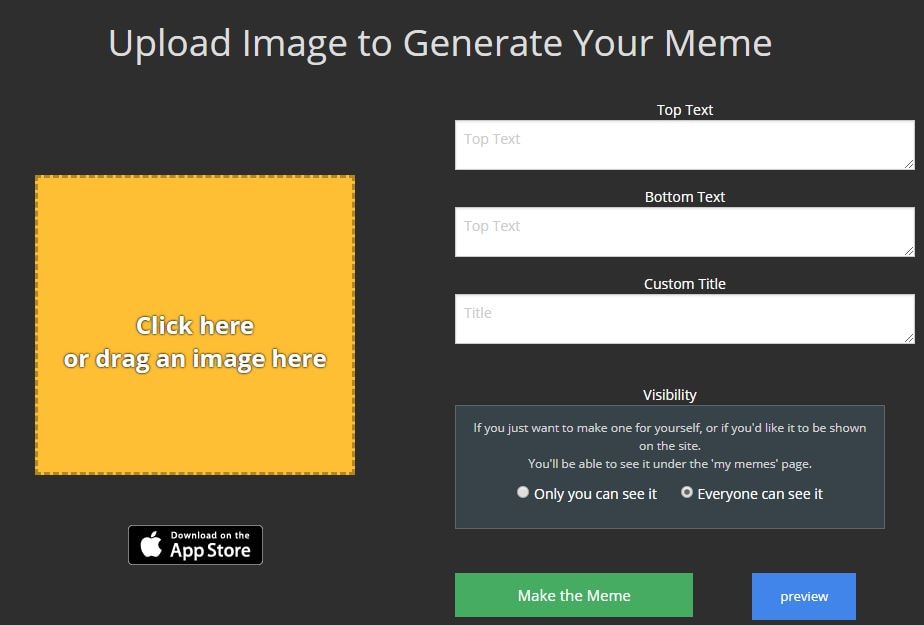
8. Livememe
Livememe is a meme generator that is very straightforward to use. When you visit the homepage, you will see a few selected images that are very popular. Click on the “create a meme” button and you will get a drop down menu that is thumbnails of all the popular memes.
You may select any of those images to create your own meme, or upload your own image and add the relevant text. You can save the image on your computer and even share it through the site.
Features:
- Includes nearly every popular meme as preselected images.
- Ability to create custom image memes.
- Easily share created memes.
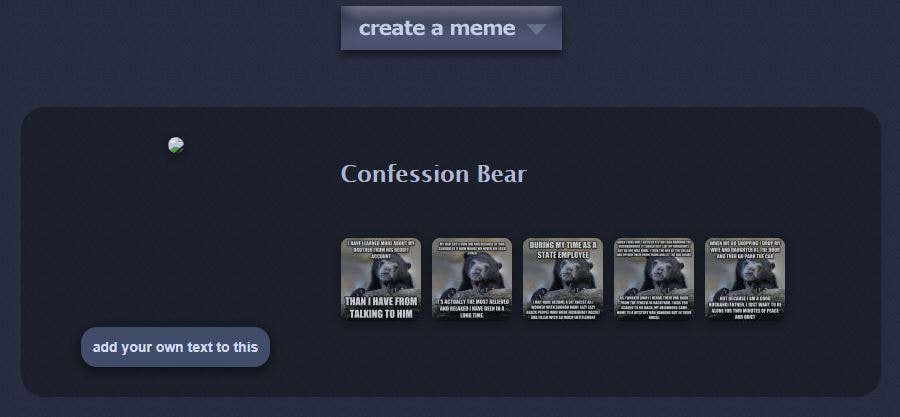
9. Canva
Unlike other sites, Canva goes a step further and gives you professionally created templates that you can use for your memes. There are over a million stock photos available to you. It is a much larger selection than other sites.
But you can also upload your own image, add relevant text and then create the meme.
Features:
- Large collection of stock images.
- Ability to create memes with your own images.
- Option to add filters to images for your memes.
- Option to change font and text color.
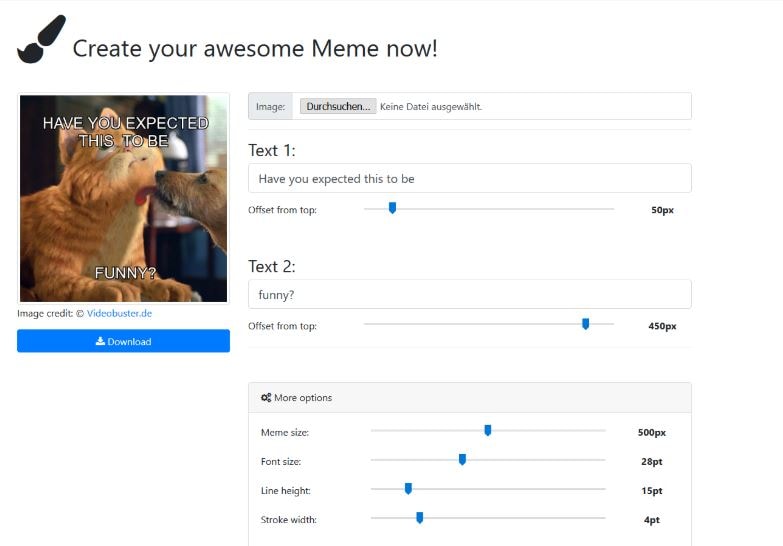
10. iLoveIMG
iLoveIMG is one of the easiest sites to use if you want to create a meme. The homepage will let you upload an image or select a meme template to get started.
Text boxes are already present, but you can edit them with your own text and see exactly how they would look. If you want to add more lines of text, you can do that as well.
It is even possible to add an image on top of one image to take your meme game to a whole new level!
Features:
- Easy meme creation with uploaded or custom images.
- Ability to add more than two lines of text.
- Option to add an image on top of the existing image.
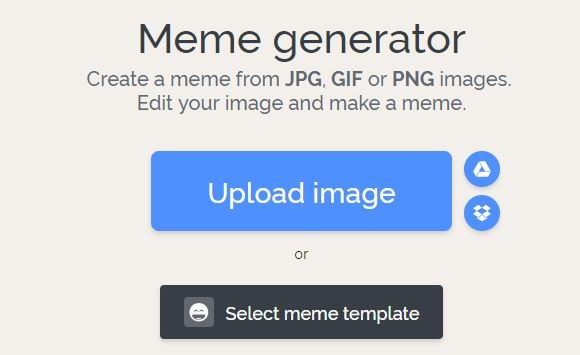
11. Meme Creator
With Meme Creator, you can recreate existing memes with the text of your choice, or upload images to make custom memes.
The site is very easy to use, which does not require you to create an account, and is completely free. It is possible to adjust the text size and color when you are using this meme generator, which is not always an option on these free tools.
Within a minute, you will have the custom meme that you can share with friends!
Features:
- Use preexisting and custom images for memes.
- Adjust the color and font size of both top and bottom text.
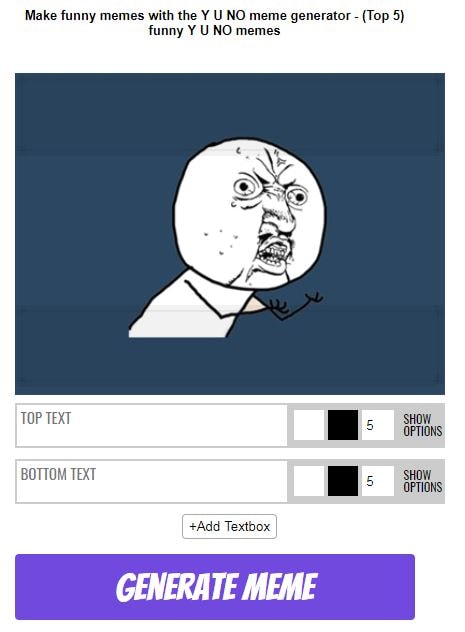
12. DIYLOL
Want to create a meme from images that already have become popular memes? Now you can do so with DIYLOL. All you need to do is pick the preexisting image that you like best, add your top and bottom text, and you are ready to go.
You can even adjust the font color and size for the top and bottom text. Then you can download the image to share with friends and family.
Features:
- Easy tool to create memes from preexisting images.
- Ability to adjust font size and color.
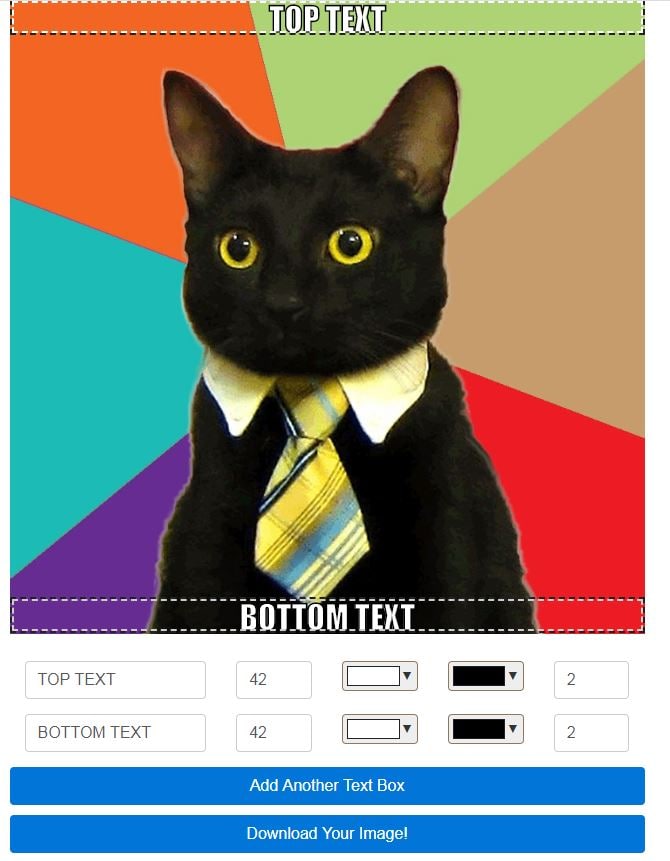
Conclusion
By using an online meme maker, you have the ability to create your own memes whenever you want. All you need is a source image and your idea for the text. Within minutes, the meme generator you are using will have your meme ready to download. Then you can share it with friends and save it on all your devices. And the best part is that you can do all of this with a meme maker online that is completely free!
[
Ollie Mattison
Ollie Mattison is a writer and a lover of all things video.
Follow @Ollie Mattison
Ollie Mattison
Mar 27, 2024• Proven solutions
Memes have become a central part of many online conversations. They pop up a lot on social media, especially platforms such as Twitter, Tumblr and Facebook . People even converse with each other using meme keyboards.
With memes taking over popular culture, you may want to make a meme for yourself. By using a meme maker, you can do just that! Here is a look at the top 10+ best meme maker online options that you can use for free.
10+ Best Meme Makers Online
1. Filmora Free Meme Generator
Filmora meme maker is a totally free meme generator without a watermark. Also, you don’t need to sign up or log in first to use it. It supports importing images, GIFs, and videos in one place. Just drag and drop to import, so easy to use. More importantly, if you want to select a white or black background to input the caption, Filmora meme maker can help you quickly. Changing text size, color and position is also available. After editing is done, just one click to export your work within a few seconds. You can also freely upload to social media platforms, like FB and IG.
- Place text anywhere (inside and outside of image)
- Support exporting to popular image and video formats, including jpg, png, gif, mp4
- It is totally free to use, no subscription or cost
[
3. Wondershare PixStudio
Wondershare PixStudio owns massive templates that can help you create your memes easily. You can feel free to upload your image and start to design it with text, colors and filters to the images.
Features:
- Free and easy to use.
- Ability to create memes with your images.
- Option to add filters to images for your memes.
- Option to change font and text color.
4. Quickmeme
Quickmeme is the best meme maker option for anyone who wants a simple experience, without too many frills. You can check out featured memes, which show you the most popular ones right now.
All you need to do to create a meme is go on “upload a funny” to start from scratch. If you want to select a famous picture and add your own text, you can do so using the “caption a meme” option.
Features:
- Create a meme with your own images or famous images.
- Login with Facebook to set up your account and save the memes you create.
5. MemeGenerator
One of the most popular tools for creating memes, MemeGenerator is the meme maker online that you can use when you want to add some funny captions to images. You can check out all the popular images that are being used to create memes by other people.
If you want to create a meme with one of those images, simply click on them or you can choose “create” to start making a meme with your own image or character.
Features:
- Create memes with custom images or characters.
- Add your own text to famous meme images.
- Send and share memes through the site.
6. Imgur
Imgur is mostly known as an image hosting platform. People will host images on Imgur so they can share them with friends or on social media. But there is also a meme creation tool that you can use on the site.
All you need to do is select one of the default images on the site, or use your own, and you can add the text that you want. Selecting the text to put at the top and bottom of the image is very easy with Imgur.
Features:
- Takes under a minute to create a meme with your own image or pre-selected ones.
- Imgur also offers an image hosting service.
7. Make a Meme
When you go on Make a Meme, you will immediately see images of all the most famous memes from around the world. You can click on those images, where you get an interface asking for the top text, bottom text, and your custom title. Then you click on “make a meme” and your image is ready.
You can even upload your own image and then add text to it in a similar way. You have the option to preview your memes before you create them as well.
Features:
- Create memes from custom images or popular ones.
- Add top and bottom text easily.
- Create custom meme titles.
- Preview memes before making them.
8. Livememe
Livememe is a meme generator that is very straightforward to use. When you visit the homepage, you will see a few selected images that are very popular. Click on the “create a meme” button and you will get a drop down menu that is thumbnails of all the popular memes.
You may select any of those images to create your own meme, or upload your own image and add the relevant text. You can save the image on your computer and even share it through the site.
Features:
- Includes nearly every popular meme as preselected images.
- Ability to create custom image memes.
- Easily share created memes.
9. Canva
Unlike other sites, Canva goes a step further and gives you professionally created templates that you can use for your memes. There are over a million stock photos available to you. It is a much larger selection than other sites.
But you can also upload your own image, add relevant text and then create the meme.
Features:
- Large collection of stock images.
- Ability to create memes with your own images.
- Option to add filters to images for your memes.
- Option to change font and text color.
10. iLoveIMG
iLoveIMG is one of the easiest sites to use if you want to create a meme. The homepage will let you upload an image or select a meme template to get started.
Text boxes are already present, but you can edit them with your own text and see exactly how they would look. If you want to add more lines of text, you can do that as well.
It is even possible to add an image on top of one image to take your meme game to a whole new level!
Features:
- Easy meme creation with uploaded or custom images.
- Ability to add more than two lines of text.
- Option to add an image on top of the existing image.
11. Meme Creator
With Meme Creator, you can recreate existing memes with the text of your choice, or upload images to make custom memes.
The site is very easy to use, which does not require you to create an account, and is completely free. It is possible to adjust the text size and color when you are using this meme generator, which is not always an option on these free tools.
Within a minute, you will have the custom meme that you can share with friends!
Features:
- Use preexisting and custom images for memes.
- Adjust the color and font size of both top and bottom text.
12. DIYLOL
Want to create a meme from images that already have become popular memes? Now you can do so with DIYLOL. All you need to do is pick the preexisting image that you like best, add your top and bottom text, and you are ready to go.
You can even adjust the font color and size for the top and bottom text. Then you can download the image to share with friends and family.
Features:
- Easy tool to create memes from preexisting images.
- Ability to adjust font size and color.
Conclusion
By using an online meme maker, you have the ability to create your own memes whenever you want. All you need is a source image and your idea for the text. Within minutes, the meme generator you are using will have your meme ready to download. Then you can share it with friends and save it on all your devices. And the best part is that you can do all of this with a meme maker online that is completely free!
[
Ollie Mattison
Ollie Mattison is a writer and a lover of all things video.
Follow @Ollie Mattison
Also read:
- [New] Essential List 8 Leading Tools for Video Translation Mastery
- [Updated] Maximizing Your TikTok Intro A Mac Guide
- 2024 Approved Add Emojis to Videos on YouTube/Facebook/Snapchat 2023 Guide
- Account Takeovers: Regularity and Trends
- Best Photo Slideshow Maker How to Make a Photo Slideshow
- Fixing the Problem: Steps When Your Humankind Application Refuses to Open
- How to Reset Realme Note 50 Without the Home Button | Dr.fone
- In 2024, Wondering the Best Alternative to Hola On Honor 100 Pro? Here Is the Answer | Dr.fone
- Learn Korean Fast: Master Hangul in No Time
- New In 2024, How to Make a iMovie Photo Slideshow with Music? IMovie Tutorial
- Troubleshooting Blackout in Win11 Upgrade
- Updated Top 12 Best Meme Makers Online for FREE for 2024
- Vocal Victory: Demystifying Difficult Phonetics and Lexicon
- Title: How to Make a iMovie Photo Slideshow with Music? IMovie Tutorial
- Author: Jan
- Created at : 2024-10-04 20:19:14
- Updated at : 2024-10-06 02:18:47
- Link: https://meme-emoji.techidaily.com/how-to-make-a-imovie-photo-slideshow-with-music-imovie-tutorial/
- License: This work is licensed under CC BY-NC-SA 4.0.