
Add Emojis to Videos on YouTube/Facebook/Snapchat 2023 Guide for 2024
Add Emojis to Videos on YouTube/Facebook/Snapchat [2023 Guide]
Add Emojis to Videos on YouTube/Facebook/Snapchat [Step by Step Guide]

Liza Brown
Mar 27, 2024• Proven solutions
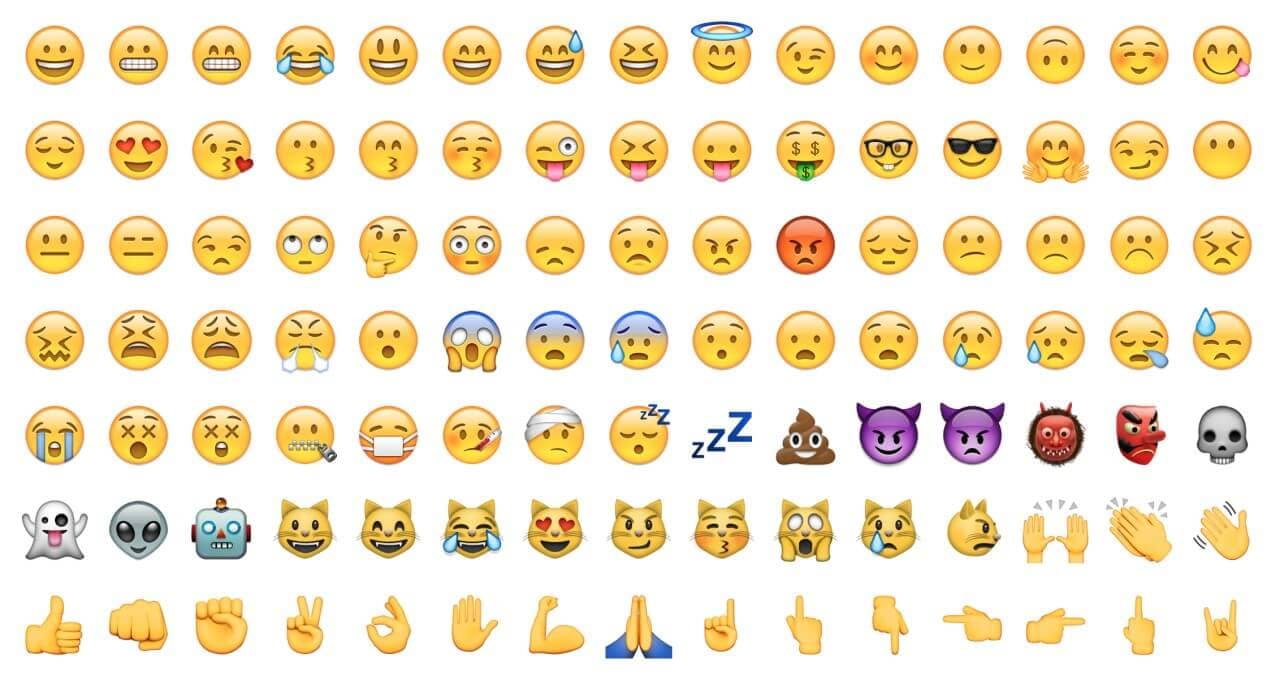
Emojis are a great way to express one’s emotion more vividly through a depiction rather than a plain conventional text. By the passage of time, the trend of using emoji on social media domain has drastically increased around the world. Since emoji are ubiquitous and its influence on culture is increasingly huge, using emoji has now become a trend.
A plain conventional text or video may not emphasize the meaning behind the phrase, but adding emoji to it is like adding a soul to the intentions behind the message. It helps outshine the theme and make a video more appealing at the same time.
So, with all this being known, let’s take a tour to a complete guide to how to accessorize a video on multiple social media domains and make it far more attractive and meaningful.
Best Tool to Help You Add Emojis to Videos in Few Clicks
Gamers, YouTubers and all other Mac and PC users who’d like to add a smiley or any other emoji to a video should try processing their footage with the Filmora video editor.
Performing basic video editing tasks like cutting or trimming the footage, choosing a soundtrack for a video or adding an emoji to a single shot or an entire sequence can all be completed in just a couple of clicks.
Filmora is free to download. Import your videos after you launch the software, you then can add any animated emojis into wherever you want. Have a try now! Emojis inside are so Cute

How to Add Emojis to YouTube Videos?
You can now add emojis to any of the YouTube videos using an online free tool called Kapwing.
Below are the basic steps about how to add emojis to YouTube videos anywhere using Kapwing.
Step 1: Open free tool Meme Maker and tap on “get started”.
Step 2: Copy the link of the targeted YouTube video and paste the URL of your YouTube video.
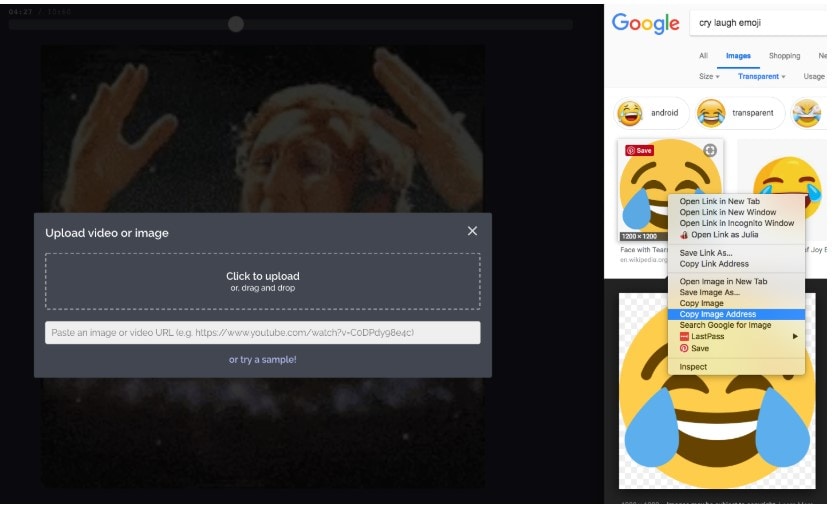
Step 3: One of the ways to insert emoji using Kapwing is to directly upload an emoji having a transparent background. In the toolbar, click on “upload” and paste its URL there. The image will be placed onto the targeted video as an overlay by importing it. Another way to add emoji is to click “add text” where you will have options to insert emojis.
Step 4: You can now play around with editing options in Kapwing to adjust accordingly.
How to Use Emojis on YouTube?
YouTube provides you an option to insert emoji on your YouTube account description, tag and titles with great ease with the use of YouTube certified plugin, Tube Buddy.
Step 1: Install this plugin on chrome browser.
Step 2: Open “info and settings” option in your YouTube targeted video.
Step 3: Tap on description box, tags or title where an emoji icon will be shown. Tap on the emoji icon to display a list of emojis. You can also search for an emoji in the search bar.
How to Add Emojis in Snapchat Videos?
Step 1: Install Snapchat if you don’t already have it. Then run Snapchat.
Step 2: Record a video by keeping your fingers on the record button.
Step 3: Choose and tap an emoji of your choice to add in your video. Hold your fingers on emoji to place to the desired frame/clip of your recorded video.
Step 4: The emoji can be resized by dragging or pinching it in. You can add more than one emoji.
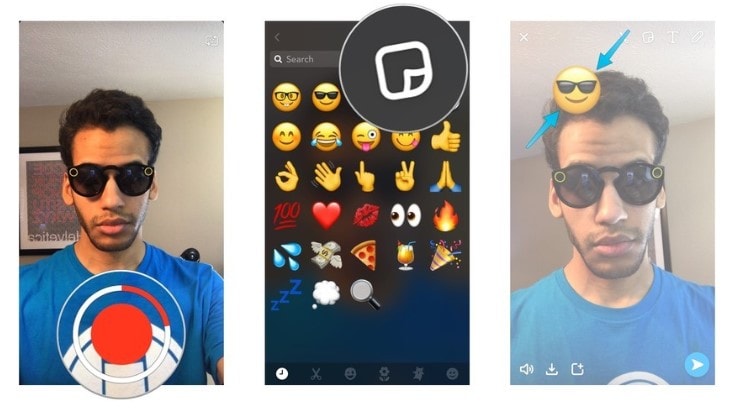
Image from iMore
How to Add Emojis to Facebook?
If you are wondering about how to add emojis to Facebook videos then, unfortunately, Facebook only offers “go live” option on Facebook where an emoji cannot be inserted. But you can insert emoji to Facebook status, comment or in your messenger conversation easily by following the step below for status:
Step 1: Click “what’s on your mind” to add new status on Facebook.
Step 2: At the bottom right side of the status box is an emoji icon. Click on it. This will open a list of emojis that you can choose as many as you want
Step 3: Click on the emoji icon back again to close the list when you are done. Click on post to share the post on your wall.
How to Add Emojis to Videos on iMovie?
Step 1: Search for the desired emoji on the internet with transparent background. Go to iMovie and select a clip of your video where you want to insert an emoji.
Step 2: Go to the “Import” option into the toolbar above, select your desired emoji from the list. This emoji will be added to the iMovie library.
Step 3: Click on that emoji. This overlays that emoji onto that video clip. You can scale the emoji up and down and drag it anywhere on the video.
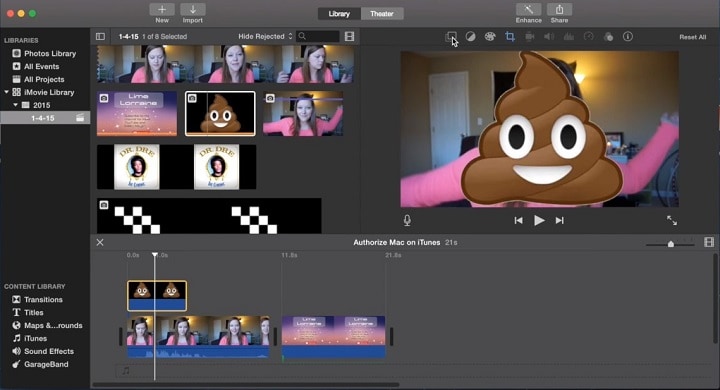
Image from YouSubtitles
How to Add Emojis to Videos Online?
Blurbiz, is an online application for editing YouTube, Instagram, Facebook and Snapchat videos. Just follow the steps below, then you can add emojis you want.
Step 1: Create and name the project in Blurbiz.
Step 2: Upload either your video, sticker or gif whichever you want an emoji to be placed in.
Step 3: Hover over the video and click on the “edit” button.
Step 4: Tap on “upload” at the top left side of the pane. Upload emoji with .png extension from your desktop.
Step 5: Drag and drop to overlay the emoji onto your video. Resize and position an emoji accordingly.
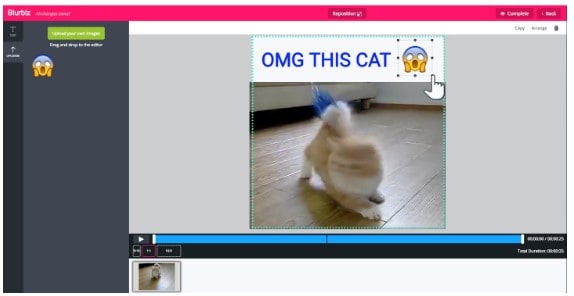
Step 6: Tap on “complete” at the top right corner when you are done. You can download an mp4 format video.
How to Add Emojis to Videos Android?
WeVideo , is an app to create and edit videos to the next level and provide one with ample special effects to add on to your videos.
Alongside using basic editing features like cutting, trimming or arranging video clips, you can amplify your editing game by adding emoji to your videos. Moreover, you can export your projects in high quality and share them on either Vimeo, YouTube or Dropbox.

Conclusion
Be it any video on any social media platform or your local device, with this thorough guide, you must be able to accessorize your video and take it to another level of emotional expression and message details in your video by using fun emojis.

Liza Brown
Liza Brown is a writer and a lover of all things video.
Follow @Liza Brown
Liza Brown
Mar 27, 2024• Proven solutions
Emojis are a great way to express one’s emotion more vividly through a depiction rather than a plain conventional text. By the passage of time, the trend of using emoji on social media domain has drastically increased around the world. Since emoji are ubiquitous and its influence on culture is increasingly huge, using emoji has now become a trend.
A plain conventional text or video may not emphasize the meaning behind the phrase, but adding emoji to it is like adding a soul to the intentions behind the message. It helps outshine the theme and make a video more appealing at the same time.
So, with all this being known, let’s take a tour to a complete guide to how to accessorize a video on multiple social media domains and make it far more attractive and meaningful.
Best Tool to Help You Add Emojis to Videos in Few Clicks
Gamers, YouTubers and all other Mac and PC users who’d like to add a smiley or any other emoji to a video should try processing their footage with the Filmora video editor.
Performing basic video editing tasks like cutting or trimming the footage, choosing a soundtrack for a video or adding an emoji to a single shot or an entire sequence can all be completed in just a couple of clicks.
Filmora is free to download. Import your videos after you launch the software, you then can add any animated emojis into wherever you want. Have a try now! Emojis inside are so Cute
How to Add Emojis to YouTube Videos?
You can now add emojis to any of the YouTube videos using an online free tool called Kapwing.
Below are the basic steps about how to add emojis to YouTube videos anywhere using Kapwing.
Step 1: Open free tool Meme Maker and tap on “get started”.
Step 2: Copy the link of the targeted YouTube video and paste the URL of your YouTube video.
Step 3: One of the ways to insert emoji using Kapwing is to directly upload an emoji having a transparent background. In the toolbar, click on “upload” and paste its URL there. The image will be placed onto the targeted video as an overlay by importing it. Another way to add emoji is to click “add text” where you will have options to insert emojis.
Step 4: You can now play around with editing options in Kapwing to adjust accordingly.
How to Use Emojis on YouTube?
YouTube provides you an option to insert emoji on your YouTube account description, tag and titles with great ease with the use of YouTube certified plugin, Tube Buddy.
Step 1: Install this plugin on chrome browser.
Step 2: Open “info and settings” option in your YouTube targeted video.
Step 3: Tap on description box, tags or title where an emoji icon will be shown. Tap on the emoji icon to display a list of emojis. You can also search for an emoji in the search bar.
How to Add Emojis in Snapchat Videos?
Step 1: Install Snapchat if you don’t already have it. Then run Snapchat.
Step 2: Record a video by keeping your fingers on the record button.
Step 3: Choose and tap an emoji of your choice to add in your video. Hold your fingers on emoji to place to the desired frame/clip of your recorded video.
Step 4: The emoji can be resized by dragging or pinching it in. You can add more than one emoji.
Image from iMore
How to Add Emojis to Facebook?
If you are wondering about how to add emojis to Facebook videos then, unfortunately, Facebook only offers “go live” option on Facebook where an emoji cannot be inserted. But you can insert emoji to Facebook status, comment or in your messenger conversation easily by following the step below for status:
Step 1: Click “what’s on your mind” to add new status on Facebook.
Step 2: At the bottom right side of the status box is an emoji icon. Click on it. This will open a list of emojis that you can choose as many as you want
Step 3: Click on the emoji icon back again to close the list when you are done. Click on post to share the post on your wall.
How to Add Emojis to Videos on iMovie?
Step 1: Search for the desired emoji on the internet with transparent background. Go to iMovie and select a clip of your video where you want to insert an emoji.
Step 2: Go to the “Import” option into the toolbar above, select your desired emoji from the list. This emoji will be added to the iMovie library.
Step 3: Click on that emoji. This overlays that emoji onto that video clip. You can scale the emoji up and down and drag it anywhere on the video.
Image from YouSubtitles
How to Add Emojis to Videos Online?
Blurbiz, is an online application for editing YouTube, Instagram, Facebook and Snapchat videos. Just follow the steps below, then you can add emojis you want.
Step 1: Create and name the project in Blurbiz.
Step 2: Upload either your video, sticker or gif whichever you want an emoji to be placed in.
Step 3: Hover over the video and click on the “edit” button.
Step 4: Tap on “upload” at the top left side of the pane. Upload emoji with .png extension from your desktop.
Step 5: Drag and drop to overlay the emoji onto your video. Resize and position an emoji accordingly.
Step 6: Tap on “complete” at the top right corner when you are done. You can download an mp4 format video.
How to Add Emojis to Videos Android?
WeVideo , is an app to create and edit videos to the next level and provide one with ample special effects to add on to your videos.
Alongside using basic editing features like cutting, trimming or arranging video clips, you can amplify your editing game by adding emoji to your videos. Moreover, you can export your projects in high quality and share them on either Vimeo, YouTube or Dropbox.
Conclusion
Be it any video on any social media platform or your local device, with this thorough guide, you must be able to accessorize your video and take it to another level of emotional expression and message details in your video by using fun emojis.
Liza Brown
Liza Brown is a writer and a lover of all things video.
Follow @Liza Brown
Liza Brown
Mar 27, 2024• Proven solutions
Emojis are a great way to express one’s emotion more vividly through a depiction rather than a plain conventional text. By the passage of time, the trend of using emoji on social media domain has drastically increased around the world. Since emoji are ubiquitous and its influence on culture is increasingly huge, using emoji has now become a trend.
A plain conventional text or video may not emphasize the meaning behind the phrase, but adding emoji to it is like adding a soul to the intentions behind the message. It helps outshine the theme and make a video more appealing at the same time.
So, with all this being known, let’s take a tour to a complete guide to how to accessorize a video on multiple social media domains and make it far more attractive and meaningful.
Best Tool to Help You Add Emojis to Videos in Few Clicks
Gamers, YouTubers and all other Mac and PC users who’d like to add a smiley or any other emoji to a video should try processing their footage with the Filmora video editor.
Performing basic video editing tasks like cutting or trimming the footage, choosing a soundtrack for a video or adding an emoji to a single shot or an entire sequence can all be completed in just a couple of clicks.
Filmora is free to download. Import your videos after you launch the software, you then can add any animated emojis into wherever you want. Have a try now! Emojis inside are so Cute
How to Add Emojis to YouTube Videos?
You can now add emojis to any of the YouTube videos using an online free tool called Kapwing.
Below are the basic steps about how to add emojis to YouTube videos anywhere using Kapwing.
Step 1: Open free tool Meme Maker and tap on “get started”.
Step 2: Copy the link of the targeted YouTube video and paste the URL of your YouTube video.
Step 3: One of the ways to insert emoji using Kapwing is to directly upload an emoji having a transparent background. In the toolbar, click on “upload” and paste its URL there. The image will be placed onto the targeted video as an overlay by importing it. Another way to add emoji is to click “add text” where you will have options to insert emojis.
Step 4: You can now play around with editing options in Kapwing to adjust accordingly.
How to Use Emojis on YouTube?
YouTube provides you an option to insert emoji on your YouTube account description, tag and titles with great ease with the use of YouTube certified plugin, Tube Buddy.
Step 1: Install this plugin on chrome browser.
Step 2: Open “info and settings” option in your YouTube targeted video.
Step 3: Tap on description box, tags or title where an emoji icon will be shown. Tap on the emoji icon to display a list of emojis. You can also search for an emoji in the search bar.
How to Add Emojis in Snapchat Videos?
Step 1: Install Snapchat if you don’t already have it. Then run Snapchat.
Step 2: Record a video by keeping your fingers on the record button.
Step 3: Choose and tap an emoji of your choice to add in your video. Hold your fingers on emoji to place to the desired frame/clip of your recorded video.
Step 4: The emoji can be resized by dragging or pinching it in. You can add more than one emoji.
Image from iMore
How to Add Emojis to Facebook?
If you are wondering about how to add emojis to Facebook videos then, unfortunately, Facebook only offers “go live” option on Facebook where an emoji cannot be inserted. But you can insert emoji to Facebook status, comment or in your messenger conversation easily by following the step below for status:
Step 1: Click “what’s on your mind” to add new status on Facebook.
Step 2: At the bottom right side of the status box is an emoji icon. Click on it. This will open a list of emojis that you can choose as many as you want
Step 3: Click on the emoji icon back again to close the list when you are done. Click on post to share the post on your wall.
How to Add Emojis to Videos on iMovie?
Step 1: Search for the desired emoji on the internet with transparent background. Go to iMovie and select a clip of your video where you want to insert an emoji.
Step 2: Go to the “Import” option into the toolbar above, select your desired emoji from the list. This emoji will be added to the iMovie library.
Step 3: Click on that emoji. This overlays that emoji onto that video clip. You can scale the emoji up and down and drag it anywhere on the video.
Image from YouSubtitles
How to Add Emojis to Videos Online?
Blurbiz, is an online application for editing YouTube, Instagram, Facebook and Snapchat videos. Just follow the steps below, then you can add emojis you want.
Step 1: Create and name the project in Blurbiz.
Step 2: Upload either your video, sticker or gif whichever you want an emoji to be placed in.
Step 3: Hover over the video and click on the “edit” button.
Step 4: Tap on “upload” at the top left side of the pane. Upload emoji with .png extension from your desktop.
Step 5: Drag and drop to overlay the emoji onto your video. Resize and position an emoji accordingly.
Step 6: Tap on “complete” at the top right corner when you are done. You can download an mp4 format video.
How to Add Emojis to Videos Android?
WeVideo , is an app to create and edit videos to the next level and provide one with ample special effects to add on to your videos.
Alongside using basic editing features like cutting, trimming or arranging video clips, you can amplify your editing game by adding emoji to your videos. Moreover, you can export your projects in high quality and share them on either Vimeo, YouTube or Dropbox.

Conclusion
Be it any video on any social media platform or your local device, with this thorough guide, you must be able to accessorize your video and take it to another level of emotional expression and message details in your video by using fun emojis.
Liza Brown
Liza Brown is a writer and a lover of all things video.
Follow @Liza Brown
[IOS&Android]Best Apps to Create Animoji and Memoji Videos
Best iOS and Android Apps You Can Use to Create Animoji and Memoji Videos

Ollie Mattison
Mar 27, 2024• Proven solutions
All recent versions of iPhones and iPads released since 2017 are equipped with a powerful face recognition technology called Face ID, that among numerous other things powers memojis and animojis. Even though these 3D emojis that track and imitate your facial expressions and movements are only accessible from the iMessages app, you can still use them to create funny videos that are going to make your friends on social media smile. On the other hand, the owners of most Android-based devices still have to use third-party apps if they want to make animoji and memoji videos. Read on if you would like to discover the best apps on the market that let you create animoji and memoji videos with ease.
You may also like: How to Record and Edit an Animoji or Memoji Karaoke Music Video >>
Best Apps You Can Use to Create Animoji or Memoji Videos
Even though recording thirty-second animoji and memoji videos with iPhone X, iPhone XS or iPad Pro is a quick and simple process, the time limit is still a huge obstacle to social media content creators who want to create animoji and memoji videos that surpass that limit. Let’s take a look at some of the best apps you can use to create memoji or animoji videos without any restrictions.
1. Emoji Me Animated Faces
Price: Free, but offers in-app purchases
Compatibility: iOS
The rich selection of animated emojis this app offers is perfectly suited for iPhone users who are looking to expand their collection of animojis. However, the Emoji Me app doesn’t offer customization features, which means that you are not going to be able to create memojis that look like you if you decide to install it on your device. Keep in mind that you are going to need iOS 10 or later in order to use this app on your iPhone, iPad or iPod touch. Emoji Me is a perfect choice if you want to send animojis to your friends via iMessages, Instagram, Facebook, and numerous other social media or messaging apps.
2. EMOJI Face Recorder
Price: Free, but offers in-app purchases
Compatibility: iOS , Android
You don’t need the latest iPhone or iPad model to record funny animoji videos, because you can download the EMOJI Face Recorder and create this type of video on a broad range of devices that support either the iOS or the Android operating system. You can become a panda, an owl or a shark in just a few taps, but some of the animated characters this app offers are only available if you make an in-app purchase. In addition, you can record your own voice while capturing the facial expressions and movements and create incredible karaoke music videos. Even though the app’s sharing capabilities are far from impressive you can still post all your videos to most popular social media networks.
3. Facemoji 3D Face Emoji Avatar
Price: Free
Compatibility: iOS
Did you ever wonder how would you look like if you were a cartoon character? Well, with Facemoji 3D Face Emoji Avatar app you can find out in a matter of minutes. The app lets you customize all of your facial features, and pick the shape of your nose, the color of your eyes or the accessories you want to add to the fictional character you’re creating. Moreover, you can quickly snap a photo of yourself with this app and choose from a variety of moods that reflect how you feel at any given moment. Facemoji 3D Face Emoji Avatar makes it easy to add your creations to group chats and make conversations with your friends more entertaining.
4. Supermoji – The Emoji App
Price: Free, but offers in-app purchases
Compatibility: iOS
This is probably the best option on the market for all video content creators who want to make memoji videos effortlessly even if they don’t have an iPhone X or iPad Pro. However, the free version of the app is only available for a few days, and after that period of time, you have to opt for one of the available subscription models. A weekly subscription can be purchased for $15.49, while a monthly subscription model costs $39.99. The Supermoji app lets you generate 3D animated emojis and turn them into captivating social media videos on a broad range of iOS-based devices. Expressing your creativity with masks and face filters this app offers is easy since you just have to select the emoji you like and hit the record button.
5. MRRMRR – Faceapp Filters
Price: Free, but offers in-app purchases
Compatibility: iOS , Android
Besides a rich selection of masks and face filters you can use to create video selfies, the MRRMRR app offers swap faces features as well as a broad spectrum of entertaining animations. The app’s intuitive interface makes the process of recording and sending an animoji or memoji video as effortless as it can possibly be so that you can focus on finding the most creative way to surprise your friends. The only downside is that you can use the MRRMRR app for free only for a limited period of time, after which you have to either purchase a weekly, monthly or an unlimited subscription model.
6. MSQRD
Price: Free
Compatibility: iOS, Android
MSQRD is a perfect solution for all iPhone and Android users who don’t have the latest versions of iOS and Android operating systems installed on their devices but still want to create amusing animoji videos. The rich selection of masks and face filters enable you to experiment with different options while taking video selfies. What’s more, you can broadcast live videos to Facebook with your favorite face mask on. The face swap option can come in handy if you are looking for a way to make group photos you take with your friends even more hilarious and memorable. However, the file sharing capabilities as well as a number of other options this app offers are far from perfect.
Samsung AR Emojis
Price: Free
Compatibility: Samsung Galaxy series.
Much like iPhones, the models from Samsung’s Galaxy series have set the standards of what Smartphones can do for years. That’s why it is hardly surprising that the Samsung Galaxy S9 lets you create memojis directly from the camera app. You just have to tap on the AR Emoji icon and you can start creating your virtual avatar. The AR Emojis let you take photos or record videos that imitate your movements or facial expressions. The technology is still relatively novel and in the future, we can expect Disney’s and Marvel characters to be thrown into the mix. Until then, you can experiment with AR Emojis to create videos that will make your friends laugh.
You may also like: Add Emojis to Videos on YouTube/Facebook/Snapchat [Step by Step Guide] >>
Conclusion
Animoji and memoji videos have become one of the hottest trends on social media in a relatively short period of time. Looking like a panda or creating an animated version of yourself is no longer a complicated process since you can easily customize any character you want and share it with your friends online. Which app do you like to use the most to create animoji and memoji videos? Leave a comment and let us know.
Ollie Mattison
Ollie Mattison is a writer and a lover of all things video.
Follow @Ollie Mattison
Ollie Mattison
Mar 27, 2024• Proven solutions
All recent versions of iPhones and iPads released since 2017 are equipped with a powerful face recognition technology called Face ID, that among numerous other things powers memojis and animojis. Even though these 3D emojis that track and imitate your facial expressions and movements are only accessible from the iMessages app, you can still use them to create funny videos that are going to make your friends on social media smile. On the other hand, the owners of most Android-based devices still have to use third-party apps if they want to make animoji and memoji videos. Read on if you would like to discover the best apps on the market that let you create animoji and memoji videos with ease.
You may also like: How to Record and Edit an Animoji or Memoji Karaoke Music Video >>
Best Apps You Can Use to Create Animoji or Memoji Videos
Even though recording thirty-second animoji and memoji videos with iPhone X, iPhone XS or iPad Pro is a quick and simple process, the time limit is still a huge obstacle to social media content creators who want to create animoji and memoji videos that surpass that limit. Let’s take a look at some of the best apps you can use to create memoji or animoji videos without any restrictions.
1. Emoji Me Animated Faces
Price: Free, but offers in-app purchases
Compatibility: iOS
The rich selection of animated emojis this app offers is perfectly suited for iPhone users who are looking to expand their collection of animojis. However, the Emoji Me app doesn’t offer customization features, which means that you are not going to be able to create memojis that look like you if you decide to install it on your device. Keep in mind that you are going to need iOS 10 or later in order to use this app on your iPhone, iPad or iPod touch. Emoji Me is a perfect choice if you want to send animojis to your friends via iMessages, Instagram, Facebook, and numerous other social media or messaging apps.
2. EMOJI Face Recorder
Price: Free, but offers in-app purchases
Compatibility: iOS , Android
You don’t need the latest iPhone or iPad model to record funny animoji videos, because you can download the EMOJI Face Recorder and create this type of video on a broad range of devices that support either the iOS or the Android operating system. You can become a panda, an owl or a shark in just a few taps, but some of the animated characters this app offers are only available if you make an in-app purchase. In addition, you can record your own voice while capturing the facial expressions and movements and create incredible karaoke music videos. Even though the app’s sharing capabilities are far from impressive you can still post all your videos to most popular social media networks.
3. Facemoji 3D Face Emoji Avatar
Price: Free
Compatibility: iOS
Did you ever wonder how would you look like if you were a cartoon character? Well, with Facemoji 3D Face Emoji Avatar app you can find out in a matter of minutes. The app lets you customize all of your facial features, and pick the shape of your nose, the color of your eyes or the accessories you want to add to the fictional character you’re creating. Moreover, you can quickly snap a photo of yourself with this app and choose from a variety of moods that reflect how you feel at any given moment. Facemoji 3D Face Emoji Avatar makes it easy to add your creations to group chats and make conversations with your friends more entertaining.
4. Supermoji – The Emoji App
Price: Free, but offers in-app purchases
Compatibility: iOS
This is probably the best option on the market for all video content creators who want to make memoji videos effortlessly even if they don’t have an iPhone X or iPad Pro. However, the free version of the app is only available for a few days, and after that period of time, you have to opt for one of the available subscription models. A weekly subscription can be purchased for $15.49, while a monthly subscription model costs $39.99. The Supermoji app lets you generate 3D animated emojis and turn them into captivating social media videos on a broad range of iOS-based devices. Expressing your creativity with masks and face filters this app offers is easy since you just have to select the emoji you like and hit the record button.
5. MRRMRR – Faceapp Filters
Price: Free, but offers in-app purchases
Compatibility: iOS , Android
Besides a rich selection of masks and face filters you can use to create video selfies, the MRRMRR app offers swap faces features as well as a broad spectrum of entertaining animations. The app’s intuitive interface makes the process of recording and sending an animoji or memoji video as effortless as it can possibly be so that you can focus on finding the most creative way to surprise your friends. The only downside is that you can use the MRRMRR app for free only for a limited period of time, after which you have to either purchase a weekly, monthly or an unlimited subscription model.
6. MSQRD
Price: Free
Compatibility: iOS, Android
MSQRD is a perfect solution for all iPhone and Android users who don’t have the latest versions of iOS and Android operating systems installed on their devices but still want to create amusing animoji videos. The rich selection of masks and face filters enable you to experiment with different options while taking video selfies. What’s more, you can broadcast live videos to Facebook with your favorite face mask on. The face swap option can come in handy if you are looking for a way to make group photos you take with your friends even more hilarious and memorable. However, the file sharing capabilities as well as a number of other options this app offers are far from perfect.
Samsung AR Emojis
Price: Free
Compatibility: Samsung Galaxy series.
Much like iPhones, the models from Samsung’s Galaxy series have set the standards of what Smartphones can do for years. That’s why it is hardly surprising that the Samsung Galaxy S9 lets you create memojis directly from the camera app. You just have to tap on the AR Emoji icon and you can start creating your virtual avatar. The AR Emojis let you take photos or record videos that imitate your movements or facial expressions. The technology is still relatively novel and in the future, we can expect Disney’s and Marvel characters to be thrown into the mix. Until then, you can experiment with AR Emojis to create videos that will make your friends laugh.
You may also like: Add Emojis to Videos on YouTube/Facebook/Snapchat [Step by Step Guide] >>
Conclusion
Animoji and memoji videos have become one of the hottest trends on social media in a relatively short period of time. Looking like a panda or creating an animated version of yourself is no longer a complicated process since you can easily customize any character you want and share it with your friends online. Which app do you like to use the most to create animoji and memoji videos? Leave a comment and let us know.
Ollie Mattison
Ollie Mattison is a writer and a lover of all things video.
Follow @Ollie Mattison
How to Add Bitmoji to Keyboard?
Emojis have made it so much better for people to express themselves. Let’s say someone compliments you on a chat app; you can use a smiley emoji to tell that you are happy. At the same time, an angry emoji lets you express that you are angry.
Apart from the generic emojis that you can find in your chat applications, Bitmoji enables you to customize your character and share it with people you chat with. Bitmoji is fun, but do you know how to add it to a keyboard? If you don’t, don’t worry, this post will help you understand how to do that.
In this article
02 How to Add and Use Bitmoji to iPhone Keyboard?
03 How to Get the Bitmoji Keyboard on Android?
04 How to Install and Use Bitmoji on Windows and Mac?
Part 1: What is Bitmoji?
If you are new to Bitmoji, you may wonder what it is? Bitmoji is essentially your own personal emoji. You can create a cartoon version of yourself and share it with people to make the conversation fun. So, what one does is create an avatar of themselves and give it all kinds of expressions.
Then, you can create comics using your Bitmoji, use it to express yourself while having a chat, and even use it as a reaction. Anyone who is done using the same old emojis has started using Bitmoji because it’s a lot more fun.
Now, let’s learn how to create your very own Bitmoji.
Step 1: First, go to the App Store or Play store and download the Bitmoji application.
Step 2: Once downloaded, launch the app and start making an avatar or your Bitmoji.
Step 3: Pick a skin color, hair color, chin, nose, hairstyle, jawline, and more.

Once your Bitmoji is created, you are all set to use the Bitmoji as stickers. Moreover, the app lets you dress your Bitmoji as you want as well. Let it have different expressions and postures because that’s how it’s going to be fun! After your Bitmoji is added, the next thing to do is enable Bitmoji on the keyboard of the device you are using.
Part 2: How to Add and Use Bitmoji to iPhone Keyboard?
Since you have learned how to create a Bimoji, it’s time to learn the steps to use it on your iPhone keyboard. Unfortunately, just by downloading the app, it won’t reflect on the keyboard directly. Instead, you will have to follow a few steps to add Bitmoji to the keyboard. Here’s what you need to do.
Step 1: Launch your iPhone and click on the Settings option.
Step 2: Now, go to the General option and click on the Keyboard option.

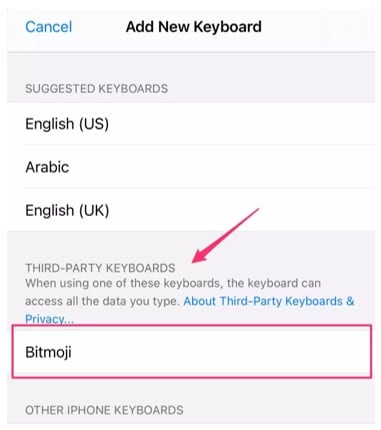
Step 3: When the Keyboard page opens, click on the option that says Keyboards and then click on Add New Keyboard.
Step 4: You will see the Third Party Keyboards option. There, you need to click on Bitmoji.
Step 5: Now, toggle the option that says Allow Full Access. Once you do that, you will see a small pop-up. Click on the Allow option.
And that’s it. Bitmoji will be added to the iPhone keyboard. Open any messaging app and click on the globe and hold it for a few seconds. When you see Bitmoji, click on that, and you will be able to use Bitmoji stickers.
Part 3: How to Get the Bitmoji Keyboard on Android?
Bitmoji is available for Android users as well. Before you begin to use it, go through the first part again and download the app. Then create your Bitmoji, as explained earlier. You can send Bitmojis directly from the app itself, but if you plan to use Bitmoji regularly, getting the Bitmoji keyboard makes sense. So, once you are done, follow the following steps to get the Bitmoji keyboard on Android.
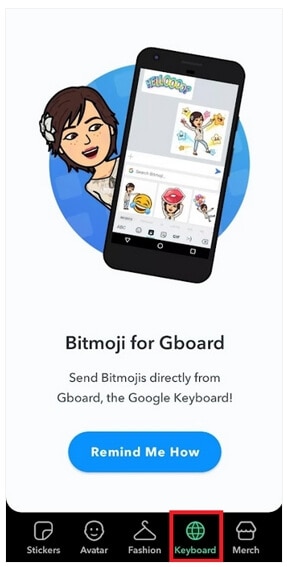
Step 1: Launch the Bitmoji app. Click on the Keyboard option that you see at the bottom of the Bitmoji app screen.
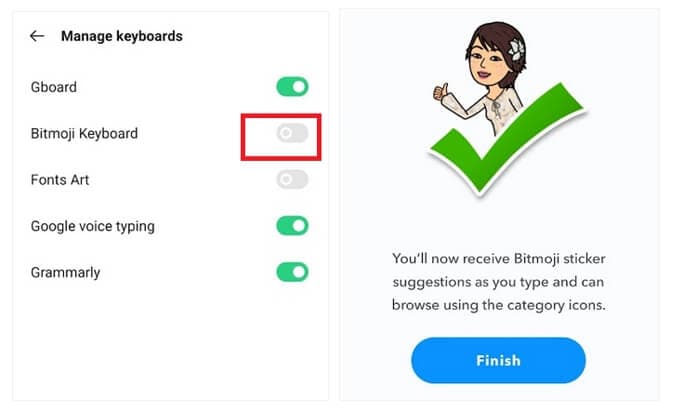
Step 2: Install Bitmoji keyboard and give permission to your phone to use Bitmoji keyboard. Bitmoji will notify you when the Bitmoji keyboard gets activated.
You are all done. Now, use the Bitmoji keyboard to chat with your family members and friends and make everything fun and exciting.
Part 4: How to Install and Use Bitmoji on Windows and Mac?
If you want to use Bitmoji on Windows and Mac, you will have to use the Google Chrome browser. If you already have the Google Chrome browser, carry on with the steps explained below; otherwise, get the browser before starting.
Step 1: Go to Chrome Extension and install Bitmoji for Chrome Extension.
Step 2: You will have to sign in to Bitmoji. If you want to add Bitmoji to Gmail, click on add Bitmoji to Gmail.
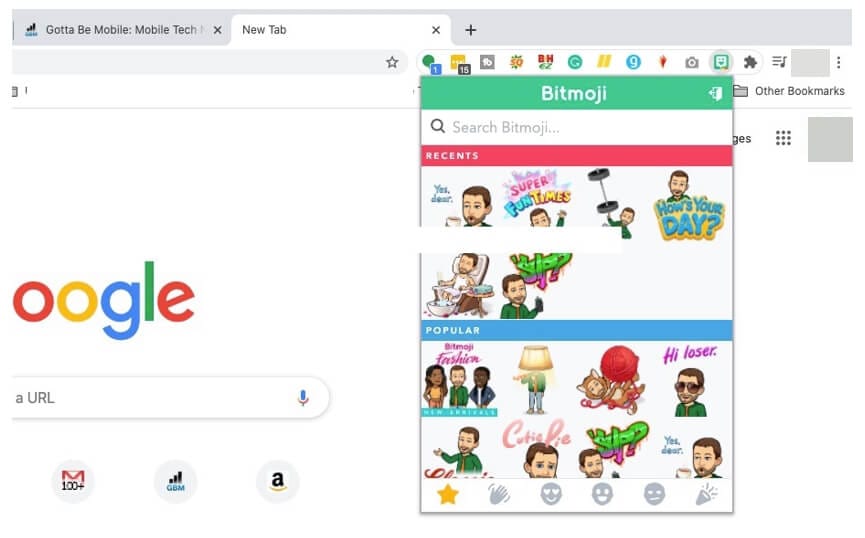
After you are done following the three easy steps, you will see Bitmoji is installed. To start using it, move the cursor to the upper corner of the browser and click on the Bitmoji icon. Next, you will see the Bitmojis. Choose any Bitmoji, copy it, and paste it on Gmail or instant messaging applications.
Part 5: Where can You Use Bitmoji?
Bitmojis can be used on different platforms. All you need to do is enable Bitmoji keyboard on your iPhone or Android phone or Windows and Mac computers and use it on various social media platforms. For example, use Snapchat to send Bitmojis for different types of occasions.
If you are an iPhone user, you can share fun Bitmojis through iMessage. On a computer, you can use these Bitmojis on Facebook or other instant messaging platforms. You can drag and drop the Bitmoji sticker or copy it to share it with your friends.
If you are a working professional and want to lighten the mood of your Slack workspace, use Bitmojis to make your coworkers feel relaxed. Plus, this can be a great way to make someone feel pumped up. Like that, there are many other platforms to use Bitmojis!
Related: Best Free Apps to Get Emojis on iPhone and Android
Conclusion
So, there you go. We have finally reached the end of this guide. We hope you have found this post interesting and will face no hassle using the Bitmoji keyboard on different devices. Get the Bitmoji app if you haven’t downloaded it yet and make your conversations fun and enjoyable!
02 How to Add and Use Bitmoji to iPhone Keyboard?
03 How to Get the Bitmoji Keyboard on Android?
04 How to Install and Use Bitmoji on Windows and Mac?
Part 1: What is Bitmoji?
If you are new to Bitmoji, you may wonder what it is? Bitmoji is essentially your own personal emoji. You can create a cartoon version of yourself and share it with people to make the conversation fun. So, what one does is create an avatar of themselves and give it all kinds of expressions.
Then, you can create comics using your Bitmoji, use it to express yourself while having a chat, and even use it as a reaction. Anyone who is done using the same old emojis has started using Bitmoji because it’s a lot more fun.
Now, let’s learn how to create your very own Bitmoji.
Step 1: First, go to the App Store or Play store and download the Bitmoji application.
Step 2: Once downloaded, launch the app and start making an avatar or your Bitmoji.
Step 3: Pick a skin color, hair color, chin, nose, hairstyle, jawline, and more.
Once your Bitmoji is created, you are all set to use the Bitmoji as stickers. Moreover, the app lets you dress your Bitmoji as you want as well. Let it have different expressions and postures because that’s how it’s going to be fun! After your Bitmoji is added, the next thing to do is enable Bitmoji on the keyboard of the device you are using.
Part 2: How to Add and Use Bitmoji to iPhone Keyboard?
Since you have learned how to create a Bimoji, it’s time to learn the steps to use it on your iPhone keyboard. Unfortunately, just by downloading the app, it won’t reflect on the keyboard directly. Instead, you will have to follow a few steps to add Bitmoji to the keyboard. Here’s what you need to do.
Step 1: Launch your iPhone and click on the Settings option.
Step 2: Now, go to the General option and click on the Keyboard option.
Step 3: When the Keyboard page opens, click on the option that says Keyboards and then click on Add New Keyboard.
Step 4: You will see the Third Party Keyboards option. There, you need to click on Bitmoji.
Step 5: Now, toggle the option that says Allow Full Access. Once you do that, you will see a small pop-up. Click on the Allow option.
And that’s it. Bitmoji will be added to the iPhone keyboard. Open any messaging app and click on the globe and hold it for a few seconds. When you see Bitmoji, click on that, and you will be able to use Bitmoji stickers.
Part 3: How to Get the Bitmoji Keyboard on Android?
Bitmoji is available for Android users as well. Before you begin to use it, go through the first part again and download the app. Then create your Bitmoji, as explained earlier. You can send Bitmojis directly from the app itself, but if you plan to use Bitmoji regularly, getting the Bitmoji keyboard makes sense. So, once you are done, follow the following steps to get the Bitmoji keyboard on Android.
Step 1: Launch the Bitmoji app. Click on the Keyboard option that you see at the bottom of the Bitmoji app screen.
Step 2: Install Bitmoji keyboard and give permission to your phone to use Bitmoji keyboard. Bitmoji will notify you when the Bitmoji keyboard gets activated.
You are all done. Now, use the Bitmoji keyboard to chat with your family members and friends and make everything fun and exciting.
Part 4: How to Install and Use Bitmoji on Windows and Mac?
If you want to use Bitmoji on Windows and Mac, you will have to use the Google Chrome browser. If you already have the Google Chrome browser, carry on with the steps explained below; otherwise, get the browser before starting.
Step 1: Go to Chrome Extension and install Bitmoji for Chrome Extension.
Step 2: You will have to sign in to Bitmoji. If you want to add Bitmoji to Gmail, click on add Bitmoji to Gmail.
After you are done following the three easy steps, you will see Bitmoji is installed. To start using it, move the cursor to the upper corner of the browser and click on the Bitmoji icon. Next, you will see the Bitmojis. Choose any Bitmoji, copy it, and paste it on Gmail or instant messaging applications.
Part 5: Where can You Use Bitmoji?
Bitmojis can be used on different platforms. All you need to do is enable Bitmoji keyboard on your iPhone or Android phone or Windows and Mac computers and use it on various social media platforms. For example, use Snapchat to send Bitmojis for different types of occasions.
If you are an iPhone user, you can share fun Bitmojis through iMessage. On a computer, you can use these Bitmojis on Facebook or other instant messaging platforms. You can drag and drop the Bitmoji sticker or copy it to share it with your friends.
If you are a working professional and want to lighten the mood of your Slack workspace, use Bitmojis to make your coworkers feel relaxed. Plus, this can be a great way to make someone feel pumped up. Like that, there are many other platforms to use Bitmojis!
Related: Best Free Apps to Get Emojis on iPhone and Android
Conclusion
So, there you go. We have finally reached the end of this guide. We hope you have found this post interesting and will face no hassle using the Bitmoji keyboard on different devices. Get the Bitmoji app if you haven’t downloaded it yet and make your conversations fun and enjoyable!
How to Make Memoji Talk-Make Memoji Video On Your Own
How to Make Memoji Talk-Make Memoji Video On Your Own

Shanoon Cox
Mar 27, 2024• Proven solutions
Memojis are the 3D virtual caricatures customized to look exactly like you. Much like an animoji, memoji can mimic your facial as well as body movements. Using a memoji to convey your messages is an exciting and fun concept that is novel and unique to your personality. But, how to make memoji talk?
Well, that’s the fun part. We will walk you through the steps on how to make memoji talk in 5 simple steps. And if you’re worried about how to make memoji talk on an Android phone, don’t fret. We have the perfect solution for that too.
Read ahead to start learning how to make memoji talk.
- Part 1: How to Make Memoji Talk on iPhone
- Part 2: How to Make Memoji Talk on Android
- Bonus tip-Add Memoji to Your Video with Wondershare Filmora
Part 1: How to Make Memoji Talk on iPhone
Now you can make a talking memoji that mimics your expressions as well as your movements. Cool, right? And if you don’t know how to make memoji talk, you will be a master at it by the end of this article.
Here’s a guide on how to make memoji talk in 5 easy steps:
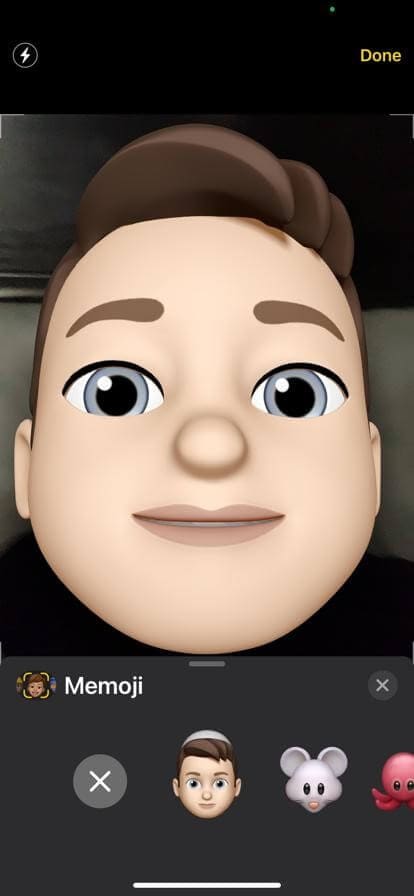
1.Open imessages. Go to New Message or open an existing conversation. If you don’t see the app tray above the keyboard, click on the App storeicon to reveal the hidden apps.
2.Now, in the app tray, click on the three-headed icon to see your memoji. If you record right there, it will just be a basic memoji head limited to a 30-second video. But, since we want more than that, click on the camera icon.
![]()
3.Now, switch to selfie mode and click on the Staricon for Effects in the bottom left corner for more options
4.Click on the Animoji icon and choose the custom memoji you like to record with. Tap to start recording. Click Doneonce you finish recording.
5.The recorded talking memoji will be automatically sent to the opened chat and will also be saved to your gallery for easy sharing to other contacts or other platforms.

Part 2: How to Make Memoji Talk on Android
Well, we know how to make memoji talk on an iPhone, but what about Android users?
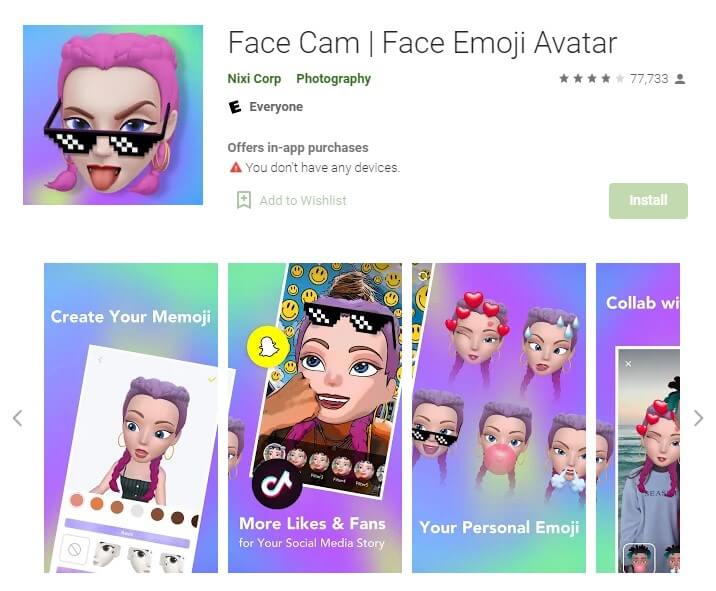
Since Android has no in-built option to make or record a talking memoji, you will need some outside help. Face Cam is an amazing app and solution to your worries. Even if you have no idea how to make memoji video, Face Cam’s user-friendly interface lets you easily understand how to make memoji talk. Plus, you can also personalize your memoji in a fun way
Let’s see how to make memoji talk on Android phones-
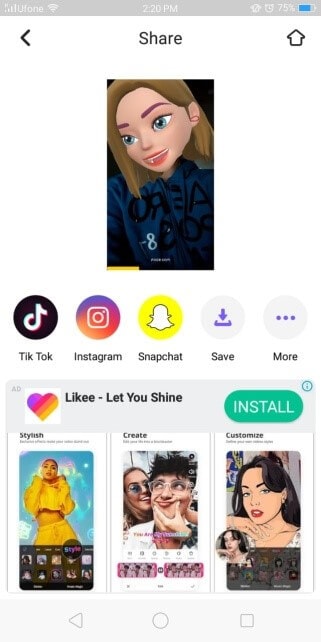
1.Install and launch Face Cam on your smartphone.
2.Now, make a custom memoji that looks like you. Select the hairstyle, face shape, eye color, accessories, etc. Tap the Tickicon to proceed.
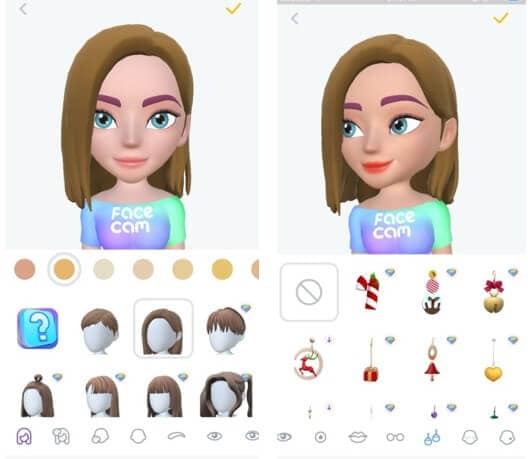
3.Click on the filter tab to reveal filters. Choose the filter you would like to apply.
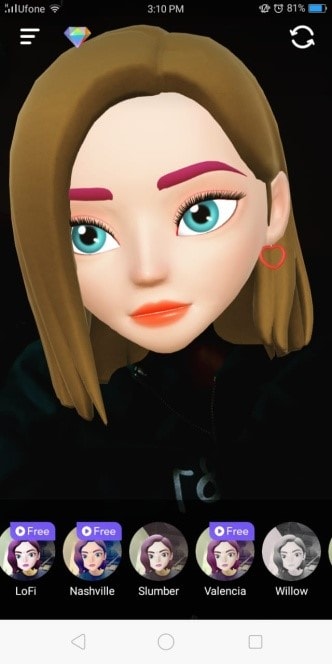
4.Tap and hold the record button to make your video.
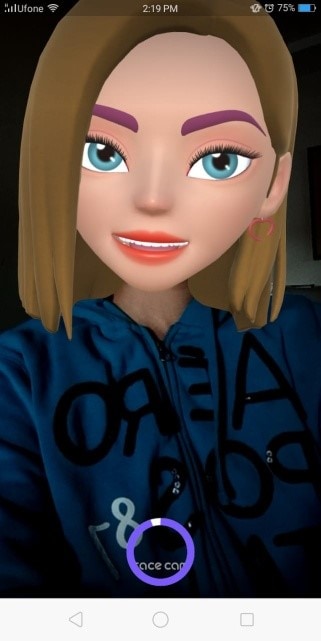
5.Finally, you can tap on the Savebutton to save the video to your gallery. You can also tap on the social media icons to share instantly.
Bonus tip-Add Memoji to Your Video with Wondershare Filmora
Wanna add emoji to your video? Now here is a bonus tip for you!
Filmora is a highly professional video editor with an incredibly intuitive and easy-to-use interface. It is packed with high-end editing tools such as keyframe animations, split-screen effect, cloning, etc. There is a range of aesthetic filters and cool special effects to give your videos a cinematic touch. One key feature is motion tracking. Once you learn how to make memoji talk, you can use your memoji sticker in any video. You will be able to paste your sticker onto your face that will follow it through the clip with easy and swift motion tracking.
Follow these steps:
1.Install and launch Wondershare Filmora. Import the video and memoji sticker to Filmora.
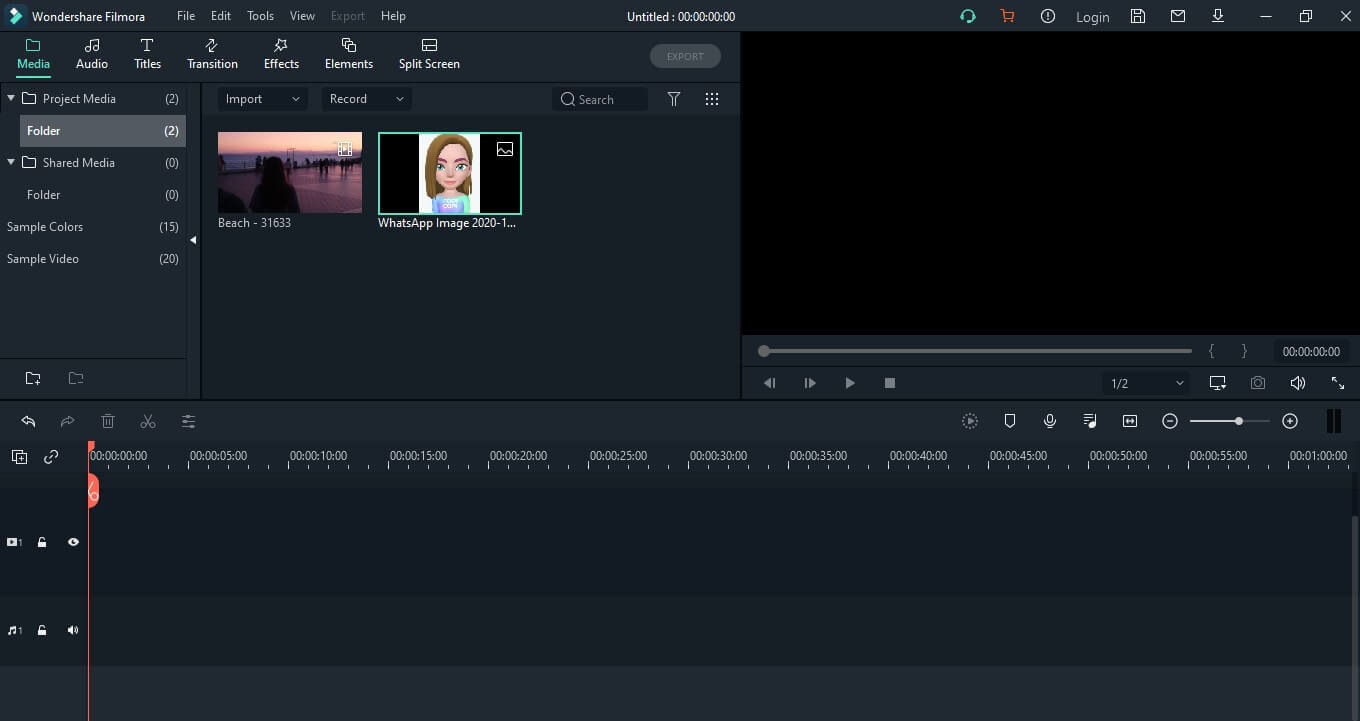
2.Drag the video to video track one and the sticker to the video track 2. And you can click on the sticker and adjust its size and position.
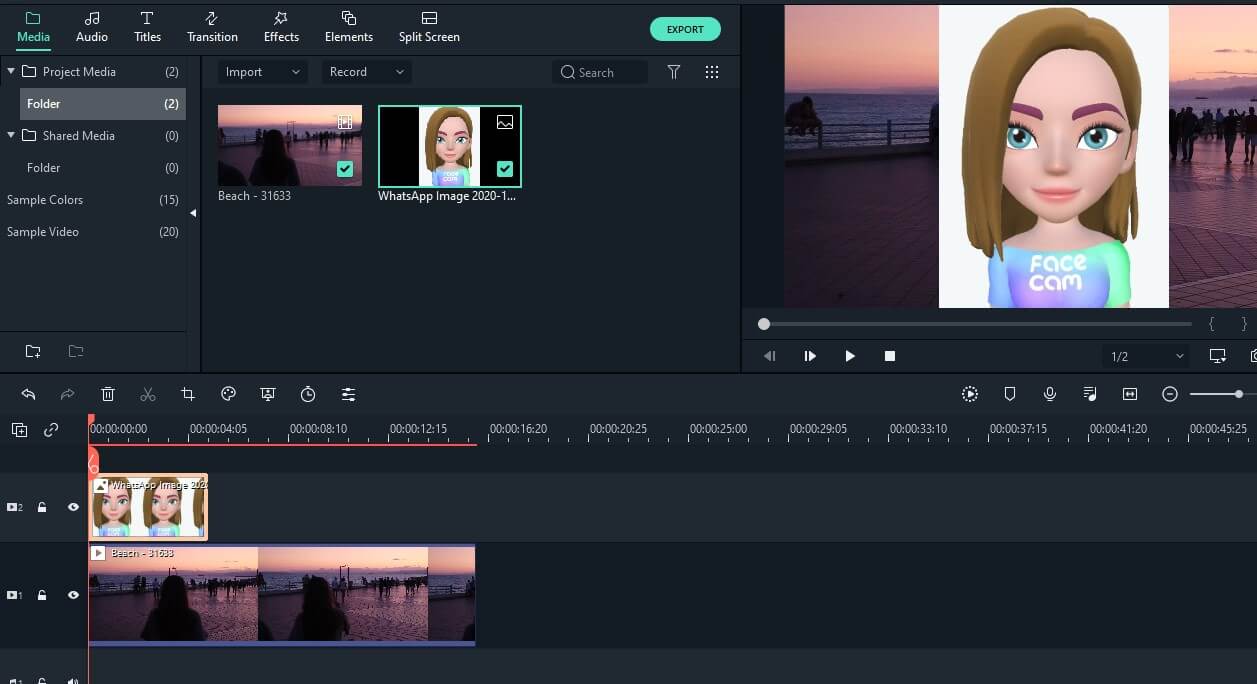
3.Double click on the video in the timeline to open settings. In the Videotab, select motion tracking, choose the area or person you want to track, and click Start Tracking.
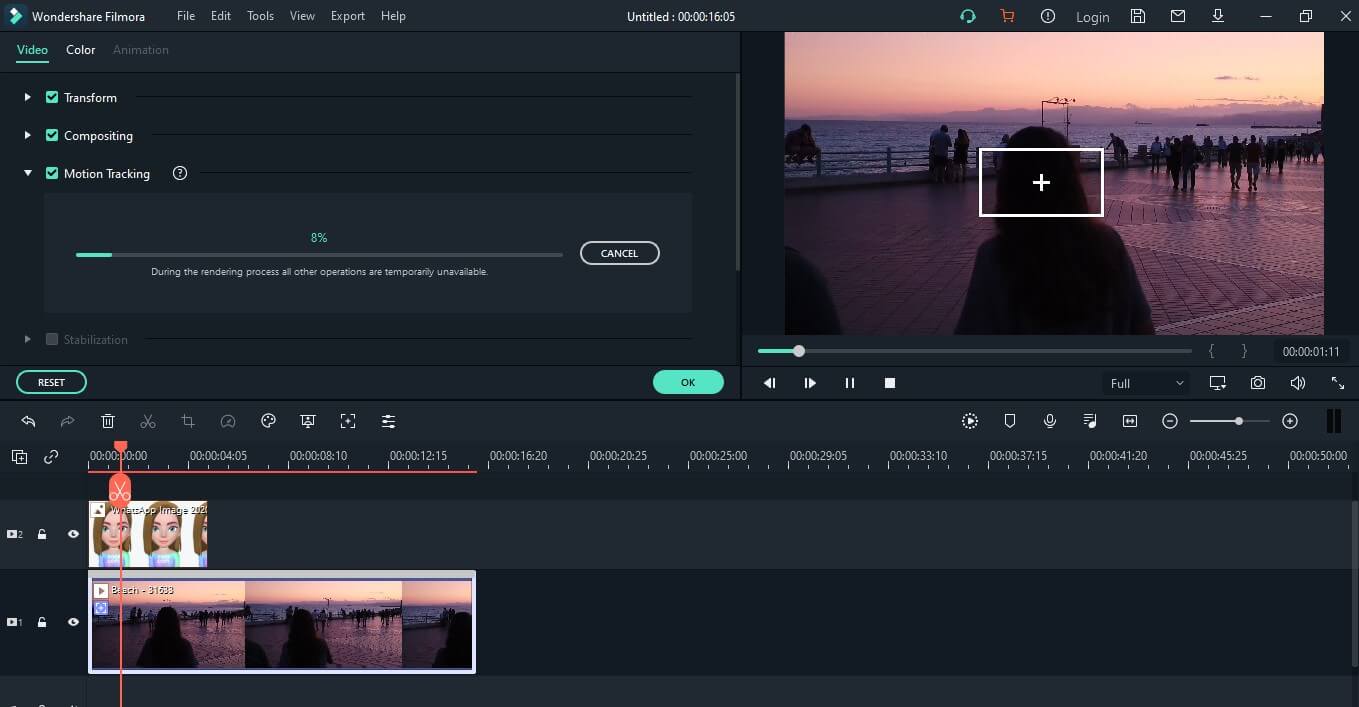
4.Now, choose the element. Open the drop-down menu and select the sticker memoji. Click Okto complete.

5.Finally, click Export. Choose the destination, format, and resolution and press Export.

Conclusion
Texting and virtual communication has now been redefined with the advent of emojis and memojis. So, you need to step up your game by learning how to make memoji talk and enter the exciting world of endless possibilities.
If you were unaware of how to make memoji talk, you must be a master at it by now. The 5 simple steps on how to make memoji video are easy to grasp and fun to try. So, don’t waste any time and start making talking memojis to share laughter. Take help from our ultimate guide on how to make memoji talk and express yourself hilariously and uniquely
Shanoon Cox
Shanoon Cox is a writer and a lover of all things video.
Follow @Shanoon Cox
Shanoon Cox
Mar 27, 2024• Proven solutions
Memojis are the 3D virtual caricatures customized to look exactly like you. Much like an animoji, memoji can mimic your facial as well as body movements. Using a memoji to convey your messages is an exciting and fun concept that is novel and unique to your personality. But, how to make memoji talk?
Well, that’s the fun part. We will walk you through the steps on how to make memoji talk in 5 simple steps. And if you’re worried about how to make memoji talk on an Android phone, don’t fret. We have the perfect solution for that too.
Read ahead to start learning how to make memoji talk.
- Part 1: How to Make Memoji Talk on iPhone
- Part 2: How to Make Memoji Talk on Android
- Bonus tip-Add Memoji to Your Video with Wondershare Filmora
Part 1: How to Make Memoji Talk on iPhone
Now you can make a talking memoji that mimics your expressions as well as your movements. Cool, right? And if you don’t know how to make memoji talk, you will be a master at it by the end of this article.
Here’s a guide on how to make memoji talk in 5 easy steps:
1.Open imessages. Go to New Message or open an existing conversation. If you don’t see the app tray above the keyboard, click on the App storeicon to reveal the hidden apps.
2.Now, in the app tray, click on the three-headed icon to see your memoji. If you record right there, it will just be a basic memoji head limited to a 30-second video. But, since we want more than that, click on the camera icon.
![]()
3.Now, switch to selfie mode and click on the Staricon for Effects in the bottom left corner for more options
4.Click on the Animoji icon and choose the custom memoji you like to record with. Tap to start recording. Click Doneonce you finish recording.
5.The recorded talking memoji will be automatically sent to the opened chat and will also be saved to your gallery for easy sharing to other contacts or other platforms.
Part 2: How to Make Memoji Talk on Android
Well, we know how to make memoji talk on an iPhone, but what about Android users?
Since Android has no in-built option to make or record a talking memoji, you will need some outside help. Face Cam is an amazing app and solution to your worries. Even if you have no idea how to make memoji video, Face Cam’s user-friendly interface lets you easily understand how to make memoji talk. Plus, you can also personalize your memoji in a fun way
Let’s see how to make memoji talk on Android phones-
1.Install and launch Face Cam on your smartphone.
2.Now, make a custom memoji that looks like you. Select the hairstyle, face shape, eye color, accessories, etc. Tap the Tickicon to proceed.
3.Click on the filter tab to reveal filters. Choose the filter you would like to apply.
4.Tap and hold the record button to make your video.
5.Finally, you can tap on the Savebutton to save the video to your gallery. You can also tap on the social media icons to share instantly.
Bonus tip-Add Memoji to Your Video with Wondershare Filmora
Wanna add emoji to your video? Now here is a bonus tip for you!
Filmora is a highly professional video editor with an incredibly intuitive and easy-to-use interface. It is packed with high-end editing tools such as keyframe animations, split-screen effect, cloning, etc. There is a range of aesthetic filters and cool special effects to give your videos a cinematic touch. One key feature is motion tracking. Once you learn how to make memoji talk, you can use your memoji sticker in any video. You will be able to paste your sticker onto your face that will follow it through the clip with easy and swift motion tracking.
Follow these steps:
1.Install and launch Wondershare Filmora. Import the video and memoji sticker to Filmora.
2.Drag the video to video track one and the sticker to the video track 2. And you can click on the sticker and adjust its size and position.
3.Double click on the video in the timeline to open settings. In the Videotab, select motion tracking, choose the area or person you want to track, and click Start Tracking.
4.Now, choose the element. Open the drop-down menu and select the sticker memoji. Click Okto complete.
5.Finally, click Export. Choose the destination, format, and resolution and press Export.
Conclusion
Texting and virtual communication has now been redefined with the advent of emojis and memojis. So, you need to step up your game by learning how to make memoji talk and enter the exciting world of endless possibilities.
If you were unaware of how to make memoji talk, you must be a master at it by now. The 5 simple steps on how to make memoji video are easy to grasp and fun to try. So, don’t waste any time and start making talking memojis to share laughter. Take help from our ultimate guide on how to make memoji talk and express yourself hilariously and uniquely
Shanoon Cox
Shanoon Cox is a writer and a lover of all things video.
Follow @Shanoon Cox
How to Make a Slideshow with Music
How to Make a Slideshow with Music
Shanoon Cox
Mar 27, 2024• Proven solutions
Nowadays, we tend to store our experiences of important occasions in photos and videos since cameras and camcorders are popular. To better preserve these sweet memories, make a slideshow with music, photos and videos is a good idea. It’s not as difficult as you think since all you need are: a good slideshow maker, photos and videos you want to show, music to go along with your slideshow. Here is a tutorial about how to make a slideshow with music with Wondershare Filmora video editor and Wondershare DVD Slideshow Builder .
Read more: 20 Best Slideshow Songs for Different Occasions [Royalty-Free]
How to create slideshow with music in Filmora?
Note: The video tutorial about how to make slideshow in minutes is created with the previous version of Filmora video editor. Most of the steps are similar and creating a music slideshow with the latest Filmora is very easy. As we said before, all you need is your photos and music tracks, then follow the steps below to start.
Step 1. Download Filmora and Run it
Click the Free Download button above to download and install Wondershare Filmora on your computer and then launch it.
In case you want to change the default aspect ratio setting in the splash screen, you can choose 9:16 for portrait mode, 1:1 for Instagram slideshow and more. And then click New Project to create a project to continue.
Step 2. Import Photos and Music
After that, you need to import all your photo and music media to the Media Library and then drag and drop them to the timeline directly. Filmora allows you to change the order the photos in the timeline, and the photo duration as well.
You can also rotate photos and crop them manually to fit your project.
Note: If you find some black bar on your photos in preview, it is recommended to change Photo Placement to Crop and Zoom under Preference before drag-n-drop to timeline.
Step 3. Add Transitions

There are hundreds of transitions available in Filmora which you should totally have a try. You can apply a specific transition between each selected photo, or apply random transitions to selected photos.
Filmora features more than 30 transitions especially for Slideshow, such as cross merge, cross split, swap and sweep clockwise. Of course, you can also use some 3D transition, ripple and dissolve, or speed blur transitions.
You can also adjust the transition duration accordingly.
To make your photos slideshow looks better, it is highly recommended to apply filters and overlays effects.
Step 4. Add background music
You can choose background music or sound effect from the inbuilt audio library in Filmora or drag and drop the music track file from computer to the timeline directly. Filmora features the voiceover recording tool which helps you to record your own voice easily.
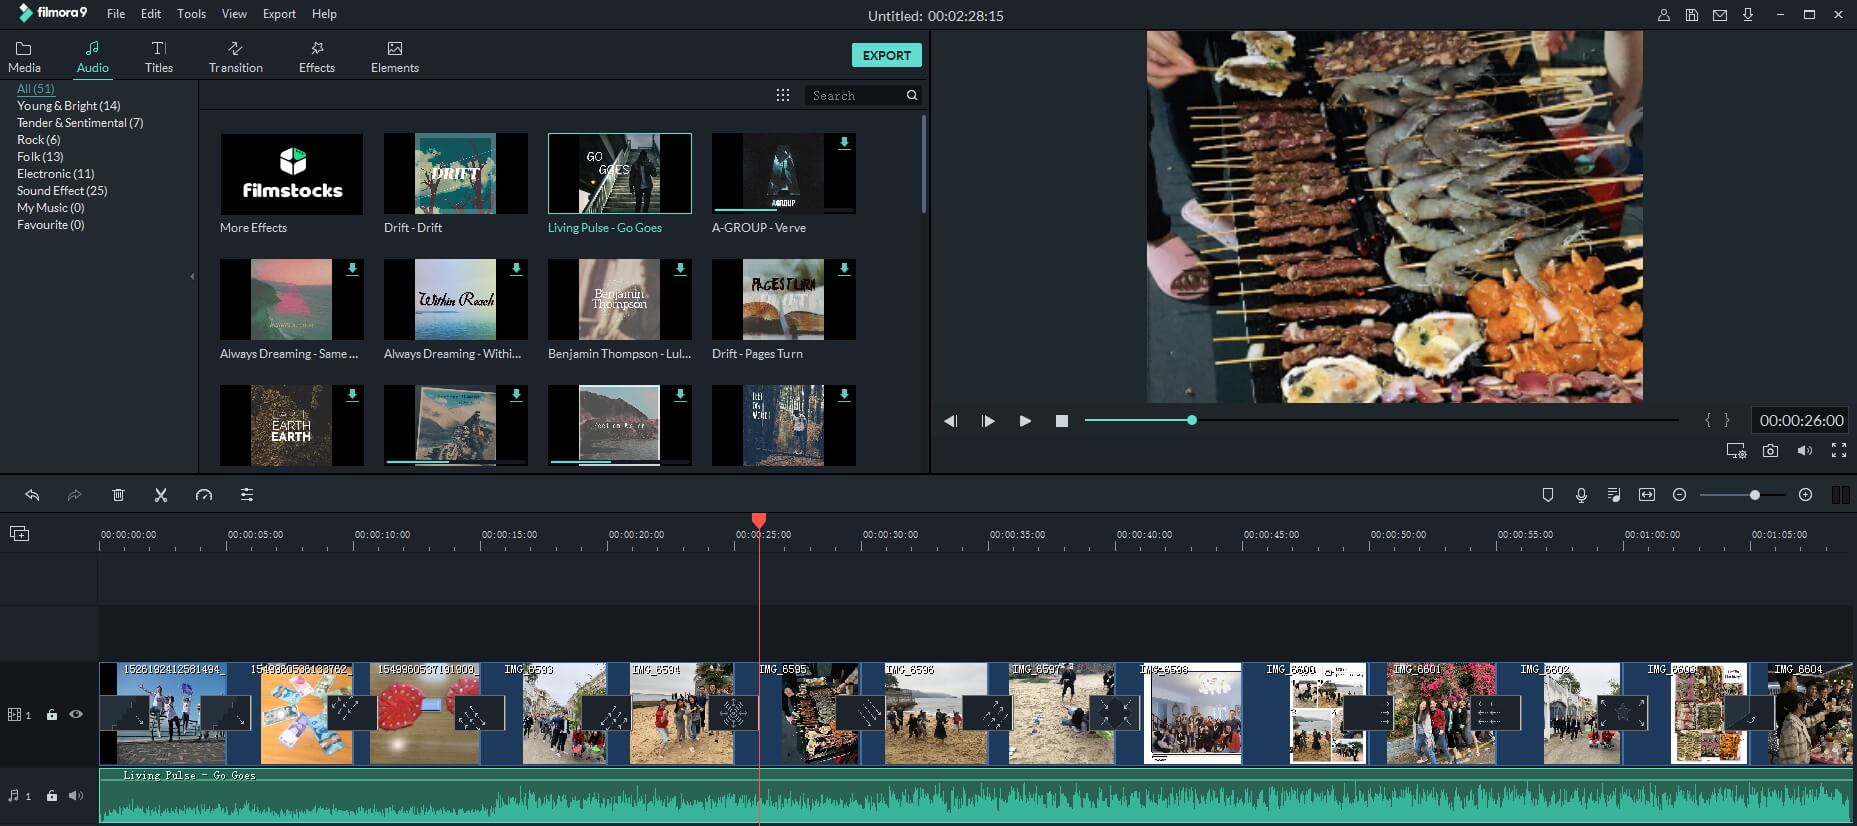
Step 5. Export and Save
Finally, it’s time to save and export the music slideshow as you see fit. You have several options, you can save it on the computer in different formats, or you can share it to YouTube or Vimeo directly, or you can burn it to DVD.
Why choose Filmora to create music slideshow?
- Filmora supports most of popular image formats such as .jpg, .png, .bmp, .gif, .tif, and .tiff.
- Filmora allows you to crop, pan & zoom the slideshow manually or automatically by applying Pan & Zoom Photo Placement.
- Filmora has inbuilt music track and sound effect library, and stunning transitions, effects and elements presets.
- Filmora allows you to record your own voiceover and apply fade in and fade out effects.
- Besides creating photo slideshow, you can use it to create videos for both your YouTube marketing, daily sharing and business.
How to make a slideshow with DVD Slideshow Builder

Tips for Make a Slideshow with Music
1. Install slideshow software and import photos and videos
Install the software and import your digital photos to the storyboard by clicking ‘“Add Files” (there is no quantity limitation of photos). You can also add videos from computer or camera.
2. Add music to your photo slideshow
Go to the “Personalize” tab. Click “Music” toolbar to add background music or just drag the music to the background track. In the timeline, you can drag the slider to make the music best suit the photos and videos. If you need to edit the music, double click the clip and in the pop up window, trim music and adjust music volume as you like.
Tip: If you want to synchronize background music with the slideshow, click “Settings” (it’s on the right upper corner) and choose “Slideshow” tab, then tick the checkbox under the “Synchronize“. At last, click “OK” button.
3 .Select movie styles and add decorations
There are also 480+ free styles and transition effects that can be used for your picture slideshow with music in this tab. Choose your favorite styles and drag it on the photos. You can also add decoration text, clipart and effects on your digital photos. To make add more fun, you can also add intro movie and credit movie to your picture slideshow with music by clicking the “Intro/Credit” build-in button.

4 . Preview and save your slideshow with music
Go to “Publish” tab, you can preview the photo video by click the preview button first. Then publish it to the format you want. If you want to watch your photo slideshow with music to iPod or iPhone, you’d better publish it to MP4 format. This slideshow software also enables you to share your slideshow directly to YouTube by filling in the necessary information. Besides, you can burn DVD slideshow with music by clicking the “Burn to DVD” button and putting a DVD disc in your computer.
We shared two ways of making slideshow with music, whether you are using Filmora or DVD slideshow maker, leave a comment below and let me know your choice.
Shanoon Cox
Shanoon Cox is a writer and a lover of all things video.
Follow @Shanoon Cox
Shanoon Cox
Mar 27, 2024• Proven solutions
Nowadays, we tend to store our experiences of important occasions in photos and videos since cameras and camcorders are popular. To better preserve these sweet memories, make a slideshow with music, photos and videos is a good idea. It’s not as difficult as you think since all you need are: a good slideshow maker, photos and videos you want to show, music to go along with your slideshow. Here is a tutorial about how to make a slideshow with music with Wondershare Filmora video editor and Wondershare DVD Slideshow Builder .
Read more: 20 Best Slideshow Songs for Different Occasions [Royalty-Free]
How to create slideshow with music in Filmora?
Note: The video tutorial about how to make slideshow in minutes is created with the previous version of Filmora video editor. Most of the steps are similar and creating a music slideshow with the latest Filmora is very easy. As we said before, all you need is your photos and music tracks, then follow the steps below to start.
Step 1. Download Filmora and Run it
Click the Free Download button above to download and install Wondershare Filmora on your computer and then launch it.
In case you want to change the default aspect ratio setting in the splash screen, you can choose 9:16 for portrait mode, 1:1 for Instagram slideshow and more. And then click New Project to create a project to continue.
Step 2. Import Photos and Music
After that, you need to import all your photo and music media to the Media Library and then drag and drop them to the timeline directly. Filmora allows you to change the order the photos in the timeline, and the photo duration as well.
You can also rotate photos and crop them manually to fit your project.
Note: If you find some black bar on your photos in preview, it is recommended to change Photo Placement to Crop and Zoom under Preference before drag-n-drop to timeline.
Step 3. Add Transitions
There are hundreds of transitions available in Filmora which you should totally have a try. You can apply a specific transition between each selected photo, or apply random transitions to selected photos.
Filmora features more than 30 transitions especially for Slideshow, such as cross merge, cross split, swap and sweep clockwise. Of course, you can also use some 3D transition, ripple and dissolve, or speed blur transitions.
You can also adjust the transition duration accordingly.
To make your photos slideshow looks better, it is highly recommended to apply filters and overlays effects.
Step 4. Add background music
You can choose background music or sound effect from the inbuilt audio library in Filmora or drag and drop the music track file from computer to the timeline directly. Filmora features the voiceover recording tool which helps you to record your own voice easily.
Step 5. Export and Save
Finally, it’s time to save and export the music slideshow as you see fit. You have several options, you can save it on the computer in different formats, or you can share it to YouTube or Vimeo directly, or you can burn it to DVD.
Why choose Filmora to create music slideshow?
- Filmora supports most of popular image formats such as .jpg, .png, .bmp, .gif, .tif, and .tiff.
- Filmora allows you to crop, pan & zoom the slideshow manually or automatically by applying Pan & Zoom Photo Placement.
- Filmora has inbuilt music track and sound effect library, and stunning transitions, effects and elements presets.
- Filmora allows you to record your own voiceover and apply fade in and fade out effects.
- Besides creating photo slideshow, you can use it to create videos for both your YouTube marketing, daily sharing and business.
How to make a slideshow with DVD Slideshow Builder
Tips for Make a Slideshow with Music
1. Install slideshow software and import photos and videos
Install the software and import your digital photos to the storyboard by clicking ‘“Add Files” (there is no quantity limitation of photos). You can also add videos from computer or camera.
2. Add music to your photo slideshow
Go to the “Personalize” tab. Click “Music” toolbar to add background music or just drag the music to the background track. In the timeline, you can drag the slider to make the music best suit the photos and videos. If you need to edit the music, double click the clip and in the pop up window, trim music and adjust music volume as you like.
Tip: If you want to synchronize background music with the slideshow, click “Settings” (it’s on the right upper corner) and choose “Slideshow” tab, then tick the checkbox under the “Synchronize“. At last, click “OK” button.
3 .Select movie styles and add decorations
There are also 480+ free styles and transition effects that can be used for your picture slideshow with music in this tab. Choose your favorite styles and drag it on the photos. You can also add decoration text, clipart and effects on your digital photos. To make add more fun, you can also add intro movie and credit movie to your picture slideshow with music by clicking the “Intro/Credit” build-in button.
4 . Preview and save your slideshow with music
Go to “Publish” tab, you can preview the photo video by click the preview button first. Then publish it to the format you want. If you want to watch your photo slideshow with music to iPod or iPhone, you’d better publish it to MP4 format. This slideshow software also enables you to share your slideshow directly to YouTube by filling in the necessary information. Besides, you can burn DVD slideshow with music by clicking the “Burn to DVD” button and putting a DVD disc in your computer.
We shared two ways of making slideshow with music, whether you are using Filmora or DVD slideshow maker, leave a comment below and let me know your choice.
Shanoon Cox
Shanoon Cox is a writer and a lover of all things video.
Follow @Shanoon Cox
How to Make Memes on iPhone and Android
How to Make Memes on iPhone and Android
Ollie Mattison
Mar 27, 2024• Proven solutions
With growing demand on the internet, memes are spreading like wildfire. In case you want to promote your brand using various types of relatable memes that would drive more traffic for your website, then there is good news for you. It doesn’t matter, whether you own an Android or iOS device. We will help you out in learning how to make memes on iPhone/Android in this article. Keep reading!
- Part1: How to make memes on iPhone with Meme Generator
- Part2: How to make memes on Android with Memedroid
- Part3: Recommended - Making memes with Filmora meme maker online
Part 1: How to make memes on iPhone with Meme Generator
While planning to create memes on your iPhone, you might find Meme Generator as the most suitable tool. It helps you create hilarious memes and allows you to share on social media platforms like Twitter, Facebook, Messenger, Instagram, Dropbox, E-mail, Snapchat etc. you get 500 plus memes with example captions under different categories.
You can customize memes using your own photos and adding text, alter size and color of text using 10 different fonts. You can crop the image, move it, add border to it, filter/search memes, and scroll through each meme category. There are no watermark or auto upload of memes to protect your privacy. Here is the detailed guide –
Step 1: Install Meme Generator from App Store on your iPhone and launch the app.
Step 2: Tap on the 3 horizontal lines on the top-left corner to browse memes. If you know the name, then search a meme and click on it.
Step 3: Use the example text or hit the ‘Text’ bar to add or edit your caption. Press the icons over the top-right corner for customizing your meme photo and caption options.

Step 4: Tap on the ‘Save’ or ‘Share’ button, once you are done editing the meme. You can find the meme on your ‘Photos’ app.
Part 2: How to make memes on Android with Memedroid
If you are wondering how to make memes on Android, then take the Memedroid app into consideration. You can create photos and GIF memes, jokes, avatars, graphics etc. with this app. There are numerous memes uploaded everyday on the app and you get the chance to let people vote for your meme too.
You get to use popular templates such as evil toddler, attached girlfriend, surprised koala with hilarious designs. The best rated memes are in the top gallery and you get the main gallery with latest funny memes too. You can design and save your memes and share them or download, it’s up to you. It supports a wide variety of languages such as English, French, Spanish, Italian, Portuguese etc.
Here are the steps for how to make memes on Android –
Step 1: Download and install the app on your mobile and launch it. Click on ‘Meme Factory’ to pick the background image and then you can swipe to explore the other features too. Alternatively, you can add your own photos if Meme factory was not of your choice. Hit ‘Upload Zone’ instead of ‘Meme Factory’ and register for a free account. On the ‘Upload’ screen, tap the ‘Select An Image’ button to pick a photo within 330MB size

Step 2: After selecting the background image, add captions at the top and bottom of the image. The ‘SAVE’ button can be found on the top-right, tap that to save. Likewise, for sharing the meme, hit the ‘SHARE’ button located at the bottom of the screen.
Step 3: Add tags and accept the ‘Terms of Service’ followed by ‘Send’ button. Wait a while, to get you meme ready for your audience.
Part 3: Recommended - Making memes with Filmora meme maker online
In order to make memes on iPhone/Android, you need a mobile device. But, what if you have a computer on which you need to create a meme? Well, Filmora meme maker is the apt choice for you. You don’t need to download apps or software on your Pc. It is the ultimate online solution.
Brief steps to introduce making memes. You can create image, GIF, and video memes adding nice fonts. It processes video/GIF/image memes rapidly than the competitors. Adding texts, fonts and altering font colors is so easy with it.
Here is the detailed guide to make memes on Android –
Step 1: Visit the official Filmora website and look for Filmora online meme maker. Import videos by dragging and dropping to the Filmora interface. You can even add online links to videos in order to upload them.

Step 2: After selecting the video/photo/GIF move to the meme editor page and customize your video meme using tools from the left pane. Include text, change fonts and then you can preview the changes.

Step 3: Tap on the ‘CREATE’ button to apply the changes, when you are satisfied. Press the ‘DOWNLOAD’ button and then share your meme on social media sites.

Conclusion
Coming towards the end of the article, we have discovered that Filmora creates brilliant memes and that too, in no time. No lengthy or annoying processes, nor you need apps that eat up your phone memory. Life is blissfully funny with meme making on Filmora.
Ollie Mattison
Ollie Mattison is a writer and a lover of all things video.
Follow @Ollie Mattison
Ollie Mattison
Mar 27, 2024• Proven solutions
With growing demand on the internet, memes are spreading like wildfire. In case you want to promote your brand using various types of relatable memes that would drive more traffic for your website, then there is good news for you. It doesn’t matter, whether you own an Android or iOS device. We will help you out in learning how to make memes on iPhone/Android in this article. Keep reading!
- Part1: How to make memes on iPhone with Meme Generator
- Part2: How to make memes on Android with Memedroid
- Part3: Recommended - Making memes with Filmora meme maker online
Part 1: How to make memes on iPhone with Meme Generator
While planning to create memes on your iPhone, you might find Meme Generator as the most suitable tool. It helps you create hilarious memes and allows you to share on social media platforms like Twitter, Facebook, Messenger, Instagram, Dropbox, E-mail, Snapchat etc. you get 500 plus memes with example captions under different categories.
You can customize memes using your own photos and adding text, alter size and color of text using 10 different fonts. You can crop the image, move it, add border to it, filter/search memes, and scroll through each meme category. There are no watermark or auto upload of memes to protect your privacy. Here is the detailed guide –
Step 1: Install Meme Generator from App Store on your iPhone and launch the app.
Step 2: Tap on the 3 horizontal lines on the top-left corner to browse memes. If you know the name, then search a meme and click on it.
Step 3: Use the example text or hit the ‘Text’ bar to add or edit your caption. Press the icons over the top-right corner for customizing your meme photo and caption options.
Step 4: Tap on the ‘Save’ or ‘Share’ button, once you are done editing the meme. You can find the meme on your ‘Photos’ app.
Part 2: How to make memes on Android with Memedroid
If you are wondering how to make memes on Android, then take the Memedroid app into consideration. You can create photos and GIF memes, jokes, avatars, graphics etc. with this app. There are numerous memes uploaded everyday on the app and you get the chance to let people vote for your meme too.
You get to use popular templates such as evil toddler, attached girlfriend, surprised koala with hilarious designs. The best rated memes are in the top gallery and you get the main gallery with latest funny memes too. You can design and save your memes and share them or download, it’s up to you. It supports a wide variety of languages such as English, French, Spanish, Italian, Portuguese etc.
Here are the steps for how to make memes on Android –
Step 1: Download and install the app on your mobile and launch it. Click on ‘Meme Factory’ to pick the background image and then you can swipe to explore the other features too. Alternatively, you can add your own photos if Meme factory was not of your choice. Hit ‘Upload Zone’ instead of ‘Meme Factory’ and register for a free account. On the ‘Upload’ screen, tap the ‘Select An Image’ button to pick a photo within 330MB size
Step 2: After selecting the background image, add captions at the top and bottom of the image. The ‘SAVE’ button can be found on the top-right, tap that to save. Likewise, for sharing the meme, hit the ‘SHARE’ button located at the bottom of the screen.
Step 3: Add tags and accept the ‘Terms of Service’ followed by ‘Send’ button. Wait a while, to get you meme ready for your audience.
Part 3: Recommended - Making memes with Filmora meme maker online
In order to make memes on iPhone/Android, you need a mobile device. But, what if you have a computer on which you need to create a meme? Well, Filmora meme maker is the apt choice for you. You don’t need to download apps or software on your Pc. It is the ultimate online solution.
Brief steps to introduce making memes. You can create image, GIF, and video memes adding nice fonts. It processes video/GIF/image memes rapidly than the competitors. Adding texts, fonts and altering font colors is so easy with it.
Here is the detailed guide to make memes on Android –
Step 1: Visit the official Filmora website and look for Filmora online meme maker. Import videos by dragging and dropping to the Filmora interface. You can even add online links to videos in order to upload them.
Step 2: After selecting the video/photo/GIF move to the meme editor page and customize your video meme using tools from the left pane. Include text, change fonts and then you can preview the changes.
Step 3: Tap on the ‘CREATE’ button to apply the changes, when you are satisfied. Press the ‘DOWNLOAD’ button and then share your meme on social media sites.
Conclusion
Coming towards the end of the article, we have discovered that Filmora creates brilliant memes and that too, in no time. No lengthy or annoying processes, nor you need apps that eat up your phone memory. Life is blissfully funny with meme making on Filmora.
Ollie Mattison
Ollie Mattison is a writer and a lover of all things video.
Follow @Ollie Mattison
How to Use Emojis on Windows
If you ever wondered how to use emojis on Windows, or since when the emojis are around and what is their significance, you will find all your answers here. Because Windows 10 offers a great range of emojis that help you express your feelings and reactions in fewer words, they have recently gained a decent level of popularity, mostly amongst youngsters and millennials.
With that said, in the following sections, you will learn how to use emojis on Windows 10 using both keyboard shortcuts and touch keyboard, how to get emojis on Windows 10 to make your text or conversation look more versatile, and what new has been added to the latest operating system released by Microsoft, i.e., Windows 11.
In this article
01 Part 1: The History of Emojis in Windows
02 Part 2: How to Use Emojis with Keyboard Shortcuts
03 Part 3: How to Use Emojis on Windows PC with Touch Keyboard
04 Part 4: What’s New in Emojis in Windows 11
05 Part 5: How to Get More Emojis in Windows 11
Part 1: The History of Emojis in Windows
Although emojis are present in some form or the other since the mid-‘90s, they were not quite popular back then. With the evolution of smartphones, these iconic characters got attention from the then-teenagers. Seeing this, in 2012, Microsoft introduced the first-ever set of black-and-white emojis with the release of Windows 8, and after some time, the company also added the same to Windows 7 that was rolled out along with the updates for the OS.
With the release of Windows 10 in 2015, a wide range of full-fledged colored emojis was introduced and received a large number of positive reactions from the users. As of today, emojis have become an integral part of everyone’s day-to-day text conversation, be it on Skype, WhatsApp, Facebook, or any other such platform.
Part 2: How to Use Emojis with Keyboard Shortcuts
A keyboard shortcut is a combination of two or more keys that are pressed simultaneously to trigger a pre-assigned event or action. A good example of a keyboard shortcut is ‘Ctrl + S’ which, when pressed, saves the document you’re working on.
While learning the process of how to use emoji in Windows 10, it is equally imperative to memorize the shortcut keys to insert those icons without taking your hands off the keyboard. This not only saves your time, but it also prevents you from going through the lengthy process of opening the emojis keyboard, navigating through all the available icons to choose the one you’re looking for, and then clicking it to insert in the document or conversation.
Nevertheless, it would be a good idea to learn how to launch the emojis keyboard, and the process is simple. All you need to do is:
- Make sure that your keyboard cursor is in an app that can accept text inputs. A text editor like MS Word or WordPad could be a good example
- Press the Windows + ; (semicolon) or Windows + . (period) keys together to open the emojis keyboard

Once the keyboard is open, you can click any of the available emojis to insert it in your conversion or text content.
As for the shortcuts, depending on the type of expression you want to convey, there could be thousands of them. Some of the commonly used emojis and their universal shortcut keys for both Windows 10 and Windows 11 include:
: (colon) + ) (right brace) will create a smiley face
: (colon) + ( (left brace) will create a sad face
: (colon) + ; (semicolon) will create a wink face
…and so on. You can conduct a quick online search to get the entire list of keyboard shortcuts and the emojis that they will create. For your convenience, a link from the Microsoft official website is given below:
Part 3: How to Use Emojis on Windows PC with Touch Keyboard
If you have Microsoft Surface or any other device that has Windows 10 or Windows 11 installed on it, and can accept inputs via touch keyboard, you can enable the feature in the operating system, and then use the touch keyboard to add emojis to your conversion or content. You can follow the instructions given below to enable touch keyboard, and then learn how to use emojis on Windows 11 or Windows 10 via touch:
- Right-click anywhere on the taskbar (Windows 11 is used here for demonstration), and then click Taskbar settings

- From the right area of the Settings window that opens next, scroll down to the Taskbar corner icons section, and then turn on the Touch keyboard switch

- Launch an app that can accept text inputs, e.g., a text editor, chatting app, etc. Click or tap the Touch keyboard icon from the notification area that is present at the bottom-right corner of the screen.

- Click or tap the Emojis icon from the upper-left corner of the touch keyboard that opens up, and then touch your preferred emoji to add it to your text or conversation.

Part 4: What’s New in Emojis in Windows 11
In addition to learning how to use emojis on Windows 10, it is also important to know what’s new with them or the emojis panel in Windows 11, the latest operating system released by Microsoft this year, i.e., 2021.
In Windows 11, although you can launch the emojis keyboard using the same shortcuts, i.e., ‘Windows + .’ or ‘Windows + ;’ keys as mentioned earlier, the emojis keyboard itself has four sections, namely:
- Emojis – Contains various emojis and smileys
- GIF – Gives you access to various animated GIFs from Tenor
- Kamojis – Lets you add the ASCII characters for emojis, e.g., :-) or :-(
- Symbols – To add important symbols to your text, e.g., ©, ®, etc.
In addition to this, the 2D Clippy emoji has also been introduced with Windows 11, and can be located by launching the emojis keyboard, and typing ‘Clippy’.
Part 5: How to Get More Emojis in Windows 11
If the built-in emoji library doesn’t contain your favorite expressions, you can always get several more by following the instructions given below:
- Launch your favorite web browser on Windows 11, and then go to http://www.iemoji.com/
- Click an emoji from the available options or copy one from your favorite portal, and paste it in the Paste Emoji here field

- Review the emoji in the MESSAGE PREVIEW field, and click Create from the Options section to generate the emoji that can be sent as a message or image

- Alternatively, click Copy from the Options section itself, and then go to the text editor or any other portal you want to use the emoji in, and press Ctrl + V to paste and insert the emoji in your conversation or text without any hassle.

Conclusion
While the emojis were introduced to Windows as late as 2012, Windows 11 has a wide range of these virtual objects or faces for various occasions and to convey different expressions respectively. Furthermore, Windows 11 also gives you access to Tenor’s GIFs, and ASCII characters with particular combinations to represent the emojis, as it was done back in the days of button-operated cellphones.
Also, if the built-in emoji keyboard doesn’t have your favorite expressions and smileys, you can always generate your custom ones by going to http://www.iemoji.com/ , and using the options that the website offers. All in all, it’s easy to learn how to use emojis on Windows as long as you have access to the correct tutorial that explains the process in an easy manner.
02 Part 2: How to Use Emojis with Keyboard Shortcuts
03 Part 3: How to Use Emojis on Windows PC with Touch Keyboard
04 Part 4: What’s New in Emojis in Windows 11
05 Part 5: How to Get More Emojis in Windows 11
Part 1: The History of Emojis in Windows
Although emojis are present in some form or the other since the mid-‘90s, they were not quite popular back then. With the evolution of smartphones, these iconic characters got attention from the then-teenagers. Seeing this, in 2012, Microsoft introduced the first-ever set of black-and-white emojis with the release of Windows 8, and after some time, the company also added the same to Windows 7 that was rolled out along with the updates for the OS.
With the release of Windows 10 in 2015, a wide range of full-fledged colored emojis was introduced and received a large number of positive reactions from the users. As of today, emojis have become an integral part of everyone’s day-to-day text conversation, be it on Skype, WhatsApp, Facebook, or any other such platform.
Part 2: How to Use Emojis with Keyboard Shortcuts
A keyboard shortcut is a combination of two or more keys that are pressed simultaneously to trigger a pre-assigned event or action. A good example of a keyboard shortcut is ‘Ctrl + S’ which, when pressed, saves the document you’re working on.
While learning the process of how to use emoji in Windows 10, it is equally imperative to memorize the shortcut keys to insert those icons without taking your hands off the keyboard. This not only saves your time, but it also prevents you from going through the lengthy process of opening the emojis keyboard, navigating through all the available icons to choose the one you’re looking for, and then clicking it to insert in the document or conversation.
Nevertheless, it would be a good idea to learn how to launch the emojis keyboard, and the process is simple. All you need to do is:
- Make sure that your keyboard cursor is in an app that can accept text inputs. A text editor like MS Word or WordPad could be a good example
- Press the Windows + ; (semicolon) or Windows + . (period) keys together to open the emojis keyboard
Once the keyboard is open, you can click any of the available emojis to insert it in your conversion or text content.
As for the shortcuts, depending on the type of expression you want to convey, there could be thousands of them. Some of the commonly used emojis and their universal shortcut keys for both Windows 10 and Windows 11 include:
: (colon) + ) (right brace) will create a smiley face
: (colon) + ( (left brace) will create a sad face
: (colon) + ; (semicolon) will create a wink face
…and so on. You can conduct a quick online search to get the entire list of keyboard shortcuts and the emojis that they will create. For your convenience, a link from the Microsoft official website is given below:
Part 3: How to Use Emojis on Windows PC with Touch Keyboard
If you have Microsoft Surface or any other device that has Windows 10 or Windows 11 installed on it, and can accept inputs via touch keyboard, you can enable the feature in the operating system, and then use the touch keyboard to add emojis to your conversion or content. You can follow the instructions given below to enable touch keyboard, and then learn how to use emojis on Windows 11 or Windows 10 via touch:
- Right-click anywhere on the taskbar (Windows 11 is used here for demonstration), and then click Taskbar settings
- From the right area of the Settings window that opens next, scroll down to the Taskbar corner icons section, and then turn on the Touch keyboard switch
- Launch an app that can accept text inputs, e.g., a text editor, chatting app, etc. Click or tap the Touch keyboard icon from the notification area that is present at the bottom-right corner of the screen.
- Click or tap the Emojis icon from the upper-left corner of the touch keyboard that opens up, and then touch your preferred emoji to add it to your text or conversation.
Part 4: What’s New in Emojis in Windows 11
In addition to learning how to use emojis on Windows 10, it is also important to know what’s new with them or the emojis panel in Windows 11, the latest operating system released by Microsoft this year, i.e., 2021.
In Windows 11, although you can launch the emojis keyboard using the same shortcuts, i.e., ‘Windows + .’ or ‘Windows + ;’ keys as mentioned earlier, the emojis keyboard itself has four sections, namely:
- Emojis – Contains various emojis and smileys
- GIF – Gives you access to various animated GIFs from Tenor
- Kamojis – Lets you add the ASCII characters for emojis, e.g., :-) or :-(
- Symbols – To add important symbols to your text, e.g., ©, ®, etc.
In addition to this, the 2D Clippy emoji has also been introduced with Windows 11, and can be located by launching the emojis keyboard, and typing ‘Clippy’.
Part 5: How to Get More Emojis in Windows 11
If the built-in emoji library doesn’t contain your favorite expressions, you can always get several more by following the instructions given below:
- Launch your favorite web browser on Windows 11, and then go to http://www.iemoji.com/
- Click an emoji from the available options or copy one from your favorite portal, and paste it in the Paste Emoji here field
- Review the emoji in the MESSAGE PREVIEW field, and click Create from the Options section to generate the emoji that can be sent as a message or image
- Alternatively, click Copy from the Options section itself, and then go to the text editor or any other portal you want to use the emoji in, and press Ctrl + V to paste and insert the emoji in your conversation or text without any hassle.
Conclusion
While the emojis were introduced to Windows as late as 2012, Windows 11 has a wide range of these virtual objects or faces for various occasions and to convey different expressions respectively. Furthermore, Windows 11 also gives you access to Tenor’s GIFs, and ASCII characters with particular combinations to represent the emojis, as it was done back in the days of button-operated cellphones.
Also, if the built-in emoji keyboard doesn’t have your favorite expressions and smileys, you can always generate your custom ones by going to http://www.iemoji.com/ , and using the options that the website offers. All in all, it’s easy to learn how to use emojis on Windows as long as you have access to the correct tutorial that explains the process in an easy manner.
Also read:
- [New] 25 Top Free Tips to Stream Online Learning Events Effectively
- [New] Capturing Gameplay A Sims 4 Tutorial for 2024
- [New] In 2024, Launching Winning Steps for an Epic YouTube Gaming Channel
- 10 Easy-to-Use FRP Bypass Tools for Unlocking Google Accounts On Nokia G42 5G
- 8 Safe and Effective Methods to Unlock Your Apple iPhone 12 Without a Passcode
- Apple ID Unlock On iPhone 6s Plus? How to Fix it?
- How to Factory Reset Poco M6 Pro 4G If I Forgot Security Code or Password? | Dr.fone
- In 2024, How to Make a Video Meme with 4 Best Meme Video Makers
- In 2024, How to Make Memes on iPhone and Android
- New 2024 Approved How to Make an Emoji of Yourself on Mobile ? Emoji Yourself
- Resolve LG Hardware Connection Problems on Windows 11, 8 & 7: USB Drivers Solutions
- Silent Sounds Elegant Dimming in Garageband Projects for 2024
- Updated 2024 Approved Best 10 Emoji Makers to Create Your Own EmojisPC/Online/Android/iPhone
- Updated 2024 Approved How Add Emojis/Stickers to Videos on PC/Mac/Mobile/Online
- Updated How to Add Emojis To Discord on Desktop Computer and Mobile
- Updated How to Use Emojis on Windows 10 and Windows 11 for 2024
- Updated In 2024, How to Add Bitmoji to Keyboard?
- Title: Add Emojis to Videos on YouTube/Facebook/Snapchat 2023 Guide for 2024
- Author: Jan
- Created at : 2024-09-29 01:01:53
- Updated at : 2024-10-05 19:49:12
- Link: https://meme-emoji.techidaily.com/add-emojis-to-videos-on-youtubefacebooksnapchat-2023-guide-for-2024/
- License: This work is licensed under CC BY-NC-SA 4.0.